
This article ideated by MiniTool official web page answers the question “do 32-bit programs work on 64-bit Windows system” and tells you how to run 32-bit programs on a 64-bit Windows operating system (OS).
About 32 Bit Programs and 64 Bit Widows
Usually, a 32-bit program is designed for 32-bit Windows and also for 64-bit systems. Yet, a 64-bit program is only developed to run on 64-bit Windows. A 32-bit can run on a 64-bit Windows without accessing all the features and memory that a 64-bit can offer.
Can I Run 32-Bit Programs on a 64-Bit Computer?
In general, you can surely run 32-bit software on a 64 bit PC. All 64 bit systems are compatible with 32-bit programs relying on WOW64, which is the x86 emulator that enables 32-bit Windows-based programs to run seamlessly on 64-bit Windows. It also allows for 32-bit (x86) Windows apps to run seamlessly in 64-bit (x64) Windows and for 32-bit (x86) and 32-bit (ARM) Windows apps to run seamlessly in 64-bit (ARM) Windows.
WOW64 is embedded in the operating system and there is no need to enable it explicitly. It isolates 32-bit software from 64-bit programs, which includes preventing file and registry collisions. Console, GUI, as well as service apps are supported. The 32-bit File system is stored as Program Files(x86). In this way, Windows can identify a 32-bit app and provide the accurate .dll file depending upon it.
Windows offers interoperability across the 32/64 boundary for scenarios like cut and paste and COM. Yet, 32-bit processes can’t load 64-bit DLLs for execution and 64-bit processes cannot load 32-bit DLLs for execution. However, this restriction doesn’t apply to DLLs loaded as data files or image resource files.
A 32-bit program can detect whether it is running under WOW64 by calling the IsWow64Process function (use IsWow64Process2 if targeting Win10). The app can obtain additional info about the processor relying on the GetNativeSystemInfo utility.
With WOW64, you can run 16-bit programs on 32-bit Windows of the same principle. Yet, 64-bit doesn’t support running 16-bit Windows-based programs because handles have 32 significant bits on 64-bit Windows. So, handles can’t be truncated and passed to 16-bit apps without loss of data. The launch of a 16-bit program on a 64-bit system will fail with this error: ERROR_BAD_EXE_FORMAT.
How to Run 32 Bit Programs on 64 Bit Windows 11/10?
There are several ways to achieve the aim of running 32 bit programs on 64 bit Windows.
#1 Directly Install 32-Bit App on 64-Bit System with WOW64
Generally, the process to run 32-bit applications on a 64-bit computer is similar to running them on a 32-bit machine.
Firstly, install the target 32-bit tool on your 64-bit computer. You may rely on software installation CD/DVD. However, if you download it online, it may automatically detect your system condition and recommend the corresponding 64-bit program for you. If you encounter this situation, just insist on choosing the 32-bit version. The process of installing a 32-bit program on a 64-bit PC is the same as installing it on a 32-bit computer.
Secondly, double-click on the shortcut of the installed 32-bit software to open it. Or, you can right-click on it and select Open. If you can’t find a shortcut on your desktop, just look for the program in the All Programs list after clicking on the Start Menu.
#2 Run 32-Bit Programs on 64-Bit PC by Virtual Box
You can also run a 32-bit application within a virtual box or virtual machine (VMWare) that is installed on your 64-bit machine. This will indirectly achieve your purpose.
#3 Let 32-Bit Software Work on 64-Bit Computer in XP Mode
XP Mode is a feature of Windows 7 Professional, Enterprise, and Ultimate that permits you to run the more popular at the time Windows XP on a Virtual machine.
#4 Dual-Run 32-Bit Apps on 64-Bit Windows
Finally, you are able to run the 32-bit tools on the 64-bit OS if you dual boot your computer with both 64-bit and 32-bit systems and install 32-bit programs on the 32-bit system.
Can’t Install 32-bit Program on 64-bit Windows?
If you fail to install your 32-bit software on your 64-bit system, try the following solution.
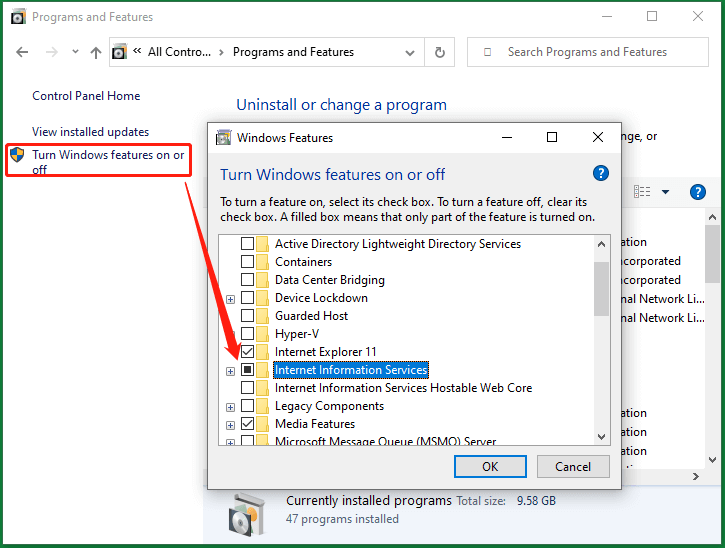
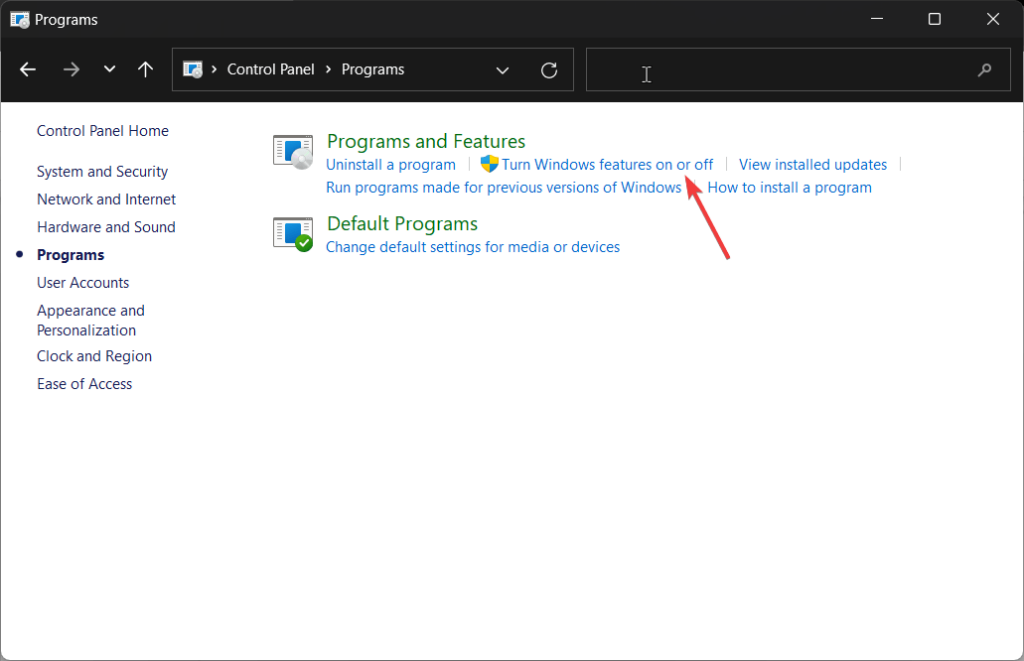
1. Open Windows Control Panel.
2. Select Programs and Features.
3. Click Turn Windows features on or off in the left panel.
4. In the new popup, find and check Internet Information Services.
5. Finally, click OK to save the change and wait for Windows to complete the request changes.
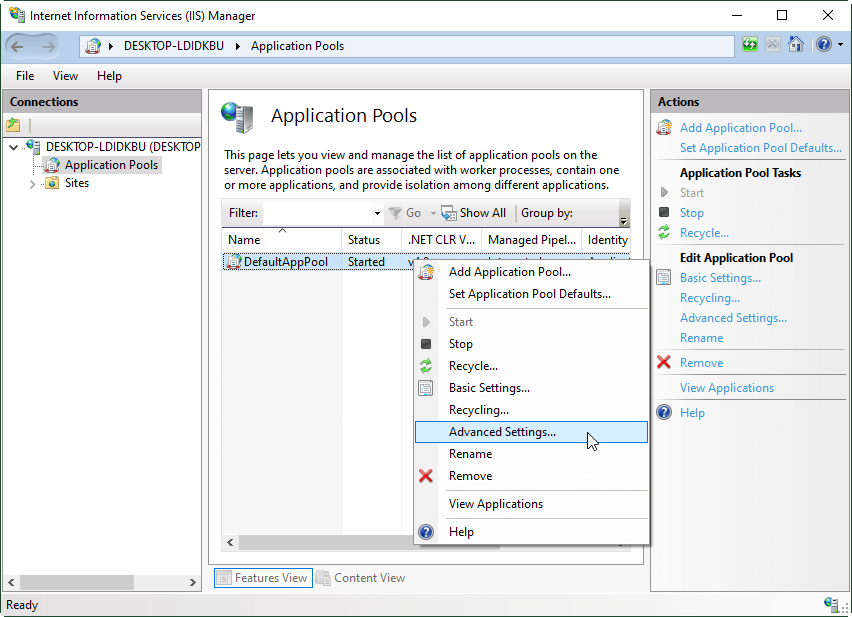
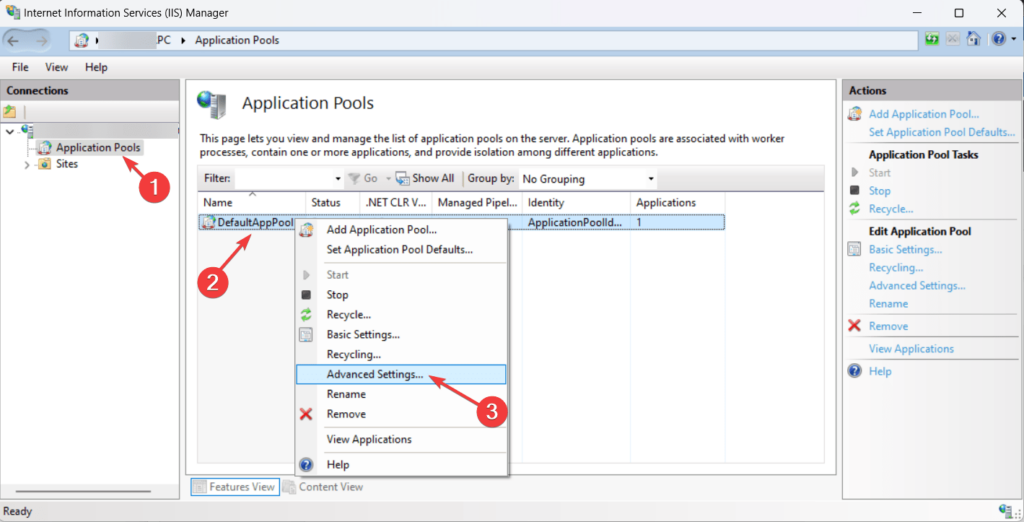
6. Search and open the Internet Information Services.
7. In the pop-up window, unfold the DESKTOP option in the left menu.
8. Then, click on the Application Pools sub-option.
9. Right-click on the Default Application Tool option and choose Advanced Settings in the right area.
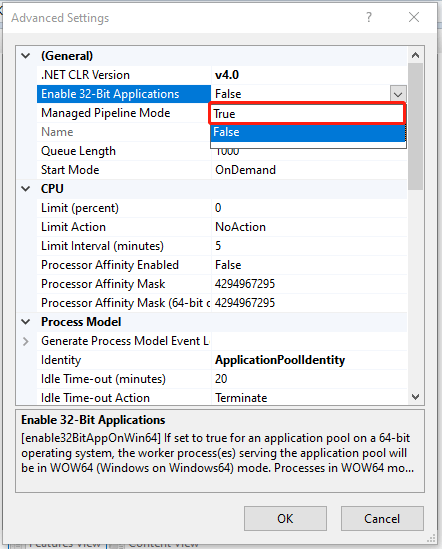
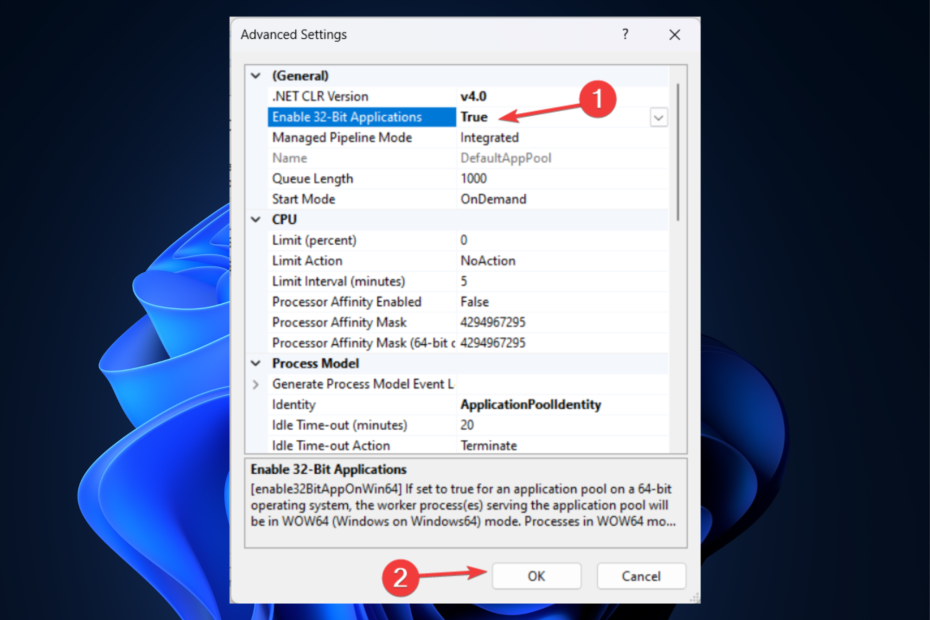
10. In the Advanced Settings window, under the General section, click on the dropdown behind Enable 32-Bit Applications option and select True.
11. Click OK to save the setting.
Now, try to install the 32-bit tool on your 64-bit Windows 10 or Windows 11 again.
How to run 64-bit programs on 32-bit Window?
Usually, you can’t directly run a 64-bit program on a 32-bit system for a 32-bit system can’t provide the necessary resources and RAM a 64-bit app requires. Yet, you can use virtual machines to run a 64-bit app on a 32-bit system.
Do 32 Bit Programs Run Faster on 64 Bit Windows?
It’s hard to answer. Sometimes, 32-bit apps run faster. Sometimes, they run slower. There are many competing factors affecting the performance. So, we can’t ensure that a 32-bit program always runs faster on a 64-bit system than on a 32-bit system.
How to run 16-bit programs on 64-bit Windows?
Generally, you can’t run 16-bit apps on a 64-bit system even with WOW64. Yet, some geeks have shown it is possible to rely on third-party 16-bit emulators. See an example here >>
How to check a program is 16-bit or not?
Just right-click on the target program and select Properties. In the Properties window, check to see whether there is a Version or Previous Versions tab or not. If there is, then, the program isn’t a 16-bit one but 32-bit or 64-bit. Otherwise, it is.
How to run a program in compatibility mode?
Right-click on the app and choose Properties. In the Properties window, select the Compatibility tab. Then, under the Compatibility mode, check Run this program in compatibility mode for and select the target Windows system.
Windows 11 Assistant Software Recommended
The new and powerful Windows 11 will bring you many benefits. At the same time, it will also bring you some unexpected damages such as data loss. Thus, it is strongly recommended that you back up your crucial files before or after upgrading to Win11 with a robust and reliable program like MiniTool ShadowMaker, which will assist you to protect your increasing data automatically on schedules!
MiniTool ShadowMaker TrialClick to Download100%Clean & Safe
Also read:
- What Is the Smallest Video Format and How to Convert to It?
- Video Game Sound Effects: Definition/History/Download/Creation
- Best Musicals on Broadway/Netflix/Disney or for Teens/Kids/Family
- [Guides] How to Crop a Photo in Photoshop and Photoshop Element?
- [2 Ways] How to Crop a Photo on Mac by Photos & Preview Apps?
Even though a 64-bit system is more powerful and faster at managing simultaneous operations, some apps on Windows 11 only function on 32-bit computers.
If you have a 64-bit system and are wondering whether you can run 32-bit apps on it, the answer is yes.
A 32-bit programme is typically written for both 32-bit Windows and 64-bit computers. A 64-bit programme, on the other hand, is exclusively designed to work on 64-bit Windows. A 32-bit Windows can operate on a 64-bit Windows without having access to all of the capabilities and RAM that a 64-bit can provide.
This article will go over methods for running 32-bit software on 64-bit Windows 11 machines, including step-by-step instructions. Let’s get this party started!
Recommended Post:- Fixed: VCOMP100.Dll was not found or Missing Errors on Windows 11
Can 32-Bit Programs be Run on a 64-Bit Computer?
In general, 32-bit software can be run on a 64-bit PC. WOW64, the x86 emulator that allows 32-bit Windows-based programmes to operate effortlessly on 64-bit Windows, ensures that all 64-bit systems are compatible with 32-bit programmes. It also enables 32-bit (x86) Windows apps to run in 64-bit (x64) Windows, as well as 32-bit (x86) and 32-bit (ARM) Windows apps to run in 64-bit (ARM) Windows.
WOW64 is built into the operating system and does not need to be enabled deliberately. It separates 32-bit software from 64-bit programmes, avoiding file and registry clashes. The console, graphical user interface, and service apps are all supported. Program Files are used to hold the 32-bit File System (x86). As a result, Windows can detect a 32-bit app and deliver the appropriate.dll file.
For scenarios such as cut & paste and COM, Windows provides interoperability across the 32/64 border. However, 32-bit processes cannot execute 64-bit DLLs, and 64-bit processes cannot execute 32-bit DLLs. This restriction, however, does not apply to DLLs loaded as data files or picture resource files.
By calling the IsWow64Process method, a 32-bit programme can determine whether it is executing under WOW64 (use IsWow64Process2 if targeting Win10). Using the GetNativeSystemInfo utility, the app can access extra information about the CPU.
WOW64 allows you to execute 16-bit programmes on 32-bit Windows using the same idea. However, because 64-bit Windows has 32 significant bits, it does not support executing 16-bit Windows-based apps. As a result, handles cannot be reduced and handed to 16-bit apps without data loss. A 16-bit programme launched on a 64-bit system will fail with the error ERROR_BAD_ EXE _FORMAT.
There are numerous approaches to running 32-bit programmes on 64-bit Windows.
Solution 1: Use WOW64 to install a 32-bit app on a 64-bit system
In general, executing 32-bit apps on a 64-bit computer is the same as running them on a 32-bit machine.
Install the target 32-bit tool on your 64-bit PC first. You could use a software installation CD/DVD. If you download it from the internet, it may automatically recognise your system status and recommend the appropriate 64-bit programme for you. If you find yourself in this circumstance, simply insist on using the 32-bit version. Installing a 32-bit programme on a 64-bit computer is the same as installing it on a 32-bit computer.
Second, open the 32-bit software by double-clicking on its shortcut. You can also right-click on it and choose Open. If you can’t find a shortcut to a programme on your desktop, look for it in the All Programs list after clicking on the Start Menu.
Solution 2: Use Virtual Box to run 32-bit programmes on a 64-bit PC
A 32-bit application can also be launched within a virtual box or virtual machine (VMWare) installed on your 64-bit system. This will help you attain your goal indirectly.
Solution 3: Run 32-Bit Software in XP Mode on a 64-Bit Computer
XP Mode is a feature in Windows 7 Professional, Enterprise, and Ultimate that allows you to run Windows XP on a virtual machine.
Solution 4: Run 32-Bit Applications on 64-Bit Windows
Finally, if you dual boot your computer with both 64-bit and 32-bit systems and install 32-bit apps on the 32-bit system, you can execute 32-bit tools on the 64-bit OS.
Is it possible to install 32-bit programs on 64-bit Windows?
If you are unable to install 32-bit applications on your 64-bit PC, use the following workaround.
- Step 1: Launch the Windows Control Panel.
- Step 2: Choose your programmes and features.
- Step 3: In the left panel, click Turn Windows features on or off.
- Step 4: Locate and tick Internet Information Services in the new popup.
- Step 5: Finally, click OK to save the changes and wait for Windows to finish processing the requests.
- Step 6: Locate and launch Internet Information Services.
- Step 7: Expand the DESKTOP option in the left menu in the pop-up window.
- Step 8: Finally, select the Application Pools sub-option.
- Step 9: In the right area, right-click on the Default Application Tool option and select Advanced Settings.
- Step 10: In the Advanced Settings window, under the General section, pick True from the dropdown under Enable 32-Bit Applications.
- Step 11: Select OK to save the configuration.
Conclusion
If one of your favourite programmes is only available in 32-bit form, you should be able to install and operate it on Windows 11 without any problems. If a programme is also available in 64-bit form, it is best to install the 64-bit version of the programme on a 64-bit Windows 11 for better speed and security. This is because 32-bit software cannot fully utilize the 64-bit architecture.
So, these are the procedures to activate and run 32-bit apps on 64-bit Windows 11 machines. Please let us know if you use them to install old or legacy software on your new Windows 11 PC.
Современные компьютеры в большинстве случаев поставляются с установленной операционной системой Windows 10 64 bit. Даже бюджетные модели уже имеют 3 и более Гбайт оперативной памяти, что позволяет задействовать системе всю мощь 64-битной разрядности обработки данных.
Подробнее о преимуществах 64 bit над 32 bit Windows вы можете прочитать в нашей статье «Преимущества перехода на 64 бита».
Но, как бы не была привлекательна 64-разрядная система, зачастую пользователь просто не имеет в своем распоряжении 64-битной программы, с которой он давно работает и которая его полностью устраивает, т.к. производитель ее просто не выпустил. Как правило, такие программы устанавливаются в Windows в отдельную папку \Program Files (x86) и их запуск осуществляется в 32-разрядном режиме.
Если в процессе запуска программа выдает ошибку или вообще не запускается, а в Windows 32 bit она работала без проблем, есть шанс запустить ее в специальном режиме, который разработчики назвали «Режим совместимости».
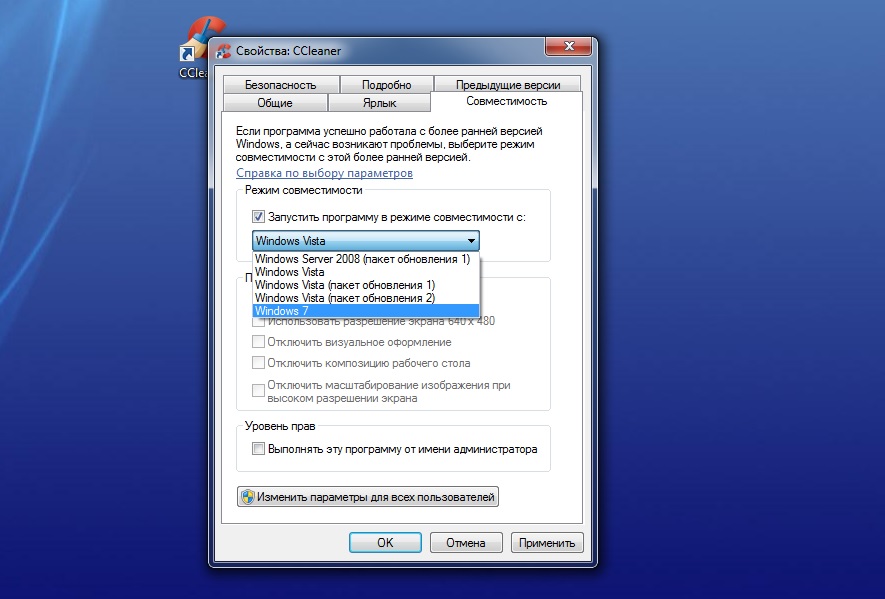
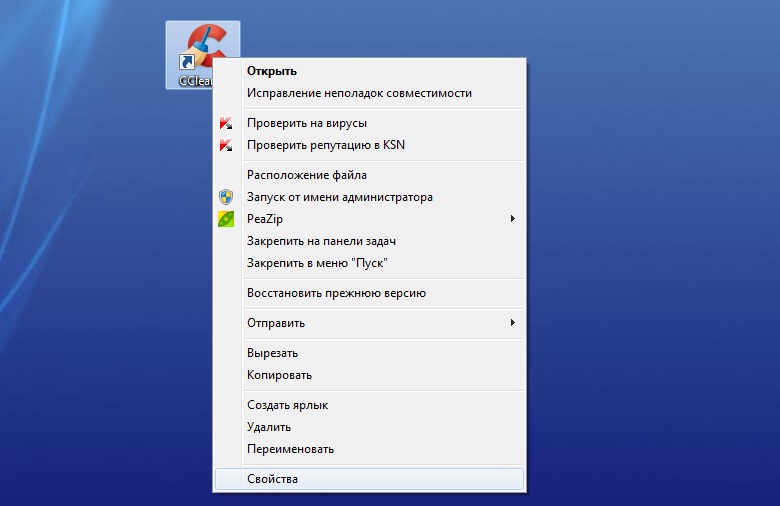
Для этого в Windows 7 щелкните правой кнопкой мыши на ярлыке нужной программы, а затем выберите в контекстном меню «Свойства». В открывшемся окне перейдите на вкладку «Совместимость» и установите флажок «Запустить программу в режиме совместимости с …» и в выпадающем списке укажите вариант системы для запуска.
Нажмите кнопку «OK». После этого попробуйте запустить вашу программу.
Кроме того, в контекстном меню Проводника также имеет смысл попытаться автоматически решить задачу, кликнув по строке «Исправление неполадок совместимости» — в Windows 7.
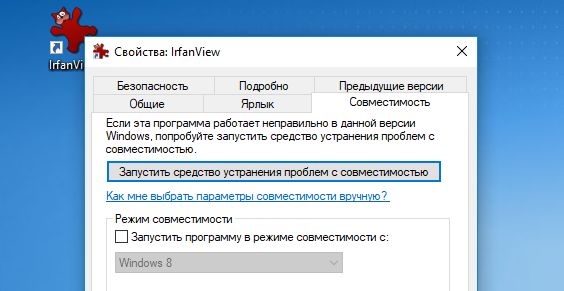
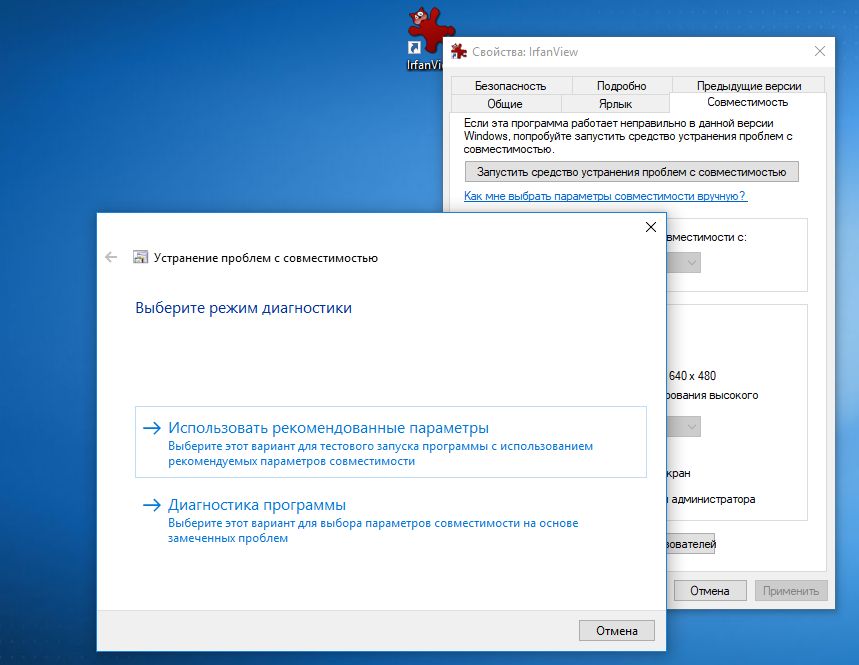
В Windows 10 при настройке запуска в совместимом режиме на вкладке «Совместимость» имеется отдельная кнопка «Запустить средство устранения проблем с совместимостью». После чего вам предложат либо использовать рекомендованные параметры, либо провести диагностику программы.
Если и после этого программа не запустилась, то стоит подойти к проблеме более основательно и попробовать варианты, указанные на официальном сайте Microsoft.
Более радикальным методом запуска программы является ее установка и использование в виртуальной машине с установленной Windows 7 32 bit. Подробнее, как установить и настроить виртуальную машину вы можете почитать в нашей статье «Как создать и настроить на ПК виртуальную ОС?».
Читайте также:
- Как переключиться с Windows 32 на 64 бита: все плюсы и минусы перехода
- Как запускать системные утилиты в Windows 7 без раздражающих запросов UAC, не отключая его
Фото: компании-производители, pexels.com
Windows 11 позволяет запускать программы в режиме совместимости с предыдущими версиями ОС, что может быть полезным в ситуациях, когда какое-то старое ПО отказывается работать исправно в новой операционной системе.
В этой инструкции подробно о способах выполнить запуск программы в режиме совместимости в Windows 11.
Вкладка «Совместимость»
Базовый способ включения режима совместимости для запуска программы в режиме совместимости — использовать соответствующую вкладку в свойствах исполняемого файла или ярлыка, достаточно выполнить следующие шаги:
- Откройте свойства файла .EXE или ярлыка какой-либо программы: нажмите по файлу или ярлыку правой кнопкой мыши и выберите пункт «Свойства».
- Перейдите на вкладку «Совместимость».
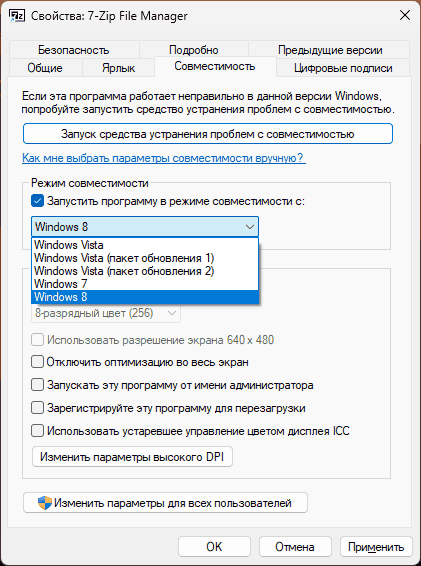
- В разделе «Режим совместимости» отметьте опцию «Запустить программу в режиме совместимости с» и выберите нужную версию Windows для запуска.

- При необходимости вы можете изменить дополнительные параметры на этом же экране: например, включить обязательный запуск от имени администратора, или изменить параметры масштабирования (Изменить параметры высокого DPI), а также применить параметры совместимости для всех пользователей компьютера (требуются права администратора).
- По завершении настройки, нажмите кнопку «Ок».
Готово, при последующих запусках программа будет выполняться в режиме совместимости с указанной вами версией ОС.
Учитывайте, что для некоторых исполняемых файлов, например, для системных утилит Windows 11 вкладка «Совместимость» может быть недоступной, то есть применить её можно только для сторонних программ и игр.
Устранение неполадок
Следующая возможность запуска программы в режиме совместимости — использование встроенного средства устранения неполадок Windows 11:
- Откройте «Параметры» (клавиши Win+I), перейдите в раздел «Система» — «Устранение неполадок» — «Другие средства устранения неполадок».
- Нажмите кнопку «Запуск» в разделе «Средство устранения проблем с совместимостью программ».

- Нажмите «Да», соглашаясь на проведение диагностики, после чего выберите программу, для которой её требуется выполнить и укажите одну из опций — «Программа отображается неправильно» (для изменения параметров отображения), «Для работы программы требуются дополнительные разрешения» (для попытки запуска с правами администратора) или «Ничего из вышеперечисленного», если предыдущие опции не подходят (в последнем случае будет автоматически применен режим совместимости с предыдущей версией Windows).

- Разрешите применение рекомендуемых параметров совместимости и дождитесь завершения процесса.
- Проверьте запуск программы, если проблема не была решена, нажмите «Нет» в запросе «Это решило вашу проблему?».
- Выберите опцию, соответствующую тому, что именно произошло при попытке запуска программы.


Средство устранения неполадок совместимости в более ранних версиях Windows 11 имело другой интерфейс, но суть работы та же самая: в зависимости от выбора устанавливается либо режим совместимости с предыдущей версией системы, либо меняются параметры масштабирования, либо включается запуск от имени администратора.
Редактор реестра
Существует возможность настроить режим совместимости в реестре Windows, для этого потребуется открыть редактор реестра (Win+R — regedit) перейти в один из разделов (первый — для текущего пользователя, второй — для всех пользователей) реестра:
HKEY_CURRENT_USER\Software\Microsoft\Windows NT\CurrentVersion\AppCompatFlags\Layers
HKEY_LOCAL_MACHINE\Software\Microsoft\Windows NT\CurrentVersion\AppCompatFlags\Layers
И создать в нём новый строковый параметр, где имя параметра соответствует пути к исполняемому файлу программы, а значение — нужной версии ОС, в режиме совместимости с которой запускается программа.

Список значений, доступных в Windows 11:
~ WIN8RTM
~ WIN7RTM
~ VISTASP2
~ VISTASP1
~ VISTARTM
Которые соответствуют Windows 8, Windows 7, Vista SP2, Vista SP1 и Vista.
Учитывайте, всё описанное может не помочь запустить очень старые программы, здесь потребуются другие варианты, например — способы запуска DOS игр и программ в Windows.
The first Windows systems used a 16-bit MS-DOS based kernel to run a graphical shell in order to access the system’s services. If that last sentence sent you scrambling for a tech glossary, put your mind at ease. The information in this article will be accessible to experts and laypeople alike. You may have experienced some issues when running a 32-bit application in a 64-bit version of Windows. If so, read on to learn about why this is happening and how to fix it.
Some Necessary Concepts
The simple fact is that you shouldn’t be having this problem in the first place. Windows has an emulator which—if working correctly—provides the necessary environment for both 64 and 32-bit applications to run normally. This emulator (WOW64) segregates 32-bit applications from 64-bit ones to prevent file and/or registry collisions. On a technical note, 32-bit processes cannot execute 64-bit DLLs, so this may be causing your issue.

Something to keep in mind is that you might actually be running a 16-bit application, which definitely will not work. A quick way to check if a program is 16-bit is to navigate to its location on your computer. Right-click on it and select Properties from the drop-down menu. If the properties tab has a “Version” or “Previous Versions” tab, it isn’t a 16-bit application.
Making It Compatible
The first thing you should try when you set out to run any software that has compatibility issues is to run it in Compatibility Mode. There are very few problems that this realistically fixes nowadays, but it was a very useful feature when Windows 95 was replaced by NT.
To run an application in Compatibility Mode, navigate to it in the file explorer and right-click it. Same as above, click on Properties from the menu. Under Properties, click on the Compatibility tab. Click the box that says “Run this program in compatibility mode for:” and select the Windows version you want to use. Then, click Apply and try to run your application. There should only be a handful of options so try to go through them all.
Enable 32-Bit Applications
To be thorough, you can make sure that 32-bit applications are enabled in your Windows services. To do so, follow these steps:
- Start by accessing Windows Features by typing “windows features” into the Windows search box and selecting the bests match.
- Check the box that reads Internet Information Services and click OK. It will take a minute to install this feature
- Launch the IIS Manager by typing “internet information services” in the Windows search box and selecting the best match.
- You will see your computer’s name in the left window, expand it and click on Application Pools.
- In the right window, right-click on DefaultAppPools and selects Advanced Settings.
- Select “Enable 32-bit Applications” and change it from False to True.
- Click OK and restart your computer.
Once you complete this, try running the application again. If your WOW64 is working correctly, this shouldn’t be necessary but it has proven to be effective in some cases.
Incorrect Program Files
Older programs sometimes get the installation mixed up and their files can end up in the wrong folder. This is particularly difficult to detect because the installation will seem to have gone off without a hitch.
On 64-bit versions of Windows, all 64-bit applications are installed in the “Program Files (x86)” folder. This includes any files related to the installed application. However, 32-bit programs end up in a separate folder titled “Program Files.” If the paths are incorrectly coded in the installation, the application may have installed in the wrong folder.

Fixing this should include editing some of the installation code but you don’t have to do that, and you may not be able to get to the source code anyway. For a makeshift solution, simply find the installed files and copy them manually into the “Program Files” folder.
Shave and a Haircut, Two Bits
These are just some of the problems you could be facing when running a 32-bit application. But again, it cannot be emphasized enough that this should never happen, as measures are in place to prevent it. It’s far more likely that you’re dealing with some other compatibility issue. If you’re very confident that the register is causing problems, start with the solutions outlined in the article.
Have any of the methods in the article been helpful? What made you sure that the 32-bit register is really what is causing your problem? Share your reasoning in the comments below.