
I wrote this post as a proof of concept and as a best effort to make a 16-bit application run on Windows 10 64-bit.
It will be demonstrated how to use a third-part open source framework called otya128 – winevdm, how to use MSIX, UWP Execution Alias and Packaging Support Framework.
Please notice that Microsoft recommends using virtualization or 32-bit machines to run 16-bit applications.
This post is only a proof of concept and for informational and training purposes only and are provided «as is» without warranty of any kind, whether express or implied.
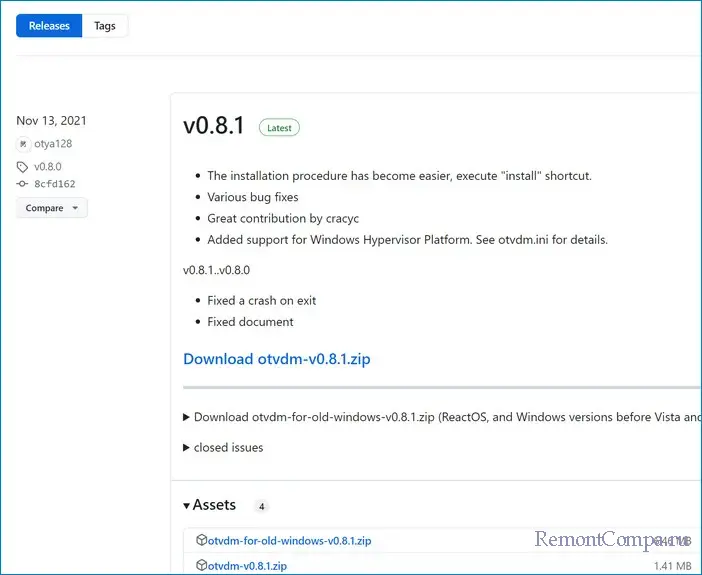
As 64-bit operating system does not have support for the Windows NT DOS Virtual Machine (NTVM) system component, the first step is to download the 16-bit emulator called otya128 – winevdm that is open source and available on GitHub:
https://github.com/otya128/winevdm
You can clone the repository and build yourself or download the build artifact from the AppVeyor repository https://ci.appveyor.com/project/otya128/winevdm/history
If you opt to download the app from the AppVeyor repository, you need to choose what build you want:
Select the job:
And finally click on artifacts to download the artifact file:
Now, all you must do is to extract the files to a folder of your preference. I will extract the files in the following folder of the root of my C drive:
C:\otvdm-master-1846If you try to run the Visual Basic 3 installer (setup.exe), you will receive the following message telling that the application cannot run, since it is a 16-bit application and that the NTVDM is not available.
We need to run the otvdm.exe passing as argument the application that we want to launch, in our case, the setup.exe of Visual Basic 3.0:
C:\otvdm-master-1846\otvdm.exe "C:\VB\VB.EXE"Notice that now the Visual Basic 3.0 16-bit installer has been successfully launched:
We can proceed with the installation:
The default destination folder is C:\VB:
There are no registry keys, and all the files will be copied to the C:\VB directory:
Done!!!! Visual Basic is successfully installed:
Click on Run Visual Basic 3.0 to launch VB3 on Windows 10 64-bit:
Notice that despite of Visual Basic 3 is available on Start menu, you can’t directly launch the app from there, as the app is 16-bit:
In that case you need to run the following command:
C:\otvdm-master-1846\otvdm.exe "C:\VB\VB.EXE"Let’s see how MSIX can simplify the application deployment by keeping together the 16-bit emulator and VB3 application in a single MSIX installation file. The installation will be reduced to a single click action that will install the App in less than 10 seconds.
At the same time MSIX will provide a better user experience, allowing users or other apps to call the application executable, in this case, VB.EXE without having to specify the otvdm emulator. This is possible, because once packaged, the App will be access to the UWP manifest that allows us to create an execution alias.
The first step is to download and install the MSIX Packaging Tool, that is free and available on Microsoft Store, to allow us to package our App:
https://www.microsoft.com/store/productId/9N5LW3JBCXKF
Before launching the MSIX Packaging Tool, move the emulator and VB folders to another folder, like C:\setup\:
This step is need, as MSIX Packaging Tool (MPT) will monitor the changes made on the computer environment. So, as we already have VB3 installed and we don’t want to install it again, I will just copy these two folders to their final destinations at the moment that the MPT will be monitoring the modifications.
Once installed, open the MSIX Packaging Tool and click on Application package to create a new package for the application:
The MSIX Packaging Tool will monitor the changes made on the environment. To perform the packaging, it is possible to use a virtual machine or the physical machine itself to install the application.
The best scenario is to use a virtual machine allowing you to reproduce the same process if necessary. It is important that the machine used to install the application does not contain the applications and their previously installed components.
Choose the desired scenario and click the Next button:
In this step, the tool will verify that the MSIX Packaging Tool Driver is installed and will disable Windows Update to decrease the number of changes to the operating system:
Click on the Next button.
Only MSIX packages signed with a valid certificate can be installed on Windows 10 machines.
You can create a self-signed certificate for testing purposes, using the following PowerShell command:
function CreateCertificate($name, $path)
{

    Set-Location Cert:\LocalMachine\My

    New-SelfSignedCertificate -Type Custom -Subject "CN=$name" -KeyUsage DigitalSignature -FriendlyName $name -CertStoreLocation "Cert:\LocalMachine\My"

    $cert = Get-ChildItem "Cert:\LocalMachine\My" | Where Subject -eq "CN=$name"

    $pwd = ConvertTo-SecureString -String DefineTheCertificatePasswordHere@2020 -Force -AsPlainText

    Export-PfxCertificate -cert $cert.Thumbprint -FilePath "$path.pfx" -Password $pwd

    Export-Certificate -Cert $cert -FilePath "$path.cer"

    Move-Item -Path $cert.PSPath -Destination "Cert:\LocalMachine\TrustedPeople"

}

CreateCertificate "luisdem" "cert"
To execute the command, open PowerShell_ISE.exe and press F5. The command creates the test certificate and copies it to the Trusted People folder.
It is important to notice that this test certificate should only be used to approve the application in a test environment. To distribute the application.
Now, that we have a certificate, we can inform the certificate to have the final MSIX package file automatically signed. It is not necessary to provide the installer file, as the tool monitors all changes made to the operating system.
Click on the Next button.
In this step, it is necessary to provide information such as the name of the package, the description that will be displayed to the user during installation, the name of the supplier (must be the same as the certificate) and the version number. Fill in the requested information:
Click on the Next button.
Is in this step that we need to install the application.
As we already have the VB3 installed, this is the moment to moving back the emulator and VB3 folders to the drive C root:
Click on the Next button only after completing the application installation and all settings.
On the next screen it is necessary to define which applications will be visible in the start menu.
As VB3 is a 16-bit application that depends on the 16-bit emulator, select only the otvdm.exe, as follows:
Notice that is not possible to provide the arguments for the otvdm.exe, i.e., C:\VB\VB.EXE. For now, we can ignore the arguments as we are fix that later.
Follows the expected result so far:
Click on the Next button.
The following screen is displayed at the end of the installation and asks for confirmation if the monitoring can be ended:
Click the Next button, as the application does not install any services:
At this point, it is necessary to inform where the package will be generated, as well as it is possible to edit the package before saving it.
Click on the Package editor button to check the package structure, as follows:
Click on Open file to check how the manifest was generated:
It is possible to edit the manifest information, such as processor architecture, application description, minimum supported version of Windows 10 and others.
Change the ProcessorArchitecture to “x86”, the DisplayName and Description attributes to “Microsoft Visual Basic 3.0”:
Notice that the Executable attribute doesn’t have the C:\otvdm-master-1846 path, but instead it has the value VFS\AppVPackageDrive\otvdm-master-1846. The AppVPackageDrive is the folder inside the package that corresponds to the drive C root. The application will look for the file on C:\otvdm-master-1846 but it will be redirected to the folder inside the package (VFS\AppVPackageDrive\otvdm-master-1846).
The only problem here, is that is no possible to pass arguments in this manifest file. So, we will need to use Package Support Framework (PSF) to fix that.
For now, just change the Executable value path to “PsfLauncher32.exe” that is part of the PSF.
We will now create an execution alias to allow launching the application by typing or calling the VB.EXE command from anywhere. To do this, add the following lines just below the line </uap:VisualElements>:
<Extensions>
        <uap3:Extension Category="windows.appExecutionAlias"
                        Executable="PsfLauncher32.exe"
                        EntryPoint="Windows.FullTrustApplication">
          <uap3:AppExecutionAlias>
            <desktop:ExecutionAlias Alias="VB.EXE" />
          </uap3:AppExecutionAlias>
        </uap3:Extension>
 </Extensions>
Follows how the manifest file must be defined:
Save and close the manifest (Notepad file) to unblock the MSIX Packaging Tool editor screen.
Click on Package files and check if all the files and directories listed are used by the application.
Remove unnecessary files or directories to reduce the package size:
It is at this step that we need to add the Package Support Framework files, to allow the PsfLauncher32.exe calling the emulator passing the arguments.
To proceed, download the PSF files (PSFBinaries.zip) available on GitHub:
Releases · microsoft/MSIX-PackageSupportFramework (github.com)
And extract the contents to a folder of your preference. I will extract to C:\PSF:
In the same folder, create a config.json file with the following content:
{
   "applications": [
    {
      "id": "OTVDM",
      "executable": "VFS/AppVPackageDrive/otvdm-master-1846/otvdmw.exe",
      "arguments": "AppVPackageDrive/VB/VB.EXE",
      "workingDirectory": "VFS"
    }
  ]
}
The id corresponds to the Application Id defined in the application manifest, the executable contains the emulator path inside the package and the arguments the VB3 path inside the package.
Switch back to MSIX Packaging Tool. In the Package file tab, right click on Package folder and click on
Add file from the context menu:
Add all the files that finish with 32 and the config.json files to the project:
Click on the Create button to generate the package and inform where the file should be generated.
The following screen will display where the MSIX file was generated as well as the log file:
Double-click the package to install the application:
You can now launch the application directly from Start menu or typing vb.exe in a prompt command:
This solution is compatible with MSIX App Attach for Windows Virtual Desktop on-premises or on Microsoft Azure.
I hope you like it!!!
Система Windows бывает 64-разрядная и 32-разрядная. А вот с приложениями ситуация чуть иная, они бывают 16, 32 и 64-битными. В связи с этими данными существует несколько нюансов. На системе x32 можно открывать приложения 16 и 32 бита. А вот на самой новой версии винды x64 можно запустить только 32-битные и 64-разрядные программы. Соответственно, при попытке на винде x64 открыть 16-разрядное приложение вы неминуемо столкнетесь с ошибкой «Неподдерживаемое 16 разрядное приложение в Windows». Как ее избежать и, все-таки, запустить старое приложение на 64-битной системе мы расскажем в этой статье. Рассматривать способы будем на примере самых новых Windows 10 и Windows 11.
Неподдерживаемое 16 разрядное приложение в Windows
Для начала выясним, почему не получается запускать старые приложения на новой системе. Основная причина заключается в том, что 64-битные системы не имеют поддержку NTVM, а он, соответственно, просто необходим для запуска 16-битных программ. И если вы просто запустите приложение в режиме совместимости, то у вас ничего не выйдет. Мы предлагаем воспользоваться другим способом.

1. Переходим по ссылке
https://github.com/otya128/winevdm/releases
2. Скачиваем новейшую версию и распаковываем архив в любое удобное место.
3. Жмем «Win+R», вводим «cmd» и заходим.
4. Вводим строку
Маршрут до\otvdm.exe маршрут до\программа.exe
Конечно, изменив путь на ваш. Программа запустится.
Есть также способ проще. Он не предполагает постоянное использование командной строки. Метод заключается в том, что необходимо просто установить winevdm/otvdm на ПК. Сделать это можно из того же распакованного архива. Следует всего лишь запустить install или install(no console). По окончании данных действий 16-разрядные приложения будут открываться автоматически, как и любые другие.
Иногда на 32-разрядных системах также не получается запустить 16-битные программы, однако это редкость. С такими случаями тоже можно справиться.
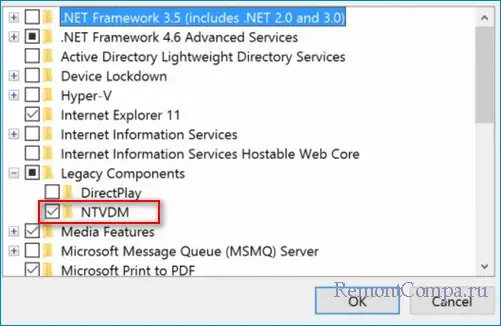
Включить поддержку NTVM можно так.
1. Жмем «Win+R», вводим «optionalfeatures.exe» и щелкаем Ввод.
2. Раскрываем пункт «Устаревшие компоненты» и ставим отметку «NTVDM».
3. Подтверждаем действия.
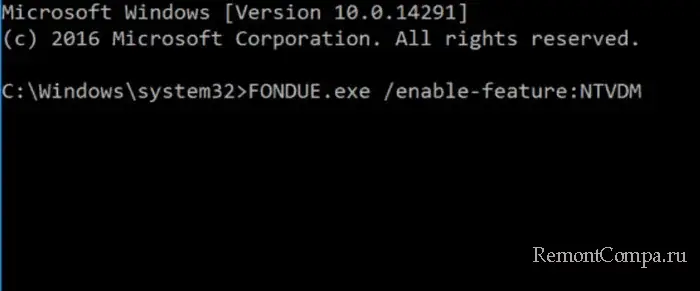
Также можно воспользоваться командной строкой.
1. Нажимаем «Win+R», пишем «cmd» и жмем Enter.
2. Вводим строку
FONDUE.exe /enable-feature: NTVDM
3. Далее следует кликнуть на «Установить этот компонент».
4. Перезапускаем ПК.
В целом, можно сделать вывод, что запускать можно любые приложения на любой версии Windows, надо только знать как.
Infopackets Reader ‘Colin’ writes:
» Dear Dennis,
I have Windows 10 64-bit and when I try and run an old Visual Basic software program, it says ‘This app cannot run on your PC’. I believe the Visual Basic program uses 16-bit architecture. So the question is, how can I run 16-bit programs on Windows 10 64-bit? «
My response:
The simple answer is that
you cannot run 16-bit applications on 64-bit Windows
directly, including Windows 10 64-bit. The same holds true when trying to run 16-bit applications on Windows 7 64-bit or Windows 8 64-bit. That said, there are workarounds to the problem.
Option #1: Use Windows 10 32-bit to run 16-bit Programs
Windows 10 32-bit supports 16-bit applications directly, but before you install it, please note that
Windows 10 32-bit supports a maximum of 4 gigabytes of RAM. Since RAM makes a massive difference in the usability and speed of a computer, you would not want to switch to Windows 10
32-bit if you have more than 4 gigabytes of RAM. In that case, try Option #2.
Option #2: Use a Virtual Machine to Emulate Windows 10 32-bit
If your computer has at least a quad core processor and 8 or more gigabytes of RAM, then the best bet would be to use a virtual machine to emulate Windows 10 32-bit inside of your Windows 10 64-bit environment.
Going about this would be somewhat tricky to avoid paying for another Windows license. To do so: backup your existing Windows 10 64-bit using a disk image, then format the drive and install Windows 10 32-bit. Following that, use
vmware vcenter converter to convert the physical machine to a virtual machine. Once that is done, test the virtual machine to ensure it works, then restore your disk image backup to put your system back to Windows 10 64-bit.
In theory your Windows 10 32-bit should now run inside of the Windows 10 64-bit desktop, using the same license. To be honest, I have not tested whether or not the license will ‘stick,’ since technically it is running on new ‘virtual machine hardware’. Anyone who has tried this is welcome to comment.
Option #3: Use DOSBox to Run your 16-bit Program
DOSBox is a program that emulates a 32-bit environment, which supports 16-bit applications. In the extremely rare case you need to run a 16-bit DOS-based program, you might want to consider using DOSBox. But, since DOS hasn’t been really been used much since the Windows XP days (back in 2001), there’s a very slim chance that anyone will want to go this route
— especially if the 16 bit application was meant to run on Windows in the first place.
Option #4: Find an Alternative Program
If none of the above three options sounds appealing to you, then I suggest you find an alternative program to replace the 16-bit program which is no longer supported on 64-bit versions of Windows. Before doing that, you may need to export data from the old program and import it into the new one so you don’t lose any information. As an example: on most major web browsers, there is a feature to ‘export bookmarks’, which can be saved to a file, then re-imported into the browser later.
Got a Computer Question or Problem? Ask Dennis!
I need more computer questions. If you have a computer question — or even a
computer problem that needs fixing —
please email me with your question
so that I can write more articles like this one. I can’t promise I’ll respond to
all the messages I receive (depending on the volume), but I’ll do my best.
About the author: Dennis Faas is the owner and operator of Infopackets.com.
With over 30 years of computing experience, Dennis’ areas of expertise are a
broad range and include PC hardware, Microsoft Windows, Linux, network
administration, and virtualization. Dennis holds a Bachelors degree in Computer
Science (1999) and has authored 6 books on the topics of MS Windows and PC
Security. If you like the advice you received on this page, please up-vote /
Like this page and share it with friends. For technical support inquiries,
Dennis can be reached via Live chat online this site using the Zopim Chat
service (currently located at the bottom left of the screen); optionally, you
can contact Dennis through the website
contact form.
Большая часть старых приложений, работающих на предыдущих версиях операционной системы Microsoft, также запускаются и на ПК с Windows 10 на борту. Правда, некоторые программы, которыми вы благополучно пользовались ранее, выдают различные ошибки в момент запуска и отказываются работать. Однако существует несколько способов решения данной проблемы.
Запуск от имени администратора
Содержание
- Запуск от имени администратора
- Настройка параметров совместимости
- Установка неподписанных или 32-битных драйверов
- Использование виртуальной машины
- 16-битные приложения
Многие устаревшие программы смогут корректно запуститься в Windows 10, но при одном условии. Во времена расцвета Windows XP среднестатистический юзер обычно использовал свой ПК с учетной записью администратора. Программы писались таким образом, чтобы самостоятельно получать административный доступ, а в случае неудачи просто отказывались запускаться. Новая функция контроля учетных записей (UAC) позволяет предоставить необходимый доступ, но поначалу возникали некоторые проблемы.
Если программа работает неправильно или не запускается вовсе, потребуется вручную предоставить административный доступ, кликнув правой кнопкой мыши по ярлыку или исполняемому файлу и во всплывающем меню на строку «Запуск от имени администратора». Если данное действие помогло, то рекомендуется включить его для запуска по умолчанию в параметрах совместимости приложения.

Настройка параметров совместимости
Параметры совместимости приложений в последней версии операционной системы Microsoft предоставляют возможности эмуляции среды запуска предыдущих версий Windows. Для их настройки необходимо перейти к свойствам исполняемого файла проблемного приложения. На вкладке «Совместимость» присутствует возможность автоматического поиска и решения проблем с помощью кнопки вызова соответствующего мастера и ручной настройки параметров.

К примеру, если вы уверены, что программа запускалась на Windows XP, то выберите нужный параметр в разделе «Режим совместимости». Проверьте необходимость задействования остальных настроек. Старым играм может потребоваться «Режим пониженной цветности». Если вы используете экран с высокой плотностью пикселей, полезным окажется отключение масштабирования. Так интерфейс запущенной программы не будет выглядеть растянутым по вертикали или горизонтали.
Установка неподписанных или 32-битных драйверов
С целью обеспечения безопасности и безотказности работы Windows 10 требует подписывания всех установленных в систему драйверов. Особенно это касается новых устройств с интерфейсом UEFI. Представленная функция блокирует проникновение в ОС нестабильных или даже опасных драйверов. Однако есть возможность обойти защиту, убедившись перед этим в безопасности и необходимости конкретного драйвера.
При установке неподписанных драйверов с использованием специальной опции следует обратить внимание на поддержку разрядности, поскольку 32-битные драйверы в 64-битную систему установить невозможно.
Использование виртуальной машины
По мере полного завершения поддержки одной из старых версий операционной системы, она исчезает из списка возможных вариантов эмуляции совместимости. Именно это произошло с Windows XP в «десятке». В качестве альтернативы существует возможность запуска старой ОС на виртуальной машине с помощью специального приложения, такого как VirtualBox. Понадобится лишь образ Windows XP, который после установки и запуска на виртуальной машине позволит пользоваться старыми программами в одном из окон Windows 10.

Представленный способ, несмотря на достаточную сложность, повысит вероятность запуска и комфортной работы со старой программой. Однако следует учитывать довольно слабую поддержку периферии виртуальными машинами.
16-битные приложения
16-битные приложения не запустятся на 64-разрядной Windows 10 по причине отсутствия необходимых для их функционирования библиотек. Выходом может стать установка 32-битной версии операционной системы. Однако и здесь на помощь может прийти виртуальная машина, ведь не каждый пользователь захочет заново устанавливать и настраивать новую ОС.
Но лучшим выходом, если такая возможность существует, станет поиск замены старому, проблемному приложению.
Страница 1 из 3
-
Для многих игр использующих в качестве установщика Setup.exe из пакетов InstallShield 3 и 5, есть проблема установить их на версиях Windows Vista+, где 16-битные приложения перестали поддерживаться вообще.
Оказывается, проблемка уже решена.
В стиле Рейгана! (кажется я слишком много смотрю Джона Стюарта)
В общем вот вам архивы с файлами, которые работают даже в Win 10.toastytech.com/files/setup.html -источник.
Во всяком случае у меня, данные файлы позволили поставить почти все игры, в которых setup.exe находящийся на образе отказывался устанавливаться.
Главное, перед заменой файла, проверьте, какой стоял изначально установщик, во вкладке «Подробно» в свойствах файла.Причина по которой они работоспособны — это потому что данные файлы представляют собой последние версии соответствующих движков установки:
3 — 3.0.117.0
5 — 5.52.164.0Последовательность запуска установщика:
- Скопировать весь диск со старой игрой в отдельную папку.
- Скопировать новый setup.exe с заменой старого в отдельной папке.
- Запустить новый setup.exe и установить игру.
Вложения:
Последнее редактирование: 31 авг 2016
-
@Awasaky, так ведь проблема действительно решена _отчасти_ — см. тему в «Мастерской» касательно программы InstallshieldWrapper за авторством товарища @AxXxB. Правда, она помогает не со всеми играми.
Большая просьба рассказать, что это за вложенные файлы, а также откуда они.
Кстати, проблема актуальна не только для игр, но и для некоторых патчей, представленных в установочном виде. Например, патч 1.02 для Star Trek: Klingon Academy имеет 16-битный инсталлятор (поэтому на сайте выложен в распакованном виде). Проверь, пожалуйста (патч есть на ag, например), помогает ли данное решение с ним.И без обид — но название темы очень странное. Надо во что-то переименовать — например, в «Запуск 16-битных инсталляторов на 64-битных системах».
Так дело ведь не в ОС как таковой, а в «битности». Если это 32-битная Vista (или 7) — то такой инсталлятор там заработает, а если 64-битная (в том числе XP) — то нет. Разве не так?А что конкретно смотришь? The Daily Show?
-
К сожалению (не в обиду @AxXxB), InstallshieldWrapper нужно переделывать под каждый пакет заново (такое вот ощущение).
Я вот здесь брал — https://www.reactos.org/forum/viewtopic.php?t=10988
-
В смысле — «под пакет»? Обновлений?
И какие же здесь могут быть обиды? Если (раз?) это так — то про это ведь нужно написать в теме, чтобы были в курсе и автор, и потенциальные пользователи программы, разве нет? По-моему, все, включая автора — исключительно адекватного человека, — будут только благодарны за это. -
Я имею в виду — каждый конкретный инсталляционный пакет (в нашем случае игру).
-
Но ведь это же явно не так. У меня с этой программой как минимум несколько десятков игр ставятся совершенно нормально (из тех, что проверял на 7 x64 лично). Среди тестировавшихся количество не ставящихся оказалось не таким уж большим.
-
У меня практически ни разу не помогло.
-
Название не корректное — речь о замене 16 битных инсталляторов на 32 битные установщики.
-
Eraser
ЧистильщикХелпер
- Регистрация:
- 29 дек 2001
- Сообщения:
- 10.462
Я тестировал не так много, где-то пять-шесть игр, только одна из них не стала инсталлироваться.
-
А вот с _этим_ инсталлятором у меня сработала инсталляция Deo Gratias и на 1.0.0 и на 1.0.10. В отличие от инсталлятора с сайта. Правда, сработало странно:
— 1.0.0 выдаёт «Это неправильный setup.exe, нажмите Ок, чтобы его закрыть» — но если Ок не нажимать, всё работает и ставится.
— А на 1.0.10 всё работает без ошибок — но инсталлятор запускается дважды. %)
—
Хмм, к изумлению моему, обнаружил, что предыдущий is5launcher, который у меня не работал, я скачивал не отсюда. Блин, а где ж я тогда его брал…
—
Нашёл. Вот здесь. Штука в том, что это тот же самый файл! Мис-стика. Но могу точно гарантировать, что в прошлый раз оно у меня не работало. Но с тех пор я успел переустановить Win10… Будет смешно, если враппер, который на сайте, ломает работу вот этого вот сетапа — потому что совершенно точно, что враппер я пробовал первым, и тоже безуспешно…
—
Проверил. Да, ломает. После установки враппера ничего так и не работает. Но после установки изменённого Setup.exe получаю вместо запуска «Setup is unable to find _SETUP.DLL» на 1.0.0. — и в прошлый раз так было. Что забавно, на 1.0.10 даёт выбрать язык, и после этого ломается точно так же — на одной из двух прежних инсталляций. Вторая при этом запускается и работает.Вывод: или Wrapper, или указанный is5launcher, но не одновременно.
Последнее редактирование: 30 авг 2016
AxXxB и kreol нравится это.
-
(с) Марк Аврелий. «Наедине с самим собой».)))
Извини, не удержался.Можешь пояснить? То есть если в системе установлен InstallshielWrapper, то эти инсталляторы _в принципе_ не будут работать? А если его удалить — то начинают? К слову @AxXxB говорил, что корректно деинсталлировать эту программу не так-то просто.Возможно, но ведь вполне можно обсуждать этот вопрос в более, скажем так, «общем ключе». -
Я противник стирания своих старых постов — а пояснять, почему они больше не валидны, как-то надо. Вот оно и получается.
Да. По крайней мере, в моём случае (Win10 x64) если установлен InstallshieldWrapper, то замена Setup.exe на приведённый выше начинает вызывать ошибку. Полагаю, Винда _ещё_ раз подменяет DLL’ки (уже на то, что написано во враппере), и в итоге всё перестаёт работать вообще.
Я, не мудрствуя, просто деинсталлировал враппер. С подменой setup.exe всё заработало как раньше.
-
PRAPAN
- Регистрация:
- 15 июл 2012
- Сообщения:
- 7
— Скачал лицензионный образ диска Dune 2000 с этого сайта. Смонтировал диск и нажал установить игру и выпрыгивает окошка:
— Я не могу даже установить игру не говоря уже о запуске ее.
У меня следующие данные:
Windows 10
64 разрядная система
CORE i5
NVIDIA GT 720mЯ хочу установить именно лицензионную копию игры а не пиратку, Я легко могу скачать пиратку и установить и она будет работать — уже делал, но меня принципиально не устраивает пиратка.
— добавлено 8 окт 2016, предыдущее сообщение размещено: 8 окт 2016 —
Сделал как сказал Awasaky и использовал Is3Engine.zip — частично момогло но выскачило это:
Вложения:
-
Bato-San
Чеширский волк-киборг- Регистрация:
- 24 июн 2010
- Сообщения:
- 14.136
потому что ставить надо с CD-ROM. А для этого, после замены файлов надо их запихать обратно в образ CD. При помощи UltraISO например.
Ну, если тебе так хочется «аутентичности», хотя столь сложные извращения её начисто убивают. Гораздо проще поставить из виртуальной машины или перенести с реальной, подключить образ через эмулятор и играть себе. -
PRAPAN
- Регистрация:
- 15 июл 2012
- Сообщения:
- 7
Ого. А можно по подробней о виртуальной машине и эмуляторе?
-
@Андрюшка КРУГлов, может не надо в папку с кириллицей в имени складывать?
-
Хз. Достаточно скопировать содержимое CD в папку на HDD, заменить setup.exe, запустить его и потом поправить пути в реестре если нужно…
Увы, для InstallShield2 не работает (всякие Formula 1 99 и так далее)… 3-я и 5-я версии проблем не вызывают. -
havec85
- Регистрация:
- 30 июн 2017
- Сообщения:
- 4
то ли я что-то не так делаю, то ли на винде 10й не работает…скачал с этого сайта C&C Tiberian Dawn gold edition. Через демон тулз образ открыл. Скинул на винт, заменил сетап на i5. В фоновых процессах открыт видно, а в реале не устанавливается игра
-
@havec85, а в той игре точно пятая версия используется, а не третья?
Страница 1 из 3