
В Windows наличие камеры и микрофона в составе устройства позволяет совершать видеозвонки Teams, делать снимки, записывать видео и многое другое. Многие приложения и службы требуют наличия камеры или микрофона и используют ее, а параметры Windows позволяют управлять списком приложений, которые могут использовать камеру или микрофон.
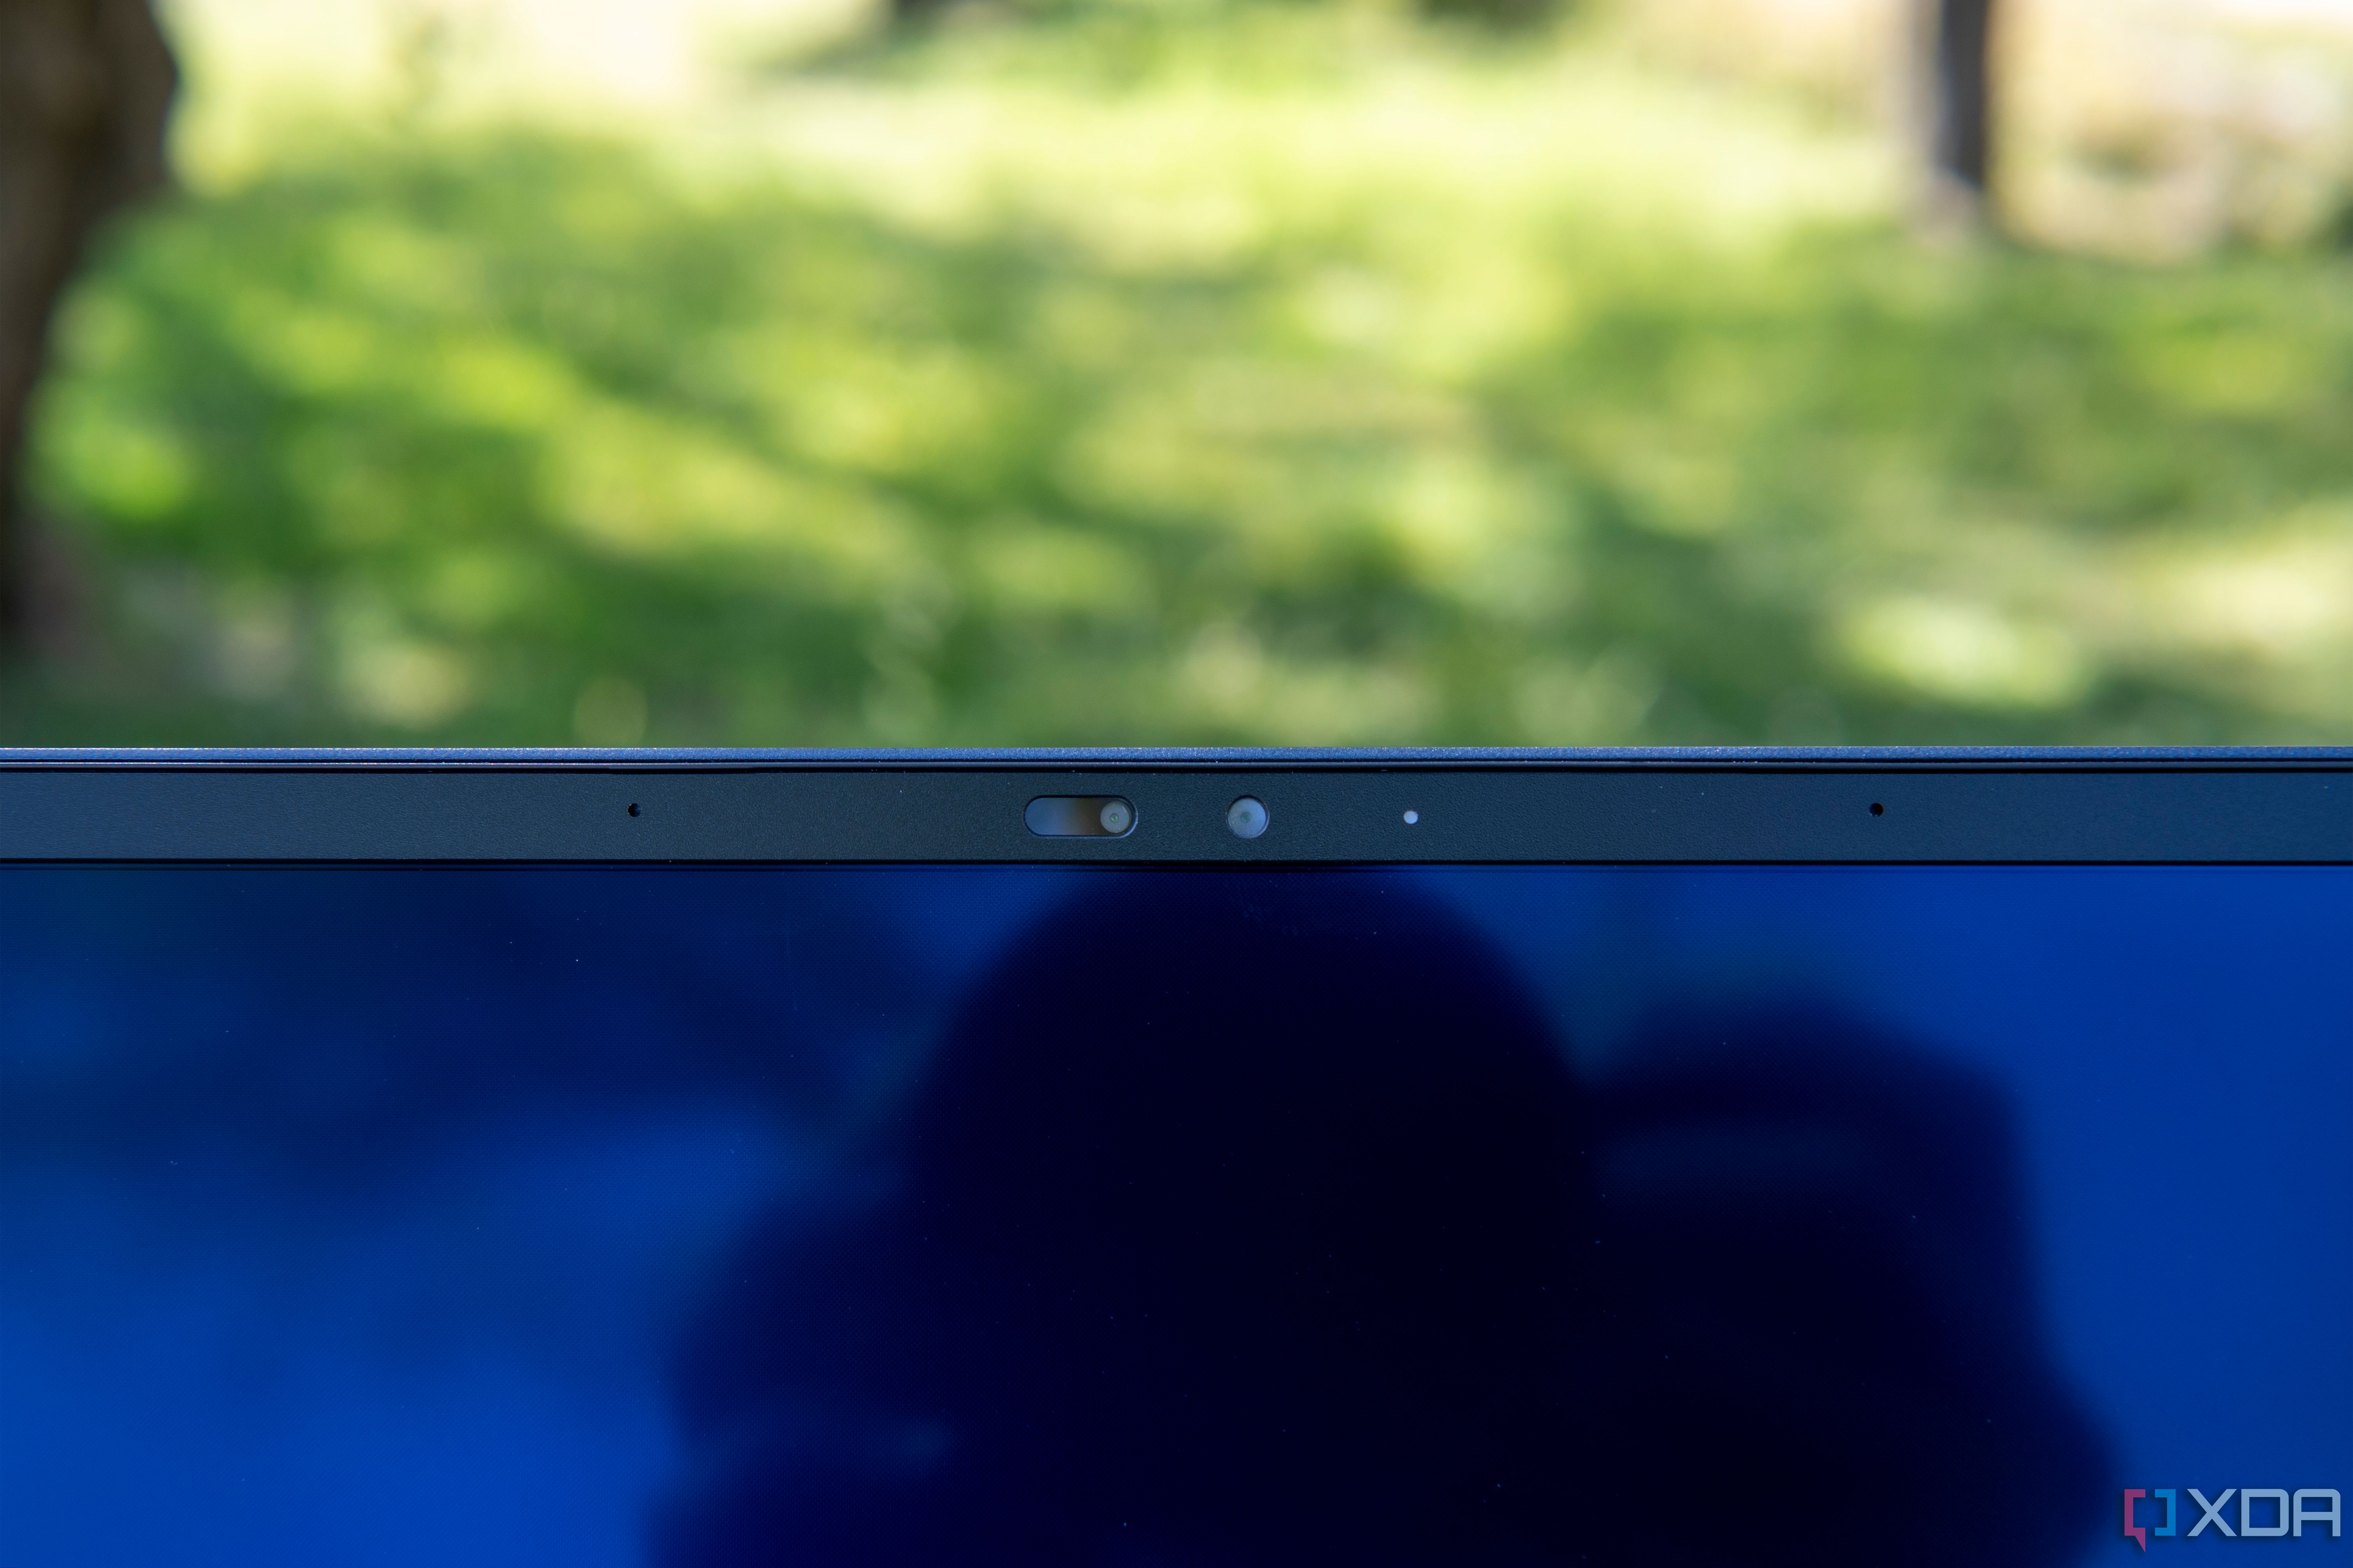
Некоторые пользователи опасаются, что незнакомые приложения, компании или вредоносные программы могут использовать камеру или микрофон их устройств. Использование камеры или микрофона должны контролировать вы. Чтобы помочь вам понять, когда камера включена, предоставляются следующие индикаторы.
-
Если устройство оснащено камерой с подсветкой, то во время использования камеры загорается подсветка.
-
Если устройство не оснащено подсветкой камеры, то при включении или отключении камеры отображается соответствующее уведомление.
Чтобы помочь вам понять, когда микрофон используется, предоставляются следующие индикаторы.
-
В области уведомлений на панели задач будет отображаться значок микрофона.
Чтобы узнать, какие приложения в настоящее время используют камеру или микрофон или недавно обращаются к камере или микрофону
-
В Windows 10 перейдите по следующим разделу:
-
Начало
Параметры > > конфиденциальности > камеры -
Начало
Параметры > > конфиденциальности > микрофона
-
-
В Windows 11 перейдите по следующим разделу:
-
Начало
> Параметры > Конфиденциальность & безопасность > камера -
Начало
> Параметры > Конфиденциальность & безопасность > Микрофон.
-
Примечание: Эта функция не существует в Windows 10 версии 1809 и более ранних версиях.
Мы также предоставляем параметры для контроля, как описано в следующих разделах.
Элементы управления параметрами камеры или микрофона могут быть уже отключены, если вы используете устройство, выданное вам на работе, или если вы добавили рабочую учетную запись в собственное устройство. В этом случае в верхней части страницы параметров камеры или микрофона появится заголовок Некоторые параметры управляются организацией.
Три типа камер
В зависимости от того, какими камерами оснащено устройство, существует три типа камер, к которым могут получить доступ приложения и службы.
-
Цветная камера используется для съемки стандартных цветных фотографий и видео.
-
Инфракрасная камера позволяет снимать фото и видео в оттенках серого (черно-белые фотографии и видео) на основе интенсивности инфракрасного излучения.
-
Камера глубины распознает контуры объектов перед ней и расстояние от них до устройства. Например, камеру глубины можно использовать для определения того, когда человек находится перед устройством.
-
Выполните одно из следующих действий:
-
В Windows 10 перейдите в раздел Пуск > Параметры > конфиденциальность > камера.
-
В Windows 11 перейдите в раздел Пуск > Параметры > конфиденциальность & безопасность > камера.
-
-
В Windows 10 убедитесь, что для этого устройства включен доступ ккамере, разрешить приложениям доступ к камере и включить переключатель для приложения Microsoft Store, которое вы хотите использовать. Если вы не видите приложение или веб-сайт, который вы ищете в списке, скорее всего, это классическое приложение. Классические приложения нельзя переключать по отдельности, но доступом к этим приложениям можно управлять с помощью параметра Разрешить классическим приложениям доступ к камере.
-
В Windows 11 убедитесь, что доступ к камере, Разрешить приложениям доступ к камере и включить переключатель для приложения Microsoft Store, которое вы хотите использовать. Если вы не видите приложение или веб-сайт, который вы ищете в списке, скорее всего, это классическое приложение. Классические приложения нельзя переключать по отдельности, но доступом к этим приложениям можно управлять с помощью функции Разрешить классическим приложениям доступ к камере.
Дополнительные сведения об управлении доступом к камере на устройстве см. в статье Управление разрешениями приложения для камеры в Windows.
-
Выполните одно из следующих действий:
-
В Windows 10 перейдите в раздел Пуск > Параметры > конфиденциальности > микрофон.
-
В Windows 11 перейдите в раздел Пуск > Параметры > конфиденциальность & безопасность > микрофон.
-
-
В Windows 10 убедитесь, что для этого устройства включен доступ кмикрофону, разрешить приложениям доступ к микрофону, а также включить переключатель для приложения Microsoft Store, которое вы хотите использовать. Если вы не видите приложение или веб-сайт, который вы ищете в списке, скорее всего, это классическое приложение. Классические приложения нельзя переключать по отдельности, но доступом к этим приложениям можно управлять с помощью параметра Разрешить классическим приложениям доступ к микрофону.
-
В Windows 11 убедитесь, что доступ кмикрофону, Разрешить приложениям доступ к микрофону, а переключатель для приложения Microsoft Store, которое вы хотите использовать, включен. Если вы не видите приложение или веб-сайт, который вы ищете в списке, скорее всего, это классическое приложение. Классические приложения нельзя переключать по отдельности, но доступом к этим приложениям можно управлять с помощью функции Разрешить классическим приложениям доступ к микрофону.
При просмотре веб-сайтов в Microsoft Edge можно использовать камеру и микрофон. Однако, даже когда камера и микрофон включены для Microsoft Edge, будет необходимо по-прежнему предоставлять разрешение отдельным веб-сайтам на использование камеры и микрофона. Ниже рассказывается, как это сделать.
-
Перейдите на веб-сайт, который хочет использовать микрофон и (или) камеру.
-
Если появится диалоговое окно с запросом на предоставление веб-сайту разрешения на использование камеры или микрофона, выберите Разрешить. Чтобы заблокировать доступ, выберите Блокировать или закройте диалоговое окно.
-
В Microsoft Edge выберите Параметры и многое другое , а затем выберите Параметры.
-
Выберите Файлы cookie и разрешения сайта в левой части экрана, а затем в разделе Разрешения сайта выберите Камера или Микрофон.
-
Щелкните значок корзины, чтобы удалить доступ для этого веб-сайта.
Примечание: Некоторые веб-сайты могут не работать, если вы заблокируете для них доступ к камере и микрофону. Например, у вас может не получиться присоединяться к видеоконференции.
Исключения для параметров конфиденциальности камеры и микрофона
Если вы включите Windows Hello, она будет использовать камеру для входа, даже если параметр, разрешающий приложениям доступ к камере, отключен. Если функция Windows Hello отключена, у нее нет доступа к камере. (Windows Hello, часть Windows 10 и более поздних версий, — это новый способ входа в устройства, приложения, веб-службы и сети.)
Начиная с Windows 10 версии 1903 на страницах параметров камеры и микрофона можно получить доступ к дополнительным параметрам, предоставляющим ограниченный контроль над классическими приложениями, которые обращаются к камере и микрофону с помощью поддерживаемых методов. Этот параметр называется Разрешить классическим приложениям доступ к камере или Разрешить классическим приложениям доступ к микрофону в Windows 10 и Разрешить классическим приложениям доступ к камере или Разрешить классическим приложениям доступ к микрофону в Windows 11. Здесь вы найдете список классических приложений, обнаруженных Windows, которые взаимодействовали с камерой или микрофоном. При включении или отключении параметра будут затронуты все приложения, указанные в этом разделе.
Примечания:
-
Вы можете выбрать любое из приложений, чтобы получить подробные сведения о конкретном файле на устройстве, который обращался к камере или микрофону.
-
Если вы используете приложение или функцию Windows, которая использует камеру или микрофон косвенно через компонент Windows, вы увидите в списке компонент Windows. Например, если вы взаимодействуете с Кортаной с помощью микрофона, вы увидите сообщение «Исполняемый файл среды выполнения речи».
-
Если вы отключите параметр Разрешить классическим приложениям доступ к камере или Разрешить классическим приложениям доступ к микрофону в Windows 10, разрешить классическим приложениям доступ к камере или Разрешить классическим приложениям доступ к микрофону в Windows 11, вы можете повлиять на некоторые функции Windows, используя камеру или микрофон, такие как Кортана или диктовка Windows.
Классические приложения могут не всегда отображаться в списке доступных приложений на страницах параметров камеры и микрофона или могут по-прежнему иметь доступ к камере или микрофону, даже если эти параметры отключены. Узнать причину
Конфиденциальность является главной проблемой в современном мире, иначе ваши частные данные рискуют оказаться в публичном доступе или могут быть использованы против вас. Одним из источников утечек приватной информации является шпионство приложениями через микрофон и камеру вашего гаджета. В Windows 11 есть простые инструменты, позволяющие заблокировать приложениям доступ к камере, микрофону и местонахождению. У вас есть возможность не только заблокировать отдельным программам доступ к вашим данным, но вообще отключить доступ к этой информации, чтобы никакие программы не имели к ней доступа.
Как заблокировать доступ к веб-камере, микрофону и другим данным в Windows 11
- Откройте Настройки.
- В меню слева выберите «Конфиденциальность и безопасность».
- Прокрутите вниз до разрешения программы.
- Нажмите Камера для управления доступом к веб-камере.
- Вы можете полностью отключить доступ к веб-камере, выключив доступ к камере.
- Чтобы заблокировать определенные программы использования веб-камеры, просмотрите список приложений в разделе «Предоставить приложениям доступ к камере».
- Установите переключатель в положение Выкл. рядом с программами, которые необходимо заблокировать.
- Вы можете вернуться на разрешения программы на шаге 3 и нажать «Микрофон» или «Местоположение» для управления настройками для этих датчиков. В общем, страницы функционируют одинаково.
- Изменения применяются автоматически, поэтому приложения не будут иметь доступ к информации с датчиков, для которых вы отменили разрешение.
Примечание: Приложения не из Microsoft Store не требуют индивидуального разрешения на доступ к веб-камере. Вы можете использовать «Разрешить программам для настольных компьютеров доступ к камере», чтобы заблокировать доступ к ней всем десктопным программам.

This tutorial will show you how to allow or deny apps access to the microphone for your account or all users in Windows 11.
Many apps and services request and use the microphone, and Windows settings give you control over which apps can use your microphone.
You can choose which apps can access the microphone.
When your microphone is in use, a microphone icon will be displayed in the notification area of the taskbar system tray.
Reference:
Contents
- Option One: Turn On or Off Microphone Access for All Users in Settings
- Option Two: Turn On or Off Microphone Access for All Users using REG file
- Option Three: Turn On or Off Apps Access to Microphone for Current User in Settings
- Option Four: Turn On or Off Apps Access to Microphone for Current User using REG file
- Option Five: Turn On or Off Desktop Apps Access to Microphone for Current User in Settings
- Option Six: Turn On or Off Desktop Apps Access to Microphone for Current User using REG file
- Option Seven: Turn On or Off Specific Apps Access to Microphone for Current User in Settings
- Option Eight: Enable or Disable Microphone Access for All Users in Local Group Policy Editor
- Option Nine: Enable or Disable Microphone Access for All Users using REG file
Option One
Turn On or Off Microphone Access for All Users in Settings
You must be signed in as an administrator to use this option.
1 Open Settings (Win+I).
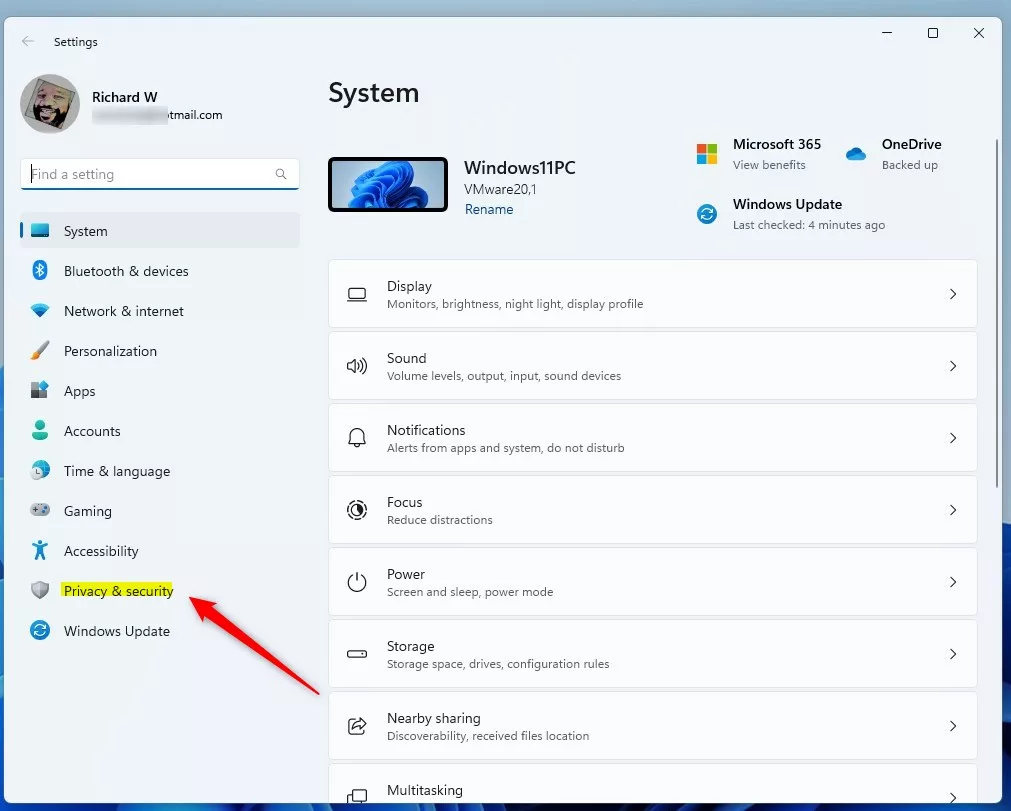
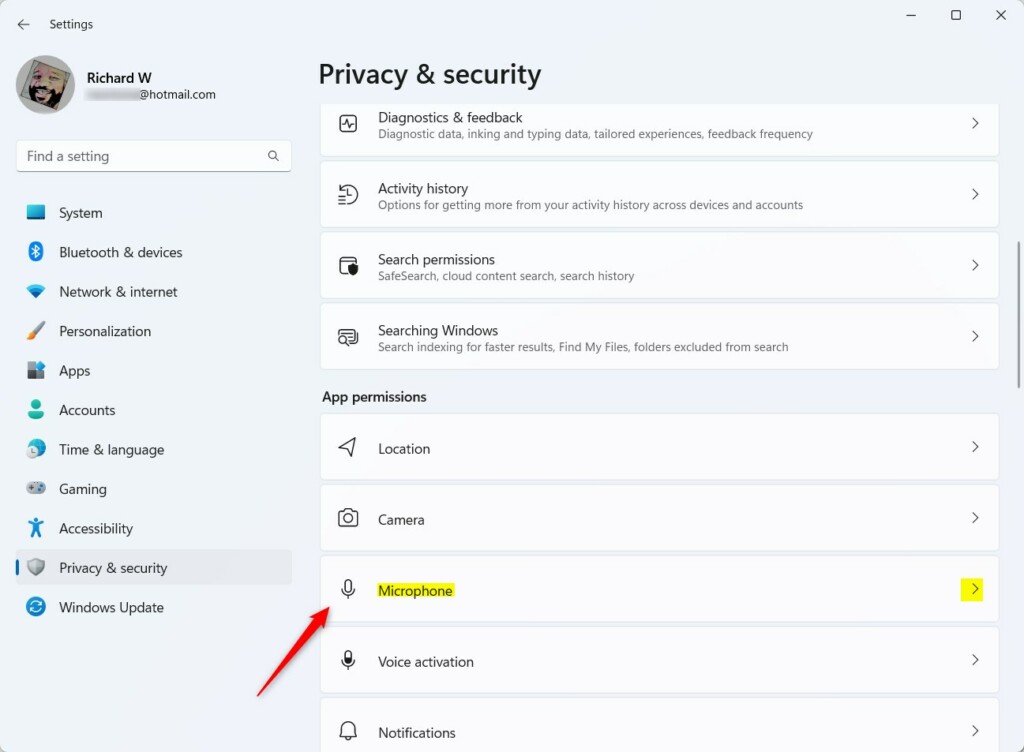
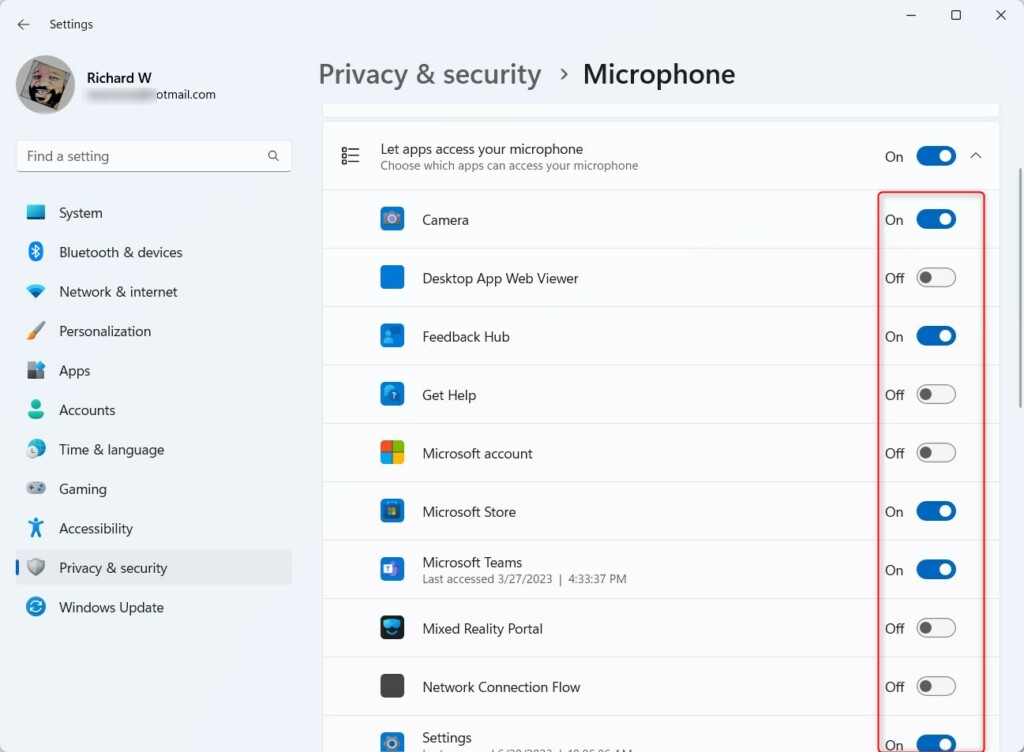
2 Click/tap on Privacy & security on the left side, and click/tap on Microphone on the right side. (see screenshot below)

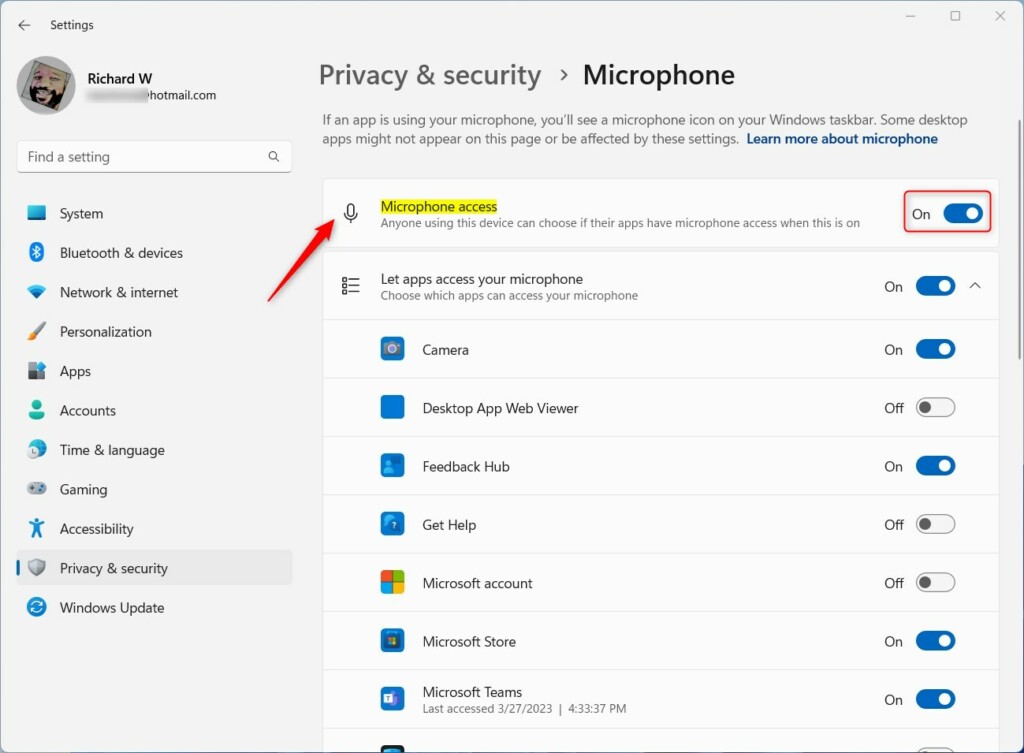
3 Turn On (default) or Off Microphone access for what you want. (see screenshots below)

4 You can now close Settings if you like.
Option Two
Turn On or Off Microphone Access for All Users using REG file
You must be signed in as an administrator to use this option.
This is the same setting as Option One.
1 Do step 2 (on) or step 3 (off) below for what you want.
2. Turn On Microphone Access for All Users
This is the default setting to allow using Option Three, Option Four, Option Five, Option Six, and Option Seven.
A) Click/tap on the Download button below to download the file below, and go to step 4 below.
Turn_ON_microphone_access_for_all_users_on_device.reg
(Contents of REG file for reference)
Code:
Windows Registry Editor Version 5.00

[HKEY_LOCAL_MACHINE\SOFTWARE\Microsoft\Windows\CurrentVersion\CapabilityAccessManager\ConsentStore\microphone]
"Value"="Allow"
3. Turn Off Microphone Access for All Users
This will disable and prevent using Option Three, Option Four, Option Five, Option Six, and Option Seven.
A) Click/tap on the Download button below to download the file below, and go to step 4 below.
Turn_OFF_microphone_access_for_all_users_on_device.reg
(Contents of REG file for reference)
Code:
Windows Registry Editor Version 5.00

[HKEY_LOCAL_MACHINE\SOFTWARE\Microsoft\Windows\CurrentVersion\CapabilityAccessManager\ConsentStore\microphone]
"Value"="Deny"
4 Save the .reg file to your desktop.
5 Double click/tap on the downloaded .reg file to merge it.
6 When prompted, click/tap on Run, Yes (UAC), Yes, and OK to approve the merge.
7 You can now delete the downloaded .reg file if you like.
Option Three
Turn On or Off Apps Access to Microphone for Current User in Settings
1 Open Settings (Win+I).
2 Click/tap on Privacy & security on the left side, and click/tap on Microphone on the right side. (see screenshot below)
3 Turn On (default) or Off Let apps access your microphone for what you want. (see screenshot below)
Turning off Let apps access your microphone, will disable and gray out Option Five, Option Six, and Option Seven.
4 You can now close Settings if you like.
Option Four
Turn On or Off Apps Access to Microphone for Current User using REG file
This is the same setting as Option Three.
1 Do step 2 (on) or step 3 (off) below for what you want.
2. Turn On Apps Access to Microphone for Current User
This is the default setting to allow you to use Option Five, Option Six, and Option Seven.
A) Click/tap on the Download button below to download the file below, and go to step 4 below.
Turn_ON_let_apps_access_microphone_for_current_user.reg
(Contents of REG file for reference)
Code:
Windows Registry Editor Version 5.00

[HKEY_CURRENT_USER\Software\Microsoft\Windows\CurrentVersion\CapabilityAccessManager\ConsentStore\microphone]
"Value"="Allow"
3. Turn Off Apps Access to Microphone for Current User
This will disable and prevent you from using Option Five, Option Six, and Option Seven.
A) Click/tap on the Download button below to download the file below, and go to step 4 below.
Turn_OFF_let_apps_access_microphone_for_current_user.reg
(Contents of REG file for reference)
Code:
Windows Registry Editor Version 5.00

[HKEY_CURRENT_USER\Software\Microsoft\Windows\CurrentVersion\CapabilityAccessManager\ConsentStore\microphone]
"Value"="Deny"
4 Save the .reg file to your desktop.
5 Double click/tap on the downloaded .reg file to merge it.
6 When prompted, click/tap on Run, Yes (UAC), Yes, and OK to approve the merge.
7 You can now delete the downloaded .reg file if you like.
Option Five
Turn On or Off Desktop Apps Access to Microphone for Current User in Settings
1 Open Settings (Win+I).
2 Click/tap on Privacy & security on the left side, and click/tap on Microphone on the right side. (see screenshot below)
3 Click/tap on Let apps access your microphone to expand it open. (see screenshot below step 4)
4 Turn On (default) or Off Let desktop apps access your microphone for what you want. (see screenshot below)
Desktop apps may not always appear in the list of apps available on the Microphone settings pages or might still be able to access your microphone even when these settings are turned off.

5 You can now close Settings if you like.
Option Six
Turn On or Off Desktop Apps Access to Microphone for Current User using REG file
This is the same setting as Option Five.
1 Do step 2 (on) or step 3 (off) below for what you want.
2. Turn On Desktop Apps Access to Microphone for Current User
This is the default setting.
This will also turn on the required Let apps access your microphone setting in Option Three and Option Four.
A) Click/tap on the Download button below to download the file below, and go to step 4 below.
Turn_ON_let_desktop_apps_access_microphone_for_current_user.reg
(Contents of REG file for reference)
Code:
Windows Registry Editor Version 5.00

[HKEY_CURRENT_USER\Software\Microsoft\Windows\CurrentVersion\CapabilityAccessManager\ConsentStore\microphone]
"Value"="Allow"

[HKEY_CURRENT_USER\Software\Microsoft\Windows\CurrentVersion\CapabilityAccessManager\ConsentStore\microphone\NonPackaged]
"Value"="Allow"
3. Turn Off Desktop Apps Access to Microphone for Current User
A) Click/tap on the Download button below to download the file below, and go to step 4 below.
Turn_OFF_let_desktop_apps_access_microphone_for_current_user.reg
(Contents of REG file for reference)
Code:
Windows Registry Editor Version 5.00

[HKEY_CURRENT_USER\Software\Microsoft\Windows\CurrentVersion\CapabilityAccessManager\ConsentStore\microphone\NonPackaged]
"Value"="Deny"
4 Save the .reg file to your desktop.
5 Double click/tap on the downloaded .reg file to merge it.
6 When prompted, click/tap on Run, Yes (UAC), Yes, and OK to approve the merge.
7 You can now delete the downloaded .reg file if you like.
Option Seven
Turn On or Off Specific Apps Access to Microphone for Current User in Settings
1 Open Settings (Win+I).
2 Click/tap on Privacy & security on the left side, and click/tap on Microphone on the right side. (see screenshot below)
3 Click/tap on Let apps access your microphone to expand it open. (see screenshot below step 4)
4 Turn On (default) or Off the apps you want. (see screenshot below)
Desktop apps may not always appear in the list of apps available on the Microphone settings pages or might still be able to access your microphone even when these settings are turned off.
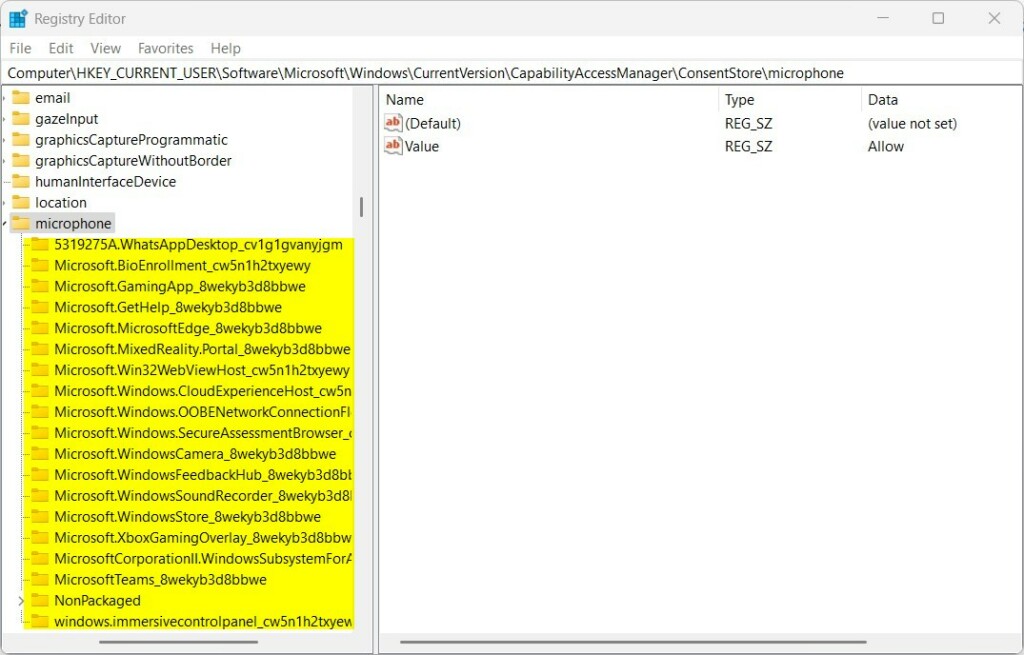
This setting is saved to the Value string value (REG_SZ) as the Prompt (off) or Allow (on) data for each app listed as a subkey in the registry key below.
HKEY_CURRENT_USER\Software\Microsoft\Windows\CurrentVersion\CapabilityAccessManager\ConsentStore\microphone

5 You can now close Settings if you like.
Option Eight
Enable or Disable Microphone Access for All Users in Local Group Policy Editor
You must be signed in as an administrator to use this option.
The Local Group Policy Editor is only available in the Windows 11 Pro, Enterprise, and Education editions.
All editions can use Option Nine to configure the same policy.
1 Open the Local Group Policy Editor (gpedit.msc).
2 Navigate to the policy location below in the left pane of the Local Group Policy Editor. (see screenshot below)
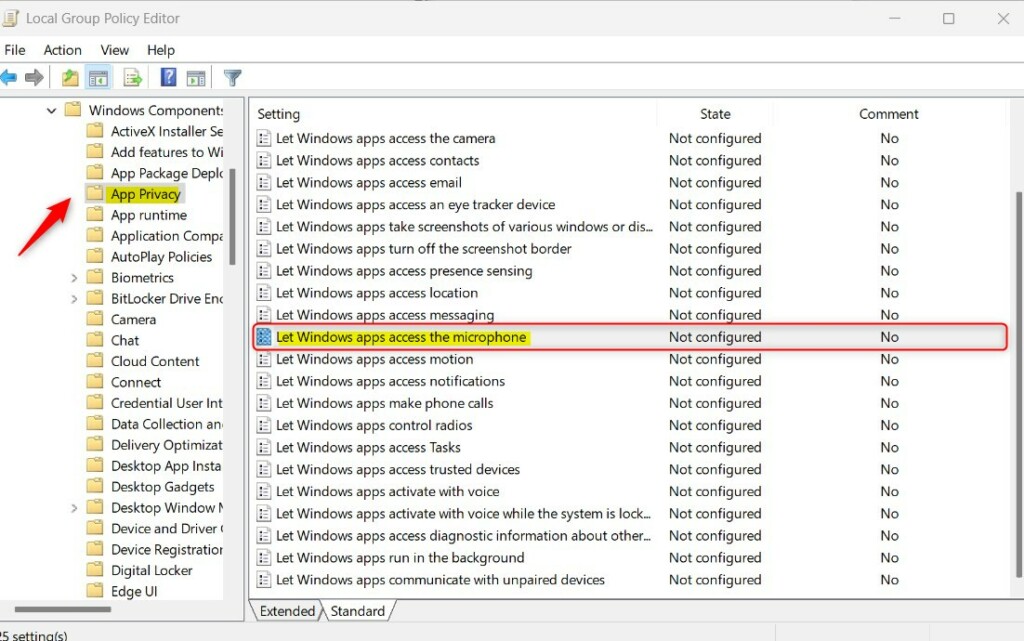
Computer Configuration > Administrative Templates > Windows Components > App Privacy

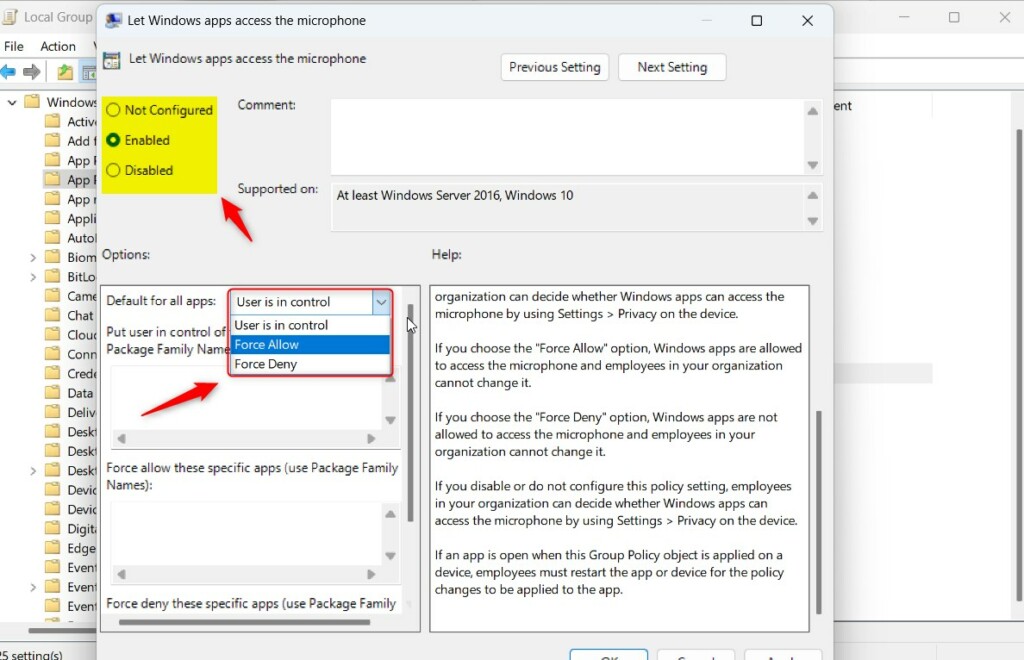
3 In the right pane of App Privacy in the Local Group Policy Editor, double click/tap on the Let Windows apps access the microphone policy to edit it. (see screenshot above)
4 Do step 5 (enable), step 6 (disable), or step 7 (default) below for what you want.
5 Always Enable Microphone Access for All Users
This will turn on and prevent using Option One, Option Two, Option Three, Option Four, Option Five, Option Six, and Option Seven.
A) Select (dot) Enabled. (see screenshot below)
B) Select Force Allow in the «Default for all apps» drop menu in Options.
C) Click/tap on OK, and go to step 8 below.

6 Disable Microphone Access for All Users
This will turn off and prevent using Option One, Option Two, Option Three, Option Four, Option Five, Option Six, and Option Seven.
A) Select (dot) Enabled. (see screenshot below)
B) Select Force Deny in the «Default for all apps» drop menu in Options.
C) Click/tap on OK, and go to step 8 below.
7 Default User-choice Microphone Access
This is the default setting to allow using Option One, Option Two, Option Three, Option Four, Option Five, Option Six, and Option Seven.
A) Select (dot) Not Configured. (see screenshot below)
B) Click/tap on OK, and go to step 8 below.
8 You can now close the Local Group Policy Editor if you like.
Option Nine
Enable or Disable Microphone Access for All Users using REG file
You must be signed in as an administrator to use this option.
This is the same setting as Option Eight.
1 Do step 2 (enable), step 3 (disable), or step 4 (default) below for what you want.
2. Always Enable Microphone Access for All Users
This will turn on and prevent using Option One, Option Two, Option Three, Option Four, Option Five, Option Six, and Option Seven.
A) Click/tap on the Download button below to download the file below, and go to step 5 below.
Always_enable_microphone_access_for_all_users_on_device.reg
(Contents of REG file for reference)
Code:
Windows Registry Editor Version 5.00

[HKEY_LOCAL_MACHINE\SOFTWARE\Policies\Microsoft\Windows\AppPrivacy]
"LetAppsAccessMicrophone"=dword:00000001
"LetAppsAccessMicrophone_UserInControlOfTheseApps"=hex(7):00,00
"LetAppsAccessMicrophone_ForceAllowTheseApps"=hex(7):00,00
"LetAppsAccessMicrophone_ForceDenyTheseApps"=hex(7):00,00
3. Disable Microphone Access for All Users
This will turn off and prevent using Option One, Option Two, Option Three, Option Four, Option Five, Option Six, and Option Seven.
A) Click/tap on the Download button below to download the file below, and go to step 5 below.
Disable_microphone_access_for_all_users_on_device.reg
(Contents of REG file for reference)
Code:
Windows Registry Editor Version 5.00

[HKEY_LOCAL_MACHINE\SOFTWARE\Policies\Microsoft\Windows\AppPrivacy]
"LetAppsAccessMicrophone"=dword:00000002
"LetAppsAccessMicrophone_UserInControlOfTheseApps"=hex(7):00,00
"LetAppsAccessMicrophone_ForceAllowTheseApps"=hex(7):00,00
"LetAppsAccessMicrophone_ForceDenyTheseApps"=hex(7):00,00
4. Default User-choice Microphone Access
This is the default setting to allow using Option One, Option Two, Option Three, Option Four, Option Five, Option Six, and Option Seven.
A) Click/tap on the Download button below to download the file below, and go to step 5 below.
Default_user-choice_microphone_access_on_device.reg
(Contents of REG file for reference)
Code:
Windows Registry Editor Version 5.00

[HKEY_LOCAL_MACHINE\SOFTWARE\Policies\Microsoft\Windows\AppPrivacy]
"LetAppsAccessMicrophone"=-
"LetAppsAccessMicrophone_UserInControlOfTheseApps"=-
"LetAppsAccessMicrophone_ForceAllowTheseApps"=-
"LetAppsAccessMicrophone_ForceDenyTheseApps"=-
5 Save the .reg file to your desktop.
6 Double click/tap on the downloaded .reg file to merge it.
7 When prompted, click/tap on Run, Yes (UAC), Yes, and OK to approve the merge.
8 You can now delete the downloaded .reg file if you like.
That’s it,
Shawn Brink
Related Tutorials
- Enable or Disable Microphone in Windows 11
- Rename Microphone in Windows 11
- Clear Microphone Last Accessed History in Windows 11
- Turn On or Off Camera and Microphone Access in Application Guard for Microsoft Edge
- Turn On or Off Include Microphone when Recording with Snipping Tool in Windows 11
- Enable or Disable Voice Focus to Reduce Microphone Background Noise in Windows 11
Sign in to your XDA account
Privacy is a major concern in today’s world, and being able to protect it has been a big focus for companies like Apple, Google, and Microsoft. That comes in many forms, but in Windows 11, one of the primary ways you can protect your privacy is by managing access to devices that can be used to collect personal information, such as the camera, microphone, and location. If you don’t want a specific app to be able to use these sensors and data, you can block it from doing so.
Not only do you have the ability to block individual apps from accessing your data, but you can disable access to this information altogether, so no apps can access it. If you’re wondering how, we’re here to help.
How to block access to your webcam, microphone, and other data in Windows 11
- Open the Settings app.
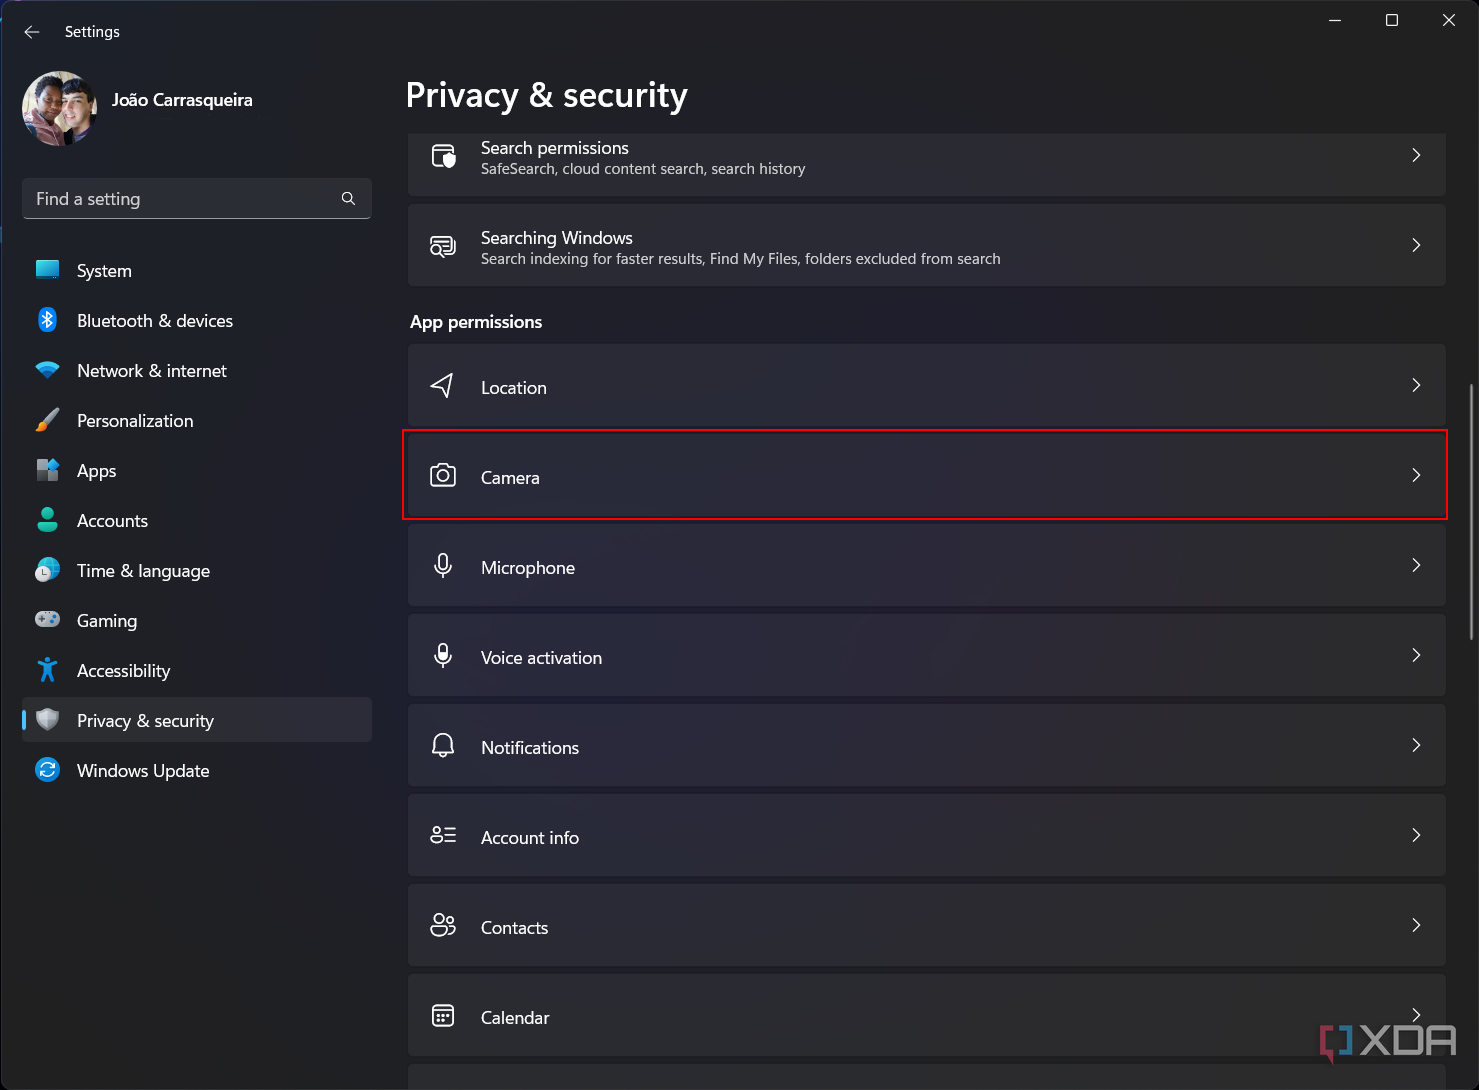
- Choose Privacy & security from the menu on the left side.
- Scroll down to the App permissions section.
-
Click Camera to manage access to your webcam.

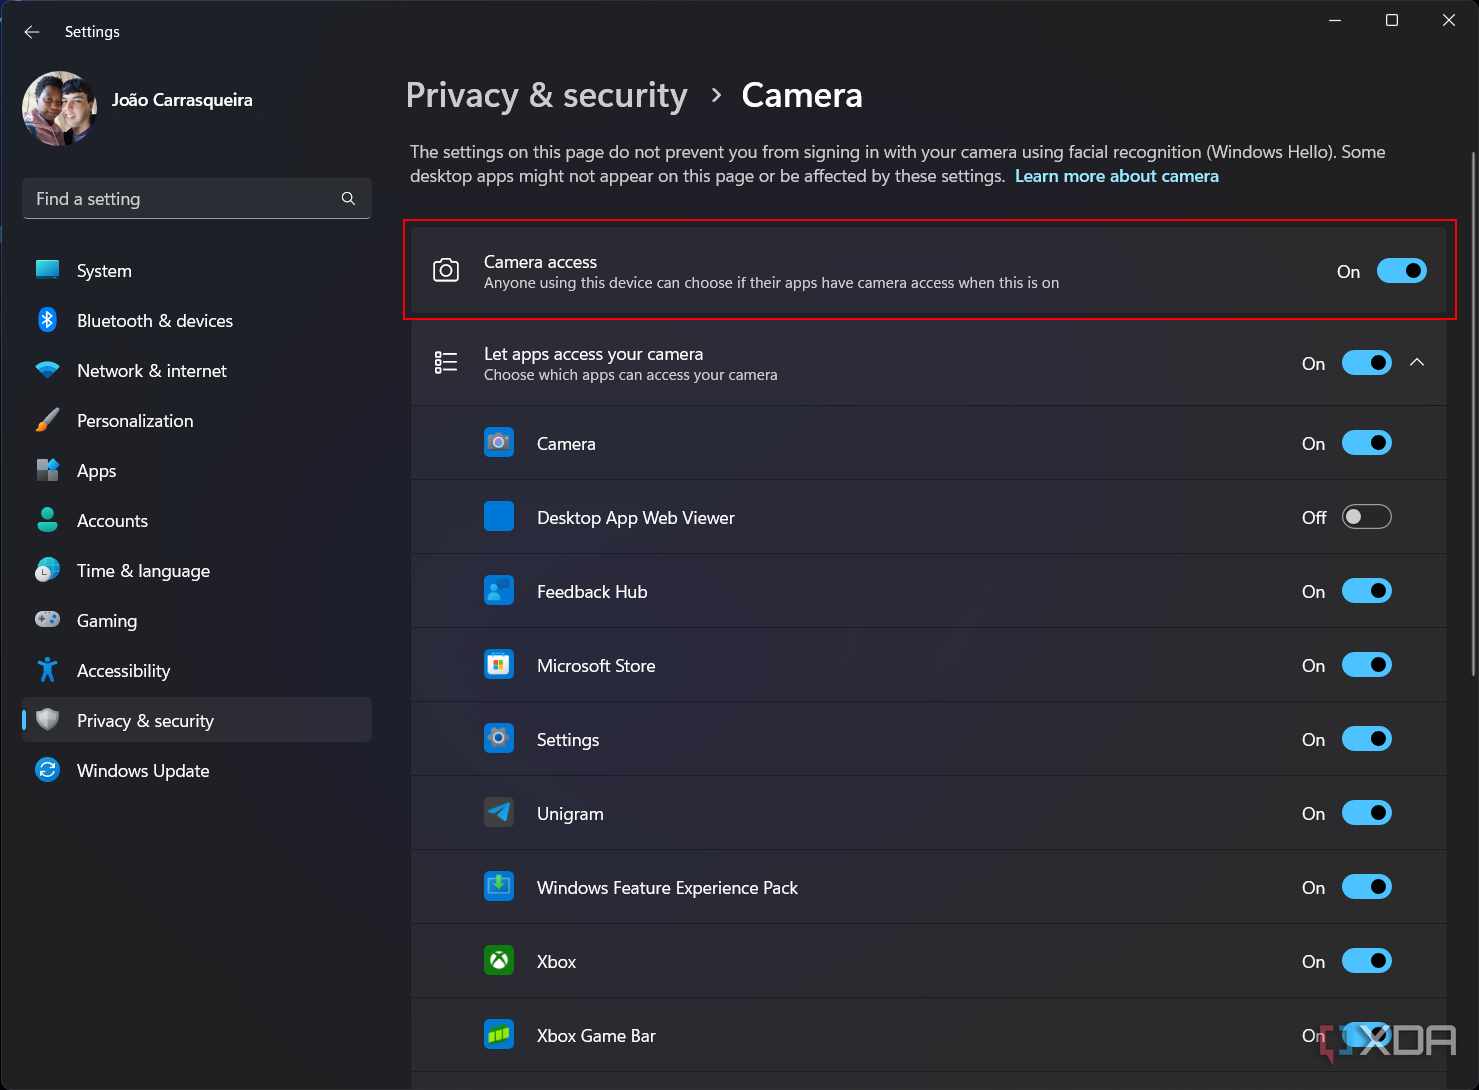
-
You can disable webcam access completely by turning off the Camera access toggle.
- To block specific apps from using your webcam, see the list of apps under Let apps access your camera.
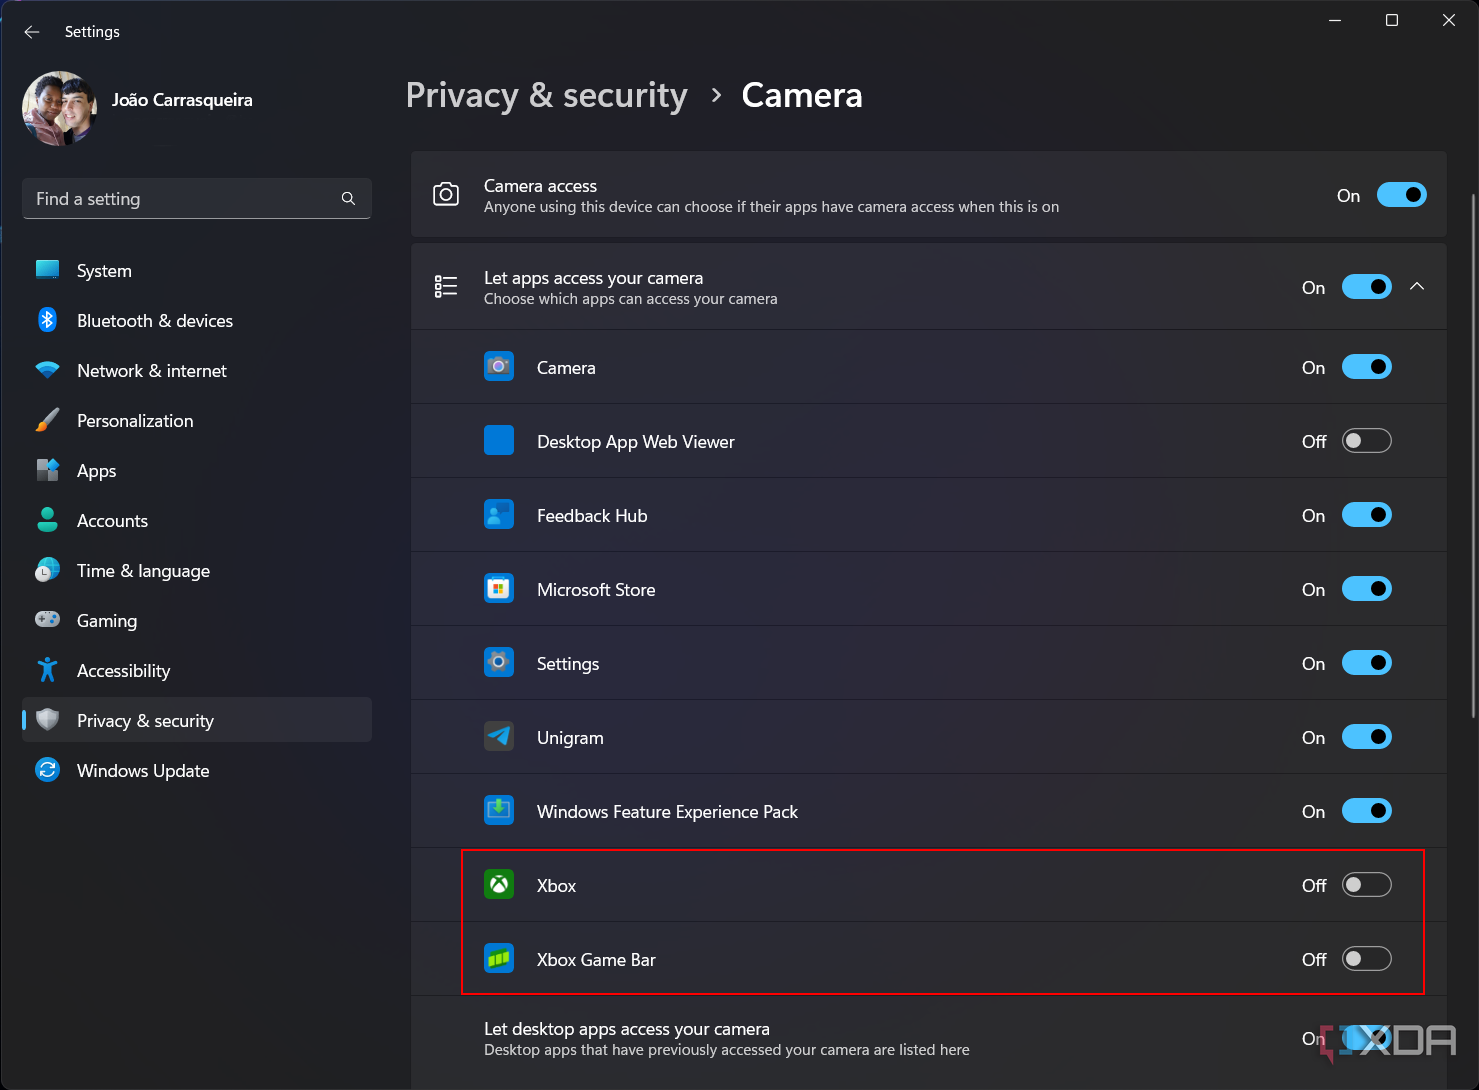
-
Set the toggle to Off next to the app(s) you want to block.
Desktop apps (not from the Microsoft Store) don’t need individual permission to access your webcam. You can use the Let desktop apps access your camera setting to block all desktop apps from accessing it.
-
You can go back to the App permissions page in step 3 and click Microphone or Location to manage settings for those sensors as well. The pages function in the same way overall.
Some high-end laptops may also have a Presence sensing section. This lets you block apps from using presence sensors on certain computers, which could detect when you’re in front of the computer. There are also similar pages for all kinds of data, like access to your files.
- Changes are applied automatically, so apps won’t be able to access the information from sensors you removed permissions for.
That’s all there is to it. If you’ve noticed something isn’t working as it should, you can always go back and grant those permissions again. But blocking apps from accessing personal data can help reduce the risk of having your private information exposed, which is why it’s so important to have these options. The presence sensing options are actually a relatively new addition with the Moment 3 update for Windows 11, and it’s great that Microsoft is keeping up with users’ need for privacy.
If you’re interested in other ways you can take control of your Windows experience, check out how to disable startup tasks in Windows 11 so you don’t have a ton of apps running every time you start your computer.
This article explains how to turn Microphone access for apps On or Off in Windows 11.
If your Windows device has a built-in microphone or one attached, you can make Team or Skype calls, record sounds, and more. Many apps and services may request access to the device’s Microphone. However, Windows gives users control over which apps and how apps can use the Microphone.
Access to the Microphone can be granted or denied per app or for all Windows device apps.
Suppose you are worried about unknown apps using your device’s Microphone without knowing. In that case, Windows displays a microphone icon in the taskbar’s notification area so you know when the Microphone is in use.
Below are steps to allow or deny apps to the device’s Microphone in Windows 11.
Restrict or allow apps access to the Microphone
As mentioned, Windows allows users to control how apps request or access their device’s Microphone.
When your Microphone is in use, a microphone icon will be displayed in the taskbar’s notification area.
Here are some steps to restrict or allow an app access to the Microphone in Windows 11.
First, open the Windows Settings app.
You can do that by clicking on the Start menu and selecting Settings. Or press the keyboard shortcut (Windows key + I) to launch the Settings app.
When the Setting app opens, click the Privacy & security button on the left.
Select the Microphone tile on the right to expand it.
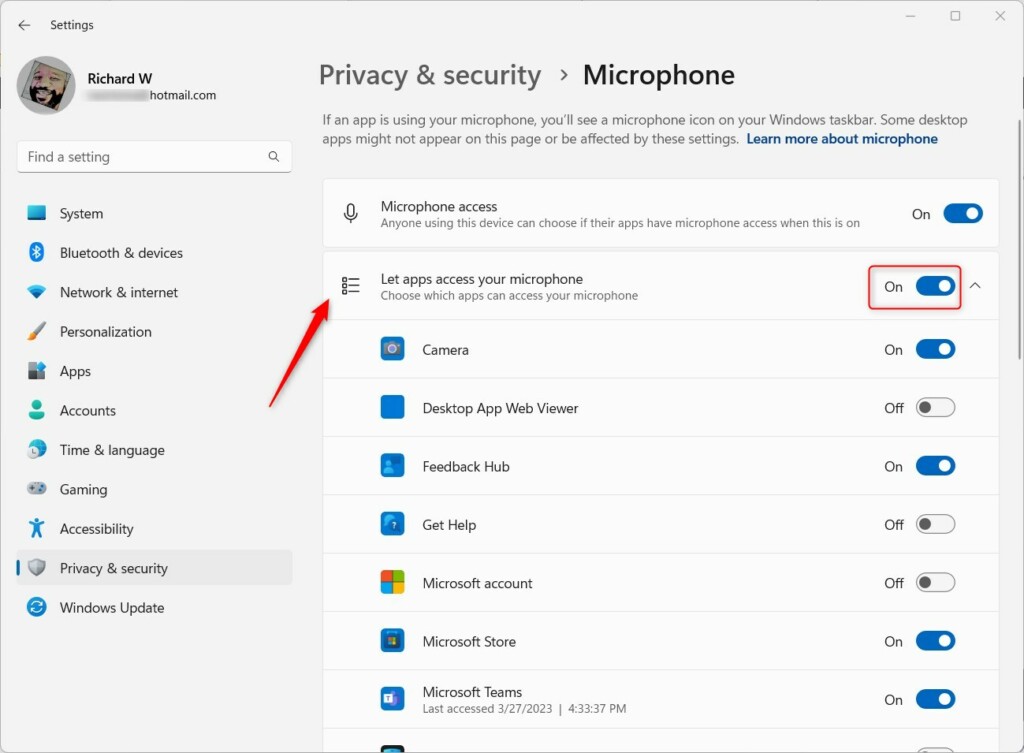
On the Privacy & security -> Microphone setting pane, select the “Microphone access” tile.
Then, toggle the switch button to the On position to enable microphone access on the device.
To disable microphone access, toggle the switch to the Off position.
The steps above turn on or off microphone access for all apps.
To Selectively deny or allow microphone access for individual apps, ensure that Microphone access, Let apps access your Microphone and the individual app you wish to allow or deny.
Close the Settings app when you are done.
Allow or deny apps access to the Microphone via the Local Group Policy Editor
Controlling app access to the device’s Microphone can also be done using the Local Group Policy Editor.
To do that, first, open the Local Group Policy editor app.
In the left pane of Local Group Policy Editor, expand the tree: Computer Configuration -> Administrative Templates -> Windows Components -> App Privacy.
Computer Configuration -> Administrative Templates -> Windows Components -> App Privacy
In the App Privacy details pane on the right, double-click the policy setting “Let Windows app access the microphone” to open it.
On the setting window, choose one of the options below:
- Not Configured – Same as Disabled. Users can decide whether apps can access the Microphone in the Settings app.
- Enabled – When this policy is enabled, you can choose”
Force Allow“or”Force Deny“users changing app access settings to the Microphone in the Settings app. - Disabled – Users can decide whether apps can access the Microphone in the Settings app.
Select OK.
Close Local Group Policy Editor.
Enable or disable Microphone access for apps using the Registry Editor
Another way to turn microphone access for apps on or off is to use the Windows Registry editor.
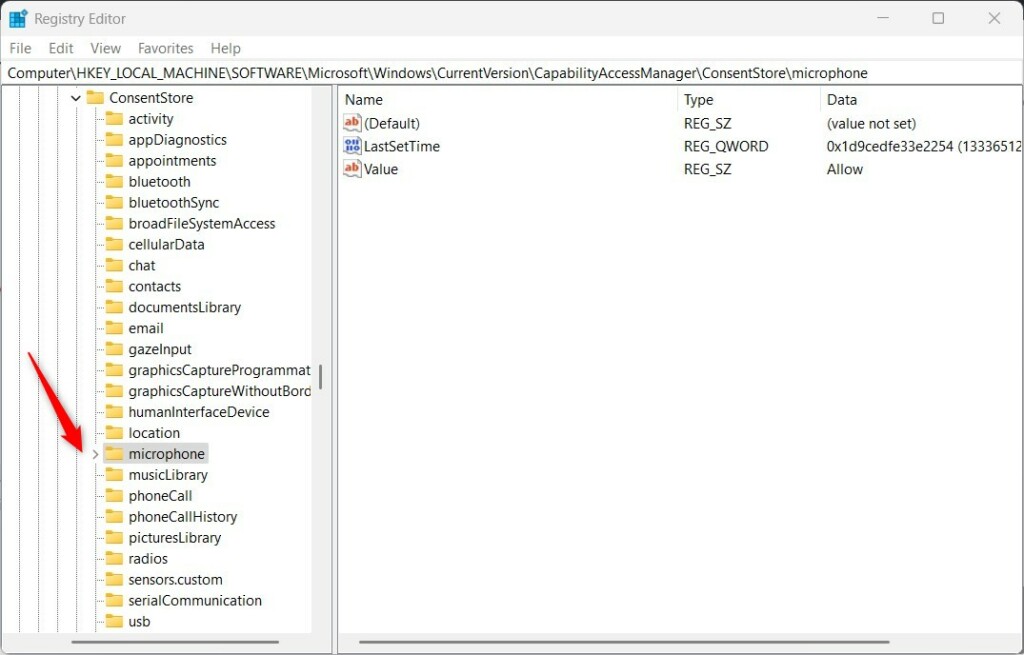
To do that, open the Windows Registry editor, and navigate to the folder key below.
Use the HKEY_CURRENT_USER settings to apply this change to your desktop background.
HKEY_LOCAL_MACHINE settings will apply the change to all users on the system.
HKEY_LOCAL_MACHINE\SOFTWARE\Microsoft\Windows\CurrentVersion\CapabilityAccessManager\ConsentStore\microphone
HKEY_CURRENT_USER\Software\Microsoft\Windows\CurrentVersion\CapabilityAccessManager\ConsentStore\microphone
If you don’t see the microphone folder key, right-click on the ConsentStore parent key, then create the subkey (Microphone) folder.
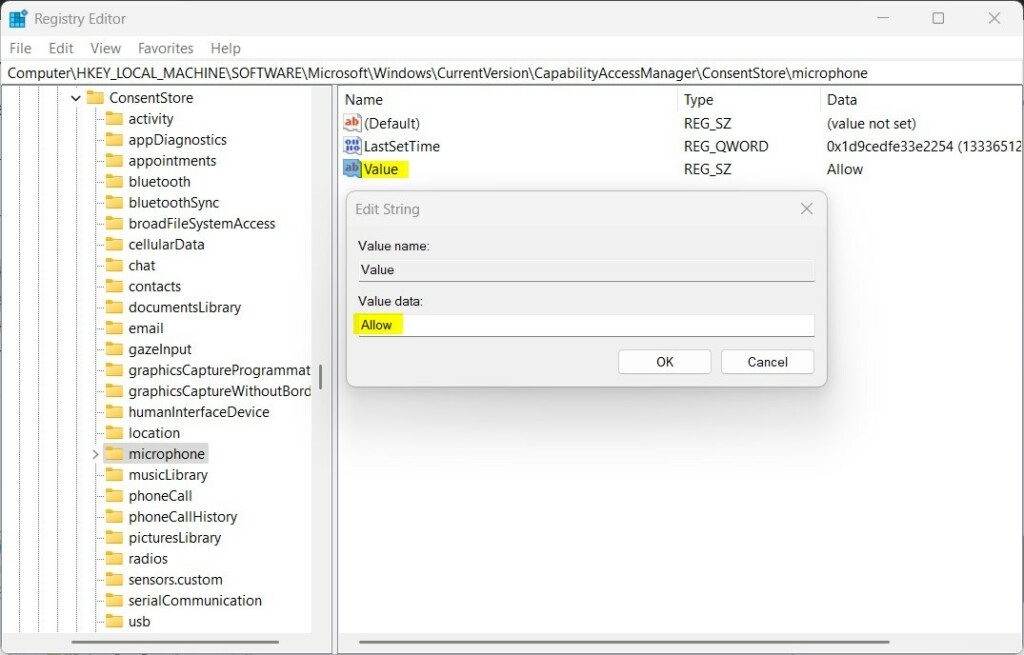
Right-click the microphone folder key’s right pane and select New -> String Value. Type a new item named Value.
Double-click the new item you created (Value) and update the Value data:
- To allow microphone access for all apps, type Allow.
- To deny microphone access for all apps, type Deny.
Turn Let desktop apps access your Microphone On or Off.
If you do not want to disable or enable all app access to the Microphone, use the “Let desktop apps access your microphone” option.
First, ensure that “Microphone access” and “Let apps access your microphone” are turned on.
Go to Start -> Settings -> Privacy & security -> Microphone and toggle the switch to On.
To turn it off, toggle the switch to Off.
Once turned on, you can selectively allow or deny apps’ access to your device’s Microphone.
Turn Let apps access your Microphone using the Registry Editor
Another way to turn “Let apps access your microphone” is to use the Windows Registry Editor.
Note: You must first ensure that the option above that enables”Microphone access“is turned on before continuing below.
Use the HKEY_CURRENT_USER settings to apply this change to your desktop background.
HKEY_LOCAL_MACHINE settings will apply the change to all users on the system.
HKEY_LOCAL_MACHINE\Software\Microsoft\Windows\CurrentVersion\CapabilityAccessManager\ConsentStore\microphone\NonPackaged
HKEY_CURRENT_USER\Software\Microsoft\Windows\CurrentVersion\CapabilityAccessManager\ConsentStore\microphone\NonPackaged
If you don’t see the NonPackaged folder key, right-click on the ConsentStore parent key, then create the subkey (NonPackaged) folder.
Right-click the NonPackaged folder key’s right pane and select New -> String Value. Type a new item named Value.
Double-click the new item you created (Value) and update the Value data:
- To allow apps to access your Microphone, type Allow.
- To deny apps accessing your Microphone, type Deny.
Once enabled, you can selectively allow or deny apps access to the Microphone at the registry location below.
HKEY_CURRENT_USER\Software\Microsoft\Windows\CurrentVersion\CapabilityAccessManager\ConsentStore\microphone
That should do it. Restart your computer to apply the changes.
Reference:
Microsoft
Conclusion:
- In this article, you’ve learned how to control app access to the Microphone on Windows 11, allowing you to safeguard your privacy and ensure only trusted apps can utilize the device’s microphone.
- Following the steps provided, you can conveniently manage and monitor which apps can access your Microphone, giving you peace of mind regarding potential privacy concerns.
- If you have any feedback, suggestions, or corrections regarding the information presented in this article, feel free to share them using the comments section below the post.