
Администратор может запретить пользователям самостоятельно менять пароль своей учетной записи в Windows. Можно как просто скрыть диалоговое окно для смены паролей, так и полностью заблокировать возможность ручного изменения пароля.
Стандартные настройки безопасности Windows требуют от пользователя регулярно менять свой пароль. Если срок действия пароля истек, при входе пользователя в Windows появится сообщение “
Пароль просрочен и должен быть заменен
”. Здесь пользователь может изменить свой пароль.
Вы может отключить требования регулярной смены пароля и запретить менять пароль для конкретного пользователя.
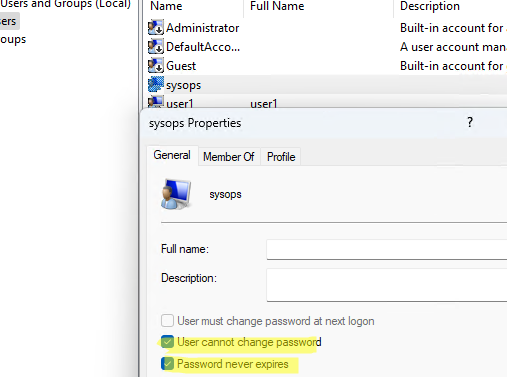
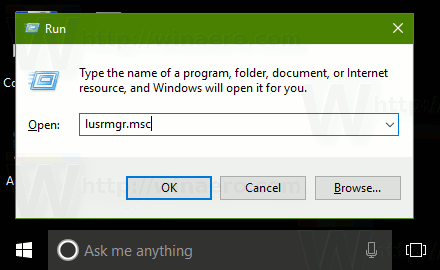
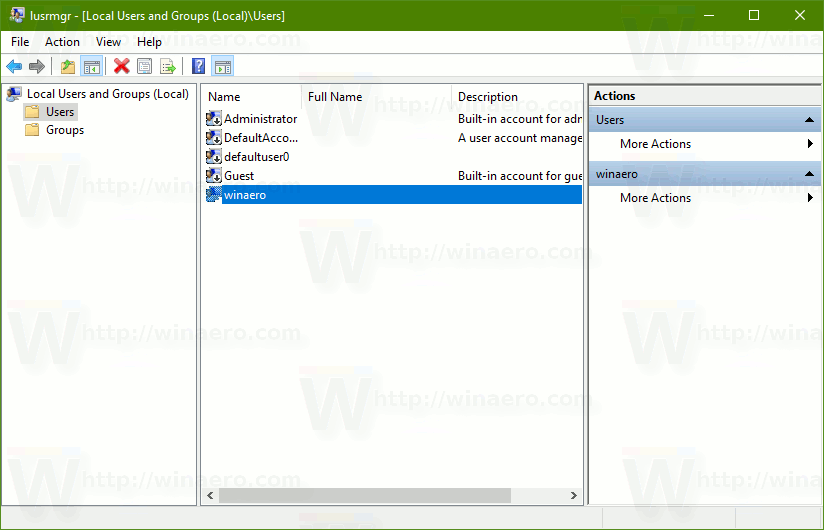
- Откройте консоль управления локальными пользователями и группами (
lusrmgr.msc
) - Разверните секцию Users
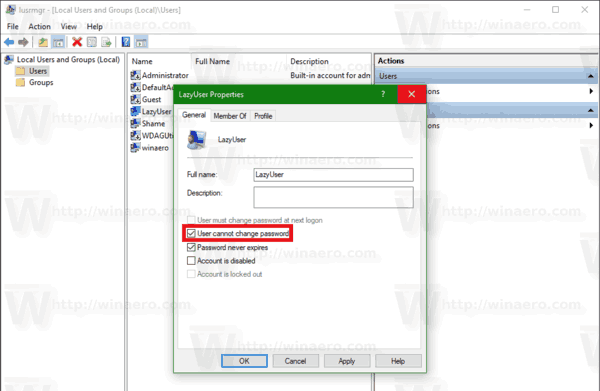
- Откройте свойства нужного пользователя и включите опцииUser cannot change password (
Запретить пользователю менять пароль
)Password newer expires (
Срок действия пароля никогда не истекает
)
- Сохраните изменения.
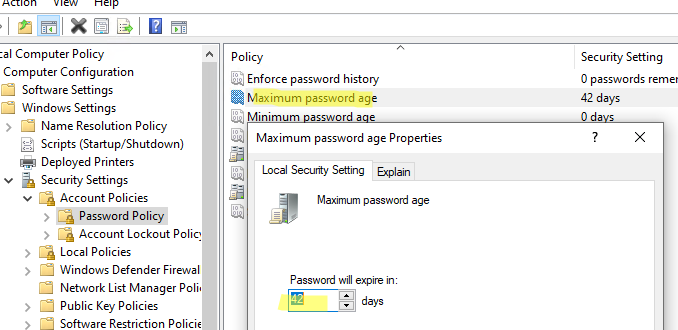
Если нужно отключить срок действия пароля для всех локальных пользователей Windows, нужно изменить настройки локальной политики паролей.
- Откройте консоль
gpedit.msc - Перейдите в Computer Configuration -> Windows Settings -> Security Settings -> Account Policies -> Password Policy
- Измените значение Maximum password age с 42 дней (по умолчанию) на 0.
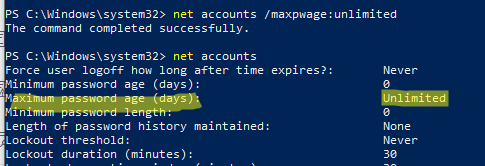
Также вы можете получить изменить настройки локальной политики паролей Windows с помощью команды:
net accounts
Отключить срок действия пароля для локальных пользователей:
net accounts /maxpwage:unlimited
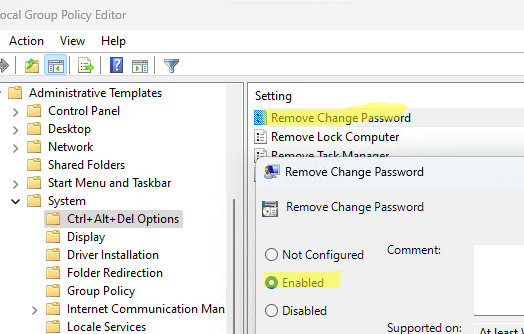
Если на компьютере настроен автовход в Windows или он работает в режиме киоска, рекомендуется скрыть кнопку Изменить пароль на экране Безопасность (Windows Security), который вызывается нажатием Ctrl+Alt+Del.
Можно скрыть кнопку смены пароля через групповые политики. Откройте консоль редактора локальной GPO (
gpedit.msc
) и включите параметр Remove Change Password в User Configuration -> Administrative Templates -> System -> Ctrl+Alt+Del Options.
Можно отключить отображение диалогового окна смены пароля через реестр:
reg add "HKEY_CURRENT_USER\Software\Microsoft\Windows\CurrentVersion\Policies\System" /v DisableChangePassword /t REG_DWORD /d 1 /f
В результате, пользователи Windows не смогут изменить свои пароли.
Windows offers many security features such as login password, minimum and maximum password age etc. which are essential for any operating system. The main problem comes when a PC with a single administrator account manages a lot of user accounts. A minimum password age prevents users from changing password too frequently as it can lead to user forgetting passwords more often, which leads to more headache for the administrator. And if the PC is used by a lot of users or children such as in the case of a PC in Computer lab, you need to prevent users from changing the password in Windows 10 as they can set a password that won’t let other user logins into that PC.

One of the best features of Windows 10 is that it allows the administrator to prevent other users from changing their account password. However, it still allows the administrator to change, reset, or remove their account password. This feature is handy for guest accounts or child accounts, anyway without wasting any time let’s see How to Prevent Users from Changing Password in Windows 10 with the help of the below-listed tutorial.
Note: You need to sign in with the administrator account to prevent other user accounts from changing their password. You will also only be able to apply this to local user accounts and not to administrator accounts. Users using Microsoft account will still be able to change their passwords online at Microsoft website.

Table of Contents
Make sure to create a restore point just in case something goes wrong.
Method 1: Prevent Users from Changing Password using Registry Editor
1. Press Windows Key + R then type regedit and hit Enter.
2. Navigate to the following Registry Key:
HKEY_CURRENT_USER\Software\Microsoft\Windows\CurrentVersion\Policies
3. Right-click on Policies then selects New > DWORD (32-bit) Value.

4. Name this new DWORD as DisableChangePassword then double-clicks on it to change its value.

5. In the value data field type 1 then hit Enter or click OK.
6. Reboot your PC to save changes.
Finally, you have learned How to Prevent Users from Changing Password in Windows 10 using Registry Editor, if you want to continue to the next method, it will override the changes made by this method.
Method 2: Prevent Users from Changing Password using Local Users and Groups
Note: This method only works in Windows 10 Pro, Enterprise, and Education Edition.
1. Press Windows Key + R then type lusrmgr.msc and hit Enter.
2. Expand Local Users and Groups (Local) then select Users.

3. Now in the right window pane right-click on the user account for which you want to prevent password change and select Properties.
4. Checkmark “User cannot change password” then click Apply followed by OK.

5. Reboot your PC to save changes and this How to Prevent Users from Changing Password in Windows 10.
Method 3: Prevent Users from Changing Password using Command Prompt
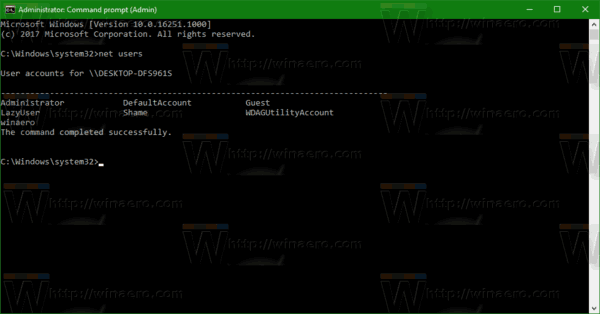
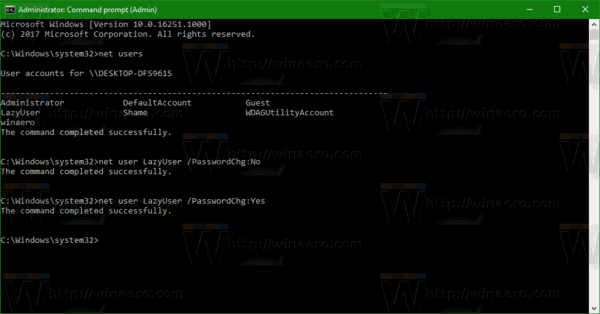
1. Open Command Prompt. The user can perform this step by searching for ‘cmd’ and then press Enter.

2. Type the following command into cmd and hit Enter.
net users

3. The above command will show you a list of user accounts available on your PC.
4. Now to prevent user from changing password type the following command:
net user user_name /PasswordChg:No

Note: Replace user_name with the actual account username.
5. If in future you want to give password change privileges to the user again use the following command:
net user user_name /PasswordChg:Yes

Note: Replace user_name with the actual account username.
6.Reboot your PC to save changes.
Method 4: Prevent Users from Changing Password using Group Policy Editor
1. Press Windows Key + R then type gpedit.msc and hit Enter.
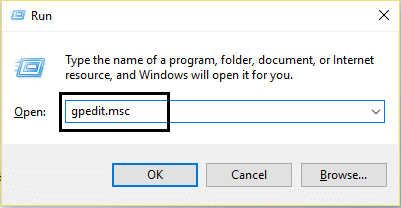
2. Navigate to the following path:
User Configuration > Administrative Templates > System > Ctrl+Alt+Del Options
3. Make sure to select Ctrl+Alt+Del Options in the right window pane double-click on Remove change password.

4. Checkmark the Enabled box then click Apply followed by OK.

This policy setting prevents users from changing their Windows password on demand. If you enable this policy setting, the ‘Change Password’ button on the Windows Security dialog box will not appear when you press Ctrl+Alt+Del. However, users are still able to change their password when prompted by the system. The system prompts users for a new password when an administrator requires a new password or their password is expiring.
5. Restart your PC to save changes.
Recommended:
- Enable or Disable User First Sign-in Animation in Windows 10
- How to View User Account Details in Windows 10
- Limit the Number of Failed Login Attempts in Windows 10
- How to Change User Account Name in Windows 10
That’s it you have successfully learned How to Prevent Users from Changing Password in Windows 10 but if you still have any queries regarding this tutorial then feel free to ask them in the comment’s section
Skip to content
In this article, we’ll review a number of methods to prevent a user from changing his password in Windows 10. Once you follow the instructions in this article, the user won’t be able to change his or her password. Here’s how to do this.
Before you proceed, please keep in mind the following. In this article, we are disabling the ability to change the password for a user. This assumes that you have physical access to the computer and can access an administrative account to manage users. Here is how to find out if you are signed in as Administrator. Also, this article is not about resetting the password. If you need to reset a forgotten password, please refer to the following article instead:
Reset Windows 10 password without using third party tools
To prevent a user from changing the password in Windows 10, do the following.
- Open an elevated command prompt.
- Type or copy-paste the following command:
net users
This command will show you a list of users available on the current PC.

- To prevent a user from changing the password, type the following command:
net user user_name /PasswordChg:No
Substitute the user_name portion with the actual user name from the list.

This will prevent the user from changing the password. To revert this change, execute the following command, again in the elevated command prompt.
net user user_name /PasswordChg:Yes
If your Windows 10 edition comes with the Local Users and Groups option, you can use it instead of the command prompt. Note: It is available only in Windows 10 Pro, Enterprise, Education and Pro Education editions. Here is how.
- Press the Win + R keys together on your keyboard to open the Run dialog and type lusrmgr.msc in the Run box. Press the Enter key to open Local Users and Groups.

- On the left, click the Users folder.

- On the right, double-click the user account you need to change.
- The properties dialog will be opened. There, enable the option (tick the check box) User cannot change password and click on the OK button.

That’s it.
Support us
Winaero greatly relies on your support. You can help the site keep bringing you interesting and useful content and software by using these options:
If you like this article, please share it using the buttons below. It won’t take a lot from you, but it will help us grow. Thanks for your support!
October 26, 2016 updated by
Leave a reply »
How to stop a user from changing their password? Look for a way to disable admin’s ability to change password? In this tutorial we’ll show you how to prevent both administrators and standard users from changing or adding Windows 10 password in PC Settings.
Note: Users can still open an elevated Command Prompt to change Windows password. To prevent changing a password from Command Prompt, you have to disable Command Prompt completely.
How to Prevent Windows 10 Users from Changing or Adding Password in PC Settings?
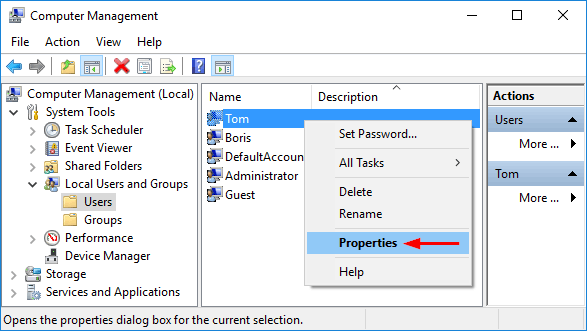
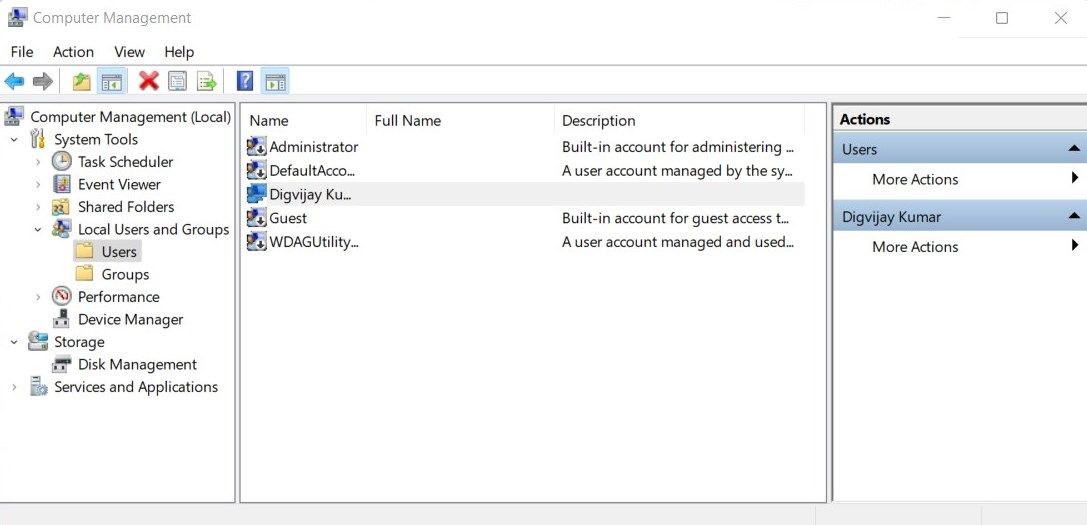
- To get started, you need to open up the Computer Management console. This can be done by pressing the Windows key + R and type compmgmt.msc in the Run box.
- Expand the Local Users and Groups category in the left pane. Click on the Users folder and you will see a list of Windows accounts on your computer in the right pane.
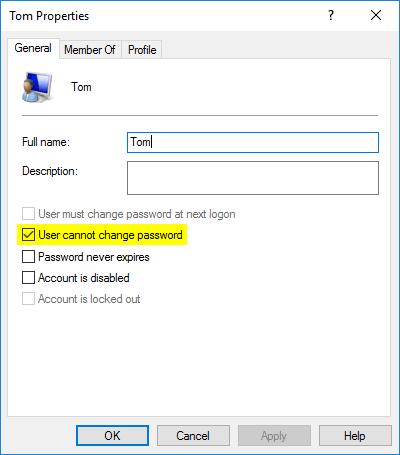
- Right-click on the account that you wish to deny permission to change their password, and select Properties from the drop-down menu.

- Uncheck the checkbox labeled User cannot change password. Click Apply and then OK.

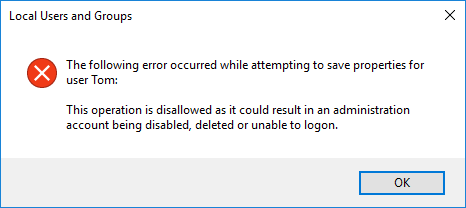
If your selected user is an administrator, you’ll received the error message “This operation is disallowed as it could result in an administration account being disabled, deleted or unable to logon.”

To get around this issue, you can change that administrator account to a standard/limited user, then follow the steps above to apply the “User cannot change password” option. When it’s done, change the account back to administrator.
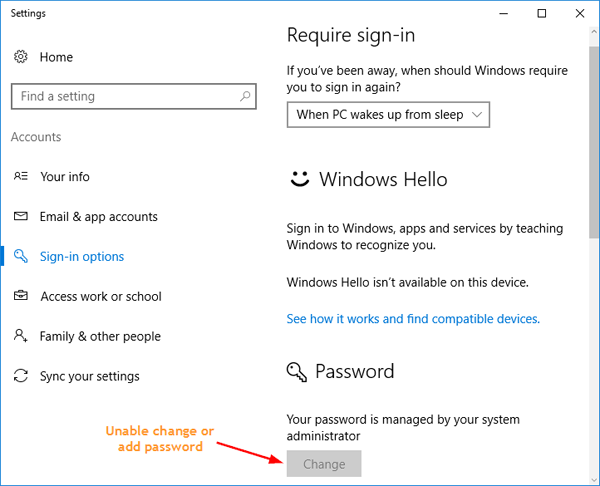
- Now log off and log on to your selected account, open the PC Settings, select Accounts -> Sign-in options and you’ll find the option of changing or adding password is greyed out.

- Previous Post: How to Change Number Format in Windows 10
- Next Post: 5 Ways to Change User Account Type in Windows 10
If you share your computer with others, you may want to prevent other users from changing your Windows password. This can be useful if you have multiple people working on your system, and you don’t want to give them the option of changing the password.
Once you’ve finished with this article, only you will be able to manage the passwords on your system. As such, let’s explore how to stop users from changing passwords on Windows.
Why Should You Prevent Users From Changing the Windows Passwords?
Before we dive deeper into how you can stop other users from changing your password, let’s first understand why you would want to prevent them from doing so. There are many reasons why you may not want other users accessing or changing your password.
Suppose you’re sharing your computer with your friends or family. If you give them the ability to change the passwords on your Windows computer, they might use this power to lock you out of the system. They may change the password you set for their account to deny you access, or even change your own password so you can’t get into your profile.
Now that you know why you need to prevent users from changing your Windows password, let’s talk about how you can stop them.
How to Prevent Users From Changing Windows Passwords
If you want to stop users from changing Windows passwords, you can do so via Group Policy Editor, Registry Editor, or the Computer Management tool. Here is a detailed explanation for each of them.
1. How to Use Group Policy Settings to Prevent Users From Changing Windows Passwords
There are a few methods that can be used to prevent users from changing their Windows passwords. One is to use the Local Group Policy editor.
However, if you’re using Windows Home edition, the Local Group Policy editor won’t be available by default. In such a case, you should first activate the Group Policy Editor in Windows Home before continuing.
Here are the steps you need to follow to prevent others from changing your Windows password:
- Open the Run command dialog box.
- Type «gpedit.msc» in the text field and press the OK button to open the Local Group Policy Editor.
-
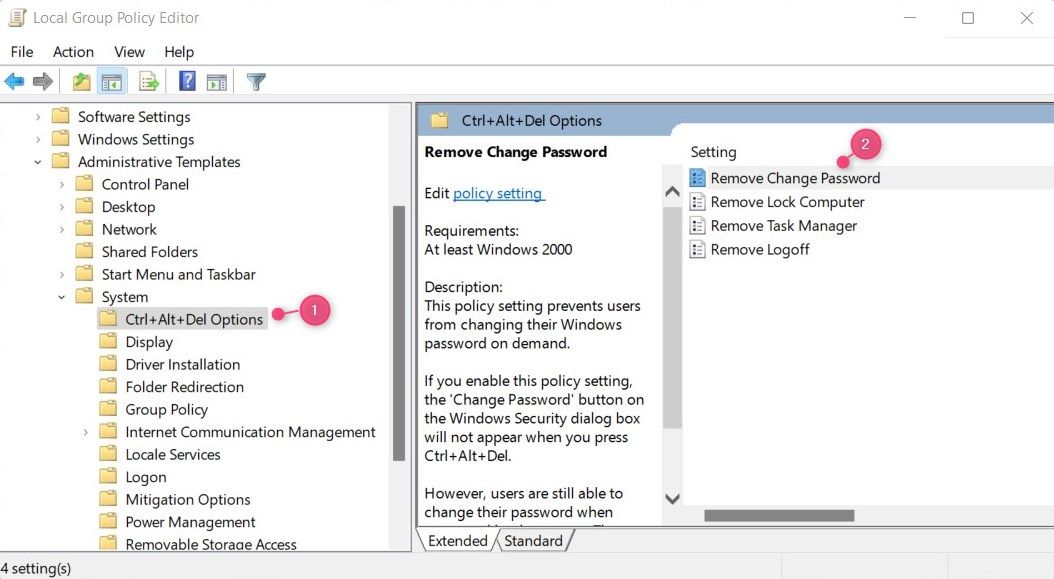
Navigate to the following path:
User Configuration > Administrative Templates > System > Ctrl+Alt+Del Options -
Choose Ctrl+Alt+Del Options from the left, then double-click the Remove Change Password on the right.

-
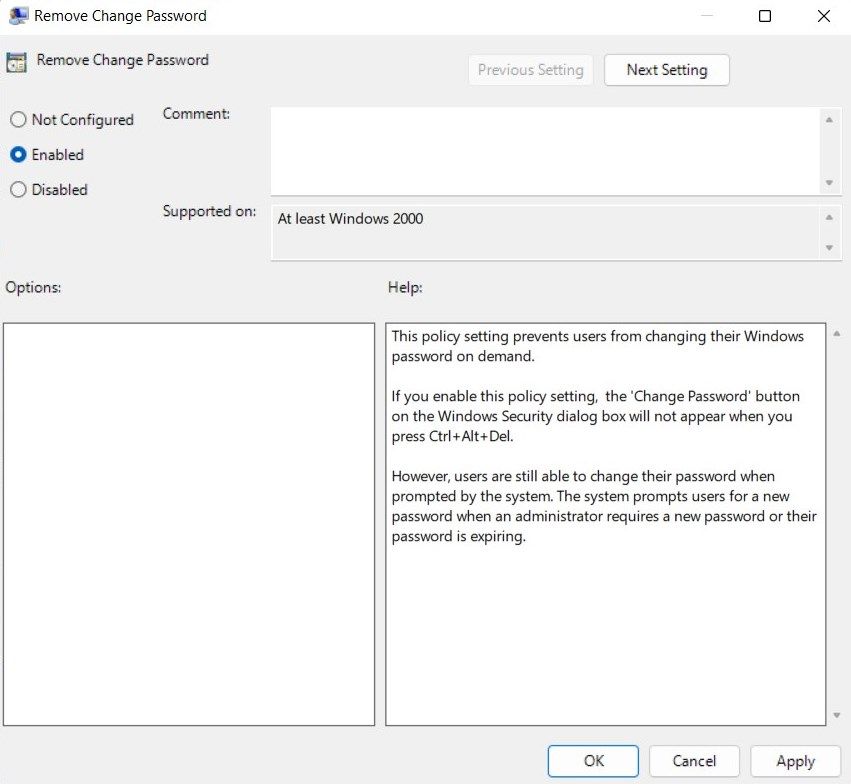
When the dialog box appears, select the Enabled radio button.

- Click Apply and OK when you’re finished making your changes.
- In order to see the changes take effect, you will need to restart your computer.
After you restart your computer, it’s time to check if the password change option is disabled. Press the Ctrl + Alt + Del key combination and double-check that you can’t see the «Change Password» button on the «Security» dialog box.
Do note that performing these steps won’t stop Windows from asking users to create a new password when necessary. If a password expires or an administrator needs to change the password, the system will still prompt the user to set up a new one.
2. How to Modify the Registry to Prevent Users From Changing Windows Passwords
Another method to prevent users from changing their Windows passwords is to use the Registry Editor. However, you must take care not to accidentally mess up the Windows Registry in the process. You could seriously damage your device if you edit the wrong keys. Therefore, you should always back up the Registry before modifying any of its settings.
Here’s how to prevent Windows users from changing passwords via the Registry Editor:
- Press Win + R to open the Run Command dialog box.
- Type «regedit» in the search field and click OK.
- A UAC window will appear on the screen; click Yes to confirm your action.
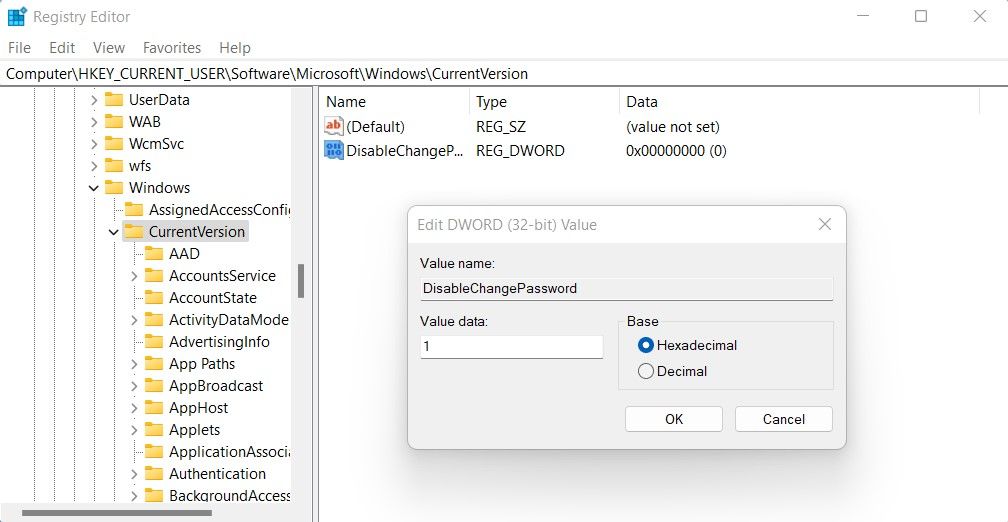
-
When the Registry Editor is opened, navigate to the following location:
HKEY_CURRENT_USER\Software\Microsoft\Windows\CurrentVersion\Policies - If the Policies key does not exist, you will have to create it. To do this, right-click CurrentVersion and select New > Key.
- Put the name Policies in the file name field and hit Enter to save it.
- Now in the right pane, right-click on empty space and select New > DWORD (32-bit) Value.
-
Name the DWORD key as DisableChangePassword and then press Enter.

- Double-click on the newly created DWORD key to open a pop-up window.
- Select the Hexadecimal base and set the value data to 1.
- Now click OK to save the changes.
Once you’ve made these changes, close the Registry window and restart your computer. If you ever want to revert the changes, you can do so at any time. In the Registry Editor, right-click the DisableChangePassword key and choose Modify. Set the Value data to 0 and hit the OK button to apply the changes.
3. How to Prevent Users from Changing Windows Passwords Using Computer Management
If you’re using Windows Home edition and don’t know much about editing the registry, you may want to try the Computer Management path instead. Here’s how you can use the Computer Management tool to prevent users from changing Windows passwords.
- Right-click on the Start menu and select Computer Management from the menu list.
-
Once you open the Computer Management tool, navigate to the following path:
Computer Management (Local) > System Tools > Local Users and Groups > Users - From the left pane, click on the Users folder to see your Windows accounts listed in the middle pane.
-
Now, right-click on the account you want to prevent from changing your Windows password, then choose Properties from the context menu.

- In the Properties window, you will be on the General tab.
-
Then check the box next to User cannot change password.

- Next, click Apply > OK to save your changes.
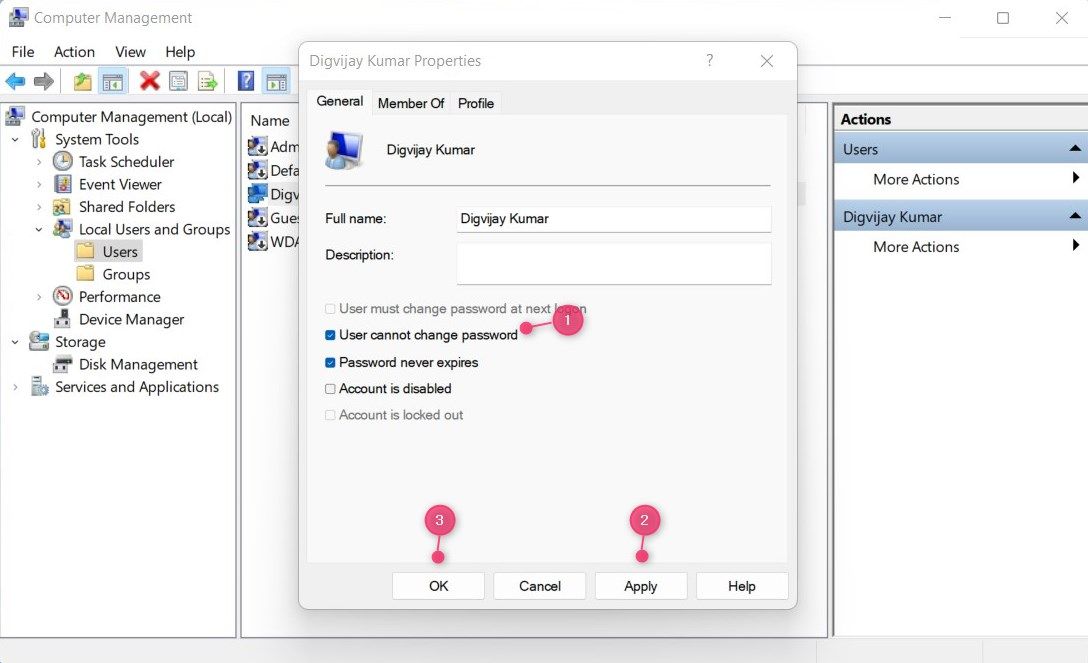
After you perform the above changes, no one else will be able to change the password. Any attempt to change it will result in an error message stating «Windows cannot change the password».
Your Windows Password Is Now Protected
Changing the Windows password is quite easy when someone else has access to your computer or if you share it with them. However, you wouldn’t want your operating system modified in a way that would make it difficult for you to use it at all. To resolve this issue, try any of the methods explained in this article.