
Встроенный брандмауэр Windows в целях безопасности по умолчанию блокирует входящий ICMP трафик как в десктопных Windows 10/11, так и в Windows Server. Это означает, что вы не сможете удаленно проверить доступность компьютера с помощью стандартной команды
ping
, т.к. она будет отвечать о превышении интервала ожидания запроса (
Request timed out
) для ICMP Echo-Reply. Если вы хотите сделать возможной проверку доступности хостов Windows по протоколу ICMP из системы мониторинга или вручную из командной строки, можно разрешить ответы на ICMP эхо-запросы.
Чтобы разрешить отправку ответов на запросы по протоколу ICMP, нужно включить предустановленные правила в брандмауэре Windows.
- Откройте оснастку управления Windows Defender Firewall with Advanced Security, выполнив команду
wf.msc - Перейдите в раздел Inbound Rules
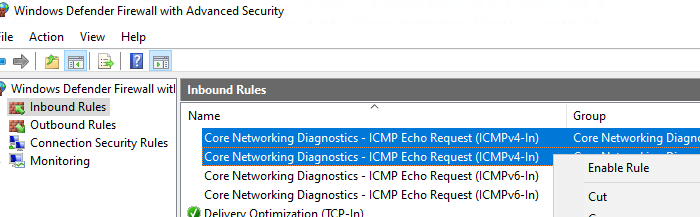
- Найдите правило Core Network Diagnostics – ICMP Echo Request (ICMPv4-In) и включите его.
- В моем случае есть два правила с этим именем. Одно для частного и общедоступного сетевого профиля Windows, и второе для доменного. Я включил их оба. Можно также включить правило, разрешающее ICMP ответы для IPv6 протокола (если используется).

Есть также другое правило File and Printer Sharing (Echo Request – ICMPv4-In), которое также разрешает компьютеру отвечать на эхо-запросы
ping
.
Попробуйте пропиговать ваш компьютер и убедитесь, что теперь он отвечает на ICMP запросы.
Можно включить правила Windows Firewall, разрешающие ответы на эхо-запросы ICMP с помощью такой команды PowerShell:
Set-NetFirewallRule -Name CoreNet-Diag-ICMP4-EchoRequest-In -enabled True
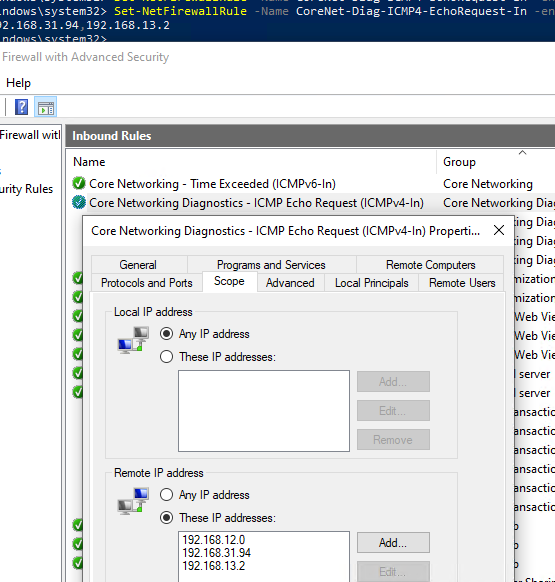
Если нужно ограничить список IP подсетей или хостов, которым разрешено отправлять ответы на ICMP запросы, выполните команду:
Set-NetFirewallRule -Name CoreNet-Diag-ICMP4-EchoRequest-In -enabled True -RemoteAddress 192.168.12.0,192.168.31.94
Откройте свойства правила в Windows Firewall и проверьте, что теперь правило разрешающие ICMP ответы будет работать только для указанных IP/подсетей.
Если в файрволе отсутствует (удалено) правило для входящих ICMP запросов, можно создать его из командной строки:
netsh advfirewall firewall add rule name="Allow_ICMPv4_Echo" protocol=icmpv4:8,any dir=in action=allow
Другой пример PowerShell команды, которое создаст правило файервола, разрешающего ping для всех хостов в локальной сети:
New-NetFirewallRule -DisplayName "Allow_ICMPv4_Echo" -Direction Inbound -Protocol ICMPv4 -IcmpType 8 -RemoteAddress localsubnet -Action Allow
Если нужно заблокировать ответы на ICMP эхо-запрос независимо от того, какие правила включены, создайте запрещающее правило, которое будет иметь более высокий приоритет:
New-NetFirewallRule -DisplayName "Block_ICMPv4_Echo" -Direction Inbound -Protocol ICMPv4 -IcmpType 8 -RemoteAddress localsubnet -Action Block
Чтобы разрешить ответы на ICMP ping на всех компьютерах в сети, можно включить правило Windows Firewall с помощью доменной групповой политики .
- Откройте редактор доменных GPO (
gpmc.msc
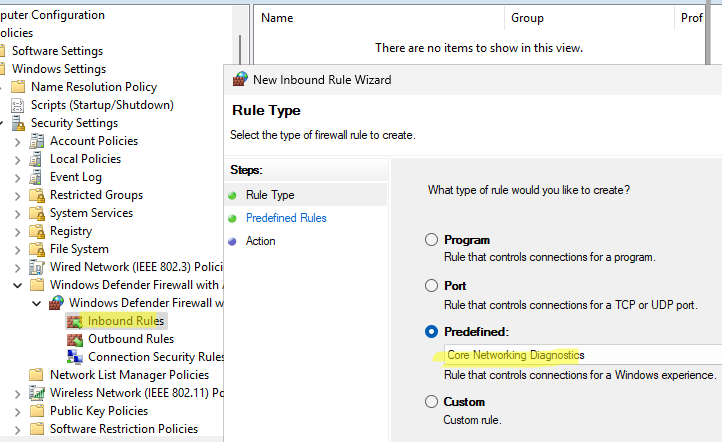
), создайте или отредактируйте имеющуюся GPO и назначьте ее на целевую OU или корень домена. - Перейдите в раздел Computer Configuration -> Windows Settings -> Security Settings -> Windows Firewall with Advanced Security -> Inbound rules
- Создайте новое правило, выберите Predefined rule типа Core Networking Diagnostics

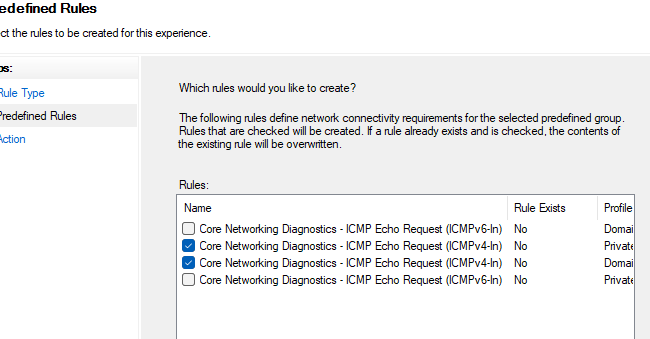
- Укажите какие правила ICMP Echo request нужно включить.

- На следующем шаге вы берите Allow the connection.
Hello! This time I’m going to talk to you about security in Windows 10. It is well known that the system offers multiple layers of security to keep the privacy of our information safe. Certainly, this entails control over network connections. These are really useful for exchanging information and sending data. However, sometimes these connections can fail and so it is imperative to get the error. One of the resources used for this task is PING. It is a basic Internet program that allows a user to verify that a particular IP address exists and can accept requests. This app verifies whether the IP address of a host is currently operational, and how long it takes to respond. Ping works by sending an Internet Control Message Protocol (ICMP) Echo Request to a specified interface on the network and waiting for a reply.
Additionally, it can be used for troubleshooting to test connectivity and determine response time. However, most administrator users consider the ICMP protocol to be potentially unsafe and prefer to block these calls. For this reason, the Windows 10 firewall by default has a security policy of blocking such requests. This is easy to check, trying to ping our computer from a remote machine, we’ll see the following message:

However, it is not advisable to completely block these calls. Therefore, here I show you how to enable and disable ping in Windows 10.
Enable ping in windows 10. Command line mode.
The first thing we need to do is to open a Command Prompt as administrators. Once there, we have to create a rule for IPv4 addressing and another for IPv6. All right, to create the first rule you just have to type the following command in the console:
netsh advFirewall Firewall add rule name="OSRadar Rule PING IPv4" protocol=icmpv4:8,any dir=in action=allow
If everything was done correctly, the CMD should look like this:

Next, we will create the rule for IPv6 addressing:
netsh advFirewall Firewall add rule name="OSRadar Rule PING IPv6" protocol=icmpv6:8,any dir=in action=allow

We have correctly applied the rules for the ping command. We can check that it works, pinging from a remote computer:

To disable the exception for IPv4 addresses, just type the following commanding in the CMD:
netsh advFirewall Firewall add rule name="OSRadar Rule PING IPv4" protocol=icmpv4:8,any dir=in action=block
In the case of IPv6 addressing, the command to write will be the following:
netsh advFirewall Firewall add rule name="OSRadar Rule IPv6" protocol=icmpv6:8,any dir=in action=block
Please note that you can choose the name you want for the rules. If you want to see every rule in the system in detail, just write the following in the terminal:
netsh advFirewall Firewall show rule name=all

Enable ping in windows 10. Graphic mode.
It is also possible to create specific rules to enable and disable ping by entering the Windows 10 Firewall Advanced Security Configuration. With this intention, just type Firewall on the search bar:

Immediately the Firewall options will be displayed. As we did before, we have to create a rule for IPv4 and another for IPv6.

So first, select the Inbound Rules option in the left column and right-click the mouse to create a New Rule:

A rule creation wizard will start. Please select Custom in the rule type and press Next to continue.

On the next screen select All programs and press Next to continue.

In the protocol type, select ICMPv4 and then click on customize.

In the pop-up screen activate the Specific ICMP types box and navigate until you activate the Echo Request option. Press accept to apply the changes.

Next, we can define which specific IP addresses this rule will apply, on the contrary, we will allow the requests of all the addresses. Once the selection is made, press next to continue.

Now select Allow the connection and press Next to continue

In the following screen, we have to select when the new rule will be applied. Please check the 3 available options and press next to continue.

Finally, we only have to assign a name to the rule and press Finish to close the wizard.

Finally, we can see the rule created correctly. To create the exception for IPv6 addressing, we have to repeat the same process but in the protocol and ports window, we have to select ICMPv6.

To disable any of the created rules, just right-click on it and choose Disable Rule.

Conclusion
Finally, we have seen how to enable and disable ping in Windows 10. This will allow us to manage and administer our connections using this command. Finally, we have seen how to enable and disable ping in Windows 10. This will allow us to manage and administer our connections using this command. Consequently, we will be able to monitor the levels of security and data protection on our computers. This is all for now, before saying goodbye I invite you to review our tutorial on bash in Windows 10
— Advertisement —
Everything Linux, A.I, IT News, DataOps, Open Source and more delivered right to you.
Subscribe
«The best Linux newsletter on the web»
In Windows 10, the firewall blocks PING command messages by default.
I presume that this setting is to improve the security of our PCs, but sometimes we need it because we have to investigate about network problems, …
Since I find quite annoying to wander through hundreds of firewall rules, then I discovered the command lines to enable/disable the related firewall rules from an Administrative Command Prompt.
To enable PING IPv4 & IPv6, type the following commands:
netsh advFirewall Firewall add rule name="PING IPv4" protocol=icmpv4:8,any dir=in action=allow
netsh advFirewall Firewall add rule name="PING IPv6" protocol=icmpv6:8,any dir=in action=allow
To disable them, type the following commands:
netsh advFirewall Firewall add rule name="PING IPv4" protocol=icmpv4:8,any dir=in action=block
netsh advFirewall Firewall add rule name="PING IPv6" protocol=icmpv6:8,any dir=in action=block
Post Views: 2,847
By on 1 Jun 2024 0 Categories / windows
If you ever thought you didn’t want pinging your Windows Server, you better disable ping requests using the Windows Firewall with Advanced Security Console. By blocking ping requests, also known as ICMP echo requests, you can make your Windows VPS less visible to potential attackers such as DDOS. Follow the steps to stop pinging the server and not let it work.
How to block ping request in ICMP Windows Firewall?
The ping command is a common feature found in operating systems. It can be used to check how fast a device on your network responds and if it’s connected. When you use the ping command, it sends out Internet Control Message Protocol (ICMP) Echo Request messages to the specified computer.
Step 1: Open Windows Firewall
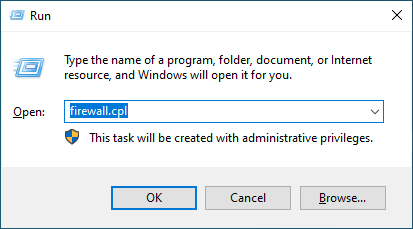
To kickstart Windows firewall, press the “Win+R” keys to open the Run box. Then type “firewall.cpl” and hit enter to get it going. Or type firewall in the search bar of the Start menu and then click on “Windows Firewall” from the search results to get it up and running.
Now tap on “Advanced Settings” from the left menu and enter the “Windows Firewall with Advanced Security” environment.
Step 2: Create New Rules
On the left hand side, “right-click” on “Inbound Rules” and select the “New Rule option” from the menu.
Once the New Inbound Rule Wizard window appears, select “Custom” and click “Next“.
Step 3. Configure the Program Sections
Select “All programs” and click “Next” to apply this rule to all programs.
Step 4: Specify the Protocol and Ports
To disable IPv4 ping on Windows, you need to select the “Protocol type” option and set it to “ICMPv4“. If you’re aiming to block IPv6, opt for “ICMPv6” instead.
Next, click the “Customize” button at the bottom of the window.
Go ahead and select “Specific ICMP types.” Then, all you have to do is check the box next to “Echo Request” and hit “OK“.
Step 5: Select the Rule Action
At this point, to close Windows ping requests choose “Block the connection” and tap “Next“.
Step 6: Profile Type
At the Profile tab, you’ll be asked ‘When does this rule apply?’ Continue with the default setting and leave all profiles checked and click “Next.”
Step 7: Name the Rule
Now pick a “Name” for that role so you remember what it’s all about and then wrap it up by clicking “Finish.”
There you go! After doing these steps your windows server will no longer have ping and this is critical for the security of your server information, now you can only enable ping requests using windows firewall.
How to Use the Ping Command in Windows 10 or beyond?
When a ping request is made, the results show how many responses were returned and how long it took to receive them. To get a ping, just follow these steps in your operating system’s terminal or command line.
Open a Terminal or Command Prompt in your Windows system by pressing the Win + R button and typing cmd.
In the terminal, enter the ping command along with the IP address or domain name of the device you want to ping. For example, to ping VPSMakers, run the following command:
ping vpsmakers.com

ping 8.8.8.8
Conclusion
To sum up, by disabling ping requests in your Windows Firewall, you can enhance the security of your system. This simple measure can prevent potential attackers from using ping to identify and potentially target your device, and to further increase the security of connecting to Windows Server, it is better to change the RDP port of your server.

- From your local system, select Windows Button.
- Now type Remote Desktop into the search box and click on it.
- Click Connect after entering the IP address of your Virtual Machine.
- Click OK after entering the Administrator Username and Password.
- Type cmd once you’ve connected to your VM/Remote Desktop.
- Right-click the command prompt and select Run as administrator from the context menu.
- Creating the IPv6 addressing rule
Now copy and paste the following command into the command prompt and press the Enter key:
netsh advFirewall Firewall add rule name=”OSRadar Rule PING IPv4″ protocol=icmpv4:8,any dir=in action=allow
- netsh advFirewall Firewall add rule name=”OSRadar Rule PING IPv6″ protocol=icmpv6:8,any dir=in action=allow
- We can now test it by pinging it from a remote computer:
- Type command in the CMD to disable the exception for IPv4 addresses:
- Please type the following command if IPv6 is being addressed:
netsh advFirewall Firewall add rule name=”OSRadar Rule IPv6″ protocol=icmpv6:8,any dir=in action=block
- To see every rule in the system in detail, run the command below:
netsh advFirewall Firewall show rule name=all
- Report in detail