
There could be many good reasons you may want to prevent users from changing the desktop background on Windows 10. Perhaps you work for a company that wants devices (or guest computers) only to display a custom wallpaper with a company logo. Or at home, if you share your computer with other people, you may want to see a particular desktop background, but someone keeps changing it.
Windows 10 offers a few ways to keep users from changing the desktop background on a computer, including using Group Policy and modifying the Registry.
In this Windows 10 guide, we’ll walk you through the steps to restrict users from changing the current desktop background using the Local Group Policy Editor and Registry.
- How to prevent users from changing wallpaper using Group Policy
- How to prevent users from changing wallpaper using Registry
How to prevent users from changing wallpaper using Group Policy
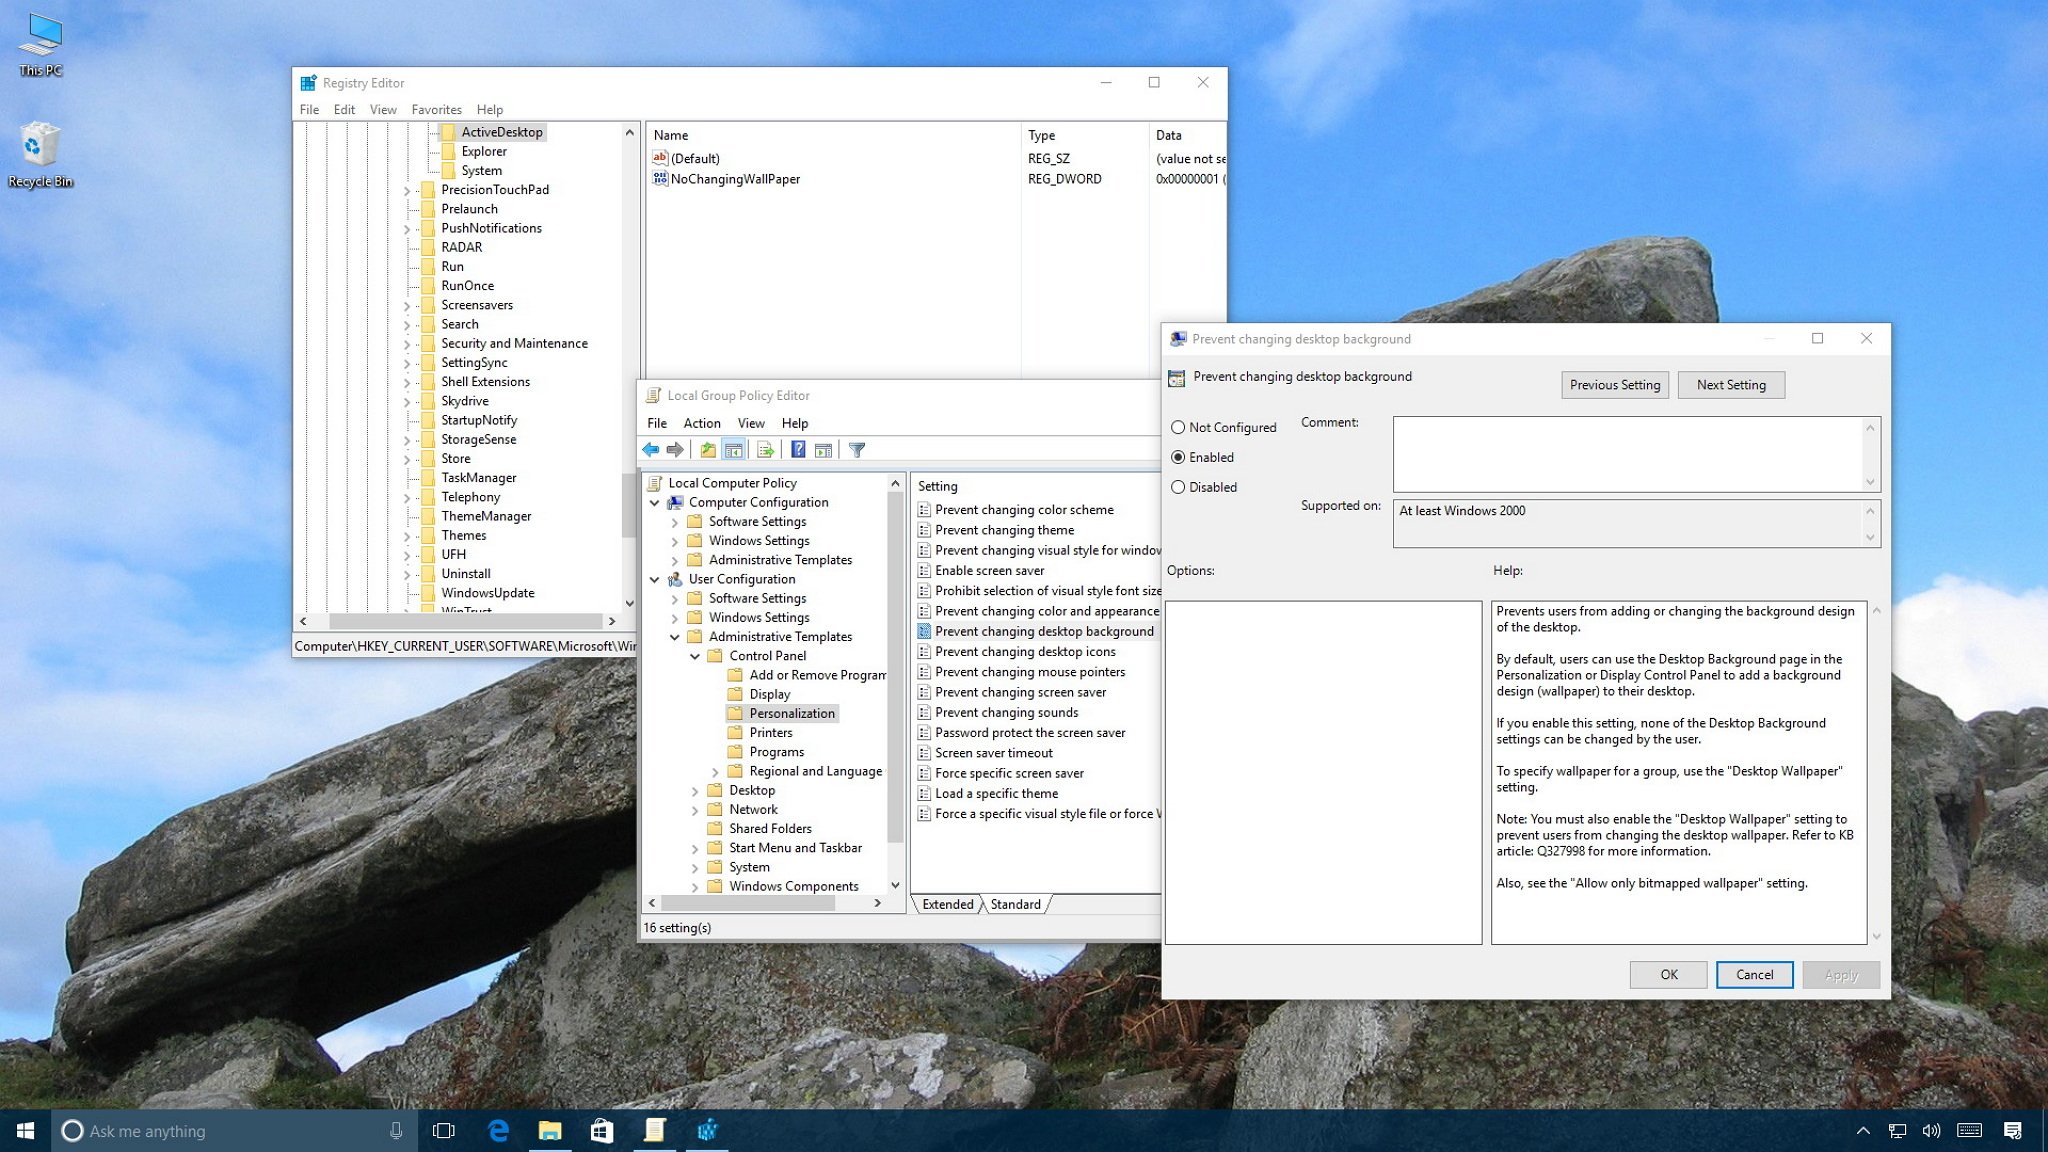
You can keep users from changing the current desktop background in multiple ways, but the quickest method is to use the Local Group Policy Editor, as long as you’re running Windows 10 Pro, Enterprise, or Education.
There are two ways to accomplish this task: You can enforce a default desktop wallpaper, or you can prevent users from changing the desktop background settings.
Prevent users from changing desktop background
Before you begin, make sure to set an image as a default on the desktop using the Settings app or right-clicking an image and selecting Set as desktop background.
Then use the Local Group Policy Editor with the following steps to restrict users from changing the desktop background:
All the latest news, reviews, and guides for Windows and Xbox diehards.
- Use the Windows key + R keyboard shortcut to open the Run command.
- Type gpedit.msc and click OK to open the Local Group Policy Editor.
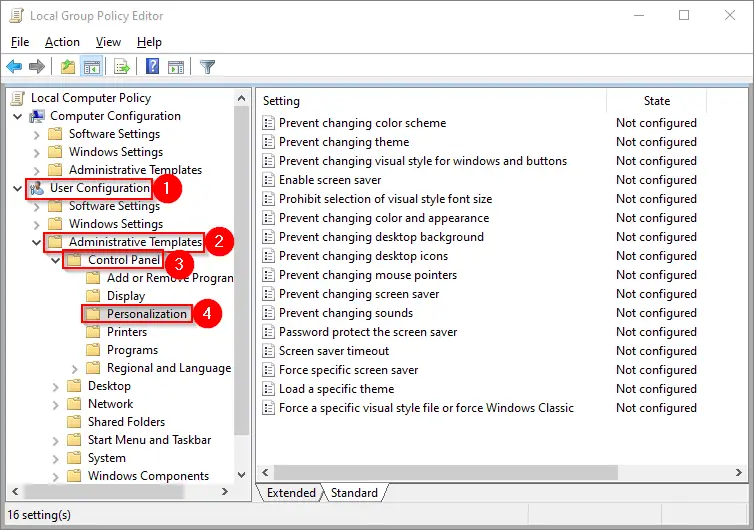
- Browse the following path:
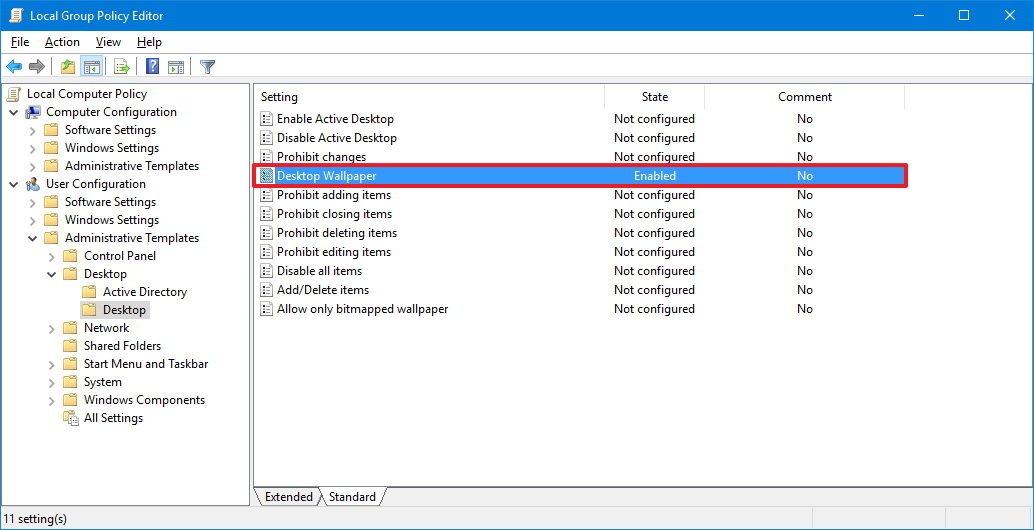
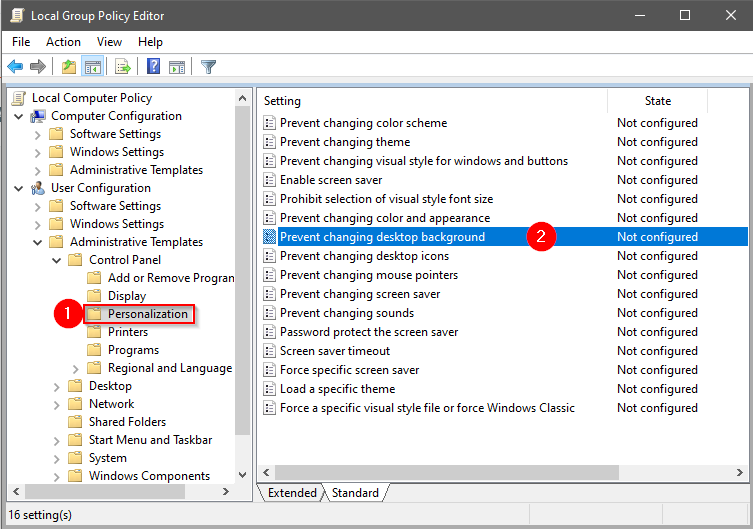
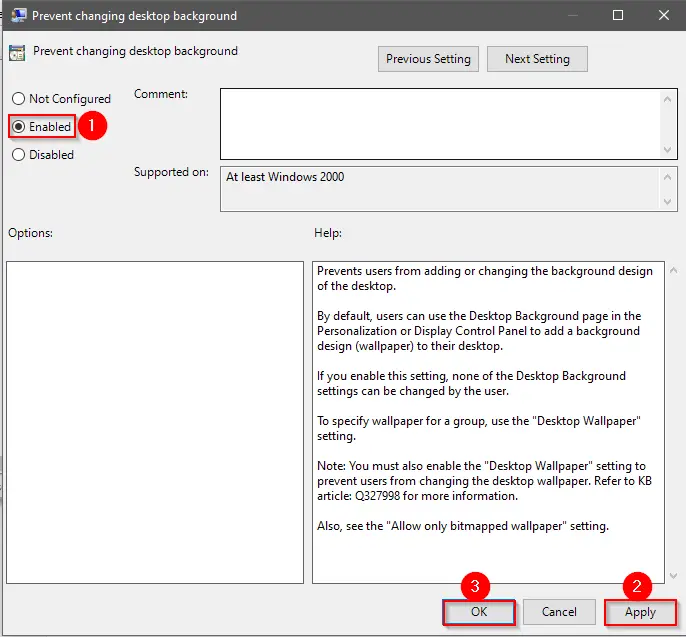
User Configuration > Administrative Templates > Control Panel > Personalization - Double-click the Prevent changing desktop background policy.
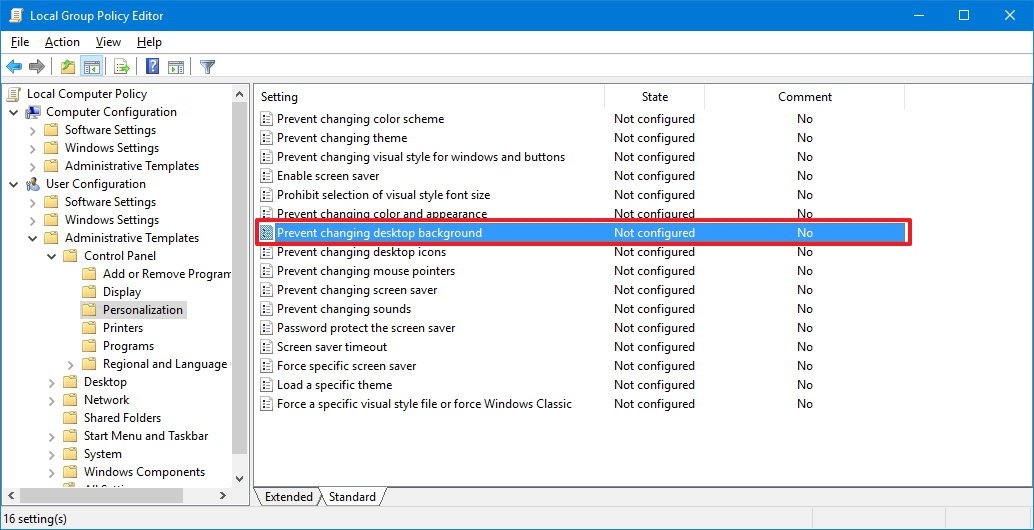
- Select the Enabled option.
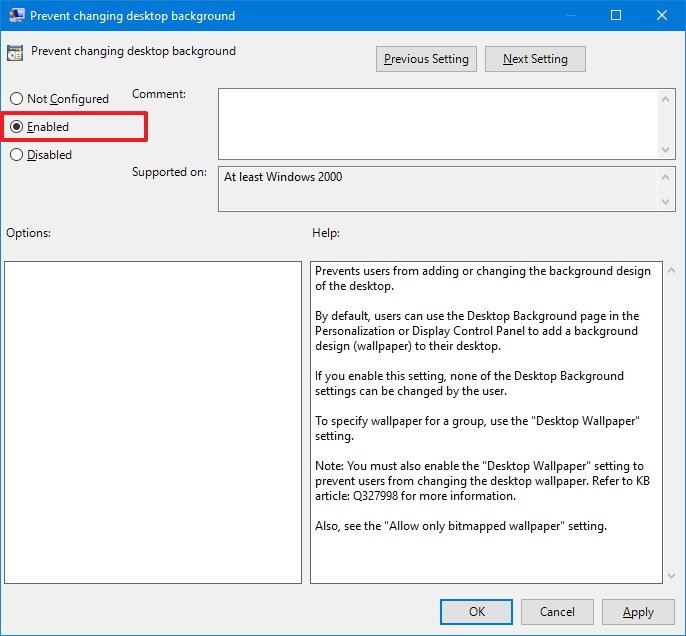
- Click Apply.
- Click OK.
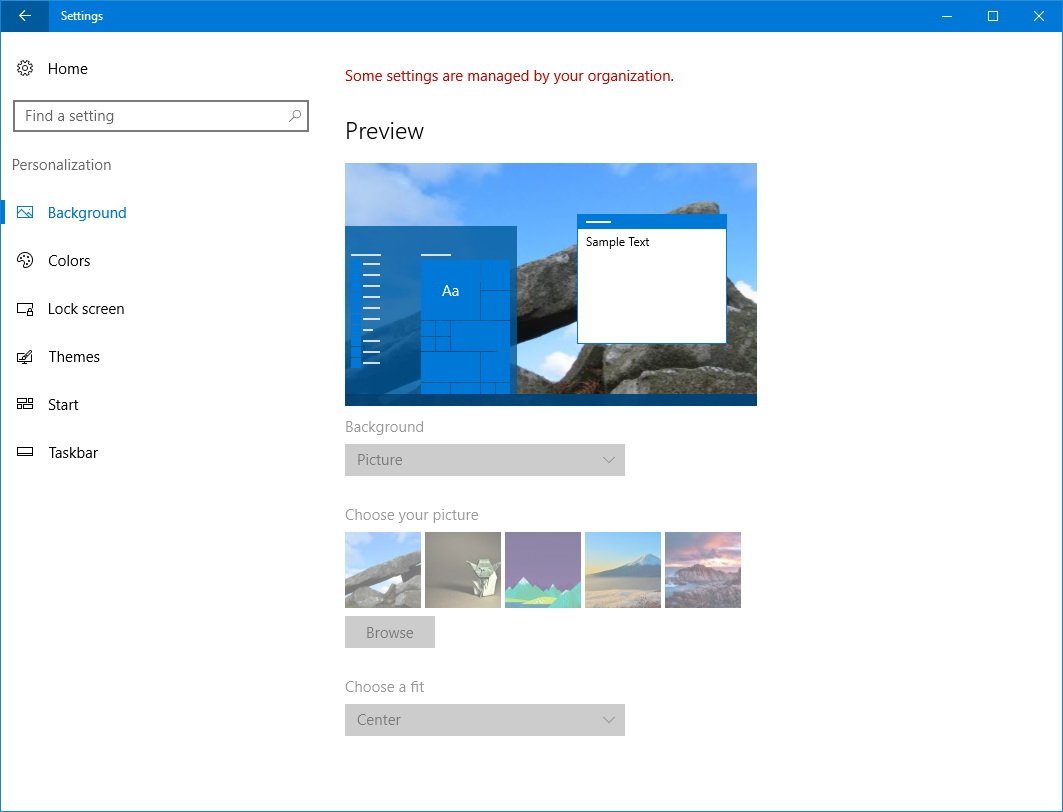
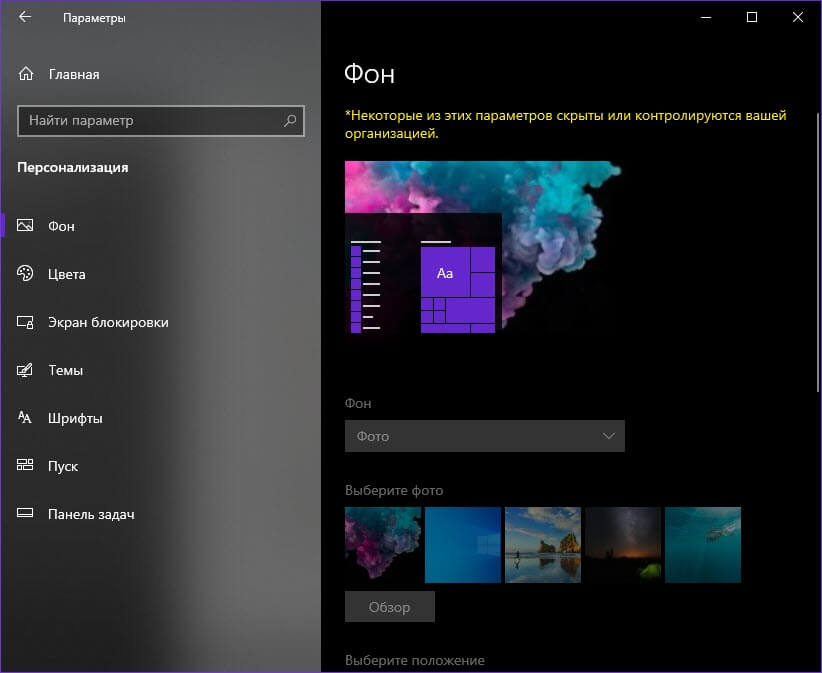
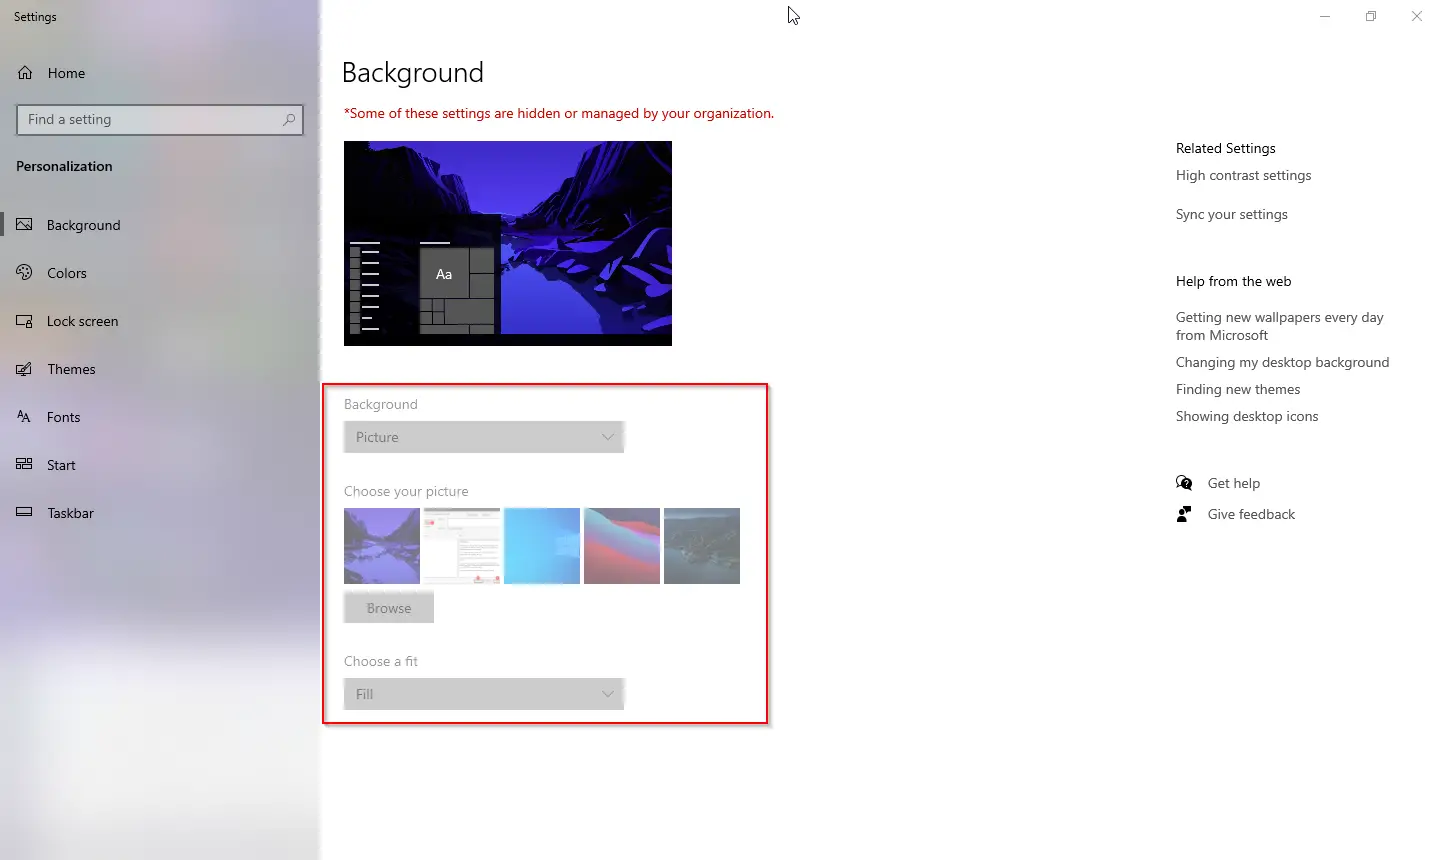
Once you complete these steps, you don’t need to restart your computer. The settings will apply immediately. You can double-check by going to Settings > Personalization > Background, where you’ll notice that options aren’t available, and you’ll also see a message that reads «Some settings are managed by your organization».
Enforce a default desktop background
Alternatively, you can use the Local Group Policy to enforce a desktop background, which will also prevent users from changing the image using the following steps:
- Use the Windows key + R keyboard shortcut to open the Run command.
- Type regedit, and click OK to open the registry.
- Browse the following path:
User Configuration > Administrative Templates > Desktop > Desktop - Double-click the Desktop Wallpaper policy.
- Select the Enabled option.
- Under «Options,» type the path for the image you want to set as a default background and select the style.
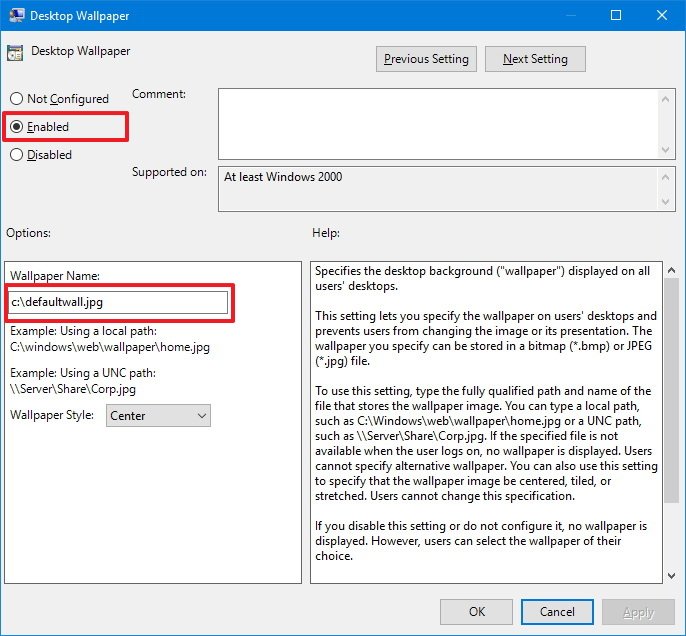
- Click Apply.
- Click OK.
Once you complete these steps, you’ll need to restart your computer to see the changes.
Using this method, you won’t see a «Some settings are managed by your organization» message in the Personalization settings, and users won’t be able to change the current desktop wallpaper.
These instructions will even prevent wallpapers for syncing when you use a Microsoft account and settings syncing is enabled. The color accent will continue to sync, but you can prevent this from happening. Just go to Settings > Accounts > Sync your settings and turn off the Theme toggle switch.
If you change your mind, you can always revert the changes by following the same steps, but on step No. 4 make sure to select the Not Configured options for the Desktop Wallpaper and Prevent changing desktop background policies.
How to prevent users from changing wallpaper using Registry
If you’re running Windows 10 Home, you won’t have access to the Local Group Policy Editor, but you can still prevent users from changing the desktop background by modifying the Registry.
Important: This is a friendly reminder to let you know that editing the registry is risky, and it can cause irreversible damage to your installation if you don’t do it correctly. We recommend making a full backup of your computer before proceeding.
In the same way as with the Local Group Policy Editor, there are two ways to accomplish this task, you can enforce a default desktop wallpaper, or you can prevent users from changing the desktop background settings.
Prevent users from changing desktop background
Before you begin, make sure to set an image as default on the desktop using the Settings app or right-clicking an image and selecting Set as desktop background.
Then if you’re running Windows 10 Home, or you simply prefer to use the Registry to make changes to the OS, use the following steps to restrict users from setting a new wallpaper:
- Use the Windows key + R keyboard shortcut to open the Run command.
- Type regedit, and click OK to open the registry.
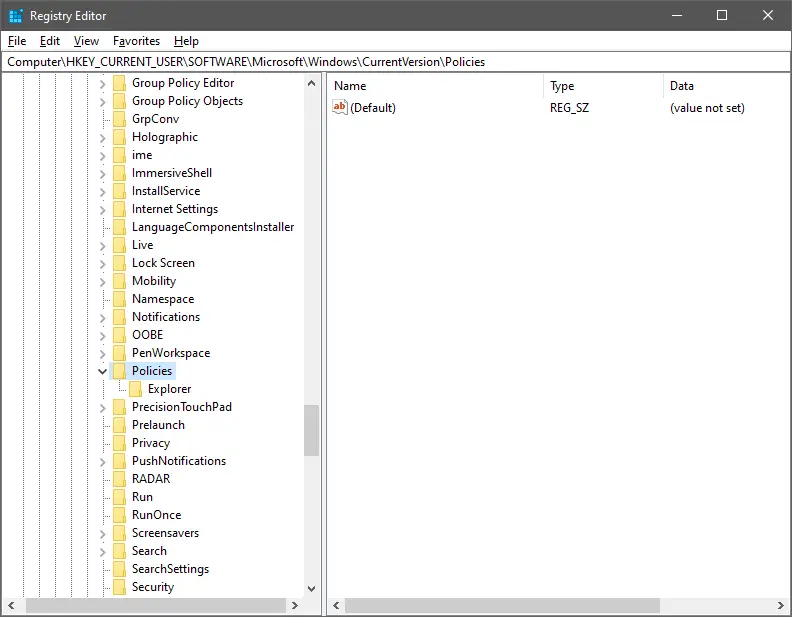
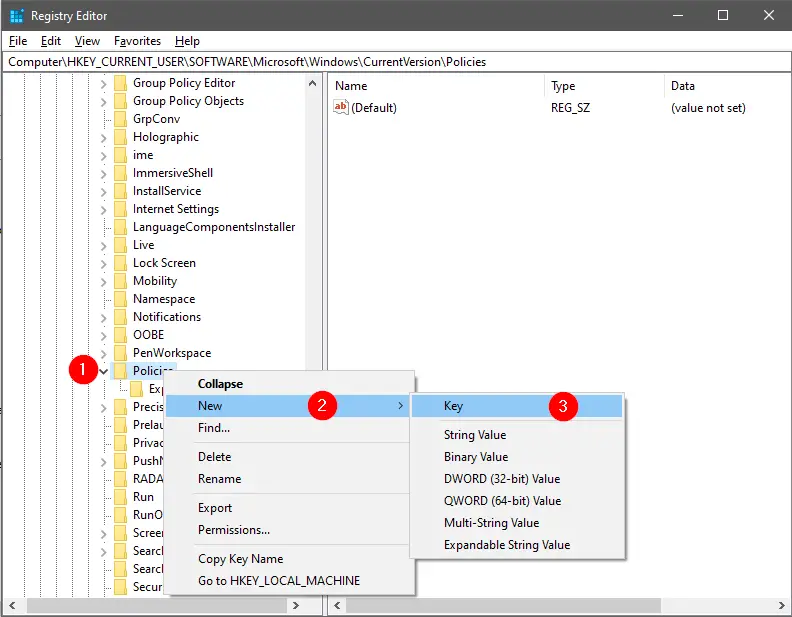
- Browse the following path:
HKEY_CURRENT_USER\Software\Microsoft\Windows\CurrentVersion\Policies - Right-click the Policies (folder) key, select New, and click on Key.
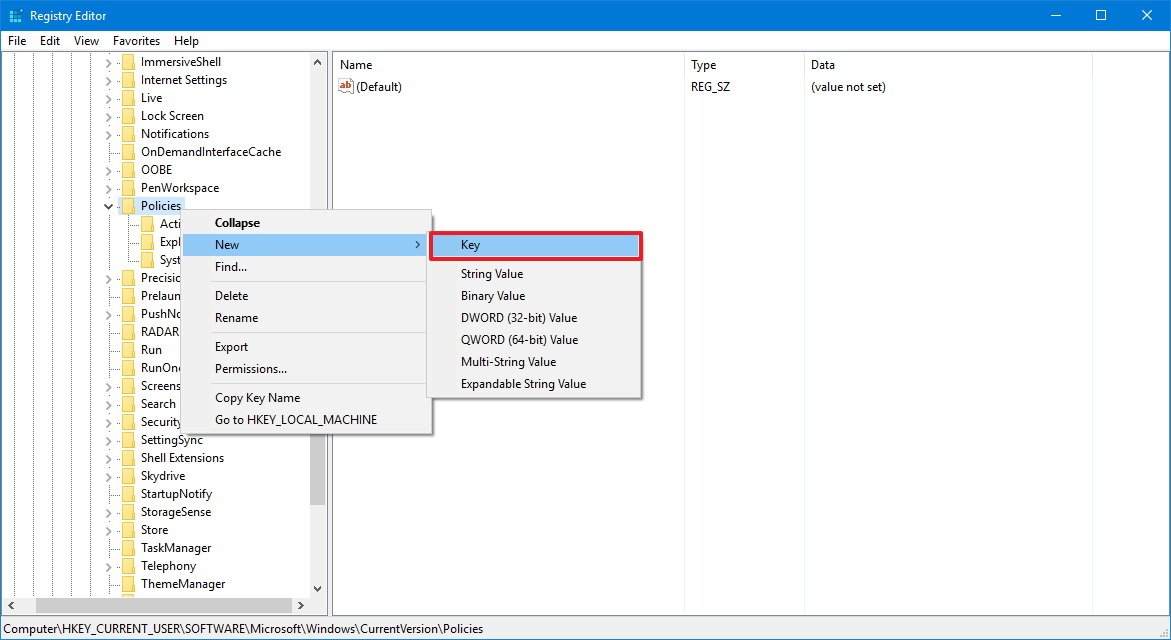
- Name the key ActiveDesktop and press Enter.
- Right-click on the right side, select New, and click on DWORD (32-bit) Value.
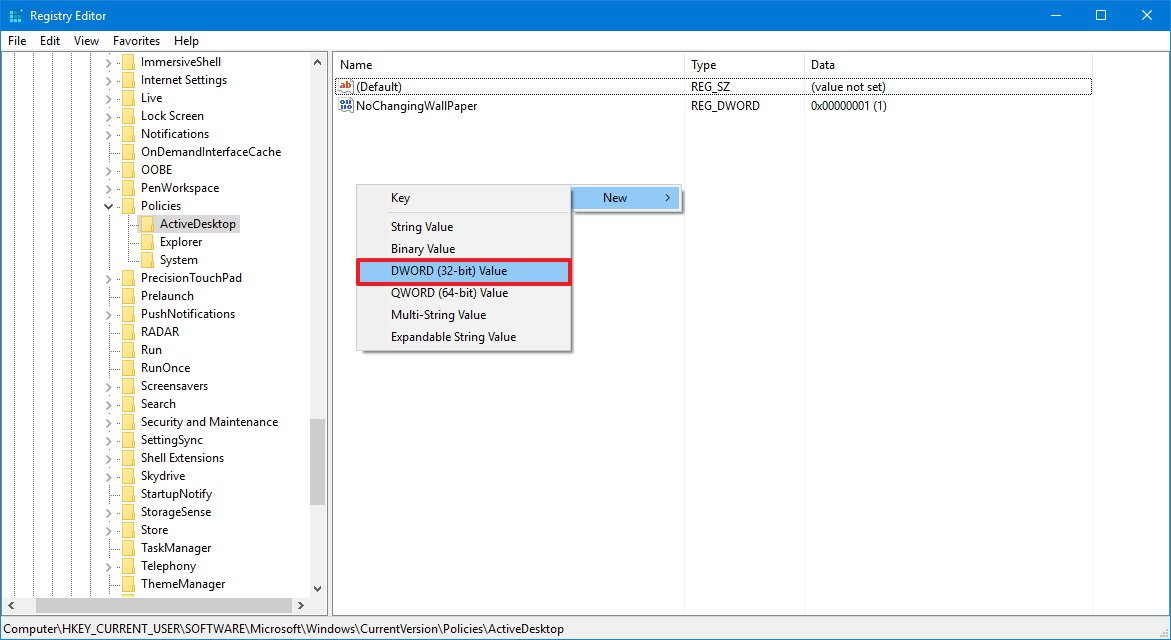
- Name the new DWORD NoChangingWallPaper and press Enter.
- Double-click the newly created DWORD and change its value from 0 to 1.
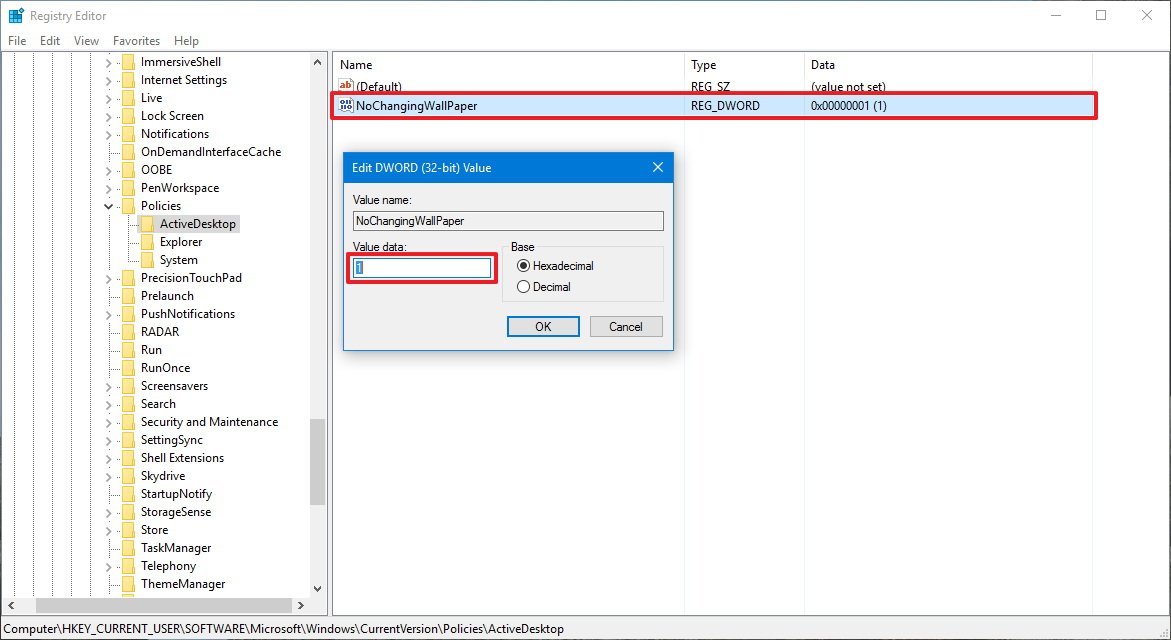
- Click OK.
After completing the steps, users will no longer be able to set a new image as a background using the Settings app and the right-click «Set as desktop background» will not work.
Enforcing a default desktop background
Alternatively, you can modify the Registry to enforce a specific desktop background, which prevents users from changing the image.
- Use the Windows key + R keyboard shortcut to open the Run command.
- Type regedit, and click OK to open the registry.
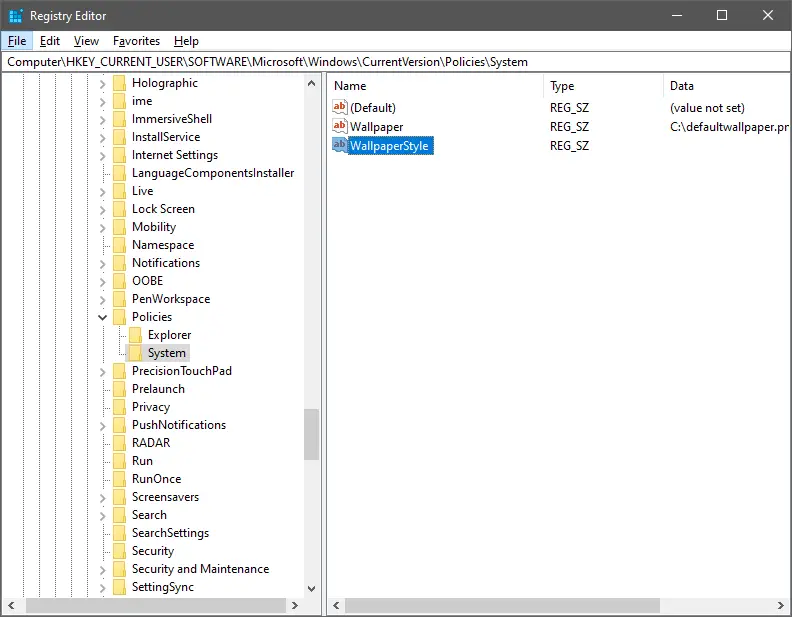
- Browse the following path:
HKEY_CURRENT_USER\Software\Microsoft\Windows\CurrentVersion\Policies - Right-click the Policies (folder) key, select New, and then click on Key.
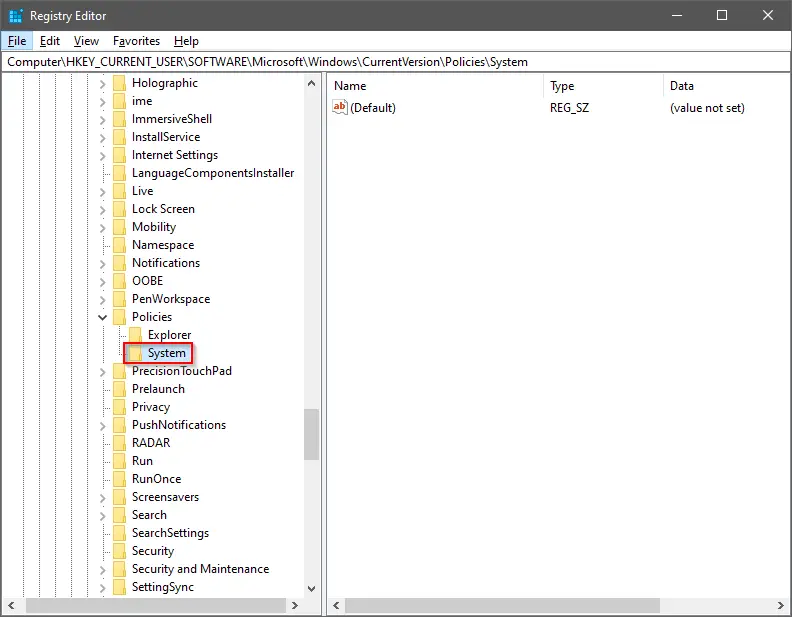
- Name the key System and press Enter.
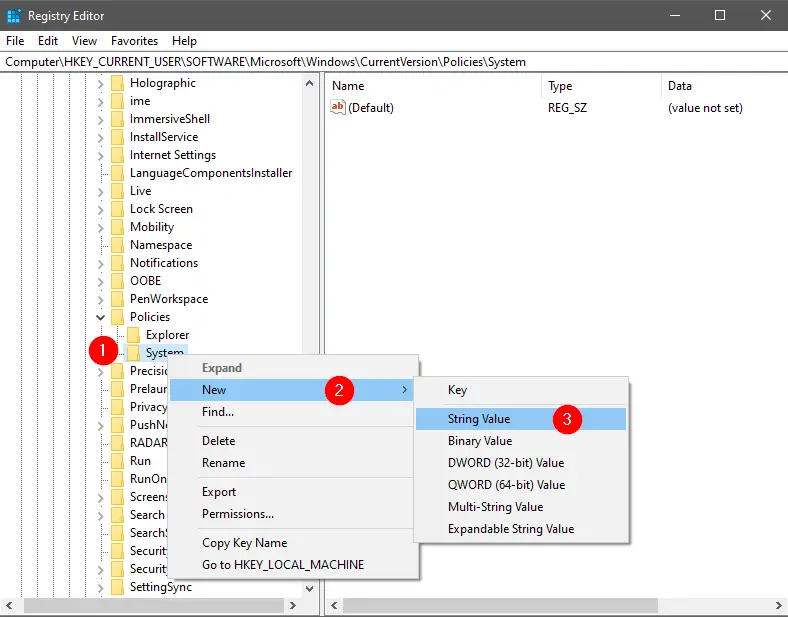
- Right-click on the right side, select New, and click on String Value.
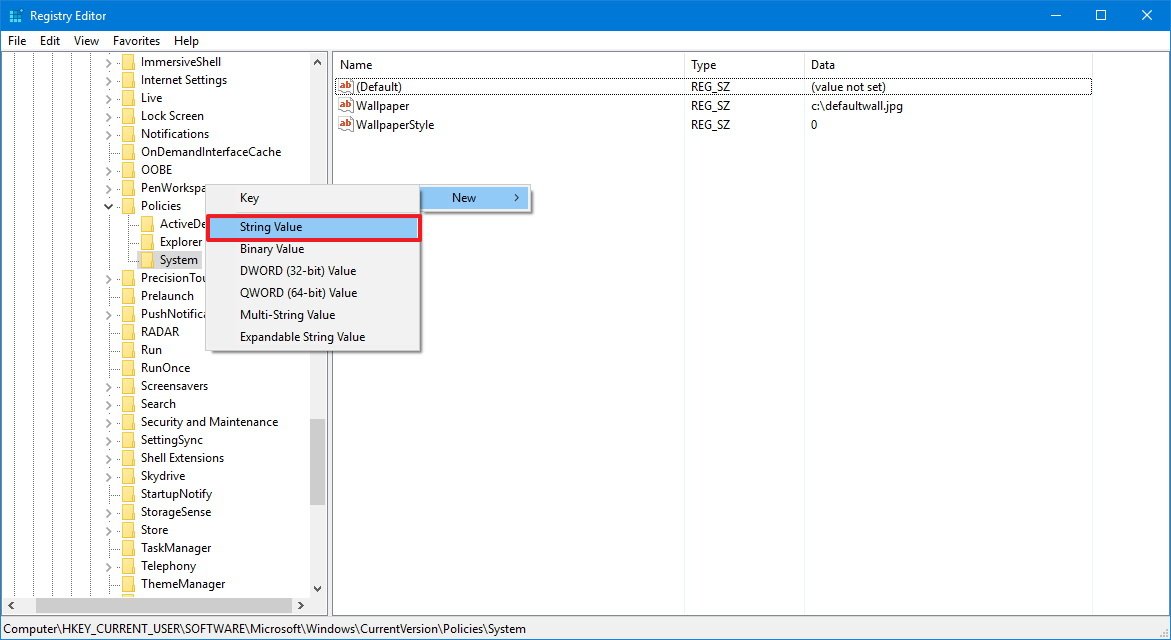
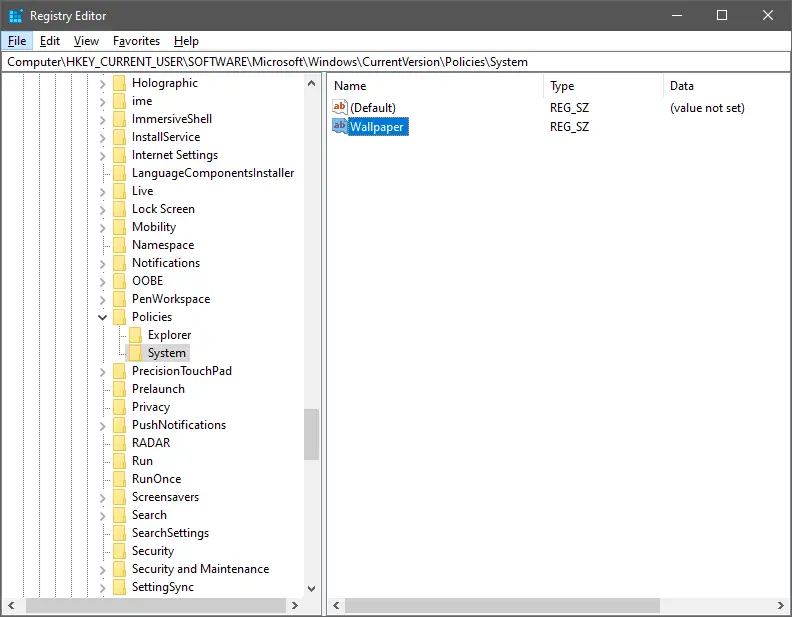
- Name the string Wallpaper and press Enter.
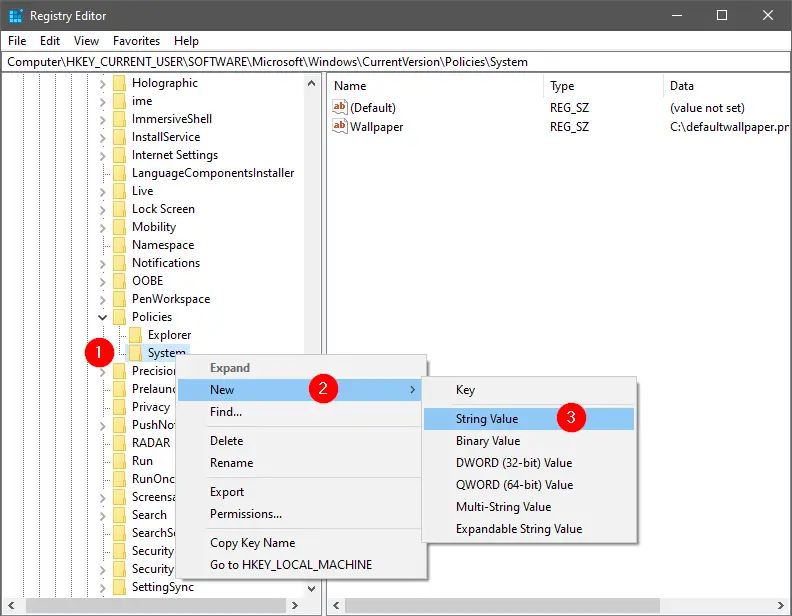
- Double-click the newly created String Value and set the path for the default wallpaper you want to use: For example, C:\defaultwall.jpg.
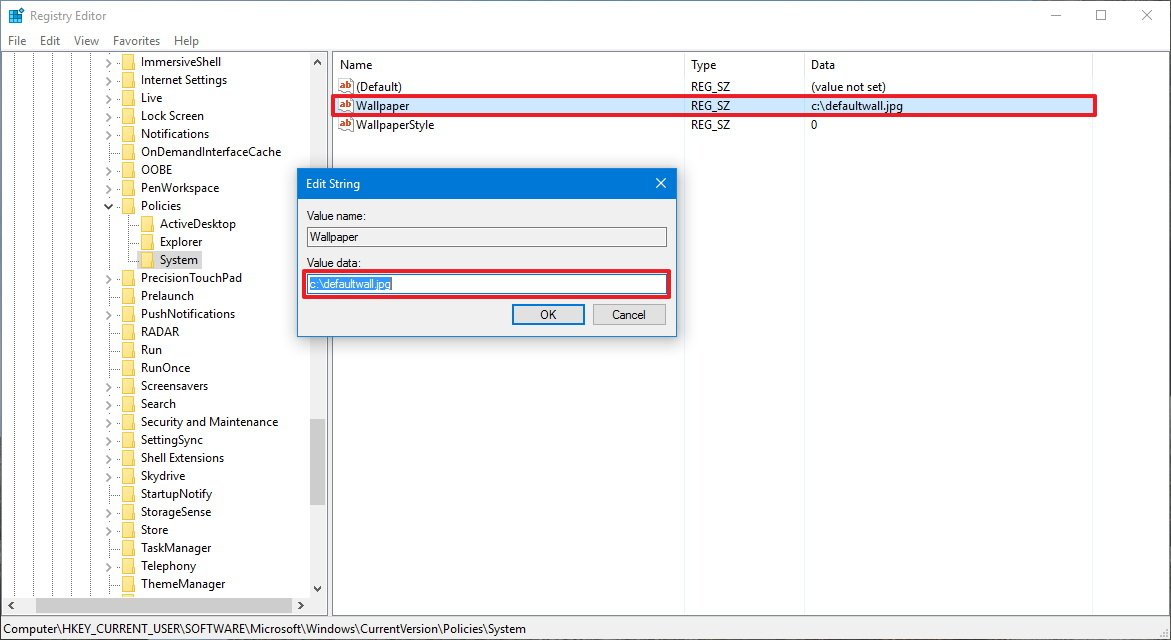
- Click OK.
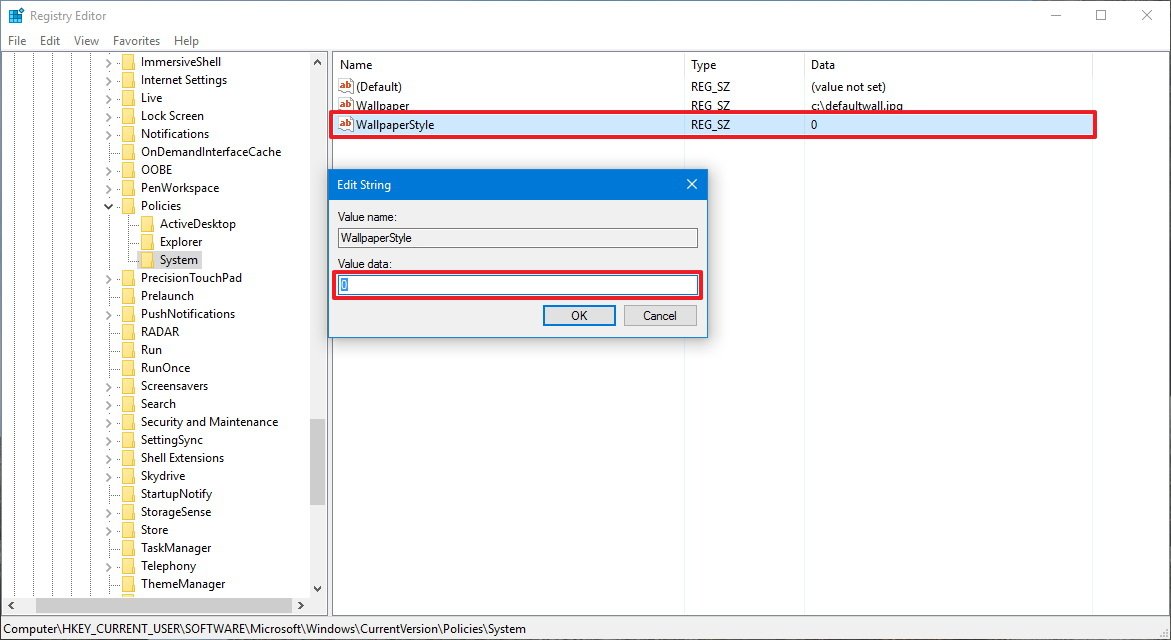
- Right-click on the right side, select New, and then click on String Value.
- Name the string WallpaperStyle and press Enter.
- Double-click the newly created string and change its value to set your wallpaper style. You can use one of the following options:
- 0 — Centered
- 1 — Tiled
- 2 — Stretched
- 3 — Fit
- 4 — Fill
- Click OK.
Once you complete the steps, you’ll need to restart your computer to see the new default wallpaper.
Using these steps will also prevent wallpapers from syncing using a Microsoft account, in the case that you sync your settings. The color accent will continue to sync, but you can go to Settings > Accounts > Sync your settings and turn off the Theme toggle switch to prevent that from happening.
You can always revert the changes by right-clicking and deleting the ActiveDesktop and System (folder) keys in the Registry.
More Windows 10 resources
For more help articles, coverage, and answers to common questions about Windows 10, visit the following resources:
- Windows 10 on Windows Central – All you need to know
- Windows 10 help, tips, and tricks
- Windows 10 forums on Windows Central
Mauro Huculak has been a Windows How-To Expert contributor for WindowsCentral.com for nearly a decade and has over 15 years of experience writing comprehensive guides. He also has an IT background and has achieved different professional certifications from Microsoft, Cisco, VMware, and CompTIA. He has been recognized as a Microsoft MVP for many years.
Если вы используете ноутбук или ПК, предоставленную компанией, скорее всего, вы не сможете внести в нее определенные изменения. Обычно эти изменения вносятся, чтобы ограничить сетевую активность и доступ к критически важным файлам, например, файлу hosts, но некоторые идут дальше и не позволяют пользователям настраивать внешний вид своего рабочего стола. Если у вас Windows 10 и вы хотите запретить менять фон рабочего стола, вы можете сделать это, отредактировав реестр. Вот что нужно сделать.
Блокировка фона рабочего стола
Прежде чем начать, выберите изображение, которое вы хотите использовать в качестве обоев. Вы можете сохранить его в любом месте, но лучше сохранить его в корне диска C, поскольку для добавления или удаления изображения из этого места вам потребуются права администратора. Вам не нужно изменять его размер, чтобы он соответствовал вашему экрану, но предварительно примените его и убедитесь, что он хорошо выглядит на вашем рабочем столе.
Шаг 1: Вам потребуются права администратора для редактирования реестра. В поиске Windows введите «regedit» или откройте окно запуска с помощью сочетания клавиш Win + R и введите «regedit». Нажмите Enter чтобы открыть приложение редактор реестра.
Шаг 2: В редакторе реестра перейдите по следующему адресу.
HKEY_CURRENT_USER\Software\Microsoft\Windows\CurrentVersion\Policies
Шаг 3: Кликните правой кнопкой мыши раздел «Policies» и перейдите в контекстном меню в «Создать» → «Раздел». Назовите его «System».
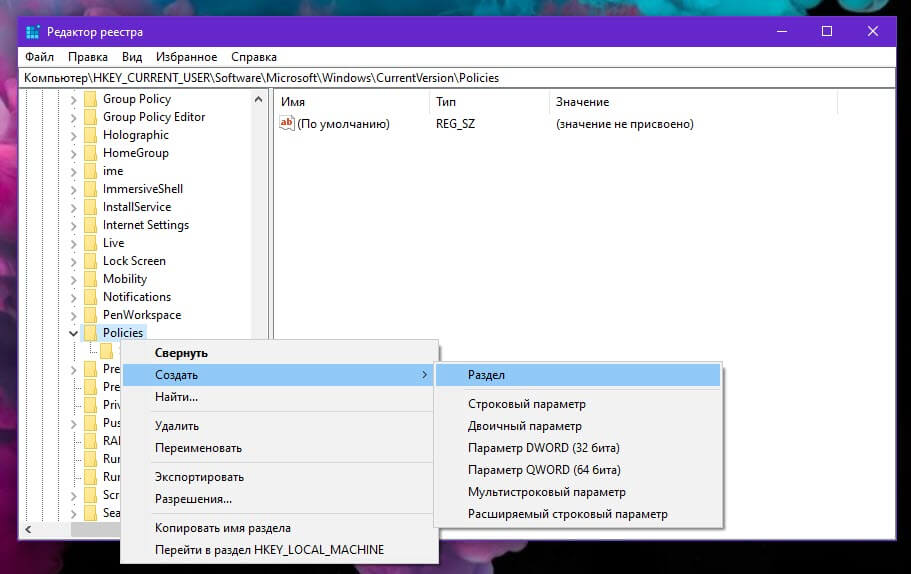
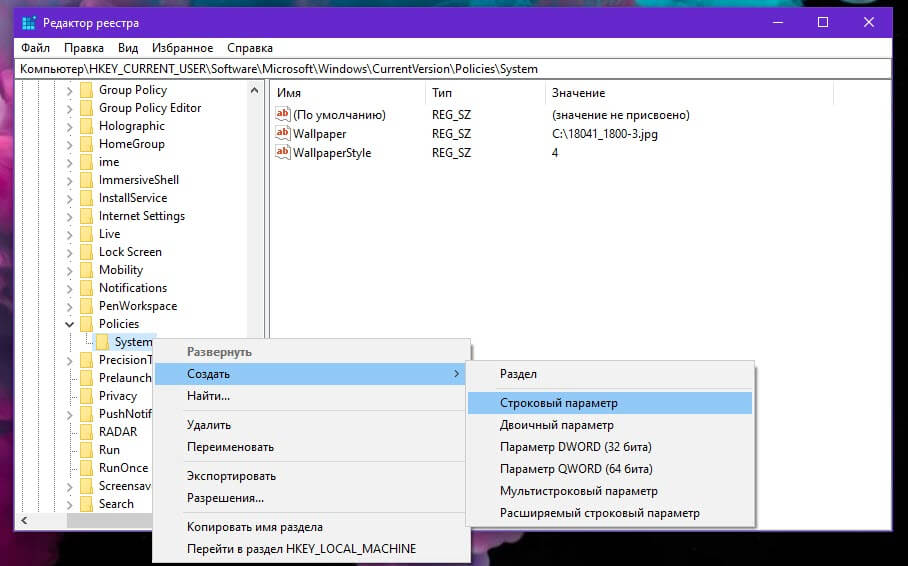
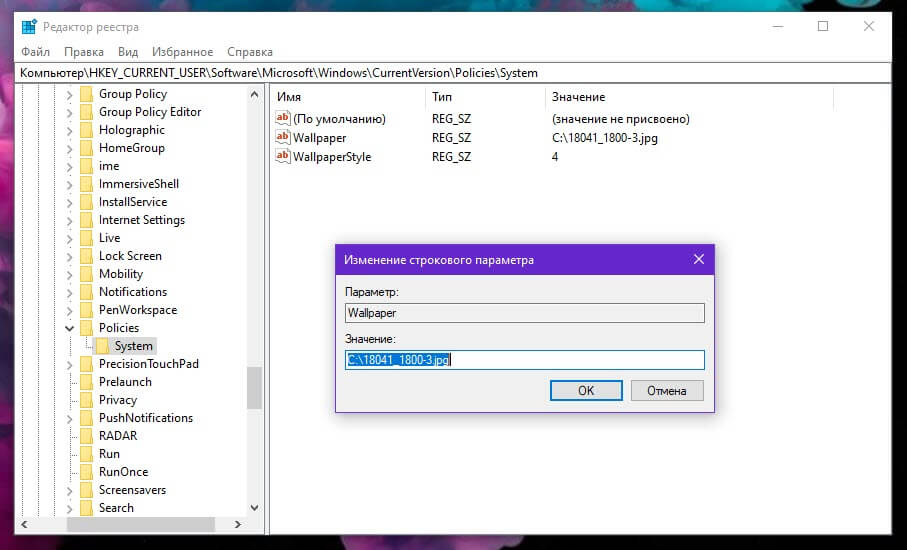
Шаг 4: Затем кликните правой кнопкой мыши на созданный раздел «System» и выберите «Создать» → «Строковый параметр». Назовите его «Wallpaper». Дважды кликните на нем и введите полный путь к картинке, которую вы хотите установить по умолчанию как обои для рабочего стола.
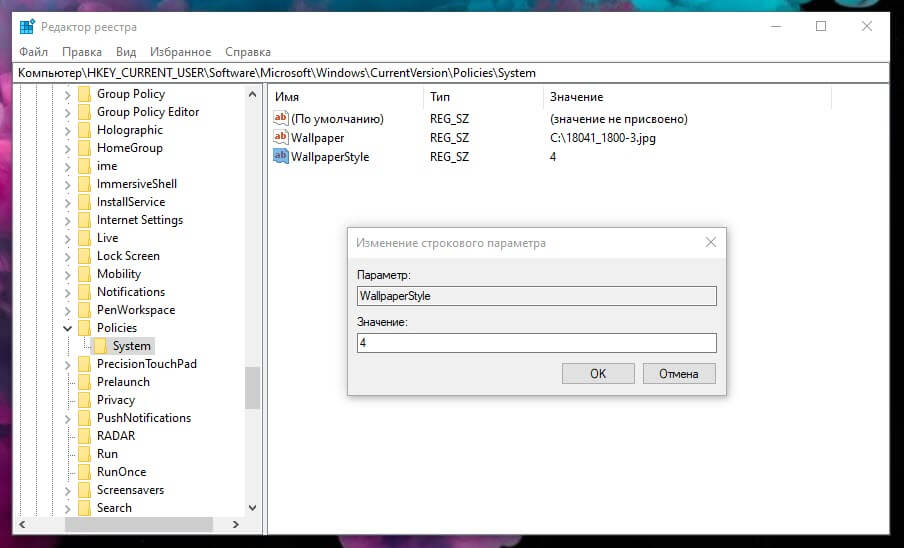
Шаг 5: Затем снова нажмите правой кнопкой мыши на разделе «System» и выберите «Создать» → «Строковый параметр» и назовите его «WallpaperStyle». Вам необходимо установить значение этого строкового параметра в зависимости от того, как вы хотите, чтобы обои были применены.
- По центру: 0
- Замостить: 1
- Растянуть: 2
- Расширение: 3
- Заполнение: 4
Шаг 6: Как только вы установите для него значение, вам нужно перезапустить проводник. Чтобы перезапустить проводник , откройте диспетчер задач и перейдите на вкладку «Процессы». Найдите Проводник, выберите его и нажмите кнопку «Перезагрузить» в правом нижнем углу.
После перезапуска изменения будут применены. Что еще более важно, когда вы откроете вкладку «Фон» в группе настроек «Персонализация» в приложении «Параметры», вы увидите сообщение «Некоторые из этих параметров скрыты или контролируются вашей организацией». Все элементы управления будут выделены серым цветом, и будут не активны, даже для учетной записи администратора.
Чтобы изменить фон на другое изображение, но при этом сохранить ограничение, вы можете просто заменить изображение, указанное в реестре, на другое, но присвоить ему то же имя. Кроме того, вы можете присвоить образу другое имя и изменить его в реестре.
Чтобы удалить запрет на смену обоев рабочего стола, просто удалите созданный вами раздел «System».
Все!
One can install a new theme on your Windows 11/10/8/7 PC by just double-clicking on a .deskthempack file. However, you can stop users from changing themes on Windows 11/10/8/7 using Group Policy Editor or Registry Editor. Stopping the theme change does not strict users from changing the wallpaper.
This post will guide you on how to prevent users from changing their Windows 11/10/8/7 desktop wallpaper.
There may be a few reasons you may want to prevent users from changing the desktop background on Windows 10. For instance, your company wants only to display a custom wallpaper with a company logo. It may also happen you share your computer with your friend or family, and you may want to see a particular desktop background all the time.
On Windows 10/8/7, there are at least two ways to stop users from changing the desktop background, including using Group Policy and modifying the Windows Registry.
Note: You should note that Group Policy Editor is not a part of Windows 11/10/8/7 Home edition; either use the Registry Editor method or enable the gpedit.msc (Local Group Policy Editor) first to prevent users from changing their Windows 10/8/7.
How to prevent users from changing their Windows 11/10/8/7 desktop wallpaper using Group Policy?
To restrict users from changing their Windows 11/10/8/7 desktop wallpaper using Group Policy, perform the following steps:-
Step 1. Press the Windows + R keyboard shortcut to open the Run command box.
Step 2. Type the following and press Enter from the keyboard to open the Local Group Policy Editor window:-
gpedit.msc
Step 3. The Local Group Policy Editor window opens. Navigate to the following pathway in the Local Group Policy Editor window:-
User Configuration > Administrative Templates > Control Panel > Personalization
Step 4. On the right side of the Personalization, double-click on the policy name “Prevent changing desktop background.”
Step 5. Select the Enabled option.
Step 6. Click Apply.
Step 7. Click OK.
Once you complete the above steps, the policy will be applied immediately, which means you don’t need to restart your computer.
Now, when you try to change the desktop background by right-clicking on the Desktop > Personalization > Background, you’ll notice that options aren’t available, and you’ll also see a message, “Some settings are managed by your organization.” You will also notice background pictures and other settings are greyed out.
Also, right-clicking on an image and selecting “Set as desktop background” will not work.
How to prevent users from changing their Windows 11/10/8/7 desktop wallpaper via Registry Editor?
Note: Before modifying the Windows Registry, we recommend making a full backup of your Windows Registry and creating a system restore point.
If you prefer to modify the Windows Registry to stop changing Windows 10/8/7 desktop background, perform the following recommended steps:-
Step 1. Press the Windows + R keys to open the Run command box.
Step 2. Type the following command in the Run box and click OK to open the Registry Editor window:-
regedit
If the User Account Control window appears, click the Yes button to continue.

Step 3. Browse to the following path in the Registry Editor window:-
HKEY_CURRENT_USER\Software\Microsoft\Windows\CurrentVersion\Policies
Step 4. Right-click on the Policies (folder) key, select New, and then click on the Key.
Step 5. Name the newly created key as System. It will create a System sub-key under Policies.
Step 6. Now, right-click on the System, select New, and then click on String Value.
Step 7. Name the newly created string as Wallpaper.
Step 8. Double-click the newly created String and set the path in the “Value data” field for the default wallpaper you want to use. For instance, C:\defaultwallpaper.jpg.
Step 9. Click OK.
Step 10. Again, right-click on the System, select New, and then click on String Value.
Step 11. Name the new String Value as WallpaperStyle.
Step 12. Double-click the newly created string and change its value to set wallpaper style. You can use one of the following values:-
- 0 – Centered
- 1 – Tiled
- 2 – Stretched
- 3 – Fit
- 4 – Fill
- 5 – Span
Step 13. Click OK.
Step 14. Close the Registry Editor.
Once you complete the above steps, restart your computer to see the new default wallpaper.
If you want to revert the changes, navigate to the following path in the registry editor:-
HKEY_CURRENT_USER\Software\Microsoft\Windows\CurrentVersion\Policies\System
Then, right-click on the System folder and select the Delete option.
That’s all!!!
Conclusion
In conclusion, preventing users from changing the desktop background on Windows 11/10/8/7 can be useful for various reasons, such as displaying a custom wallpaper with a company logo or maintaining a particular desktop background when sharing the computer with others. This post has provided two methods to stop users from changing the desktop background, including using the Group Policy Editor and modifying the Windows Registry. Both methods are easy to follow, and users can choose the one that suits them the best. It is essential to note that before making changes to the Windows Registry, it is crucial to back up the system and create a system restore point. With these steps, users can ensure that their desktop background stays the same, and they have control over their computer’s appearance.
В этой статье показаны действия, с помощью которых можно запретить изменение фона рабочего стола в Windows 10.
По умолчанию пользователи операционной системы могут изменять фон рабочего стола, устанавливая различные изображения. Если нужно запретить пользователям изменять фон рабочего стола, то сделать это можно при помощи редактора локальных групповых политик (способ для пользователей Windows редакции профессиональная или корпоративная) или используя редактор системного реестра (способ для всех редакций).
Как запретить изменение фона рабочего стола в редакторе локальных групповых политик (gpedit.msc)
Существует два способа запретить изменение фона рабочего стола в редакторе локальных групповых политик. В принципе первого способа будет достаточно, только перед его применением установите нужное изображение рабочего стола. Оба способа можно использовать как раздельно (или первый, или второй), так и вместе (второй способ дополняет первый).
Способ 1
Откройте редактор локальных групповых политик, для этого нажмите сочетание клавиш + R, в открывшемся окне Выполнить введите команду gpedit.msc и нажмите клавишу Enter ↵.

В открывшемся окне редактора локальной групповой политики последовательно разверните следующие элементы списка:
Конфигурация пользователя ➯ Административные шаблоны ➯ Панель управления ➯ Персонализация
Далее, в правой части окна дважды щелкните левой кнопкой мыши по параметру политики с названием
Запрет изменения фона рабочего стола
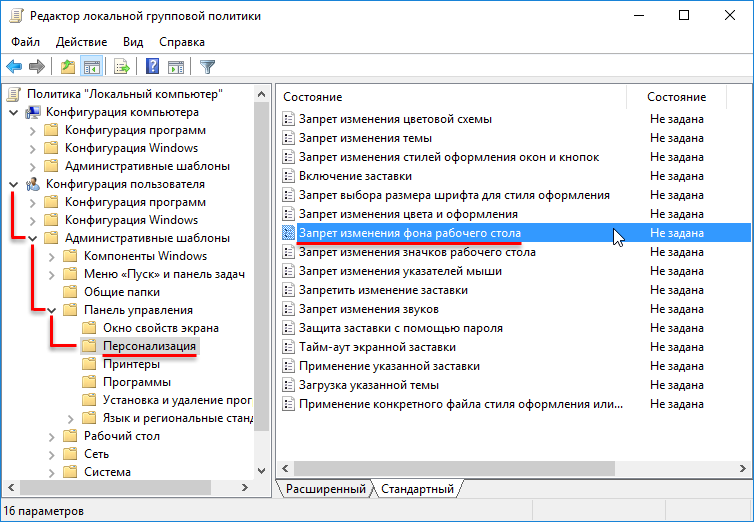
В окне Запрет изменения фона рабочего стола, установите переключатель из положения Не задано в положение Включено и нажмите кнопку OK.

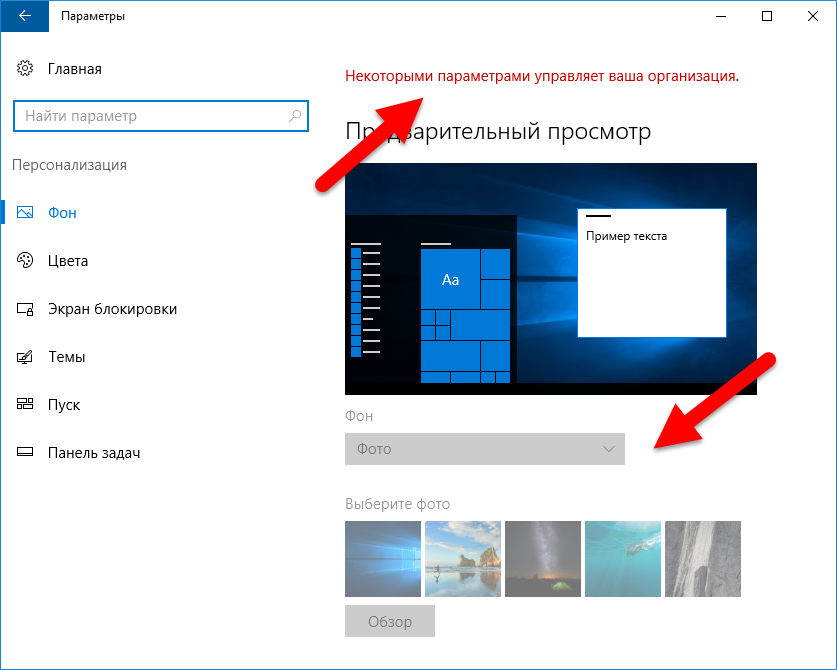
Изменения вступают в силу сразу. Теперь открыв Параметры Windows ➯ Персонализация ➯ Фон, вы увидите строку красного цвета Некоторыми параметрами управляет ваша организация и настройки по изменению фона будут недоступны.
Также вы не сможете изменить фон рабочего стола щелкнув изображение правой кнопкой мыши и выбрав команду Сделать фоновым изображением рабочего стола или с помощью программ для просмотра изображений.
Способ 2
Этот способ можно использовать как отдельно, так и в дополнение к первому способу.
В окне редактора локальных групповых политик перейдите по следующему пути:
Конфигурация пользователя ➯ Административные шаблоны ➯ Рабочий стол ➯ Рабочий стол
Далее, в правой части окна дважды щелкните левой кнопкой мыши по параметру политики с названием
Фоновые рисунки рабочего стола.

В окне Фоновые рисунки рабочего стола, установите переключатель из положения Не задано в положение Включено, в поле Имя фонового рисунка введите полный путь и имя файла изображения. В выпадающем списке Стиль фонового рисунка выберите один из вариантов расположения изображения: Замостить, Заполнение, По размеру, По центру, Растянуть, Расширение и нажмите кнопку OK.

Изменения вступают в силу сразу, но изображение которое вы указали в качестве фона сразу не появится, для этого нужно выйти из системы или перезапустить проводник Windows, или щелкнуть правой кнопкой мыши на любом графическом файле и в контекстном меню выбрать пункт Сделать фоновым изображением рабочего стола, при этом фон рабочего стола изменится на то изображение, которое вы указали в редакторе групповых политик.
Как запретить изменение фона рабочего стола в редакторе реестра
Данный способ подходит для всех редакций операционной системы Windows. Прежде чем вносить какие-либо изменения в реестр, рекомендуется создать точку восстановления или экспортировать тот раздел реестра, непосредственно в котором будут производиться изменения.
Откройте редактор реестра, для этого нажмите сочетание клавиш + R, в открывшемся окне Выполнить введите команду regedit и нажмите клавишу Enter ↵.

Чтобы запретить изменение фона рабочего стола для пользователя под которым вы вошли в систему, в редакторе реестра перейдите по следующему пути:
HKEY_CURRENT_USER\\Software\\Microsoft\\Windows\\CurrentVersion\\Policies
Если вы хотите запретить изменение фона рабочего стола для всех пользователей данного компьютера, то
перейдите по следующему пути:
HKEY_LOCAL_MACHINE\\Software\\Microsoft\\Windows\\CurrentVersion\\Policies
Нажмите правой кнопкой мыши на разделе Policies и в появившемся контекстном меню выберите
Создать > Раздел.

Присвойте созданному разделу имя ActiveDesktop.

Нажмите правой кнопкой мыши на разделе ActiveDesktop и в появившемся контекстном меню выберите
Создать > Параметр DWORD (32 бита). Присвойте созданному параметру имя NoChangingWallPaper.

Далее дважды щелкните левой кнопкой мыши по созданному нами параметру, и в качестве его значения установите 1, нажмите кнопку OK.

Теперь если вы зайдете в Параметры Windows ➯ Персонализация ➯ Фон, вы увидите что настройки по изменению фона
будут недоступны. После выполненных действий рекомендуется перезапустить проводник Windows или выйти из системы.
Описанные выше действия по редактированию реестра по сути повторяют первый способ запрета изменения фона рабочего стола в редакторе групповых политик.
Следующие действия по редактированию реестра повторяют второй способ запрета изменения фона рабочего стола в редакторе групповых политик.
Чтобы запретить изменение фона рабочего стола для пользователя под которым вы вошли в систему, в редакторе реестра перейдите по следующему пути:
HKEY_CURRENT_USER\\Software\\Microsoft\\Windows\\CurrentVersion\\Policies
Если вы хотите запретить изменение фона рабочего стола для всех пользователей данного компьютера, то
перейдите по следующему пути:
HKEY_LOCAL_MACHINE\\Software\\Microsoft\\Windows\\CurrentVersion\\Policies
Нажмите правой кнопкой мыши на разделе Policies и в появившемся контекстном меню выберите
Создать > Раздел. Присвойте созданному разделу имя System.

Далее нажмите правой кнопкой мыши на разделе System и в появившемся контекстном меню выберите
Создать > Строковый параметр. Присвойте созданному параметру имя Wallpaper.

Теперь дважды щелкните левой кнопкой мыши по созданному нами параметру, и в качестве его значения укажите путь к изображению, которое вы хотите использовать, например D:\\Wallpaper\\img1.jpg, нажмите кнопку OK.

Далее нам нужно в разделе System создать еще один Строковый параметр, для этого нажмите правой кнопкой мыши на разделе System и в появившемся контекстном меню выберите
Создать > Строковый параметр. Присвойте созданному параметру имя WallpaperStyle

Дважды щелкните левой кнопкой мыши по созданному нами параметру, и в качестве его значения установите одну из перечисленных ниже цифр и нажмите кнопку OK.
0 — по центру
1 — замостить
2 — растянуть
3 — по размеру
4 — заполнение
5 — расширение

После выполненных действий рекомендуется перезапустить проводник Windows или выйти из системы. Теперь открыв любое изображение, пользователь не сможет установить его в качестве фонового рисунка рабочего стола.
.
Download Windows Speedup Tool to fix errors and make PC run faster
At times, you might want to prevent users from changing the theme in Windows 11/10 computers. If so, you can use the Registry Editor and the Local Group Policy Editor to block other users from changing the Windows theme.
Prevent users from changing Theme using Registry in Windows 11/10
To prevent users from changing the theme in Windows 10, follow these steps-
- Press Win+R to open the Run prompt.
- Type regedit and press the Enter button.
- Click the Yes button.
- Navigate to Explorer in HKEY_LOCAL_MACHINE.
- Right-click on Explorer > New > DWORD (32-bit) Value.
- Name it as NoThemesTab.
- Double-click on it to set the Value data as 1.
- Click the OK button.
To learn more about these steps, keep reading.
At first, you have to open Registry Editor on your computer. For that, press Win+R, type regedit, hit the Enter button, and select the Yes option in the UAC popup window.
Next, navigate to the following path-
HKEY_CURRENT_USER\Software\Microsoft\Windows\CurrentVersion\Policies\Explorer
HKEY_LOCAL_MACHINE\SOFTWARE\Microsoft\Windows\CurrentVersion\Policies\Explorer
If you want to prevent this setting for the current user only, select the first path. However, if you want to block this setting for all users, you must navigate to the second path.
Right-click on the Explorer key, select New > DWORD (32-bit) Value and name it as NoThemesTab.

Double-click on this REG_DWORD value and set the Value data as 1.
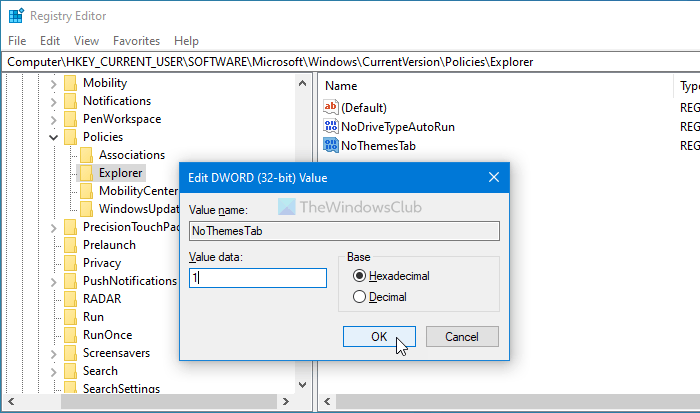
Click the OK button to save the change.
Finally, you have to sign out and re-sign in to your account.
Block users from changing the theme in using Group Policy
It is highly recommended to create a System Restore point before following the REGEDIT method. To prevent users from changing the theme in Windows using Group Policy, follow these steps:
- Press Win+R to display the Run prompt.
- Type gpedit.msc and hit the Enter button.
- Navigate to Personalization in User Configuration.
- Double-click on the Prevent changing theme setting.
- Select the Enabled option.
- Click on the OK button.
To find more, continue reading.
To get started, you have to open the Local Group Policy Editor. For that, press Win+R, type gpedit.msc, and hit the Enter button.
Next, navigate to the following path-
User Configuration > Administrative Templates > Control Panel > Personalization
Here you can find a setting called Prevent changing theme. Double-click on it and select the Enabled option.
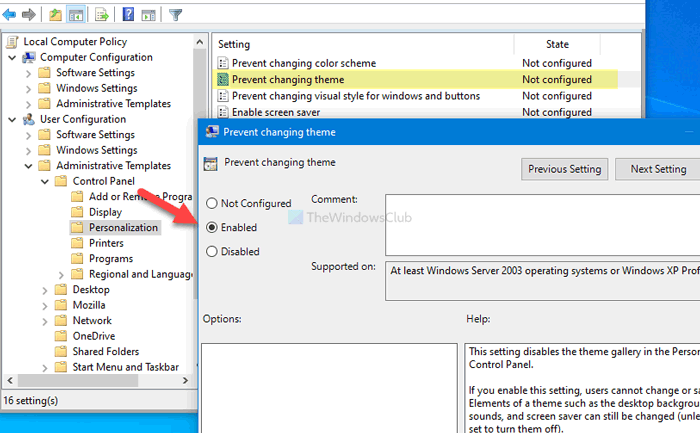
Click the OK button to save the change.
Unfortunately, the GPEDIT method doesn’t include the option to enable/disable this setting for all users like the REGEDIT method does.
That’s all! This is how you can prevent users from changing the theme in Windows 11/10.
Read: How to change the theme in Windows without Activation.
When he is not writing about Microsoft Windows or Office, Sudip likes to work with Photoshop. He has managed the front end and back end of many websites over the years. He is currently pursuing his Bachelor’s degree.