
Встроенная утилита CHKDSK.exe (check disk) используется в Windows для проверки диска на ошибки. Сhkdsk проверяет файловую систему на физические и логические ошибки, находит поврежденные секторы (bad sectors) и исправляет найденные проблемы.
Содержание:
- Проверка и восстановление диска с помощью команды chkdsk
- Просмотр результатов проверки Chkdsk в Windows
Проверка и восстановление диска с помощью команды chkdsk
Чтобы проверить жесткий диск на ошибки, запустите командную строку с правами администратора и выполните:
chkdsk E: /F /R
Данная команда:
- Выполнит проверку диска E:\
- Исправит автоматически найденные ошиьки (/F)
- Попытаться восстановить данные при обнаружении поврежденных секторов, она попытается восстановить информации (/R).
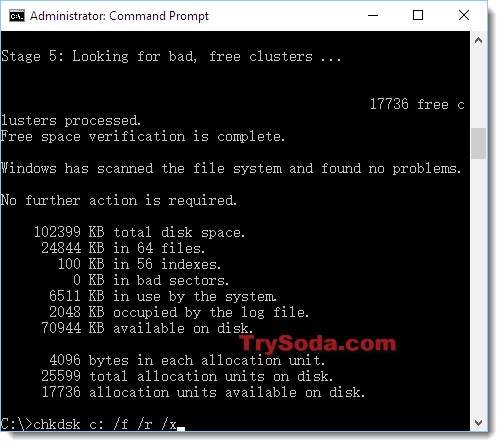
Полная проверка диска может занять длительное время в зависимости от емкости носителя и количества файлов. После окончания проверки диска вы увидите подробную статистику диска, информацию о поврежденных секторах и файлах, предпринятых действиях по восстановлению.
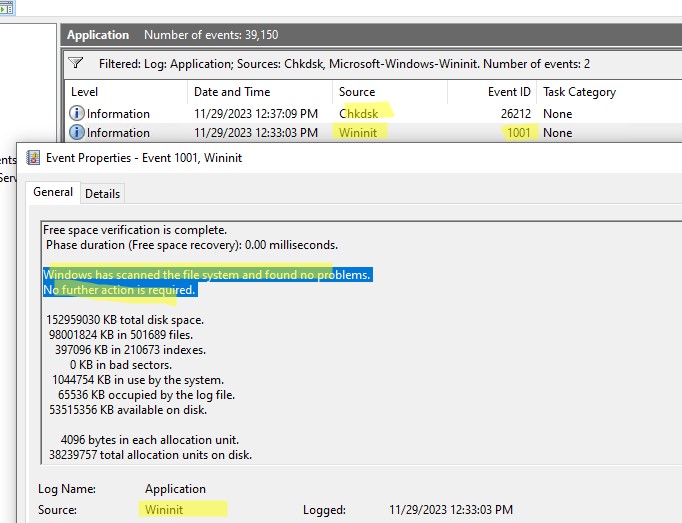
Если утилита chkdsk не обнаружила проблем на диске, появится сообщение:
Windows has scanned the file system and found no problems.
No further action is required.

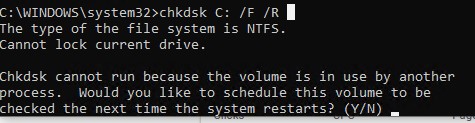
Утилита chkdsk не позволяет выполнить online проверку системного диска (C:\). При запуске команды chkdsk C: /F /R появится уведомление:
Cannot lock current drive. Chkdsk cannot run because the volume is in use by another process. Would you like to schedule this volume to be checked the next time the system restarts? (Y/N).
Невозможно выполнить команду Chkdsk, так как указанный том используется другим процессом. Следует ли выполнить проверку этого тома при следующей перезагрузке системы?
Чтобы запланировать проверку диска при следующей загрузке Windows, нажмите
Y
->
Enter
.
This volume will be checked the next time the system restarts
.
Чтобы отменить запланированную проверку диска, выполните:
chkntfs /x c:
Чтобы отключить топ перед проверкой, добавьте атрибут /X в команде chkdsk. В этом случае Windows принудительно закрое все открытые файловые дескрипторы, отмонтирует диск и выполнит проверку на ошибки.
Если вам нужно выполнить проверку большого NTFS тома, но вы не хотите блокировать диск, можно сначала просканировать диск на ошибки:
chkdsk E: /f /offlinescanandfix
Утилита найдет ошибки и сохранит их в файл $corrupt для дальнейшего исправления
Чтобы исправить найденные ошибки, не тратя время на полное сканирование тома, выполните:
chkdsk D: /spotfix
Это существенно сократит время недоступности тома для пользователя при исправлении ошибок.
В консоли PowerShell для проверки диска можно использовать командлет Repair-Volume как аналог команды chkdsk:
Repair-Volume -driveletter C -scan
Также рекомендуем перед проверкой проверить SMART состояние жестких дисков с помощью встроенных PowerShell командлетов из модуля управления дисками:
Get-PhysicalDisk | Sort Size | FT FriendlyName, Size, MediaType,SpindleSpeed, HealthStatus, OperationalStatus -AutoSize

Просмотр результатов проверки Chkdsk в Windows
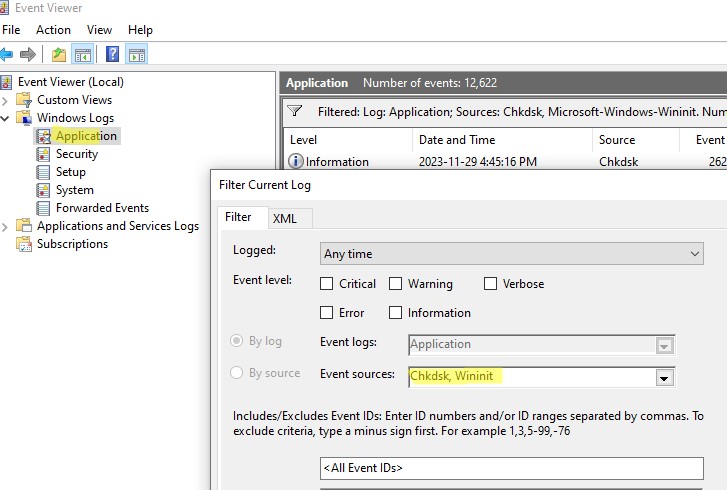
Chkdsk при онлайн сканировании диска выводит результаты прямо в консоль. Если вы запланировали проверку диска при загрузке Windows, то результаты можно получить только из журнала событий Windows (Event Viewer).
- Откройте консоль Event Viewer (
Eventvwr.msc
) и перейдите в раздел Windows Logs -> Application; - Щелкните правой клавишей по разделы Application и выберите Filter Current Log. В поле Event Source выберите Chkdsk и Wininit и нажмите ОК;

- Подробные результаты проверки диска содержатся в описании события. Обратите внимание, что у онлайн событий проверки диска будет указан источник Chkdsk. Если выполнялась офлайн проверка диска при загрузке Windows, у такого события будет источник Wininit и EventID 1001.

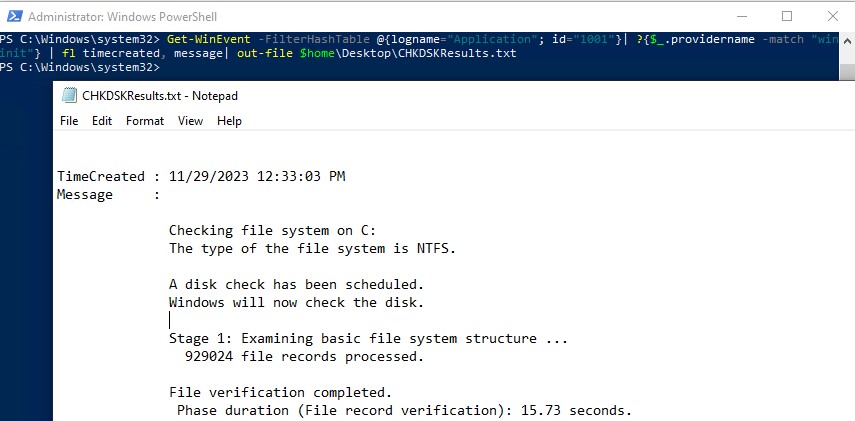
Можно получить лог проверки диска с помощью PowerShell командлета Get-WinEvent. Например, чтобы выгрузить результаты последних 5 проверок диска в текстовый файл CHKDSK_SCAN.txt на рабочем столе, выполните команду:
Get-WinEvent -FilterHashTable @{logname="Application"; id="1001"}| ?{$_.providername –match "wininit"} | fl timecreated, message| out-file $home\Desktop\CHKDSKResults.txt
Открыть полученный файл с логом chkdsk:
notepad.exe $home\Desktop\CHKDSKResults.txt
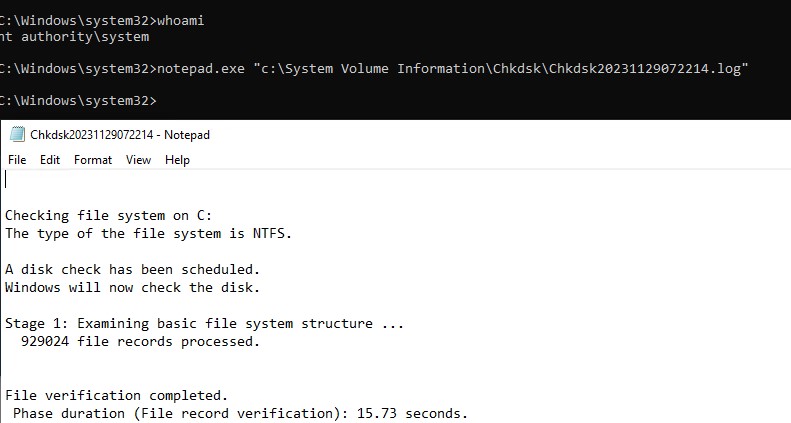
Если размер лога Chkdks очень большой, журнал событий может обрезать его. В этом случае можно открыть полный лог проверки диск в System Volume Information. Чтобы получить доступ к этой папке, нужно запустить командную строку от имени SYSTEM (проще всего с помощью утилиты psexec):
.\PsExec.exe -i -s cmd.exe
После этого можно открыть лог chkdsk:
notepad.exe "c:\System Volume Information\Chkdsk\Chkdsk20231129072214.log"
This post introduces 4 ways to allow you to run CHKDSK on startup in Windows 10 to check and fix computer hard drive errors. It also explains how to stop CHKDSK from running at startup if you find that CHKDSK runs at every startup in Windows 10. Best free CHKDSK alternative and hard drive data recovery services from MiniTool are also offered.
If you’d like to run CHKDSK on startup in Windows 10 to scan and repair hard disk errors, you can check the solutions below. This post also includes ways to run Windows 10 disk check on startup when your PC or laptop won’t turn on.
Besides, if you feel troublesome that CHKDSK runs at every startup in Windows 10, you can also easily stop CHKDSK on startup in Windows 10 by following the operation below.
Hard disk errors often cause some data loss. So, MiniTool Software will also introduce professional data recovery software to help you recover your lost and deleted files in all versions of Windows.
Also read: Discover the essential steps for successful hard drive recovery in this informative article.
How to Run CHKDSK on Startup Windows 10 – 4 Ways
- Run CHKDSK on Startup from Command Prompt
- Run CHKDSK on Startup from Advanced Options Screen
- Run CHKDSK on Startup with Recovery Disk/USB
- Run CHKDSK on Startup with Installation Media
How to Run CHKDSK on Startup Windows 10 – 4 Ways
If your computer can boot and you want to scan the Windows system C drive (where the OS is installed) or other system related drives, you need to run CHKDSK in Windows 10 before boot since CHKDSK can’t run if the drive is in use. Check how to run CHKDSK before booting into Windows below.
1. How to Run CHKDSK on Startup from Command Prompt
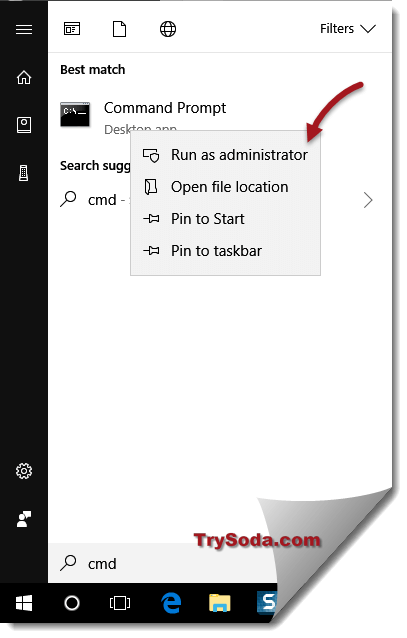
- Press Windows + R, type cmd, press Ctrl + Shift + Enter to open elevated Command Prompt in Windows 10.
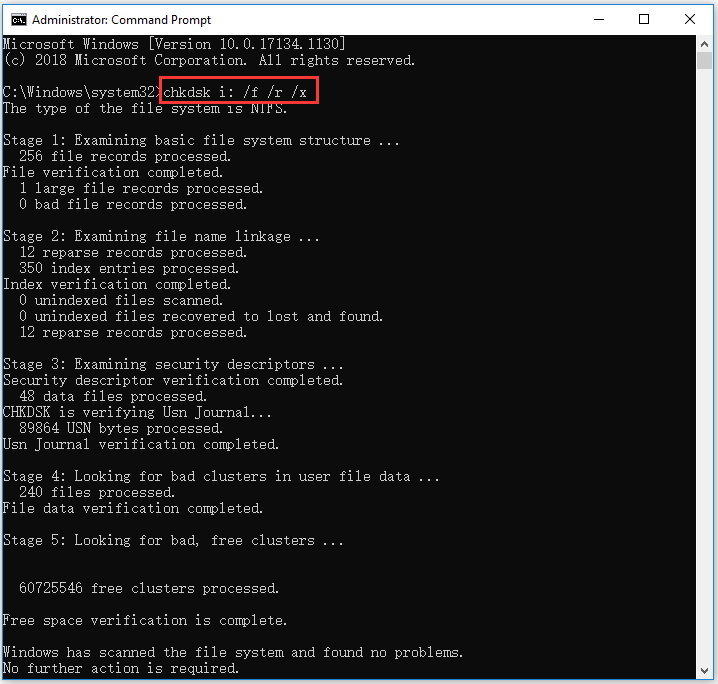
- In command Prompt, type this command: chkdsk C: /f /r /x, and press Enter. Replace “C” with the drive letter of the target drive. Please do not miss the spaces in this command.
- If you are trying to scan the system C drive, CHKDSK will pop up a message saying that cannot lock current drive, the volume is in use by another process, and asking you if you want to schedule this volume to be checked the next time the system restarts. You can type Y and press Enter.
- Restart your computer and Windows will automatically run CHKDSK on reboot to scan and fix hard drive errors.
2. How to Run Windows 10 Disk Check on Startup from Advanced Options Screen
If you know how to access advanced startup options in Windows 10, you can select Command Prompt in Advanced options screen to boot your computer into Command Prompt window. And then you can run CHKDSK command in Command Prompt window to check and fix computer hard drive errors before booting into Windows.
3. How to Run CHKDSK on Startup with Recovery Disk/USB
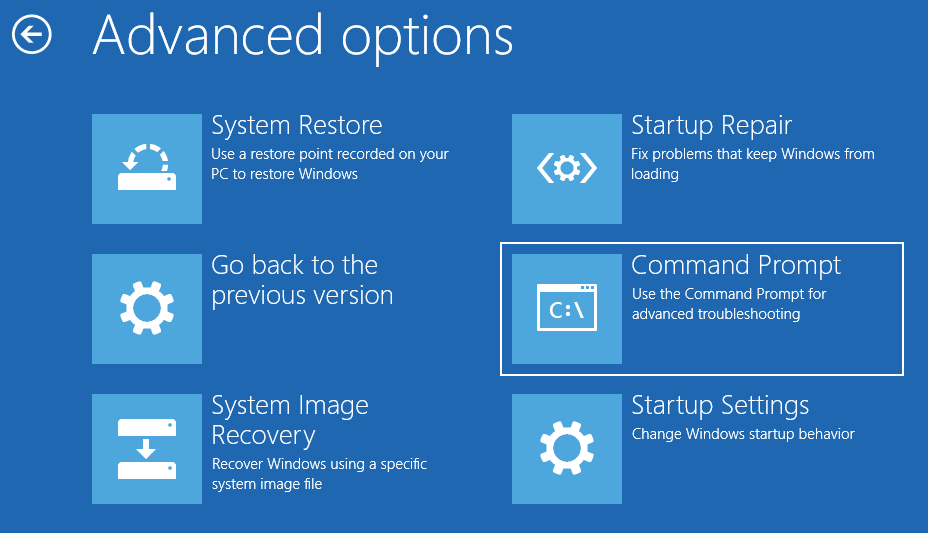
If your Windows 10 computer can’t boot, but if you know how to create a Windows 10 recovery USB drive or disk, you can then use the recovery USB or disk drive to boot your Windows 10 computer into Windows Recovery Environment (Windows RE). Then you can click Troubleshoot -> Advanced options, click Command Prompt in the blue Advanced options screen and use it to run chkdsk /f /r command.
4. How to Run CHKDSK on Startup with Installation Media
If you don’t have a Windows 10 installation media at hand, you can check how to create an installation media with Windows 10 media creation tool. After you get the installation USB or disc, you can use it to boot your computer into WinRE and get into Advanced options screen to choose Command Prompt option. Then you can run CHKDSK command in Command Prompt to scan and fix disk errors.
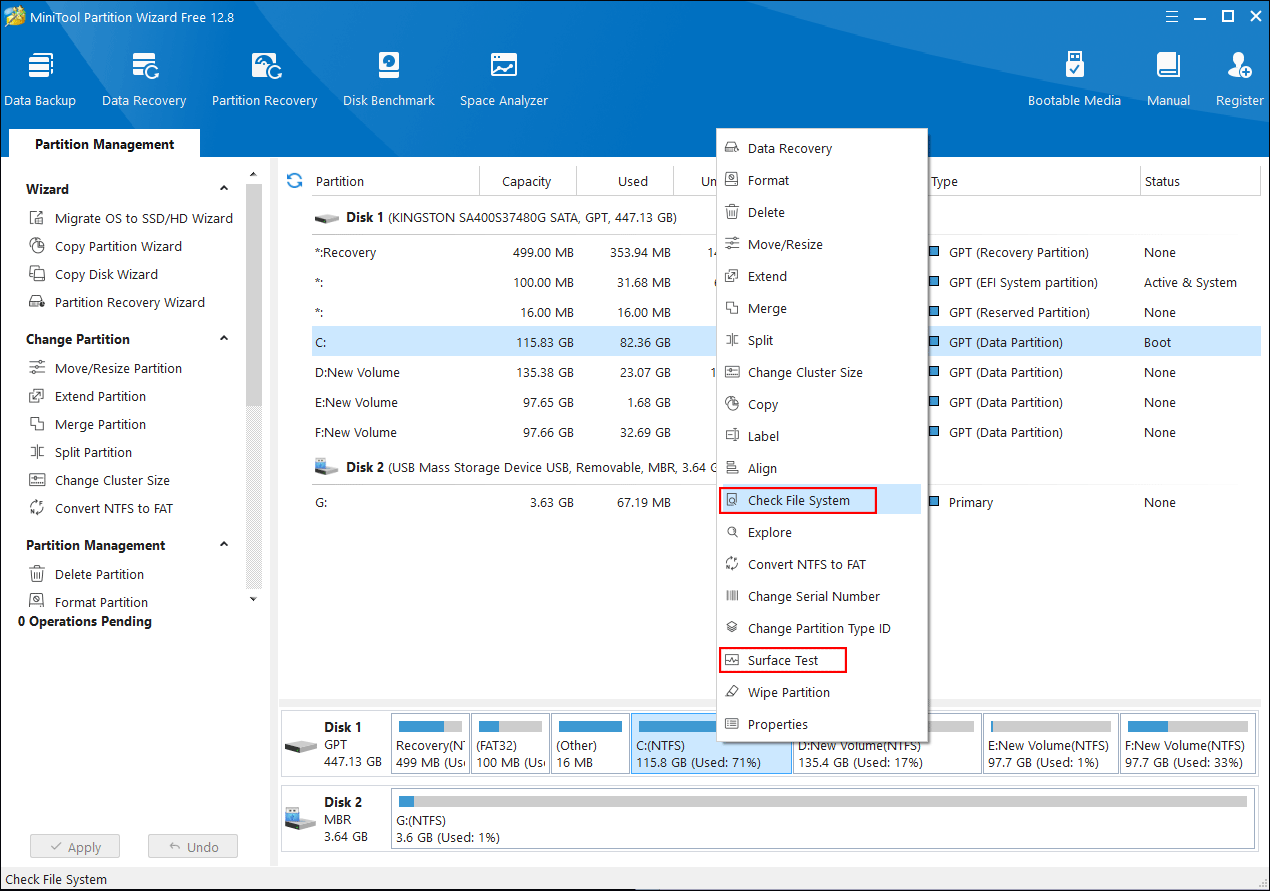
Instead of struggling to run CHKDSK on startup, you can use third-party free disk check tool like MiniTool Partition Wizard to easily check and fix disk errors.
MiniTool Partition Wizard is an all-in-one disk partition manager for Windows. Aside from scanning and fixing disk errors and checking disk bad sectors, you can also use it to easily create/resize/format/delete/wipe partitions, copy disk, migrate OS, convert partition format, analyze disk space usage, test hard drive speed, etc.
Free download and install MiniTool Partition Wizard on your Windows computer, and check the guide below for how to use it to check and fix disk errors as well as how to detect bad sectors on hard drive.
MiniTool Partition Wizard FreeClick to Download100%Clean & Safe
Step 1. Launch MiniTool Partition Wizard and click Yes if it pops up the User Account Control window to enter into the main interface of the software. Locate the target hard drive and the target partition which you want to check disk errors.
Step 2. Right-click the target partition and select Check File System option. In the new window, you can click check & fix file system error option, and click Start button. MiniTool Partition Wizard will automatically scan and fix detected file system errors on the disk.
Step 3. To diagnose if the hard drive has bad sectors, you can go back to the main interface, and right-click the target partition to choose Surface Test option. Click Start Now button to begin checking bad sectors on the disk.
Click to tweet
How to Stop CHKDSK on Startup Windows 10 – 3 Ways
- Press Any Key to Cancel the Disk Check
- Stop CHKDSK on Startup via Command Prompt
- Disable CHKDSK on Startup with Registry Editor
How to Stop CHKDSK on Startup Windows 10 – 3 Solutions
Some users have the problem that CHKDSK always runs at startup. CHKDSK scanning can be very time-consuming. If you want, you can stop CHKDSK from running at startup in Windows 10. Check the solutions below.
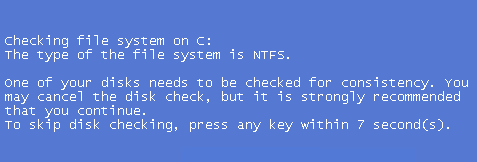
Solution 1. Press Any Key to Cancel the Disk Check
If your computer didn’t shut down properly, Window CHKDSK may automatically run when you start your computer next time. It will appear a message on booting saying that one of your disks needs to be checked for consistency. It advises you to conduct the disk check, but also gives an option to cancel the disk check by pressing any key within several seconds. You can press any key to stop CHKDSK on startup in Windows 10.
Solution 2. Stop CHKDSK on Startup via Command Prompt
By using solution 1, you can skip the CHKDSK scanning for once. But if you restart your computer next time, CHKDSK may automatically run again since it thinks one of your computer hard drive still needs to be checked. If CHKDSK runs at startup in every restart, you can use Command Prompt to disable it if you want.
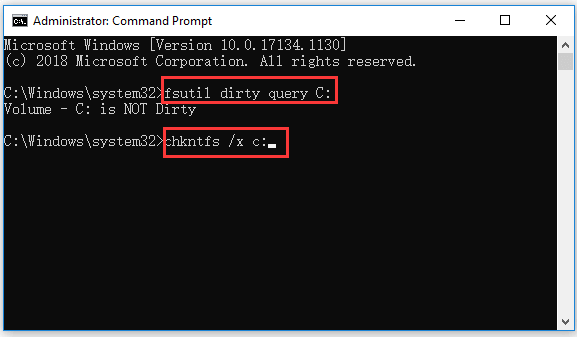
- Press Windows + R, type cmd, and press Ctrl + Shift + Enter to open elevated Command Prompt.
- Optional action: Type the command fsutil dirty query C: in Command Prompt, and press Enter to execute the command. This can help check if the drive has been marked with a dirty bit value, since CHKDSK will automatically check the disk that is marked as dirty.
- Next you can type chkntfs /x c: command, and press Enter to disable CHKDSK from scanning C drive on startup.
- If you want to stop CHKDSK on startup for several drives, you can add the drive letters in the command, e.g. chkntfs /x c: d: e:. Please do not forget the spaces in the command line.
Solution 3. Disable CHKDSK on Startup with Registry Editor
You can also stop check disk on startup by using Registry Editor.
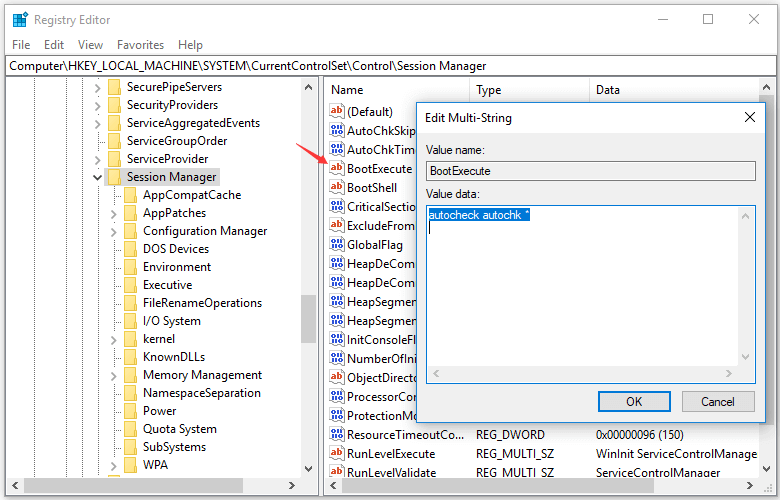
- Press Windows + R, type regedit in Run box, and press Enter to open Registry Editor in Windows 10.
- Navigate the following path in Registry Editor: HKEY_LOCAL_MACHINE\SYSTEM\CurrentControlSet\Control\Session Manager.
- Double-click BootExecute key in the right window. And delete all lines under Value data except autocheck autochk *.
- Close Registry Editor and restart your computer to check if CHKDSK runs at startup.
How to Recover Lost/Deleted Files from Windows 10 PC or Laptop
In case you lost some important data after CHKDSK scan or lost some important files due to hard drive failures or other reasons, here we introduce an easy and fast way to help you recover any lost or deleted files from Windows 10 computer and other storage devices.
MiniTool Power Data Recovery is best free data recovery software for Windows. You can use this tool to easily recover lost/deleted files from Windows PC or laptop, external hard drive, SSD, USB flash drive, SD memory card, etc. in simple steps. Various data loss situations are covered.
It delivers fast scan speed, high recovery result, and keeps original file. Extremely easy-to-use and 100% safe. Download and install MiniTool Power Data Recovery in your Windows 10 computer, and check how to recover data from Windows 10 computer below.
MiniTool Power Data Recovery FreeClick to Download100%Clean & Safe
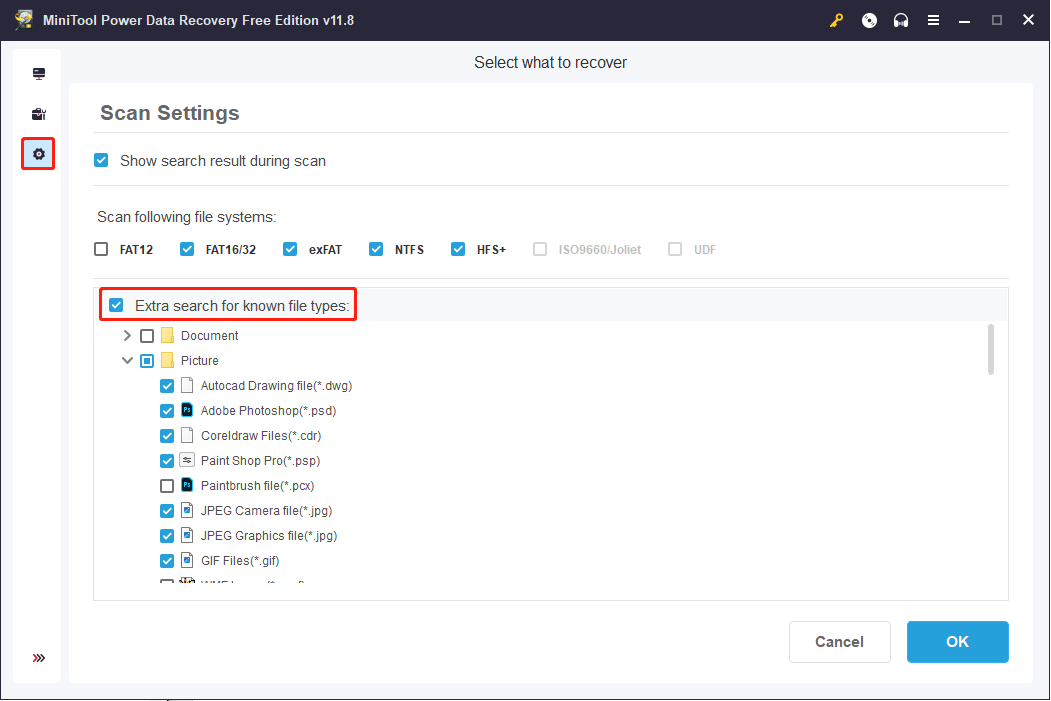
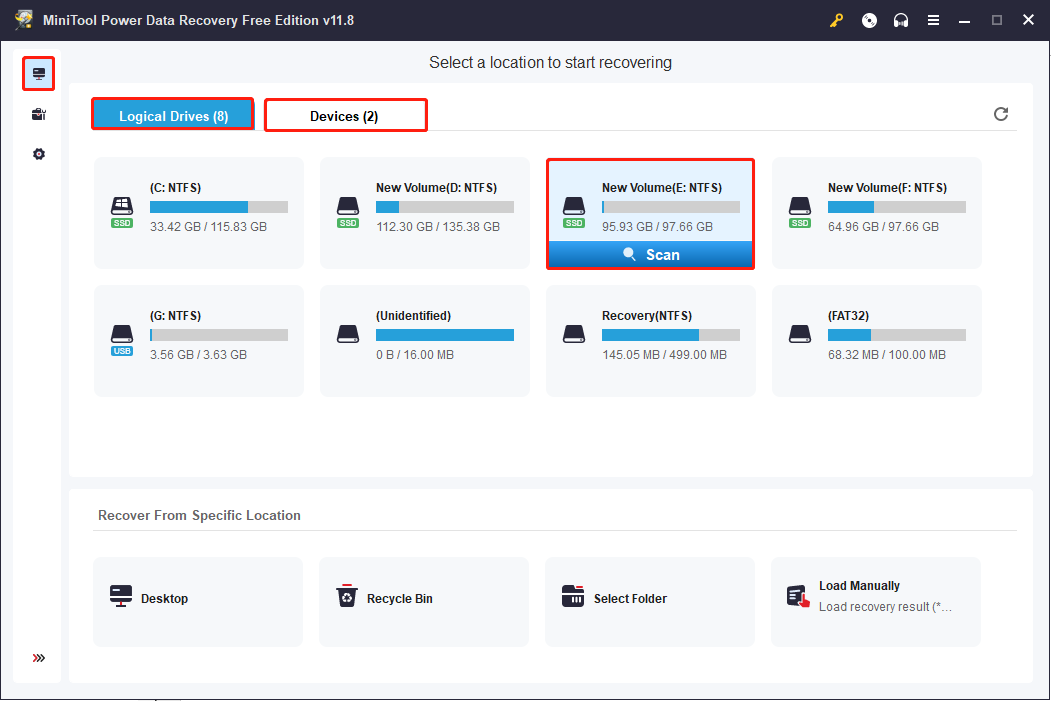
Step 1. Launch MiniTool Power Data Recovery. Optionally, before starting the scanning process, you can also click the Scan Settings button in the left menu bar to select specific file types and click OK to save the change.
Step 2: Return to This PC interface, choose the target partition that contains your lost/deleted files, and click the Scan button. If you want to select the whole disk to scan, you can click the Devices tab and choose the disk.
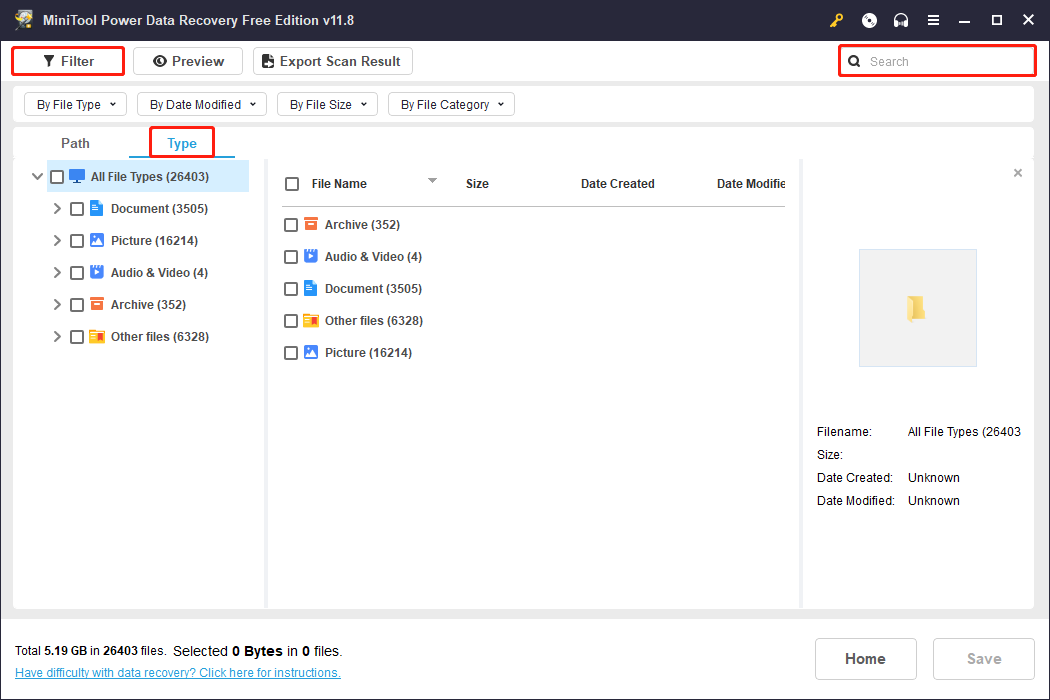
Step 3: The software will list files according to their paths on the result page. You can shift to the Type tab to discover wanted files by their types. To help you locate wanted files quickly, the Filter and Search features work significantly.
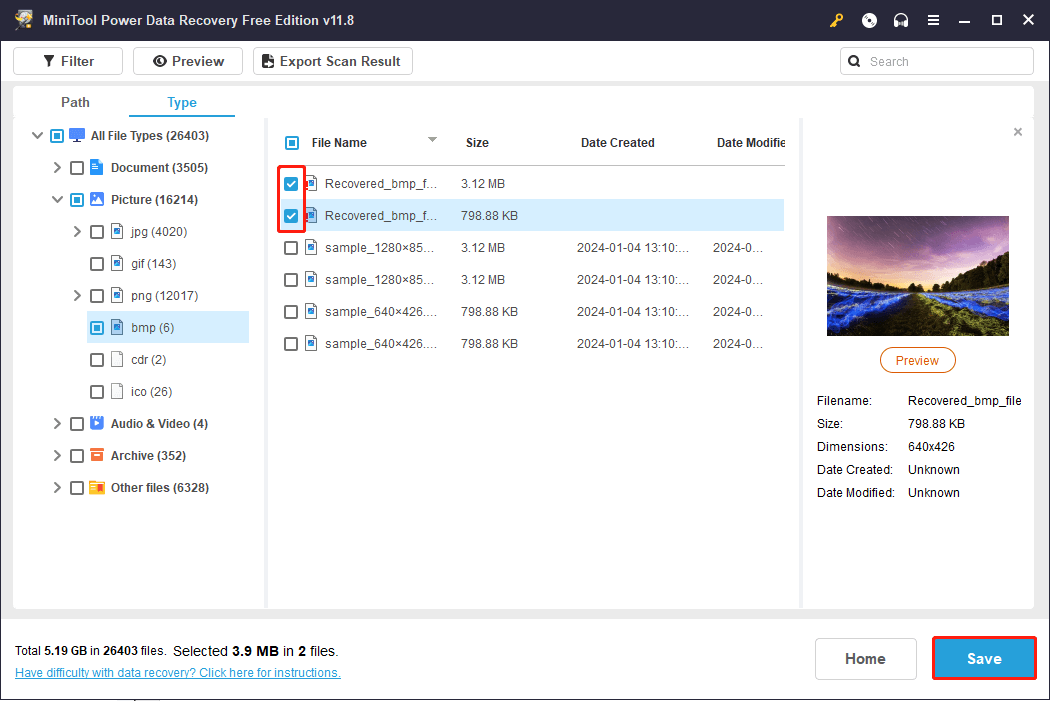
Step 4: Tick the needed files and click the Save button to choose a new destination path to store the recovered files.
Conclusion
This tutorial explains how to run or stop CHKDSK on startup in Windows 10. If you have other questions about how to use MiniTool Partition Wizard or MiniTool Power Data Recovery, please contact [email protected].
Click to tweet
Why does CHKDSK run on startup?
If your computer runs CHKDSK on startup, it might because of improper computer shutdown, hard drive failures, disk file system errors caused by malware/virus infection, etc. You can let CHKDSK perform the disk check and it may cost some time. You can also use one of the 3 solutions in this post to stop CHKDSK on startup in Windows 10 if you want.
How do I stop CHKDSK from running at startup Windows 10?
This tutorial explains 3 solutions to let you stop CHKDSK on startup in Windows 10. You can try one of them.
Is it safe to stop CHKDSK?
Generally you can’t stop CHKDSK process once it starts. It’s not safe to stop CHKDSK while it’s still scanning. It may cause file system corruption and data loss if you shut down the computer during the disk check process.
How to stop CHKDSK in progress Windows 10?
- Press Ctrl + Shift + Esc to open Task Manager.
- Find CHKDSK in Task Manager window, right-click it and click Details to find out PID of the CHKDSK task.
- Next you can press Windows + R, type cmd, and press Ctrl + Shift + Enter to open elevated Command Prompt.
- Then type the command taskkill /F PID PID number in Command Prompt window, and press Enter. Replace “PID number” with the PID of CHKDSK.
You may use this way to force stop CHKDSK if the scanning and repairing drive gets stuck in Windows 10. However, it’s not a good idea to force stop CHKDSK in progress after you manually run chkdsk /f /r command in Windows 10. It may cause damage to the hard disk and cause data loss. So it’s not recommended.
CHKDSK (Check Disk) is a built-in command-line tool that scans and fixes errors in your hard drive’s file system. Learn how to schedule chkdsk to run automatically on restart in Windows 11 and 10.
Almost every Windows user has seen the chkdsk screen at least once where it proceeds to scan your file system and automatically fix any errors it found. Generally, this happens when the system crashes or on sudden power failures. However, when needed, you can also schedule a chkdsk scan on any drive so that it scans it on the next restart. For example, if you feel like your system is slow, unable to open certain apps, or producing odd errors from time to time, running a manual chkdsk scan will often fix the problem. In fact, running a scheduled chkdsk scan is one of the first things you should do as part of the troubleshooting process.
Let me show you how to schedule a chkdsk scan to run on restart in Windows 11 and Windows 10 in simple steps.
Before You Begin
- Administrator rights are required to schedule a chkdsk scan.
- The steps are tested to work on Windows 11 and Windows 10.
Schedule Chkdsk Scan To Run on the Next Restart
We can schedule a chkdsk scan using the admin Command Prompt shell. Here’s how to do it.
- Open the Start menu.
- Search for “Command Prompt“.
- Select the “Run as administrator” option.
- Run the
chkdsk C: /x /f /rcommand. - Type “Y” and press the “Enter”.
- With that, you’ve scheduled a chkdsk scan.
- Restart your system to run the chkdsk scan.
Detailed Steps (With Screenshots)
First, open the Start menu by clicking the “Windows key” on the taskbar. Next, search for “Command Prompt” and select the “Run as administrator” option. This opens the Command Prompt shell with admin rights.
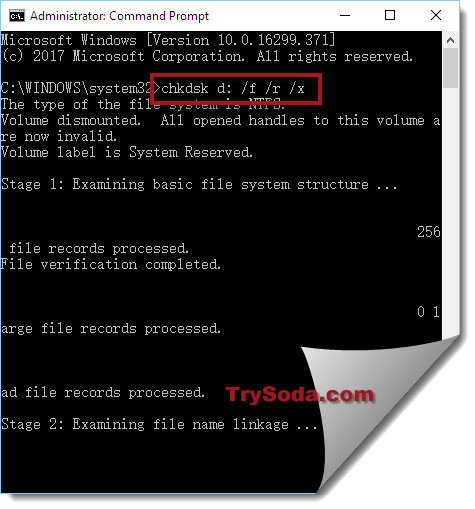
In the Command Prompt window, run the following command. By default, the below command will scan your C drive. If you wish to scan another drive, replace C: with the letter of the drive you want to scan. For example, D:, E:, etc.
chkdsk C: /x /f /r
Here’s a brief explanation of what the command and its flags do:
- chkdsk: Invokes the chkdsk utility.
- C:: Sets the drive to scan. You can replace this with the drive letter of your choice.
- /x: Forces the target drive to dismount first. That way, all open handles are closed for better scanning.
- /f: It tells the chkdsk utility to fix any errors it found.
- /r: It tries to locate bad sectors and recover readable information.
After running the command, type “Y” when prompted for confirmation and press “Enter“.

That’s it. You’ve scheduled a chkdsk scan on the next restart. You will also see the “This volume will be checked the next time the system restarts” confirmation message. At this point, close the Command Prompt window and restart your computer to run the scan.
Once the scan is complete and your system restarted, you can find chkdsk logs in the Event Viewer.
Cancel Scheduled Chkdsk Scan
Just as you can create a schedule for chkdsk, you can also cancel it. This is helpful when you don’t have time and want to restart your computer as soon as possible. Follow this guide to learn how to cancel a chkdsk scan in Windows 11 & 10.
—
That is all. It is that simple to schedule a chkdsk scan. If you have any questions or need help, comment below. I’ll be happy to assist.
CHKDSK is a command used in Command Prompt to scan, check, and repair hard drives in our computers. In Windows 11 or Windows 10, using chkdsk is no different from using it in any previous version of Windows. However, you will need to give the Command Prompt (CMD) administrative privileges to use the chkdsk command.
Run CHKDSK in Windows 11/10 from Command Prompt
If your target hard drive is not a boot drive, meaning that the drive isn’t where your Windows is located, using CHKDSK in Command Prompt will scan and repair the target drive immediately.
- Go to Start Menu. Type CMD.
- From the search result, right click Command Prompt, then click Run as administrator.

- If “User Account Control” ask for permission, click Yes to proceed.
- In the command prompt, type:
chkdsk [driveletter] /f /r /x
- For example:
chkdsk C: /f /r /x

- Chkdsk will then run to scan the selected disk for errors and repair them automatically. It may take hours if you have a huge and messy drive.
Why do we need the parameters “/f /r /x” when doing chkdsk?
- If you enter CHKDSK without the parameters, the command itself will only scan the disk and show you the disk’s status. It won’t repair anything. To allow it to fix errors it finds, “/f” is needed.
- If you want it to also locate bad sectors on the drive and recover readable information, “/r” is needed.
- To force it to dismount the drive before checking the disk, “/x” is needed. This is recommended to make sure there is no running application in that particular drive that may interfere with the CHKDSK process.
- If you need more info on other parameters you can use, go to this chkdsk docs from microsoft.
Run CHKDSK in Windows 10/11 Before Boot
If you want to CHKDSK your primary drive where you store and boot your Windows, usually C: drive, CHKDSK will need to run before booting into Windows. This is because CHKDSK cannot be run if the drive is in use, especially if there are any system core files on the drive that Windows relies on to work.
Note: If you cannot even boot into Windows, skip this method and go to the next one.
Here’s how you can set CHKDSK to run before boot in Windows 11/10:
- Follow step 1-4 in the instruction above.
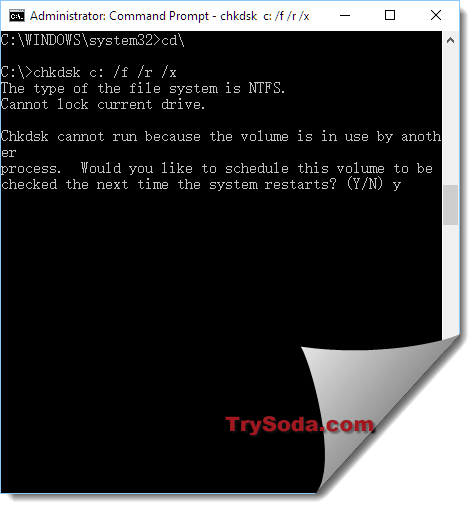
- In the command prompt, enter chkdsk commands with the parameters. For example:
chkdsk C: /f /r /x
- If chkdsk detects that the drive you want to scan is a boot drive, it will shows “Cannot lock current drive. Chkdsk cannot run because the volume is in used by another process“, and ask if you would like to schedule the drive to be checked the next time you reboot/restart your computer.
- Type and enter Y.
- Restart your computer.
- Chkdsk will run automatically during your next boot before booting into Windows.
If you cannot even boot into Windows
If you are facing a serious issue where you can’t even boot into Windows, you can force your PC to boot into recovery mode and open Command Prompt from the recovery mode.
For more info about how to launch CMD on boot, read: How to Startup Repair Windows 11/10 using Command Prompt.
When do you need to run chkdsk for your drives?
You can run CHKDSK gradually and as frequently as you like. Unlike defragmenting, CHKDSK won’t harm your drive in any way no matter how frequently you run it. If you have not run it for a while, it’s recommended that you run CHKDSK for each of your hard drives once a month.
If you encounter freezes, hangs, drives, or CPU running at 100% all the time in Windows, run CHKDSK. There may be errors on the disk that cause all the problems.
Why is chkdsk stuck at a certain percentage for a long time?
CHKDSK may take some time to finish. We are talking about several hours here depending on the size of the disk and how much space it was used. Try to wait it out. We usually let our system run CHKDSK overnight.
If CHKDSK is still stuck at a certain percentage even after 10 hours of running, try to restart the run. It may indicate that your drive is starting to fail. Backup immediately and replace the drive as soon as possible before it completely breaks down.
Повлиять на стабильность работы операционной системы может множество факторов, начиная от повреждения системных файлов и заканчивая аппаратными неполадками. При этом по характеру проблем иногда можно установить их причину, например, ошибки чтения/записи, пропажа раздела или «превращение» в RAW могут косвенно указывать на наличие ошибок файловой системы, повреждение ее логической структуры или появлению на диске так называемых битых секторов. По вполне понятным причинам физические повреждения не подлежат устранению, однако данные, записанные в проблемные сектора, могут быть перемещены в «здоровую» область диска, а сами участки с повреждениями помечены особыми маркерами, чтобы операционная система больше не пыталась записывать в них информацию. С повреждениями логической структуры всё намного проще, в большинстве случаев вызванные ими неполадки удается устранить без особых помех, воспользовавшись штатной утилитой CHKDSK.
Chkdsk в Windows 10, для чего он нужен и как его использовать
Основным предназначением этого консольного инструмента в Windows является поиск и устранение неполадок жестких дисков и внешних Flash-накопителей. Будучи запущенным с соответствующими параметрами, CHKDSK исправляет логические ошибки, маркирует bad-сектора и перемещает записанные в них данные в неповрежденные области диска. Проверка диска/раздела с помощью этого инструмента не представляет особой сложности, хотя определенные нюансы его использования всё же имеются. Чтобы проверить, скажем, раздел D, необходимо открыть от имени администратора командную строку или консоль PowerShell и выполнить в ней такую команду:
chkdsk d:

Запущенная без параметров, утилита проверит раздел на предмет ошибок и выведет соответствующее сообщение. Если ошибки будут найдены, CHKDSK предложит исправить их, выполнив команду с параметрами /F и /R, в некоторых случаях утилита может предложить выполнить команду chkdsk с параметром /scan, чтобы найти проблемы и поставить их в очередь на исправление. Лучше, однако, использовать /F и /R, так как ключ /scan служит для оперативного сканирования томов и применим только в файловой системе NTFS. Итак, чтобы исправить ошибки диска D, выполните такую команду:
chkdsk d: /f /r
Ключ F исправляет логические ошибки, ключ R выполняет поиск поврежденных секторов и переносит их содержимое. Это что касалось пользовательских томов и подключенных носителей. А вот с системным томом всё не так однозначно. Существует вероятность, что при попытке проверить раздел C вы получите сообщение «Не удается открыть том для прямого доступа». Здесь можно предложить два решения: мягкое и жесткое. Первое предполагает запуск утилиты с параметром /scan, вот так:
chkdsk C: /scan


Второе решение более трудоемкое, но и зато и более эффективное. Чтобы получить монопольный доступ к системному разделу, загрузите компьютер с установочного диска, а затем произведите проверку chkdsk, предварительно определив букву тома, так как в загрузочной среде буквы разделов отличаются. Диск C, к примеру, в среде WinPE имеет букву D. Параметры /f и /r используем в случае необходимости.

До этого момента мы проверяли тома, которым присвоена буква, а теперь представьте, что нужно проверить раздел, не имеющий буквы, допустим, «Зарезервировано системой». Как быть в этом случае? Вариантов опять же несколько. Вы можете присвоить букву тому в оснастке управления дисками, воспользоваться сторонними программами вроде Acronis Disk Director, умеющими выполнять проверку томов без буквы либо прибегнуть к услугам посредника — встроенной консольной утилиты mountvol, позволяющей монтировать разделы без буквы.


Алгоритм действий следующий. Выполните в запущенной от имени администратора командной строке mountvol и найдите в выведенном списке разделы с меткой «НЕТ ТОЧЕК ПОДКЛЮЧЕНИЯ». Как правило, первым в списке располагается зарезервированный раздел. Копируем его ID вместе с \\?\Volume и формируем такую команду, заменив значение в фигурных скобках своим:
Chkdsk \\?\Volume{xxxxxxxx-xxxx-xxxx-xxxx-xxxxxxxxxxxx}
Если надо, указываем после Chkdsk ключи /f и /r. В случае добавления последних, так как том является системным, утилита попросит отключить его, введя Y и нажав ввод. В случае обнаружения ошибок их исправления будет выполнено при следующей загрузке Windows. По большому счету это всё, что нужно знать пользователю о применении Chkdsk. Если вы хотите знать больше об этом инструменте, дополнительную информацию найдете на официальном сайте компании Microsoft.