Как записать свой голос на компьютер через микрофон windows 10

Are you looking to quickly record voice and audio on your Windows 11/10 computer without having to install any software? This tutorial will show you how to use the built-in Voice Recorder app to record voice from your microphone.

If you’re looking to record internal audio from apps or games on your computer, follow this guide instead: How to Record Internal Audio on Windows 11/10 (Without Microphone).

If you want to record both voice and screen as a video on Windows 11/10, check out this tutorial: How to Record a Video of Your Screen (with Sound) on Windows 11/10.

Record voice on Windows 11 or 10

Windows 11/10 comes with a built-in app called Voice Recorder that can quickly and easily record any audio that comes from your microphone. Here’s how to use the app to record voices and audio from your Mic on Windows 11/10:
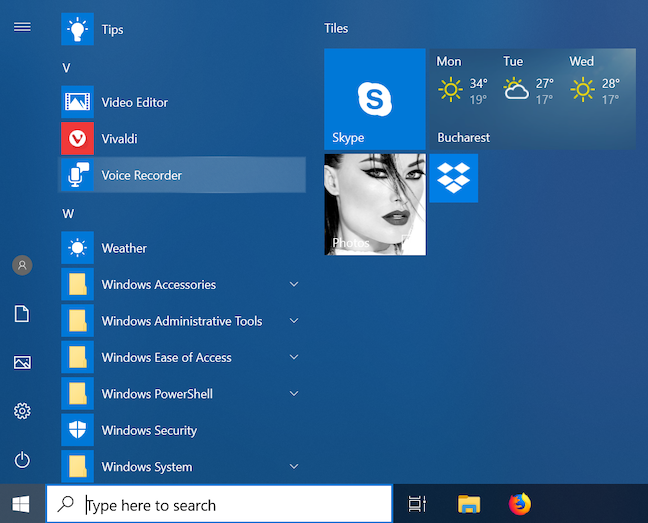
  1. Go to Start menu.
  2. Search and open “Voice Recorder“.

    Record voice from Microphone in Windows 11

    Windows 11

    Windows 10

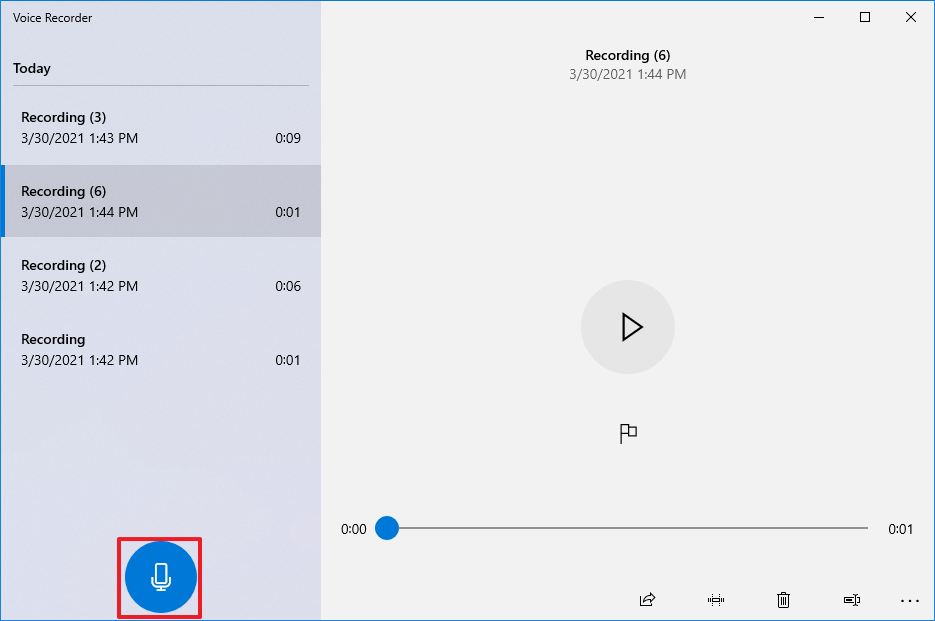
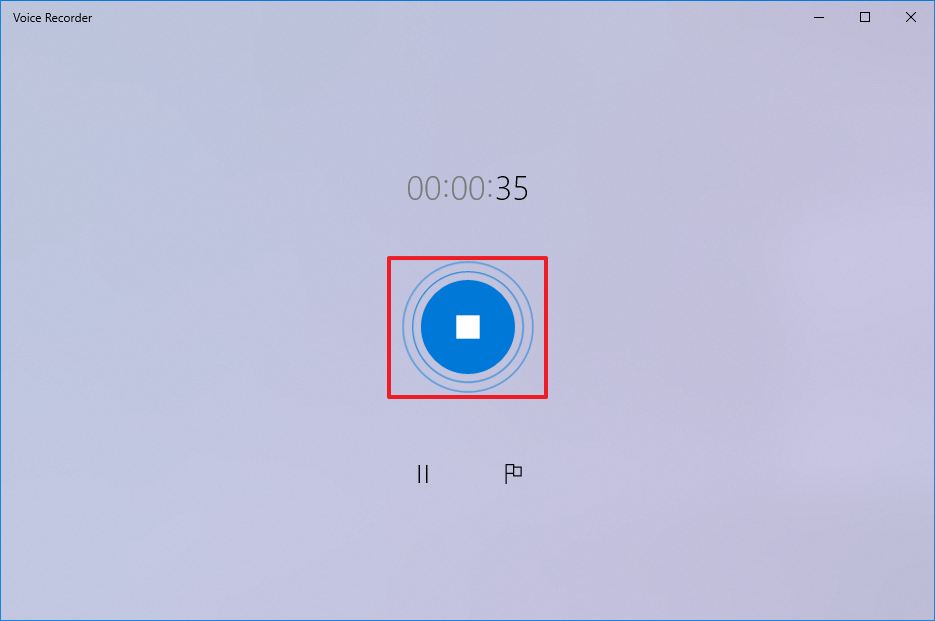
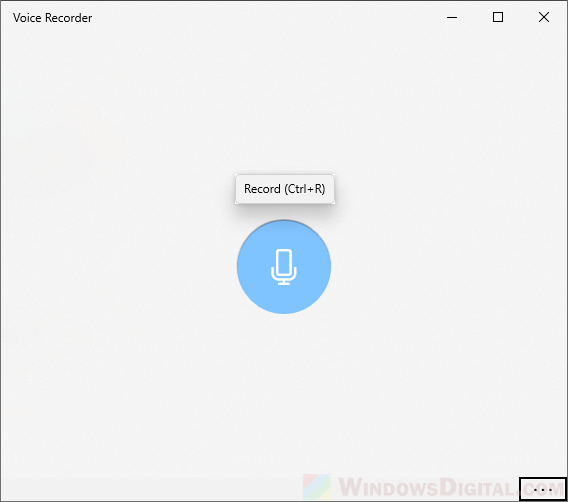
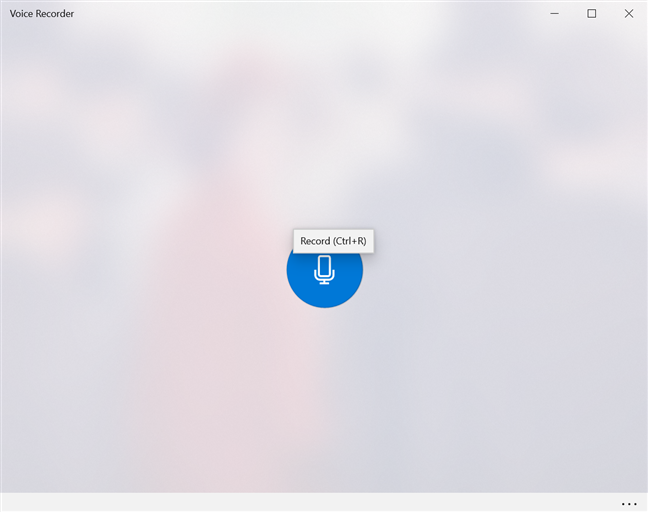
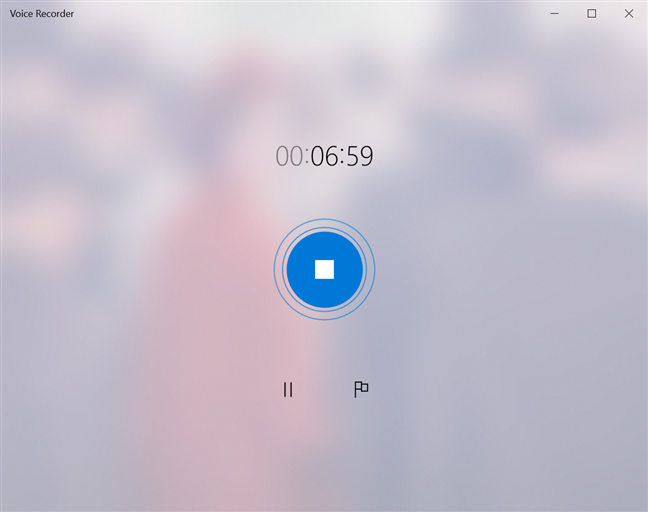
  3. Click on the blue Record button to start recording voice or audio from your microphone. Alternatively, you can press CTRL+R hotkey to start recording.
    Start Recording your voice on Windows 10/11

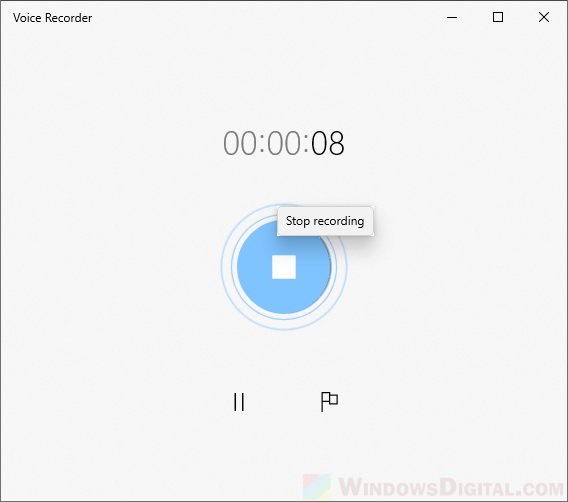
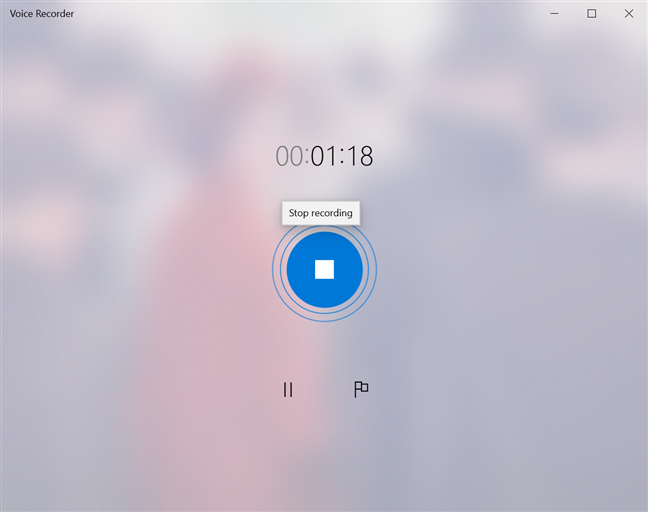
  4. To stop recording, click on the blue button again.
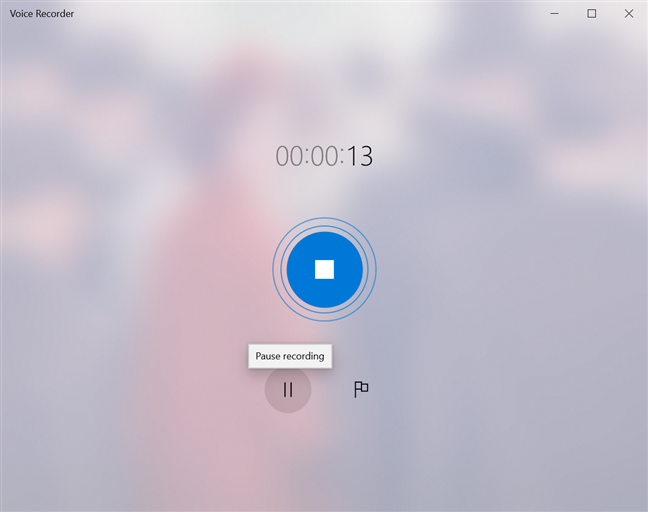
    • To pause the recording, click on the pause button. You can resume the recording anytime by pressing the same button again.
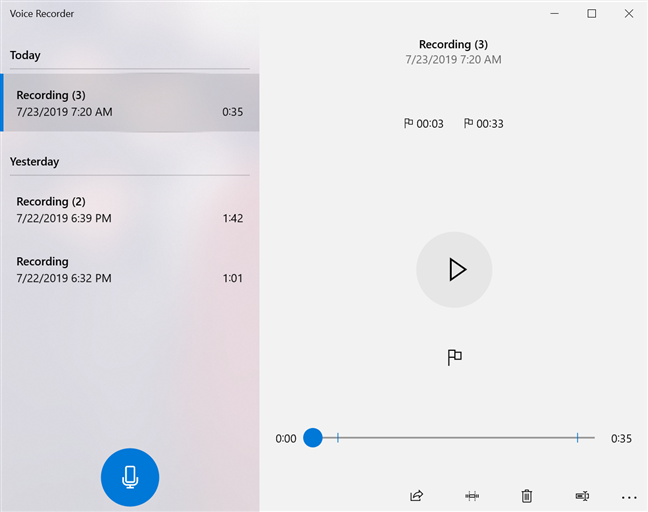
    • To add a marker, click on the flag icon, or press CTRL+M keys.
      How to Record Voice With Microphone on Windows 11/10

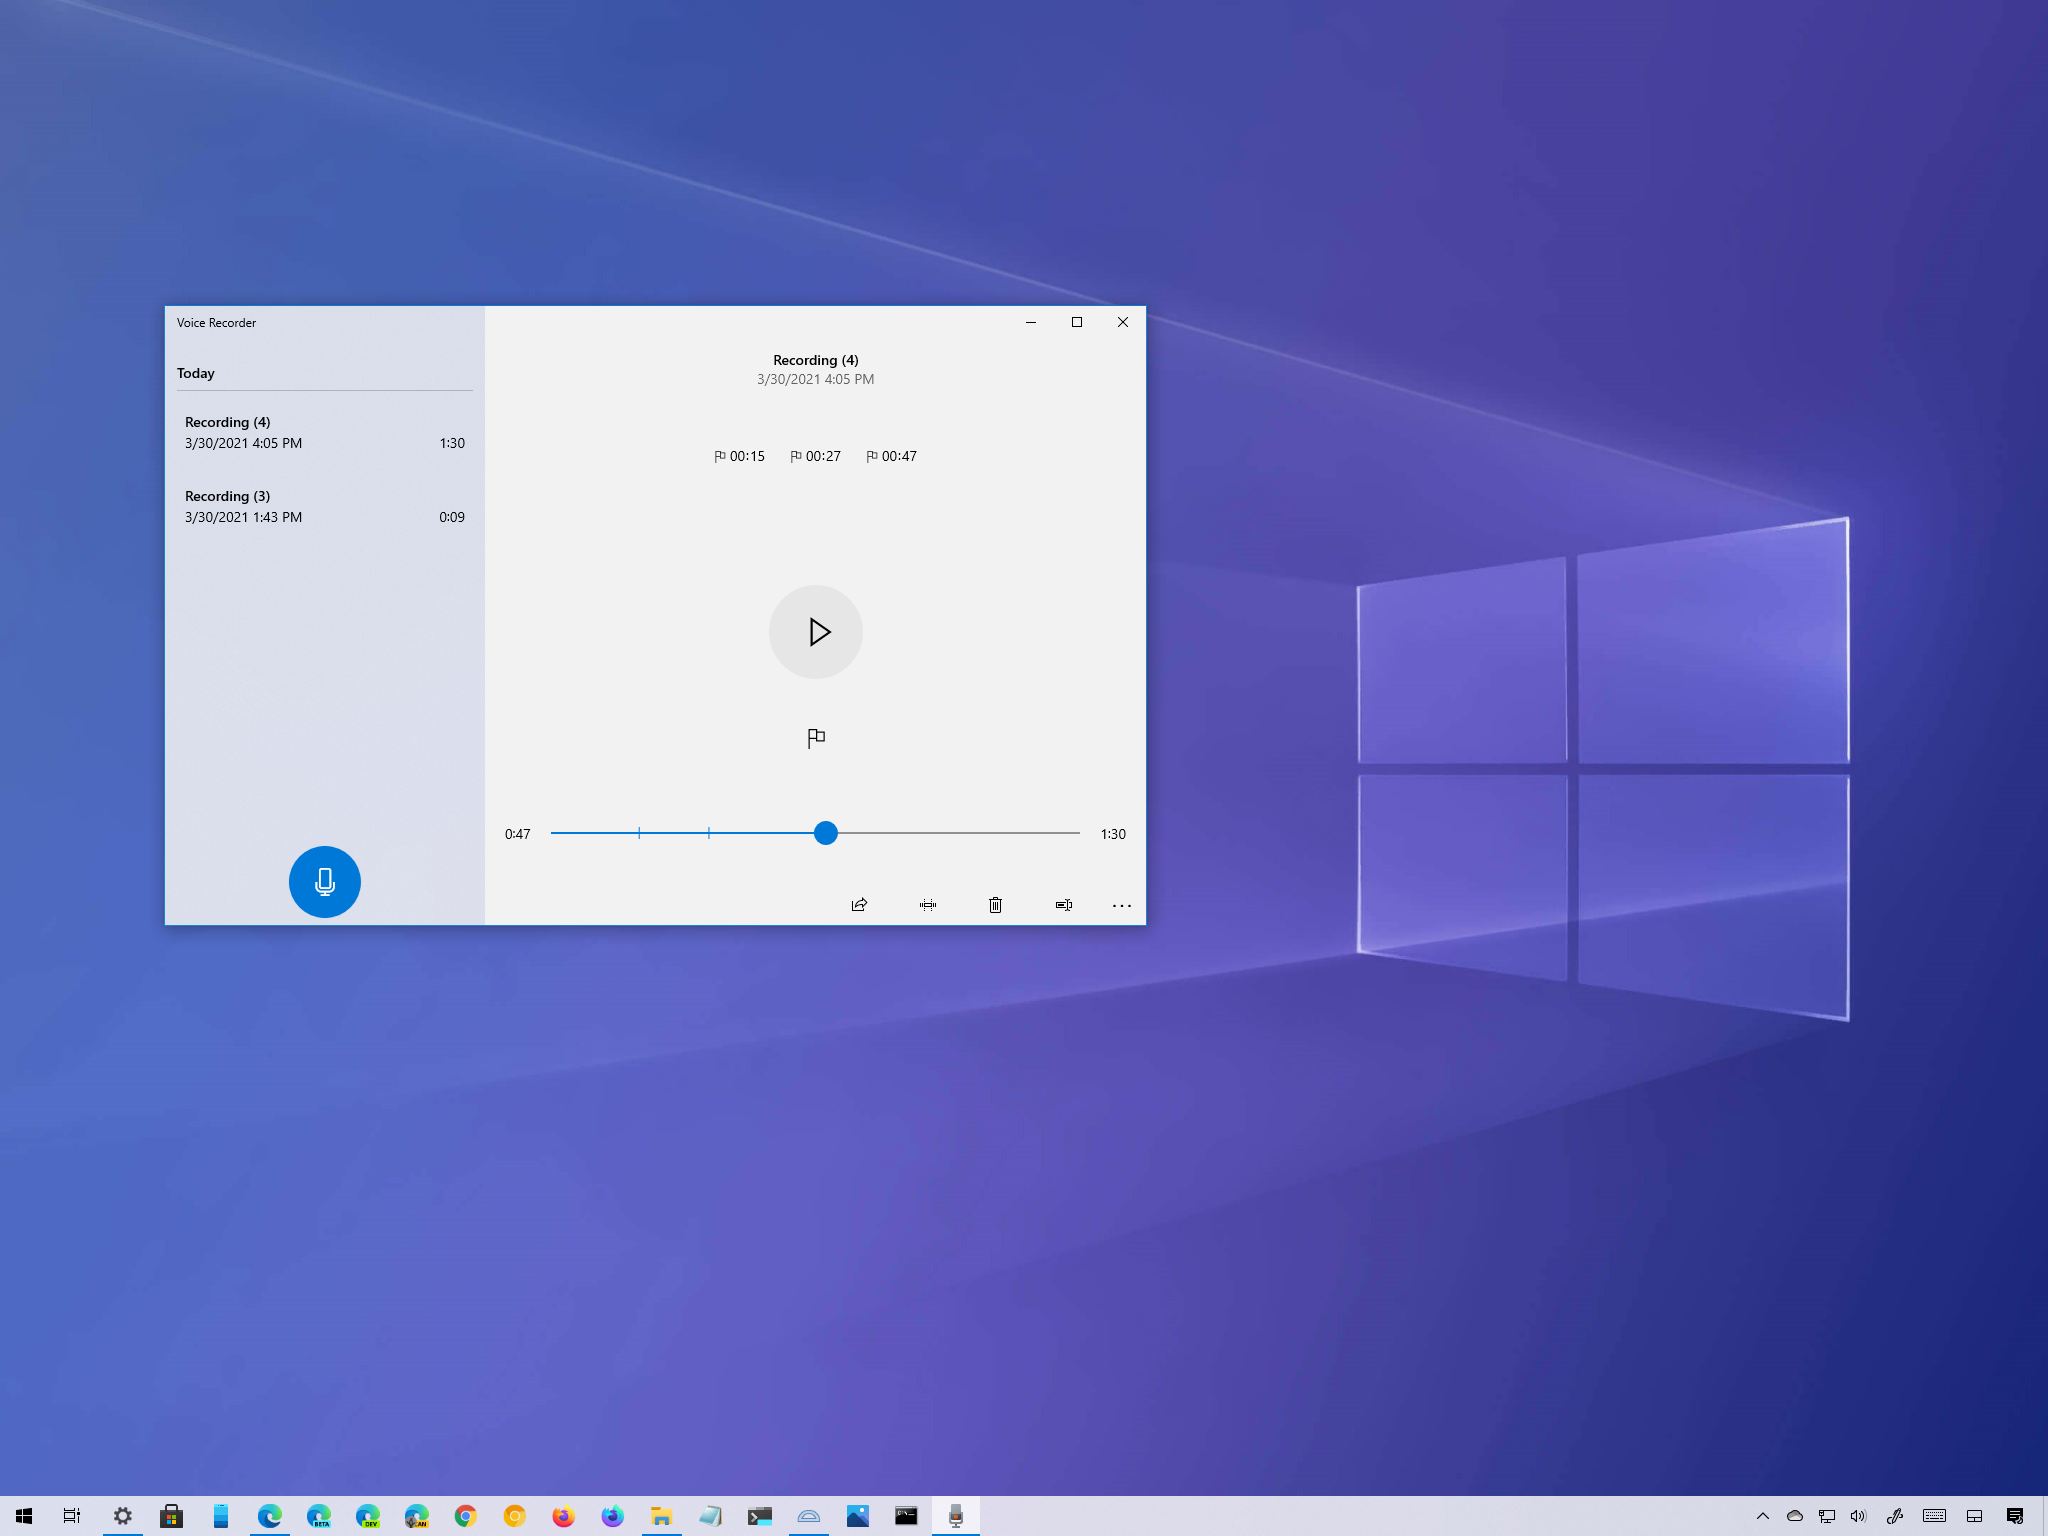
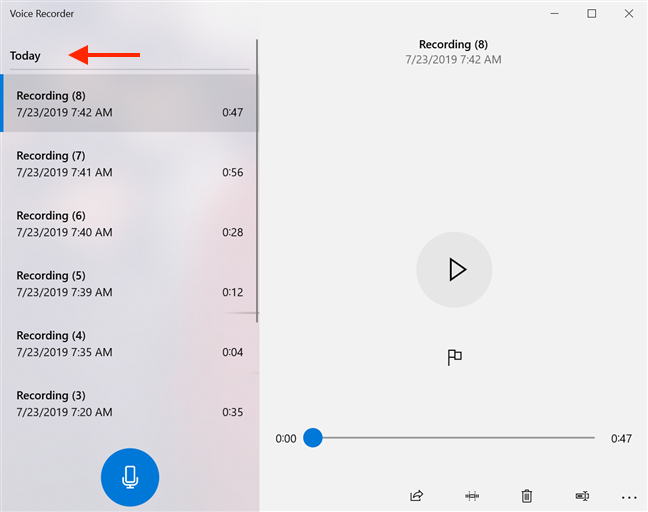
  5. As soon as you click the Stop recording button, Voice Recorder will immediately save your recording and list it along with all your past recordings on the next screen. From there, you can playback your recordings by left-clicking them.
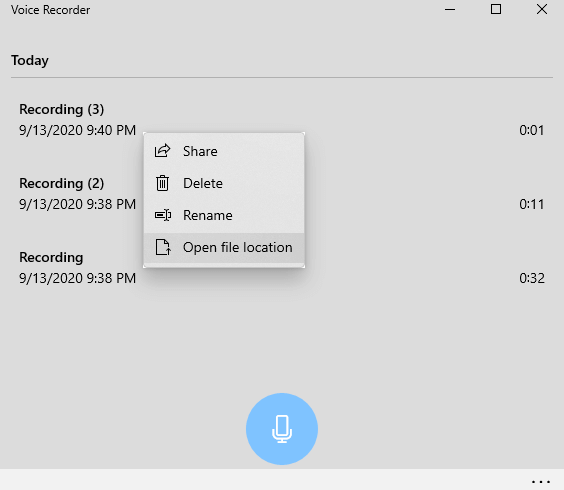
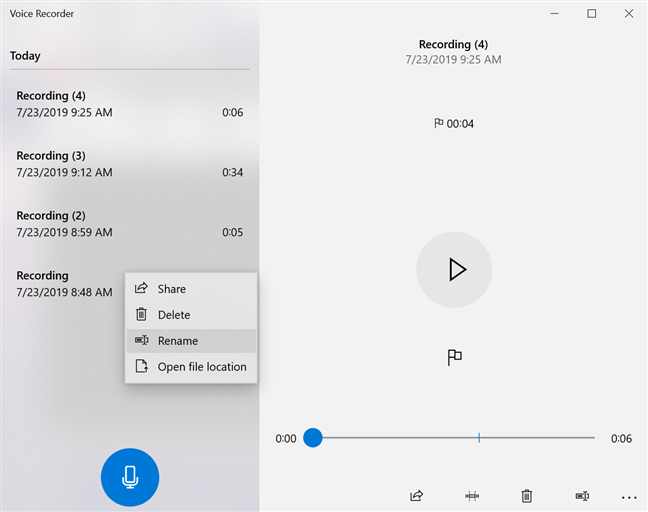
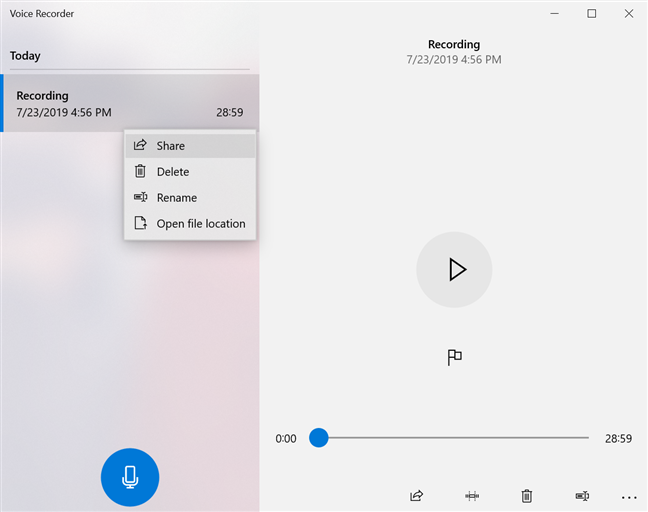
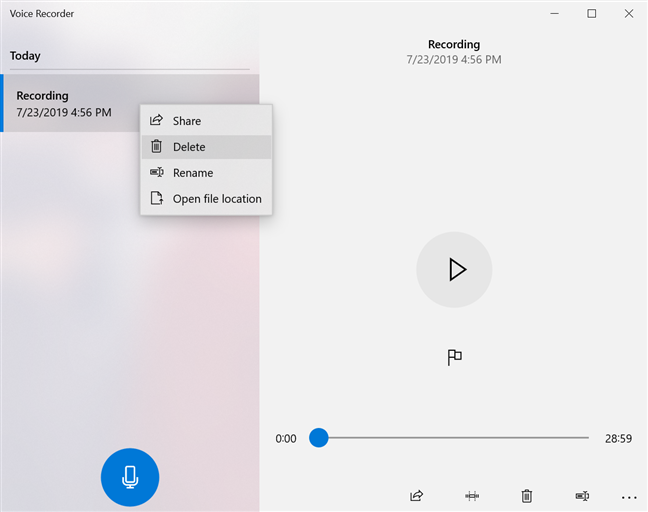
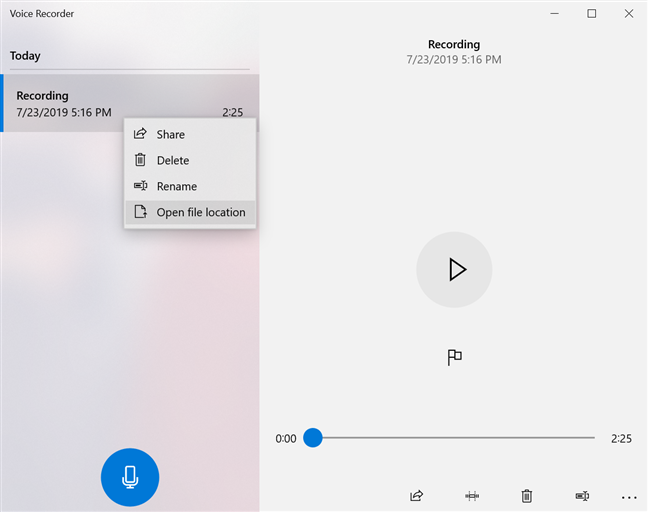
    • By right-clicking any of your recordings on the list, you can share, rename or delete them as you want.
      Where is the default save location for Voice Recorder recordings on Windows 10/11

    Optionally, you can pin the “Voice Recorder” app to the Start menu or taskbar for quick access so you don’t miss out on any surprise occasion that’s worth recording.

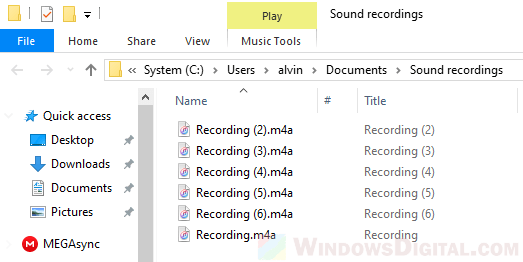
    Where does “Voice recorder” save the recording files on Windows 11/10?

    The Voice Recorder app saves all recordings in the following folder path (replace your_username with your actual Windows account’s username):

    C:\Users\your_username\Documents\Sound recordings

    All your recordings using the Voice Recorder app will be saved as M4A audio file types.

    Voice recorder Windows 11/10 file location

    Another way to quickly access this folder is by opening it directly from the Voice Recording app. Right-click any of your recordings on the app, then click Open file location.

    Recording files location

    Voice Recorder shows “To get started, connect a microphone”

    If you see a message that says “To get started, connect a microphone” when you open the Voice Recorder app, it means Windows couldn’t detect a working microphone connected to your PC, or that the app is blocked from accessing your microphone.

    To get started connect a microphone

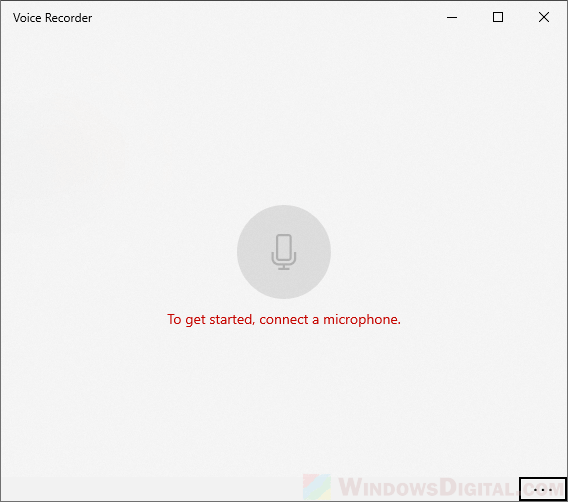
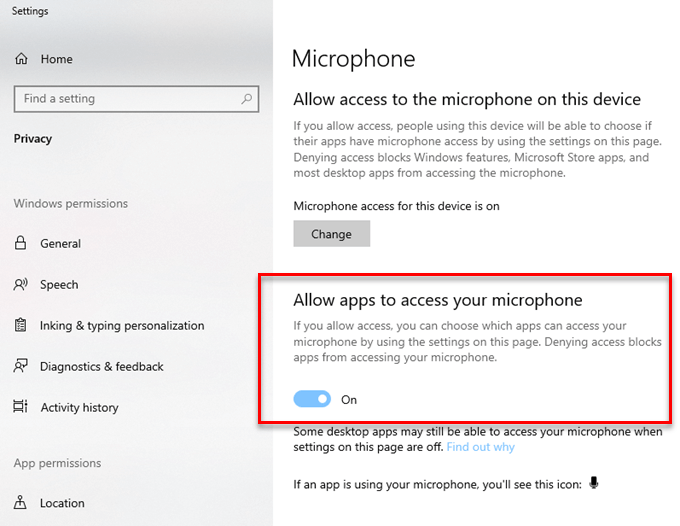
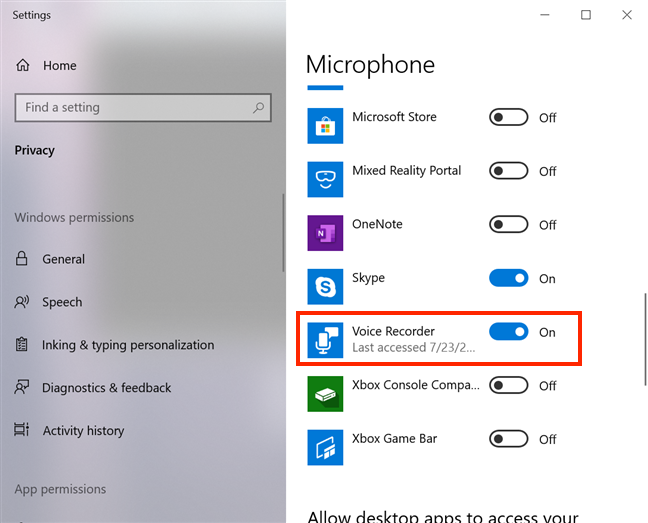
    To resolve this issue, ensure that the “Allow apps to access your microphone” option is turned on in Settings > Privacy > Microphone.

    Allow apps to access microphone

    If you’re having issues with your connected external or built-in microphone on your laptop or desktop PC, these guides may be helpful:

    • How to Test Microphone on Windows 11/10 to see if it’s working
    • Microphone Not Working After Windows 10 Update (Solved)

    Change recording quality and format

    By default, Voice Recorder saves all recordings in M4A format with a bit rate of 96 kbps. However, you can change the recording quality and format by following these steps:

    1. Open the Voice Recorder app.
    2. Click on the three-dot menu in the top-right corner of the app window.
    3. Select Settings from the drop-down menu.
    4. Under the Recordings section, you can change the Audio quality and Format settings.

    Use a keyboard shortcut to open Voice Recorder

    If you use Voice Recorder frequently, you can create a keyboard shortcut to open the app quickly. Follow these steps:

    1. Right-click on the Voice Recorder app in the Start menu or taskbar.
    2. Select More > Open file location from the drop-down menu.
    3. Right-click on the Voice Recorder shortcut in the folder that opens.
    4. Select Properties from the drop-down menu.
    5. In the Properties window, click on the Shortcut key field.
    6. Press the keyboard shortcut you want to use to open the app (e.g. Ctrl+Alt+R).

    Звукозапись — это приложение, которое можно использовать для записи звука в течение трех часов для каждого файла записи. Его можно расположить на экране рядом с другими приложениями и использовать их одновременно, что позволяет записывать звук, не прерывая работы на компьютере. 

    1. Нажмите кнопку Пуск  и найдите звукозапись или выберите приложение Звукозапись в списке.

      1. Чтобы начать запись, коснитесь или выберите Пункт Запись.

      2. Чтобы приостановить запись, нажмите кнопку Приостановить.  Кнопка Пауза изменится на кнопку Записать. Чтобы возобновить приостановленную запись, коснитесь или выберите Запись еще раз.

      3. Чтобы сохранить запись, нажмите кнопку Остановить. Вы увидите запись в списке записей. При следующем касании или нажатии кнопки Запись вы начнете новую запись.

    1. Коснитесь и удерживайте или щелкните правой кнопкой мыши запись, которую нужно переименовать.

    2. Нажмите кнопку Переименовать.

    3. Введите для записи новое имя. Нажмите кнопку Переименовать.

    Ваши записи сохраняются в приложении «Студия звукозаписи». При удалении приложения будут удалены и записи. 

    1. Откройте «Студию звукозаписи».

    2. Коснитесь и удерживайте или щелкните правой кнопкой мыши запись, к которой вы хотите предоставить общий доступ.

    3. Нажмите Поделиться.

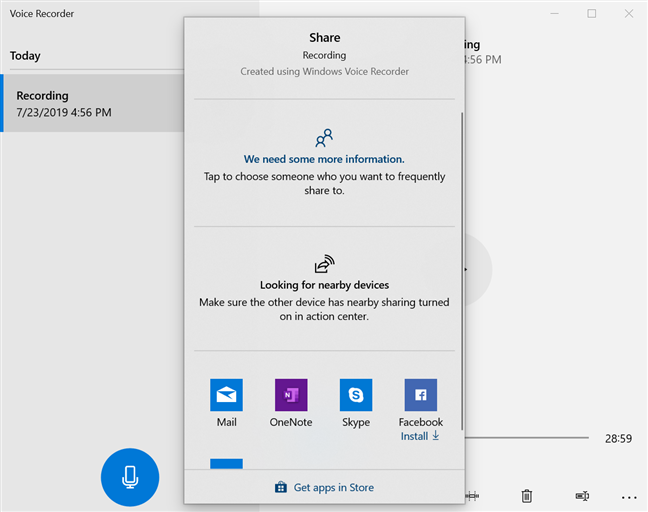
    4. Вы увидите список приложений, с помощью которых можно открыть общий доступ к вашим файлам. Чтобы отправить запись по почте, нажмите кнопку Почта и следуйте инструкциям. Чтобы предоставить общий доступ к записи приложению, щелкните приложение и следуйте инструкциям.

    Кроме того, вы можете отправить запись в виде вложения при помощи приложения «Почта». При выборе файла для вложения в сообщение электронной почты коснитесь или выберите звукозаписыватель в меню.

    1. Выберите запись, которую нужно удалить.

    2. Коснитесь и удерживайте или щелкните правой кнопкой мыши и выберите Удалить.

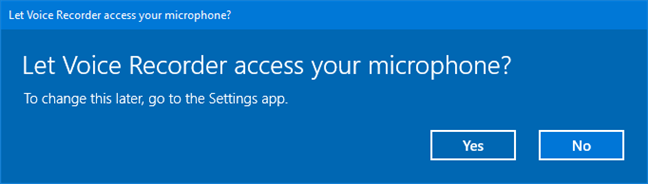
    Если вы впервые используете это приложение, следуйте инструкциям на экране, чтобы предоставить ему разрешение на доступ к микрофону компьютера.

    Чтобы вручную предоставить звукозаписывательу разрешение на использование микрофона, выполните следующие действия:

    1. Выберите Пуск  > Параметры > Конфиденциальность & безопасность > Микрофон

    2. В разделе Разрешить приложениям доступ к микрофону найдите приложение «Звукозапись» и включите доступ к микрофону

    1. Выберите Пуск  > Параметры > система > звук > вход >массив микрофона.

    2. Рядом с массивом микрофона выберите шеврон . 

    3. В разделе Параметры ввода > Громкость ввода используйте ползунок, чтобы настроить громкость микрофона. 

    Нужна дополнительная помощь?

    Нужны дополнительные параметры?

    Изучите преимущества подписки, просмотрите учебные курсы, узнайте, как защитить свое устройство и т. д.

    The free Voice Recorder app bundled with Windows 10 is great in its simplicity, allowing you to make quick and clear audio recordings, without the use of a professional program or recording device. Whether you need to practice the acceptance speech for winning your Hearthstone Tournament, decide to interview your favorite pet or want to figure out if you are good enough for American Idol, the Voice Recorder is your go-to app in Windows 10. Let’s see what it can do:

    NOTE: The screenshots and the instructions in this guide apply to Windows 10 May 2019 update or newer. If you do not know what version of Windows 10 you have, read: How to check the Windows 10 version, OS build, edition, or type.

    How to access the Voice Recorder app in Windows 10

    One way to access the Voice Recorder is to start typing the app’s name in the Windows 10 search box and then click or tap the relevant result.

    Search for the Voice Recorder app

    Search for the Voice Recorder app

    Another way is by finding the app in the list of apps from the Start Menu and then clicking or tapping on it.

    Find the Voice Recorder in the Start Menu

    Find the Voice Recorder in the Start Menu

    The Voice Recorder app opens, and, if this is the first time you access it and there are no previous recordings saved, it asks for permission to access your microphone. Obviously, this permission should be given, otherwise the app does not work.

    Voice Recorder wants to access your microphone

    Voice Recorder wants to access your microphone

    How to create a recording using Voice Recorder in Windows 10

    Click or tap the Record button or use the keyboard shortcut Ctrl + R to start your recording.

    The Record button in Voice Recorder

    The Record button in Voice Recorder

    The app starts recording, displaying the time elapsed since the audio recording started.

    The Voice Recorder displays the time elapsed since the start of a recording

    The Voice Recorder displays the time elapsed since the start of a recording

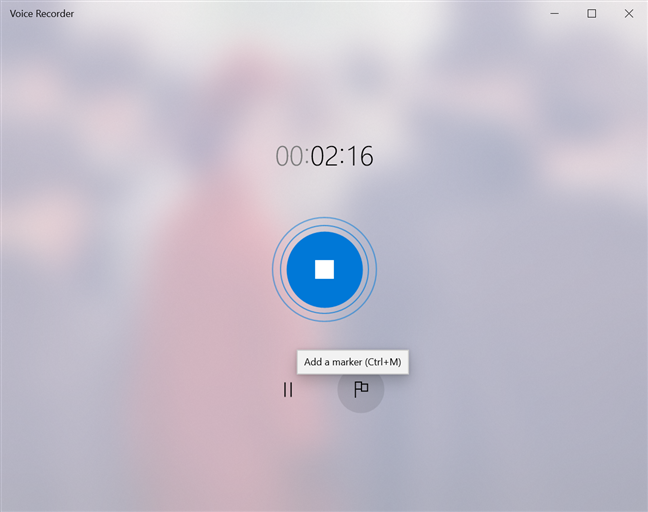
    Click or tap the Pause button to pause the recording at any time, without ending the current recording session.

    Press Pause if you want to stop recording for a short time

    Press Pause if you want to stop recording for a short time

    Clicking or tapping the Pause button one more time causes the app to resume the recording. When you are done recording, click or tap the Stop recording button in the center of the window, or press one of the following keys on your keyboard: Esc, Enter, Spacebar, or BackSpace.

    Stop the recording session by clicking the Stop button

    Stop the recording session by clicking the Stop button

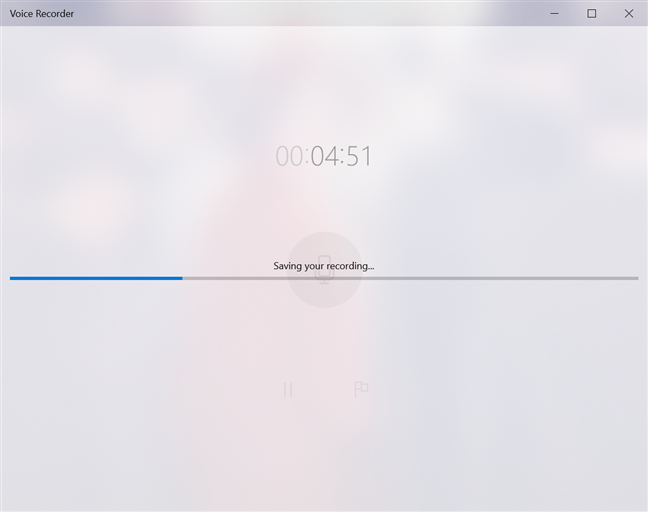
    The recording session ends and, especially when it comes to long audio recordings, you are notified that it is being saved. Keep in mind that the limit for a recording is 2hours 59 minutes and 59 seconds, according to our tests.

    Wait while your recording is being saved

    Wait while your recording is being saved

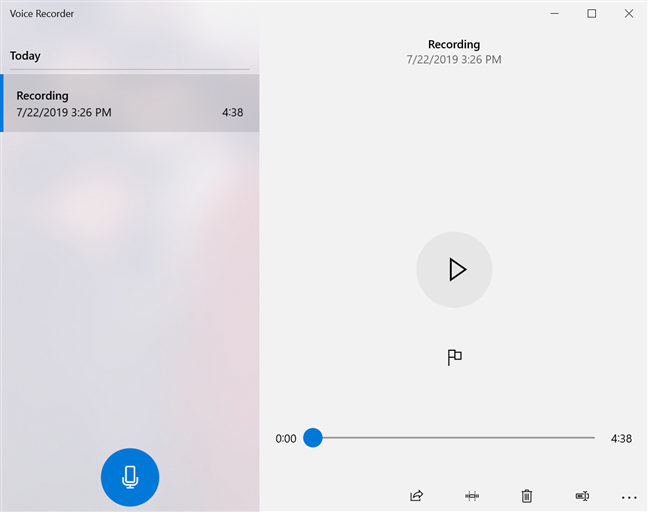
    Your audio recording is saved under the default name Recording. The date and time when the recording was saved are displayed underneath, followed by the duration of the recording. Once you have at least one recording saved in Voice Recorder, the Record button is displayed in the lower-left corner of the window, and you can press it at any time to start a new recording.

    Stopping a recording saves it

    Stopping a recording saves it

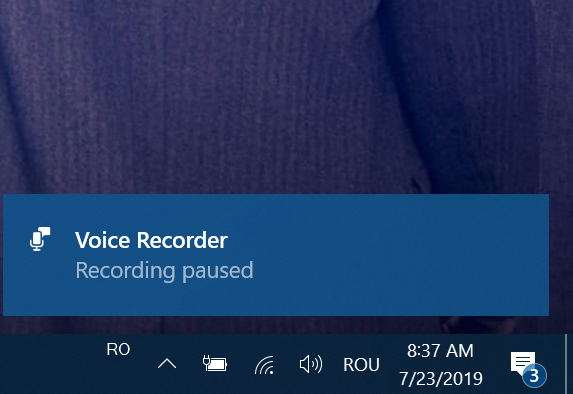
    If the Voice Recorder is closed before saving the recording, you get a notification, letting you know that your recording is paused.

    A notification lets you know your recording is paused

    A notification lets you know your recording is paused

    This is not entirely accurate, as your recording is actually saved under the name Recording (autosaved) and it can not be resumed.

    Your recording is autosaved when the Voice Recorder closes

    Your recording is autosaved when the Voice Recorder closes

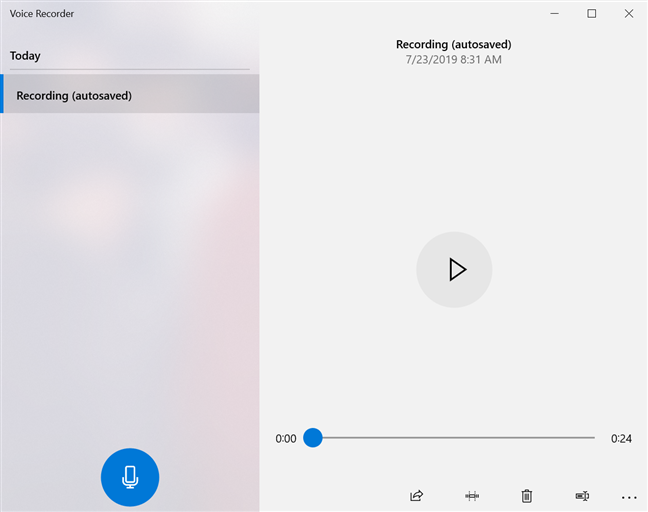
    In this specific case, any markers added to the recording are gone, same as the option to add a marker.

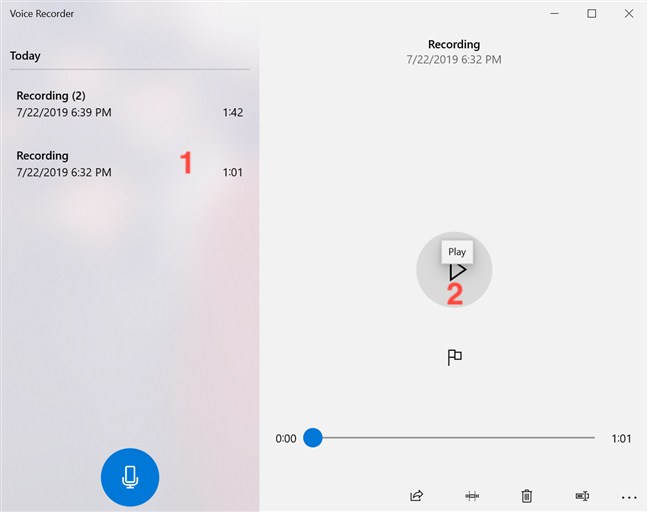
    How to find and play your audio recording in Voice Recorder

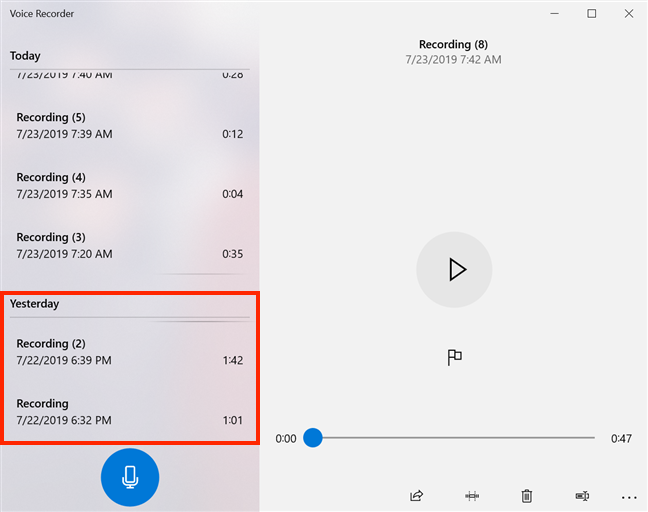
    All your recording sessions are saved in a list in the Voice Recorder app under the default name Recording, the most recent being at the top. To make things less confusing for users, subsequent recordings display a number in brackets, and the list is divided by days.

    Recordings are sorted by the day they were created

    Recordings are sorted by the day they were created

    If you use the Voice Recorder a lot, scrolling through the list of recordings to find the one you want can become tiresome. Clicking or tapping the day subcategory displayed in the Voice Recorder takes you to a new window, where you can choose any of the days when recordings have been made.

    Press a day for a complete list of the days recordings were created

    Press a day for a complete list of the days recordings were created

    Click or tap the day that interests you from the list.

    Choose the day you made the recording you are looking for

    Choose the day you made the recording you are looking for

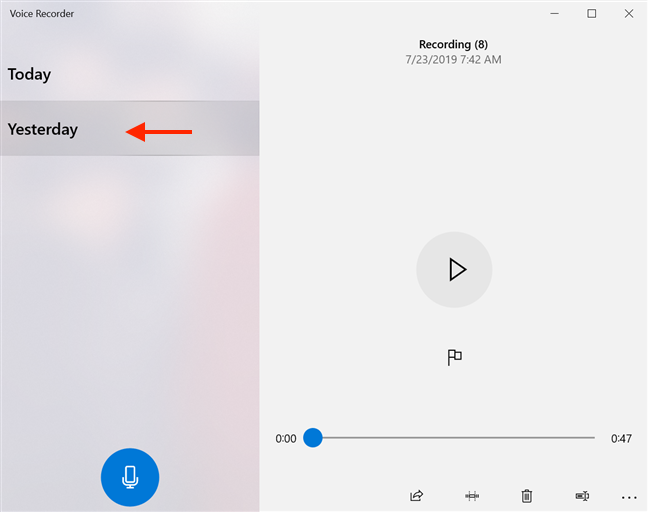
    This returns you to the initial list, where the recordings from that day come into focus.

    Choosing the day of a recording scrolls you to that section of the recording list

    Choosing the day of a recording scrolls you to that section of the recording list

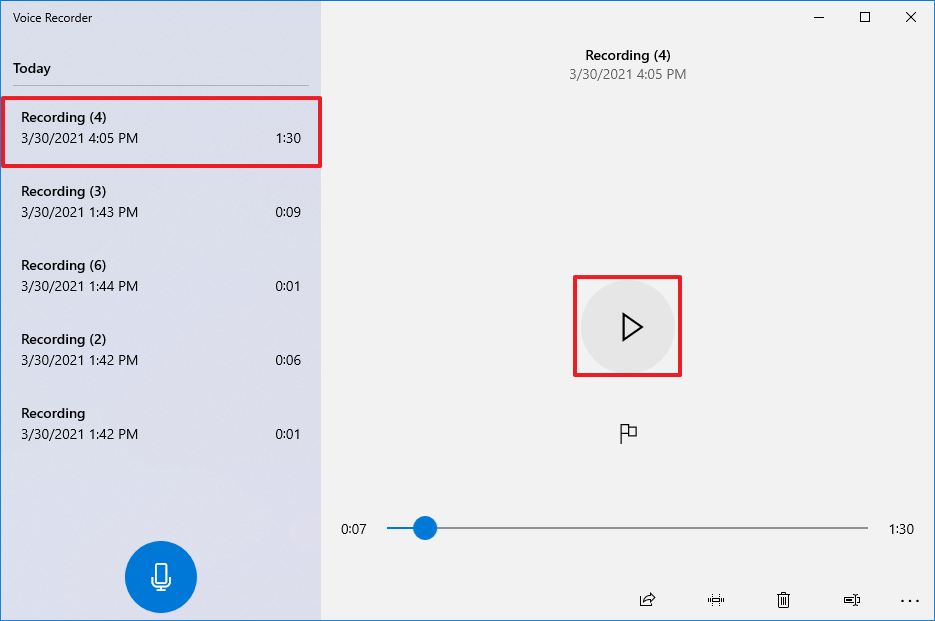
    To listen to a recording, select it from the list and either click or tap on it again or press Play.

    Press Play to listen to a recording

    Press Play to listen to a recording

    Press the Pause button to pause the recording at any time. To toggle between playing and pausing a recording, you can also click or tap on its name in the list, or use the Enter or Spacebar keys on your keyboard.

    How to use markers inside a recording in Voice Recorder

    Markers let you «bookmark» important parts of a recording, making them easy to identify and access afterwards. You can use them to mark portions of a recording or to highlight key moments, and they come in handy, especially when it comes to long recording sessions. A marker does not alter or interrupt the recording in any way. While you are recording, the flag icon displayed next to the Pause button allows you to «Add a marker» inside your recording. To add a marker, click or tap the «Add a marker» button or use the keyboard shortcut Ctrl + M.

    Add markers inside your recording while it is being created

    Add markers inside your recording while it is being created

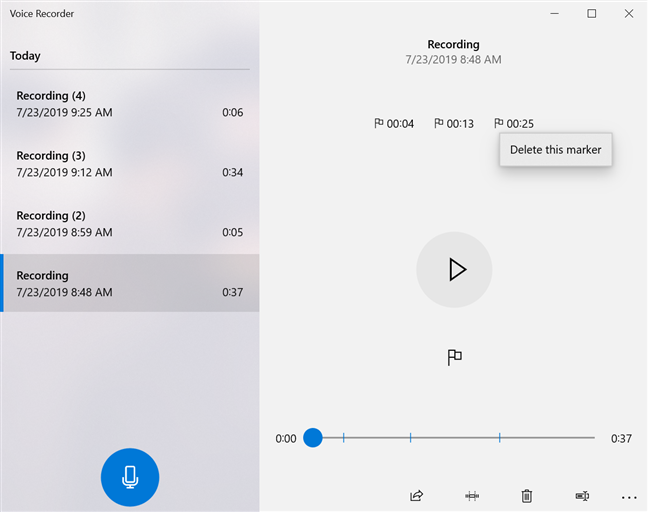
    The marker is shown at the bottom of the window, next to a flag icon, and it displays the time elapsed since the recording started.

    The marker is displayed at the bottom of the window

    The marker is displayed at the bottom of the window

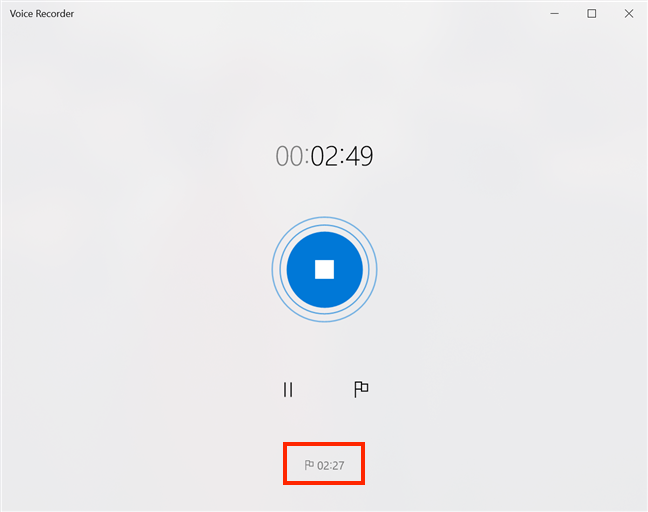
    You can add as many markers as you want while recording. You can also add markers while playing a previously saved recording, by pressing the «Add a marker» button.

    Add markers while playing a recording

    Add markers while playing a recording

    When you play a recording, all the markers for that recording (whether you added them doing the making of the recording or while listening to it) are displayed both in the upper right portion of the window, under the name and details of the recording, and in the play bar. Clicking or tapping a marker allows you to quickly jump to underlined moments.

    Click on a marker in the recording to jump to that part of the recording

    Click on a marker in the recording to jump to that part of the recording

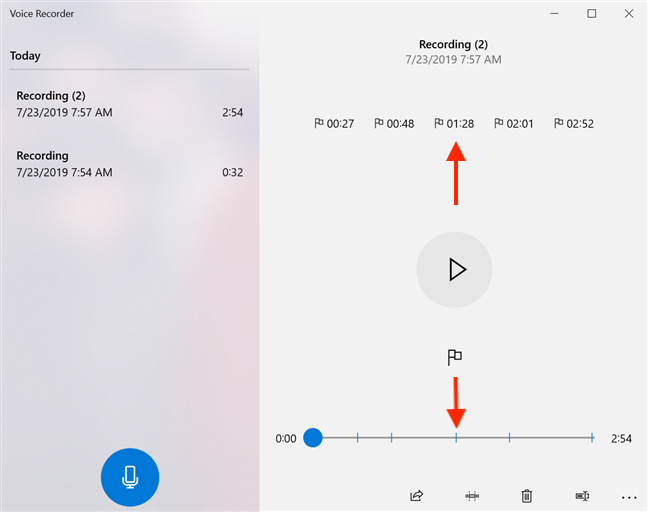
    To remove a marker, right-click or press-and-hold on it, and then click or tap the only available option: «Delete this marker.«

    Delete this marker removes the marker

    Delete this marker removes the marker

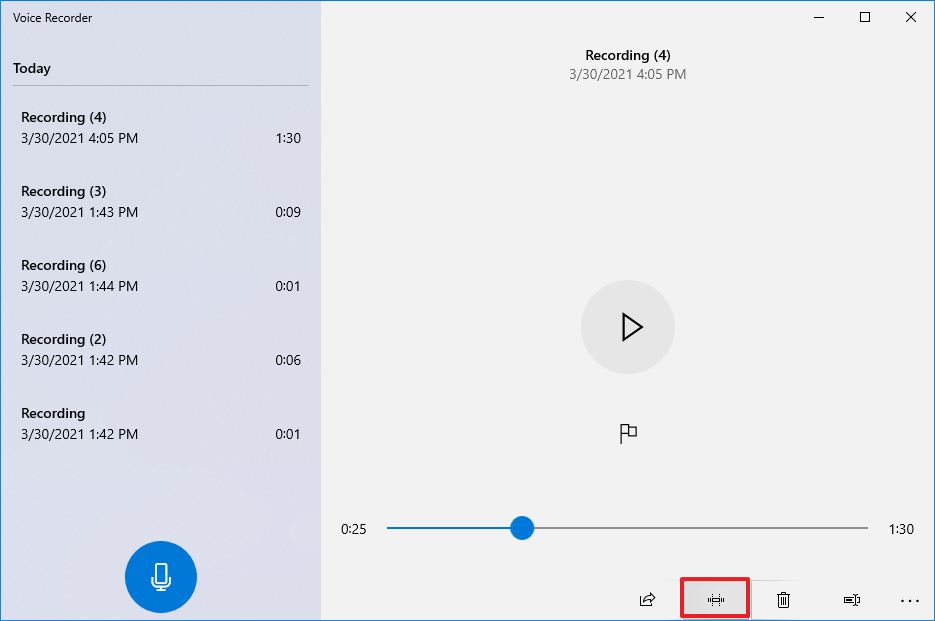
    How to trim a recording with Voice Recorder in Windows 10

    The Voice Recorder allows you to trim a recording, and only keep the relevant part(s) from it.

    To do that, select the Recording from the list and then click or tap the Trim button at the bottom of the window.

    Press Trim to edit your recording

    Press Trim to edit your recording

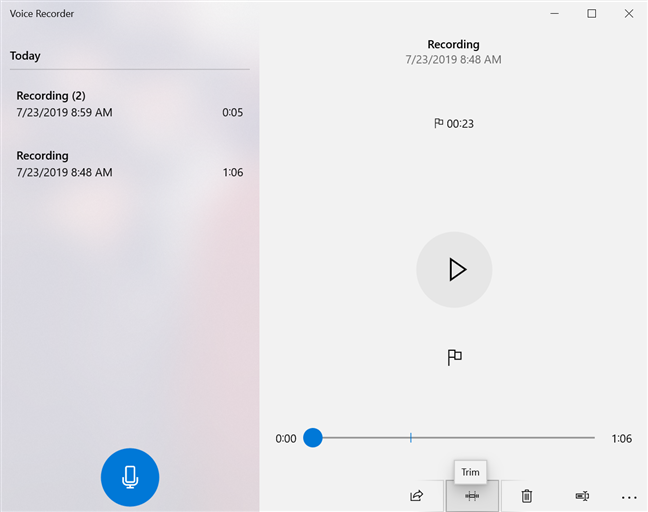
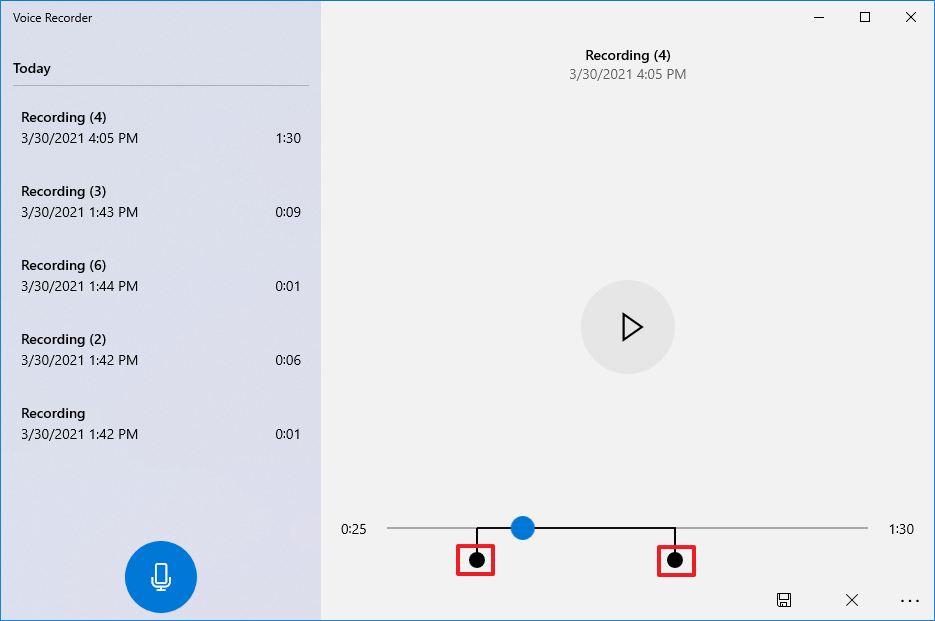
    This causes two pins to appear on the play bar, named «Start of trimmed section» and «End of trimmed section.« Drag them around to select the part of your recording you want to keep.

    Use the pins on the play bar to trim your recording

    Use the pins on the play bar to trim your recording

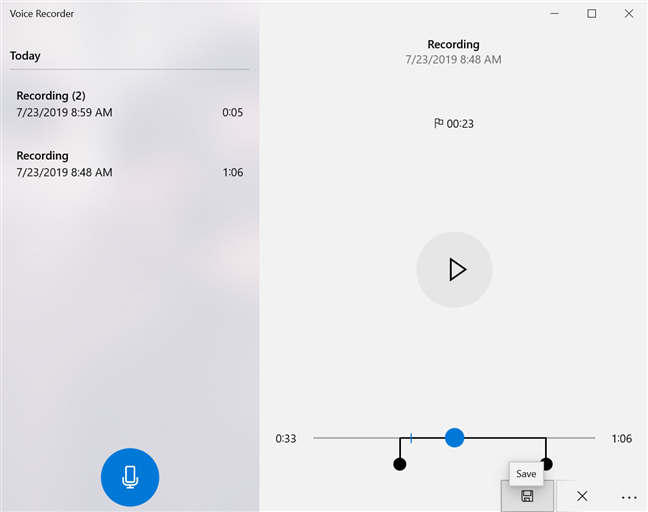
    You can press the Play button at any time while trimming to make sure your selection is accurate. When you have made your decision, click or tap Save at the bottom of the window.

    Press Save when you are done editing a recording

    Press Save when you are done editing a recording

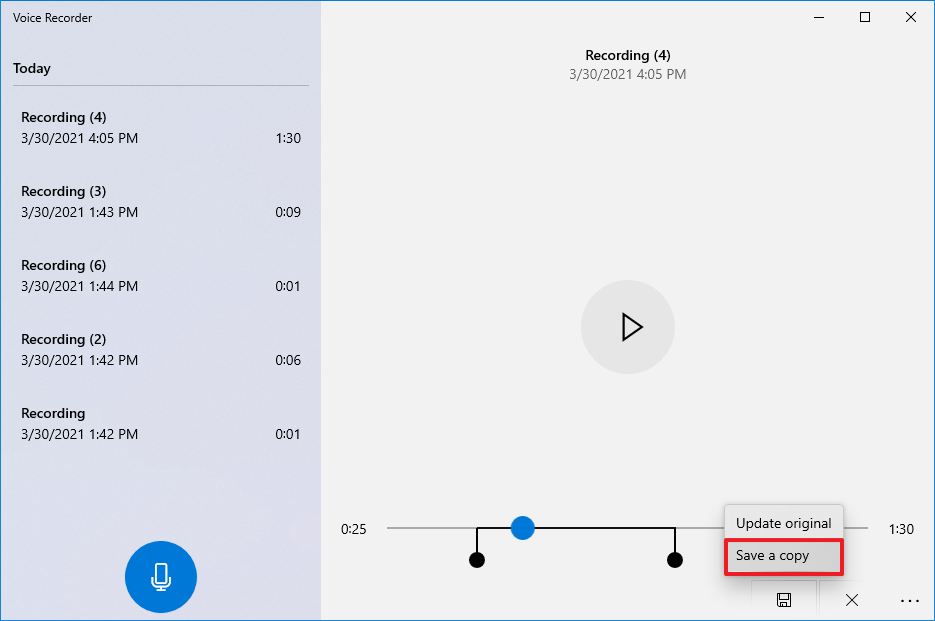
    You now have two options: «Update original» or «Save a copy.« If you choose to «Update original,« the recording is replaced by the new version, while «Save a copy» creates a new recording in the list.

    Choose how to save your trimmed recording

    Choose how to save your trimmed recording

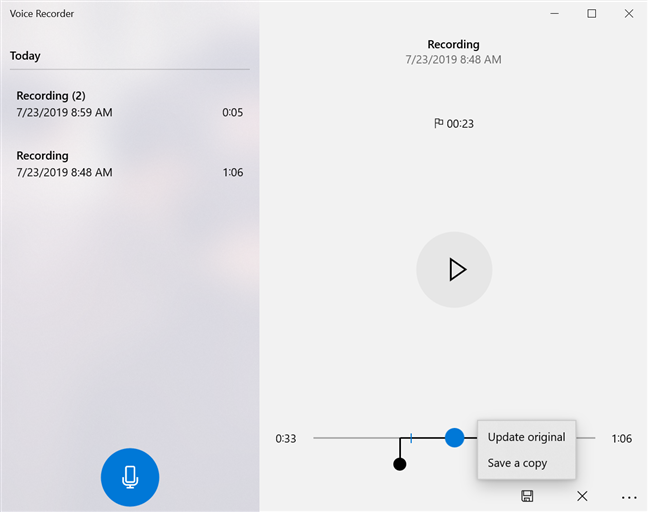
    If you change your mind, use the Cancel button (marked with an X) at any point during the trimming process or select another recording from the list to cancel editing the recording.

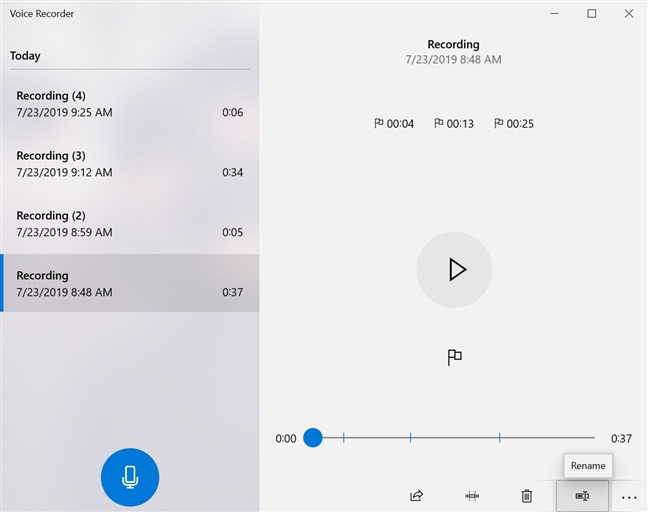
    How to rename a recording in Voice Recorder

    Having all the files in Voice Recorder named Recording can be inconvenient, so the option to rename them is a welcome addition. The easiest way to do this is by selecting the recording you want to rename and then clicking or tapping the Rename button at the bottom of the window.

    Press the Rename button to choose a new name for your recording

    Press the Rename button to choose a new name for your recording

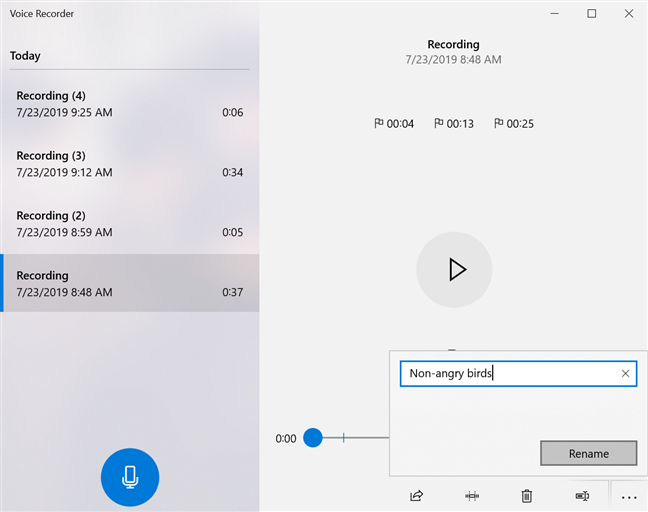
    In the pop-up window that appears, insert the desired name for your recording, and click or tap Rename.

    Choose a new name and press Rename

    Choose a new name and press Rename

    You can also rename a recording by right-clicking or pressing-and-holding it and then choosing Rename from its contextual menu.

    Choose Rename from a recording's contextual menu

    Choose Rename from a recording’s contextual menu

    The pop-up window appears, and you can insert the name of your choice for the recording and click or tap Rename.

    Insert a new name for your recording

    Insert a new name for your recording

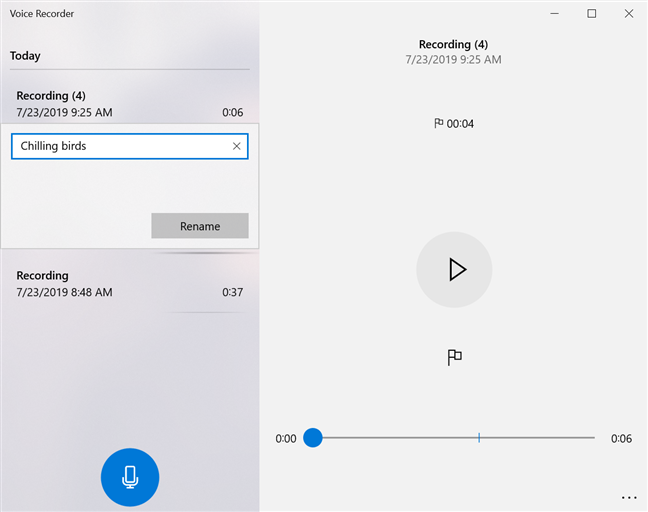
    Your recording’s new name is instantly displayed.

    How to share your recordings from Voice Recorder in Windows 10

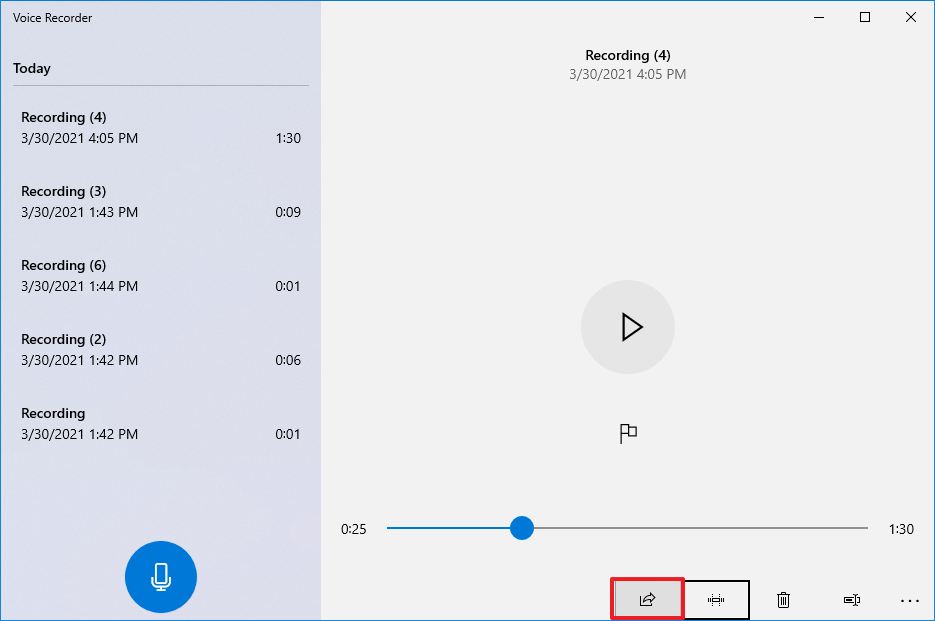
    Once you are happy with your recording, the Voice Recorder gives you the option to share it with others. Select the recording you want to share and click or tap the Share button at the bottom of the window.

    The Share button lets you share you recording

    The Share button lets you share you recording

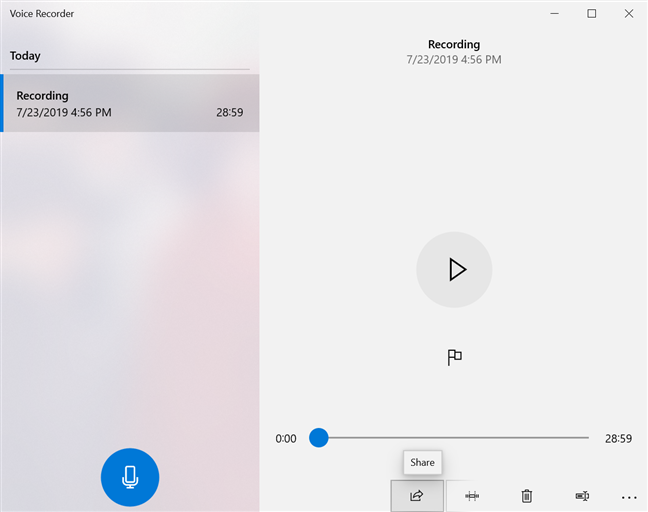
    Alternatively, you can right-click or press-and-hold the recording in the list and click or tap Share from the contextual menu.

    Press Share in a recording's contextual menu

    Press Share in a recording’s contextual menu

    A window pops up, displaying the options available for sharing.

    Choose how you want to share your recording

    Choose how you want to share your recording

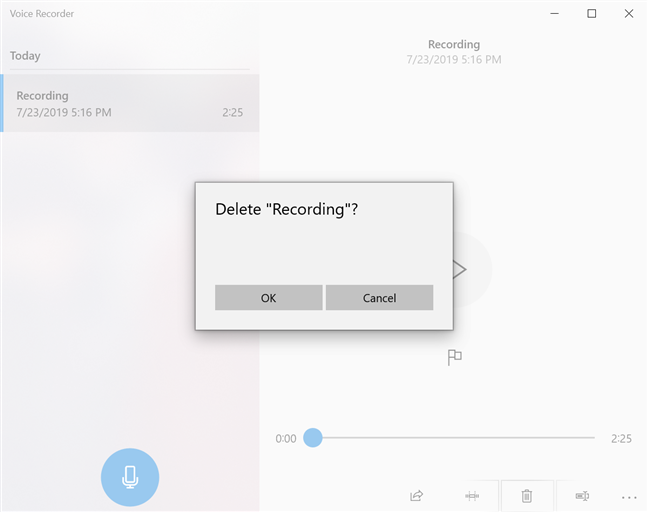
    How to delete a recording from Voice Recorder

    The obvious way to delete a recording is by selecting it and then clicking or tapping the trash-bin button at the bottom of the window, called Delete, or by pressing the Delete key on your keyboard.

    Press Delete to get rid of a recording

    Press Delete to get rid of a recording

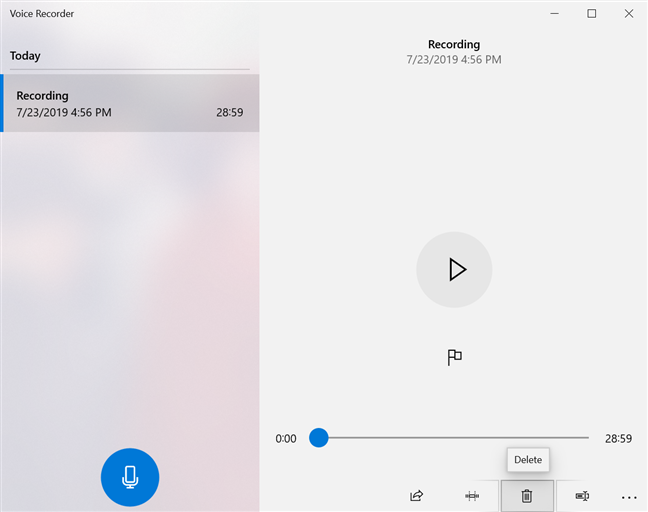
    You can also right-click or press-and-hold on any recording, then click or tap Delete.

    Click or tap Delete from the contextual menu

    Click or tap Delete from the contextual menu

    A pop-up window asks you to confirm the action.

    Confirm deleting the recording

    Confirm deleting the recording

    How to open recordings in File Explorer from Voice Recorder

    To open a recording from Voice Recorder, right-click or press-and-hold it and then press «Open file location.«

    Open file location to find your recording in File Explorer

    Open file location to find your recording in File Explorer

    You can also click or tap the three dots in the bottom right corner to open the See more menu.

    The See more menu

    The See more menu

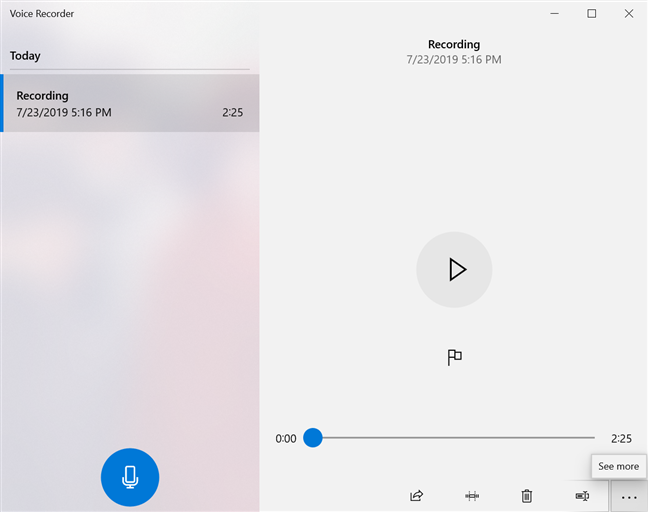
    Then click or tap «Open file location» from the See more menu.

    Click or tap Open file location

    Click or tap Open file location

    The Sound recordings folder opens in File Explorer, and your recording is highlighted within. You can find the Sound recordings folder in Documents. The default location is C:UsersusernameDocumentsSound recordingsRecording.m4a.

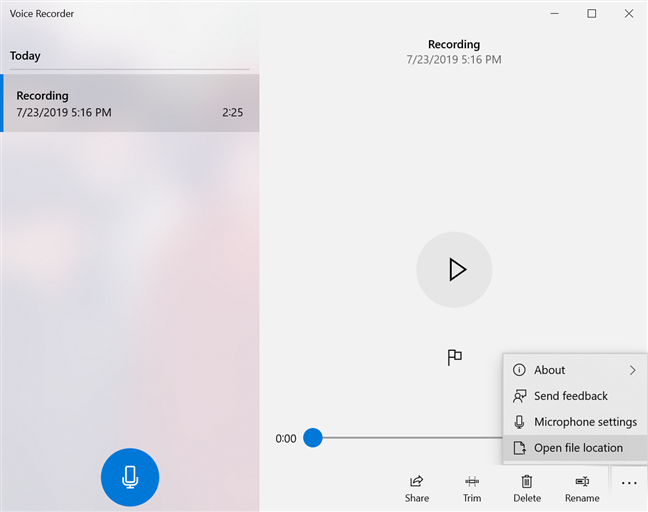
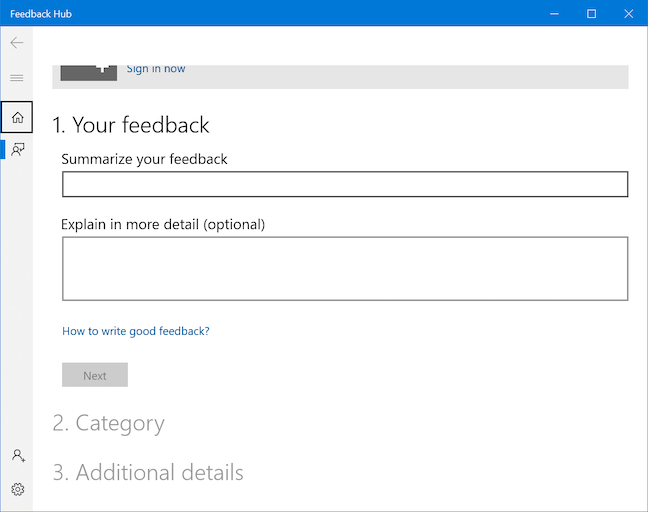
    How to provide feedback to Microsoft about Voice Recorder

    The Feedback Hub is easily accessible from the Voice Recorder app, allowing you to offer feedback to Microsoft. Click or tap the See more menu and then Send feedback.

    Click or tap <em data-lazy-src=

    Click or tap <em>Send feedback</em> to make your voice heard

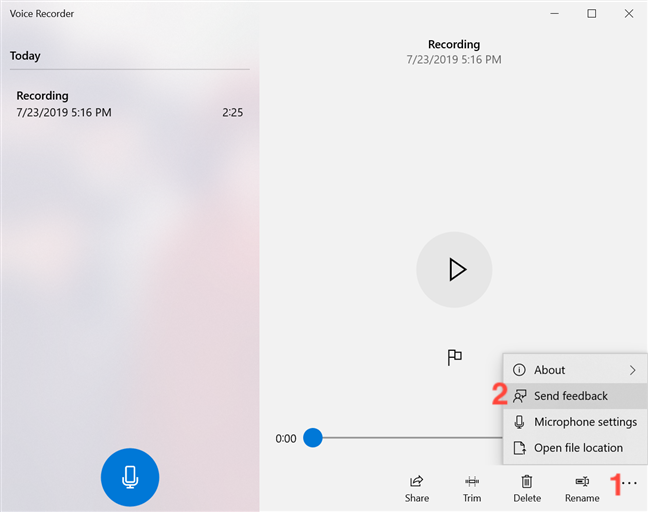
    When the Feedback Hub opens, you can sign in with your Microsoft account and use it to send your opinion to Microsoft.

    The Feedback Hub helps you share your opinion

    The Feedback Hub helps you share your opinion

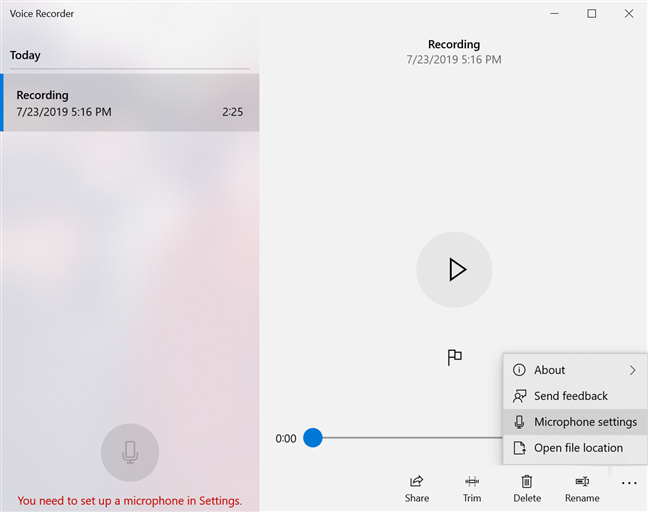
    How to set up a microphone for the Voice Recorder app

    When you open the Voice Recorder app, you might find that the Record button is unavailable and the message «You need to set up a microphone in Settings» is displayed at the bottom of the window. This happens because you did not give this app access to your microphone.

    The Voice Recorder lets you know you need to set up a microphone

    The Voice Recorder lets you know you need to set up a microphone

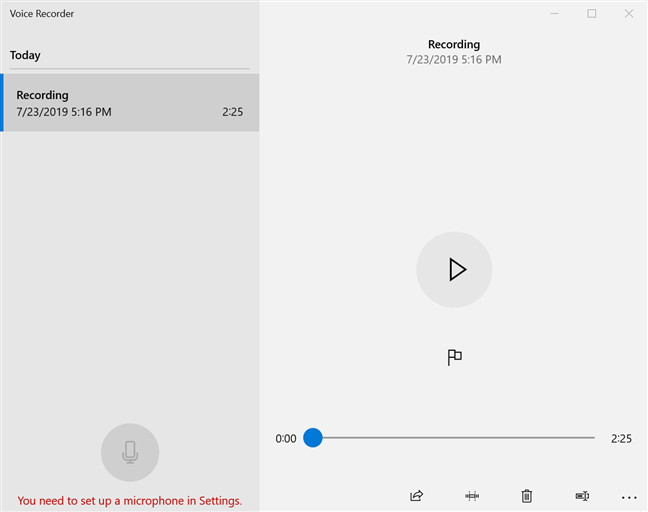
    To fix this problem, click or tap the See more menu to open it, and then Microphone settings.

    Select Microphone Settings to start setting up your microphone

    Select Microphone Settings to start setting up your microphone

    The Microphone window opens in the Settings app.

    The Microphone settings open

    The Microphone settings open

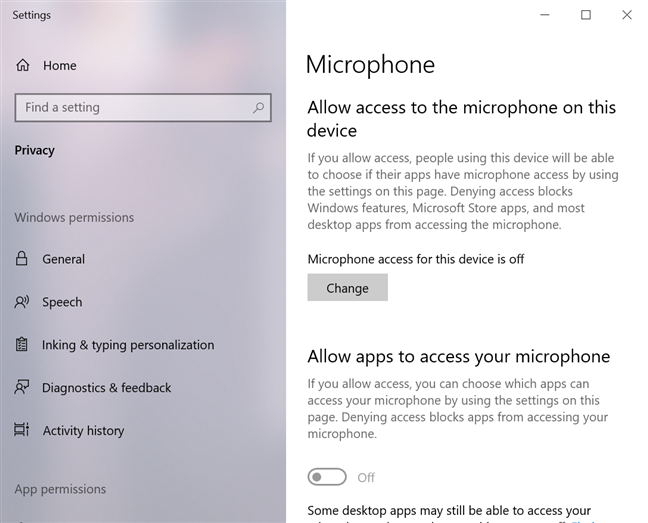
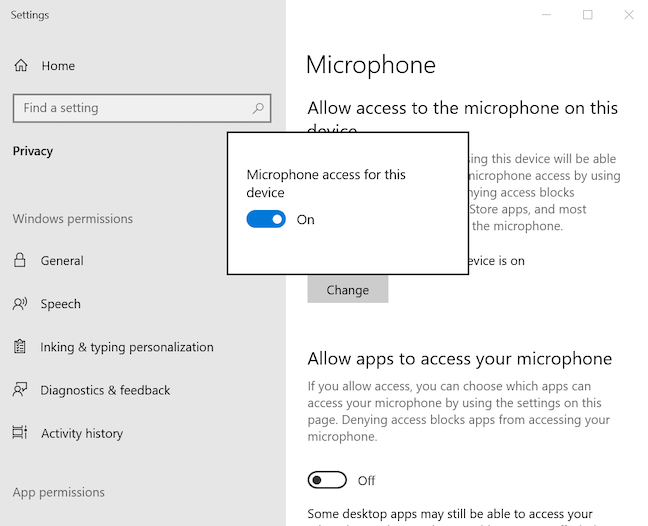
    The first thing you need to enable is the «Allow access to the microphone on this device» option. Press the Change button at the bottom of this option if the status displayed is «Microphone access for this device is off,« and then turn the switch On.

    Enable Microphone access for this device

    Enable Microphone access for this device

    The option underneath, «Allow apps to access your microphone,« also needs to be enabled, so turn it On.

    Allow apps to access your microphone

    Allow apps to access your microphone

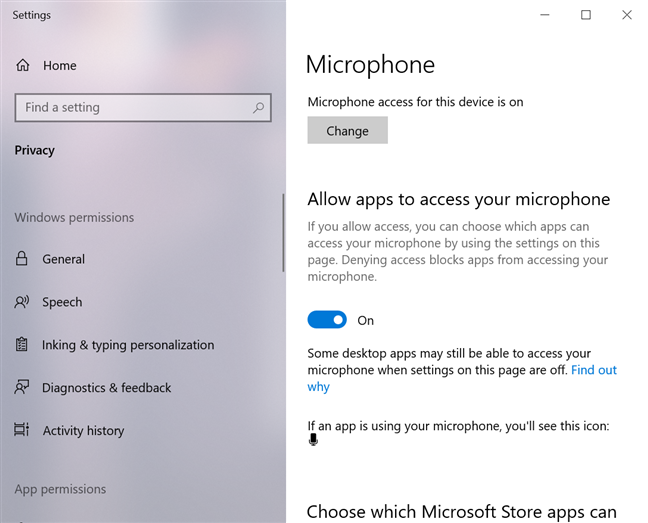
    Scroll down to find a list containing apps and whether or not they are allowed to access your microphone. Find the Voice Recorder app in the list and make sure it is allowed to access the microphone, by turning the switch On.

    Turn On the switch next to Voice Recorder

    Turn On the switch next to Voice Recorder

    This should resolve any issues, and the Voice Recorder app should work as intended.

    What is the first recording you plan to make with the Voice Recorder?

    Thank you for taking the time to read this very thorough tutorial! During its creation, our Lenovo Yoga Book kept picking up birds happily chirping outside, so we ended up creating lots of National Geographic soundtracks. Now that you know everything about the Voice Recorder app, let us know what you plan your first recording to be. Comment below and let’s discuss.

    record-sound-voicerecorder-app-windows-10_2020

    record-sound-voicerecorder-app-windows-10_2020
    (Image credit: Windows Central)

    On Windows 10, the Voice Recorder app is a quick and convenient solution that anyone can use to record lectures, conversations, interviews, podcasts, and virtually anything else.

    Although you can find many other applications with many different features, the free Voice Recorder app included on Windows 10 is simple and ships with all the necessary functionalities to record, trim, flag important moments, and share audio tracks.

    In this Windows 10 guide, we will walk you through the steps to use the Voice Recorder app on your computer.

    How to add Voice Recorder app on Windows 10

    Voice Recorder comes installed on Windows 10, but you will have to install it manually if you don’t have it.

    To install the app to record voice, use these steps:

    1. Open the Windows Voice Recorder download page.
    2. Click the Get button.

    Download Voice Recorder

    Source: Windows Central (Image credit: Source: Windows Central)
    1. Click the Open button (if applicable).
    2. Click the Get\Install button.

    Once you complete the steps, the app will be available from the Start menu to record audio on your desktop or laptop.

    How to use Voice Recorder app on Windows 10

    On Windows 10, Voice Recorder is a straightforward app. You only need one of the best microphones. The one built-in on your device, the one from a webcam, or any microphone will do just fine for basic recording.

    All the latest news, reviews, and guides for Windows and Xbox diehards.

    The instructions below include everything you need to get started recording, listing, and editing sound files.

    Record audio

    To record audio on Windows 10, make sure the microphone is connected (if applicable), and use these steps:

    1. Open Start.
    2. Search for Video Recorder, and click the top result to open the app.
    3. Click the Record button.Quick tip: You can also start recording using the Ctrl + R keyboard shortcut.

    Record sound button in Voice Recorder app

    Source: Windows Central (Image credit: Source: Windows Central)
    1. (Optional) Click the Flag button to add a marker to the recording.Quick note: This option won’t interrupt the audio recording, but you can quickly jump to important parts of the recording when editing the track. You can use the marking feature while recording or listening to the audio file.
    2. (Optional) Click the Pause button (or Alt + P keyboard shortcut) to stop recording without terminating the session. (This option will keep the recording in a single file.)
    3. Click the Stop button to end the voice recording.Quick note: You can also use the Spacebar, Backspace, Enter, or Esc key to stop recording.

    Voice Recorder stop button

    Source: Windows Central (Image credit: Source: Windows Central)

    Once you complete the steps, the audio will save automatically using a .m4a file format in the «Sound recordings» folder inside the «Documents» folder.

    If you need the best microphone, we recommend the Blue Yeti Nano since it offers good quality sound and a relatively low price.

    Budget friendly

    Blue Yeti Nano

    The Blue Yeti Nano has impressive sound and built quality considering its price. It’s a USB-powered plug-and-play device, and it features no-latency headphone output, headphone volume, and mute button.

    Play audio recordings

    To play recorded audio tracks on Windows 10, use these steps:

    1. Open Start.
    2. Search for Video Recorder, and click the top result to open the app.
    3. Select the track from the left pane to play the audio.

    Voice Recorder play and pause audio

    Source: Windows Central (Image credit: Source: Windows Central)
    1. Click the Pause/Play button as necessary.

    Once you complete the steps, click the Pause button to stop listening or select another recording from the playlist.

    Trim audio recording

    To trim an audio track after a recording session, use these steps:

    1. Open Start.
    2. Search for Video Recorder, and click the top result to open the app.
    3. Select the recording from the left pane.
    4. Click the Trim button from the bottom-right corner.

    Voice Recorder trimming option

    Source: Windows Central (Image credit: Source: Windows Central)
    1. Use the pins in the track to select the beginning and end of the recording, leaving out the parts you want to trim.

    Trim recording on Windows 10

    Source: Windows Central (Image credit: Source: Windows Central)
    1. Click the Save (floppy) button from the bottom-right corner.
    2. Select the Save a copy (recommended) or the Update original option.

    Save copy of audio file

    Source: Windows Central (Image credit: Source: Windows Central)

    After you complete the steps, you will end up with a shorter version of the file.

    Rename audio files

    Although the app saves every recording file automatically, it uses generic names, which are not descriptive enough to keep your recordings organized.

    To rename a recording file on Windows 10, use these steps:

    1. Open Start.
    2. Search for Video Recorder, and click the top result to open the app.
    3. Select the recording from the left pane.
    4. Click the Rename button in the bottom right corner.
    5. Type a descriptive name for the file — for example, interview_satya_nadella_april2021.
    6. Click the Rename button.

    Voice Recorder change file name

    Source: Windows Central (Image credit: Source: Windows Central)

    Once you complete these steps, the audio file will be saved with the name you specified in the «Sound recording» folder inside the «Documents» folder.

    Share audio recording

    To share a recording on social media or email, use these steps:

    1. Open Start.
    2. Search for Video Recorder, and click the top result to open the app.
    3. Select the recording from the left pane.
    4. Click the Share button from the bottom-right corner.

    Voice Recorder share file option

    Source: Windows Central (Image credit: Source: Windows Central)
    1. Select the app to share the audio file.
    2. Continue with the on-screen directions to share the audio file.

    If you have to import the audio file into another project, you do not need to share it. Instead, copy and paste the file from the «Sound recordings» folder to your «Documents» folder or any other location.

    How to fix Voice Recorder app problems on Windows 10

    In the event that the app is not working, there is likely a problem with the microphone or privacy settings on Windows 10.

    Fix Voice Recorder microphone access

    To allow the Voice Recorder app to access the microphone, use these steps:

    1. Open Settings.
    2. Click on Privacy.
    3. Click on Microphone.
    4. Under the «Allow access to the microphone on this device» section, click the Change button.
    5. Turn on the Microphone for this device toggle switch.
    6. Under the «Allow apps to access your microphone» section, make sure the toggle switch is in the On position.

    Microphone privacy settings

    Source: Windows Central (Image credit: Source: Windows Central)
    1. Under the «Choose which Microsoft Store apps can access your microphone» section, turn on the Voice Recorder toggle switch.

    Enable microphone for Voice Recorder app

    Source: Windows Central (Image credit: Source: Windows Central)

    After you complete the steps, the app should now be able to record audio from the microphone.

    Fix microphone problems

    If the app can’t find the microphone, you can use the «Sound» troubleshooter to fix this problem.

    To fix microphone problems on Windows 10, use these steps:

    1. Open Settings.
    2. Click on Update & Security.
    3. Click on Troubleshoot.
    4. Click the Additional troubleshooters option.

    Additional Troubleshooters

    Source: Windows Central (Image credit: Source: Windows Central)
    1. Under the «Fin and fix other problems» section, select the Recording audio option.
    2. Click the Run the troubleshooter button.

    Run Recording Audio troubleshooter

    Source: Windows Central (Image credit: Source: Windows Central)
    1. Select the microphone having the issue.
    2. Click the Next button.

    Windows 10 troubleshooter fix microphone

    Source: Windows Central (Image credit: Source: Windows Central)
    1. Continue with the on-screen directions to resolve the problem.

    Once you complete the steps, any problems with the microphone should be resolved, and Voice Recorder should now work correctly.

    If the microphone still does not work, check it is connected properly to the computer. In the case that you have multiple microphones, you can use these steps to set the system default. If it is a USB microphone, you can try a different port on the device or USB cable.

    In the case that you have a Bluetooth microphone, confirm it appears on Settings > Devices > Bluetooth & other devices. Also, make sure that Bluetooth is enabled on your device from the settings page. You can learn more about using Bluetooth in this comprehensive guide.

    More Windows 10 resources

    For more helpful articles, coverage, and answers to common questions about Windows 10, visit the following resources:

    • Windows 10 on Windows Central – All you need to know
    • Windows 10 help, tips, and tricks
    • Windows 10 forums on Windows Central

    Mauro Huculak has been a Windows How-To Expert contributor for WindowsCentral.com for nearly a decade and has over 15 years of experience writing comprehensive guides. He also has an IT background and has achieved different professional certifications from Microsoft, Cisco, VMware, and CompTIA. He has been recognized as a Microsoft MVP for many years.

    Загрузить PDF

    Загрузить PDF

    С помощью программы “Звукозапись” от Microsoft, которая доступна на всех версиях Windows, вы можете записывать, редактировать и воспроизводить свой голос. Она также позволит вам соединять воедино сказанные фразы, добавлять музыку или вставлять комментарии к документам или видео. Мы покажем вам, как это сделать.

    1. Step 1 Откройте звукозапись.

      Нажмите на кнопку “Пуск”. В поисковую строку введите “звукозапись”, затем в результатах поиска выберите ее.

      • В Windows 8 введите “звукозапись”, находясь на начальном экране, после чего в результатах поиска выберите “Звукозапись”.
      • Программа “Звукозапись” не откроется, если у вас не подключен к компьютеру микрофон.
      • Для прослушивания аудио к компьютеру должны быть подключены колонки или наушники.
    2. Step 2 Начало записи.

      В окне звукозаписи нажмите на кнопку Начать звукозапись (кнопка с красной точкой).

    3. Step 3 Пойте, говорите или озвучьте то, что хотите записать.

      Зеленая шкала будет двигаться, давая вам знать, что идет запись.

      • С помощью звукозаписи вы можете сделать запись длительностью до 60 секунд. Если вам не достаточно времени, читайте далее, что с этим можно сделать.
    4. Step 4 Остановка записи.

      Для остановки записи нажмите на кнопку Остановить запись (черный квадрат). После чего автоматически откроется окно сохранения записи.

    5. Step 5 Сохраните запись.

      Сохраняйте аудиозапись в то место, где вы потом ее легко найдете.[1]

      • Если вы пока не хотите ее сохранять, чтобы закрыть диалоговое окно “Сохранить как”, нажмите “Отмена”. Чтобы продолжить аудиозапись, нажмите кнопку “Возобновить запись”. Когда закончите, кликните по “Остановить запись” и сохраните файл.
      • Файлы, сделанные программой “Звукозапись”, можно воспроизводить на большинстве плееров, включая Windows Media Player, iTunes и другие подобные программы.

      Реклама

    1. Step 1 Найдите надежную программу.

      В интернете есть множество как платных, так и бесплатных программ для записи, и многие из них — от проверенных разработчиков. Скачивайте только с тех сайтов, которые заслуживают доверия, и перед этим прочитайте о программе как можно больше отзывов.

      • Почти все программы позволяют производить звукозапись длительностью более лимита ПО “Звукозапись” 1 минута.
    2. Step 2 Поиграйте с настройками тона и скорости.

      Почти все сторонние программы для аудиозаписи позволяют изменять настройки. Вы можете замедлить запись, чтобы лучше разобрать слова, или увеличить высоту голоса, чтобы говорить как бурундук.

    3. Step 3 Делайте высококачественные записи.

      Профессиональные программы для звукозаписи способны улучшить качество вашей записи. Эти программы могут пригодиться, если у вас есть высококачественный микрофон и вы часто делаете и редактируете звукозаписи.

    4. Step 4 Переведите ваше пение на следующий уровень.

      Запись ваших песен — это первый шаг к всемирной известности. Для записи своих песен дома с профессиональным подходом вы можете использовать бесплатные программы для аудиозаписи.

      Реклама

    Советы

    • Для записи песен с CD-плеера на компьютер настройте ваш компьютер на определение линейного входа вместо входа для микрофона:
      • Откройте Панель управления звуковыми устройствами, нажав на кнопку меню Пуск и выбрав Панель управления. В поисковую строку введите «звук», затем кликните по Звук в результатах поиска.
      • Перейдите на вкладку Запись.
      • Щелкните по Line In (Линейный вход) и выберите По умолчанию
      • Кликните по кнопке Свойства, перейдите на вкладку Уровни и перетащите ползунок громкости вправо, чтобы увеличить громкость записи, затем нажмите OK.
      • В диалоговом окне Звук нажмите OK.
      • Вы хорошо справились!
    • Для преодоления 60-секундного лимита в программе «Звукозапись» есть несколько способов. Первый — это метод копирования и вставки.
      • Запишите максимум 60 секунд тишины. В меню Правка выберите Копировать и затем — Вставить. Этим вы увеличите время записи до 120 секунд. С этого момента вы можете добавлять по 60 секунд за раз или, копируя и вставляя, увеличивать это время в два раза. Благодаря этим действиям, вы быстро увеличите время записи: 60+60=120 + 120 = 240 + 240 = 480 + 480 = 960, и т. д. Всего за четыре процедуры копировать-вставить у вас будет 16 минут записи!
      • Второй способ преодоления 60-секундного лимита требует использования командной строки.
      • Откройте командную строку, нажав на кнопку меню Пуск. В поисковой строке введите «командная строка» и выберите ее в результатах поиска.
      • В командной строке введите следующее, где filename — это название вашей аудиозаписи (имя файла), а filetype — расширение файла:

        SoundRecorder/FILE filename.filetype /DURATION hhh:mm:ss

        Например, если вы хотите сделать запись в формате wma с именем «FunkyBunky» длительностью 3 минуты 20 секунд, введите следующее

        SoundRecorder/FILE FunkyBunky.wma/DURATION 0000:03:20

      • Нажмите кнопку enter, и «Звукозапись» откроется как иконка в области уведомлений.
      • Сделайте вашу запись на запланированную продолжительность, после этого она будет сохранена в C:\Users\ВАШЕИМЯПОЛЬЗОВАТЕЛЯ под именем «FunkyBunky».
    • Если вы не можете найти программу «Звукозапись» на вашем компьютере, возможно, вы ее удалили (может быть когда-то давно, когда пытались освободить немного места на винчестере). В этом случае, вы можете легко скачать ее с любого надежного веб-сайта.
    • Для записи гитары вам понадобится звуковая карта с линейным входом. Посмотрите на заднюю, боковые и переднюю часть компьютера, вы должны увидеть три разъема: розовый, голубой и зеленый. В розовый вы подключаете микрофон. Голубой разъем вы используете как линейный вход для подключения, например, CD-плеера. Зеленый служит для подключения динамиков и наушников. Для подключения гитары сделайте следующее:
      • Подключите одну сторону кабеля к гитаре, а другую — к переходнику с 6,3 мм на 3,5 мм, затем — к разъему микрофона. Это сработает.
      • Однако, если вы хотите получить действительно качественный звук, задумайтесь о приобретении USB аудио-интерфейса или другого активного (с питанием) интерфейса между компьютером и гитарой.
    • USB микрофоны и аудио интерфейсы — отличные и бюджетные средства для работы со звуком на ПК. Есть отличные USB-микрофоны с очень хорошим качеством звука.

    Реклама

    Что вам понадобится

    • Устройство ввода — микрофон, музыкальный инструмент или другой проигрыватель. Большинство современных компьютеров имеют встроенный микрофон, но если у вас его нету, микрофон можно легко приобрести в магазине.
    • Устройство вывода — колонки или наушники

    Об этой статье

    Эту страницу просматривали 54 952 раза.

    Была ли эта статья полезной?

    Понравилась статья? Поделить с друзьями:
    0 0 голоса
    Рейтинг статьи
    Подписаться
    Уведомить о
    guest

    0 комментариев
    Старые
    Новые Популярные
    Межтекстовые Отзывы
    Посмотреть все комментарии
  1. Грустный смайлик в меню пуск windows 10 что значит
  2. Отключение служб windows 10 tweaker
  3. Как убрать файл из автозагрузки windows 10
  4. Можно ли удалять обновления windows 10 для очистки
  5. Как зайти в настройки диска windows 10