
23 июля 2023
В общем, это только мой способ, т.к. никто больше о таком способе не писал.
Требуемые программы:
1. usbimager (bztsrc.gitlab.io/usbimager/)
2. Ultra ISO
Еще нужен образ Вашей MacOS.
Открываем образ MacOS программой Ultra ISO.
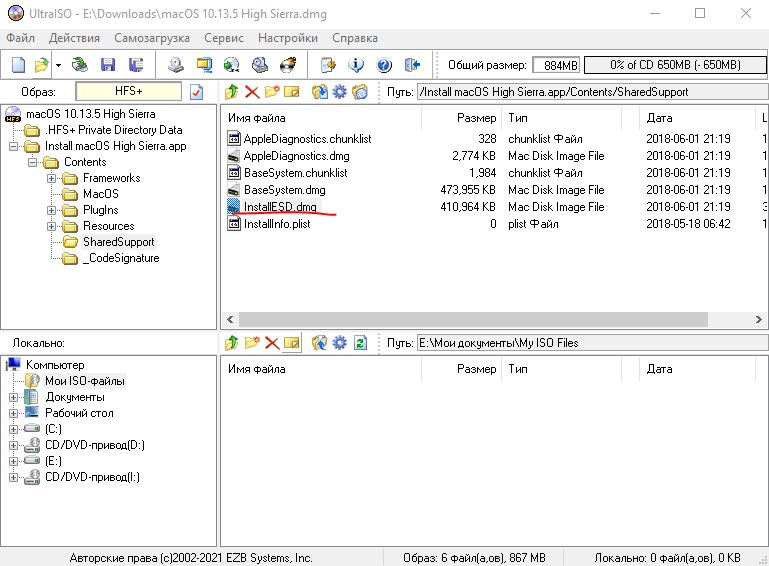
Найти папку Install MacOS бла бла.app —> Contents —> SharedSupport -> образ InstallESD.dmg.
Копируем InstallESD.dmg в любую папку и подгружаем в программу Usbimager.

Записываем на флешку.
Подключаем наш накопитель к компьютеру Mac и включаем его с зажатой клавишей Alt (Option).
В меню выбора диска указываем флешку и производим установку macOS.
Следуйте подсказкам мастера установки и через несколько минут получите работоспособный Mac.
Войдите или зарегистрируйтесь, чтобы писать комментарии, задавать вопросы и участвовать в обсуждении.
Когда компьютер Mac внезапно перестал запускаться, а резервной копии macOS под рукой нет, поможет чистая переустановка системы.
Если рядом есть другой Mac, то проблем с созданием загрузочной флешки не возникнет. Сейчас расскажем, как выкрутиться из ситуации с Windows-ПК.
? Спасибо re:Store за полезную информацию. ?
Как создать загрузочную флешку в Windows
1. Для создания флешки скачиваем приложение TransMac.
Утилита распространяете на сайте разработчика по цене $59. К счастью, есть бесплатный 15-дневный триал.
2. Теперь потребуется найти образ для установки macOS.
Официального способа скачать операционную систему из Windows нет. Придется либо искать друга с компьютером Mac, либо пользоваться известными всем сайтами.
Обратите внимание, что для работы утилиты TransMac нужен образ macOS в формате *.dmg
Если удастся найти друга с яблочным компьютером и скачать macOS из Mac App Store, будет проще у него же и сделать нагрузочную флешку по инструкции.
3. Когда образ скачан, а утилита установлена, запускаем TransMac от имени Администратора и соглашаемся на триальный период использования программы.
4. Подключаем к компьютеру флешку (понадобится накопитель емкостью 8ГБ и более)
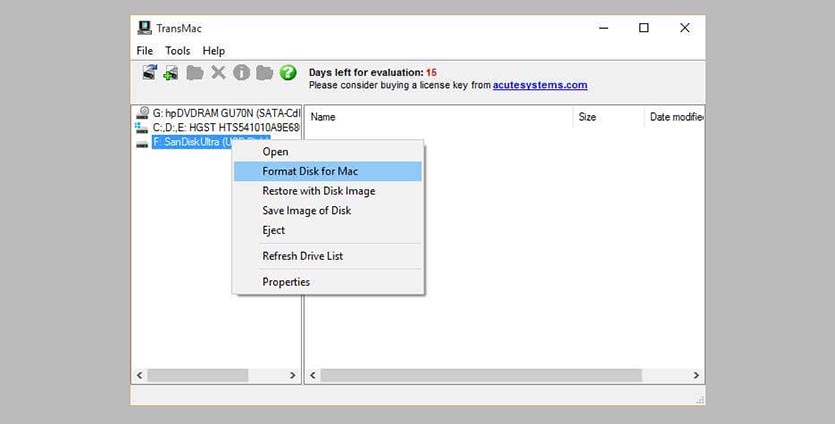
5. В боковом меню находим подключенный накопитель и через контекстное меню форматируем командой Format Disk for Mac.
Внимание! Данный процесс является необратимым, все данные с флешки будут удалены.
6. После окончания форматирования снова вызываем контекстное меню диска и выбираем пункт Restore with Disk Image.
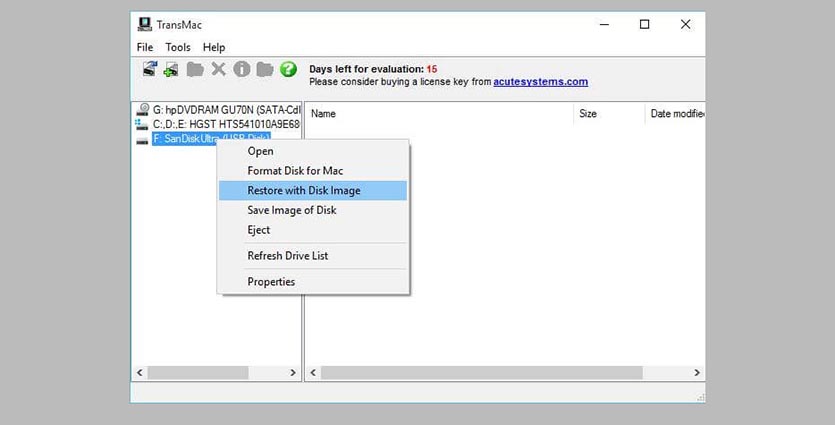
7. В открывшемся окне проводника указываем скачанный образ для установки macOS.
8. Подтверждаем запись образа на флешку и ждем 20-30 минут, пока процесс не завершится.
Все! Флешка для установки macOS готова.
Как запустить Mac с флешки
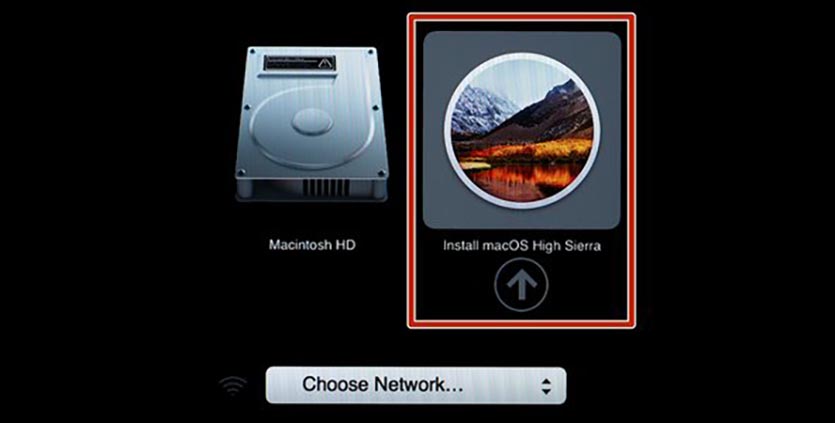
Подключаем наш накопитель к компьютеру Mac и включаем его с зажатой клавишей Alt (Option).
Обратите внимание, что для загрузки со внешних накопителей на Mac с чипом T2 нужно произвести некоторые манипуляции.
В меню выбора диска указываем флешку и производим установку macOS.
Следуйте подсказкам мастера установки и через несколько минут получите работоспособный Mac.
(159 голосов, общий рейтинг: 4.41 из 5)
iPhones.ru
Это может пригодиться каждому, когда нет второго Mac под рукой.
Артём Суровцев
@artyomsurovtsev
Люблю технологии и все, что с ними связано. Верю, что величайшие открытия человечества еще впереди!
| Workable Solutions | Step-by-step Troubleshooting |
|---|---|
| Fix 1. Rescue Data from Mac That Cannot Boot with Software | With EaseUS Data Recovery Wizard for Mac, you can rescue data from a…Full steps |
| Fix 2. Create a GPT Partition on a USB Drive |
Creating a GPT partition will enable you to manage your drive easily…Full steps |
| Fix 3. Create a Mac Bootable USB with UltraDMG on Windows | Insert an empty USB Drive into your Windows PC. Open UltraDMG from the Desktop on…Full steps |
| Fix 4. Boot Mac with the macOS Bootable USB | Most of the work is already done by creating Mac bootable USB from Windows…Full steps |
You should know how to create a bootable Mac USB and not wait until there is a problem with your Mac. As with every other machine, there might come a time in their life cycle when your Mac device goes beyond repair.
Due to file corruption, severe hardware breakdown, or continuous recurring faults, you may finally have to let it go. While you hope it will not happen, you would need all your data safe and sound if it ever comes to it.
However, using an Apple device doesn’t stop you from creating a Mac bootable USB from Windows 10.
The reasons you need to do this are valid for both you and the safety of your data, such as:
- Use your Mac Bootable installer to troubleshoot your malfunctioned Mac.
- Have a backup data file in cases of emergency or unexpected Mac failures.
- Install the earliest version of macOS on your Mac easily when you want.
- Installing the latest versions of macOS on various Mac devices without downloading them individually etc.
Let’s move on to how you can rescue data that cannot boot with software.
Rescue Data from Mac That Cannot Boot with Software
Data safety has to be the most important thing to look out for regarding various devices. With EaseUS Data Recovery Wizard for Mac, you can recover files from Mac won’t boot, recover accidentally deleted files, and rescue data from a dead hard drive or damaged hardware.
Irrespective of what device you use or how you lost your data, you should be able to recover it entirely, and EaseUS Data Recovery Wizard for Mac users helps you do just that. Scenarios such as a virus attack, hard drive damage, operation error, or a macOS being wrongly installed can all be solved by the EaseUS Data Recovery Wizard for Mac software.
The EaseUS data recovery program also allows you to preview recovered files for the files you deleted intentionally. The best part would be the ease of use and navigation, which this next step would help you with, so keep reading.
Following these few easy steps helps you use this software easily while gaining the best results. These steps include:
First, you need to enter the Recovery Mode on Mac:
|
For Apple Silicon Macs:
|
|
For Intel-based Macs:
|
Step 1. Launch EaseUS Software in Recovery Mode
Select «Utilities > Terminal» from the top menu, and enter the command sh <(curl https://d3.easeus.com/mac/boot.sh). Hit «Return». Wait for the application to open, and it will take several minutes.
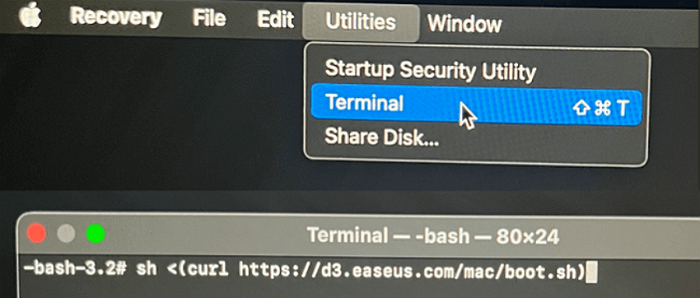
Note: If the Terminal displays either «No such file or directory» or «Could not resolve host,» you should verify that the command line you entered is correctly spelled, ensure your Mac has a stable internet connection, and confirm that your macOS version is not lower than macOS 10.15.
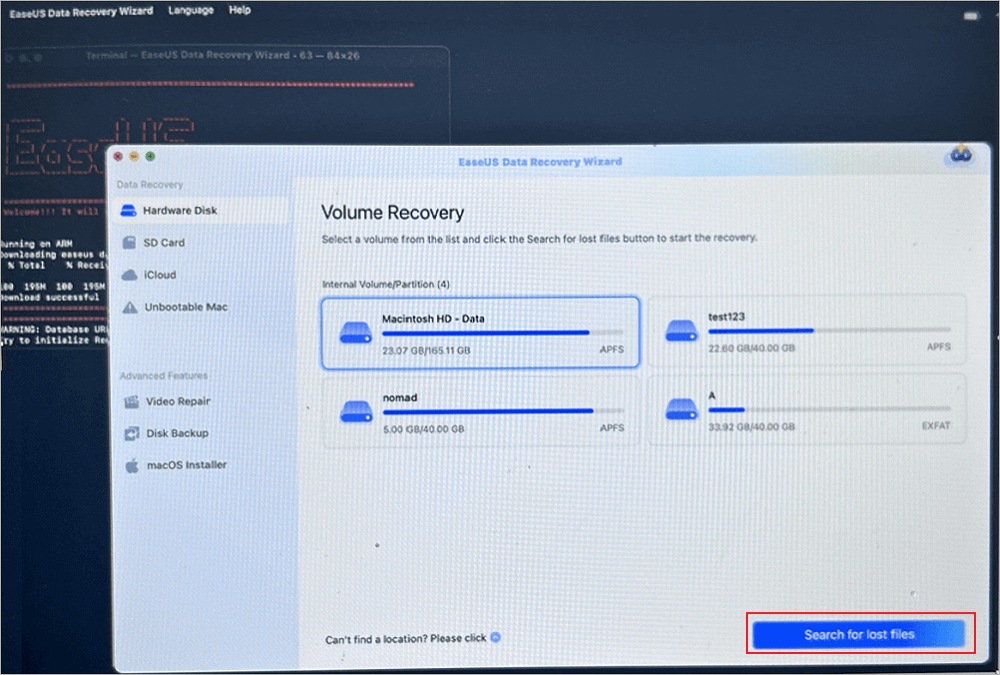
Step 2. Select the Volume on Your Mac Hard Drive
Select the volume where your lost data is stored, and click «Search for lost files». The EaseUS software will quickly locate all the recoverable data on the selected volume.
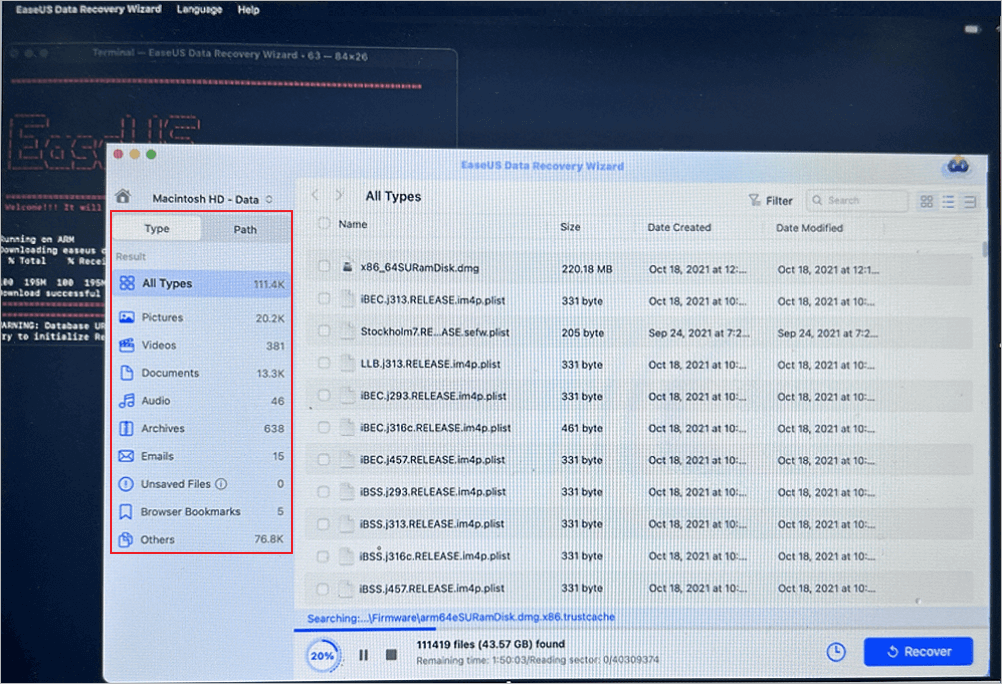
Step 3. Choose the Lost Data You Want
EaseUS software categorizes the scanned recoverable data by file type and storage path. Find the data you want by clicking «Type» or «Path» in the left panel. Then, check the boxes in front of the data you want to recover.
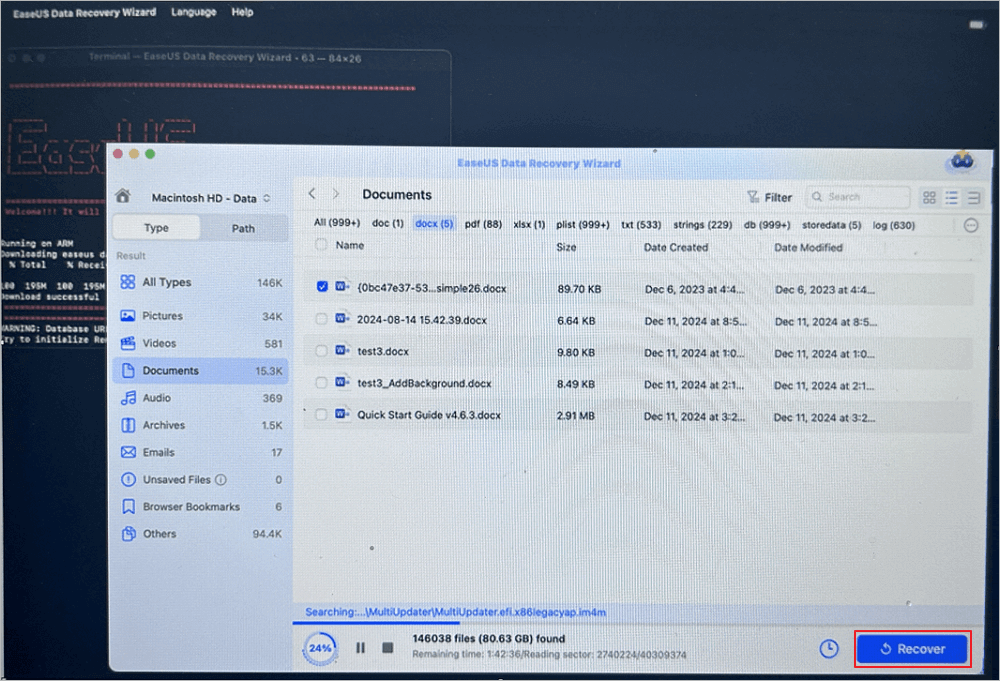
Step 4. Recover and Save Data on an External Disk
Click the «Recover» button, and a pop-up window will show up saying, «Please select a target location to save». Choose the external disk as the new storage location of your recovered data.
How to Create Mac Bootable USB from Windows
Having proven how important and useful this is, in this section, you will learn in detail how to do so. The video below offers a thorough and simplified guide to help you create a Mac bootable USB from Windows.
This simplified video guide will give you all the necessary information and a practical walkthrough of what you will do. Watch it now, and check the following highlights:
- 02:26 Run Command Prompt on your computer
- 03:40 Download TransMac from the Internet
- 04:10 Download macOS DMG files
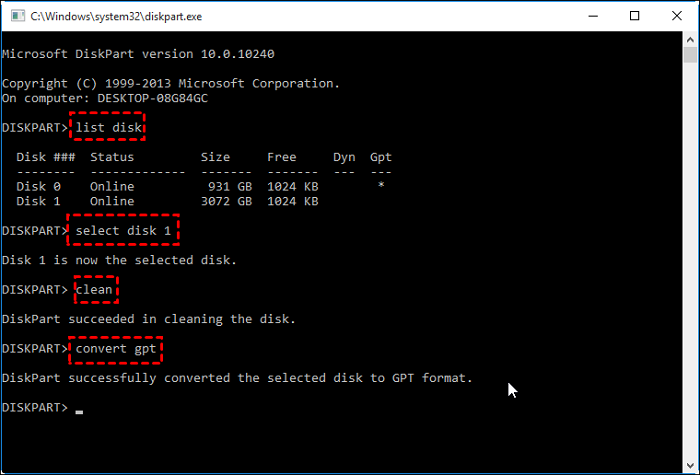
1. How to Create a GPT Partition on a USB Drive
If you want to create Mac bootable USB from Windows, you must create partitions on your USB drive. Creating a GPT partition will enable you to manage your drive easily, amongst other benefits, and it’s effortless. Follow the steps below to create a GPT Partition on a USB Drive:
Step 1. Go to Start on your PC and search for Command Prompt. Right-click on the top result and select ‘Run as an administrator.’
Step 2. Open the «diskpart» and click «list disk» to view your USB drive.
Step 3. Select your USB disk and press Enter.
Step 4. Select the «Clean» option to clear your disk.
Step 5. Select and click the «Convert GPT» command.
Step 6. Click the «Create Partition Primary», and the process is complete.
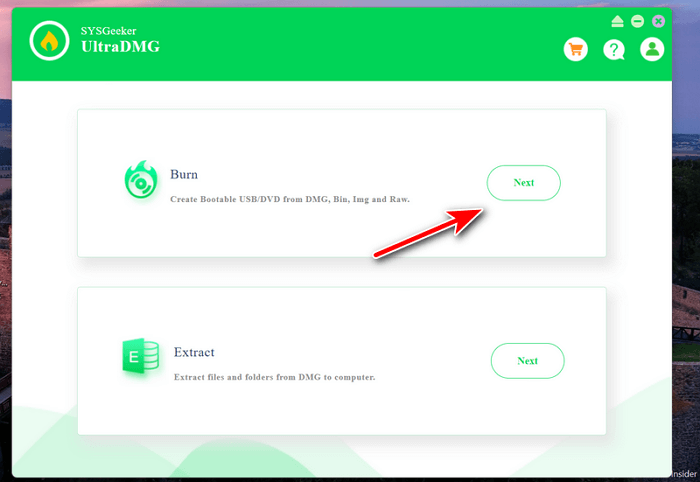
2. How to Create a Mac Bootable USB with UltraDMG on Windows
A Mac bootable USB can always be prepared to run directly on your Mac device. However, if your Mac isn’t bootable now, you can always create a Mac bootable USB with UltraDMG on Windows. You can do this on Windows 7, 10, and 11.
To carry out this action, you will need the basics, such as a macOS DMG file, a USB Drive with over 16 GB storage, a trial copy of SysGeeker UltraDMG, and a Windows PC to run it on. The steps below will help you create a Mac Bootable USB with UltraDMG on Windows, taking the latest macOS Sonoma as example.
Step 1. Insert an empty USB Drive into your Windows PC.
Step 2. Download the UltraDMG software on your PC from the link and install the software.
Step 3. Open UltraDMG from the Desktop on your PC, and click on the «Next» button at the right side of the «Burn» menu. You will be redirected to a new window at this time.
Step 4. You are now at the place where you can create a macOS bootable USB. Please click the «Browse» button to import the macOS dmg file into the software.
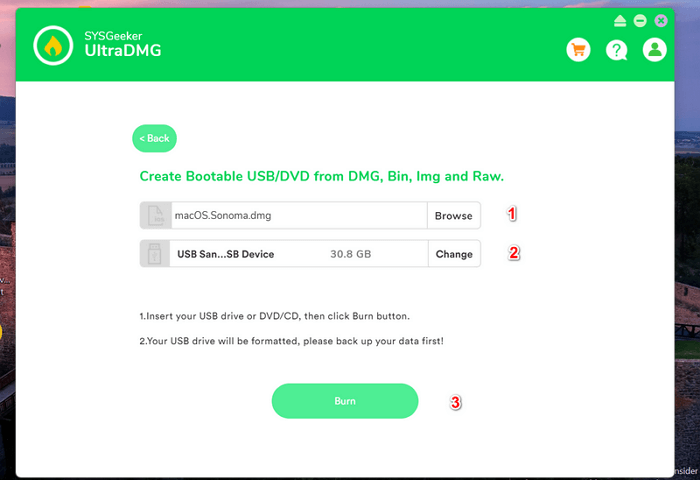
Step 5. You will see the USB name at the same time. If the USB name is not correct, please click the «Change» button to pick up the right one from the list.
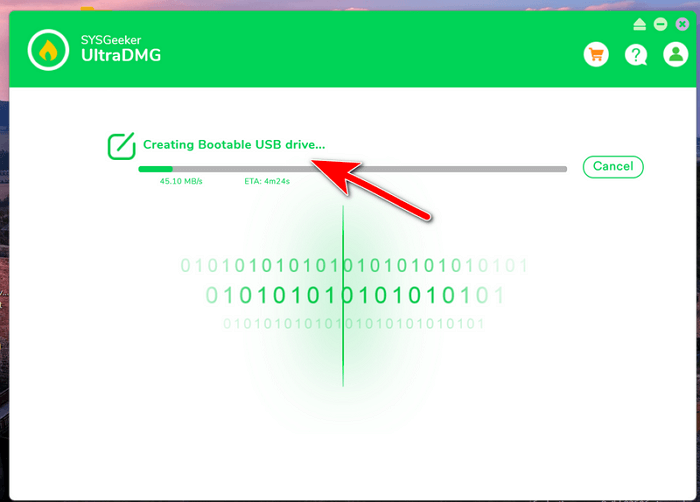
Step 6. Click on the «Burn» button at the bottom to start burning macOS dmg file to the USB drive. Once it is done, you will get a bootable USB drive for macOS installation.
3. How to Boot Mac with the macOS Bootable USB
Most of the work is already done by creating Mac bootable USB from Windows. Follow these steps to continue.
Step 1. Insert the bootable USB into any open USB slot.
Step 2. Press the Power button to turn on your Mac.
Step 3. Once the startup chime begins, press and hold the Option key down. This gives you access to OS X’s Startup Manager. Release the Option key immediately after the Startup Manager screen appears. At this point, the utility will open any available drive with bootable content.
Step 4. Select the USB drive you want to boot from and either double-click or press the return key. Your Mac begins to boot immediately.
Summary
In this article, you have learned how to create Mac bootable USB from Windows and how to recover lost data. Losing data is a nightmare no one wants to go through, which makes the EaseUS Data Recovery Wizard for Mac the best fit for you. It helps you recover from as little as a Word document to numerous photos, pictures, and videos with few straightforward steps.
Create Mac Bootable USB from Windows FAQs
In this article, you have learned how to create Mac bootable USB from Windows and how to recover lost data. Here are a few questions that are found to be recurring and answered in detail
1. How do I make a bootable DMG file in Windows 11?
Here are the steps required to burn a DMG file on a Windows PC:
- 1. Begin by running PowerISO, and insert a blank or rewritable disc in the drive.
- 2. Select the «Tools» bar, then click «burn.»
- 3. The «DMG Burner» dialogue pops up while the DMG file starts burning on the disk.
- 4. Take the disc with the burnt DMG file to where you want it.
2. Can you boot macOS from a USB drive?
Yes, you can boot Mac from a USB flash drive. Here is how you do it:
- 1. Insert the USB drive and power on the system.
- 2. Once the system chimes, press and hold down the Alt key.
- 3. When the startup manager appears, select the USB drive with the startup disk.
- 4. Your device begins to boot off the USB drive.
3. What format does a bootable USB need to be for Mac?
A bootable USB for Mac should be in APFS format. The APFS is the original default file format used on macOS. The APFS isn’t compatible with the older versions. You might need a macOS X Extended if you are using an older macOS version.
4. Can I create Windows bootable USB on Mac?
Yes, you can create a Windows bootable USB on your Mac. Here is how you to
Download the Windows 10 ISO file to your Mac and insert your USB drive.
- 1. Use the «diskutil» command to identify which drive your USB is mounted on.
- 2. Format the USB to work with Windows.
- 3. Use «hdiutil» to mount the Windows 10 folder and proceed to prepare it for transfer.
- 4. Copy the Windows 10 ISO over to your USB drive.
- 5. Put your USB into your new PC and start loading Windows.
Уровень сложностиПростой
Время на прочтение3 мин
Количество просмотров80K
Описываю свой рабочий опыт установки macOS на старенький macbook, так как другие способы описанные в интернете не дали результатов, либо привели к новым ошибкам.
Для начала скачиваем дистрибутив в формате *.dmg. Сделать это можно из App Store со второго macbook, либо с торрент (важно чтобы это была чистая копия из App Store).
Берем флешку на 8Гб и более, вставляем в компьютер с Windows, нажимаем Win+R, пишем cmd.
Запускается консоль и в ней уже пишем diskpart потом list disk, на экран выводиться список дисков windows, теперь важно не перепутать диски и выбрать именно диск с флешкой. Пишем select disk (номер флешки):

Теперь нам нужно преобразовать загрузочную область в формат GPT, набираем по очереди команды:
clean, convert GPT, create partition primary, exit.
C сайта https://www.acutesystems.com/ скачиваем программу TransMac, она платная, но работает 15 дней которых должно хватить. Запускаем, выбираем наш флеш накопитель, сначала выбираем пункт Format Disk fo Mac. И после завершения процесса выбираем Restore with Disk Image где нам нужно будет указать наш дистрибутив с macOS в формате *.dmg.

Все флешка готова, но загрузиться с нее не выйдет. Если загрузить мак удерживая клавишу alt, слоты загрузки будут пустые. Поэтому загружаем Recovery system удерживая клавиши cmd+R (нажимать нужно сразу после кнопки включения до появления яблока или земного шара).
Тут нам понадобиться дисковая утилита, запускаем ее, смотрим что флешка определилась и далее нам нужно отформатировать основной диск (Тут я подразумеваю что все ваши нужные файлы лежат в облаке, важных файлов на самом маке нет, так как после форматирования все файлы будут УТЕРЯНЫ).
Нажимаем в меню пункт вид-показывать все устройства. Выбираем APPLE SSD, нажимаем кнопку стереть. Вводим имя, Mac OS Extended, Схема разделов GUID.

Ну а теперь можно и загрузочную флешку сделать. Выходим из дисковой утилиты и в меню выбираем пункт Утилиты-Терминал. Пишем команду df -h и смотрим что в файловой системе есть флеш накопитель с названием который был в дисковой утилите (у меня это /Volumes/Install macOS Mojave) после этого копируем дистрибутив на жесткий диск командой
cp -R "/Volumes/Install macOS Mojave/Install macOS Mojave.app" "/Volumes/Macintosh HD"
После копирования закрываем терминал cmd+Q. Выбираем флешку и форматируем также как форматировали жесткий диск (Имя: USB, Mac OS Extended, Схема разделов GUID.).
Теперь запускаем терминал и создаем загрузочный образ:
"/Volumes/Macintosh HD/Install macOS Mojave.app/Contents/Resources/createinstallmedia" --volume /Volumes/USB
Соглашаемся, вводим y и возможно потребуется пароль от системы.
Теперь можно перезагрузить мак с зажатой клавишей alt и в пункте загрузки мы увидим картинку Install macOS Mojave. Теперь можно нажать пункт Установить macOS.
Если в процессе установки вылетела ошибка “Экземпляр программы установка macOS Mojave поврежден и не может быть использован.”
Нужно найти в интернете дату выпуска дистрибутива, отключить WiFi, запустить терминал ввести команду установки даты date: месяц-число-время-год в формате ммддччммгггг
Например, 12 декабря 10:00 2017 будет выглядеть так:
date 120110002017
Если не помогло, перезагружаем, отключаем интернет, ставим дату и после этого только запускаем установку.
После этого устанавливаем mac OS как обычно.
P.S.1: Чтобы восстановить флешку для пользования под Windows скачиваем программу SD Memory Card Formatter for Windows с сайта https://www.sdcard.org/ так как в проводнике вряд ли получиться отформатировать.
P.S.2: У других дистрибутивов названия путей будут другие, так что смотрите по возможности название папок например командой ls в терминале.
парпар
По разным причинам нам может потребоваться переустановить Mac OS, возможно мы заменили жесткий диск или просто хотим сделать чистую установку системы. Сейчас разберемся как сделать загрузочную флешку для Мac-a из под Windows, описывать процесс установки Mac OS мы не будем Вы это легко сделаете и без нашей помощи, а мы расскажем как сделать флешку с Mac OS из под Windows и запустим установку системы.
Для создания загрузочной флешки из под винды Мы будем пользоваться утилитой Boot Disk Utility, посмотрим как она работает и пройдем весь процесс создания флешки с Mac OS по шагам.

Что понадобится для создания загрузочной флешки Mac OS?
– Утилита Boot Disk Utility, скачиваем ее с официального сайта по ссылке
– Флешка объемом на 8 или 16 гигов, зависит от версии системы, чем новее версия тем больше места ей потребуется.
– Образ системы Mac OS в формате HFS
Где взять образ Mac OS для создания загрузочной флешки?
Образ Mac OS в формате HFS, можно скачать на торрентах, например на NNM-Club (пример на скрине).

Мы будем загружать hfs образ с помощью Boot Disk Utility, утилита сама скачает и подготовит выбранный образ.

При создании загрузочной флешки вся информация содержащаяся на ней будет стерта и перезаписана, обязательно убедитесь что на флешке нет важных документов и фалов.
Загрузочная флешка Mac OS из под Windows по шагам
Запускаем Boot Disk Utility (BDU) и заходим в DL Center, будем скачивать образ.

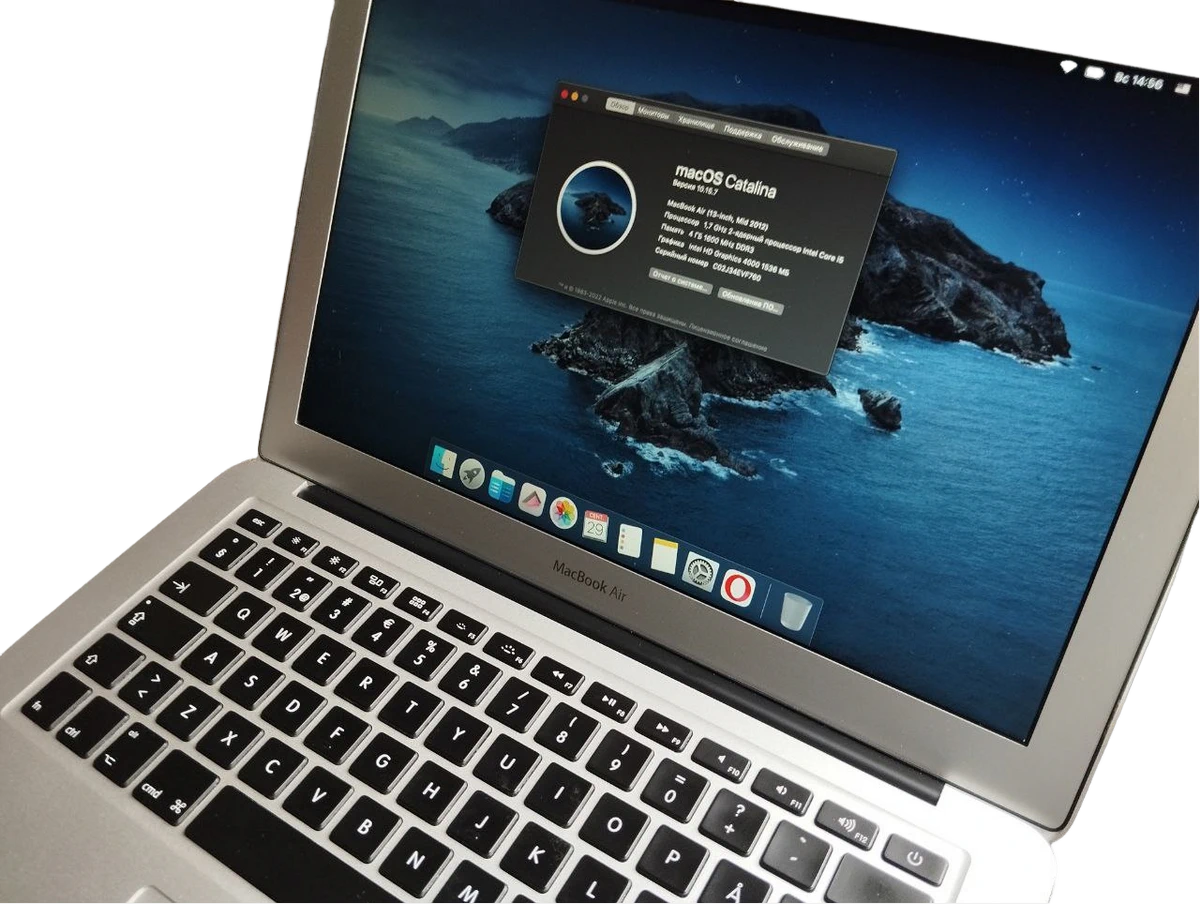
Поскольку наш Mac старенький то и систему для него мы выбираем не самую новую, но и не очень старую, OS Catalina подойдет. Жмем кнопку DL.

Ждем пока Наш образ будет скачен и подготовлен. Подготовленный образ Mac OS будет лежать в папе утилиты.

Теперь подготовим флешку, в списке выбираем флешку и жмем формат, утилита поделит флешку на два раздела, загрузочная область на 200Мб и основная часть диска. Форматируем флешку — жмем Format.

Утилита предупреждает о том что данные будут удалены.

Записываем образ Mac OS на флешку, для этого выбираем второй раздел флешки и жмем Restore.

Утилита попросит указать скаченные образ Mac OS в формате hfs, выбираем и жмем “открыть”.

Ждем завершения процесса.

Загрузочная флешка с Mac OS готова.

Проверяем загрузочную флешку с macOS
Теперь проверим работоспособность нашей флешки, запустим процесс установки Mac OS. Включаем ноут и жмем клавишу Option (⌥) пока не появится загрузочное меню.
На ноутбуках с разными процессорами (apple m/ intel i) вызов загрузочного меню происходит по разному, полную информацию по запуску флешки можно найти на официальной странице Apple – Сочетания клавиш Mac

Вот так просто можно создать загрузочную флешку с Mac OS из под Windows. Флешка запустилась, с нее нам без каких либо проблем получилось установить OS Catalina.
