
To password protect a Zip file in Windows 10, first, gather the files or folders you want to include in the archive. Then, select them, right-click, and choose “Send to” > “Compressed (zipped) folder.” Rename the Zip file if needed. Double-click to open it, click “File,” and select “Add a password.” Set a strong password and optionally encrypt file names. Confirm the password and save. Now, your Zip file is protected. To open it, you’ll need to enter the password.
Recommended Tool to Password Protect a Zip File in Windows 10: https://www.newsoftwares.net/folderlock/
Why Password Protect a Zip File?

- Data Security: Password-protecting a Zip file adds more security to your data. Even if someone gains access to the Zip file, they won’t be able to open it without the correct password.
- Confidentiality: If you deal with sensitive information like financial records, personal documents, or business reports, password protection ensures that only authorized individuals can view the contents.
- Data Compression: Zip files secure and compress your data, saving storage space and making it easier to transfer over the internet or via email.
- Organized Storage: Zip files allow you to consolidate multiple files or folders into a single archive, helping you organize your data.
How To Password Protect A Zip File In Windows 10?
To password-protect a zip file in Windows 10, you can use the built-in compression utility, which allows you to create a password-protected zip archive.

Step 1: Prepare Your Files
Before creating a password-protected Zip file, gather the files or folders you want to include in the archive. Ensure you have all the data you want to protect in one location.
Step 2: Select the Files/Folders
Navigate to the location of your files or folders. Press the ‘Ctrl’ key to select multiple items while clicking on each file or folder. Alternatively, to select all items in a folder, press ‘Ctrl + A.’
Step 3: Right-click and Choose ‘Send to’
After selecting your files or folders, right-click on one of them. In the context menu that appears, hover over the ‘Send to’ option, and a submenu will appear.
Step 4: Select ‘Compressed (zipped) folder’
From the ‘Send to’ submenu, select ‘Compressed (zipped) folder.’ This action will create a new Zip file in the same location as your original files or folders.
Step 5: Rename the Zip File
By default, Windows will name the Zip file based on the first file or folder you selected. To rename the Zip file, right-click on it, select ‘Rename,’ and enter the desired name.
Step 6: Open the Zip File
Double-click on the newly created Zip file to open it. Windows will display the contents of the Zip archive, which should contain your selected files or folders.
Step 7: Add a Password
To password protect this Zip file, click the ‘File’ menu at the window’s top-left corner and select ‘Add a password.
Step 8: Set a Password
In the ‘Add a password’ window, you will be prompted to enter and confirm a password for the Zip file. Choose a unique password that combines letters, numbers, and special characters for added security.
Step 9: Optional Encryption
You have the option to encrypt the file names inside the Zip archive. While this is not mandatory, it can enhance the security of your data. To enable this option, check the box that says ‘Encrypt file names,’ then click ‘OK.’
Step 10: Confirm the Password
Windows will ask you to confirm the password by entering it again. Ensure you type it correctly, as this will be the key to accessing the Zip file’s contents. Once confirmed, click ‘OK.’
Step 11: Save and Close
Your Zip file is now password-protected. Save and close the archive. You will notice a small padlock icon on the Zip file, indicating password-protected.
Step 12: Test the Zip File
To ensure that the password protection is working as intended, try to open the Zip file. Windows will prompt you to enter the password before granting access to the contents.
Tips for a Secure Password:
- Use a combination of upper and lower-case letters.
- Include numbers and special characters (!, @, #, $, etc.).
- Avoid using easily guessable information like birthdays or names.
- Make it at least eight characters long.
Conclusion:
Password-protecting a Zip file in Windows 10 is a simple yet effective way to safeguard sensitive data. By following the steps outlined in this guide, you can ensure that only authorized individuals can access the contents of your Zip archives. Remember to use strong passwords and consider encrypting file names for an added layer of security. With these precautions, you can confidently share or store your important files while maintaining confidentiality.
FAQs
Can I password-protect a Zip file without using third-party software in Windows 10?

Yes, Windows 10 has built-in functionality to create password-protected Zip files. You don’t need third-party software for this task.
How do I create a Zip file in Windows 10?
You can create a Zip file by selecting the files or folders you want to include, right-clicking, choosing ‘Send to,’ and selecting ‘Compressed (zipped) folder.’
What makes a strong password for a password-protected Zip file?
A strong password should be at least eight characters long and include a combination of upper and lower-case letters, numbers, and special characters. Avoid easily guessable information like birthdays or names.
Can I change the password of an existing password-protected Zip file?
No, Windows does not provide a built-in option to change the password of an existing Zip file. To change the password, you must create a new Zip file with the desired password and copy the contents from the old one.
What if I forget the password for a password-protected Zip file?
If you forget the password for a password-protected Zip file, there is usually no way to recover it. It’s crucial to keep the password in a secure place or use a password manager to avoid losing access to your files.
Are password-protected Zip files compatible with other operating systems?
Password-protected Zip files can be opened on various operating systems, including Windows, macOS, and Linux. However, opening them may vary slightly depending on the software used.
1 Is the software available for creating password-protected Zip files in Windows 10?
Windows 10 has built-in functionality to create password-protected Zip files, as the guide explains. However, there are also third-party Zip file compression tools available that offer additional features and options for encryption.
Have you ever wanted to keep your sensitive files and documents safe and secure? One way to achieve this is by password-protecting your ZIP files before saving or sharing them with someone. In this article, we will guide you on how to password-protect a ZIP file on Windows 11 and 10.
Password-protecting a ZIP file is a great way to keep your files secure and hidden from others who may have access to your computer. If not, anyone can easily unzip files on Windows. That said, let’s begin with the article.
Method 1: How to Lock a ZIP File using Windows Encrypting File System (EFS)
Windows natively provides an encryption feature that helps protect your files and folders, including ZIP files, on your Windows PC. However, you must have Windows Pro, Education, or the Enterprise version for the method to work. With that said, follow the steps below.
Step 1: Go to the file or folder you want to ZIP secure, right-click on it, and select ‘Show more options’ in the context menu.
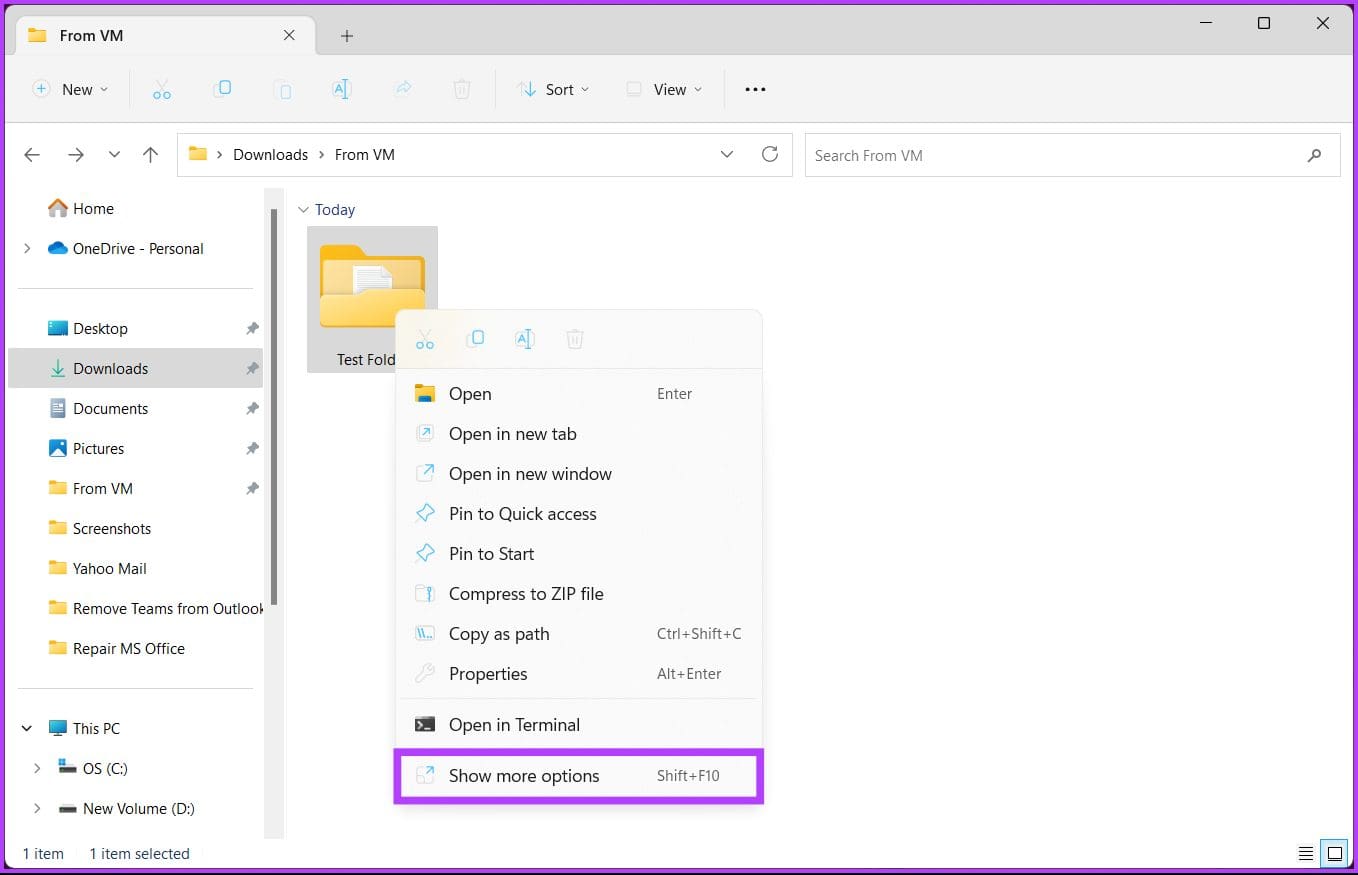
Step 2: From the menu, choose Send to and click on the ‘Compressed (zipped) folder’ option.
This will create a ZIP folder at the exact location of your original folder.

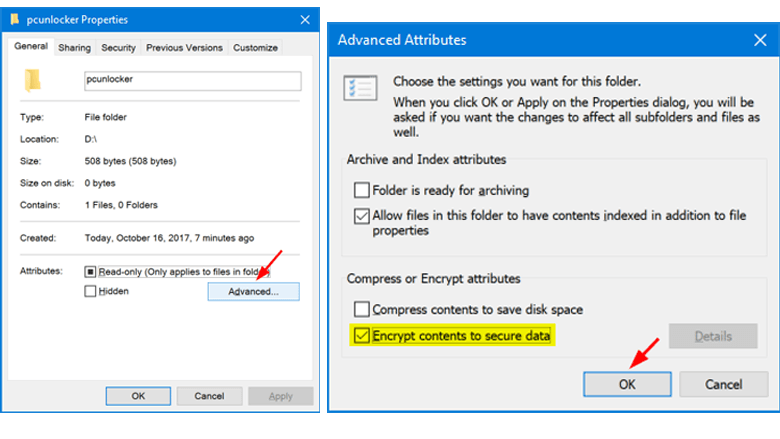
Step 3: Now, right-click on the ZIP folder you want to protect, and from the context menu, select Properties.
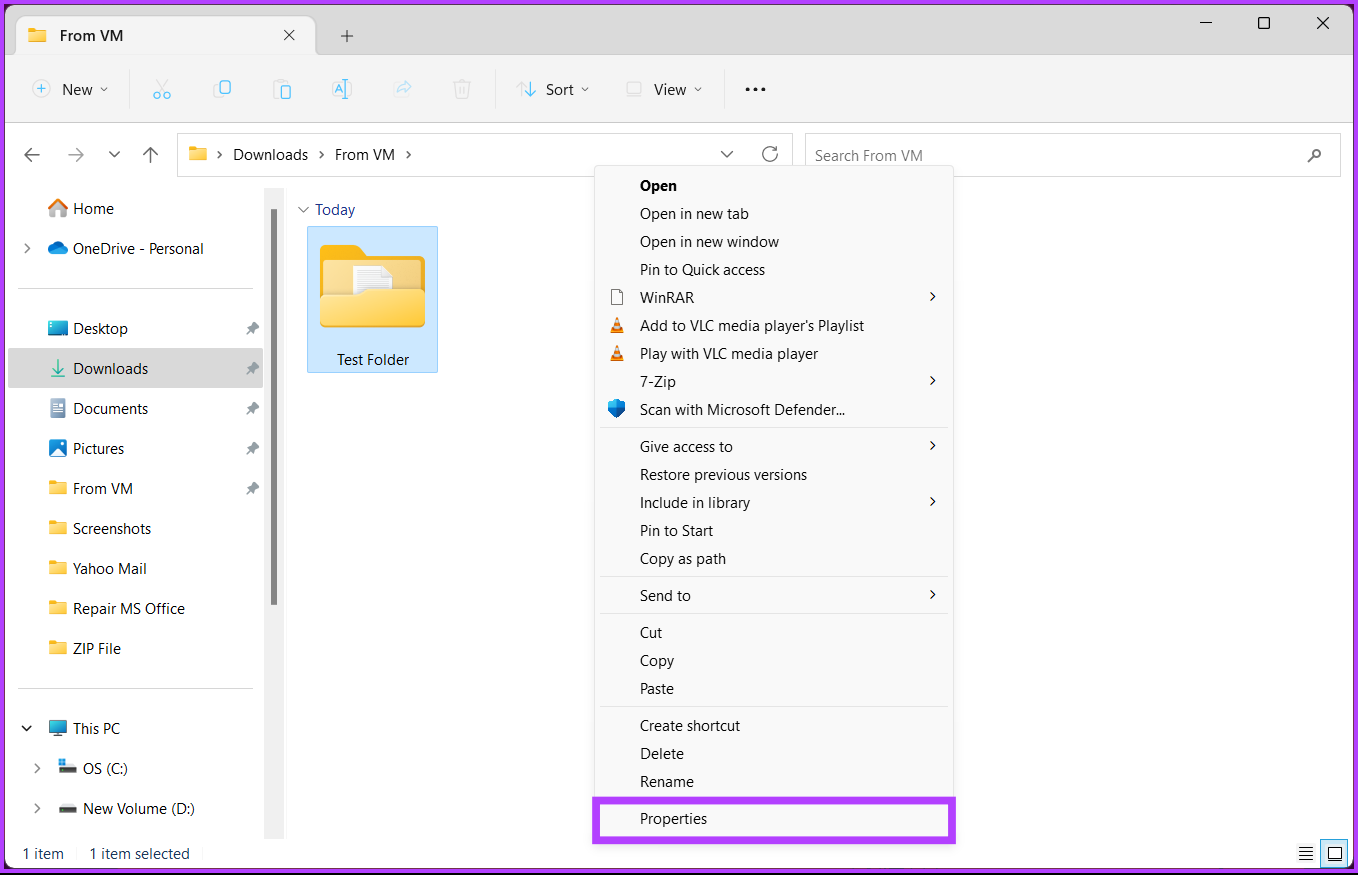
Step 4: In the Properties window, go to Advanced.
Step 5: Under the Advanced Attributes window, check ‘Encrypt contents to secure data’ and click OK.
Step 6: In the Encryption Warning window, choose ‘Encrypt the file and its parent folder (recommended)’ or ‘Encrypt the file only,’ and click OK.
Step 7: Now, click and save the decryption key from the pop notification.
Note: If this key is lost, there’s no way to decrypt the file or folder, and you can never see the content of the file or folder.
That’s it. You have locked the ZIP file and folders on your Windows machine. Note that this free Windows method to lock a ZIP file isn’t designed for sending the file but rather to safeguard it in a single location.
If the above steps and saving up a decryption key are too complicated or you are running on a Windows Home machine that is not activated or looking for some advanced-level features, move to the following method.
Method 2: Add Password to Your ZIP File Using 7-Zip
7-Zip remains a widely-used and effective archiving tool that provides exceptional compression and supports a broad range of formats, all while remaining completely free and open-source. Follow the instructions below.
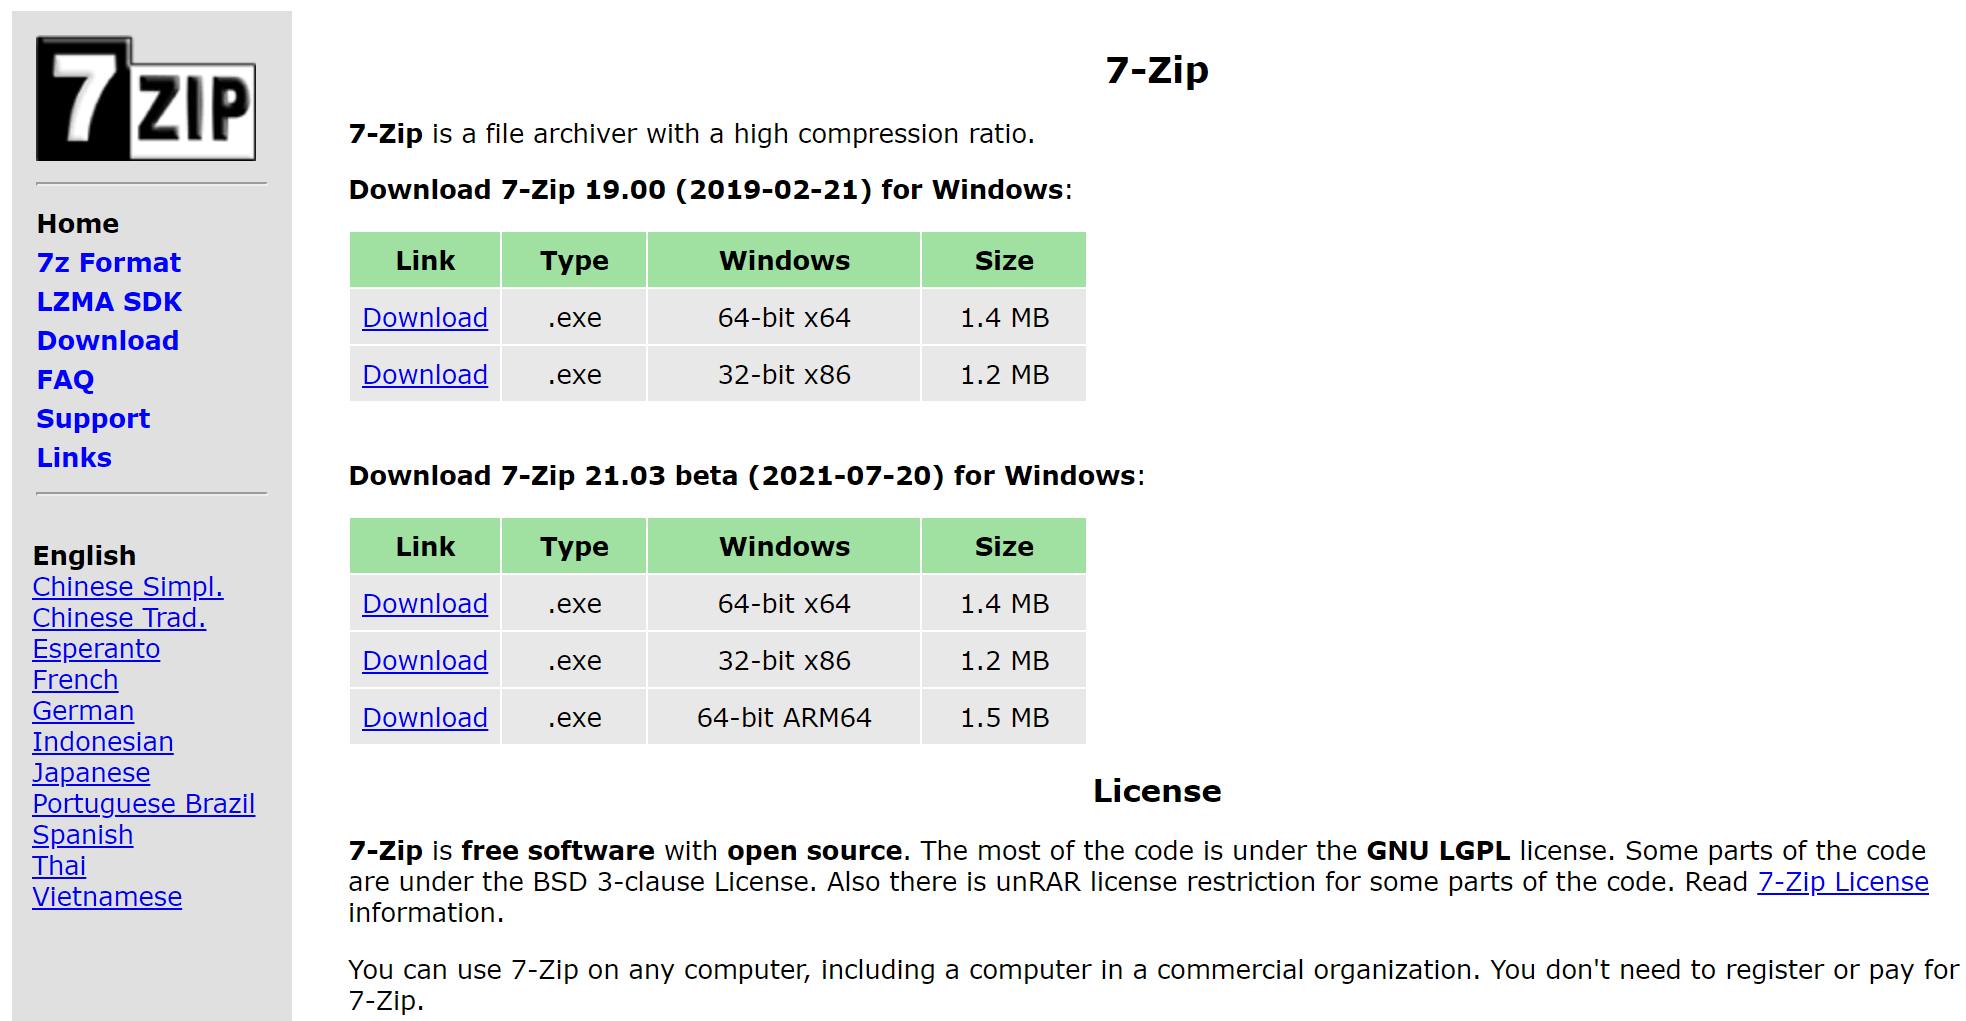
Step 1: Firstly, download and install the 7-Zip program on your Windows system.
Download 7-Zip
Once you install and are all set, move to the next step.

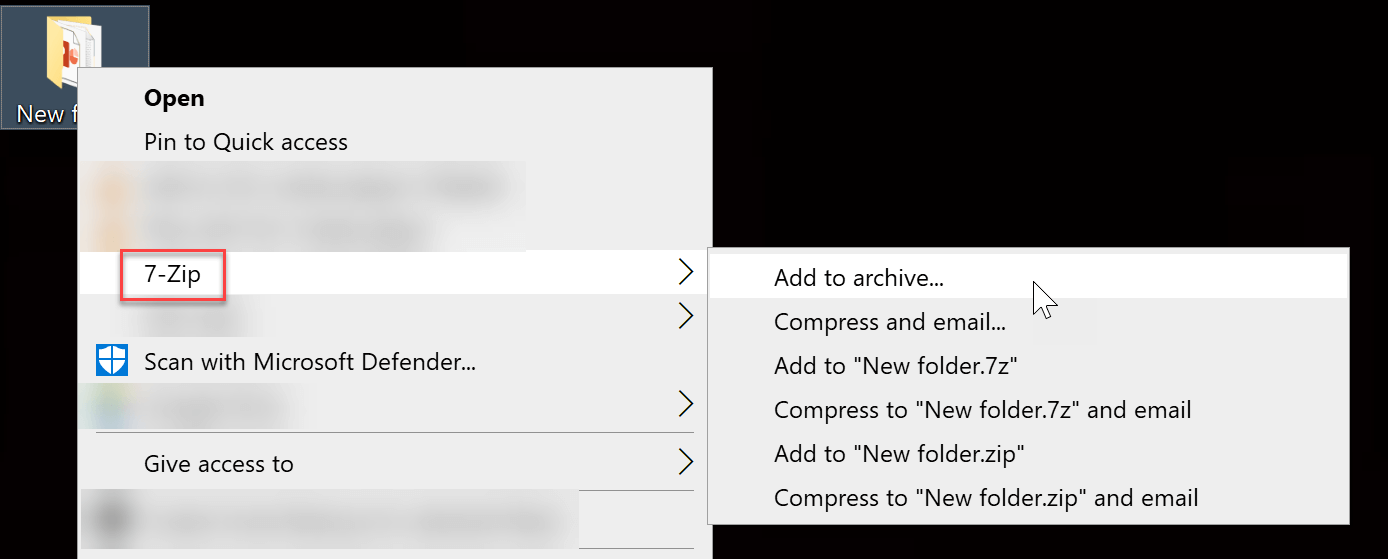
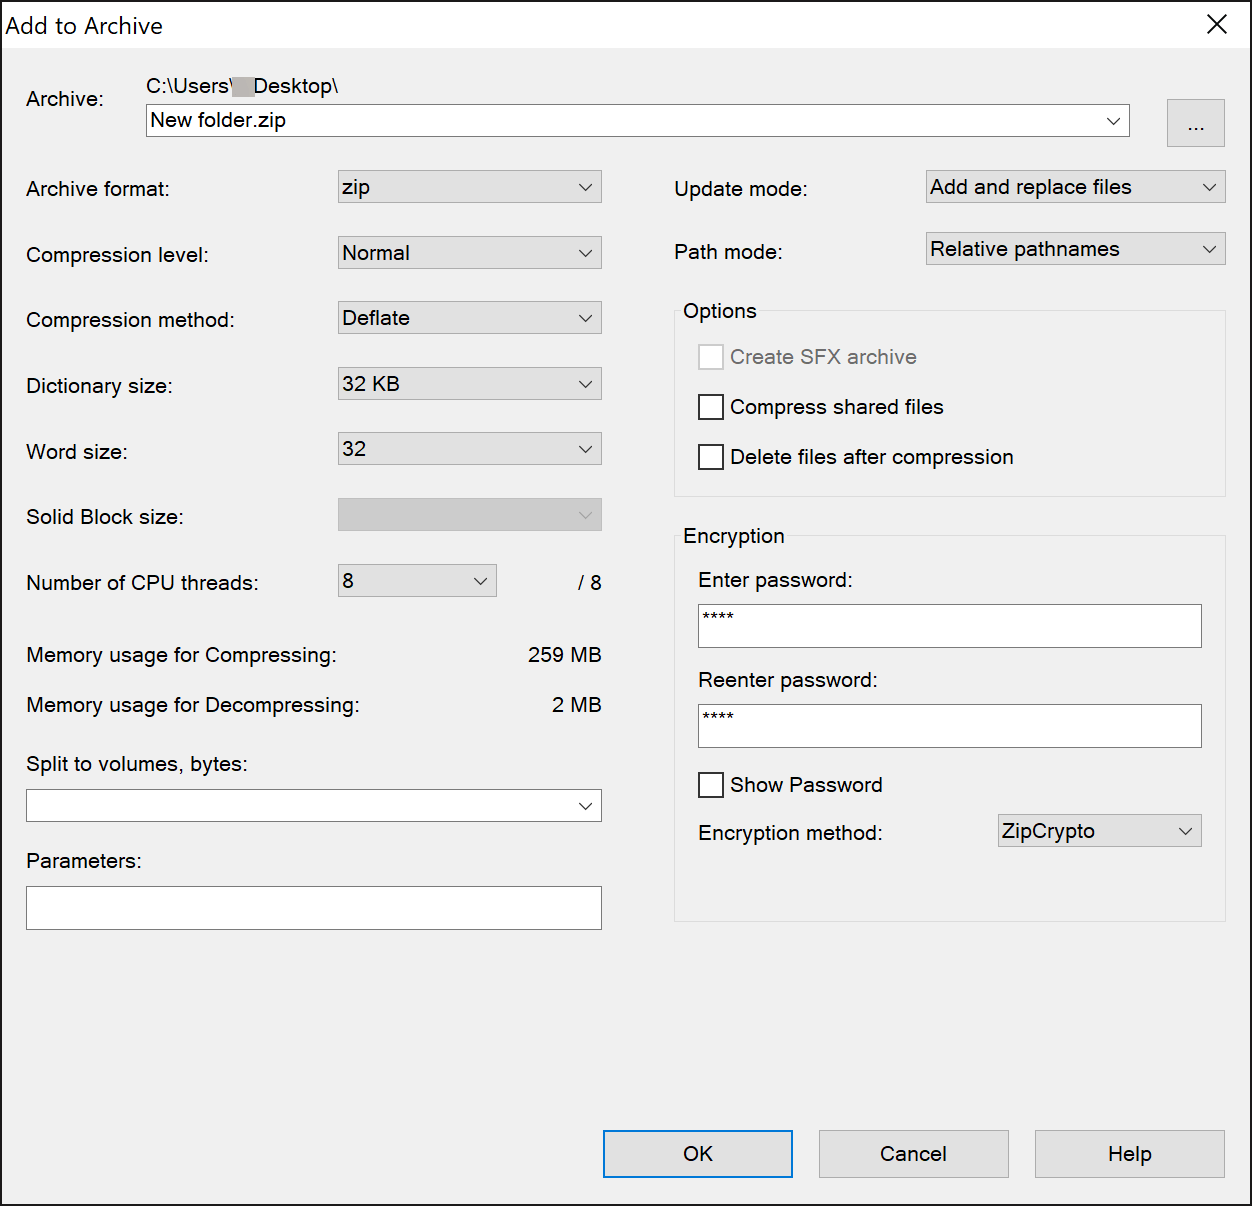
Step 2: Select the files you want to add to a ZIP archive, right-click on any of the files and select ‘Show more options’.
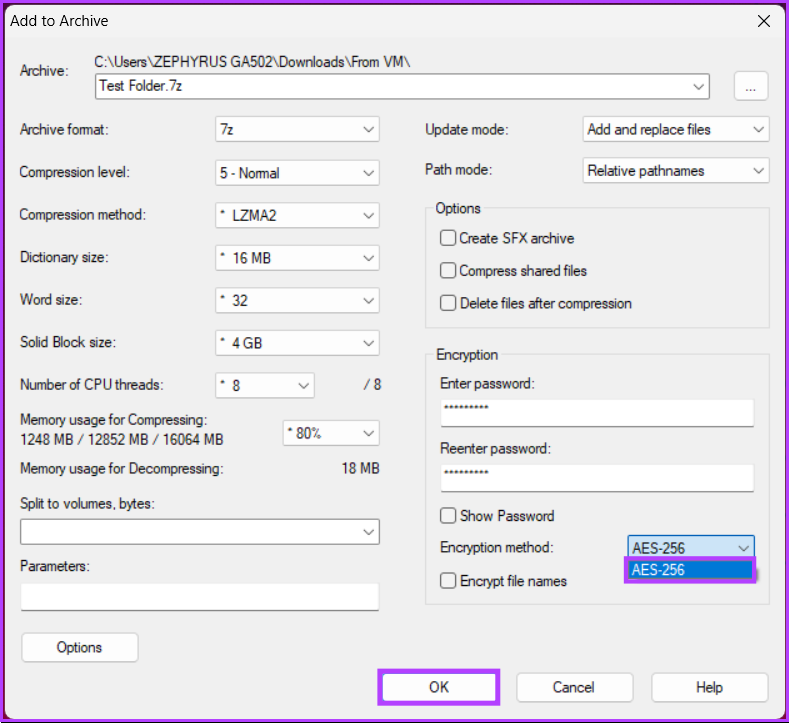
Step 3: From the context menu, choose 7-Zip and select ‘Add to archive.’

Step 4: In the ‘Add to Archive’ window, type the password you want to use under Encryption and re-enter the password.
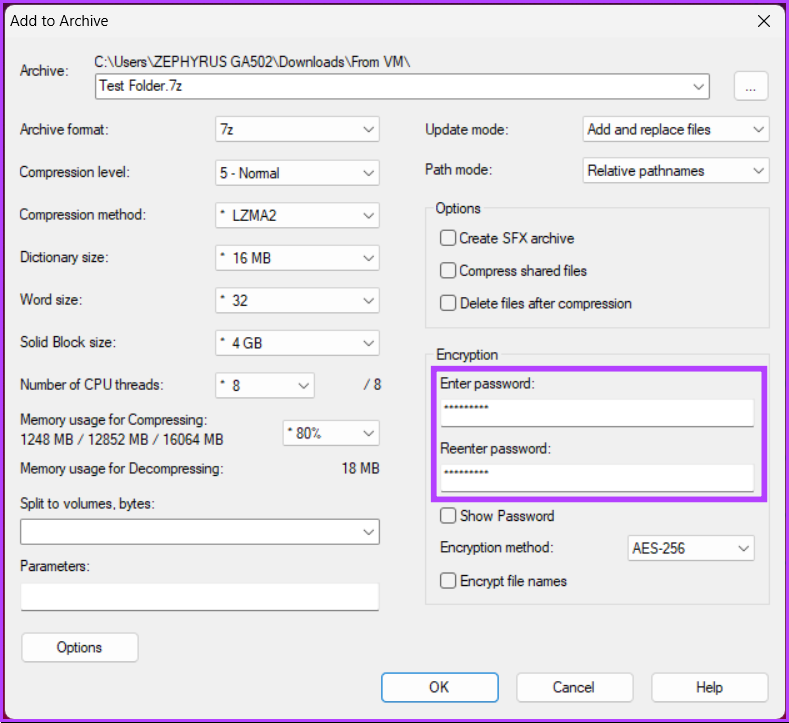
Step 5: Open the drop-down menu next to Encryption method, choose AES-256, and click OK.
Tip: The AES-256 encryption method is so secure that even the US government uses it to protect classified information.
With this, 7-Zip will create a password-protected Zip archive in the same folder you selected the files from. You will be asked to enter the password when this file is shared.
That said, if you are zipping a larger file, 7-Zip can get slower for you and may also restrict using some advanced features. In this case, the next method can significantly help you.
Also read: 5 best tools to extract RAR files on Windows 11
Method 3: Encrypt a ZIP Archive Using WinRAR
WinRAR is another popular tool with a good user interface, better compression speed, and some advanced features, such as creating self-extracting archives and repairing damaged archives, which may be helpful for some users.
On the flip side, the only drawback of WinRAR is that it only supports a limited range of formats when compared to 7-Zip. With that said, follow the below-mentioned steps.
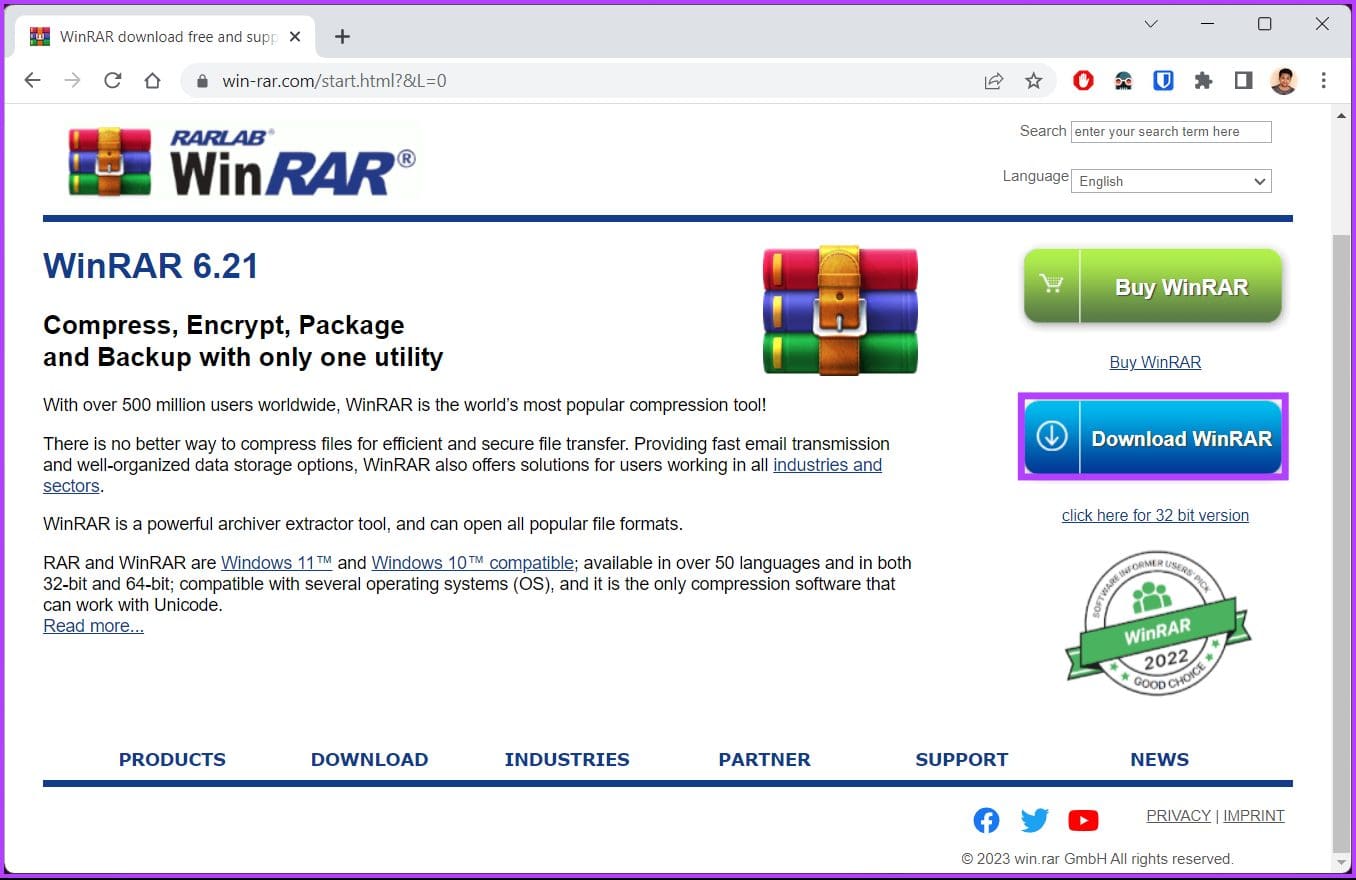
Step 1: Firstly, download and install the WinRAR program on your Windows machine.
Download WinRAR
Once you install and are all set, move to the next step.
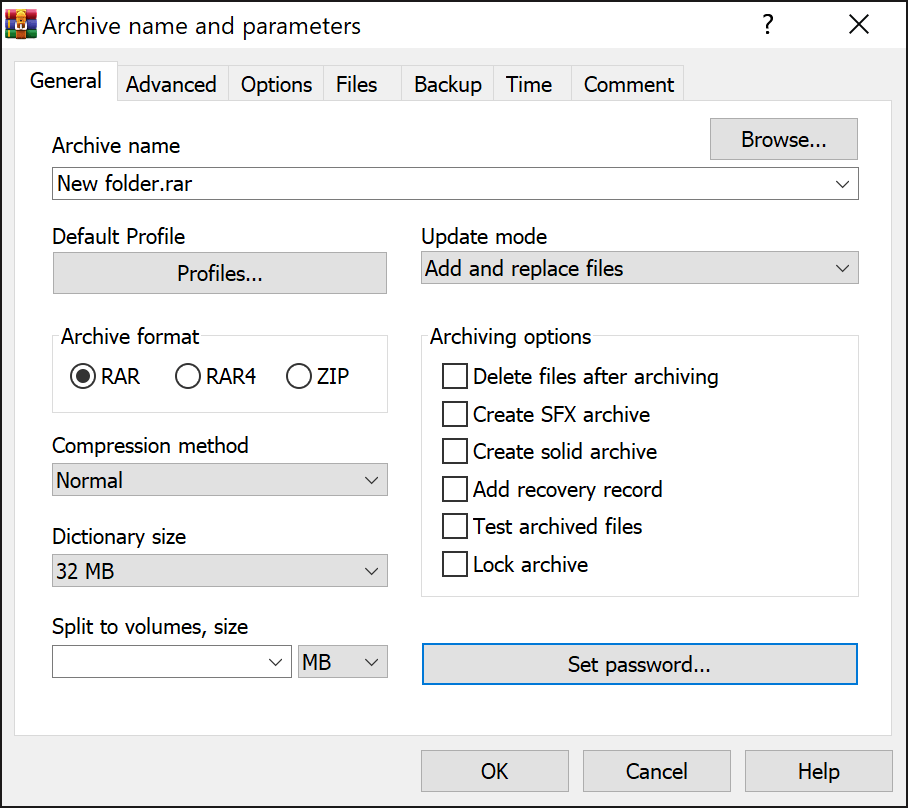
Step 2: Select the files you want to add to a ZIP archive, right-click on any of the files, and choose ‘Add to Archive’ from the context menu.

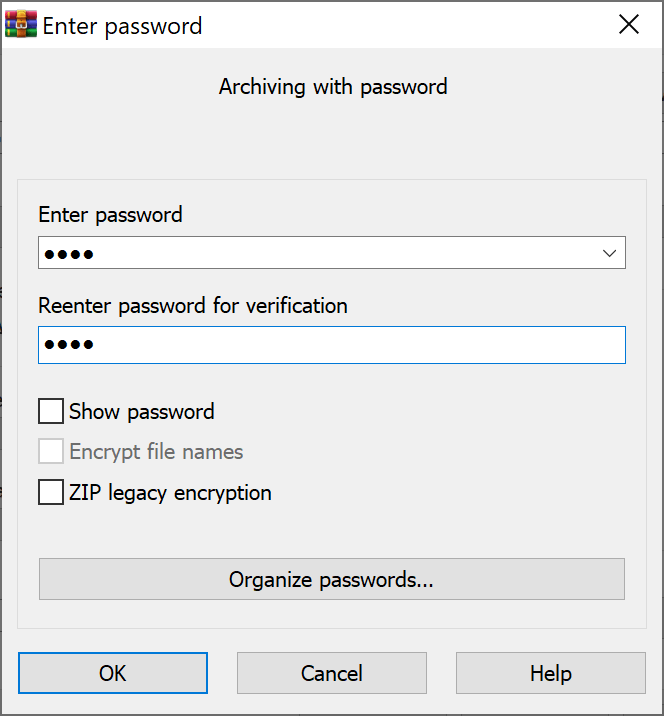
Step 3: In the ‘Archive name and parameters’ window, click on Set password.

Step 4: Select the Enter Password field and type your password. Type the same password in the ‘Reenter password for verification’ field and click OK.
Note: Additionally, you can encrypt the file names too.

Step 5: In the ‘Archiving with password’ window, select the Archive format to ZIP and click OK.

There you have it. WinRAR will make a new ZIP archive, which, when shared, will ask for the password to extract the file.
If you have any questions we missed addressing in the article, check out the FAQ section below.
FAQs for Password Protecting a ZIP File on Windows
1. Are ZIP files automatically encrypted?
ZIP files are not automatically encrypted. However, you can encrypt a ZIP file’s contents using a password. This can be the right way to protect sensitive files or data you don’t want easily accessible to others.
2. What password algorithm do ZIP files use?
ZIP files use the ZipCrypto password algorithm. However, it is essential to note that this algorithm is relatively weak. So, we recommend using the AES encryption algorithm when encrypting ZIP files.
3. What is the risk of opening ZIP files?
ZIP files may contain malware or viruses that can infect your computer or device. Cybercriminals may also use ZIP files to deliver phishing emails or spam messages. Additionally, opening ZIP files from unknown or untrusted sources can lead to installing unwanted software or stealing sensitive information.
ZIP Lock Your Files and Folders
Whether sharing important documents with colleagues or storing personal information on your computer, adding a password to your ZIP files can provide an extra layer of security and peace of mind. Now that you know how to password-protect a ZIP file on Windows 11 and 10, you can quickly and effectively keep your sensitive data safe from prying eyes.
Was this helpful?
Thanks for your feedback!
The article above may contain affiliate links which help support Guiding Tech. The content remains unbiased and authentic and will never affect our editorial integrity.
Зачем шифровать ZIP-файл?
ZIP (с расширением файла .zip) — это формат архивации, который используется для упаковки и сжатия различных цифровых файлов для экономии места на устройстве, упрощения управления файлами или упрощения процесса передачи. Обычно есть две ситуации, когда нам нужно зашифровать ZIP-файл.
Номер один — хранение некоторых личных файлов на общедоступном компьютере. Это может быть ПК в офисе или домашний компьютер, к которому могут получить доступ другие члены семьи, и вы не хотите, чтобы другие открыли или непреднамеренно внесли изменения в файлы. В этой ситуации не забудьте удалить незащищенные исходные файлы и папки после того, как вы упакуете их в защищенный паролем ZIP-архив.
Номер два — отправка некоторых файлов только предполагаемым лицам. В этой ситуации вам лучше отправить ZIP-архив и его пароль через разные платформы для повышения безопасности, например, если вы распечатываете банковскую выписку из приложения, банк может отправить вам зашифрованный пакет по электронной почте, но пароль останется в его приложении. Вы не можете получить и архив, и пароль на одной платформе.
Перемещение документа в защищенный паролем ZIP-архив
НЕТ
сделать документ также защищенным. Файл останется в обычной области и к нему можно будет получить доступ без ввода пароля.
Далее я вам покажу
как защитить паролем ZIP-файл на всех компьютерах с Windows 10
с этими двумя наиболее используемыми программами-архиваторами-экстракторами:
WinRAR
и
7-Зип
.
Для пользователей Windows 10 Professional, Windows 10 Enterprise и Windows 10 Education вы также можете использовать шифрованную файловую систему для защиты своих ZIP-пакетов. Этот метод не подходит для передачи файлов, но он подходит, когда на вашем компьютере есть несколько учетных записей пользователей, и вы единственный, кто может получить доступ к учетной записи администратора.
Как поставить пароль на ZIP-файл с помощью WinRAR
WinRAR ведёт свою историю с апреля 1995 года, и на сегодняшний день это самый известный архиватор файлов.
Когда вы загружаете программу с их официального сайта, вы можете увидеть кнопку «Загрузить» вместе с кнопкой «Купить». Для отдельных пользователей вы можете увидеть ее как бесплатное программное обеспечение. Различия между пробной и платной версиями? Всего два. Назойливое сообщение об истечении срока действия пробной версии и функция ведения журнала, которую люди редко используют. Не нужно ее покупать, так сказать.
Вот как использовать WinRAR для защиты паролем ZIP-файла в системе Windows.
Шаг 1. Выберите «Добавить в архив».
Щелкните правой кнопкой мыши папку или файлы и выберите «Добавить в архив» со значком WinRAR на переднем плане.
* Если на вашем компьютере уже сохранен незащищенный ZIP-файл, вам необходимо извлечь ZIP-файл в папку, прежде чем добавлять его в архив.
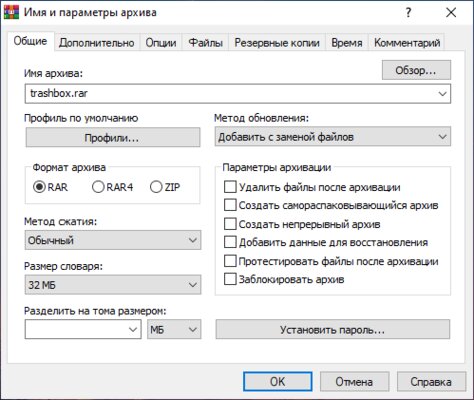
Шаг 2. Установите «Формат архива» на ZIP и нажмите «Установить пароль».
По умолчанию пакет сохраняется как RAR. Но поскольку нам нужен ZIP-файл, нам следует изменить «Формат архива» на ZIP. Затем нажмите «Установить пароль».
Шаг 3. Введите пароль для защиты ZIP-архива.
Введите пароль, введите его еще раз, а затем дважды нажмите «ОК» для подтверждения. Будет создан сжатый (zip-архивированный) файл папки с расширением .zip.
Обратите внимание, что WinRAR по умолчанию использует режим AES-256 CTR для защиты паролем ZIP-файла. Это улучшенный алгоритм шифрования, но он может быть несовместим с некоторыми старыми экстракторами. Если вас это волнует, вы можете установить флажок «ZIP legacy encrypted», чтобы выбрать более слабый, но сильный совместимый метод шифрования.
Как использовать 7-Zip для бесплатной защиты паролем ZIP-файла
7-Zip — это программное обеспечение для извлечения файлов, которое я буду устанавливать каждый раз, когда у меня появится новый ПК. Благодаря своему бесплатному исходному коду, чистоте, мощности и безопасности, он становится лучшей бесплатной альтернативой WinRAR.
Чтобы защитить паролем ZIP-файл или папку(и) с помощью 7-Zip, выполните следующие действия.
Шаг 1. Загрузите и установите 7-Zip на свой компьютер с Windows 10.
Перейдите на официальную страницу загрузки 7-Zip. Мы предлагаем вам загрузить стабильную версию вместо бета-версии.
Шаг 2. Добавьте папку(и) или файлы в архив
Если у вас уже есть ZIP-архив без какой-либо защиты паролем, вы можете извлечь его в папку, выполнив следующие действия:
Щелкните правой кнопкой мыши по ZIP-архиву, наведите указатель мыши на «7-Zip». Затем нажмите «Извлечь в…».
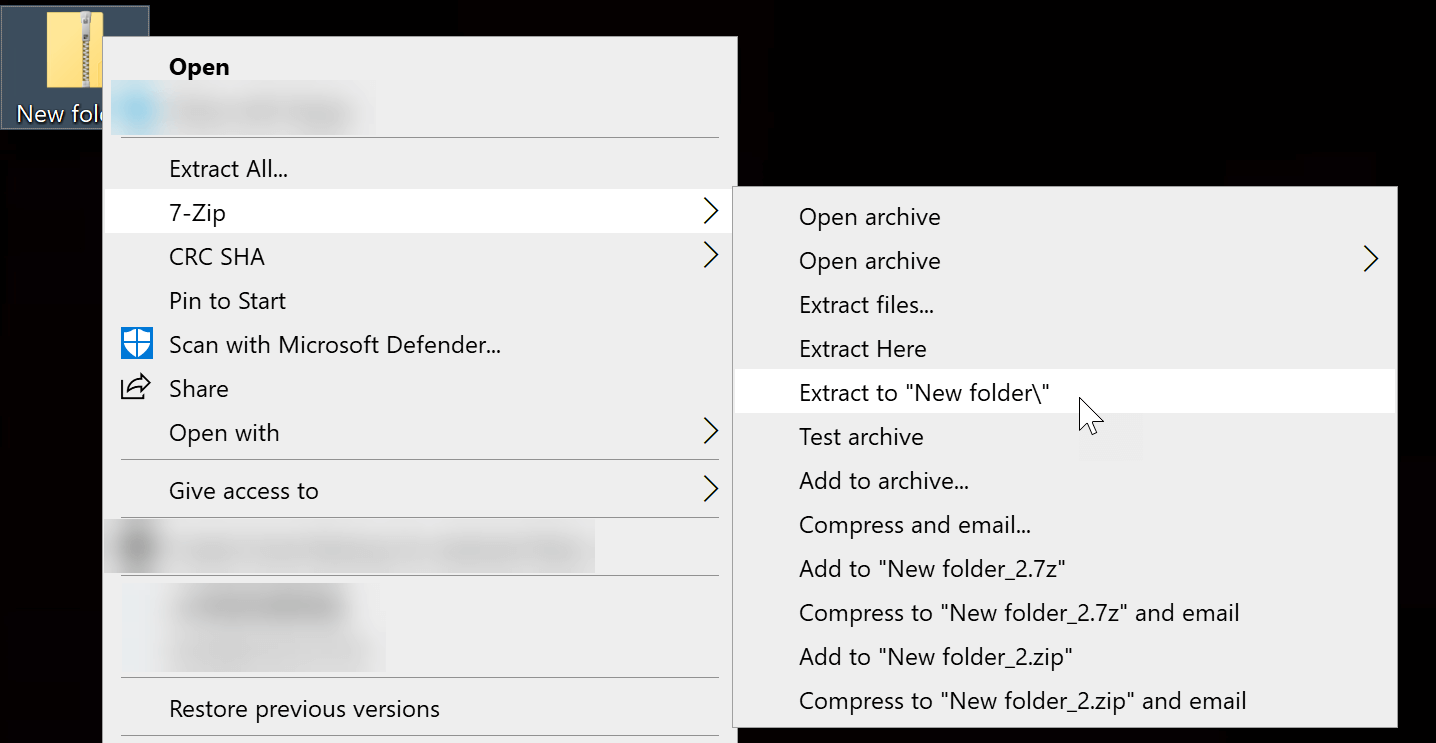
Теперь у вас есть файлы, которые вы хотите добавить в архив. Выберите файл или выберите несколько файлов/папок, удерживая клавишу Ctrl, щелкните правой кнопкой мыши по выделенному файлу, перейдите к «7-Zip», а затем щелкните «Добавить в архив…».
Шаг 3. Установите пароль для защиты ZIP-файла.
После нажатия «Добавить в архив…» появится панель настроек. Можно сосредоточиться только на «Шифровании» и оставить остальные настройки по умолчанию.
7-Zip предоставляет два метода шифрования ZIP-файла: «ZipCrypto» и очень сильный метод шифрования под названием «AES-256». Мы рекомендуем выбрать последний. Если вы выберете «ZipCrypto», файлы в вашем зашифрованном ZIP-пакете могут остаться расшифрованными после ввода пароля.
После этого вы можете попробовать извлечь ваш ZIP-пакет. Если требуется ввести пароль, все хорошо настроено. Убедитесь, что вы сохранили свой пароль в безопасности.
Доступно для пользователей Windows 10 Pro, Enterprise и Education: шифрование ZIP-файла с помощью шифрованной файловой системы
EFS (шифрованная файловая система) может шифровать отдельные файлы и папки, включая ZIP-файл, путем генерации ключа шифрования файла.
В отличие от использования WinRAR и 7-Zip для добавления пароля, шифрование EFS привязано к пользователю ПК. Следует отметить три момента:
- После входа в учетную запись пользователя вы сможете получить обычный доступ к файлу, не импортируя сертификат.
- Если на компьютере есть другие пользователи с правами администратора, им не составит труда получить доступ к вашим файлам.
- Шифрование будет потеряно при перемещении или копировании зашифрованных файлов (включая передачу по сети).
Шаг 1.
Щелкните правой кнопкой мыши по вашему ZIP-файлу и выберите «Свойства».
Шаг 2.
Нажмите «Дополнительно», а затем установите флажок «Шифровать содержимое для защиты данных».
Шаг 3.
Нажмите «ОК» > «Применить» > «Применить изменения к этой папке, подпапкам и файлам». И, наконец, нажмите «ОК» для подтверждения.
Не забудьте создать резервную копию ключа шифрования файлов на другом устройстве, например, на USB-флеш-накопителе.
Средство для утерянных паролей ZIP
Последнее, с чем мы хотим столкнуться после установки защиты, — это то, что мы забудем пароль и не сможем открыть файл.
В этой ситуации вы можете попробовать использовать
Паспорт для почтового индекса
. Он предоставляет четыре режима восстановления для восстановления паролей, созданных программными инструментами, такими как WinRAR/7-Zip/WinZip/Bandizip и т. д. Постарайтесь ввести всю известную вам информацию о пароле ZIP. Если вы ничего не помните, вы можете выбрать только метод взлома Dictionary или Brute Force.
Загрузить Passper для ZIP

В любом случае, мы всегда должны хранить наши пароли в надежном месте. Не просто запоминать их в своей голове.
It is important to protect your confidential data from unauthorized access and one way to ensure that is through password protection.
And to achieve this, what’s better than encrypting your files within a zip folder?
In this article, we will guide you through different ways to password-protect or encrypt a zip file in Windows 10 or 11.
So, go ahead and read below to have control over your sensitive data.

Table of Contents
Password-protecting a zip file can be one of the effective methods when it comes to securing sensitive information saved on your PC,
It groups and compresses multiple files into a single archive that is easier to store and share.
Password adds an extra layer of security and acts as a key to unlock and decrypt the contents of the ZIP file.
Method 1: Use Windows Encrypting Service (EFS)
One of the easiest and most effective ways to protect your sensitive file is using the built-in Encrypting File System on Windows that encrypts individual files and folders rather than the entire drive.
Note: EFS is only available on Windows Pro, Education, and Enterprise versions.
1. Open File Explorer on the PC and right-click the file or folder you want to password protect.
2. Click on Show more options from the context menu, hover the cursor to Send to, and choose Compressed (zipped) folder.
It will now create a ZIP folder at that location.
3. Once created, right-click on the ZIP folder and select Properties from the context menu.
4. In the General tab, click on the Advanced option in the Attributes section.

5. In the Advanced Attributes pop-up window, tick the checkbox next to Encrypt contents to secure data and click on OK.

6. Click on Apply and a dialog box will open from where you can choose the option for encryption. Choose your preferred opinion and click on OK to continue.
- Apply changes to this folder only
- Apply changes to this folder, subfolders and files
7. You will receive a notification now to back up your encryption key. Click on it and select the Back up now (recommended) option to continue.
8. In the Certificate Export Wizard window, click on Next and follow the on-screen instructions.
9. Type the Password, then Confirm password, and click on Next.
10. Set the File name and click on Next, followed by Finish.
That’s it, the file will be encrypted and its key will be saved in the chosen location.
Also Read: 32 Best Free Folder Lock Software For Windows 10
Method 2: Use BitLocker Encryption
Microsoft also offers BitLocker encryption software on Windows for Windows 11 Pro, Enterprise, and Education which encrypts the entire disk volume and protects the data stored on it from unauthorized access.
1. Press the Windows key on your PC, search for Manage BitLocker, and open it. This will open the Control Panel in Windows 11.
2. Click on Turn on BitLocker under the drive that you want to protect.

3. In the search bar, type BitLocker and hit the Enter button.
4. From the search result, click on the Manage BitLocker option.
5. Click on the Turn On BitLocker option.
Once turned on BitLocker will guide you to set up encryption for the file.
Method 3: Use the 7-Zip Compression Tool
7-Zip is free and open-source software that you can use to compress files into ZIP format and password protect them.
1. Download the 7-Zip compression tool on your Windows PC from its official website and install it.
2. Once installed, right-click on the file you want to protect with the password and click on Show more options in the context menu.
3. Hover your cursor over the 7-Zip option and select Add to archive… from the context menu.
4. Make sure that the Archive format is set to zip, and the Encryption method is set to AES-256.
5. Enter and Reenter your password and click on OK.

It will now create a password protected zip file.
Also Read: 7-Zip vs WinZip vs WinRAR (Best File Compression Tool)
Method 4: Use WinRAR
WinRar is another compression tool for Windows that you can use to password protect ZIP files on Windows 11. Here’s how:
1. Download WinRAR software from the official website and install it on your PC.
2. Right-click on the file you want to encrypt, click on Show more options in the context menu, and then on the Add to archive… option.
4. In the Archive format select ZIP and make sure that under Archiving options, the Delete files after archiving option is unchecked.
5. Now, click on Set password.

6. Enter a strong password and once set click on the OK button.
Method 5: Use OneDrive
You can even set a password for your files on OneDrive.
1. Open OneDrive, right-click the file you want to protect the password, and then click on the Send to option.
2. Click on the Compressed (zipped) folder and once the file is uploaded, right-click on it again.
3. Select Share, click on Set password, and enter the password.

4. Click on Apply.
Also See: How to Password Protect a Folder in Mac
Are ZIP Files Automatically Encrypted?
No, by default zip files are not automatically encrypted. Anyone who has access to the file can easily view its contents.
However, you can encrypt the contents of a folder using a password.
Why Password Protect ZIP File on Windows 11?
Protecting files with a password is a convenient way to control who can see and view them. This will help you to prevent your data from unauthorized access.
Moreover, it also provides an extra level of security to your files in case your desktop gets hacked or infected with malware.
Also See: 3 Ways to Password Protect an Excel File
What Password Algorithm Do ZIP Files Use?
Zip files support a password algorithm that is popularly known as ZipCrypto. However, this algorithm is considered relatively weak and is not very secure.
Therefore, when encrypting zip files, it is advisable to use the Advanced Encryption Standard (AES) encryption algorithm instead.
We hope our guide helped you password protect zip files on Windows 10/11.
If you have any queries or suggestions for us, drop them in the comments section and stay tuned to TechCult for more informative blogs.
В современном мире, когда хакеры воруют целые исходные коды ААА-игр, номера кредитных карт и взламывают аккаунты глав государств в социальных сетях, вопрос хранения и передачи ценной информации встаёт особенно остро. И архивы, как бы это удивительно не звучало, являются отличным методом защиты важной информации от посторонних лиц. Главное — подбирать сложный пароль, ведь в этом случае даже популярные платные программы взлома окажутся бессильны. Эта статья расскажет, как поставить на ZIP-архив пароль.
Как установить пароль на архив в WinRAR
- Для использования данного метода нужно загрузить бесплатную версию приложения WinRAR с официального сайта и установить его на ваш ПК. Этот процесс ничем не отличается от установки любого другого приложения.
Программа WinRAR пользуется невероятной популярностью среди владельцев ПК — она полностью бесплатна (весь функционал доступен без оплаты полной версии, но изредка будет появляться реклама) и обладает приличным набором функций. Более того, приложение позволяет создавать архивы с паролем, что даёт пользователю возможность защитить приватный контент от третьих лиц.
Пошаговая инструкция:
- выделите файлы и папки, которые нужно добавить в архив (Ctrl+левая клавиша мыши по каждому файлу и папке);
- нажмите правой клавишей мыши по выделенным файлам;
- в выпадающем меню кликните по пункту «Добавить в архив…»;
- выберите тип архива — RAR или ZIP (данный выбор никак не влияет на дальнейшие шаги);

- нажмите на кнопку «Установить пароль…» в правой нижней части окна;
- введите пароль в необходимое поле;
- повторите пароль для проверки;
- при необходимости поставьте галочку в пункте «Шифровать имена файлов» (недоступно при выборе ZIP-архива);
- нажмите «ОК» в окне ввода пароля для подтверждения;
- повторно нажмите «ОК» для создания архива.

После этого у вас появится архив, открыв который появится окно с запросом пароля. Только после того, как пользователь его введёт, содержимое будет доступно.
Как установить пароль на архив в 7-Zip
- Для использования данного метода нужно загрузить программу 7-Zip с официального сайта и установить её на ваш ПК.
Прямым конкурентом предыдущему приложению выступает архиватор 7-Zip. Данная программа тоже полностью бесплатна, довольно удобна и обладает примерно тем же набором функций, что и WinRAR, но рекламы с предложением купить полную версию не будет. Для создания архива с паролем при помощи 7-Zip пользователю нужно выполнить несколько простых шагов.
Пошаговая инструкция:
- выделите файлы и папки, которые нужно добавить в архив (Ctrl+левая клавиша мыши по каждому файлу и папке);
- нажмите правой клавишей мыши по выделенным файлам;
- в выпадающем меню кликните по пункту «7-Zip» и выберите пункт «Добавить к архиву…»;

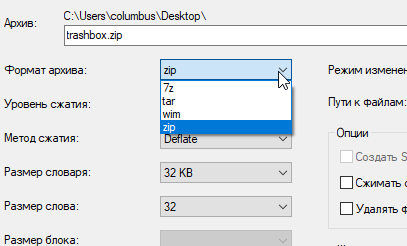
- в левой верхней части появившегося окна кликните по «Формат архива»;

- в выпадающем списке выберите zip или 7z (установить пароль для других форматов нельзя);
- введите пароль и его подтверждение в правой части окна в соответствующее поле;
- при необходимости поставьте галочку в пункте «Шифровать имена файлов» (доступно только в формате 7z);
- нажмите «ОК».

Для максимального уровня безопасности рекомендуется использовать формат 7z и шифрование имён файлов — в данном случае до ввода пароля пользователь не сможет узнать, что находится в данном архиве. Если же использовать архивацию в формат zip, то просмотреть содержимое архива можно даже без знания пароля, но файлы, естественно, достать можно будет только по паролю.
