
-
Home
-
Partition Magic
- How to Lock an App with a Password in Windows 11?
By Vega | Follow |
Last Updated
Most of the time, laptops or computers are often shared among family members. Don’t you want anyone to open an application without your permission? Then there is an easy way to restrict other people from accessing the application. This article from MiniTool Partition Wizard shows you how to lock an app with a password in Windows 11.
How to Lock an App with a Password in Windows 11?
Since there is no built-in feature in Windows that allows you to password protect applications, folders, or files, we will have to rely on third-party tools to do this. My Lockbox is a simple tool that can lock the entire folder with the password you set. The following guide will show you how to lock apps with a password in Windows 11.
Step 1: Download and install My Lockbox.
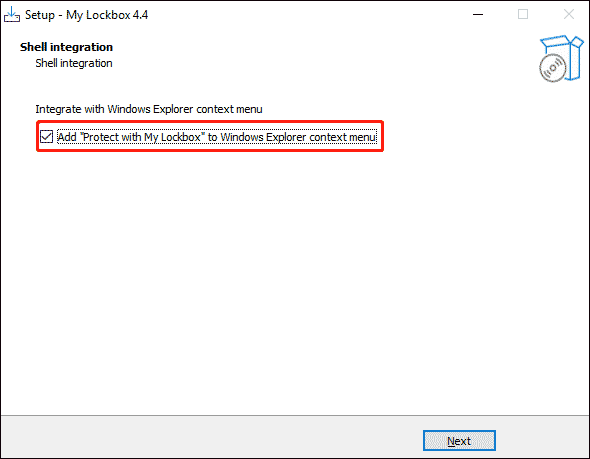
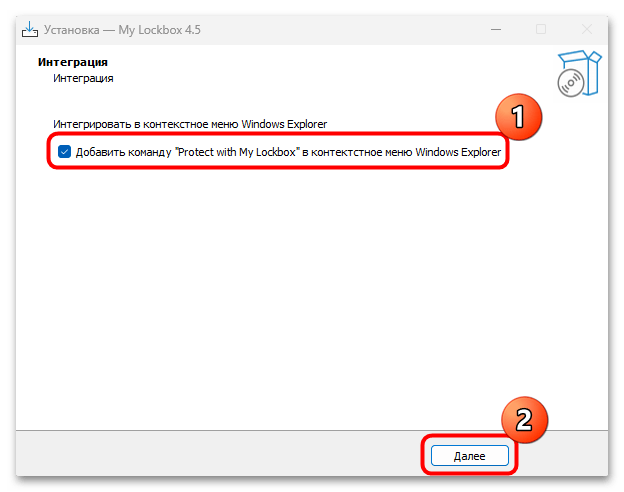
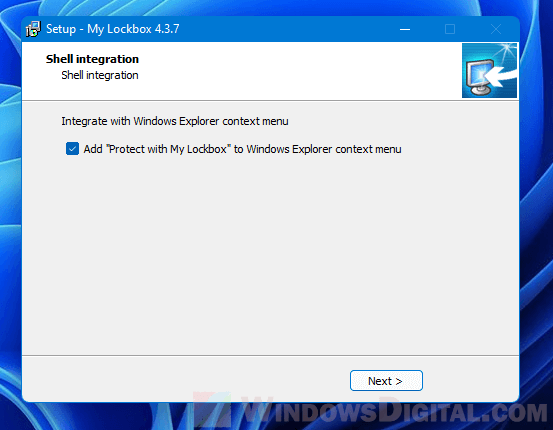
Note: During the installation process, My Lockbox will ask you if you want to add the Protect with My Lockbox option in the Windows Explorer context menu. If enabled, after installation, when you right-click the folder in Windows 11 and select Show more options, you will see the Protect with My Lockbox option in the context menu.
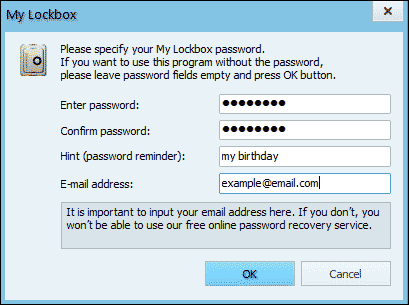
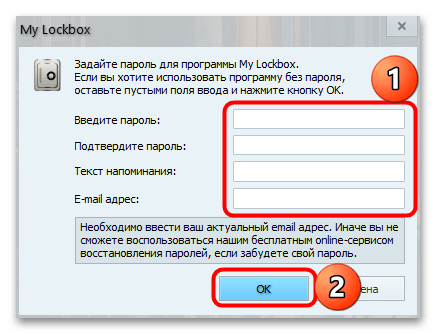
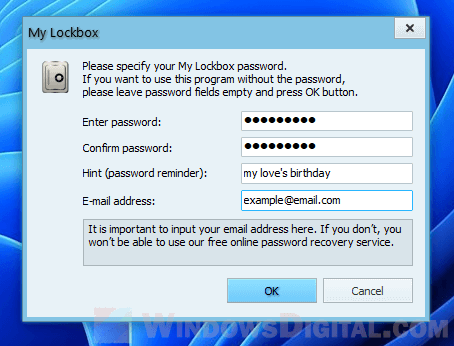
Step 2: When you open My Lockbox for the first time, the software will ask you to set a password to lock the applications on your PC. You can also add a password reminder and an email ID, which will help you recover your password if you forget it.
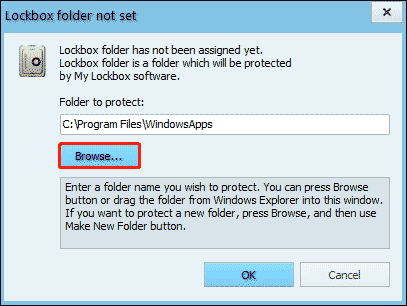
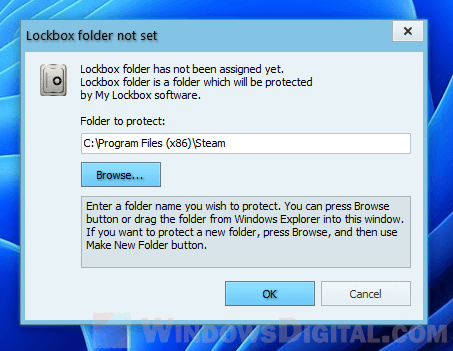
Step 3: In the Folder to protect, click Browse and browse to the folder you want to lock. Then click OK. Windows software is usually installed in C:/Program Files or Program Files (x86), so you can directly find the software you want to lock. You can even select the Program Files folder to lock all applications in it.
Note: If you don’t know the location of the application installation folder, right-click the desktop shortcut of the application you want to lock, and select the Properties option. The Start in field will show where the application was originally located.
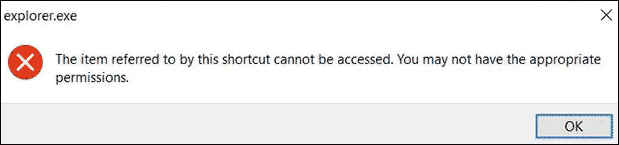
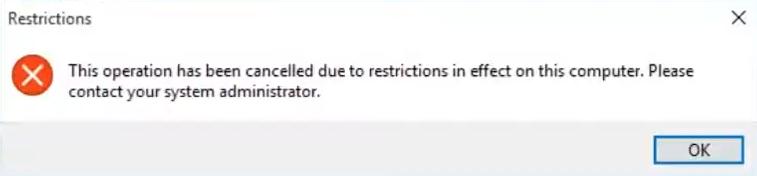
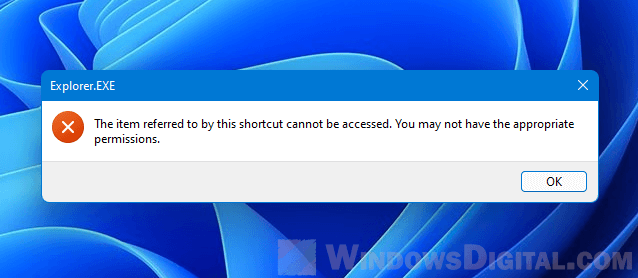
Step 4: Once a folder is locked, when you try to open an application (via the desktop shortcut, the Start menu, or anywhere else) located in your locked folder, Windows 11 will display an error message stating “The item referred to by this shortcut cannot be accessed. You may not have the appropriate permissions. ”
Tip: The free version of My Lockbox only allows you to lock 1 folder. To lock more folders, you need to pay for a subscription or purchase software. But you can try to put all the apps and files you want to lock in one folder and lock only that specific folder. It can still lock all files and subfolders in the specific folder you choose to lock.
In this way, you can put a lock on an app with a password in Windows 11 to protect your information.
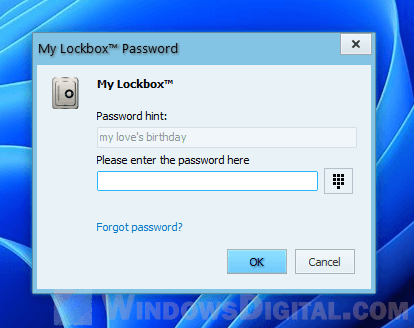
To unlock the application, you can open the My Lockbox Control Panel and click the Unlocked button.

Bottom Line
After reading this post, you may find it is not being very complicated to lock an app with a password in Windows 11. And do you know other methods? Please share with us.
About The Author
Position: Columnist
Vega joined MiniTool as an editor after graduation. She enjoys helping people with computer problems, including disk management, data recovery, and more. She is constantly expanding her knowledge in related fields. And she will continue to bring more easy-to-understand professional articles to help people solve various problems on the PC. In her daily life, Vega enjoys hanging out with friends, shopping online and listening to music. She is someone who knows how to enjoy life.
Locking certain applications on your PC is a good practice. It helps prevent unauthorized access to apps containing private data. In addition, locking apps like games helps with parental controls and productivity. This article will show you how to lock apps in Windows 10 and 11 with an app lock for PC.
- How to lock apps on Windows 10/11 PC
- A comparison of these app lockers for PC
Cisdem AppCrypt
The Best App Lock for Windows 10/11
- Lock individual apps with password
- Offer an option to automatically relock apps after a period of inactivity
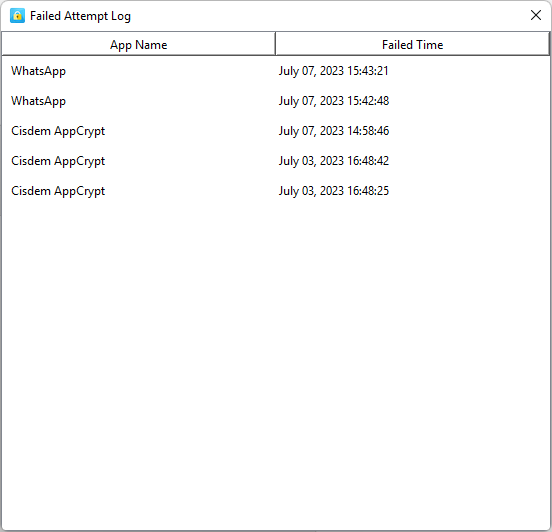
- Record failed attempts to open locked apps
- Also block websites on Chrome, Edge and more with password
- Let you block specific sites and pages, URLs with certain words, or all sites except a few
- Let you block all porn sites with 1 click
- Let you lock apps and block websites permanently or at scheduled times
- Easy to use
- Hard to bypass
- Help with privacy protection, productivity and parental controls
- Compatible with Windows 11, 10 or earlier
- Also available for Mac, Android and iPhone
How to lock apps in Windows 10, Windows 11
Method 1. Use Cisdem AppCrypt, the best app lock for PC
Cisdem AppCrypt is an easy-to-use app to effectively password lock apps on PC. It’s compatible with Windows 7 or later (64-bit only). This app lock is the best of its kind with high performance and ease of use. You can use it to password protect certain apps permanently or to prevent access to certain apps during certain times.
Below are the steps to lock apps in Windows using it.
1. Download and install AppCrypt.
Free Download Windows 11/10/8/7
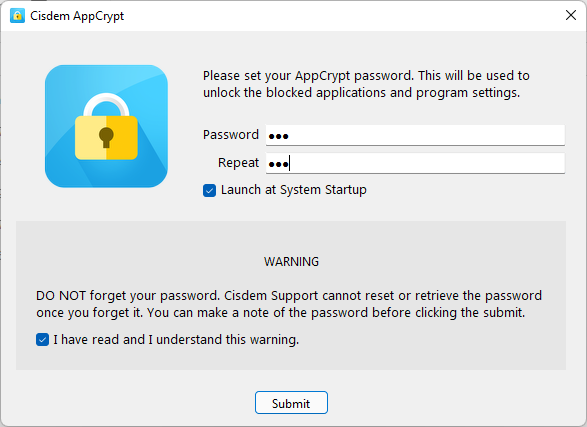
2. When you open it for the first time, set a password. (It is recommended to select the Start at System Startup checkbox so that the lock remains active even after restarting the computer.)
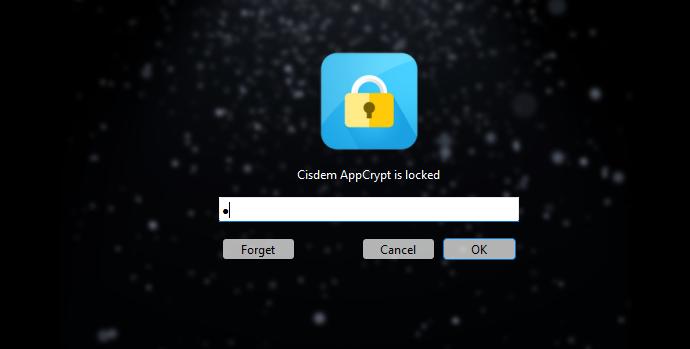
3. On the taskbar, click its icon. Alternatively, right-click the icon and choose Open Main Window.
4. Enter the password to access the main window.
5. Under the App Lock tab, add the apps that you want to lock. There are two situations.
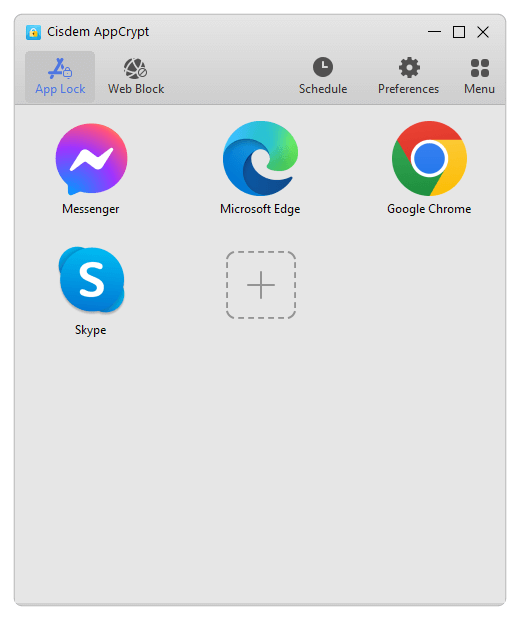
- If you installed this app using the installer you downloaded from its official website or elsewhere, it’s very likely that a desktop shortcut for this app was created during the installation. Simply drag the desktop shortcut of this app into the App Lock tab.
- If there’s no desktop shortcut icon, you can use the Plus button. Click it and find the app’s EXE file from File Explorer. Select it and click Open. Can not find the EXE file? Please see this detail this detail.
Now the apps are locked permanently as long as AppCrypt is running. (You can set AppCrypt to run automatically when your computer starts, and it requires the password to quit AppCrypt.) When one tries to open a locked app, one will be prompted to enter the password. If the password entered is correct, the app will be unlocked.
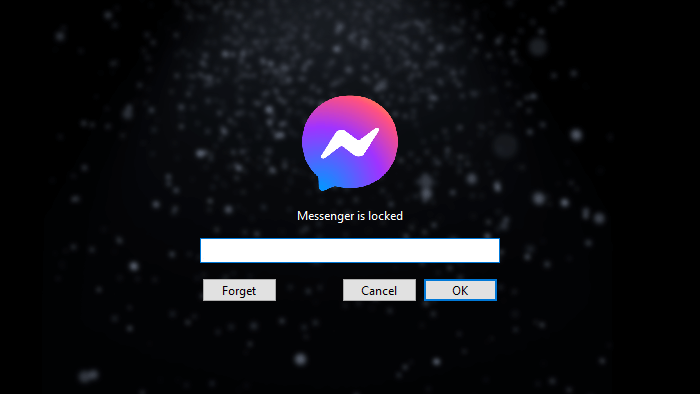
If the password entered is wrong, the app will stay locked. Also, the failed attempt will be recorded.
To remove the lock from an app, you need to go to the main window (which requires the password), select the app and press the Delete key.
Tip 1
This tip tells you how to find the .exe file in step 5.
- If you installed the app from the Microsoft Store, its EXE file is most likely stored in a folder called “WindowsApps”. Open File Explorer. Go to C:\Program Files\WindowsApps. Find the folder that contains «_x64__» in its name. Open this folder to find the EXE file. (If you can’t find the EXE file, try looking for it in the subfolders of the said folder. If you still can’t find it, try using the search feature in File Explorer.) Now, drag the EXE file into the App Lock tab.
- If the app is not installed from the Microsoft Store, its EXE file will be stored in other location. To locate it, click the Windows logo in the taskbar to open the Start menu. Search for the app. Then right click it from the result and select “Open file location”. A File Explorer window will open, showing up the app’s shortcut file. You can directly drag it to the App Lock tab. Alternatively, right-click on the shortcut and select “Open file location”. Then you can find the EXE file.
Tip 2
To make this app lock more effective, it’s highly recommended go to Preferences to turn on “Disable TaskMgr” and “Disable CMD”. Because some technical users know how to bypass the locking using these two tools in PC. Also, it’s a good idea to enable the automatic lock feature. Once enabled, this feature will automatically lock unlocked apps after they are inactive for an amount of time specified by you.
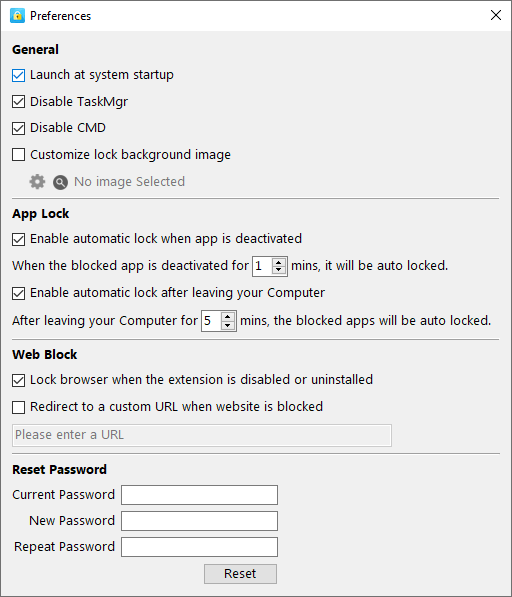
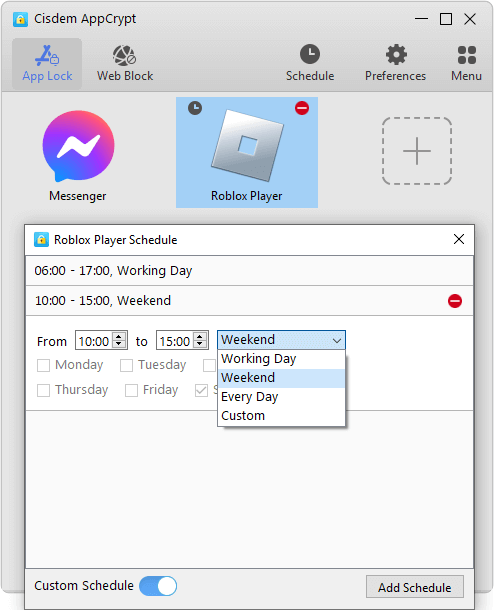
Tip 3
If you want to lock a certain app (like a game app) only at certain times, you can use the Schedule feature. Select the app in the App Lock tab. Click the clock icon and set a desired schedule.
Method 2. Use My Lockbox, a simple folder locker app to lock certain application folders
My Lockbox is not designed to put app lock but can definitely help with this purpose. It’s compatible with Windows 11 and Windows 10. There is a free version, which allows you to lock one app. To use it without limits, you need to pay.
Its Auto-lock feature is worth mentioning. It has 4 options. You can enable one or more options, depending on your needs.
Below are the steps.
1. Download and install My Lockbox.
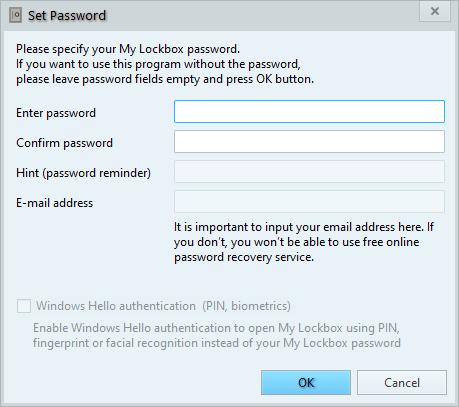
2. The first time you open it, you will be asked to set a password. Click OK.
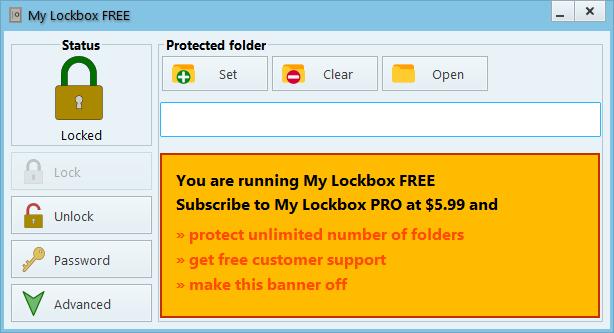
3. The My Lockbox Free main window will appear, reminding you to subscribe to the Pro version. You can ignore it. Then click the Set button.
4. To lock an app, select the folder where this app is installed.
Typically, you can find the folder in C:\Program Files or C:\Program Files (x86). If the app was installed from Microsoft Store, you will find it in C:\Program Files\WindowsApps.
5. Click OK.
Alternatively, you can use drag and drop in steps 3 and 4.
Now the app is locked and protected by a password. If one tries to open a protected app, one will see an error message. The app will remain locked even if you quit My Lockbox.
To unlock an app, you need to open My Lockbox with password. Click Open My Lockbox Control Panel. Click Unlock. By default, an unlocked app will remain accessible until you click Lock. It’s a good idea to turn on the Auto-lock feature. To completely remove the lock, just click Clear.
As you can see, this method doesn’t allow you directly lock an app itself. But it’s useful and easy to follow.
Method 3. Use ExeLock, a good app to password protect EXE files on Windows
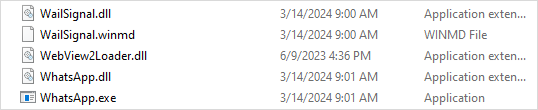
KakaSoft ExeLock can be an effective app lock for PC. It’s dedicated to locking the EXE file. For example, to lock the WhatsApp app, just lock WhatsApp.exe. ExeLock puts app lock by modifying the EXE file.
But there is a drawback. According to my experience, there isn’t a way to remove the lock from an app (or more precisely undo the modification to the EXE file). I also did some searches online but in vain. You can easily unlock an app by entering the password though.
Note: There is a free version, with which you can’t change the default password. The default password is 123456 and is very easy to guess. This means that the free version is almost useless. To effectively lock apps, one needs to get the paid version.
Below are the steps.
1. Download and install ExeLock. Open it.
2. You will be presented with the Protect tab. There, click Select.
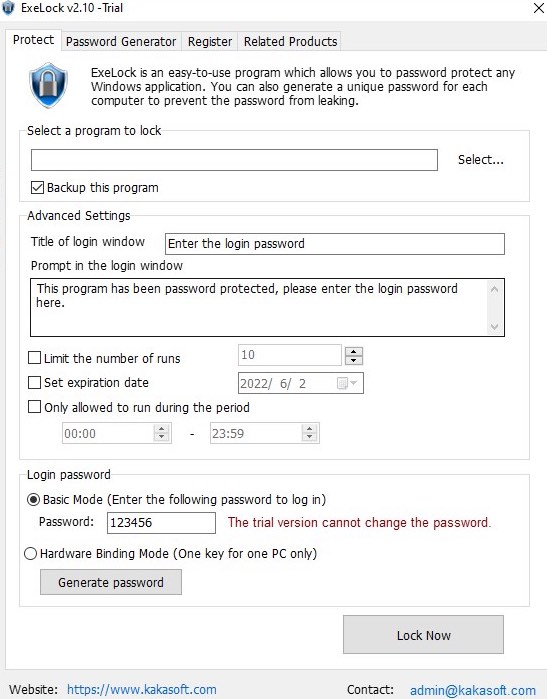
3. Navigate to Program Files to select app that you want to protect and click Open.
For example, to lock WhatsApp, you need to select WhatsApp.exe.
In most cases, you can find the EXE file in Program Files. If you can’t find it, use File Explorer to search for it.
4. Change the default password to something more secure.
5. Click Lock Now.
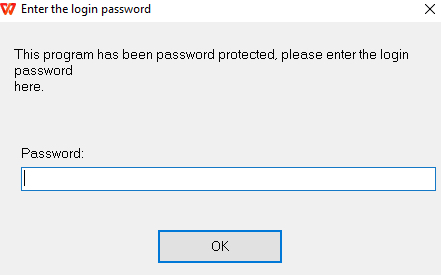
Now you will see a message telling you that the app is locked successfully. If you double-click the app, it won’t open, and an Enter the login password window will appear, allowing you to enter the password to unlock the app.
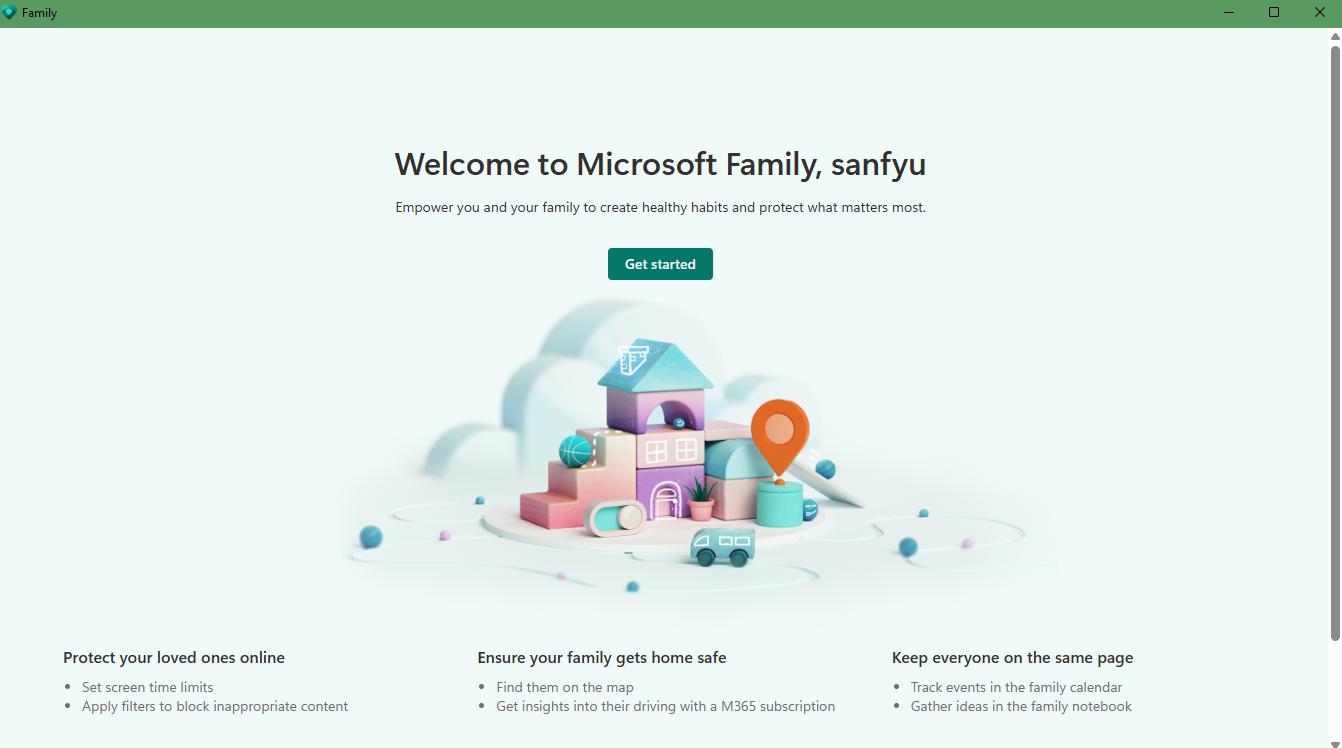
Method 4. Use Microsoft Family Safety, a built-in and free solution
If you’re a parent who wants to prevent children from accessing certain apps by locking the apps, you can try Microsoft Family Safety, which is free and included with most Windows PCs, including Windows 10 Home. If you can’t find this app on your computer, download it from the Microsoft Store.
Family Safety is a tool for parents to monitor and manage child’s online activities. It allows you to lock unwanted apps on child’s device. The disadvantage is it can only lock apps that have already been used on this account. In addition, it only works on non-administrator’s account.
Here are steps on how to lock apps in Windows 10 through Family Safety.
1. Go to Window 10 Start menu. Search for Family Safety.
2. Open it. Click Get Started.
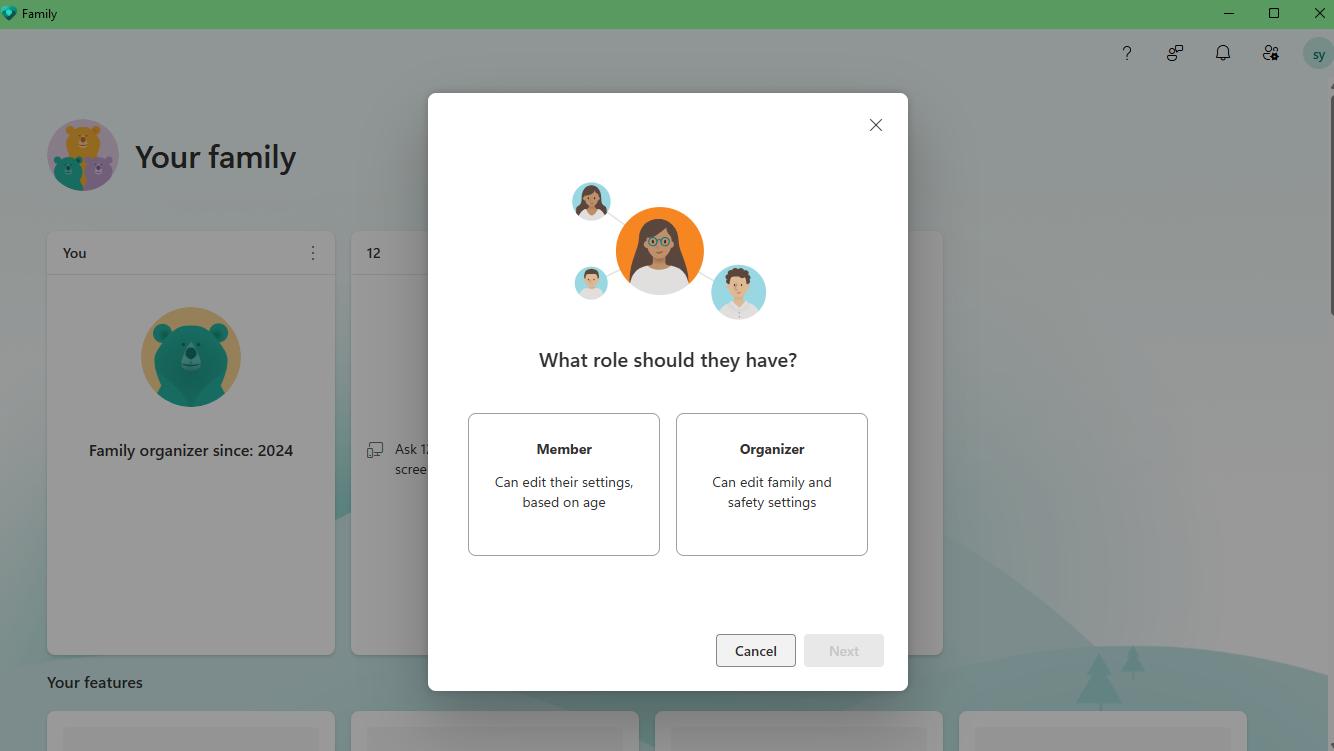
3. On the Family window. Click Add a family member > Member. Click Next.
4. Enter your child’s email address and some other information. If you child doesn’t have an email, create one for him and make sure he can only sign in his own account.
5. Back to the Family window, you’ll see your child’s account has been added. Click on his/her profile picture.
6. Then the parental controls page will pop up. Scroll down and tap on App and games under Screen Time.
7. Turn on the Time limits option and select the app you want to block. Use the slide under this app and set the daily limit to 0 min.
Method 5. Use Group Policy, a solution for Windows Pro, Enterprise, and Education editions
Group Policy is a free utility ships with Windows Pro, Enterprise and Education editions that allows you to configure group policy settings. As network administrator, you can define how you or other users can use this PC such as blocking specific app. Now let’s look at how to lock apps in Windows 11 Pro via Group Policy.
1. Press Windows + R on the keyboard. Enter gpedit.msc. Click OK.
2. Then the Local Group Policy Editor window will appear. Navigate to User Configuration > Administrative Templates > System.

3. Under Settings, find and double-click on Don’t run specific Windows applications.
4. Select Enabled. Click the Show button next to List of disallowed applications.
5. Add the app you want to lock to the disallowed list. For example, to lock the Chrome app, enter chrome.exe.
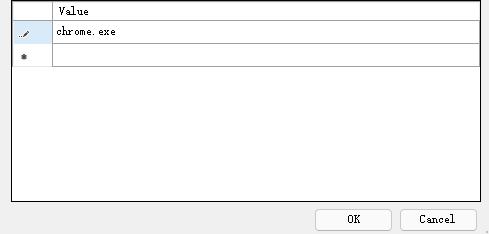
6. Click OK. Then click Apply.
After above settings, the application will be disabled on your Windows computer.
A comparison of these app lockers for PC
Above are 5 app lockers for Windows 11, 10. After reading my detailed introduction, you may have already found the one that suits you best. If you’re still unsure, the comparison table below may help you:
Conclusion
This article talks about five ways on how to lock apps in Windows computers, using app lock for PC from third-party developers or using built-in solutions. Compared to the last two methods, the first three methods are easier and more widely applicable. Regardless of the app lock you use, it’s important to set a strong password so that the lock is harder to bypass.
В операционной системе Windows 11 не предусматривается встроенных средств, с помощью которых можно установить пароль на приложение, поэтому в этом случае потребуется воспользоваться сторонними решениями. Но вы можете поставить его на вход в систему, используя наше отдельное руководство.
Подробнее: Установка пароля на вход в Windows 11
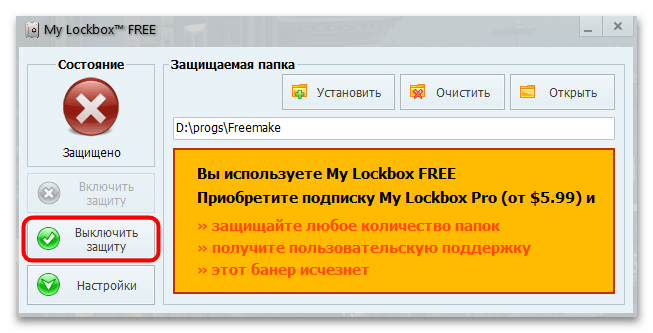
Способ 1: My Lockbox
My Lockbox – один из самых эффективных, но при этом бесплатных инструментов, позволяющих установить пароль на любое приложение или игру. Есть возможность обновить софт до PRO-версии, в которой реализована возможность ставить защиту на любое количество папок и файлов.
Скачать My Lockbox с официального сайта
- Перейдите по ссылке выше и скачайте установочный файл. Дождитесь завершения загрузки, после чего запустите инсталлятор и следуйте инструкциям пошагового мастера.
- Кстати, программа поддерживает интеграцию в контекстное меню системы. На завершающем этапе установке будет предложено активировать ее – тогда опция быстрой защиты станет доступна в меню, вызываемом правой кнопкой мыши.
- После завершения инсталляции программа автоматически запустится. Также найти ее теперь можно и в главном меню Windows. Для начала задайте пароль и подтвердите его, введя повторно. Чтобы иметь возможность восстановления доступа к данным укажите текст для напоминания и действующий адрес электронной почты. Нажмите на кнопку «ОК».
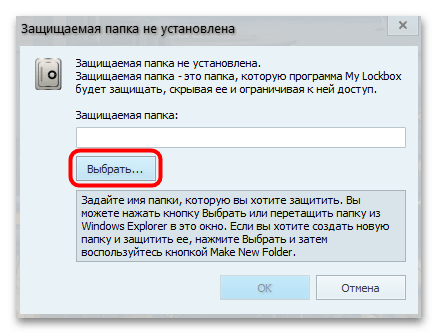
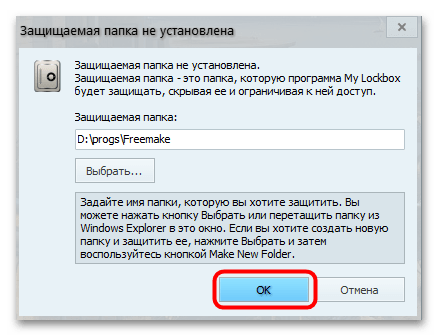
- В новом окне нужно выбрать защищаемую папку. В нашем случае это корневая директория, где хранится исполняемый файл приложения, которое нужно запаролить. Нажмите на кнопку «Выбрать», затем через системный «Проводник» укажите путь к каталогу.

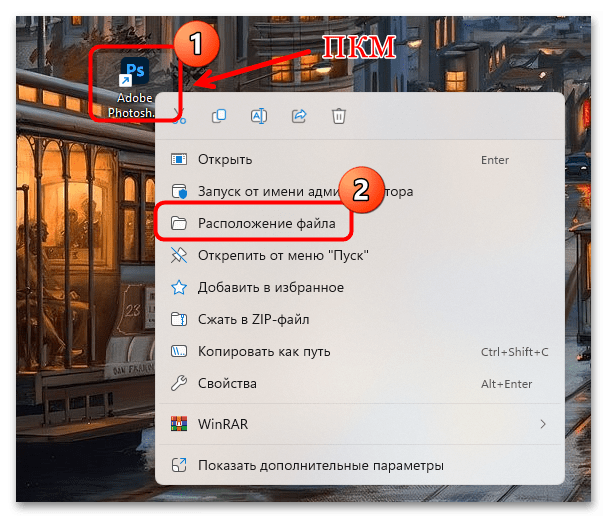
Если вы не знаете, где хранится исполняемый файл приложения или игры, кликните правой кнопкой мыши по его ярлыку на рабочем столе или в главном меню, затем выберите пункт «Расположение файла». В некоторых случаях (если путь был указан снова на ярлык, например в каталог с системными средствами) придется еще раз проделать то же самое.
- После того как путь был вами указан, нажмите на кнопку «ОК».
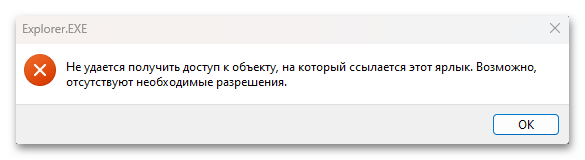
На этом установка пароля на приложение завершена. После попытки запуска запароленной программы отобразится системное предупреждение о том, что получить доступ к объекту не удается из-за отсутствия необходимых разрешений.
Чтобы получить доступ к исполняемому файлу и запустить защищенное приложение, откройте утилиту My Lockbox Control Panel.
Введите пароль, который был задан на Шаге 3 из инструкции.
Отобразится окно со списком запароленных папок. Нажмите на кнопку «Выключить защиту», чтобы запустить приложение из таких папок. Перед выходом из панели управления My Lockbox можете снова активировать пароль.
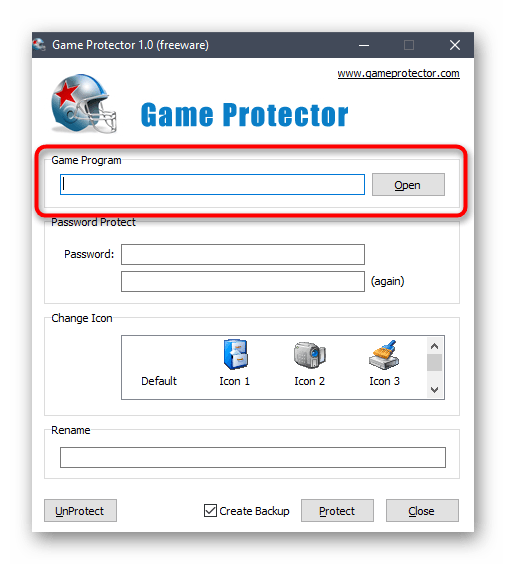
Способ 2: Game Protector
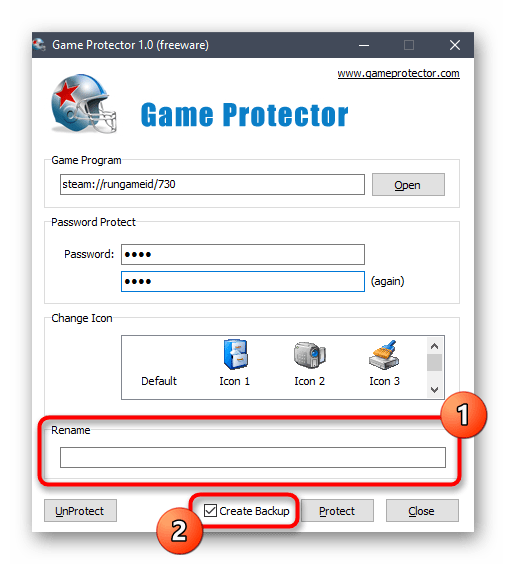
Еще одно решение для защиты приложений в Windows 11 – это программа Game Protector, которая, судя по названию, предназначена для игр, но ее можно полноценно применять и к другим программам, установленных на компьютер. Софт распространяется бесплатно, причем есть несколько дополнительных опций, в частности скрытие истинной иконки запароленной программы.
Скачать Game Protector с официального сайта
- Скачайте и установите Game Protector. После стандартной установки запустите утилиту, затем в верхнем поле нажмите на кнопку «Open», чтобы открыть системный «Проводник» и указать путь к исполняемому файлу программы, на которую нужно установить пароль.
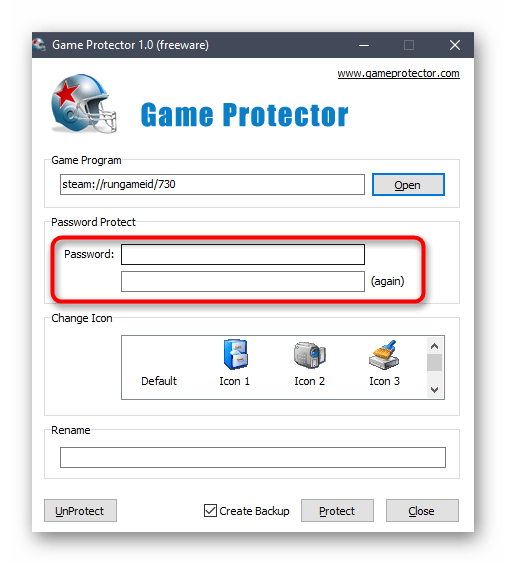
- После выбора потребуется задать сам пароль для программы. В полях «Password» введите и подтвердите ключ для защиты.
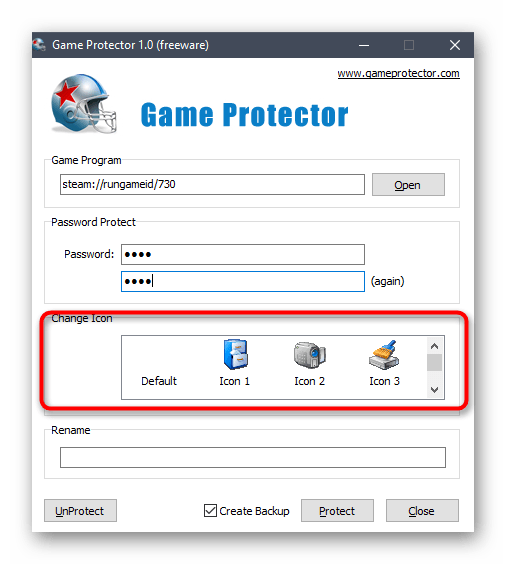
- Если нужно, можете поменять иконку для запароленного приложения – в блоке «Change Icon».
- Также среди дополнительных опций можно отметить возможность изменить имя для исполняемого файла и создать резервную копию, которая позволит вернуть файл к первоначальному состоянию в случае непредвиденных обстоятельств — например, при утере пароля.
- Для завершения установки пароля нажмите на кнопку «Protect».
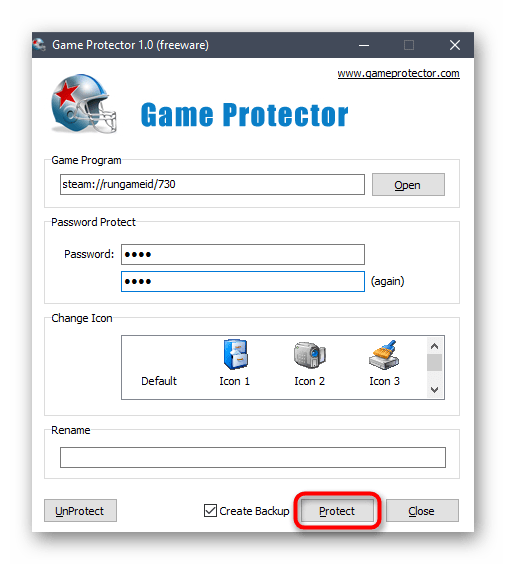
Теперь после попытки запуска программы отобразится окно с полем для ввода пароля. Если использован неправильный ключ, тогда открыть приложение не получится и будет предложено повторить попытку снятия блокировки.
Чтобы убрать защиту с запароленного приложения, запустите Game Protector и нажмите на кнопку «UnProtect» внизу.
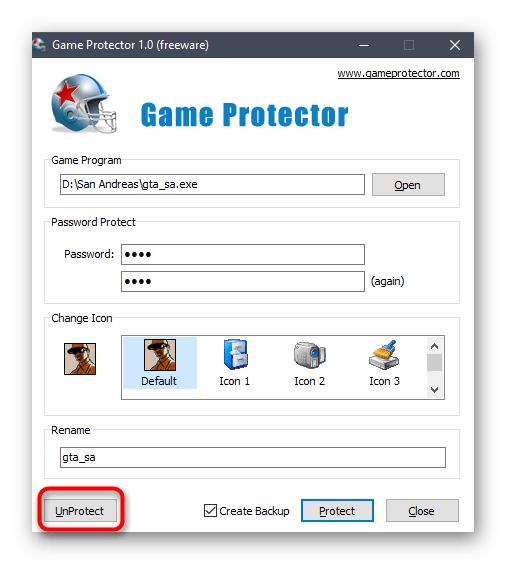
Пожалуй, единственным недостатком приложения является то, что в его интерфейсе не отображается список программ, на которые с помощью него был установлен пароль, – их придется запоминать.
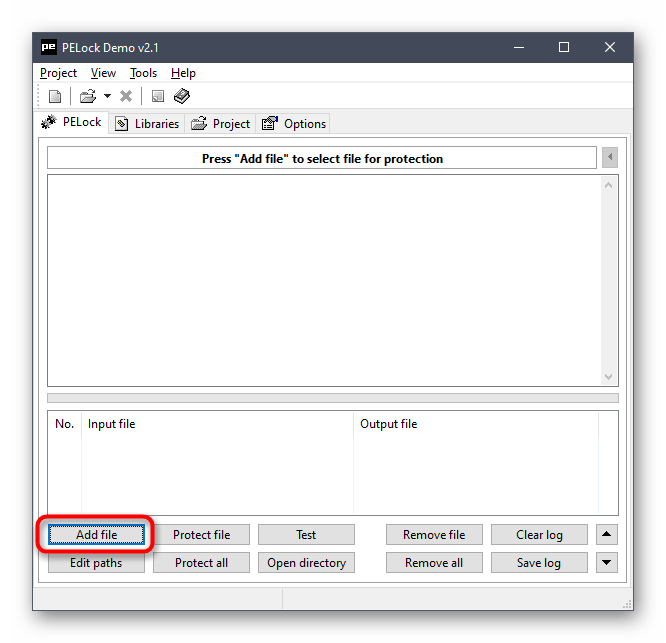
Способ 3: PELock
PELock – это многофункциональный инструмент для защиты файлов и других данных. Кроме того, он предусматривает большое количество дополнительных возможностей. Приложение платное, но на официальном сайте разработчика есть демоверсия, с помощью которой можно ознакомиться с основными особенностями софта.
Скачать PELock с официального сайта
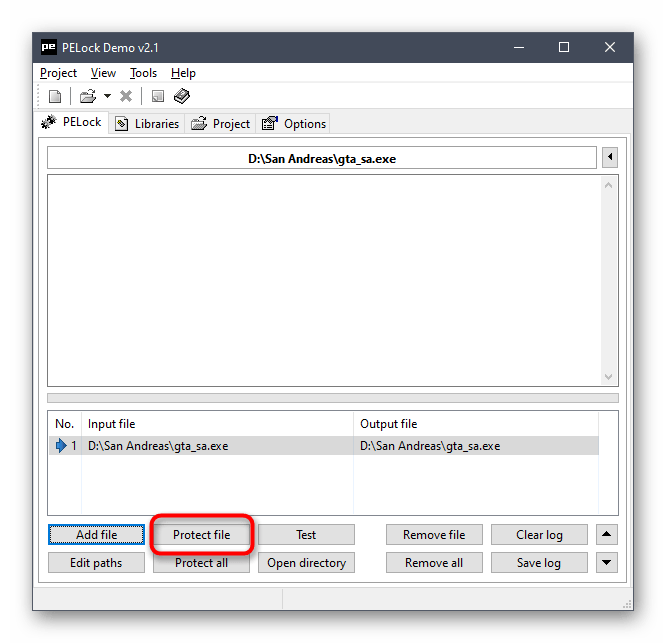
- После инсталляции запустите программу и нажмите на кнопку «Add file» внизу. Выберите ярлык или исполняемый файл в предустановленном «Проводнике», дважды кликнув по иконке.
- Путь к файлу появится в интерфейсе PELock – выделите его и кликните по кнопке «Protect file».
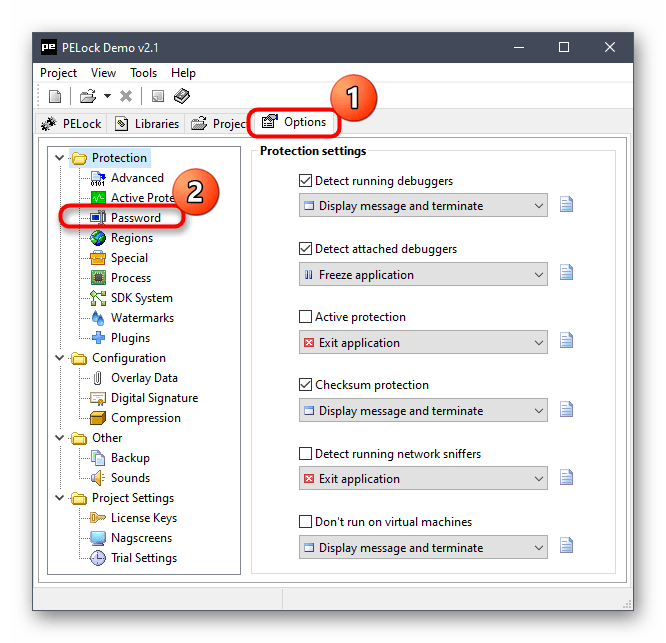
- Далее перейдите на вкладку «Options» в верхней части окна, а в панели слева разверните меню «Protection» и выберите пункт «Password».
- В основной части окна отметьте опцию «Password protection», а ниже в специально отведенном поле задайте надежный пароль.
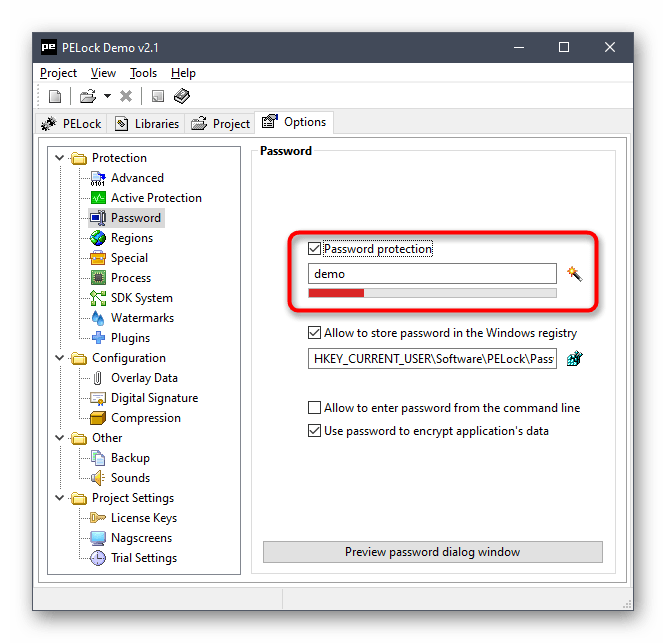
После этих действий на выбранное приложение будет установлен пароль, а после запуска появится дополнительное окно, требующее ввести его.
Пароль для программы можно поменять в любой момент и неограниченное количество раз. К тому же блокировка снимается также через интерфейс PELock.
Наша группа в TelegramПолезные советы и помощь
Эта функция доступна в версиях Frontline Starter, Frontline Standard и Frontline Plus, Business Plus, Enterprise Standard и Enterprise Plus, Education Standard, Education Plus и лицензия Endpoint Education, Enterprise Essentials и Enterprise Essentials Plus, Cloud Identity Premium.Сравнение версий
Если вы управляете корпоративными устройствами с ОС Windows с помощью системы управления устройствами Windows, вы можете ограничить на этих устройствах работу приложений, добавив специальные настройки в консоли администратора Google. Для этого вам нужно указать приложения в XML-файле и загрузить его в качестве значения для специальной настройки. Вы можете блокировать отдельные приложения или все файлы приложений определенного типа, например файлы EXE или MSI.
Шаг 1. Укажите разрешенные и заблокированные приложения в XML-файле
XML-файл можно создать с помощью командной строки в PowerShell или графического интерфейса пользователя в редакторе групповых политик Windows. Ниже описано, как создать одну политику, но вы можете включить в XML-файл несколько связанных политик для приложений с одним и тем же типом файлов. Посмотрите примеры.
Важно! Чтобы блокировать разные типы файлов приложений (EXE, MSI, Script, StoreApps и DLL), необходимо создать отдельные пользовательские настройки.
Вариант 1. Командная строка (PowerShell)
- Создайте случайный идентификатор GUID с помощью онлайн-генератора. Совет. В поисковой системе введите запрос
online GUID generator. - Если вы хотите заблокировать определенное приложение, получите сведения об этом приложении. Если вы хотите заблокировать все приложения с определенным типом файлов, можно пропустить этот шаг.
- На устройстве с ОС Windows скачайте исполняемый файл приложения (с расширением EXE), которое вы хотите заблокировать или разрешить.
- Откройте PowerShell.
- Выполните команду Get-AppLockerFileInformation -path PathToExe | format-list, где PathToExe – это путь к исполняемому файлу.
- В ответе найдите значения в строке
Publisherи сохраните их. Эти значения имеют следующий формат и соответствуют значениям, которые вы будете использовать в XML-файле:Название_издателя\Название_продукта\Название_исполняемого_файла,Версия_исполняемого_файла
Название издателя представляет собой длинную строку вида
O=MICROSOFT CORPORATION, L=REDWOOD, S=WASHINGTON, C=US, и ее нужно включить целиком.
- Скопируйте в текстовый редактор следующий код XML:
<RuleCollection Type="Type" EnforcementMode="Enabled">

          <FilePublisherRule Id=GUID Name=PolicyName Description=PolicyDescription UserOrGroupSid=UserOrGroupSid Action=[Allow|Deny]>

             <Conditions>

               <FilePublisherCondition PublisherName=PublisherName BinaryName=BinaryName ProductName=ProductName>

                 <BinaryVersionRange HighSection=latestVersion LowSection=earliestVersion />

               </FilePublisherCondition>

             </Conditions>

           </FilePublisherRule>

</RuleCollection> - Замените теги в XML-файле реальными значениями. Примеры того, как сгруппировать несколько политик в один файл и выполнить другие действия, приведены ниже.
Тег Значение Type Тип файла приложения (должен соответствовать OMA-URI):
- Для EXE-файлов введите
"Exe" - Для MSI-файлов введите
"Msi" - Для файлов Script введите
"Script" - Для DLL-файлов введите
"Dll" - Для приложений из Microsoft Store введите
"Appx"
GUID Глобальный уникальный идентификатор, который вы сгенерировали на шаге 1. PolicyName Название для политики. Можно ввести любую строку. PolicyDescription Описание политики. UserOrGroupSid Пользователи или группы, к которым применяется политика: - Чтобы применить политику ко всем пользователям устройства, введите S-1-1-0.
- Чтобы применить политику к конкретному пользователю, введите его идентификатор SID. Чтобы получить этот идентификатор, выполните в командной строке команду
wmic имя_пользователя get name,sid,
где имя_пользователя – это имя нужного пользователя на устройстве. Если вы не знаете имени пользователя, получите список всех пользователей на устройстве с помощью команды
wmic useraccount get name,sid.
-
Вы можете ввести только одно имя пользователя. Чтобы применить политику к большему количеству пользователей, объедините их в группу или скопируйте политику и измените в ней имя.
- Чтобы применить политику к группе, введите идентификатор SID группы. Чтобы получить этот идентификатор для группы, выполните в командной строке команду
wmic название_группы get name,sid,
где название_группы – это название группы на устройстве. Если вы не знаете названия группы, вы можете получить список всех групп на этом устройстве, запустив команду
wmic group get name,sid.
Allow|Deny Выберите действие для политики: разрешить или заблокировать указанные приложения. PublisherName Название издателя приложения (указанное на шаге 2). Вы можете использовать подстановочный знак *, но совпадения по регулярным выражениям, а также подстановочные знаки префиксов и суффиксов не поддерживаются. BinaryName Название исполняемого файла (указанное на шаге 2). Вы можете использовать подстановочный знак *, но совпадения по регулярным выражениям, а также подстановочные знаки префиксов и суффиксов не поддерживаются.
Например, чтобы блокировать все EXE-файлы, введите * и при добавлении специальной настройки выберите OMA-URI, который заканчивается на /EXE/Policy.
ProductName Название продукта (указанное на шаге 2). Вы можете использовать подстановочный знак *, но совпадения по регулярным выражениям, а также подстановочные знаки префиксов и суффиксов не поддерживаются. latestVersion Номер последней версии приложения, к которой применяется эта политика. Чтобы блокировать все версии этого приложения, введите *. earliestVersion Номер самой ранней версии приложения, к которой применяется эта политика. Чтобы блокировать все версии этого приложения, введите *. - Для EXE-файлов введите
-
Сохраните файл.
Вариант 2. Графический интерфейс пользователя (редактор групповых политик Windows)
- Выполните инструкции из раздела Generating the XML (Создание XML-файла) этой статьи Microsoft. Остановитесь, когда дойдете до раздела Creating the Policy (Создание политики).
Примечание. Эти инструкции описывают процесс создания политики для приложения, установленного на устройстве. Чтобы создать политику для приложения, не установленного на устройстве, на шаге 6 выберите Use an installed packaged app as a reference (Использовать пакет установленного приложения в качестве примера).
- После экспорта XML-файла удалите созданную вами политику в редакторе групповых политик. В противном случае эта политика будет применена на устройстве.
Шаг 2. Добавьте специальную настройку
-
Войдите в консоль администратора Google как администратор.
Войти в консоль администратора можно, только если вы используете аккаунт администратора.
- Нажмите Специальные настройки.
- Нажмите Добавить специальную настройку.
- Задайте специальную настройку:
- В поле OMA-URI введите ApplicationLaunchRestriction и выберите один из вариантов, который соответствует типу файла приложения в этой политике.
- Для EXE-файлов выберите ./Vendor/MSFT/AppLocker/ApplicationLaunchRestrictions/<Enter Grouping>/EXE/Policy.
- Для приложений из Microsoft Store выберите ./Vendor/MSFT/AppLocker/ApplicationLaunchRestrictions/<Enter Grouping>/AppStore/Policy
- Для MSI-файлов выберите ./Vendor/MSFT/AppLocker/ApplicationLaunchRestrictions/<Enter Grouping>/MSI/Policy
- Для скриптов PowerShell выберите ./Vendor/MSFT/AppLocker/ApplicationLaunchRestrictions/<Enter Grouping>/Script/Policy
- Для DLL-файлов выберите ./Vendor/MSFT/AppLocker/ApplicationLaunchRestrictions/<Enter Grouping>/DLL/Policy
Дополнительная информация приведена в документации Microsoft по AppLocker CSP.
- В поле OMA-URI замените <Enter Grouping> случайной строкой с буквенно-цифровыми символами. Она должна быть уникальной для каждой специальной настройки. Например, если вы добавляете одну специальную настройку для блокировки файлов EXE, а другую для блокировки файлов MSI, используйте для них разные значения.
- При выборе OMA-URI в поле Имя подставляется значение «Политика». Введите уникальное имя, которое поможет вам найти его в списке специальных настроек.
- Для параметра Тип данных выберите значение Строка (XML), нажмите Загрузить файл XML и выберите созданный вами в первом разделе XML-файл конфигурации.
- Введите описание специальной настройки, которое поясняет ее действие и целевые объекты (необязательно).
- В поле OMA-URI введите ApplicationLaunchRestriction и выберите один из вариантов, который соответствует типу файла приложения в этой политике.
- Нажмите Далее и выберите организационное подразделение, к которому нужно применить специальную настройку, или нажмите Добавить, чтобы перейти к следующей настройке. Дополнительные правила не будут применены к организационному подразделению, пока вы не нажмете Далее и не выберете его.
- Выберите организационное подразделение, к которому будет применена политика.
- Нажмите Применить.
Если пользователь в организационном подразделении попытается установить или открыть заблокированное приложение на устройстве с ОС Windows, он увидит сообщение об ошибке, поясняющее, что это приложение заблокировано системным администратором.
Примеры XML-файлов
Как разрешить только подписанные приложения (заблокировать все неподписанные приложения)
Эта политика позволяет пользователям устанавливать только подписанные приложения и запрещает устанавливать неподписанные приложения, тип файлов которых указан в OMA-URI.
Чтобы заблокировать все неподписанные приложения с любым типом файлов, добавьте пользовательский параметр для каждого типа файлов и в качестве значения для него укажите приведенный ниже XML-код.
Примечание. В RuleCollection параметр Type должен соответствовать типу файла приложения. Поддерживаются следующие значения: "Exe" для файлов формата EXE, "Msi" для MSI-файлов, "Script" для файлов скриптов, "Dll" для DLL-файлов и "Appx" для приложений из Microsoft Store. В FilePublisherRule замените GUID случайным значением, которое вы получили с помощью онлайн-генератора GUID.
<RuleCollection Type="Type" EnforcementMode="Enabled">
  <FilePublisherRule Id=GUID Name="Allow all signed apps" Description="Allows all users to run signed apps" UserOrGroupSid="S-1-1-0" Action="Allow">
     <Conditions>
       <FilePublisherCondition PublisherName="*" ProductName="*" BinaryName="*">
         <BinaryVersionRange LowSection="*" HighSection="*" />
       </FilePublisherCondition>
     </Conditions>
   </FilePublisherRule>
</RuleCollection>
Как заблокировать определенные приложения
Для блокировки приложений нужно включить раздел <FilePublisherRule>, который разрешает приложения, и <FilePublisherRule> заблокирует все приложения, какие вам нужно.
Стандартный формат:
<RuleCollection Type="Type" EnforcementMode="Enabled">
  <FilePublisherRule...>
    ...разрешенные приложения...
  </FilePublisherRule>
  <FilePublisherRule...>
    ...условия для блокировки первого приложения...
  </FilePublisherRule>
  <FilePublisherRule...>
    ...условия для блокировки второго приложения...
  </FilePublisherRule>
</RuleCollection>
Примечание. В RuleCollection параметр Type должен соответствовать типу файла приложения. Поддерживаются следующие значения: "Exe" для файлов формата EXE, "Msi" для MSI-файлов, "Script" для файлов скриптов, "Dll" для DLL-файлов и "Appx" для приложений из Microsoft Store. В FilePublisherRule замените GUID случайным значением, которое вы получили с помощью онлайн-генератора GUID.
Например, такая политика не позволяет пользователям запускать «App A» и «App B», которые являются EXE-файлами:
<RuleCollection Type="Exe" EnforcementMode="Enabled">
  <FilePublisherRule Id=GUID Name="Allow all signed apps" Description="Allows all users to run signed apps" UserOrGroupSid="S-1-1-0" Action="Allow">
    <Conditions>
      <FilePublisherCondition PublisherName="*" ProductName="*" BinaryName="*">
  <BinaryVersionRange LowSection="*" HighSection="*" />
      </FilePublisherCondition>
    </Conditions>
  </FilePublisherRule>
  <FilePublisherRule Id=GUID Name="Block app A" Description="Blocks app A for all users" UserOrGroupSid="S-1-1-0" Action="Deny">
    <Conditions>
      <FilePublisherCondition PublisherName="O=Software Company, L=London, C=GB" ProductName="APPLICATION A" BinaryName="APPA.EXE">
        <BinaryVersionRange LowSection="*" HighSection="*" />
      </FilePublisherCondition>
    </Conditions>
  </FilePublisherRule>
  <FilePublisherRule Id=GUID Name="Block app B" Description="Blocks app B for all users" UserOrGroupSid="S-1-1-0" Action="Deny">
    <Conditions>
      <FilePublisherCondition PublisherName="O=Solarmora Inc, L=Mountain View, S=California, C=US" ProductName="APPLICATION B" BinaryName="APPB.EXE">
        <BinaryVersionRange LowSection="*" HighSection="*" />
      </FilePublisherCondition>
    </Conditions>
 </FilePublisherRule>
</RuleCollection>
Как заблокировать приложения из пакета операционной системы Windows
Приведенный ниже код основан на примере из документации Microsoft. Он блокирует приложение «Почта Windows» для пользователей. Перед началом использования замените GUID случайным значением, полученным из онлайн-генератора GUID.
Примечание. Этот файл приложения является приложением Microsoft Store, поэтому OMA-URI должен иметь значение ./Vendor/MSFT/AppLocker/ApplicationLaunchRestrictions/<Enter Grouping>/AppStore/Policy.
<RuleCollection Type="Appx" EnforcementMode="Enabled">
  <FilePublisherRule Id=GUID Name="Allow all signed apps" Description="Allows all users to run signed apps" UserOrGroupSid="S-1-1-0" Action="Allow">
    <Conditions>
      <FilePublisherCondition PublisherName="*" ProductName="*" BinaryName="*">
        <BinaryVersionRange LowSection="*" HighSection="*" />
      </FilePublisherCondition>
    </Conditions>
  </FilePublisherRule>
  <FilePublisherRule Id=GUID Name="Block Windows Mail" Description="Blocks all users from using Windows Mail" UserOrGroupSid="S-1-1-0" Action="Deny">
    <Conditions>
      <FilePublisherCondition PublisherName="O=Microsoft Corporation, L=Redmond, S=Washington, C=US" ProductName="microsoft.windowscommunicationsapps" BinaryName="*">
        <BinaryVersionRange LowSection="*" HighSection="*" />
      </FilePublisherCondition>
    </Conditions>
  </FilePublisherRule>
</RuleCollection>
Google, Google Workspace, а также другие связанные знаки и логотипы являются товарными знаками компании Google LLC. Все другие названия компаний и продуктов являются товарными знаками соответствующих компаний.
Эта информация оказалась полезной?
Как можно улучшить эту статью?
Do you have an app you don’t want anybody to be able to open without your permission? Whether it’s for the sake of your kids or clueless family or friends, there are several methods to restrict others from being able to access the app. This short guide will show you how to lock an app with a password in Windows 11.
If another user has a separated user account in the same Windows PC, you can restrict access to a certain folder so that any executable file (of the app) in the folder will not be visible or accessible to the user. To learn how to restrict access to app, file or folder in Windows 11, go to: How to Restrict User Access to a Folder or Drive in Windows 11.
If you only have one user account on your PC and you share the same user account with other people, use the method below to lock an app with a password in Windows 11.
How to password protect an app in Windows 11
Since there is no built-in feature that allows you to password protect an app, folder or file in Windows, we will have to rely on a third party tool to do so. We recommend My Lockbox.
My Lockbox is a simple tool that is able to lock an entire folder with a password set by you. Any file in the locked folder cannot be opened without first unlocking the folder with your set password.
Here’s an example of how to set up My Lockbox to lock an app with password on Windows 11.
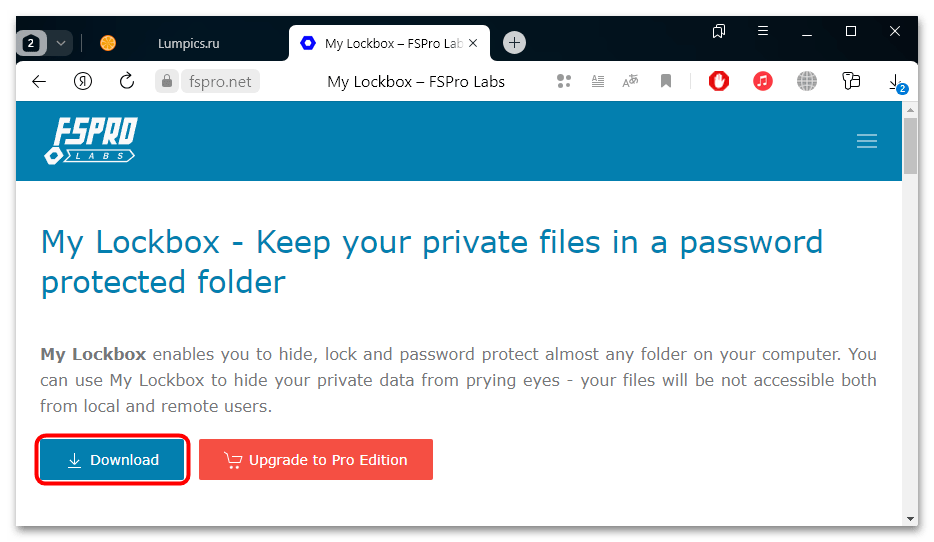
First, download and install My Lockbox.
https://fspro.net/my-lockbox/
During the installation, My Lockbox will ask if you want to add an “Protect with My Lockbox” option to the Windows Explorer context menu. If enabled, once installed, when you right-click on a folder and select “Show more options” in Windows 11, you will see a “Protect with My Lockbox” option in the context menu which lets you to quickly lock the folder without manually browsing to this folder when setting up My Lockbox. This integration is optional.
Once installed, open My Lockbox. The first time you open the program, it will prompt you to specify a password you want to use with the program. You need to enter a password twice, a hint to remind yourself about the password should you forget it, and an email address for password recovery if you lose your password in the future.
On the next screen, in the Folder to protect field, click on Browse and browse to the folder you want to lock. In the screenshot example below, I want to lock Steam client (a gaming platform). Thus, I need to browse to where Steam was installed – “C:\Program Files (x86)\Steam“. Once done, click OK to lock the folder.
If you do not know the location of the app’s installation folder, right-click the desktop shortcut of the app you want to lock, and select Properties. The “Start in” field will show the location of where the app is originally located.
Once the folder is locked, when you try to open an app (via desktop shortcut, Start menu or anywhere else) that is located in the folder you’ve locked, Windows 11 will show an error that says “The item referred to by this shortcut cannot be accessed. You may not have the appropriate permissions.”
To unlock the folder so that you can launch the app again, open My Lockbox and enter your password. Then, open the app again.
To lock the app again after unlocking it, right-click on the My Lockbox icon from the taskbar corner and select Lock and quit.
My Lockbox free version allows you to lock only 1 folder. To lock more folders, you will need to pay for a subscription or purchase the software. Tip: You can try to put all the apps and files you want to lock in a single folder and lock only that particular folder. It will still be able to lock all files and subfolders within that particular folder you select to lock.
For example, you can create a folder such as “C:\Personal“, and install all the apps (or change the installation location) you want lock onto this folder. Then, use My Lockbox to lock this folder to lock all the apps installed in this particular folder.