
In the previous tutorials we discussed the possible ways to lock a Word document (.doc/.docx) and encrypt an Excel workbook (.xls/.xlsx), and here we’ll continue with the other widely used editor in Windows — Notepad. Is there any simple but effective way to password protect a Notepad file in Windows 11 or Windows 10?
As we know, Microsoft Office has a readymade function to password protect a document. For example, in a Word application for Windows, go to File > Info > Protect Document > Encrypt with Password, you’ll keep a file under a protected view. Without a password, nobody can open, view or edit the content in it. How about the plain Notepad text file? It seems that there is no such a Microsoft Office encryption solution in the Notepad editor. Do not worry. Here you’ll find three reliable ways to keep a Notepad file private with a password.
Method 1. Use Windows File Encryption Tool to Password Protect Notepad File
Here, the Windows File Encryption tool lies in a secret path in the file Properties. It’s not exclusively for encyrpting a Notepad file but all file types. If your goal is to ensure the content of a Notepad file are secure and inaccessible without using a standalone encryption key, the Windows native encryption method is sufficient. Follow the below steps to protect your Notepad file from leaking to the public.
Step 1. Right-click on the tareget Notepad text file and choose Properties.
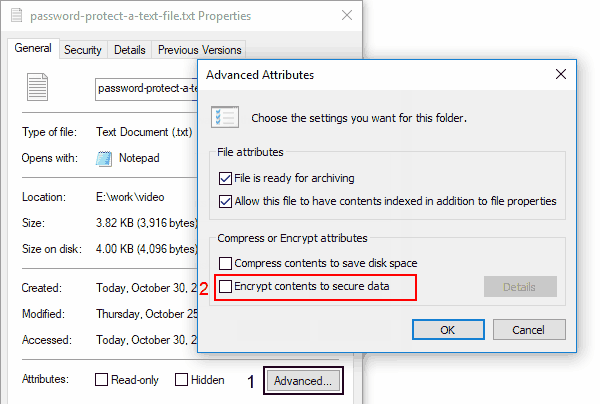
Step 2. Under the General tab, click the Advanced button and then select Encrypt Contents to Secure Data on the new window. There you can also compress the contents to save disk space. Click OK and then Apply.
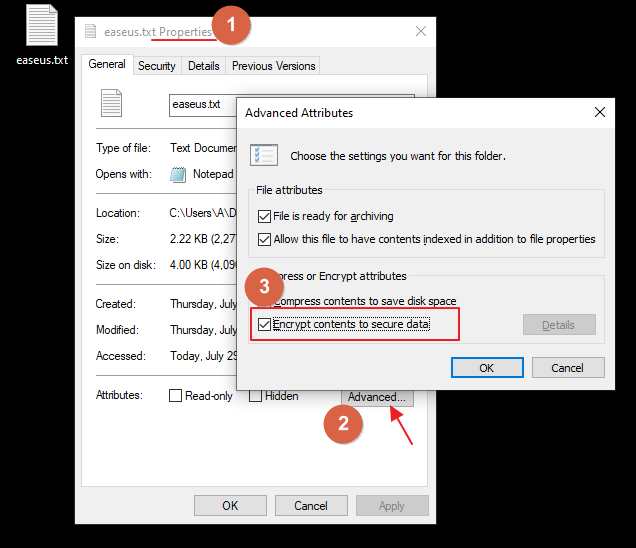
Step 3. Continue clicking the Encrypt the File Only option and click OK.
Step 4. Your text file should be added with a lock icon. You can move the fiel to any drive that suppports encryptioin using the NTFS file format. The FAT32 drive does not support to save a file encyrpted by this way.
Method 2. Use WinRAR Encryption Tool to Password Protect Notepad File
Many Windows users have a WinRAR compression program installed on their computers, sometimes it can be a WinZip or 7-zip program. But here, you’ll start to know the WinRAR as a new file/folder encryption program, which uses AES-256 bit encryption technology. In short, WinRAR adopts advanced encryption standard encryption algorithm that provides a high level of security to a compressed file.
Follow the overal steps to encrypt a Notepad file using the Windows WinRAR program:
Step 1. Right-click on the Notepad file you want to password protect and select Add to archive.
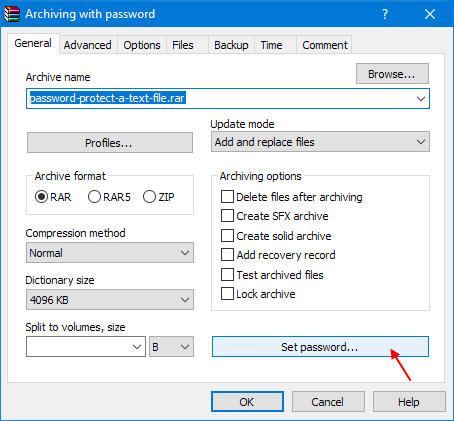
Step 2. Under the General tab, you can choose an Archive format among RAR, RAR5 and ZIP, and click Set password.
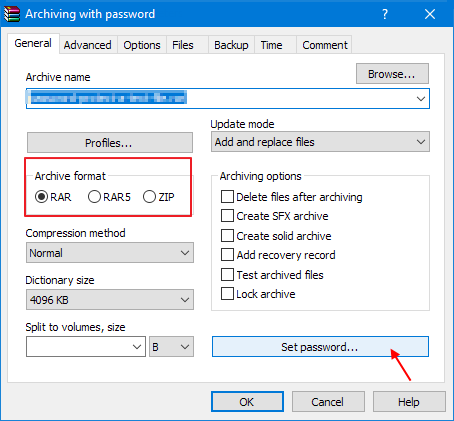
Step 3. Enter the password you prepared and click OK.
Method 3. Use EaseUS File Encryption Software to Password Protect Notepad File
In addition to the two ways you may be very farmilar with in Windows operating systems, there is another worthwhile encryption method. Third-party EaseUS LockMyFile can protect your Notepad files safe and untouched by anyone without your knowledge. Compared with the mere encryption ability of Windows Encryption Tool and WinRAR, the EaseUS file and folder locker software provides more comprehensive password protection solution as follows:
- Hide: Completely disguise your Notepad file without visibility on your PC.
- Lock: Add a lock to your Notepad file so that it cannot be opened or modified.
- Protect: Allow you Notepad file to be viewed but cannot be changed.
- Encrypt: Pasword protect your Notepad file.
See how to encrypt a Notepad file in Windows using EaseUS LockMyFile:
Step 1. Enter «easeus» to launch EaseUS LockMyFile, register with a valid email and a license code.
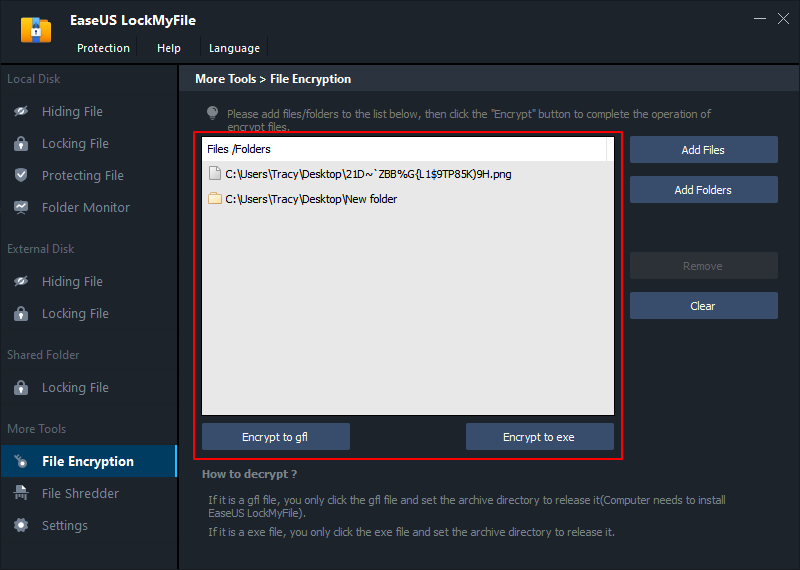
Step 2. Click File Encryption under More Tools > Click Add Files or Add Folders.
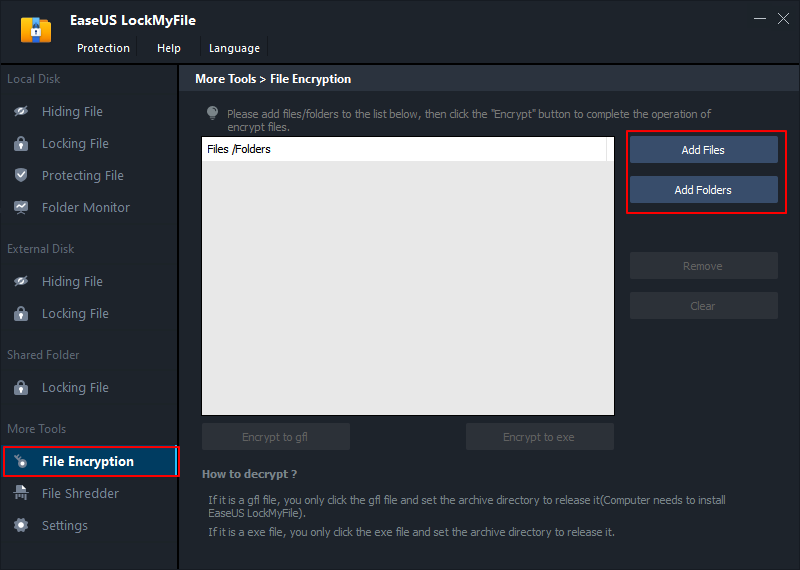
Step 3. Select important files or folders that you need to encrypt, and click Open.
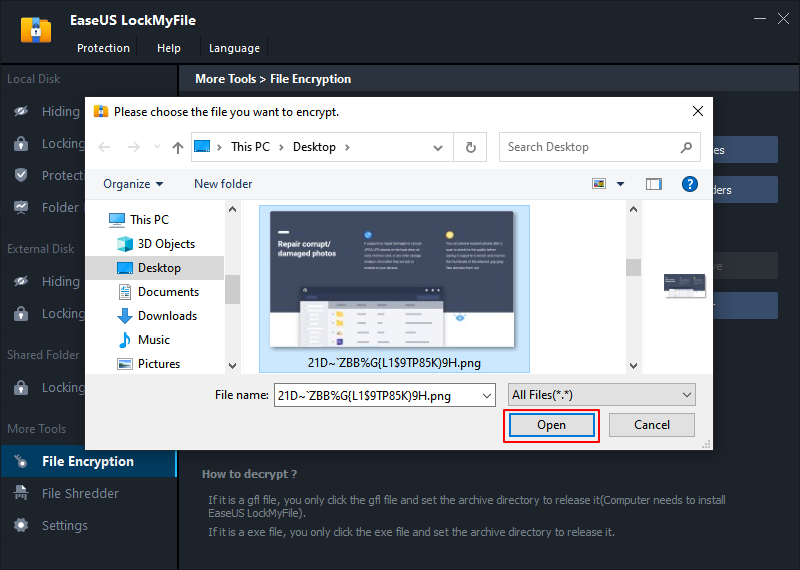
Step 4. Select the encryption mode: Encrypt to gfl or Encrypt to exe.
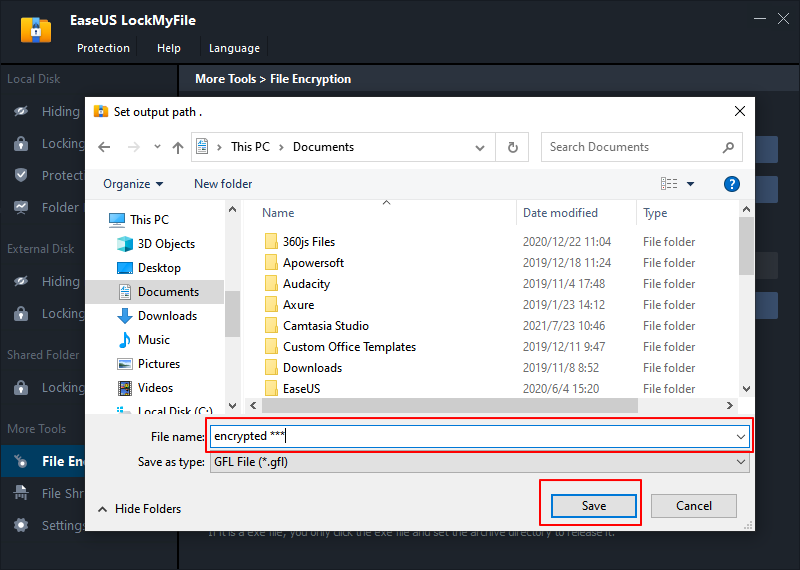
Step 5. Browse a safe location on your PC, rename the encrypted file or folder, and click Save to save the encrypted files/folders.
Closing Thoughts
Regarding the topic of «How to password protect a Notepad folder in Windows», we provide users with three effective ways. They are all protection measures that are trustworthy and applicable to a plain Text document as well as other types of files like images, videos or zip compressed files.
The built-in Windows File Encryption method can only take effective on an NTFS partition, while WinRAR sets a Notepad text file to a new password protected file and still keeps the original file unchanged. In contrast, the third-party EaseUS LockMyFile seems to be the most efficient and comprehensive solution to encrypt a file but it needs a download and installation. Each way has its own advantages and shortcomings, so choose one plan you get most used to it.
Have a text file with sensitive information on your computer? Find a good way to password protect notepad files thus prevents other people from seeing the contents? There are several ways we try to help keep your files safe in the Windows operating system.
File Encryption is probably the easiest way out there to password protect text files in Windows. In addition to that method, you can use a ZIP or RAR software to password protect Notepad files.
Following are 3 easy ways to password protect Windows Notepad files.
Use File Encryption to password protect Notepad files
The best way to secure files you don’t want others seeing is encryption. Windows operating system, File Encryption is an easy to use tool that can help protect your data. Only someone with the right password can decrypt it.
Step 1: Right-click a text file or folder and select Properties.
Step 2: Select the Advanced button and select Encrypt contents to secure data check box.
Step 3: Select OK to close the Attributes windows, select Apply, then select OK.
Use 7-Zip to password protect Notepad text files
You can create a password protected zip file containing your text file. To access the text file inside the protected zip file, you will have to enter the password. Here is how to do just that. In fact, you can use this method to protect all file types.
Download and install 7-Zip, if not already installed on your PC.
Right-click on the text file, click 7-Zip and then click Add to archive option.
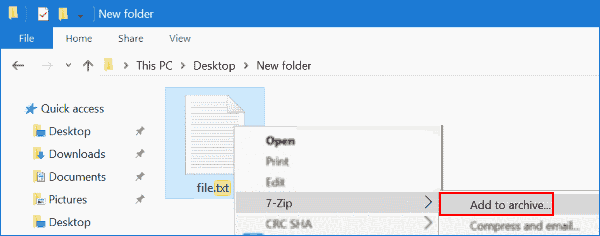
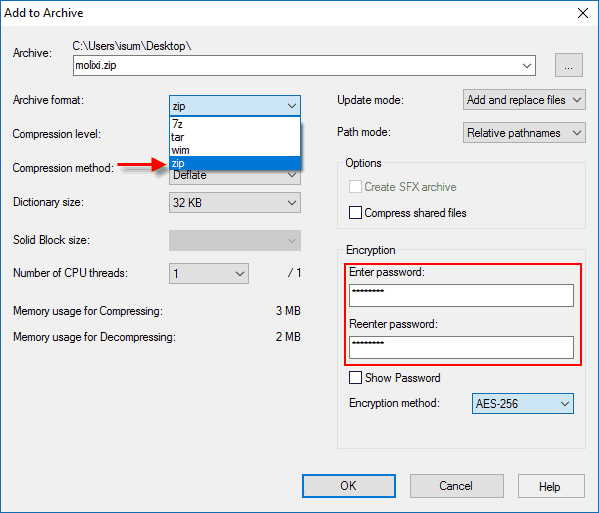
In the Archive section, enter a name for your new password-protected zip file and select a location to save the file. Select the archive format as zip.
In the Encryption section, either select the default or the popular AES-256 encryption.
Finally, enter the password which you would like to use to a password-protect text file, re-enter the password, and then click OK button to create a zip file containing your text file. That’s it!
Now, whenever you try to open the zip file using Windows 10’s built-in zip extraction tool or any other tool, you will need to enter the password to get the text file.
Use WinRAR to password protect Notepad files
If you have WinRAR installed on your computer, just follow these steps below:
Right-click on the text file which you want to password protect and then click Add to archive. In the General tab, enter a name for the file, select archive format you like, and then click Set password button.
Enter the password, and re-enter the password. Finally, click OK.
In addition to 7-Zip and WinRAR, you can also use other archiving software like WinZip or Bandizip to password protect text files in Windows PC.
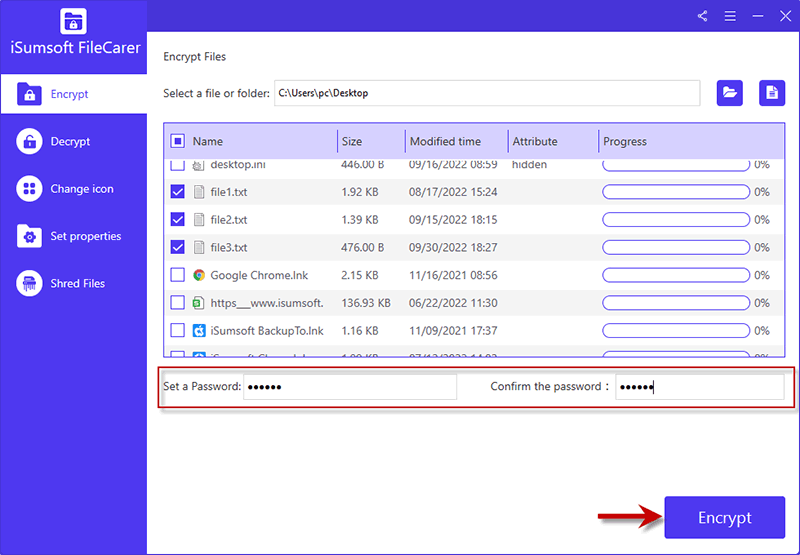
Use iSumsoft FileCarer to password protect text files
iSumsoft FileCarer is a professional file protection tool that certainly makes it easier to password protect your important text files without any leakages. It allows you to strongly encrypt various types of files such as texts, documents, images, videos, etc. with a password and secretly hide them on your Computer. Here you can download and install FileCarer. Then launch it on your Computer.
Go to Encrypt option and click the file/folder icon to choose the text file you want to protect.
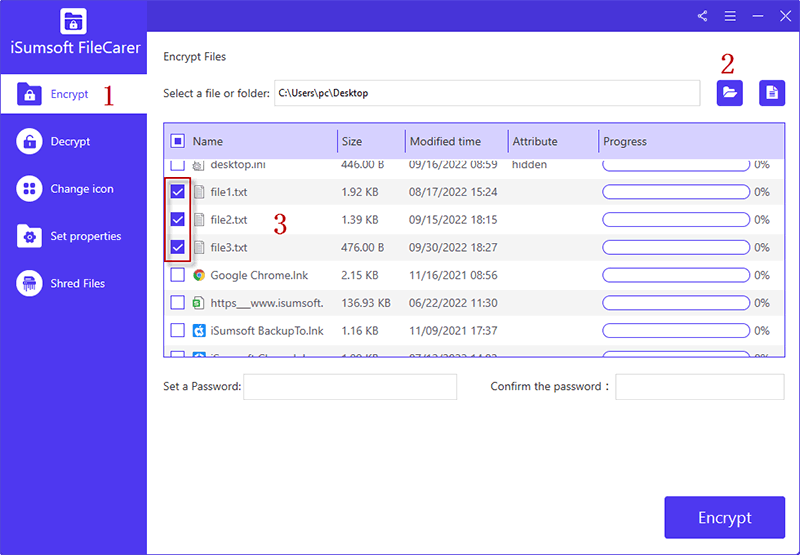
After selection, you can enter a preferred password and hit Encrypt button to start encrypting text files.
Applies ToOneNote for Windows 10
Important: OneNote for Windows 10 support will end in October 2025. To keep up to date with the latest OneNote features, get OneNote from the Microsoft Store or as part of Microsoft 365.
Password protection keeps your notes safe from prying eyes. Whether you use OneNote at school, at work, or at home, passwords let you control access to specific sections in your notebooks.
Add a password to a section in your notebook
When your protect a notebook section with a password, all of its pages are locked until you enter the correct password.
-
Right-click the name of the notebook section that you want to protect, and then choose Password Protection > Add Password.
-
In the Password Protection window, type the password you want into the Enter Password box.
-
Type the password again into the Confirm Password box, and then press Enter.
Note: Choose your password carefully. If you forget your password, no one will be able to unlock your notes for you (not even Microsoft Technical Support).
Lock all protected sections in your notebook
If you’ve applied passwords to multiple sections in your notebook, you can lock them all at the same time.
-
Right-click the name of any protected (but currently unlocked) notebook section, and then choose Password Protection > Lock All Protected Sections. OneNote immediately locks all protected sections in the current notebook.
Note: To unlock a protected section and gain access to its pages, click the section you want to unlock, type its password into the Password box, and then press Enter. Keep in mind that protected sections will be locked again when you exit OneNote.
Change the password for a protected section
-
Right-click the name of any protected (but currently unlocked) notebook section whose password you want to change, and then choose Password Protection > Change Password. (If this option isn’t available, it means that the current section doesn’t have a password.)
-
In the Change Password window, type the current section password into the Old Password box.
-
In the Enter New Password box, type the new password that will replace the current one.
-
Type the new password again into the Confirm Password box, and then press Enter.
Note: Changing a password only affects the section that you’re currently in. To change the passwords for other protected sections in your notebook, follow the preceding steps for each protected section.
Remove the password from a protected section
-
Right-click the name of any protected (but currently unlocked) notebook section whose password you want to remove, and then choose Password Protection > Remove Password. (If this option isn’t available, it means that the current section doesn’t have a password.)
-
In the Remove Password window, type the current password, and then press Enter.
Some important notes about passwords
-
Passwords can be applied only to notebook sections, not to entire notebooks.
-
Passwords are case-sensitive. Make sure that the Caps Lock key is off before you add or enter a password.
-
OneNote uses encryption to secure password-protected sections. If you forget any of your section passwords, no one will be able to unlock those notes for you (not even Microsoft Technical Support). Take care when adding passwords to your notebook sections and when changing them.
-
Password-protected sections aren’t included in notebook searches. To include the notes in a protected section in a search, you’ll have to unlock that section first.
Need more help?
Want more options?
Explore subscription benefits, browse training courses, learn how to secure your device, and more.
You are here:
Home » Windows 10 » 3 Ways To Password Protect Text Files In Windows 10
Do you have a text file with sensitive information on your Windows 10 PC? Want to password protect text files in Windows 10? In this guide, we will see the three easy ways out there to password protect text files in Windows 10 and earlier versions.
Creating a password protected zip file containing text files is probably the easiest way out there to password protect text files in Windows. In addition to that method, you can use LockNote software password protect text files.
Following are the three easy ways to password protect text files in Windows 10 and earlier versions of Windows operating system.
Use LockNote to password protect text file
LockNote is a free program designed to help you to password protect your text file with ease. When you use LockNote program to password protect a text file, it creates a password protected executable file containing your text and not the text file.
Basically, LockNote is a text editor with password protection capabilities. You can password protect notes created using LockNote.
If you have used another text editor to create a text file and wanted to protect it, you need to copy and paste the text (not the text file) that you want to password protect into the LockNote interface and then save the file. LockNote saves the file as an executable rather than saving it as a normal text file. While saving the file, LockNote allows you to add a password to the note.
To open the note, you just need to open the executable by double-clicking on it. The executable will be opened with LockNote program.
Here is how to use LockNote to password protect a text file in Windows:
Step 1: Download LockNote program from this page. Extract the zip file to get LockNote folder. Open up the folder to find the LockNote executable.
Step 2: Run the LockNote program by double-clicking on its executable. By default, the LockNote will display some text. You can erase all the text and copy and paste the text that you want to protect.

Step 3: Click the File menu, click Save as option, choose a location to save the note, enter a name for the note/executable, and then click Save button to see a prompt asking to enter the password. Enter a password and re-enter the password. Click OK button to create a password protected executable containing your text file.


To open the password protected note/executable, double-click on the executable that you previously created. Enter the password to see the note.
In this method, we create a password protected zip file containing your text file. To access the text file inside the protected zip file, you will have to enter the password. Here is how to do just that. In fact, you can use this method to protect all file types.
Step 1: Download and install 7-Zip, if not already installed on your PC.
Step 2: Right-click on the text file which you want to protect with password, click 7-Zip, and then click Add to archive option. This action will open 7-Zip’s Add to Archive dialog.

Step 3: Here, in the Archive section, enter a name for your new password protected zip file and select a location to save the file.
Select the archive format as zip. In the Encryption section, either select the default ZipCrypto or popular AES-256 encryption.

Finally, enter the password which you would like to use to password protect text file, re-enter the password, and then click OK button to create a zip file containing your text file. That’s it!
Now, whenever you try to open the zip file using Windows 10’s built-in zip extraction tool or any other tool, you will need to enter the password to get the text file.
Use WinRAR to password protect text files in Windows 10
Step 1: Download WinRAR setup file, and install it on your PC.
Step 2: Right-click on the text file which you want to password protect and then click Add to archive option. This action will open Archive name and parameters dialog.

Step 3: In the General tab, enter a name for the zip file, select archive format as ZIP, and then click Set password button.

Step 4: Enter the password, and re-enter the password. Finally, click OK button to create a password protected zip file containing your text file.

In addition to 7-Zip and WinRAR, you can also use other archiving software like WinZip, Bandizip, and PeaZip to password protect text files in Windows 10 and earlier versions.
Much like in real life, what we must remember momentarily or for a considerable goes into notepad. In Windows, notepad is a crucial productive component and may be used by users to record and keep sensitive information, but there is no direct way to safeguard that information. Password-protecting notepad files is essential, especially when storing confidential or personal information. In this article, we will learn how to lock Notepad Text files with a password in Windows, aka notepad with password.

How does Windows File Encryption Work?
The Windows file encryption is a more straightforward encryption method in Windows only available to the Professional, Enterprise, or Educational versions of Windows. The encrypted files or folders can only be accessed by users who encrypt the files or have access to the encryption keys. Users on other accounts on the same PC won’t be able to access the files without the encryption keys. Windows file and folder encryption is only available on drives formatted with the NTFS file system.
Windows does not have a direct built way to password protect notepad, but we can work around locking Notepad text files with a password in Windows, which will be discussed in this section. Here’s all that’s covered:
- Using Windows File Encryption To Lock Notepad Text Files
- Restricting User Permission To Lock Notepad Text Files
- Using Third-Party Apps To Lock Notepad Text Files
Let’s start looking at each of these methods in detail without further ado.
1] Using Windows File Encryption To Lock Notepad Text Files
Windows’s Windows file encryption or EFS works only on NTFS formatted drives. The EFS prevents users other than the ones who have encrypted the files from accessing them on the computer. Whenever an unauthorized user tries to access the file, they will be asked to provide a decryption key or to contact the user. Here’s how to use Windows file encryption to lock Notepad text files:
- Firstly, create or move the notepad text file to a drive formatted with the NTFS file system.
- Now, right-click the file or the folder containing the files and open properties from the context menu.
- In the General tab of the properties window, click on Advanced.
- In the Advanced settings, enable Encrypt contents to secure data option, and click on Apply to save the settings.

- You will now receive a popup to save the encryption key. You can save and share the encryption key to allow other users to access the file.

Note: It is always better to use a local file then using online notepad with password.
2] Restricting User Permission To Lock Notepad Text Files
As a PC administrator, you can prevent other users from accessing a particular file or folder by restricting user access to the file or folder properties. Here’s how to limit user permission to lock Notepad text files in Windows with a notepad password:
- Open Windows file explorer and navigate to the notepad text file you wish to restrict other users from accessing.
- Now, right-click the file and open Properties.
- In the properties window, head over to the security tab. In the security tab, click the Edit button.
- Now, you will see the list of users on the PC, select any user, and deny all their permissions.
- Click apply to save the changes.
3] Using Third-Party Apps To Lock Notepad Text Files
Using the inbuilt workaround methods to lock notepad text files in Windows may come in handy, but it will only sometimes be the most reliable and efficient. Numerous third-party apps allow users to lock files and folders in Windows. You can use them for easy and dependable to password protected notepad and any other file.
Conclusion:
Windows is widely used and one of the most user-centered operating systems. With a very active community of enthusiasts, new features are introduced frequently. It won’t be long before you’ll also be able to password-protect individual files. Till then, you can use the methods in this article to lock Notepad text files in Windows. We hope you found the article to be helpful. Please make sure that you share it with everyone.
Are Bitlocker and Windows File Encryption the Same?
Bitlocker and Windows File encryption are not the same. For starters, Bitlocker can only be used on entire drives and not on files and folders, while Windows File Encryption can be used on a file and folder is available. Bitlocker uses TPM, while WFE uses Ciphertext. Also, the WFE only applies to a particular user, while Bitlocker is applied systemwide.
How do I hide and unhide files and folders?
To hide and unhide files and folders in Windows, you can use File Explorer, Command Prompt, or PowerShell. In File Explorer, you can right-click the file or folder, select Properties, and check or uncheck the Hidden box.