
Время на прочтение1 мин
Количество просмотров20K

Эксперт Microsoft раскрыл, как можно временно заблокировать прыгающие процессы в диспетчере задач Windows 7/10/11. Для этого достаточно нажать и удерживать клавишу Ctrl.
«Знаете ли вы, что если вы удерживаете Ctrl, то это приостанавливает обновление диспетчера задач и означает, что имена процессов не перемещаются и их легче выбирать, когда вы сортируете нужные процессы по использованию различных ресурсов ПК», — сообщил менеджер Microsoft Джен Джентльман.

Чтобы снова автоматически обновить список процессов, необходимо просто отпустить клавишу Ctrl в диспетчере задач Windows 7/10/11.
Разработчик Microsoft Дейв Пламмер поделился, что это именно он стоял за этой полезной функцией, добавив в код диспетчера задач фриз по нажатию Ctrl.
«Наконец, кто-то заметил, что при удерживании нажатой клавиши Ctrl список процессов в диспетчере задач удобно останавливается, поэтому вы можете выбирать строки, не прыгая по ним. Я сделал это, чтобы пользователи могли сортировать данные по загрузке ЦП и другим динамическим столбцам, но при этом иметь возможность нажимать что-то ещё…», — написал Пламмер.
Windows 10 comes with a feature that allows apps to run in the background even when they are not started. This enables apps to receive information, send notifications, and stay up to date even when they aren’t actively running.
Although useful, these apps can sometimes consume a considerable amount of system resources, including CPU, RAM, Internet bandwidth, and battery power.
Fortunately, you can choose which apps and programs can run in the background. In this article, we discuss ways to put programs to sleep selectively so they can’t wake without being actively used or how to disable the background apps feature altogether.
Put programs to sleep from Windows Settings
Disable programs from running from Task Manager/Configuration Manager
Unfortunately, the above mentioned settings only apply to Windows Universal apps (also known as Metro Apps). If you want to prevent traditional Windows programs and executables from running in the background, you will need to follow the steps below:
- Open the Task Manager (Ctrl + Shift + Esc)
- Open the Startup tab
- Select the programs you don’t want to run in the background and then click on the Disable button


To disable all startup items at once, follow the steps below:
- Open the Microsoft Configuration Manager by going to Run –> msconfig
- In General tab, select “Selective startup” and uncheck “Load startup items“


This will make your system faster. The apps and programs will not consume any system resources until you start them. This may slightly increase the startup time of each application but will also increase system performance.
The Verdict
I usually keep selective background apps running as they are very useful in providing timely information and updates. For example, my currently enabled background apps include Mail and Calendar, Microsoft Store, Microsoft To Do, OneNote for Windows 10, Skype and Windows Security.
What apps do you prefer running in the background?
When it comes to managing tasks and programs in Windows 10, knowing how to suspend a program in Task Manager can be a useful skill. Did you know that suspending a program can help free up system resources without closing it completely? This can be particularly useful when you have multiple programs running simultaneously and want to temporarily pause one without losing any unsaved work.
Suspending a program in Task Manager is a straightforward process that can be done in just a few steps. By accessing the Task Manager, you can view all the currently running programs and choose to suspend the ones you want. This feature has been available since earlier versions of Windows and continues to be a valuable tool in Windows 10, allowing users to optimize their computer’s performance and multitasking capabilities.
To suspend a program in Task Manager on Windows 10, follow these steps:
- Open Task Manager by pressing Ctrl+Shift+Esc or right-clicking on the taskbar and selecting «Task Manager».
- In the «Processes» or «Details» tab, find the program you want to suspend.
- Right-click on the program and select «Suspend» from the context menu.
By suspending a program, you temporarily pause its execution, which can be useful if the program is using excessive system resources or causing issues.

Understanding Task Manager in Windows 10
Task Manager is a built-in utility in Windows 10 that allows you to monitor and manage the processes and programs running on your computer. It provides real-time information on the performance of your system, including CPU usage, memory usage, disk activity, and network activity. In addition to monitoring, Task Manager also allows you to take actions on processes, such as ending them or changing their priority. One useful feature of Task Manager is the ability to suspend a program, which can be helpful in situations where a program is consuming excessive system resources or is unresponsive.
In this article, we will guide you through the process of suspending a program in Task Manager in Windows 10. This can be a useful troubleshooting step if you are experiencing issues with a specific program, as it allows you to temporarily pause its execution without terminating it completely. By suspending a program, you can free up system resources and potentially resolve the issue without losing any unsaved work.
Please note that suspending a program may cause it to become unresponsive or behave unpredictably. It is always recommended to save your work before suspending a program and to resume its execution as soon as possible to avoid any potential data loss.
Now, let’s dive into the process of suspending a program in Task Manager in Windows 10.
Step 1: Open Task Manager
The first step in suspending a program is to open Task Manager. There are several ways to do this:
- Right-click on the taskbar and select «Task Manager» from the context menu.
- Press Ctrl + Shift + Esc on your keyboard to open Task Manager directly.
- Press Ctrl + Alt + Del on your keyboard, then select «Task Manager» from the options menu.
Once you have opened Task Manager, you will see a window displaying the processes and programs currently running on your computer.
Step 2: Locate the Program
In Task Manager, navigate to the «Processes» or «Details» tab (depending on your version of Windows 10). Here, you will find a list of all the processes running on your computer. To locate the program you want to suspend:
— Scan the list of processes to find the program’s name. You can sort the list by clicking on the column headers, such as «Name» or «CPU,» to make it easier to find the program.
— If the program is not visible in the list, navigate to the «Applications» or «Processes» tab (again, depending on your version of Windows 10) and look for the program there.
Once you have located the program in Task Manager, you can proceed to suspend it.
Step 3: Suspend the Program
To suspend a program in Task Manager:
— Right-click on the program’s name in the list and select «Suspend» from the context menu.
— Alternatively, you can select the program by clicking on it once, then click on the «Suspend» button located at the bottom-right corner of the Task Manager window.
Once you have suspended the program, its status in Task Manager will change to «Suspended». This means that the program’s execution has been paused, and it is not using any system resources.
Note:
Suspending a program may cause it to become unresponsive or behave unpredictably. It is important to resume the program as soon as you are done troubleshooting or no longer need it to be suspended.
If you cannot resume the program, or if it continues to cause issues after resuming, you may need to consider other troubleshooting steps, such as ending the program or restarting your computer.
Step 4: Resume the Program
To resume a suspended program in Task Manager:
— Right-click on the program’s name in the list and select «Resume» from the context menu.
— Alternatively, you can select the program by clicking on it once, then click on the «Resume» button located at the bottom-right corner of the Task Manager window.
Once you have resumed the program, it will continue its execution and start using system resources again.
Conclusion
Suspending a program in Task Manager can be a helpful troubleshooting step to temporarily pause its execution without terminating it completely. By following the steps outlined in this article, you can easily suspend and resume a program in Task Manager in Windows 10. Just remember to save your work before suspending a program and to resume its execution as soon as possible to avoid any potential data loss.
Suspend a Program in Task Manager Windows 10
When facing a frozen or unresponsive program in Windows 10, suspending it using the Task Manager can help regain control and possibly resolve the issue. Here’s how to suspend a program:
| Step | Action |
| 1 | Press Ctrl+Shift+Esc simultaneously to open the Task Manager. |
| 2 | In the «Processes» tab, locate the program you want to suspend. |
| 3 | Right-click on the program and select «Suspend» from the context menu. |
| 4 | If you receive a warning prompt, click «Yes» to confirm the suspension. |
| 5 | The program will be temporarily paused, allowing you to troubleshoot or close it if needed. |
| 6 | To resume the program, right-click it and select «Resume.» |
Suspending a program can be helpful if you need to free up system resources or if the program is causing issues like high CPU usage. It allows you to stop the program’s operation without completely closing it down. Use this method wisely, as suspending important system processes or critical programs could have unintended consequences.
Key Takeaways — How to Suspend a Program in Task Manager Windows 10
- Suspending a program in Task Manager can help resolve unresponsive program issues.
- In Windows 10, right-click the taskbar and select «Task Manager» to open it.
- In the Task Manager window, go to the «Processes» or «Details» tab.
- Find the program you want to suspend, right-click on it, and select «Suspend.»
- Suspending a program temporarily pauses its activities without closing it completely.
Frequently Asked Questions
Here are some common questions about suspending a program in Task Manager on Windows 10:
1. How can I suspend a program in Task Manager on Windows 10?
To suspend a program in Task Manager on Windows 10, follow these steps:
1. Press Ctrl + Shift + Esc to open the Task Manager.
2. In the Task Manager, click on the «Processes» tab.
3. Find the program you want to suspend in the list of running processes.
4. Right-click on the program and select «Suspend» from the context menu.
5. The program will now be suspended, and its status will change to «Suspended».
2. Can I resume a suspended program in Task Manager?
Yes, you can resume a suspended program in Task Manager. Here’s how:
1. Open the Task Manager by pressing Ctrl + Shift + Esc.
2. Go to the «Processes» tab.
3. Locate the suspended program in the list of processes.
4. Right-click on the program and select «Resume» from the context menu.
5. The program will be resumed and will start running again.
3. Why would I want to suspend a program in Task Manager?
Suspending a program in Task Manager can be useful in various situations, such as:
1. If a program is using too much CPU or memory resources and affecting the performance of your computer, suspending it can help free up system resources.
2. If a program is unresponsive or not working properly, suspending it can temporarily halt its operations and allow you to troubleshoot or close the program.
4. Can I suspend multiple programs at once in Task Manager?
No, you can only suspend one program at a time in Task Manager. To suspend multiple programs, you will need to repeat the process for each program individually.
5. Will suspending a program in Task Manager close it?
No, suspending a program in Task Manager will not close it. It will only temporarily pause the program’s operations. You can resume the program later if needed.
To conclude, suspending a program in Task Manager on Windows 10 is a straightforward process that can help you manage the performance of your computer. By following the steps outlined in this article, you can easily suspend a program that is causing issues or consuming excessive resources. Remember to open Task Manager by pressing Ctrl+Shift+Esc, locate the program in the Processes or Details tab, right-click on it, and select «Suspend» from the menu that appears.
Suspending a program temporarily pauses its activity, allowing you to free up system resources or troubleshoot any problems it might be causing. It is important to note that suspending a program should be done cautiously, as it may affect other processes or functionality. It is recommended to only suspend programs that you are familiar with or that are not crucial to the functioning of your computer. With the ability to suspend programs in Task Manager, you can have better control over the performance of your Windows 10 system.
We all like our apps and programs to work smoothly and efficiently. But sometimes, certain apps can start to hog resources and slow down our computers.
If you’re finding that an app is making your PC run sluggishly, you can use the Task Manager to sleep the app and give your system a much-needed break.
Unless you’re like me, you probably have several apps open anytime. And while that can help get work done, it can also be a little overwhelming. Let’s find out the best way to manage all those open apps and how to put apps to sleep in Windows 11/10.

How to Put Apps to Sleep in Windows 11/10 – Step by Step Guide
Windows 11 has a new power-saving feature that allows you to put apps to sleep. This can help save battery life and improve performance.
Here’s a step-by-step guide on how to put apps to sleep in Windows 11.
- Press the Windows + I key on your keyboard to launch the Settings app.
- Click on System -> Power & Sleep.
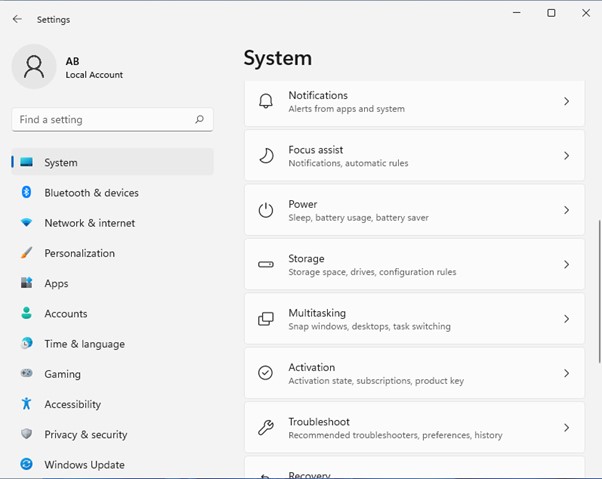
- Under the Sleep section, you will see an option called “App sleep settings”. Click on it.
- You will see a list of many apps installed on your computer. For each app, there are three options – “Never”, “After 1 minute”, and “After 3 minutes”.
Choose the option that you want for each app. If you want an app to never go to sleep, select the “Never” option for that app.
If you want an app to go to sleep after 1 minute of inactive, select the “After 1-minute” option for that app. And if you want an app to go to sleep after 3 minutes of idle, select the “After 3 minutes” option for that app.
How to put background and Startup services to sleep:
Windows keeps many services running in the background even when you’re not using them. These include everything from system processes to app notifications.
While most of these are essential for the proper functioning of your PC, some may not always be required.
For example, you may not need app notifications while working on something important. Or, you may want to put certain apps to sleep when they’re not in use to conserve battery power on your laptop.
If you want more control over which apps are put to sleep, you can use a third-party application like InsomniaX or AmphetaDesk. These apps allow you to put any app to sleep and prevent your computer from going to sleep when specific applications are running.
Windows 11 Sleep mode not working?
There are chances that on a few occasions, even after sending the sleep command to Windows, it doesn’t go to sleep mode.
In this scenario, we have to look for a few of the below options that sometimes causes this issue:
Disable Hybrid Sleep Mode:
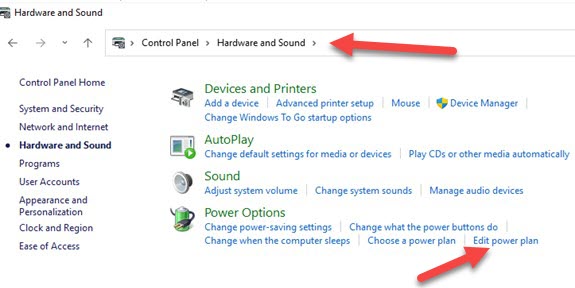
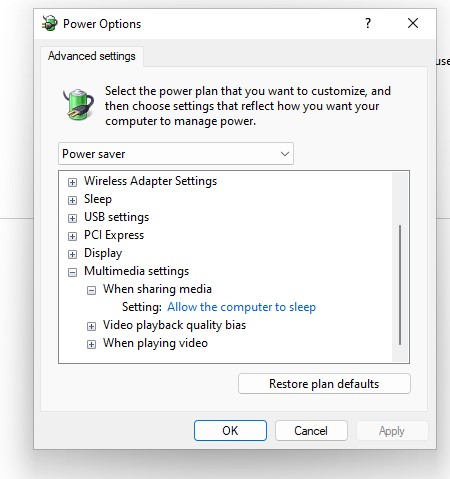
- Go to Start -> Control Panel -> Hardware and Sound -> Power Options -> Edit Plan Settings
- In the edit settings, select the change advanced power settings button
- Under sleep option-> Allow Hybrid sleep from the list -> change settings to off
- Now under Media settings -> when sharing media -> allow computer to sleep -> apply-ok
Disable Fast Startup:
- Go to Start -> Control Panel -> Hardware and Sound -> Power Options
- Edit Plan Settings -> Change settings that are currently unavailable
- Uncheck the turn on fast Startup -> save changes option
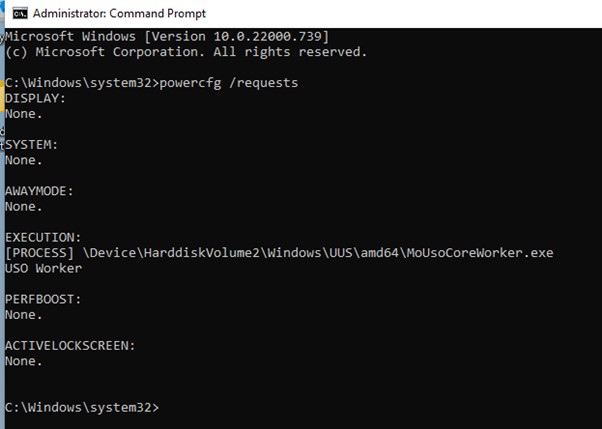
Check Energy Request:
- In the search bar -> Type cmd -> right click “Run as administrator”
- Type the below command at the cmd and press Enter to run: powercfg /requests
- After executing the above command, if any problematic app appears, disable the app from Task Manager and put the system to sleep mode.
Related: Simple methods to fix IRQL Not Less or Equal in Windows 10/11
Related Questions:
What is App Sleep?
App Sleep is a new Windows 11 that allows you to put apps to sleep when they’re not in use, thereby saving battery life.
When an app is put to sleep on your PC, it will not be able to run in the background or receive push notifications.
You can manually put an app to sleep or allow Windows 11 to do it automatically when your device is inactive for some time.
How do I put an app to sleep?
You can manually put an app to sleep by going to the settings > System > Battery Saver and selecting the “App Sleep” tab. All your apps will be listed here, and you can toggle them on or off as you desire.
You can also allow Windows 11 to automatically put apps to sleep when your device is inactive for some time by going to the settings > System > Battery Saver and selecting the “Automatically enter App Sleep mode” option.
Can I Wake Up a Sleeping App?
Launching a sleeping app from the Start Menu or Taskbar can wake you up. The app will then remain active until you close it or it becomes inactive again.
Alternatively, you can go to the settings > System > Battery Saver and select the “Wake up apps” option, allowing all sleeping apps to be woken up periodically to check for updates and notifications.
Putting apps to sleep can help free up memory and allow the device to run more smoothly. This, in turn, increases the life of OS and keeps them up and running for a long time. Please let us know your experience putting apps to sleep in Windows 11/10 in the comment section below.
Распределенное обучение с TensorFlow и Python
AI_Generated 05.05.2025
В машинном обучении размер имеет значение. С ростом сложности моделей и объема данных одиночный процессор или даже мощная видеокарта уже не справляются с задачей обучения за разумное время. Когда. . .
CRUD API на C# и GraphQL
stackOverflow 05.05.2025
В бэкенд-разработке постоянно возникают новые технологии, призванные решить актуальные проблемы и упростить жизнь программистам. Одной из таких технологий стал GraphQL — язык запросов для API,. . .
Распознавание голоса и речи на C#
UnmanagedCoder 05.05.2025
Интеграция голосового управления в приложения на C# стала намного доступнее благодаря развитию специализированных библиотек и API. При этом многие разработчики до сих пор считают голосовое управление. . .
Реализация своих итераторов в C++
NullReferenced 05.05.2025
Итераторы в C++ — это абстракция, которая связывает весь экосистему Стандартной Библиотеки Шаблонов (STL) в единое целое, позволяя алгоритмам работать с разнородными структурами данных без знания их. . .
Разработка собственного фреймворка для тестирования в C#
UnmanagedCoder 04.05.2025
C# довольно богат готовыми решениями – NUnit, xUnit, MSTest уже давно стали своеобразными динозаврами индустрии. Однако, как и любой динозавр, они не всегда могут протиснуться в узкие коридоры. . .
Распределенная трассировка в Java с помощью OpenTelemetry
Javaican 04.05.2025
Микросервисная архитектура стала краеугольным камнем современной разработки, но вместе с ней пришла и головная боль, знакомая многим — отслеживание прохождения запросов через лабиринт взаимосвязанных. . .
Шаблоны обнаружения сервисов в Kubernetes
Mr. Docker 04.05.2025
Современные Kubernetes-инфраструктуры сталкиваются с серьёзными вызовами. Развертывание в нескольких регионах и облаках одновременно, необходимость обеспечения низкой задержки для глобально. . .
Создаем SPA на C# и Blazor
stackOverflow 04.05.2025
Мир веб-разработки за последние десять лет претерпел коллосальные изменения. Переход от традиционных многостраничных сайтов к одностраничным приложениям (Single Page Applications, SPA) — это. . .
Реализация шаблонов проектирования GoF на C++
NullReferenced 04.05.2025
«Банда четырёх» (Gang of Four или GoF) — Эрих Гамма, Ричард Хелм, Ральф Джонсон и Джон Влиссидес — в 1994 году сформировали канон шаблонов, который выдержал проверку временем. И хотя C++ претерпел. . .
C# и сети: Сокеты, gRPC и SignalR
UnmanagedCoder 04.05.2025
Сетевые технологии не стоят на месте, а вместе с ними эволюционируют и инструменты разработки. В . NET появилось множество решений — от низкоуровневых сокетов, позволяющих управлять каждым байтом. . .