
Терминал Windows — это терминальное приложение с несколькими вкладками для работы с командной строкой, PowerShell и тд. Терминал Windows обеспечивает доступность различных оболочек в одном окне — функция, которой раньше не было. Это мощный и эффективный инструмент, если вы не можете найти его на своем компьютере, просто загрузите его из Microsoft Store.
Вкладка PowerShell открывается по умолчанию при запуске терминала Windows.
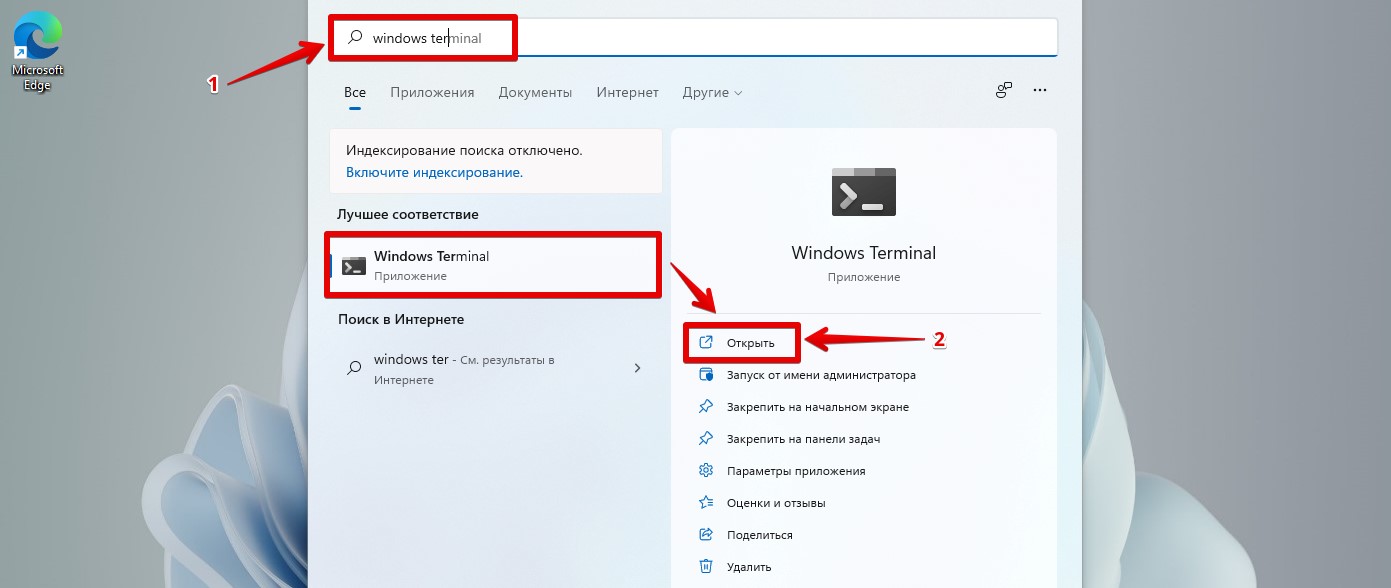
Чтобы изменить профиль по умолчанию на Командную строку в Терминале Windows, нажимаем «Win+S» на клавиатуре, чтобы открыть меню «Поиск». Затем вводим поисковый запрос «Windows Terminal» и запускаем найденное приложение.
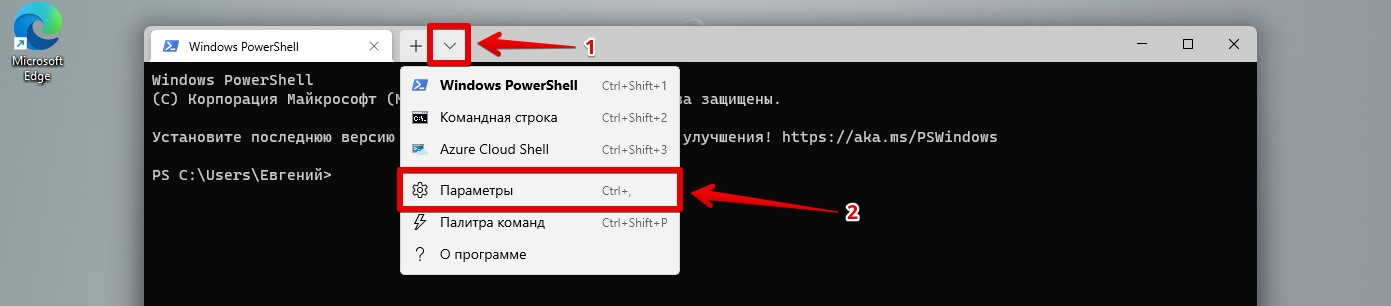
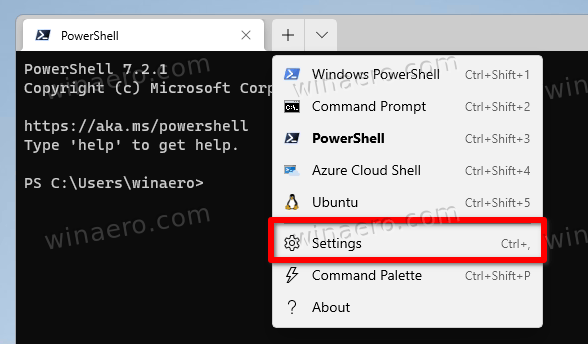
В терминале Windows щелкаем вкладку со стрелкой вниз и выбираем «Параметры» из меню. Либо нажимаем одновременно клавиши «Ctrl» и «+».
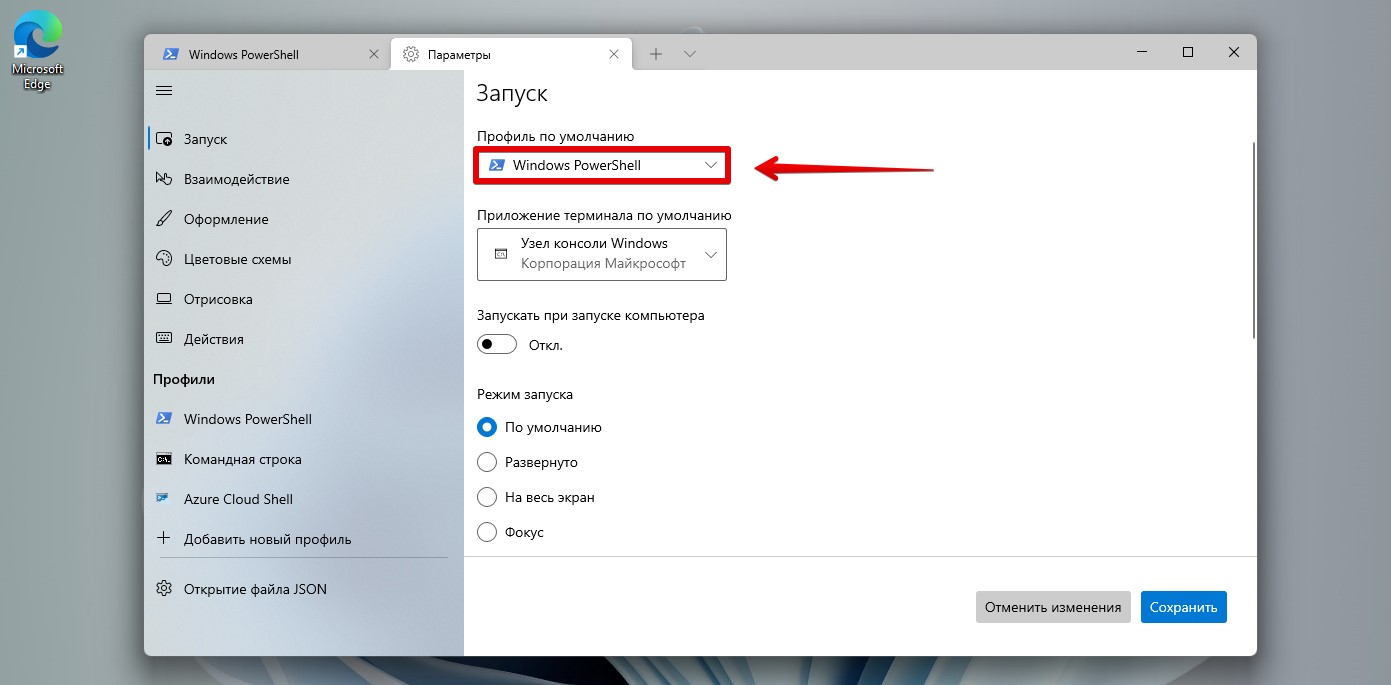
Находим раздел «Профиль по умолчанию» и щелкаем по раскрывающемуся списку.
Выбираем пункт «Командная строка» и нажимаем «Сохранить«.
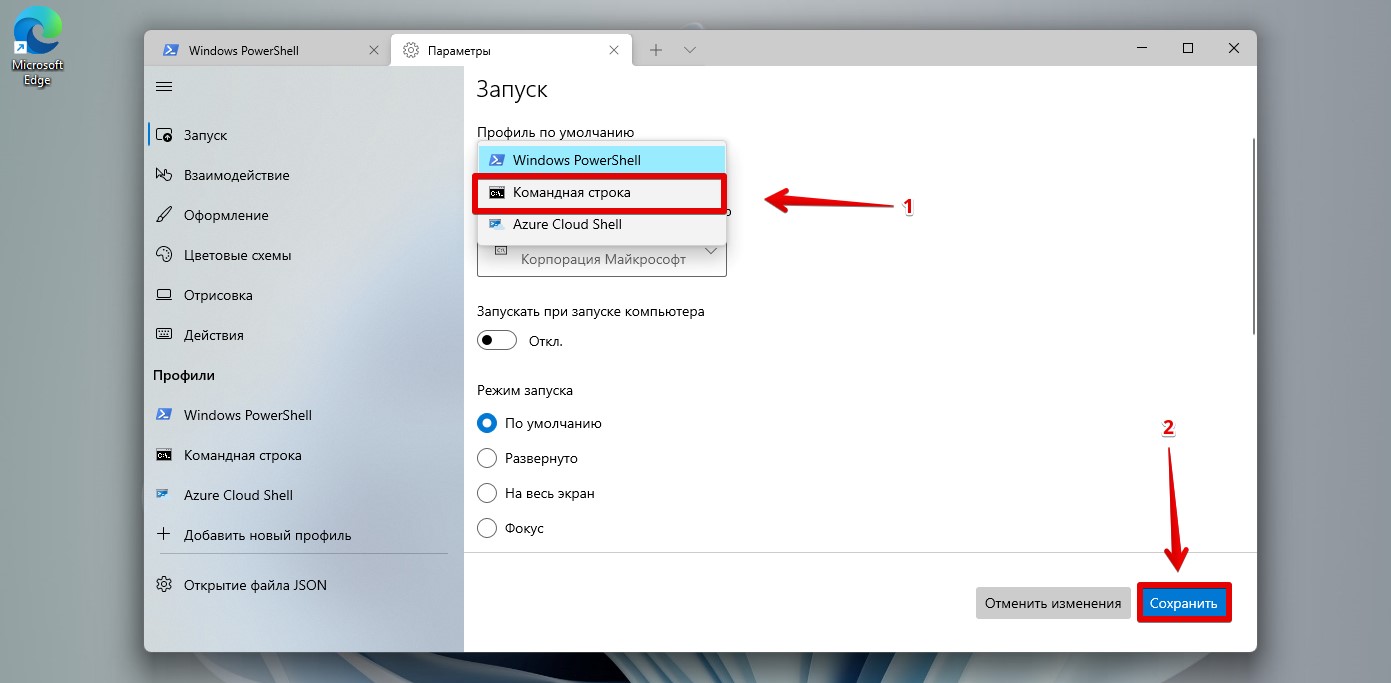
Теперь наш компьютер с Windows 11 будет открывать командную строку вместо PowerShell при каждом запуске Windows Terminal. Это поможет сэкономить время при навигации и открытии командной строки в последующих запусках.
In this guide, we will show you the steps to replace PowerShell with Command Prompt on your Windows 11 PC. No matter how hard Windows try to make PowerShell the go-to choice for the users, some tech enthusiasts (including myself) are always inclined toward CMD. However, that hasn’t stopped the Silicon Valley giants from giving more weightage to PowerShell.
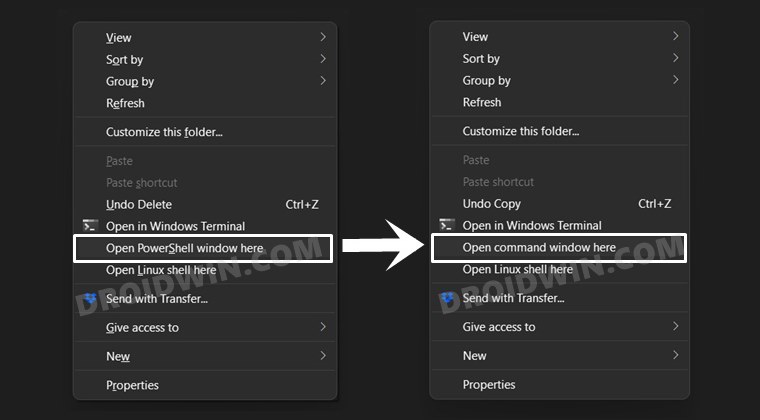
When you bring up the context menu, either by right-clicking on the Windows icon or performing a right-click while holding the Shift key, the Command Prompt is nowhere to be found. Rather, it has now been replaced with PowerShell. Fortunately, there’s still a slight ‘window’ of opportunity left through which you could replace PowerShell with Command Prompt on your Windows 11 PC. And this guide shall make you aware of just that. So without further ado, let’s get started.
- 10 Methods to Open Command Prompt (CMD) in Windows 11
- How to Download and Install Windows 11 Insider Preview Build
- Fix: This PC can’t run Windows 11 | The PC must support TPM 2.0
- How to Install Windows 11 on any PC using Virtual Machine
Table of Contents
In Windows 10, you could easily replace PowerShell with CMD in the Windows+X menu by going to Settings > Personalization > Taskbar. However, at the time of writing, this feature is yet to be added in Windows 11 Insider Preview. But there’s still a Registry Editor tweak through which this process could be carried out. Let’s check it out.
STEP 1: Add CMD to Windows 11 Context Menu
- To begin with, bring up the Run dialog box via Ctrl+R shortcut keys.
- Then type in regedit and hit Enter. This shall open the Registry Editor.
- Now head over to the below location (you may also copy-paste this location in the address bar):
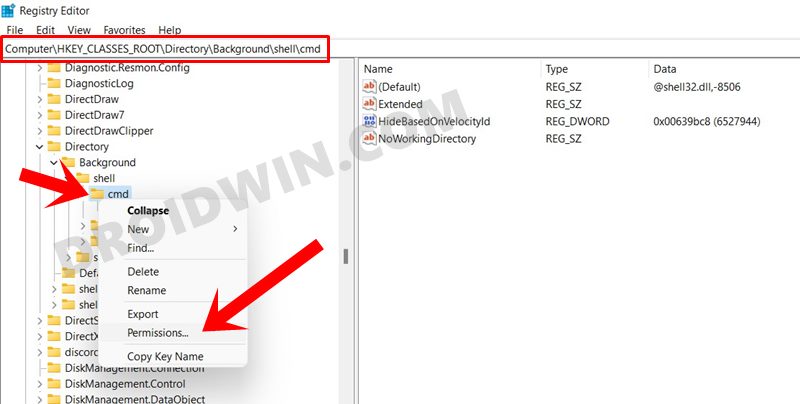
Computer\HKEY_CLASSES_ROOT\Directory\Background\shell\cmd
- Now select the cmd folder from the left menu bar, right-click on it, and select Permissions.

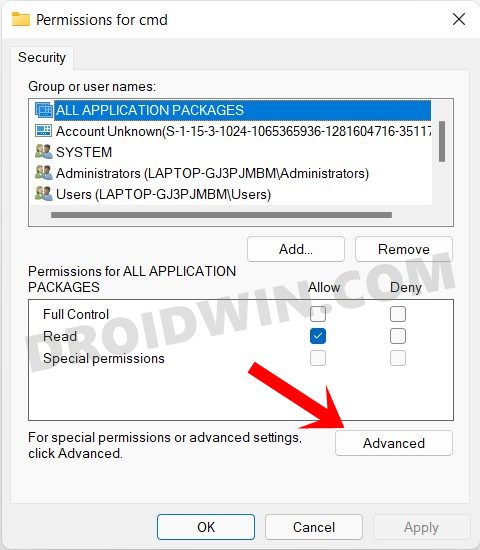
- Then click on the Advanced button.

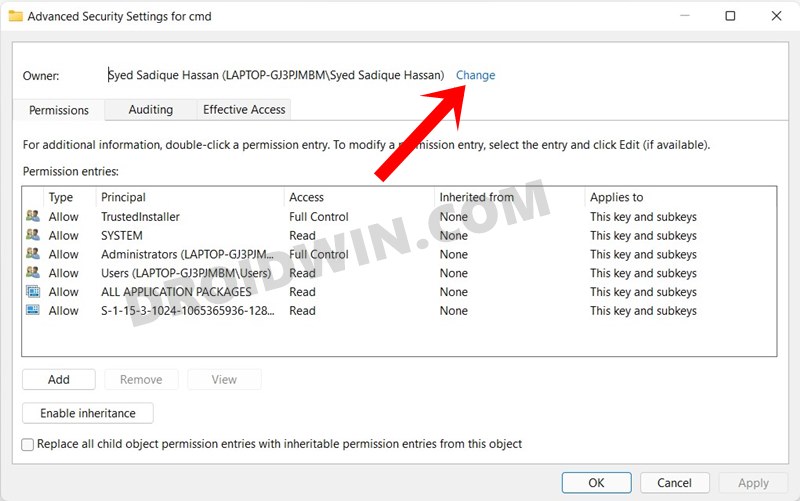
- After this, click on Change.

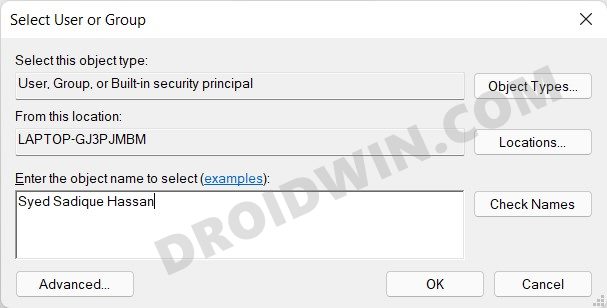
- Under the Enter the object name to change dialog box, type in your username and click OK. [To check your username in Windows 11, launch CMD, type in echo %username% and hit Enter].

- Then double click on Administrator, checkmark the Full Control dialog box, and click OK.

- Now go back to Registry Editor and select the cmd folder from the left menu bar.
- On the right side, select the HideBasedOnVelocityld file, right-click and select Rename. Add _bac at the end of the name and save it.


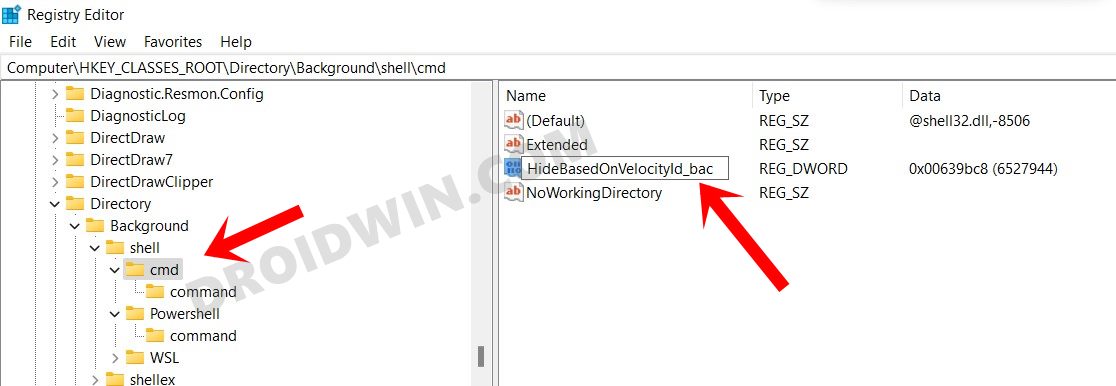
What we did just now: well, we needed to remove the HideBasedOnVelocityld file. However, deleting it is never a good option, hence we added _bac so that Windows wouldn’t be able to recognize the file but at the same time, we still have this file in our hands.
That’s it, the process stands complete. You may now head over to the folder of your choice, press and hold the Shift key and perform a right-click, the Command Prompt option will now be visible.
STEP 2: Remove PowerShell from Windows 11 Context Menu
This guide talks about the steps to replace PowerShell with Command Prompt on Windows 11, however, till now we have only added the CMD option. Let’s now check out the steps to remove the PowerShell from the context menu (this is optional and is only done to make the right-click menu clutter-free).
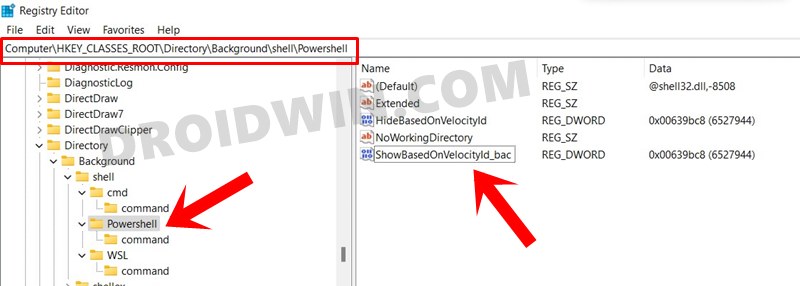
- Open Registry Editor and head over to the below location:
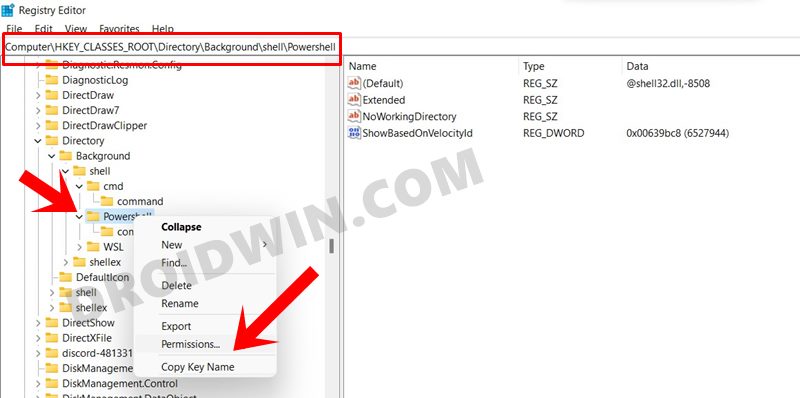
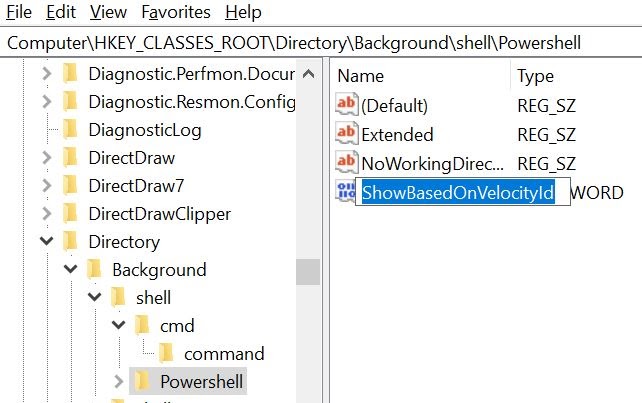
Computer\HKEY_CLASSES_ROOT\Directory\Background\shell\Powershell
- Select the PowerShell folder from the left menu bar, right-click on it, and select Permissions.

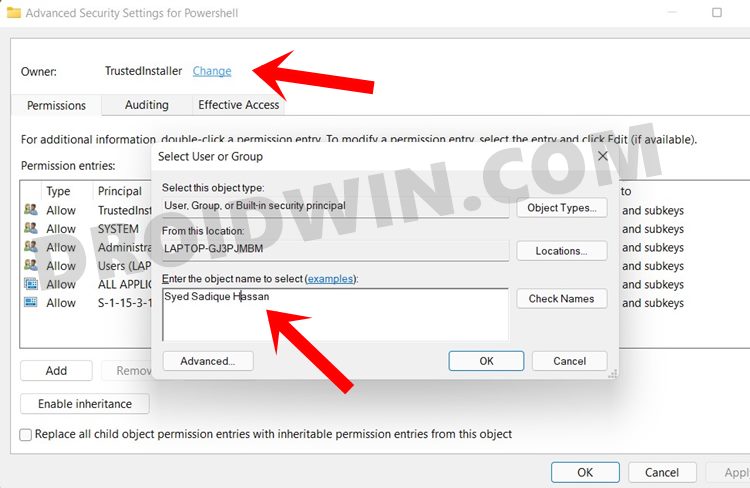
- We will be applying the same permissions as before. So click on the Advanced button.
- Then click on Change. Under the Enter the object name to change dialog box, type in your username and click OK.

- Then double click on Administrator, checkmark the Full Control dialog box, and click OK.
- Now go back to Registry Editor and select the PowerShell folder from the left menu bar.
- Select the ShowBasedOnVelocityId file, right-click on it and select Rename. Add _bac at the end.

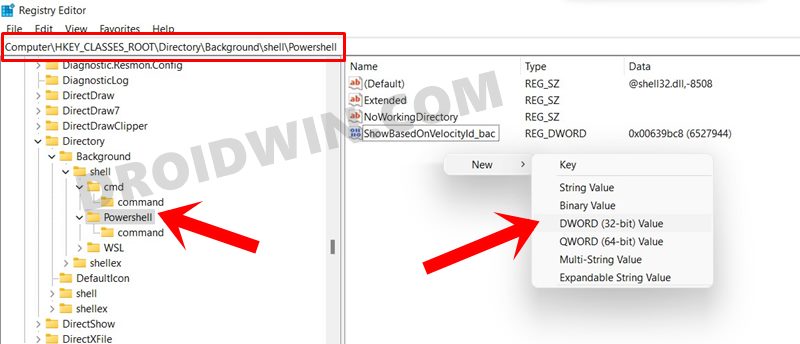
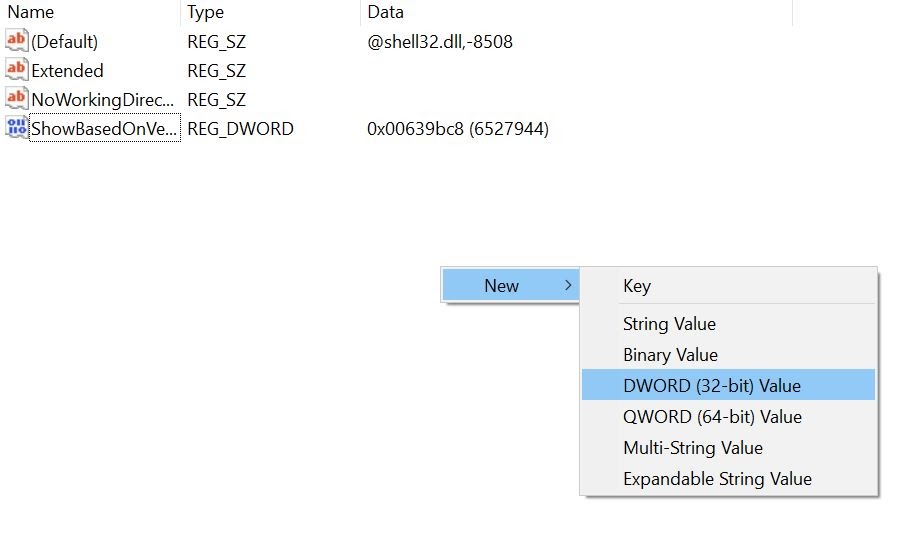
- Now right-click in an empty location, select New > DWord (32-Bit) Value. Name this file as HideBasedOnVelocityId.

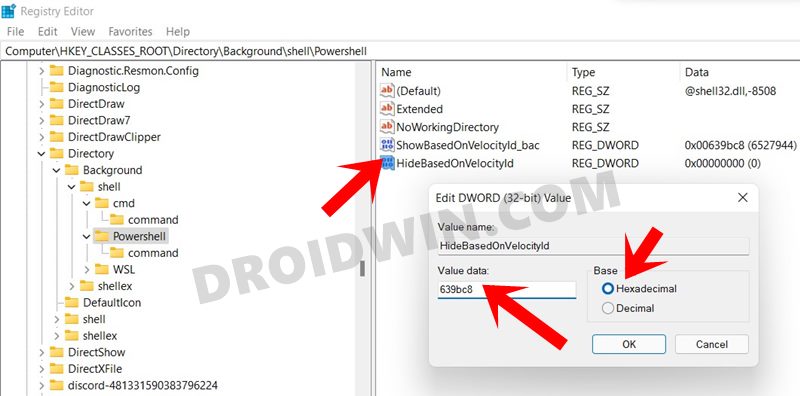
- Double click to open this file and type in 639bc8 under Value Data. Leave the Base as Hexadecimal and click OK.

- That’s it. Head over to the desired location, press and hold the Shift Key, and right-click in an empty location. The PowerShell option will no longer be there.
So these were the instructions to replace PowerShell with Command Prompt in Windows 11.
FAQs: How to Revert Everything to Default
if you wish to revert everything back to their default settings, i.e. bring back the PowerShell and remove the Command Prompt from Windows 11, then here’s what you need to do:
- First off, go to the below location:
Computer\HKEY_CLASSES_ROOT\Directory\Background\shell\cmd
- Rename the HideBasedOnVelocityld_bac file back to HideBasedOnVelocityld. This will remove the CMD option from the context menu.
- After that, go to the below location:
Computer\HKEY_CLASSES_ROOT\Directory\Background\shell\Powershell
- Rename the ShowBasedOnVelocityId_bac file back to ShowBasedOnVelocityId.
- Then delete the HideBasedOnVelocityId file and the PowerShell option will be back. That’s it.
With this, we round off this guide on how to replace PowerShell with Command Prompt on your Windows 11 PC. As of now, there doesn’t seem to be an option to add the CMD option in the Windows context menu (Windows+X menu). As and when I get hold of the same, will update the guide accordingly. With that said, if you have any queries, do let us know in the comments.
Windows operating system is basically a Graphical User interface (GUI) evolved from command line MS-DOS interface. Earlier days, Windows used to come with a Command Prompt as a default command line tool. Later, Windows PowerShell came with more powerful and scripting capabilities. And finally, you have Windows Terminal as a console app for using command line tools. If you do not want to use Windows Terminal as your default console, here is how you can change it in Windows 11.
Default Behavior Changed in Windows 11 22H2
If you have upgraded to Windows 11 22H2, you will notice opening Command Prompt will by default open Terminal app.
- Click the search box in taskbar and search for “Command Prompt” app.
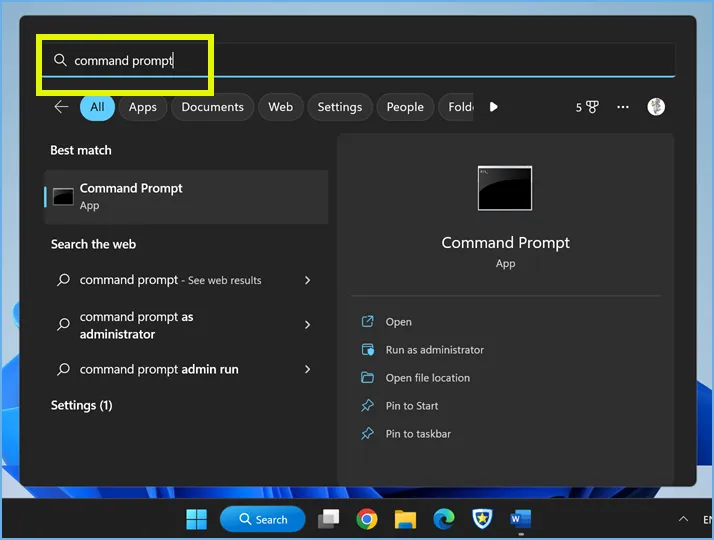
- When you click Command Prompt app, you will notice it opens Windows Terminal app instead of Command Prompt.
- This is the same way it works when you search and open Windows PowerShell app.

You can open Command Prompt, PowerShell or Azure Cloud Shell in new tabs of the same Terminal app. This means Windows 11 22H2 makes Terminal app as a default for all command line tools.
Changing Default Command Line Interface
Follow the below If you do not want to open Terminal by default.
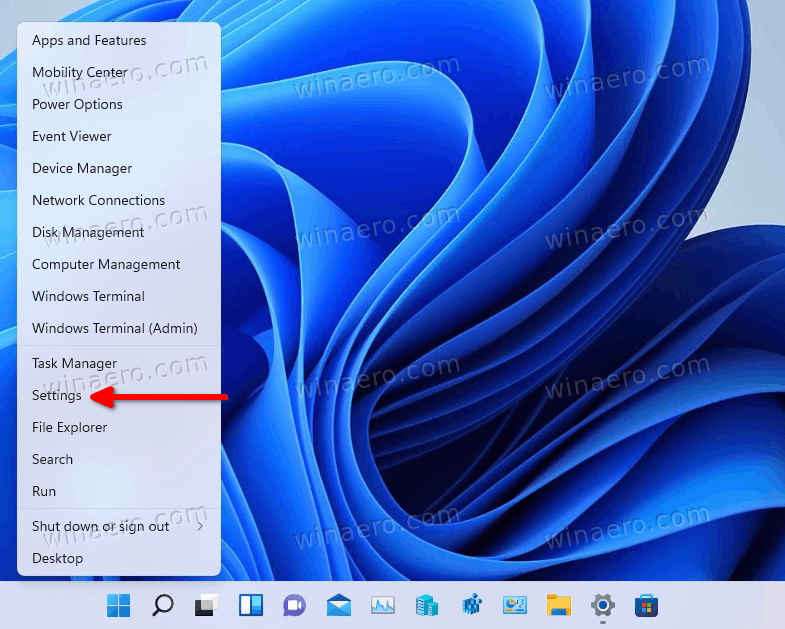
- Right-click on the Start menu and select “Settings” from the power user menu that appears.
- Go to “Privacy and security” section from the sidebar.
- On the right pane, click on “For developers” section showing under “Security” heading.

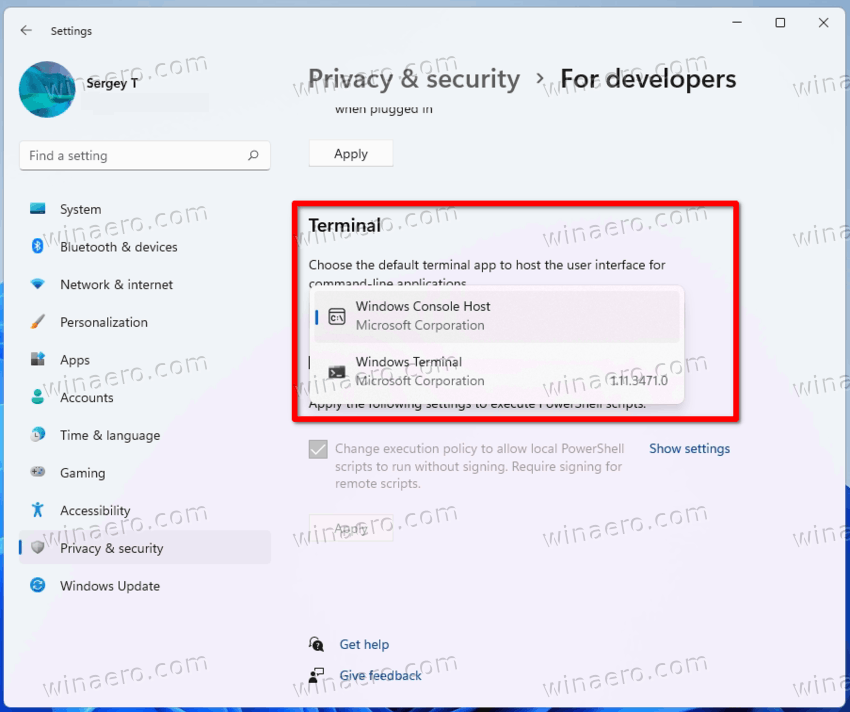
- Scroll down to bottom of the page and check “Terminal” section.
- You should see “Let’s Windows decide” as shown below which is the default behavior from Windows 11 22H2 upgrade. Both “Let’s Windows decide” as well as “Windows Terminal” will open Terminal app as your default command line tool

- Click on the dropdown and select “Windows Console Host” option.

Now, you can search and open Command Prompt and PowerShell as independent apps instead of opening them in Terminal.
Open Command Prompt and PowerShell in Admin Mode
If you like to use Terminal as a default interface but continue to use Command Prompt or PowerShell separately, then there is an option for you. First make sure to select “Let’s Windows decide” option in the Settings app as explained above. Now, search and open Command Prompt or PowerShell in admin mode. This will open the apps independently instead of opening in Terminal interface.
You can open the apps in admin mode either by right clicking and selecting “Run as administrator” option or select “Run as administrator” option from the right pane when searching.

Changing Default Interface in Terminal App
If your Terminal app always open with PowerShell interface, it is also possible to change the default launching with Command Prompt.
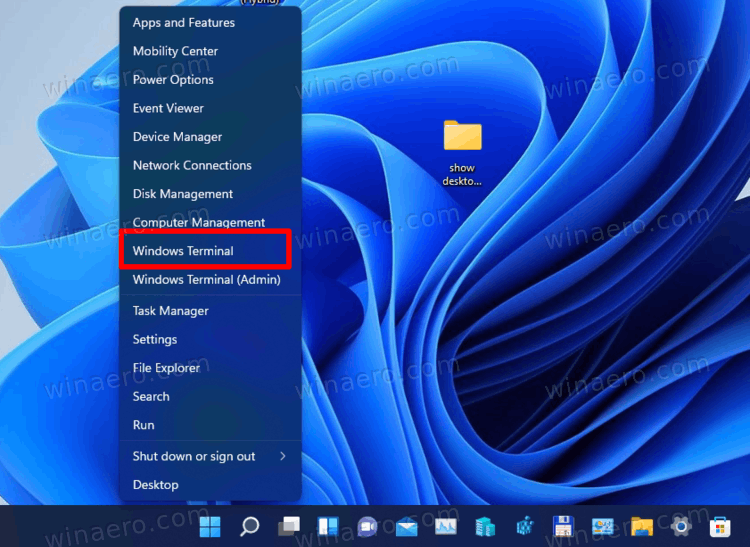
- Right-click on the Start menu and select “Terminal” or “Terminal (Admin)” option to launch Terminal app.
- When the Terminal app open, click on the + icon in the tab and select “Settings” option. Alternatively, press “Control + ,” shortcut keys to open Terminal settings page.

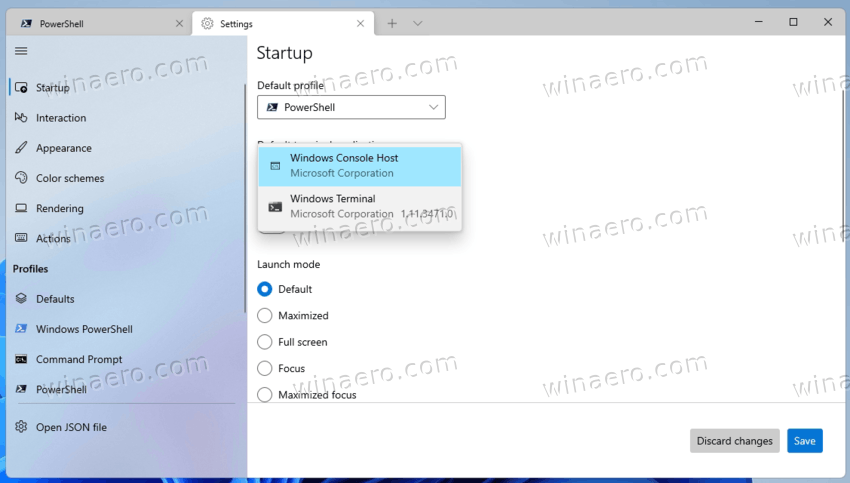
- Go to “Startup” section and click the dropdown against “Default profile”.
- If you are seeing “Windows PowerShell”, change the app to “Command Prompt” from the list. This will always launch Terminal app with Command Prompt when you use the default profile.

Note that you can also change the “Default terminal application” from this “Startup” section on Terminal settings page. The selection here and in the Windows Settings app will be synchronized automatically.
It is worth noting that Windows 11 has already arrived on a lot of computers worldwide and we know that people are loving this latest update from Microsoft as well.
However, there is a problem with Windows 11 that a lot of Windows users are concerned about and it is the implementation of Powershell in place of Command Prompt.
The CMD, as a lot of people like to call it, has been replaced by Windows Powershell for a long time and Windows 11 makes it even more obvious.
It is obvious that Microsoft is trying to make Powershell the go-to choice for Windows users but early users of Windows can’t get over Command Prompt.
Luckily, we still have Windows 10 running on one of our PCs and when we right-click on the Start Menu, a context menu pops up and you see Command Prompt listed in the menu.
However, when you do the same on Windows 11 then you will see that Command Prompt is replaced by Powershell.
In this article, we will tell you how you can replace Powershell with Command Prompt in Windows 11 on your PC:
Also, Read:
- How to Fix Broken Registry Items in Windows 10?
- Download Latest Windows 11 ISO File (64-Bit)
- Top 5 CMD Tips and Tricks You Need to Know
It is quite easy to replace Powershell with Command Prompt in Windows 10 and you can do so by going to Settings > Personalization > Taskbar.
However, we are talking about Windows 11 and the problem is that there is no simple way to replace Powershell with Command Prompt even to this day.
We will have to rely on the Registry Editor tweaking method in order to change it. For that, you need to check the article:
- Press the Win + R shortcut key on your keyboard to bring up the Run dialog box.
- After that, type regedit and hit Enter to open the Registry Editor.

- Now, copy and paste the below address in your registry editor.
Computer\HKEY_CLASSES_ROOT\Directory\Background\shell\cmd
- Select the CMD folder from the left menu bar, right-click on it and go to Permissions.

- Click on the Advanced button and click on Change.

- Under the “Enter the object name to select” dialog box, type your username and click OK. Your username can be found by typing echo %username% and pressing Enter.
- Double click on Administrator and check mark the full control dialog box and click OK.
- Go back to the Registry Editor and select the CMD folder once again as we did earlier.

- See on the right side after clicking and you will see a file named HideBasedOnVelocityId. Right-click on it and select Rename and add _bac at the end of this file name.
- This will add the CMD to our context menu on Windows 11 and we have just edited the HideBasedOnVelocityId instead of deleting it because that would be too risky.
The first part of our process is now complete as we have just added Command Prompt to our Context Menu on Windows 11.
Now, we need to remove the Powershell option from our Windows 11 Context Menu but we must add that this is an optional step. If you are happy with just adding the Command Prompt to your Windows 11 Context Menu then your task is now complete.
In order to remove Powershell from your Windows 11 Context Menu, you will have to do the following:
- Open Registry Editor as we did in the above guide and go to this address:
Computer\HKEY_CLASSES_ROOT\Directory\Background\shell\Powershell

- On this location, you will see a folder named Powershell on the left-side pane. Right-click on it and select Permissions.
- Click on the Advanced button and click on Change. Under the “Enter the Object Name to Select” dialog box, enter your username.
- Double-click on Administrator and checkmark Full Control dialog box and press OK.
- Again, go back to the Registry Editor and Powershell folder as we did in Step 1 and see the right-side pane this time.
- You will see a ShowBasedOnVelocityId file, right-click on it and select Rename. Add _bac at the end.
- Right-click on any empty location on the right-side and go to New > DWord (32-bit) Value and name this file as HideBasedOnVelocityId.
- Double click on this newly created file to open it and type 639bc8 under Value Data. Leave the base as Hexadecimal and click OK.
- That’s it. The Powershell will be removed from your Windows 11 Context Menu and you will only see Command Prompt in its place.
Step 3: How to revert everything back to default (if you want)
While we know that you don’t want to revert back to default after you have replaced Powershell with Command Prompt in Windows 11, it is still our duty to tell you how you can get back to the default state after you have done these changes.
Follow these steps to revert back to default if needed:
- Go to the location mentioned below in Registry Editor:
Computer\HKEY_CLASSES_ROOT\Directory\Background\shell\cmd
- Rename the HideBasedOnVelocityId_bac file back to HideBasedOnVelocityId and this will remove CMD from your Windows 11 Context Menu.
- Now, go to the following location in order to bring back Powershell to Context Menu:
Computer\HKEY_CLASSES_ROOT\Directory\Background\shell\Powershell
- Rename the ShowBasedOnVelocityId_bac file back to ShowBasedOnVelocityId and you will see the Powershell reappear in your Windows 11 Context Menu.
In this way, we can revert back to the default state if you encounter any problems after the changes or for whatsoever reason.
Conclusion – Replace PowerShell with Command Prompt in Windows 11
In this article, we have mentioned how you can replace Powershell with Command Prompt in your Windows 11 Context Menu.
We have also gone the extra mile to show you how to revert back to the original state if needed so that you can act as if nothing happened.
We do hope that you found this article useful and if you did, feel free to share it with your friends or someone who wants to do the same on their PC.
(68 Articles Published)
Troubleshooting Expert
A blogger who likes producing content.
Here’s how to change the Windows 11 default console app to Windows Terminal or Command Prompt. The default console is a host app that opens when you launch a command line software, such as diskpart or sfc.
The default console is also responsible for running PowerShell applets, command prompt tools and commands, and so on. Those commands and utilities run inside the specified console host, that process their output and provides them certain system resources.
Windows 11 allows you setting either Windows Terminal or classic console (conhost) as your default console software. The latter doesn’t need introduction, as it is available in Windows for decades.
The Windows Terminal app is a new, modern command host that greatly extends capabilities of the input window. It has tabs, graphic accelerated text output, multiple profiles, customizable appearance and hotkeys, and much more.
With Windows Terminal, you will have PowerShell, WSL, and Command Prompt running in tabs, as each of the tools will have its own individual profile.
With conhost as your console, PowerShell, WSL, and Command Prompt will run in their own windows and will be limited to the classic set of features.
There are three methods to change your default console on Windows 11. You can set your preferred command host app using the Windows Settings, Windows Terminal settings, and also in the Command Prompt window properties. Let’s review these methods.
Change the Windows 11 Default Console in Settings
- Right-click the Start button and select Settings from the menu.

- On the left, click on Privacy & security. On the right, click on For developers.

- On the right, select Windows Terminal or Windows Console Host from the drop-down menu of the Terminal option.

Done!
Besides the system Settings app, you can specify the preferred console app right in the options of the Windows Terminal. It has very tight integration with the OS, e.g. it is available in the context menu of File Explorer.
Change Default Console in Windows 11 in Settings of Windows Terminal
- Press Win + X and select the Windows Terminal entry.

- In Windows Terminal, click on the down arrow button and select Settings.

- In the left pane of settings, select Startup.
- On the right, select Windows Terminal or Windows Console Host from the Default terminal application drop-down menu.

- Click on the Save button to apply the change.
You are done.
Finally, you can change the preferred terminal app right from the Command Prompt options. Please keep in mind that this method only works when you current terminal app is set to Windows Console Host, and not to Windows Terminal. Do the following.
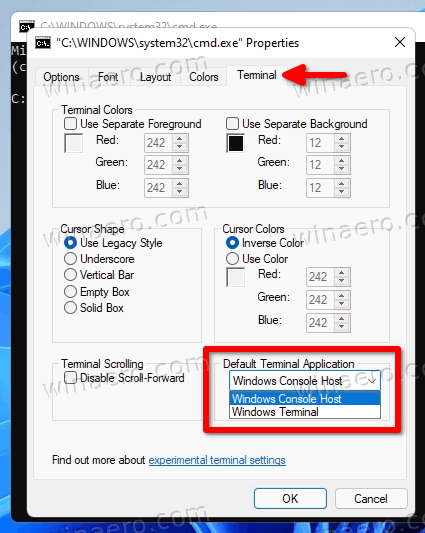
Change the Default Terminal app from Command Prompt properties
- Press Win + R and type
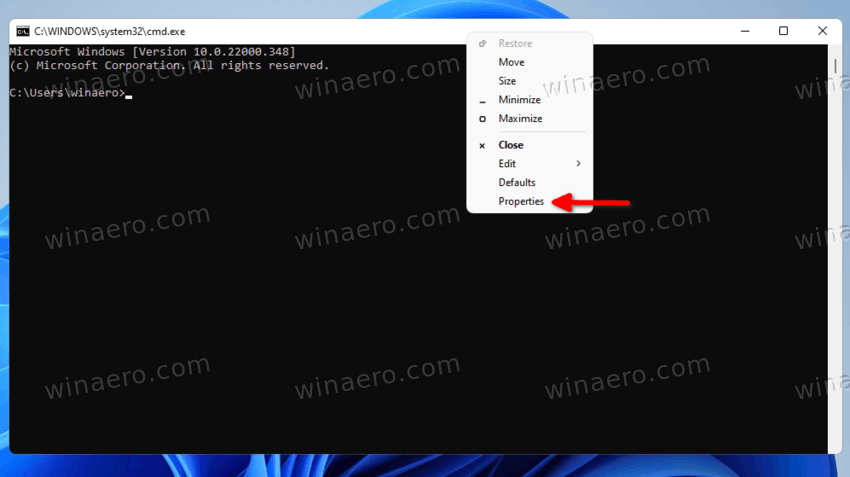
cmd.exeinto the Run box to open a new Command Prompt. - Right-click the title bar and select Properties from the menu.

- Go to to the Terminal tab in the Properties dialog.
- Under Default Terminal Application, select either Windows Console Host or Windows Terminal.

- Click OK to save the change.
You are done.
Again, this option will not be available if you have already set your default terminal application to Windows Terminal. In this case, you must use any of methods reviewed above to switch it back to Windows Console Host.
That’s it.
Support us
Winaero greatly relies on your support. You can help the site keep bringing you interesting and useful content and software by using these options:
If you like this article, please share it using the buttons below. It won’t take a lot from you, but it will help us grow. Thanks for your support!