
Windows has become synonymous with its modern blue-tiled logo. It can be seen in the black backdrop whenever PC is powered on. Windows gives tons of customization abilities to its users which include changing the default boot logo to any other picture. In this article, we bring to you a helpful guide that will teach you how to change Windows 10 boot logo, edit Windows startup and also look into Windows 10 boot screen changer.
Here are some necessary pre-requisites to change Windows 10 boot logo.
- Windows should be running on UEFI boot mode.
- Secure boot must be disabled.
- Administrative privileges are required.
Most modern Windows PC come with UEFI while older systems use Legacy BIOS. You can follow our guide below to check which one your system is running. Follow our guide to Check if your PC is using UEFI or Legacy BIOS.
Windows 10 doesn’t allow changing boot logo but there is a safe way to do it. HackBGRT is an open-source and free command-line tool used to change boot logo. Follow these steps to do so.
Note: Using HackBGRT, GIFs or transparent images cannot be used as the boot logo and the required image resolution is 300px x 300px.
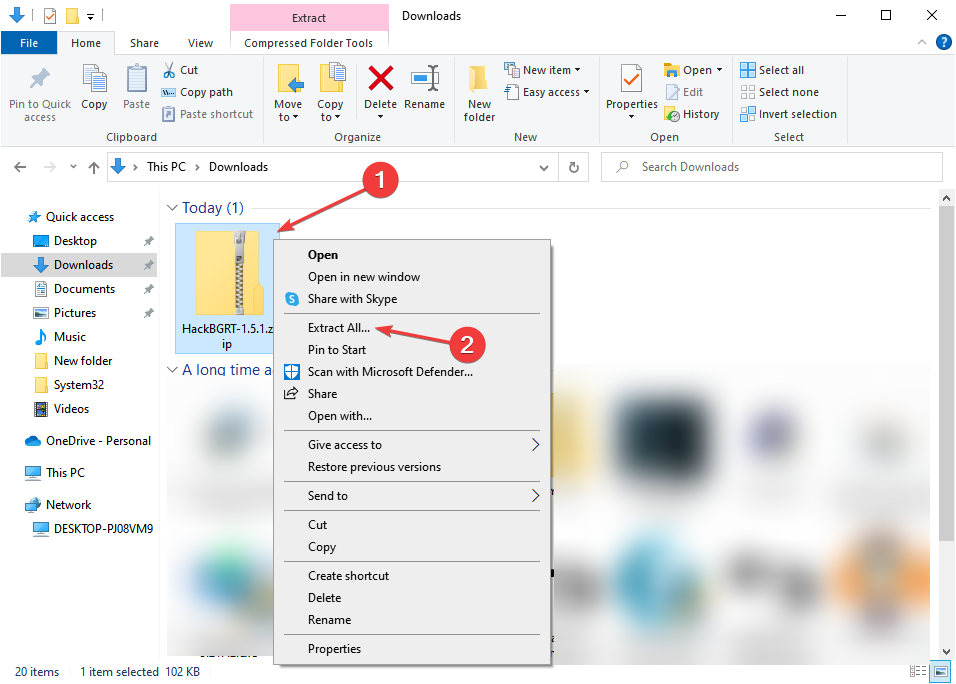
1. Go to download page of HackBGRT and download zip file for the latest version (1.5.1).

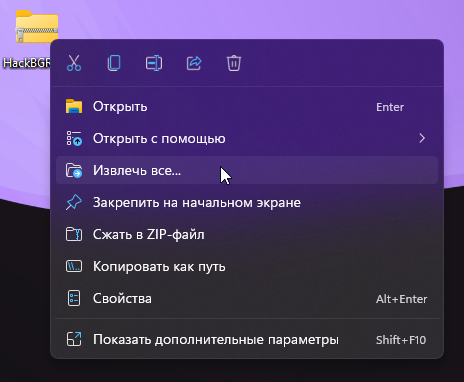
2. Once downloaded, unzip HackBGRT – 1.5.1.zip using appropriate tool like 7-zip.

3. In the extracted folder, right–click on setup.exe file and select Run as administrator from context menu.

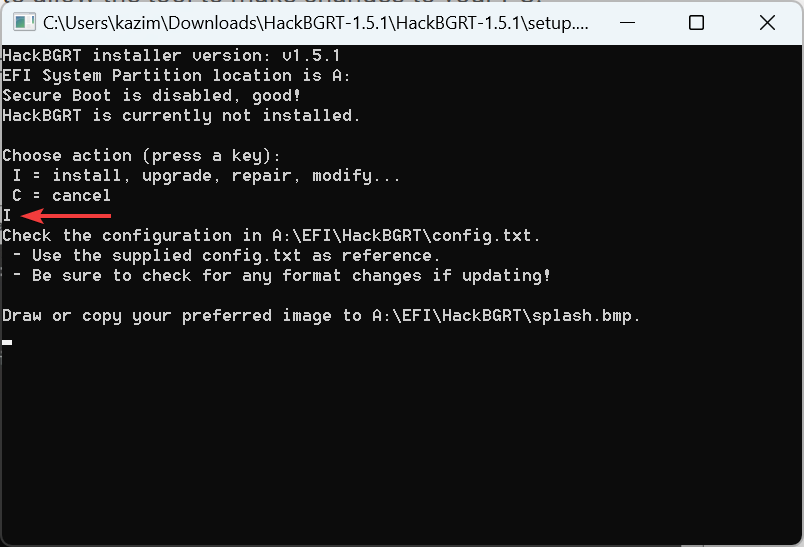
4. HackBGRT will open Command Prompt window. HackBGRT will detect location of UEFI System Partition and check if Secure Boot has been disabled. Information regarding the same will be displayed.

5. Install HackBGRT by pressing the I key.
6. After executing the install command HackBGRT config file will open up in Notepad. Close it by changing it.
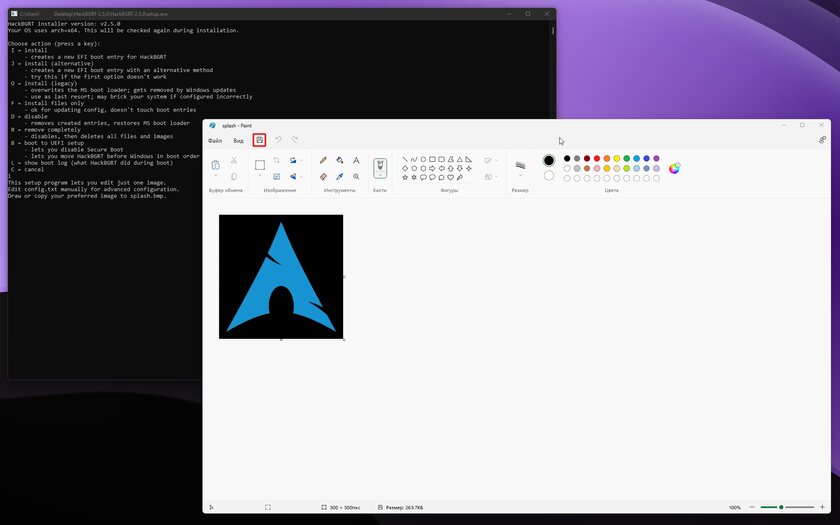
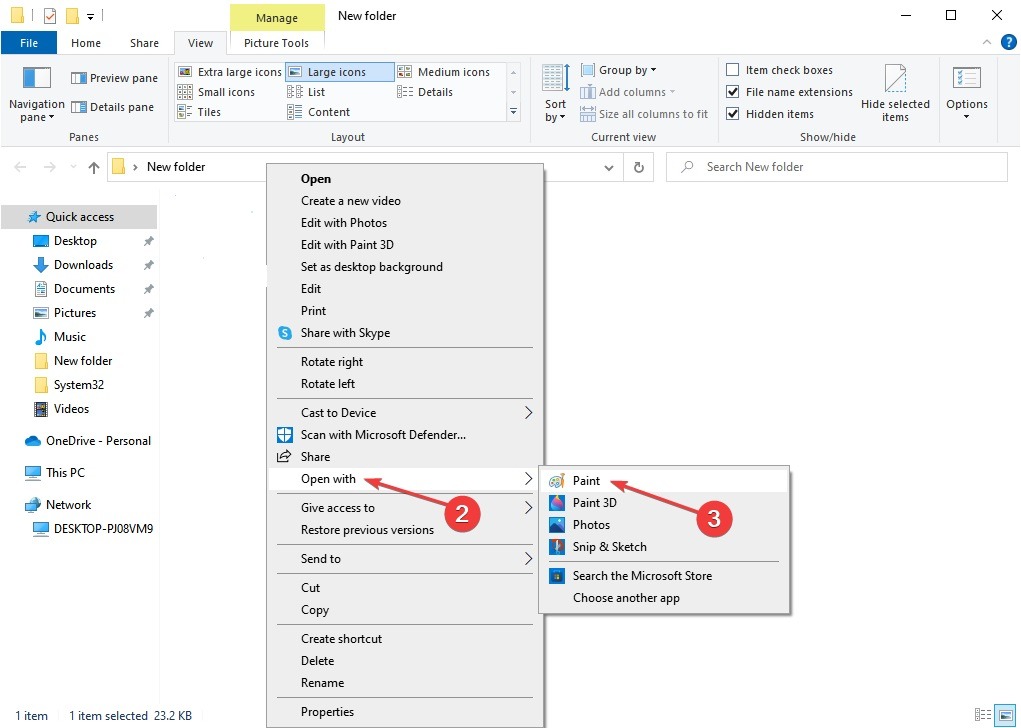
7. HackBGRT will automatically launch the Paint application now with its logo on it.
8. To replace the boot logo with your preferred image, expand the Paste drop-down list and select Paste from the option.

9. Locate image file you wish to set as new boot logo, select it and click on Open.

10. Edit it as you wish and once satisfied, click on File > Save. Close the Paint application window.

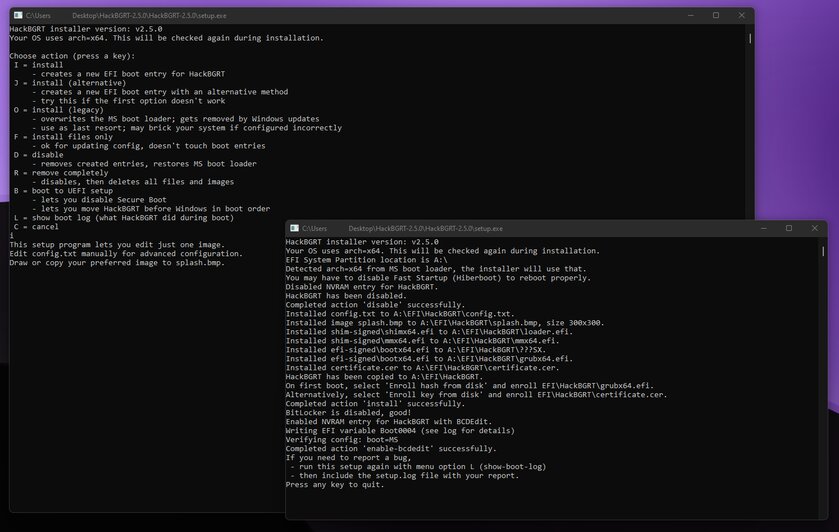
11. Look for confirmation message HackBGRT is now installed and then close Command Prompt.

12. Finally, reboot the PC and you will see the new boot logo.
Also Read: What is Windows 10 Boot Manager?
How to Revert back to default Windows Boot Logo
If you wish to revert back to the original Windows 10 boot logo, you will need to remove the HackBGRT application. Follow these steps to do so.
1. Follow Step 3 from the previous method to open the HackBGRT setup file as administrator.
2. You will see additional options to remove and disable HackBGRT.
Note: If you want to keep the application, press the D key to disable it and it will restore the default boot logo.
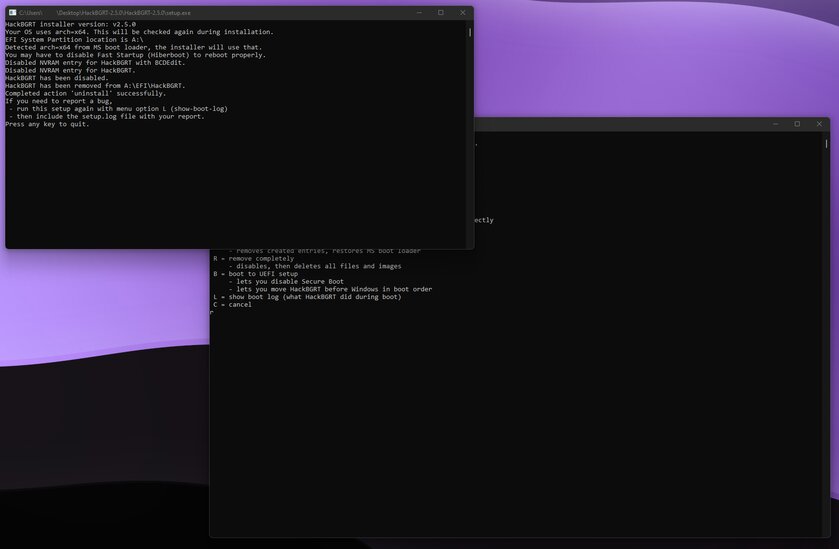
3. Press the R key to execute the remove command. It will remove HackBGRT completely from your System.

4. Once you receive HackBGRT has been removed confirmation message, press any key to quit the Command Prompt window.
The Default Windows logo will now be restored.
Also Read: How to Boot Windows 10 into Recovery Mode
How to Disable Secure Boot
If your Windows PC is running UEFI then you will need to disable Secure boot to change Windows 10 boot logo. Secure boot ensures that the device boots using only system-manufactured trusted software. If enabled, it will prevent the third-party applications from running and changing the boot logo. Follow these steps to check whether it is enabled.
1. Press the Windows key and type System Information, and click on Open.

2. Check whether Secure Boot State is On or Off.

If it is On, follow the steps below to disable it.
1. Launch Settings application by pressing Windows + I keys and clicking on Update & Security tile.

2. Move to Recovery tab and click on Restart now button under Advanced Startup.

3. On the Choose an Option screen, click on Troubleshoot.

4. Click on Advanced Options.

5. Select UEFI Firmware Settings and click on Restart on the next screen.

6. Your system will now boot into the BIOS menu.
Note: The placement of Secure Boot settings varies for each manufacturer. Read our article to access BIOS settings in Windows 10.
7. Using Arrow Keys go to the Boot tab and find the Secure Boot option.
8. Press Enter key or use + or – to change its status to Disabled, Press F10 to confirm changes.
Restart your PC and now you are ready to change the Windows 10 boot logo.
Recommended:
- Fix WaasMedicSVC.exe High Disk Usage in Windows 10
- How to Convert M4B to MP3 in Windows 10
- Fix Windows 10 Bluetooth Mouse Lag
- What is Test Mode in Windows 10?
We hope that this guide was helpful and you were able to change Windows 10 boot logo. We showed how to edit Windows startup using Windows 10 boot screen changer application, HackBGRT. If you have any queries or suggestions then feel free to drop them in the comments section.
В Windows 10 многие параметры оформления можно настроить, используя средства системы, специально предназначенные для персонализации. Но не все: к примеру, вы не можете легко поменять логотип OEM производителя в сведениях о системе (правый клик по «Этот компьютер» — «Свойства») или логотип в UEFI (логотип при загрузке Windows 10).
Однако, изменить (или установить при отсутствии) эти логотипы все-таки можно и в этой инструкции речь пойдет о способах изменения данных логотипов с помощью редактора реестра, сторонних бесплатных программ и, для некоторых материнских плат — с помощью настроек UEFI.
Как изменить логотип производителя в сведениях о системе Windows 10
Если на вашем компьютере или ноутбуке Windows 10 была предустановлена производителем, то зайдя в сведения о системе (это можно сделать как описано в начале статьи или в Панель управления — Система) в разделе «Система» справа вы увидите логотип производителя.
Иногда, собственные логотипы вставляют туда «сборки» Windows, а также некоторые сторонние программы делают это «без разрешения».
За то, какой логотип OEM производителя размещен в указанном месте отвечают определенные параметры реестра, которые можно изменить.
- Нажмите клавиши Win+R (где Win — клавиша с эмблемой Windows), введите regedit и нажмите Enter, откроется редактор реестра.
- Перейдите к разделу реестра HKEY_LOCAL_MACHINE\SOFTWARE\ Microsoft\Windows\CurrentVersion\OEMInformation
- Этот раздел будет пуст (если вы сами устанавливали систему) или же с указанием данных вашего производителя, включая путь к логотипу.

- Для изменения логотипа при наличии параметра Logo, просто укажите путь к другому файлу .bmp с разрешением 120 на 120 пикселей.
- При отсутствии такого параметра, создайте его (правый клик в свободном месте правой части редактора реестра — создать — строковый параметр, задайте имя Logo, а затем измените его значение на путь к файлу с логотипом.
- Изменения вступят в силу без перезагрузки Windows 10 (но закрыть и открыть снова окно сведений о системе потребуется).

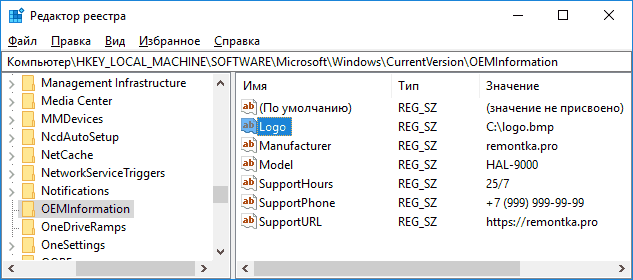
Дополнительно в этом разделе реестра могут располагаться строковые параметры со следующими именами, которые, при желании тоже можно изменить:
- Manufacturer — имя производителя
- Model — модель компьютера или ноутбука
- SupportHours — время работы службы поддержки
- SupportPhone — номер телефона службы поддержки
- SupportURL — адрес сайта поддержки
Существуют сторонние программы, позволяющие изменить этот логотип системы, например — бесплатная Windows 7, 8 and 10 OEM Info Editor.
В программе достаточно просто указать всю необходимую информацию и путь к файлу bmp с логотипом. Есть и другие программы такого рода — OEM Brander, OEM Info Tool.
Как изменить логотип при загрузке компьютера или ноутбука (логотип UEFI)
Если на вашем компьютере или ноутбуке для загрузки Windows 10 используется режим UEFI (для Legacy режима способ не подходит), то при включении компьютера сначала отображается логотип производителя материнской платы или ноутбука, а затем, если установлена «заводская» ОС — логотип производителя, а если система ставилась вручную — стандартное лого Windows 10.
Некоторые (редкие) материнские платы позволяют задать первый логотип (производителя, еще до начала загрузки ОС) в UEFI, плюс есть способы подменить его в прошивке (не рекомендую), плюс почти на многих материнских платах в параметрах можно отключить отображение этого лого при загрузке.
А вот второй логотип (тот, что появляется уже при загрузке ОС) можно поменять, однако и это не вполне безопасно (поскольку логотип прошит в загрузчике UEFI и путь изменения — с помощью сторонней программы, и теоретически это может привести к невозможности запустить компьютер в дальнейшем), а потому используйте далее описанный метод только под свою ответственность.
Я описываю его кратко и без некоторых нюансов с расчетом на то, что начинающий пользователь не станет за это браться. Также после самого способа описываю проблемы, с которыми столкнулся при проверке программы.
Важно: предварительно создайте диск восстановления (или загрузочную флешку с дистрибутивом ОС), может пригодиться. Способ работает только для EFI-загрузки (если система установлена в режиме Legacy на MBR, он не подойдет).
- Скачайте программу HackBGRT с официальной страницы разработчика и распакуйте zip-архив github.com/Metabolix/HackBGRT/releases
- Отключите Secure Boot в UEFI. См. Как отключить Secure Boot.
- Подготовьте файл bmp, который будет использоваться в качестве логотипа (24-битной цветности с заголовком 54 байт), рекомендую просто отредактировать вложенный в папку программы файл splash.bmp — это позволит избежать проблем, которые могут возникнуть (у меня возникли), если bmp будет неправильным.
- Запустите файл setup.exe — вам будет предложено отключить Secure Boot предварительно (без этого система может не стартовать после смены логотипа). Для входа в параметры UEFI можно просто нажать S в программе. Для установки без отключения Secure Boot (или если он уже отключен на 2-м шаге) нажмите клавишу I.

- Откроется файл конфигурации. Его менять не обязательно (но можно для дополнительных возможностей или при особенностях системы и её загрузчика, более одной ОС на компьютере и в других случаях). Закройте этот файл (если кроме единственной Windows 10 в режиме UEFI на компьютере ничего нет).
- Откроется редактор Paint с фирменным логотипом HackBGRT (надеюсь, предварительно замененного вами, но можно отредактировать его на этом этапе и сохранить). Закройте редактор Paint.
- Если всё прошло успешно, вам сообщат что HackBGRT is now installed — можно закрыть командную строку.

- Попробуйте перезагрузить компьютер или ноутбук и проверить, был ли изменен логотип.
Чтобы удалить «кастомный» логотип UEFI, снова запустите setup.exe из HackBGRT и нажите клавишу R.
В моём тесте я сначала соорудил собственный файл логотипа в фотошопе, как результат — система не загрузилась (сообщая о невозможности загрузки моего bmp файла), помогло восстановление загрузчика Windows 10 (с помощью bсdedit c:\windows, несмотря на то, что операция сообщила об ошибке).
Затем прочитал у разработчика, что заголовок файла должен быть 54 байта и в таком формате сохраняет Microsoft Paint (24-бит BMP). Вставил свое изображение в пэйнте (из буфера обмена) и сохранил в нужном формате — опять проблемы с загрузкой. И только когда отредактировал уже имеющийся файл splash.bmp от разработчиков программы, всё прошло успешно.
Вот, примерно так: надеюсь, для кого-то будет полезно и не навредит вашей системе.
Если вам надоел стандартный логотип Windows, появляющийся при загрузке ПК, его можно сменить с помощью утилиты HackBGRT. Поменять лого вручную, заменив один файл, не получится — всё намного сложнее. Поэтому лучше использовать именно сторонюю программу.
Стоит сразу сказать, что существуют ограничения: анимацию в высоком разрешении установить не получится. Программа позволяет поставить только статичное изображение размером 300 × 300 пикселей. В этой статье я объясню, как это сделать.
Требования
Описанный в этой статье способ сработает только для компьютеров с ОС Windows 10 или 11. Кроме того, нужно соблюсти ещё несколько условий. Во-первых, требуется загрузка компьютера в режиме UEFI. Также системный диск должен быть размечен в формат GPT, а технология шифрования накопителя BitLocker выключена. И наконец, следует отключить параметр Secure Boot в BIOS.
Чтобы проверить диск, нажмите сочетание клавиш Win+R и введите diskmgmt.msc. В открывшемся окне найдите диск, на который установлена система, нажмите на него правой клавишей мыши и откройте «Свойства». Перейдите в раздел «Тома» и убедитесь, что в строке «Стиль раздела» указано «Таблица с GUID» либо просто «GPT».
Для проверки того, используется ли UEFI, а также Secure Boot, достаточно нажать сочетание клавиш Win+R и ввести msinfo32. Найдите строки «Режим BIOS» и «Secure Boot». В первом случае значение должно быть «UEFI», во втором — «Отключено».
Шифрование BitLocker проверяется проще всего. Зайдите в «Проводник» и кликните правой клавишей мыши по системному диску. Если там будет доступен пункт «Включить BitLocker», значит эта опция выключена и всё в порядке.
Инструкция
Чтобы заменить логотип загрузки, надо повторить следующие шаги.
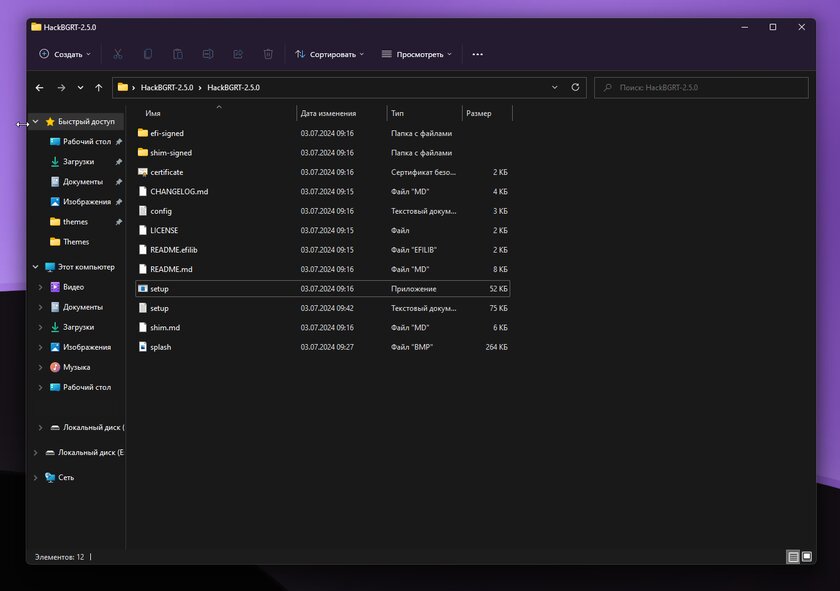
1) Скачайте HackBGRT и распакуйте архив в удобном месте.
2) Запустите файл setup.exe из распакованного архива.
3) Откроется окно командной строки, где предложат выбрать один из пунктов. Нас интересует вариант Install. Впишите символ i и нажмите клавишу Enter.
4) Откроется программа Paint, в которой будет находиться стандартный логотип. Чтобы заменить его на свой собственный, нажмите на нижнюю часть кнопки «Вставить» и выберите пункт «Вставить из» или «Импорт» для Windows 10 или 11 соответственно.
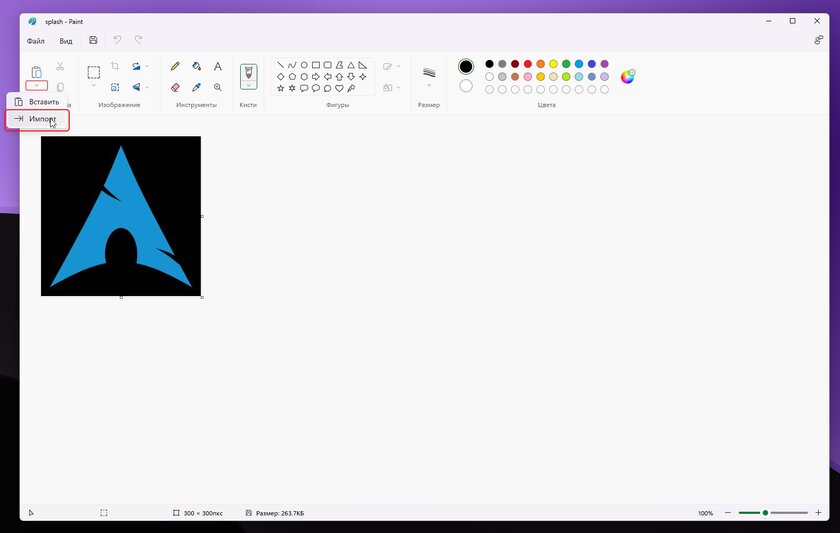
5) После успешного переноса изображения убедитесь, что размер картинки составляет 300 на 300 пикселей. Если всё верно, сохраните файл кнопкой в верхней панели или сочетанием клавиш Ctrl-S. Окно Paint закройте. В случае, если картинка больше, чем нужно, достаточно воспользоваться встроенным в Paint инструментом. Потяните изображение за угол до тех пор, пока оно не станет необходимого размера.
6) Появится окно User Account Control, спрашивающее разрешение на работу программы. Выберите «Да».
7) В окне командной строки должны появиться новые строки. Надпись «Completed action ‘install’ successfully» означает успех операции. После сообщения «Press any key to quit» закройте окно программы нажатием любой клавиши.
Восстановление стандартного лого
Для того, чтобы вернуть стандартный логотип загрузки Windows, нужно снова воспользоваться утилитой HackBGRT.
1) Запустите файл setup.exe из распакованного архива.
2) В командной строке выберите пункт Uninstall. Для этого напишите символ r и нажмите клавишу Enter.
3) Появится окно User Account Control, спрашивающее разрешение на работу программы. Выберите «Да».
4) Откроется новое окно командной строки, и через несколько секунд появится сообщение «Completed action ‘uninstall’ successfully». Это означает успешное удаление нового логотипа. После этого закройте окно командной строки нажатием любой клавиши.
Readers help support Windows Report. We may get a commission if you buy through our links.
Read our disclosure page to find out how can you help Windows Report sustain the editorial team. Read more
Windows is often said to be a highly customizable OS, but most users remain unaware of the wide range of changes they can make. For instance, many wonder if they can change the boot logo in Windows 10.
By default, every time you boot the OS, a Windows logo appears on the screen with a few dots spinning in a circle which denotes the boot progress. Let’s find out all there’s to now.
Can you change the Windows startup logo?
Yes, you can easily change the Windows startup or boot logo without making any significant modifications to the BIOS or the OS. And the best part, you can do it with a simple open-source tool.
While there are a few other ways, the complex ones run the risk of bricking the PC if you are not careful during the process. So, let’s stick to the simpler option to change the boot logo in Windows 10.
How do I change the boot logo in Windows 10?
Before we start the actual process, here are a few quick checks and changes to ensure that things work:
- Make sure your PC employs UEFI as the firmware interface. Though most newer generation PCs do, a quick way to verify this is to check System Information and look at the BIOS Mode.
- Disable Secure Boot on the PC through the BIOS. The method here differs for every OEM, so you must check the official website for the exact steps.
Once done with these two, let’s start the actual process.
NOTE
Given that changing the boot logo in Windows 10 is a slightly complex process, we have divided the steps into three sections for higher clarity and enhanced ease. The last section details how you can revert to the default settings.
1. Get the image ready
- Right-click on the image you want to set as the boot logo, hover over Open with, and choose Paint from the list.

- Under the Image section, select Resize.

- Now, choose Pixels as the unit, enter 250 under both Horizontal and Vertical, and then click OK. Alternatively, you could use a third-party tool or website to resize the image.
- Once done, click on the File menu, hover the cursor over Save as, and select BMP picture.
- Navigate to the desired folder, enter splash as the file name, under Save as type, choose 24-bit Bitmap, and click on Save.


After the file is ready, let’s head to the next step, which is to get HackBGRT running to change the boot logo. It’s an open-source tool and easy to use.
2. Get the tool ready
- Go to HackBGRT’s GitHub page and download the ZIP file.

- Head to the Downloads folder, right-click on the HackBGRT.zip file, and select Extract All.

- Choose the desired path for extracted files, and click on Extract.

- Once done, head to the extracted files, and run setup.exe.
- Click Yes in the UAC prompt.


3. Change the boot logo
- The tool will now open in a Command Prompt window, press I to proceed with the installation.

- A notepad window will launch, listing the various details. Simply close it.
- In the Paint window that opens next, click on the File menu, and choose Open.
- Now, open the partition created by the tool, select the EFI folder, and then the HackBGRT folder. In our case, the path was:
A:\EFI\HackBGRT - You will now find a splash.bmp image here. Copy the one you created earlier, head back to this window, and press Ctrl + V to paste it.
- Click on Replace the file in the destination option in the prompt that appears.

- Once done, click on Open, and then close the Paint window.
- The Command Prompt will read HackBGRT is now installed. Press any key to quit. Close it.


That’s it! You have successfully changed the boot logo in Windows 10. Every time you restart the computer, the new logo will appear instead of the old Windows icon.
- Microsoft wants Windows 10 users to upgrade to Windows 11 or Copilot + PCs
- Deleting ‘inetpub’ folder lets hackers permanently stop Windows updates, Microsoft warns
4. Revert to default settings
Reverting to the default settings is easier than ever using HackBGRT. Open the tool and press either D to restore the default settings or R to remove the HackBGRT files completely.

Now, when you boot Windows, it will display the default logo instead of the customized one.
That’s it! This was the easiest method to change to boot logo in Windows 10 using a simple and user-friendly open-source tool. Make sure to check the conditions (listed earlier) beforehand and make the relevant changes to avoid any issues later.
Also, if you are planning on making more changes, check the best desktop customization software for Windows 10. For Windows 11 users, we have a separate guide on how to change the boot logo on Windows 11, so don’t miss it.
If you have any queries or want to share your experience of changing the boot logo, drop a comment below.
Kazim Ali Alvi
Windows Hardware Expert
Kazim has always been fond of technology, be it scrolling through the settings on his iPhone, Android device, or Windows PC. He’s specialized in hardware devices, always ready to remove a screw or two to find out the real cause of a problem.
Long-time Windows user, Kazim is ready to provide a solution for your every software & hardware error on Windows 11, Windows 10 and any previous iteration. He’s also one of our experts in Networking & Security.
Windows’ current blue-tiled logo has become synonymous with the operating system. When the PC is turned on, it may be seen in the black background. Windows provides its customers with numerous customization options, including the ability to change the default boot logo to any other image. In this post, we will show you how to change the Windows 10 boot logo, edit Windows startup, and look into Windows 10 boot screen changer.
Windows is frequently described as a highly adaptable operating system, although most users are unaware of the extensive customization options available. Many people, for example, question if they can modify the boot logo in Windows 10.
It is a very customizable operating system, and the boot screen logo is one of the options. If you’re sick of seeing the Windows logo when your computer boots up, you can replace it.
By default, when you boot the operating system, a Windows logo displays on the screen, along with a few dots spinning in a circle to indicate the boot progress. Let’s find out what’s going on now.
Recommended Post:- How to Turn On or Off the Hidden Icon Menu on Windows 11
Is it possible to modify the Windows launch logo?
Yes, you can easily alter the Windows startup or boot logo without modifying the BIOS or the operating system. The best part is that you can do it with a simple open-source programme.
While there are a few additional options, the more complicated ones risk bricking the PC if you are not attentive during the procedure. Hence, to modify the boot logo in Windows 10, we’ll stick to the simplest approach.
Points to Remember While Applying a Custom Boot Logo
Before making any changes, make sure you understand and follow the list below.
- Before making any changes to the Windows boot logo, make a full backup or a rescue disc. This is because if something goes wrong, you will be unable to boot into Windows. This is where a backup or rescue disc comes in helpful.
- Windows should be in UEFI mode, not Legacy BIOS mode. You can simply determine whether Windows is using UEFI or Legacy BIOS.
- If Windows is operating on UEFI, disable the Secure Boot option. You cannot alter the boot logo while Secure Boot is enabled in UEFI.
- GIFs and translucent pictures cannot be used as the new boot logo.
- Have the image you want to use as the boot logo ready to go. The image must not be larger than 300px x 300px. The size is not a hard and fast rule.
- To alter the Windows boot logo, you must have administrative capabilities.
- This guide applies solely to Windows 10. It may not function properly in Windows 8 or 7.
Let’s look at the solution now that you’re certain of everything.
How can you Change the Windows 10 Boot Logo
Before we begin, here are a few short checks and modifications to ensure that everything is in working order:
Ascertain that your PC’s firmware interface is UEFI. Though most later-generation PCs do, checking System Details and looking at the BIOS Mode is an easy way to confirm this.
Disable Secure Boot in the BIOS of the Computer. Because the technique varies per Manufacturer, you must consult the official website for the exact steps.
Let’s get started on the actual process when we finish these two.
Note: While altering the boot logo in Windows 10 is a fairly complicated process, we’ve broken it down into three pieces for more clarity and ease of use. The final section explains how to return to the default settings.
Solution 1: Prepare the image
- Step 1: Right-click on the image you wish to use as the boot logo, then select Open from the menu.
- Step 2: Under the Image section, choose Resize.
- Step 3: Choose Pixels as the unit, enter 250 in both the Horizontal and Vertical boxes, and then click OK. You might also use a third-party programme or website to resize the image.
- Step 4: When finished, go to the File menu, hover over Save as, and select BMP picture.
- Step 5: Browse to the relevant folder, type splash as the file name, select 24-bit Bitmap as the Save type, and click Save.
Let’s go on to the next step, which is to start HackBGRT to modify the boot logo. It’s an open-source utility that’s simple to use.
Solution 2: Prepare the tool
- Step 1: Download the ZIP file from HackBGRT’s GitHub website.
- Step 2: Go to the Downloads folder, right-click the HackBGRT.zip file, and choose Extract All.
- Step 3: Choose the desired directory for the retrieved files and press the Extract button.
- Step 4: After that, navigate to the extracted files and start setup.exe.
- Step 5: In the UAC question, click Yes.
Solution 3: Modify the boot Logo
- Step 1: The tool will now launch in a Command Prompt window; press I to begin the installation.
- Step 2: A notepad window will open, listing all of the details. Simply shut it.
- Step 3: In the Paint window that appears, go to the File menu and select Open.
- Step 4: Now, enter the tool-created partition and navigate to the EFI folder, followed by the HackBGRT folder. In our case, the path was as follows: A:\EFI\HackBGRT
- Step 5: A splash.bmp image is now available here. Copy the one you made previously, return to this window, and paste it using Ctrl + V.
- Step 6: In the prompt that appears, select Replace the file in the destination option.
- Step 7: Once completed, click on Open, and then close the Paint window.
- Step 8: The Command Prompt will display the message HackBGRT is now installed. To exit, press any key. Put it away.
That’s all! In Windows 10, you have successfully modified the boot logo. After you restart your computer, the new logo will replace the old Windows icon.
Solution 4: Restore the factory settings
With HackBGRT, reverting to the default settings is easier than ever. Launch the tool and hit D to restore the default settings or R to erase the HackBGRT files.
When you boot Windows, it will now display the default logo rather than the personalized one.
Conclusion
That’s all! Using a simple and user-friendly open-source application, this was the simplest way to modify the boot logo in Windows 10. Check the circumstances (mentioned previously) and make any necessary changes ahead of time to avoid problems later.
When you’re sick of the Windows loading logo, it’s nice to know you can change it to something more intriguing. We hope this article was useful and that you were able to change the Windows 10 boot logo.