
Все способы:
- Вариант 1: Виртуальный привод
- Способ 1: Перезагрузка компьютера
- Способ 2: Извлечение диска
- Способ 3: Параметры софта
- Вариант 2: Виртуальный диск
- Вопросы и ответы: 0
Вариант 1: Виртуальный привод
Образы дисков на компьютере с Windows 10, как правило, представляют собой файлы в формате ISO, монтируемые системными или сторонними средствами с помощью виртуального привода. Сам по себе процесс извлечения, так или иначе необходимый для фактического удаления образа, напрямую зависит от способа монтирования и используемой вами программы.
Читайте также: Создание образа диска в Windows 10
Способ 1: Перезагрузка компьютера
Наиболее простой способ выполнения поставленной задачи сводится к простому перезапуску компьютера, что в большинстве случаев приводит к автоматическому извлечению всех накопителей из виртуальных приводов. Сделать это можете через меню «Пуск», «Командную строку» или воспользовавшись кнопками на корпусе, о чем было нами рассказано в другой инструкции на сайте.
Подробнее: Способы перезагрузки компьютера с Windows 10
К сожалению, не во всех случаях указанное действие приводит к желаемому результату – иногда смонтированный диск возвращается автоматически, так как за это отвечает сторонний софт. Обойти данную проблему можно путем самостоятельного извлечения или через блокировку автоматического монтирования, о чем будет рассказано далее по ходу статьи.
Способ 2: Извлечение диска
В настоящее время каждая версия Windows 10 в полной мере поддерживает монтирование образов средствами стандартного «Проводника», который по совместительству используется для отсоединения дисков. Тут же сразу отметим, что представленный порядок действий в полной мере будет актуален для удаления образов, смонтированных сторонними программами, а также для виртуальных жестких дисков.
Читайте также: Монтирование образа диска в Windows 10
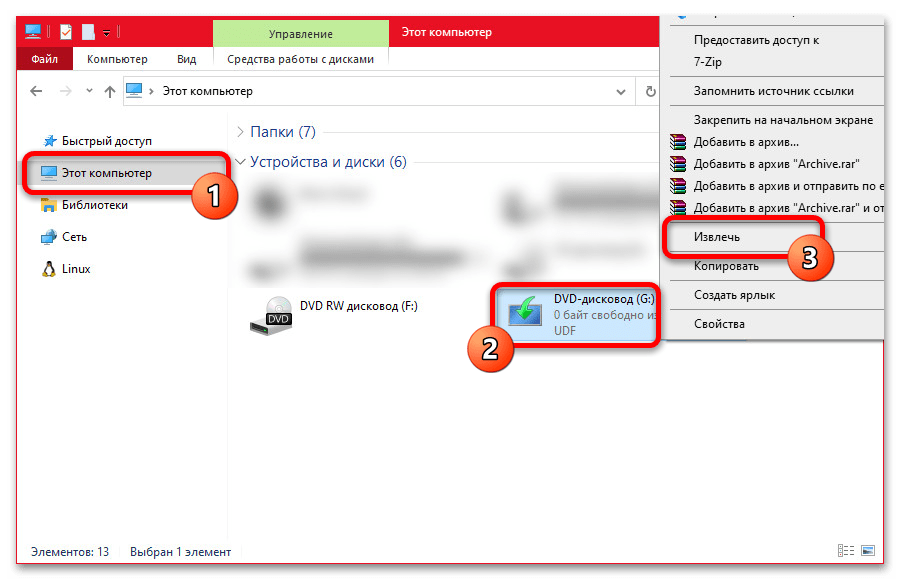
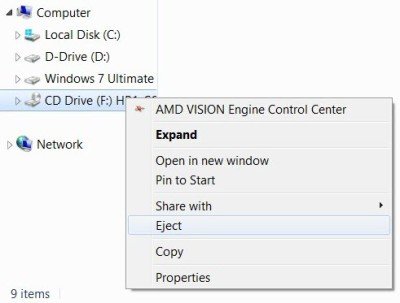
- Чтобы выполнить рассматриваемую задачу, с помощью значка «Проводника» на панели задач, иконки на рабочем столе или любым другим способом откройте системную категорию «Этот компьютер». Здесь нужно найти смонтированный ранее образ, кликнуть правой кнопкой мыши и воспользоваться опцией «Извлечь».
- По завершении виртуальный привод исчезнет со страницы, и образ будет недоступен для дальнейшего использования. Теперь можете найти непосредственно сам файл в формате ISO на компьютере и произвести удаление через меню.
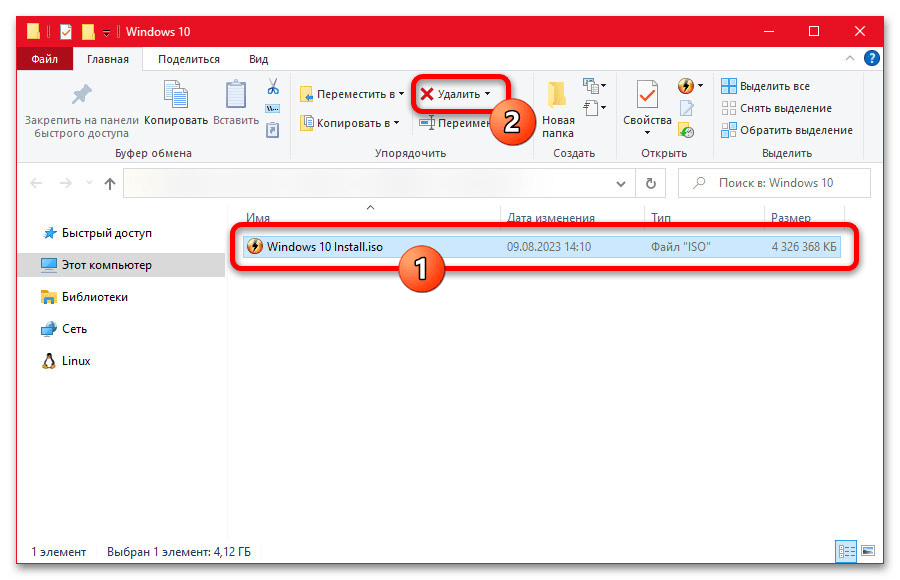
Обратите внимание, что после самостоятельного извлечения даже в случае со сторонними программами образ не будет автоматически монтироваться при запуске компьютера. В связи с этим полное удаление следует производить, только если вы изначально хотели, но не могли удалить файл образа, или просто требуется очистить свободное место.
Способ 3: Параметры софта
При использовании сторонней программы для монтирования образа произвести извлечение можно через ее основной интерфейс. Как нетрудно догадаться, точный порядок действий в этом случае может меняться в зависимости от софта, однако мы ограничимся только наиболее популярным Daemon Tools, чтобы просто продемонстрировать принцип использования.
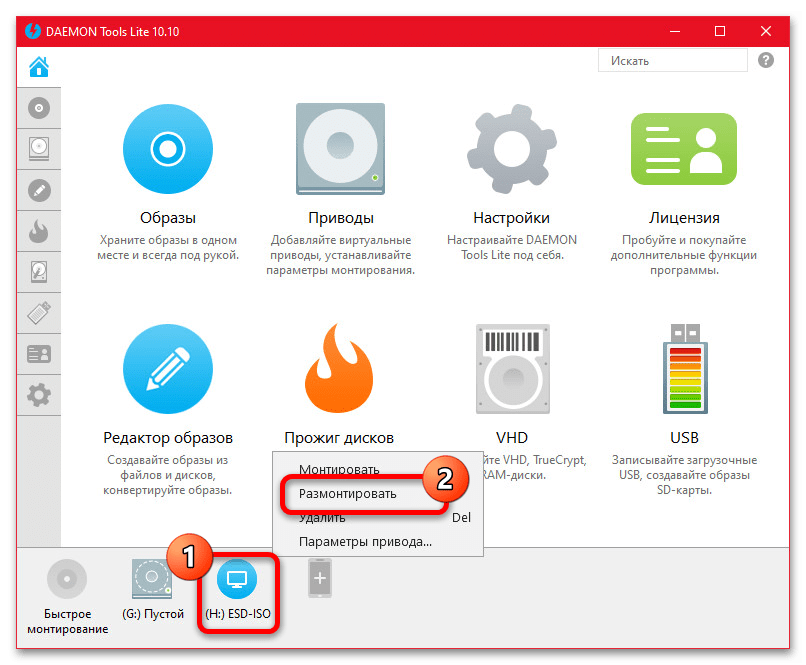
- Сначала необходимо открыть нужную программу с помощью значка, будь то иконка на рабочем столе, в меню «Пуск» или на панели задач, и в нижней части рабочего окна найти смонтированный ранее образ. После этого просто кликните правой кнопкой мыши и воспользуйтесь опцией «Размонтировать» для одного привода или «Размонтировать все приводы» для обработки сразу всех образов.
- Как уже было отмечено ранее, подобные программы в большинстве случаев запоминают последний смонтированный образ и выполняют данную процедуру автоматически при запуске компьютера. Если вам это не нравится или мешает, с помощью боковой панели перейдите на вкладку «Настройки», выберите категорию «Общие» и снимите галочку «Автоматическое монтирование».
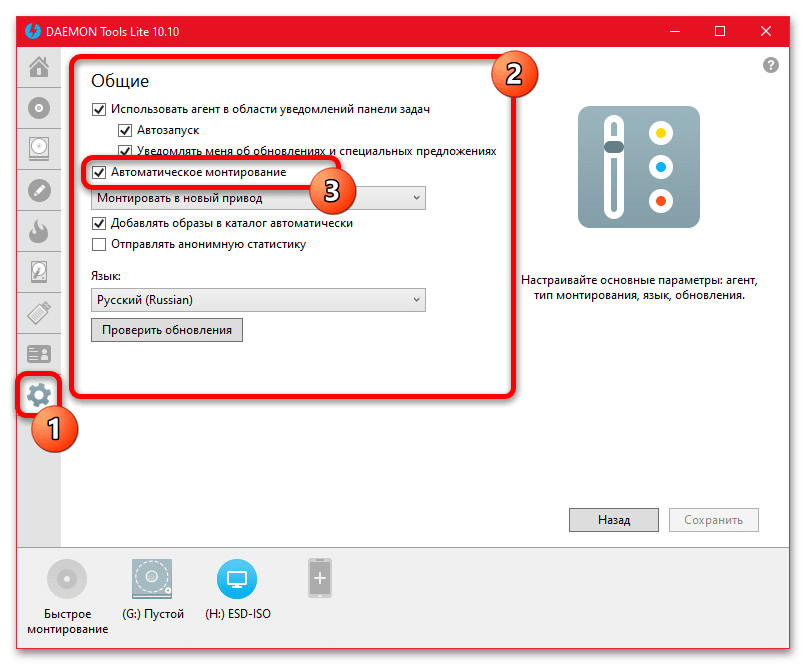
Изменение настроек потребует последующего нажатия кнопки «Сохранить» в нижней части окна, тогда как простое размонтирование не нуждается во вспомогательных действиях. По завершении, так или иначе, можете просто закрыть программу, не забывая про значок в области уведомлений на панели задач Windows, и выполнить удаление оригинального файла образа с компьютера, если нужно.
Вариант 2: Виртуальный диск
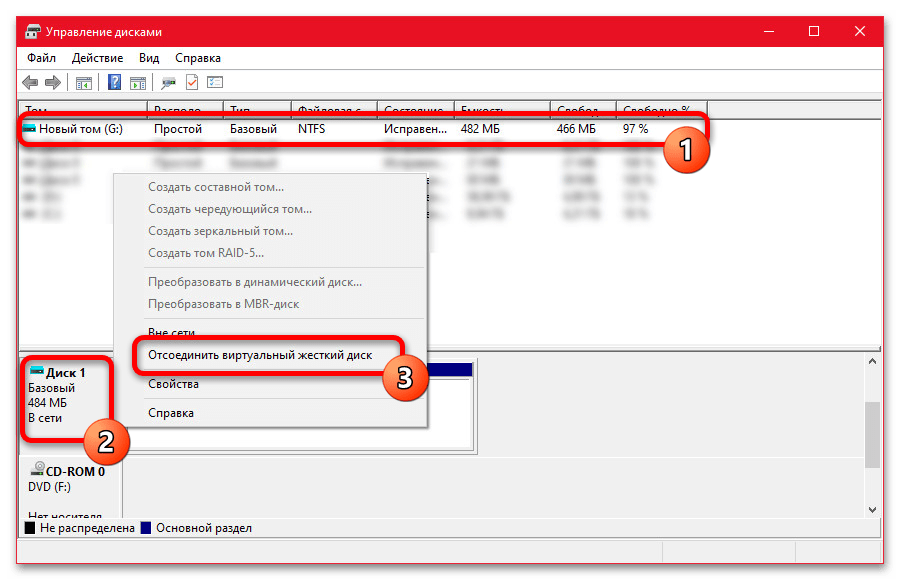
Избавиться от виртуального диска, имеющего совершенно другие форматы, нежели смонтированные образы, можно двумя основными способами, воспользовавшись системной утилитой «Управления дисками» или «Командной строкой». В первом случае нужно открыть соответствующее окно через меню «Пуск», найти диск в общем списке, кликнуть правой кнопкой и выбрать «Отсоединить виртуальный жесткий диск», тогда как во втором достаточно будет одной небольшой команды и нажатия клавиши «Enter».
Подробнее: Способы удаления виртуального диска в Windows 10
Кроме сказанного, можно также просто открыть «Этот компьютер», щелкнуть правой кнопкой мыши по нужному диску и воспользоваться опцией «Извлечь» по аналогии с рассмотренными ранее образами. Так или иначе, диск моментально станет недоступен, в том числе после перезапуска операционной системы, но при этом сохраненная на нем информация останется на компьютере.
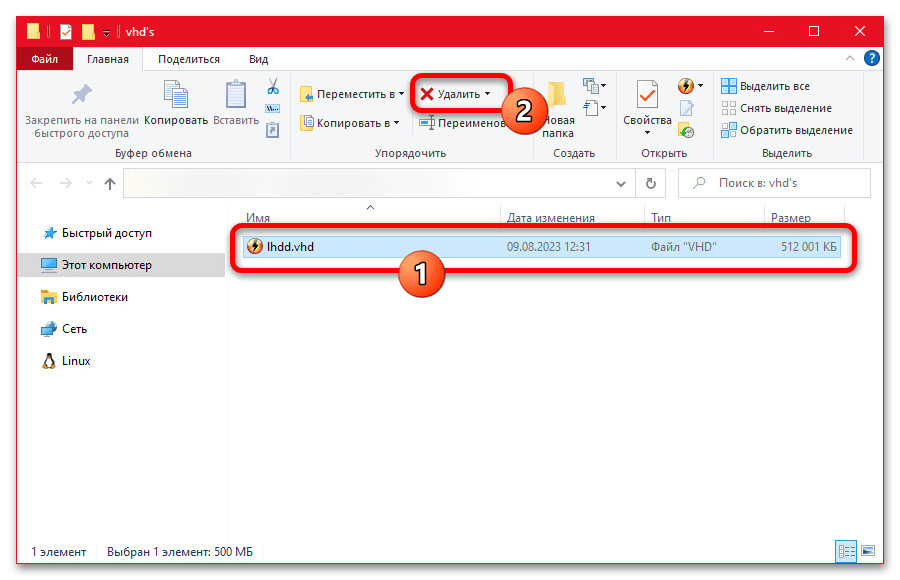
Чтобы полностью избавиться от виртуального диска и тем самым освободить место на логическом томе, необходимо найти соответствующий файл в одном из двух поддерживаемых форматов (VHD или VHDX) и произвести удаление по аналогии с любыми другими данными. В то же время, нужно понимать, что произвести процедуру не получится, если предварительно не было выполнено описанное ранее отсоединение.
Наша группа в TelegramПолезные советы и помощь

In Windows 10, File Explorer can open and eject ISO disc images without requiring users to install third-party apps for this task. This feature comes in handy when you are trying to work with disc images, view and interact with their content. In this article, we show you the straightforward process of using File Explorer to mount and unmount any ISO image file you need to work with:
How to open (mount) ISO files with File Explorer in Windows 10
ISO is the most popular file format for disc images. When you open a disc image, you see its contents, as if it were the disc that it is cloning. You can use the disc image the same way you would use the original disc. While previous versions of Windows needed third-party software for this task, Windows 10 comes with the versatile File Explorer, which enables you to mount a disc image with just a few clicks or taps.
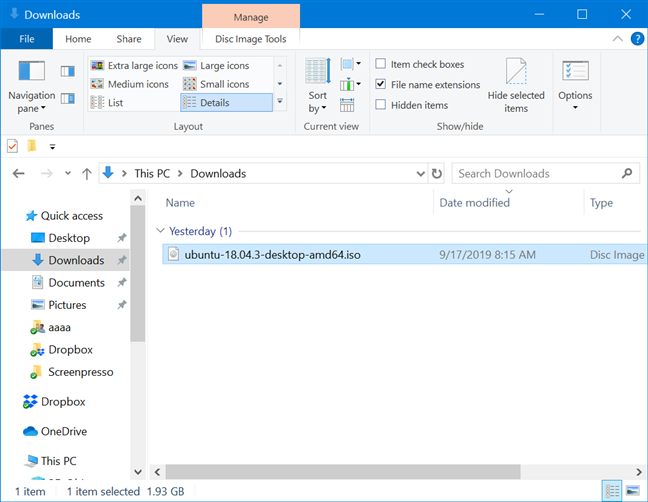
First, open File Explorer and navigate to the «.iso» file that you want to open. We used the ISO for Ubuntu Linux for this tutorial. The fastest way to open it is to double-click (or double-tap) on the ISO file. Another method involves selecting it by clicking or tapping on it.
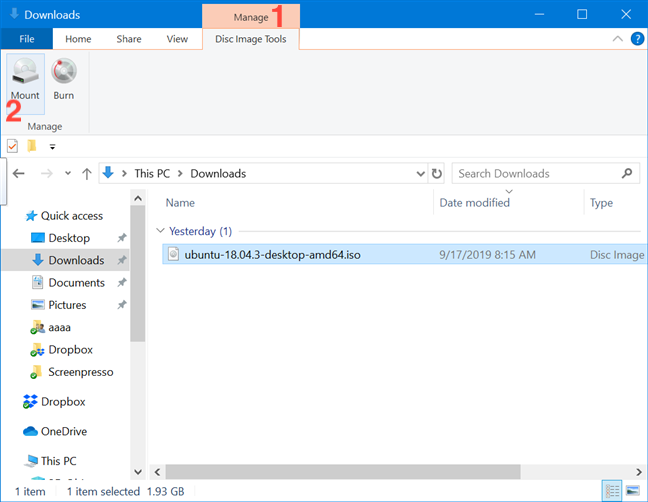
With the ISO file selected, click or tap the Manage tab on the ribbon and then press the Mount button.
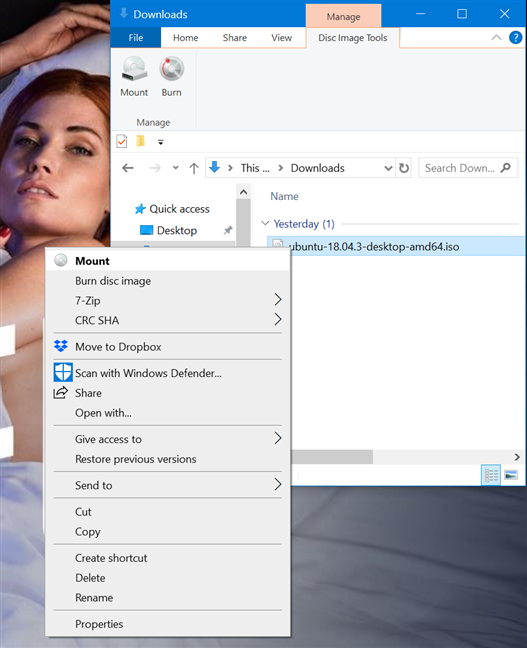
Alternatively, you can right-click or press-and-hold the ISO file, and then click or tap Mount from the contextual menu.
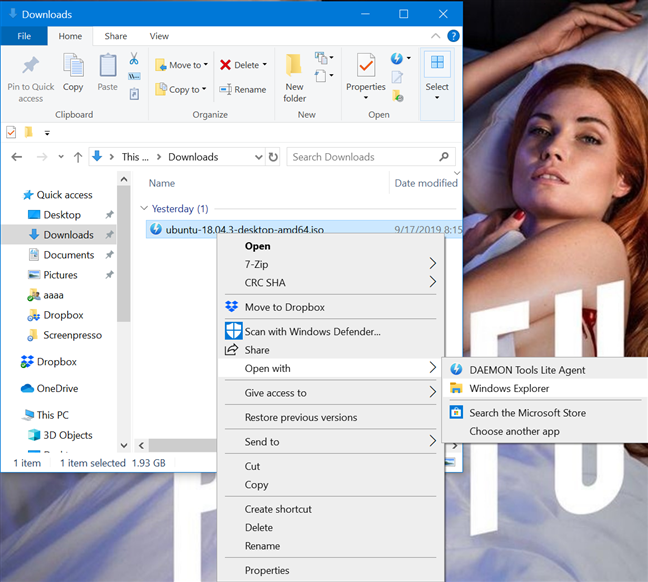
Even if a third-party app that works with ISO files is already installed on your Windows 10 computer or device, you can still open them using File Explorer instead. Right-click or press-and-hold the ISO file to open the contextual menu and then click or tap Open with, followed by Windows Explorer (which is what File Explorer was called on previous versions).
Regardless of the method used to mount the ISO file, the result is the same: the disc image is opened in File Explorer, and you can access its entire contents.
TIP: If AutoPlay is enabled when you mount an ISO file, the disc’s AutoPlay menu is displayed.
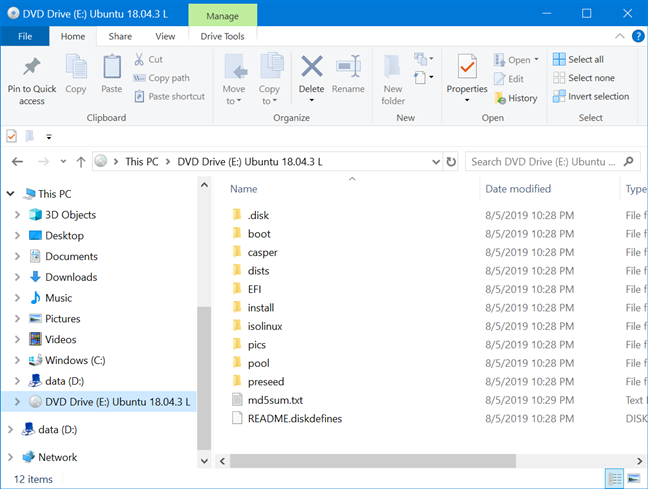
You can now access everything, just like you would from a physical disc: you can copy files from the disc image, run them and so on.
How to eject (unmount) ISO files in Windows 10
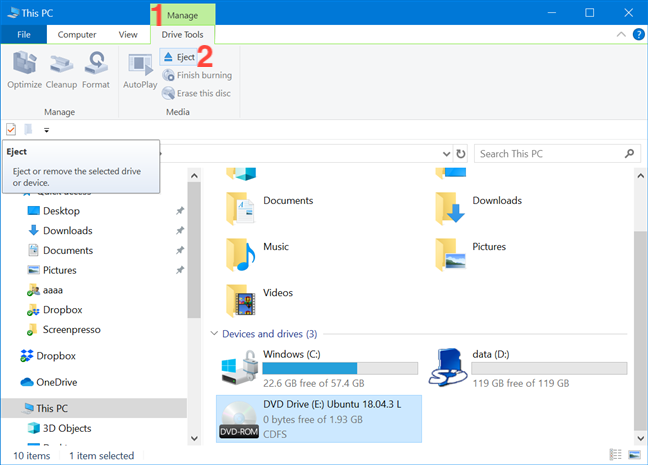
When you are done working with a mounted ISO file and want to unmount it, open File Explorer and go to This PC.
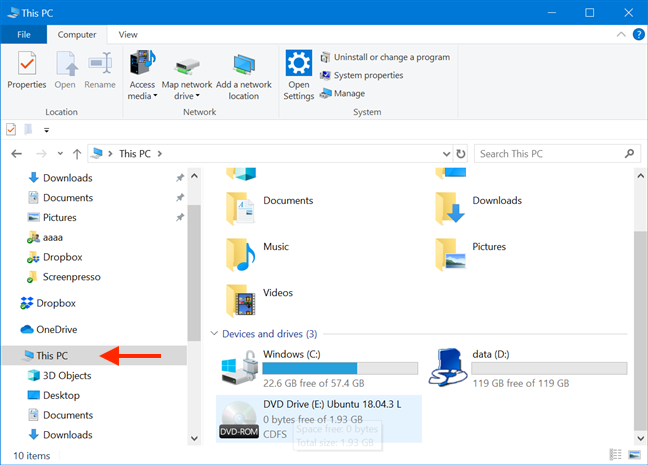
Select the drive used for the ISO file and click or tap the Manage tab on the ribbon. Then, click or tap Eject.
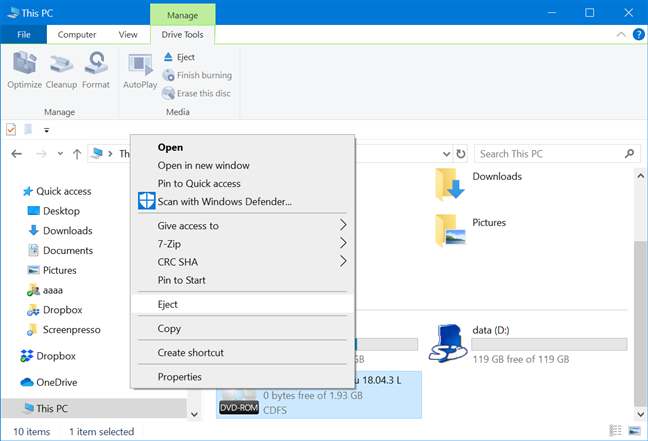
You can also unmount the ISO file by right-clicking or pressing-and-holding the drive of your ISO file, and then clicking or tapping Eject in the contextual menu.
The ISO file is unmounted immediately, and the drive disappears from This PC. If you use the This PC section of the File Explorer often, you might want to learn How to make File Explorer open This PC, by default.
Do you use File Explorer to mount disc images?
For this tutorial, we downloaded and installed third-party software, Daemon Tools Lite. We were disappointed to find that, in spite of our vigilance, the app somehow managed to sneak bloatware past us during installation. This convinced us to only use Windows 10’s File Explorer for this purpose from now on, which also comes with the advantage of not wasting extra disk space. What have you been using to mount or unmount disc images? Let us know in a comment below.
Subscribe:
RSS Feed
Google News
YouTube
Download Windows Speedup Tool to fix errors and make PC run faster
Many times you must have used third-party software to quickly Mount a disc image. This image appears as a virtual DVD drive. Mounting ISO images is a great way to view and run the content of the disk image without having to burn it onto a CD/DVD if you have such software. Now with Windows 10, this feature has been provided natively. So let us see how to Mount and Unmount an ISO so that you can extract files from the ISO or run them on a virtual drive.
When you select your ISO file, the ribbon interface has the Mount option along with Burn. Use it.
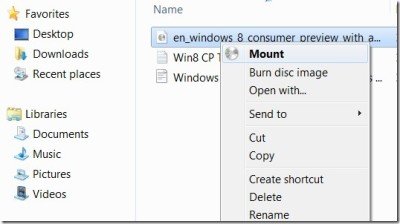
Or else, just right-click the ISO to get the Mount option.

Alternatively, simply double-click the ISO to Mount.
After mounting you will be able to see the Virtual Drive listed.
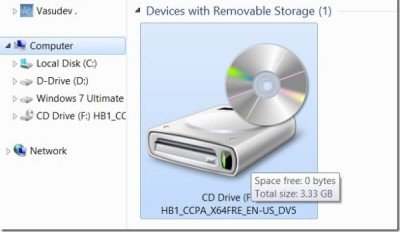
Now you will be able to run and install the software from the Virtual Drive.
To UnMount, just right-click on the drive and select Eject
This is one of the great new features in Windows, among many!
On a side note about ISO files, many a time, people just start using the ISO file without checking them and later get an error during installation. Always remember to verify the integrity of the ISO downloaded from the web. You must have seen the digital signatures provided in the form of MD5 or Sha 1 hash. Just use some free apps like slavasoft.com/HashCalc to verify these digital signatures. If they match, then you are sure that you have downloaded the exact copy of the file without any error. And you can proceed to use ISO file.
Go here if you are unable to mount ISO images in Windows.
How to mount ISO using PowerShell?
You can mount ISO images using PowerShell as follows:
Open PowerShell as an administrator and execute the following command:
Mount-DiskImage -ImagePath "Path to the ISO"
You have to replace Path to the ISO with the actual path of the .iso file.
How to unmount ISO using PowerShell?
You can unmount ISO images using PowerShell as follows:
Open PowerShell as an administrator, and execute the following command:
Dismount-DiskImage -ImagePath "Path to the ISO"
You have to replace Path to the ISO with the actual path of the .iso file.
Windows 7, Windows Vista and Windows XP users may want to use the Virtual CD-ROM Control Panel from Microsoft.
The author has been a Microsoft MVP awardee in various Windows categories (2006-2016) and currently a Windows Insider MVP. A Technology Enthusiast, interested in anything technical and is committed to Microsoft technologies and products. He is actively associated with various Microsoft online communities, forums, Newsgroups and has been actively involved in Beta testing various Microsoft products and bug submissions.
An ISO image file is an archive file that holds the exact replica of files that remain in the physical disc (like CD, DVD or Blu-Ray discs). Even different software companies use ISO files for distributing their applications or programs. These ISO files can contain anything from Games, Windows OS, video and audio files, etc as a single compact image file. ISO is the most popular file format for disk images which has .iso as the file extension.
In order to access and use ISO files in older OS like Windows 7, Windows XP, etc, users need to install some third party application; but with the release of Windows 8, 8.1 and 10, users do not need to install any external application for running these files, and the File Explorer is enough for running. In this article, you will learn about how to mount and unmount ISO image files in different OS.
Mounting is the approach where users or vendors can create a virtual CD/DVD drive on the system so that the operating system can run an image file like it usually runs files from DVD-ROM. Unmounting is the exact opposite of mounting that is you can relate to ejecting DVD-ROM once your work is over.
Table of Contents
Method 1: Mount an ISO Image File in Windows 8, 8.1 or 10:
With the latest Windows OS such as Windows 8.1 or Windows 10, you can directly mount or unmount ISO file using the built-in tool. You can also mount virtual hard drives using the below steps. There are three different ways via which you can mount ISO image file:
1. Navigate to the ISO file location in File Explorer then double-click on the ISO file that you want to mount.
Note: This approach will not work if the ISO file is associated with a third-party program (to open).

2. Another way is to right-click on the ISO file that you want to mount and select “Mount” from the context menu.

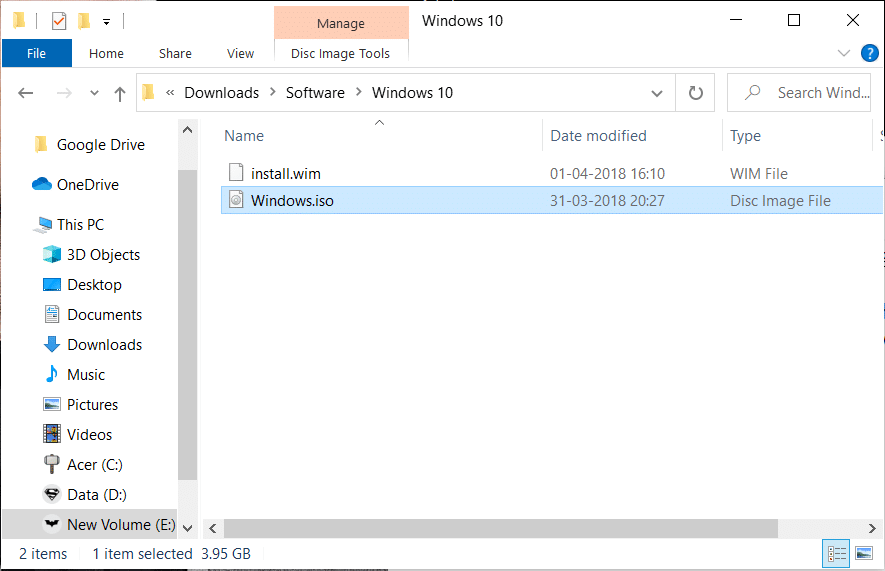
3. The final option is to mount the ISO file from File Explorer. Navigate to the location of the ISO file, then select the ISO file. From File Explorer menu, click on the Disc Image Tools tab and click on the Mount option.

4. Next, under This PC you will see a new drive (virtual) which will host the files from ISO image using which you can browse all the data of the ISO file.

5. To unmount the ISO file, right-click on the new drive (mounted ISO) and select “Eject” option from the context menu.
Also Read: Creating a Full System Image Backup in Windows 10 [The Ultimate Guide]
Method 2: Mount an ISO Image File on Windows 7/Vista
To access the content of the ISO file in older versions of Windows OS, you will need to download & install a third-party application for mounting the ISO image file. In this example, we will use the application “WinCDEmu” (which you can download from here) which is a simple open-source ISO mounting application. And this application also supports Windows 8 as well as Windows 10.

1. To use this application, you have to first download & install it from this link and give the necessary permission to complete the installation.
2. Once the installation finished, simply double-click on the ISO file to mount the image file.
3. Now start the application and you will see a window where you can choose the configuration settings for the mounted ISO drive such as drive letter and other basic options. Once done, click OK to save changes.
Method 3: How to Mount or Unmount ISO file using PowerShell:
1. Go to Start menu search type “PowerShell” and click on the search result to open.

2. Once the PowerShell window opens, simply type the command written below for mounting the ISO file:
Mount-DiskImage -ImagePath "C:\PATH.ISO"

3. In the above command make sure you change C:\PATH.ISO with the location of your ISO image file on your system.
4. Also, you can easily unmount your image file by typing the command and hit Enter:
Dismount-DiskImage -ImagePath "C:\FILE.ISO"

Also Read: Download official Windows 10 ISO without Media Creation Tool
That’s the end of the article, I hope using the above steps you will be able to mount or unmount the ISO image file on Windows 10. But if you still have any questions regarding this tutorial then feel free to ask them in the comment section.
Physical DVD drives might be an endangered species on PCs, but they live on in virtual format, thanks to ISO disk image files.
ISO files are a common way to distribute software that would previously have required a DVD. When you use the Windows 10 Media Creation Tool, for example, one of two default options is to save the installer as an ISO file.
In Windows 7 and earlier, the only thing you could do with an ISO file was burn it to a DVD. For any other task, you needed third-party software. In Windows 10 (as with Windows 8.x), you can simply double-click an ISO file to mount it as a virtual DVD drive.
That virtual drive shows up in File Explorer with its own drive letter, and it acts just like a DVD. You can copy files from the virtual DVD to any other storage medium, for example. If the ISO file contains installation media you can run Setup directly, without the tedious step of extracting files.
One feature that isn’t obvious right away is how to unmount a virtual DVD. Mac users will probably figure it out instantly, but for longtime Windows users here’s the answer: Right-click the virtual DVD in File Explorer and then click Eject.
Previous tip: Look up your IP address quickly
Next week: Another Windows 10 tip from Ed Bott
Editorial standards