
,
If you own a Windows computer that you share with other people, you can prevent the access to local drives or to certain folders for a specific user account or for everyone.
Imagine the following scenario: You have all your important files on a secondary internal disk on your computer and you don’t want other people to view or to delete them.
In this article, we will find detailed instructions on how to restrict the access to a local drive (or folder), for all or for specific users in Windows 10. (The instructions applies to all Windows versions).
- Related article: How to Hide a Local Drive in Windows 10.
How to Prevent Users to Access a Local Drive in Windows 10.
- Prevent access to Drive to Specific Users.
- Prevent access to Drive for All Users in Registry Editor .
- Prevent access to Drive for All Users using Group Policy
Method 1: How to Prevent Specific Users from Accessing a Drive or Folder.
The first and best method* to deny access to a drive/folder is to change the user permissions on the drive/folder properties.
* Note: This is the best method, because it allows you to prevent only specific users from accessing the contents of a disk unit or a folder. All other methods listed here prevent access to all users (including you).
To disallow certain users to access the contents of a folder/drive:
1. In File Explorer, right-click the drive on which you want to deny access to specific users, and then click Properties.

2. Select the Security tab, then click the Edit button.
3. Click Add to select the user you want to prevent from accessing your drive.
4. Type the username* of the user you want to restrict access to, and to confirm, click Check Names. Then select OK. *
* Note: You need to know the correct username of the account you want to restrict. An easy way to view the users on your pc, is to to view the names of the profile folders under the «C:\Users\» folder.

5. Now in Permissions for local disk window, select the user you just added and in the Permissions section, tick Deny, restricting access for Full control. Now select Apply >> OK.
6. Click Yes when prompted to apply the permissions and then close all windows.

7. At this point, you have successfully prevented a specific user from accessing the selected drive. If you want to restrict access to more users, follow the same steps above.
Method 2. How to Prevent Access to Local Drive to All Users in Registry.
The next method to prevent users to access a local drive in Windows 10, is by using Registry. *
* Note: Use this method only if you want to prevent the access to all users (including you).
Important: Making incorrect changes to the Registry can cause serious damage to your device and could require you to reinstall Windows. Therefore, be careful when making changes to the Registry Editor and always back up the Registry before making any changes.
1. Press the Windows and R keys to open the Run command box.
2. Type regedit and hit Enter: *
* Note: If you see a User Access Control (UAC) warning window asking for permission, click on Yes.
3. In Registry Editor, navigate to the following path:
1. Navigate to the following path on Registry Editor:
- HKEY_LOCAL_MACHINE\Software\Microsoft\Windows\CurrentVersion\Policies\Explorer
4. Right-click at the blank space on the right side and select New > DWORD (32-bit) Value.

3. Type NoViewOnDrive as the name of the new DWORD, then press Enter.

4a. Double-click at the newly created NoViewOnDrive value, and select Decimal at the Base options.
4b. Now change the value data to the number corresponding to the drive letter, according to the table below and press OK.*
e.g To hide the drive «E:» with have to type «16» in the Value Data box.

* Note: See the table below to find the value data for each drive letter.
| Drive letter | Value Data | Drive Letter | Value Data |
| A | 1 | N | 8192 |
| B | 2 | O | 16384 |
| C | 4 | P | 32768 |
| D | 8 | Q | 65536 |
| E | 16 | R | 131072 |
| F | 32 | S | 262144 |
| G | 64 | T | 524288 |
| H | 128 | U | 1048576 |
| I | 256 | V | 2097152 |
| J | 512 | W | 4194304 |
| K | 1024 | X | 8388608 |
| L | 2048 | Y | 16777216 |
| M | 4096 | Z | 33554432 |
5. When done, close the registry editor and restart your PC to apply the change.
6. After restarting every user who tries to access the drive will receive the error:
“This operation has been canceled due to restrictions in effect on this computer. Please contact your system administrator.”
* Note: To remove the access restriction, open the registry editor again and delete the NoViewOnDrive DWORD Value from the above mentioned registry location and restart your PC.
Method 3: How to Deny Access to a local drive using Group Policy.
Alternatively, local group policy is also effective for restricting users to access a local drive. Compare to Registry Editor, group policy has a limited amount of drive letters that can be restricted.
* Notes:
1. To use Group Policy method, you must be running Windows 10 Pro/Enterprise/Education edition. Local group policy is not available on Windows 10 Home.
2. Use this method only if you want to prevent the access to all users (including you).
1. Simultaneously press the Windows + R keys to open the Run command box.
2. In the text field of the dialog box, type gpedit.msc and hit Enter to open the Group Policy Editor.
3. Navigate to the following path in the Group Policy Editor.
- User Configuration –> Administrative Templates–> Windows Components –> File Explorer
4. At the right side double-click to open the Prevent Access to drives from My Computer policy.*
* Info: This policy prevents users from using My Computer to gain access to the content of selected drives. If you enable this setting, users can browse the directory structure of the selected drives in My Computer or File Explorer, but they cannot open folders and access the contents. Also, they cannot use the Run dialog box or the Map Network Drive dialog box to view the directories on these drives.

4. At the new window that will pop up, select Enabled and from the dropdown menu below Options, select the drive letter* you want to hide. When done, click Apply and OK.
* Note: If you don’t see the drive letter that you want to hide, then use one of the above methods, because group policy doesn’t allow to hide all drives/letters. (Yes, this another good job from MS!)

5. Close the Group Policy Editor.
6. Now, check in File Explorer to verify that you no longer have access to the drive with error:*
“This operation has been canceled due to restrictions in effect on this computer. Please contact your system administrator.”
* Note: To regain access to the drive, open again the Group Policy Editor and set the policy Prevent Access to drives from My Computer to Not Configured.
That’s it! Which method worked for you?
Let me know if this guide has helped you by leaving your comment about your experience. Please like and share this guide to help others.
If this article was useful for you, please consider supporting us by making a donation. Even $1 can a make a huge difference for us in our effort to continue to help others while keeping this site free:
- Author
- Recent Posts
Konstantinos is the founder and administrator of Wintips.org. Since 1995 he works and provides IT support as a computer and network expert to individuals and large companies. He is specialized in solving problems related to Windows or other Microsoft products (Windows Server, Office, Microsoft 365, etc.).
1
Гурус
[65.6K]
4 года назад
Запретить доступ к папке или файлу можно в свойствах/Безопаснос
Еще проще запаролить папку или файл упаковав его в WinRAR и установив пароль.
А еще в 10-ке есть программка BitLocker (в контекстном меню по ПК) она позволяет запаролить и диск и флешку.
автор вопроса выбрал этот ответ лучшим
комментировать
в избранное
ссылка
отблагодарить
Download Windows Speedup Tool to fix errors and make PC run faster
To prevent users from accessing drives in This PC, you can either use the Group Policy Editor or the Registry Editor. In this post, we will discuss how you can do the same.

Although you can hide a drive, the user can access the drive if he/she comes across the drive, in some other way. This tutorial is handy since users cannot access a specific drive or all drives to save a file or make changes. When you enable this setting other users will not be able to save images, videos, documents, etc. However, all your installed programs will run without any error.
If you want to prevent users from accessing drives in Windows 11/10 Explorer, follow the steps given below.
- Press Win+R to open the Run prompt.
- Type gpedit.msc and hit the Enter button.
- Navigate to File Explorer in User Configuration.
- Double-click on Prevent access to drives from My Computer.
- Select Enabled.
- Select the drive letter from the drop-down list.
- Click Apply and OK to save.
Open the Local Group Policy Editor on your computer. For that, press Win+R, type gpedit.msc and hit the Enter button.
Next, navigate to the following path-
User Configuration > Administrative Templates > Windows Components > File Explorer
Find the setting called Prevent access to drives from My Computer and double-click on it on your right-hand side. Select the Enabled option and expand the drop-down menu.

Here, it is possible to select the drive letter. You can choose:
- Restrict C drive only
- Restrict all drives
or any other option as per your requirement. At last, click the Apply and OK buttons to save the change.
Following that, whenever you try to open the selected drive, you will be greeted with an error message saying the restriction.
In case you want to allow everyone to access all the drives or lift the barrier, go to the same setting, and select the Not Configured option.
Using Registry Editor
In case you want to do the same with Registry Editor, you need to open the Registry Editor and follow this path-file
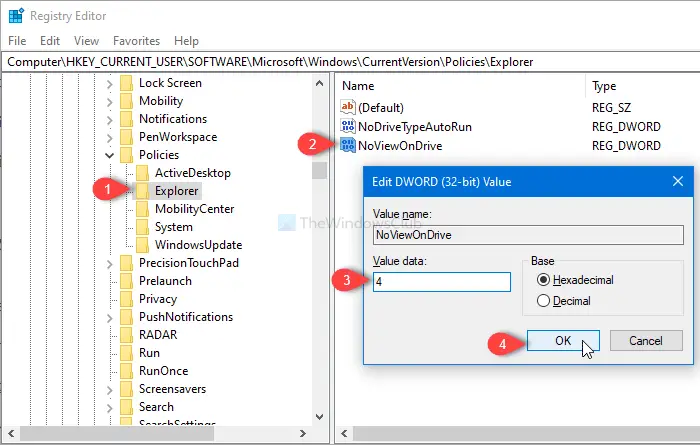
HKEY_CURRENT_USER\SOFTWARE\Microsoft\Windows\CurrentVersion\Policies\Explorer
Right-click on Explorer, select New > DWORD (32-bit) value, and name it as NoViewOnDrive.
Next, double-click on it, and set the value as 4 (to prevent C drive), or 3ffffff (to restrict all drives). Then, click OK to save the change.
That’s all!
Read: Enable or Prevent access to Registry Editor in Windows 11/10
How to restrict user to access drive in Windows 11?
Users can restrict access to the drive in Windows 11 using the Local Group Policy Editor, or the Registry Editor. To know how to do the same, check out the aforementioned post.
How do I remove all permissions from my Drive?
To remove all the permissions from my Drive, log in to the Admin console of Google Drive, and click on the Apps option. Now navigate to Google Workspace, and then to Drive and Docs. Once there select Manage Shared Devices, place the mouse on the shared driver, and hit the Member Management option. Now place the mouse over the users who need to be removed, and select the Remove access option. Lastly, click the Done option to execute the effect.
Also Read: Prevent Users from changing the Language in Windows.
Anand Khanse is the Admin of TheWindowsClub.com, a 10-year Microsoft MVP (2006-16) & a Windows Insider MVP (2016-2022). Please read the entire post & the comments first, create a System Restore Point before making any changes to your system & be careful about any 3rd-party offers while installing freeware.
Есть масса ситуаций, когда хотелось бы ограничить доступ к контенту даже на собственном компьютере. Например, для ребенка, которому не обязательно видеть все ваши фотографии и видео. К счастью, это делается довольно просто. Главное — зайти в систему под учеткой с администраторскими правами. Соответственно, пользователи, которым вы запрещаете доступ, таких прав иметь не должны.
«Запаролить» можно как отдельные файлы, так и папки или содержимое диска. Для этого есть встроенные возможности в Windows и сторонние программы.
Способ первый: права доступа в Windows
Этим способом можно ограничить доступ к папке, любому файлу и даже целому разделу диска. Если у вас на компьютере несколько учетных записей пользователей, и вы являетесь администратором компьютера, вы можете закрыть доступ к нужной информации для всех, кроме себя. Делается это так:
- Нажмите на файл, папку или диск правой кнопкой мыши и выберите Свойства.
- Перейдите на вкладку Безопасность.
- В списке учетных записей, имеющих доступ к файлу, поочередно выберите те, которым не нужно открывать этот файл или папку, и в столбце Запретить установите все галочки.


После этого файл, папка или раздел диска станут недоступны для всех пользователей, которым вы запретите доступ. Они не смогут его открыть — для этого нужно будет ввести пароль от учетной записи администратора, то есть вашей. Не забудьте только дать файлу или папке неприметное имя, так как имена файлов по-прежнему будут видны всем.
Способ второй: используем архиватор
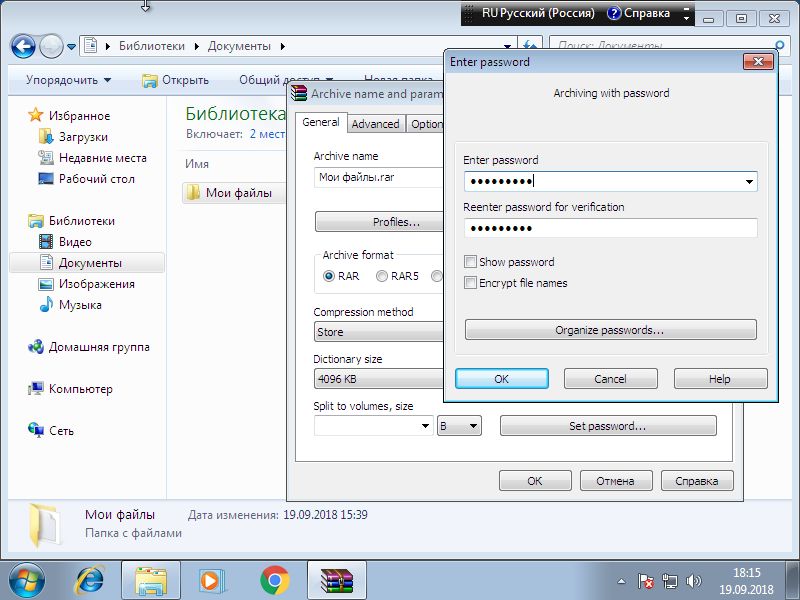
Этот способ позволяет поставить пароль на папку или файл. Наверняка у вас на компьютере стоит как минимум один архиватор, например, WinRAR. Тогда вы можете спрятать секретный файл или папку в архив и установить на него пароль. Для этого сделайте следующее:
- Нажмите правой кнопкой мыши по файлу или папке и выберите Добавить в архив (Add to archive).
- В отобразившемся окне в поле Метод сжатия (Compression method) выберите Без сжатия (Store). Так вам не придется тратить время на распаковку файла при открытии архива.
- Затем нажмите на кнопку Установить пароль (Set password).
- В отобразившемся окошке введите пароль и подтверждение и нажмите ОК.
- Нажмите ОК в основном окне. Будет создан архив с файлом или папкой.
- Удалите оригинальный файл или папку.
Теперь, чтобы получить доступ к файлу или папке, нужно сначала открыть архив. А при открытии архива — ввести пароль, который вы задали. Не забывайте про неприметные имена. Таким же образом можно поставить пароль на любой новый архив в Windows.
Способ 3: BitLocker
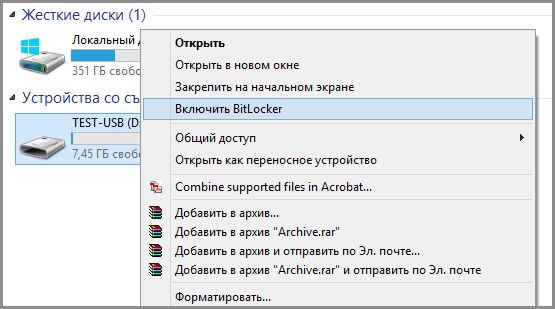
Этот способ — для дисков. Он доступен, если у вас Windows 7 Ultimate или Enterprise, Windows 8/8.1 или Windows 10. Подробнее об использовании BitLocker можно прочитать в нашей статье о шифровании жесткого диска в Windows 10. А для того, чтобы зашифровать дисковый раздел или флешку, сделайте следующее:
- Нажмите правой кнопкой мыши по диску и выберите Включить BitLocker.

- В окне установите галочку Использовать пароль для снятия блокировки диска. Введите пароль и подтверждение и нажмите Далее.
- В следующем окне установите переключатель Шифровать весь диск.
- Нажмите Начать шифрование и дождитесь его окончания.
Теперь при попытке доступа к диску система будет требовать ввести пароль.
Это способы, позволяющие запретить доступ к вашим данным без использования каких-либо специфических программ.
Вот еще немного полезных инструкций:
- Как отключить обновление Windows 10: самые действенные способы
- Чистим диск: что и где может занимать много места
- Как отправить папку по электронной почте: несколько удобных способов
Не администраторы (пользователи ОС не с правами администратора) не могут ‘видеть разделы’, им доступны только диски и каталоги, на которые выданы соответствующие права (по умолчанию на чтение доступ есть)
Можно убрать все буквы дисков (останется только системный C:) а диски примонтировать на каталоги (в управление дисками можно удалить букву у диска и добавить каталог), настроив на них соответствующие права.
p.s. для минимальной (не идеальной, можно обойти, заразив машину трояном) защиты данных от пользователей ‘администраторов’ можно воспользоваться встроенным шифрованием файлов (в свойствах каталога или файла можно указать что он зашифрован). Такие файлы будут доступны только из под аккаунта, создавшего их (внимание, без резервного копирования пользовательского профиля, там есть специальные встроенные методы для этого, его потеря будет означать потерю доступа ко всем зашифрованным файлам без возможности восстановления)