
Nowadays, most users are aware of the Command Prompt that is present in all versions of Windows. Undoubtedly this is one of the most dominant tools on the Windows Operating System. However, Windows supports another powerful application, PowerShell, to perform a wide range of operations. Just sign in as an Administrator and you may run PowerShell to handle configuration and carry out task automation.
PowerShell is a task-based mechanization and a fully developed scripting tool that can accelerate the admin job. It instructs users to manage the device from the command line. In other words, you can say that PowerShell is an advanced form of CMD. Therefore in the coming days, it is quite possible that this tool can take the place of a command prompt. So here are the five easy methods by following you can Open PowerShell as an administrator in Windows 10.
6 Ways to open PowerShell as Admin on Windows 10
Here is how to open Windows PowerShell with admin rights on your computer –
1. Using Cortana or the Search bar
You can open this tool using the Search (Win + S) bar available on the Taskbar. Here’s what you need to do –
- Click on Cortana and type PowerShell.
- Look for the option “Run as Administrator” on the right pane and click on it.

- The User Account Control window will prompt next, hit Yes to authorize opening it.
- When Windows PowerShell starts, you may run whichever command you want to execute on your PC.
2. Using Run Command
- Press the Win + R hotkey to open the Run dialog box.
- Type PowerShell and click OK.
Note: Windows PowerShell will open in normal mode.
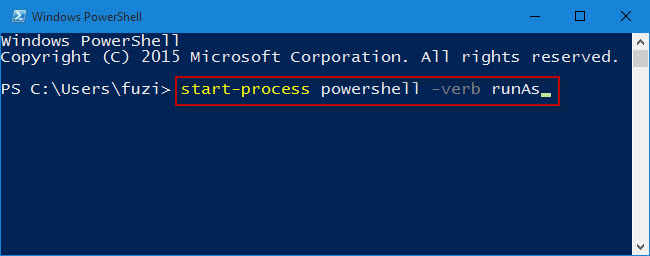
- Type the command Start-Process Powershell -verb runAs and press the Enter key.
- Its interface will switch to administrator mode.

- There will be a confirmation line regarding this request.
- Type Y and hit Enter to confirm this action.
3. By using the Command Prompt
- Press Win + S, and type Command Prompt.
- Right-click on the result and select Run as administrator.
- Provide permission on the UAC window by clicking Yes.
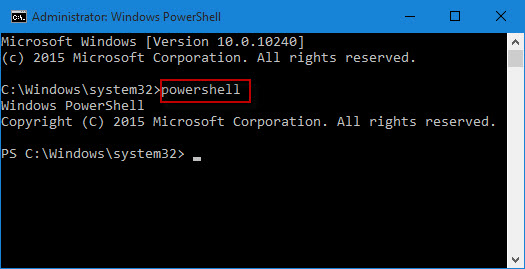
- On the running Window, type PowerShell and hit Enter.

- Well, the default structure on CMD will now change to the PowerShell way. You may see the Snapshot above.
4. By using the Power menu
This method will only work if you haven’t changed Windows PowerShell to Command Prompt sometime back on your PC. Let’s see how to open PowerShell using the Power Menu (Win + X) –
- Right-click on the Start button.
- Click on Windows PowerShell (Admin).
5. By using Task Manager
- Initially open the Task Manager by pressing ctrl + shift + Esc.
- Click on File, available in the top-left corner of the wizard.
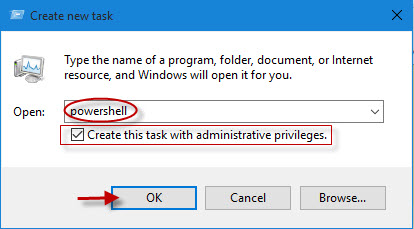
- Hit the Run new task option.
- Now, type PowerShell in the void box and tick the checkbox below the void space.

6. By using the Start Menu
- Click on the start button; scroll down the menu list.
- Explore the drop-down menu in the Windows PowerShell folder.
- Now select this folder and it will expand.
- Right-click on the Windows PowerShell option and select Run as Administrator.

I hope you find this guide useful and all six methods also work on your computer. Let us know in the comment section if any method doesn’t work.
That would be all!
Whether you’re just starting out with PowerShell or you already know how to run commands, there are times when you must use PowerShell to ‘run as administrator’ Why? Because sometimes, any activity you do inside of PowerShell will require elevated privileges.
In this tutorial, you’re going to learn just about every way possible to run PowerShell as administrator from the perspective of an end-user, a command-line junkie, or an IT admin!
This tutorial has many sections each showcasing how to run PowerShell as administrator. Feel free to click on whichever method you prefer in the Table of Contents.
Prerequisites
This article will be a hands-on tutorial. If you’d like to follow along, please be sure you have:
- A Windows 10 PC – Although Windows 10 was used as an example for this article, most of the methods provided will work with Windows 7+.
- An account with administrator privileges. If you don’t already have one, learn how to create one here.
- PowerShell – Most of these methods will work with Windows PowerShell 5.1 or PowerShell 7.
Running PowerShell as Administrator with a Right-Click
One of the simplest ways to run PowerShell as administrator is with a right-click. There are a few different areas where you can right click on PowerShell and run it. Let’s run through them.
Using the Search Bar
The Search Bar is practically one of the easiest ways to run most of the programs installed on your computer. It’s also an easy way to run any program as administrator, including PowerShell.
To run PowerShell, specifically, as administrator from the search bar:
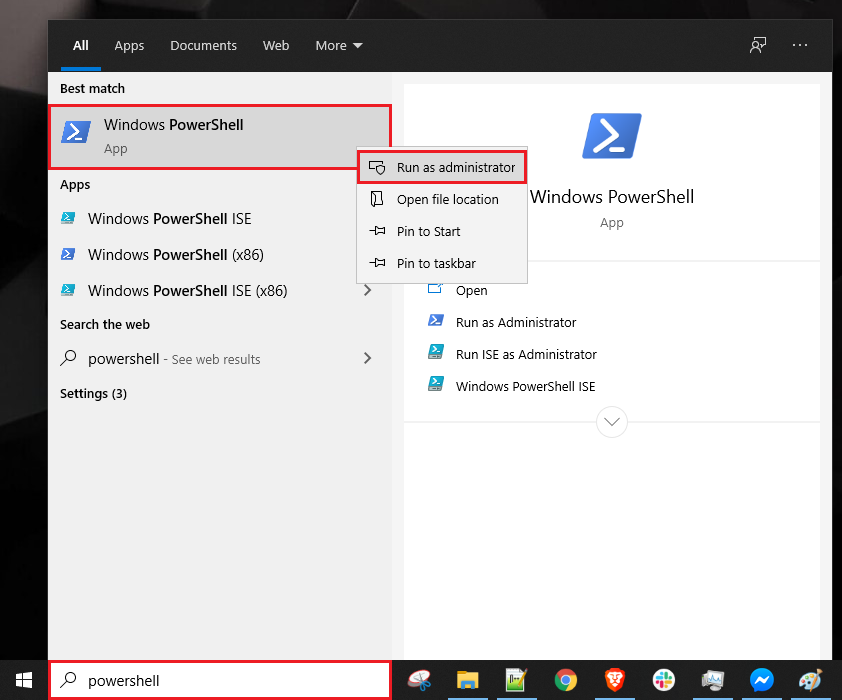
- Click on the search box at the taskbar and type powershell. This action will bring up the PowerShell edition of your preference.
- Look for Windows PowerShell or just PowerShell, if using PowerShell Core, from the search result.
- Right-click on the menu item and select Run as administrator.
You can see these steps demonstrated in the screenshot below.
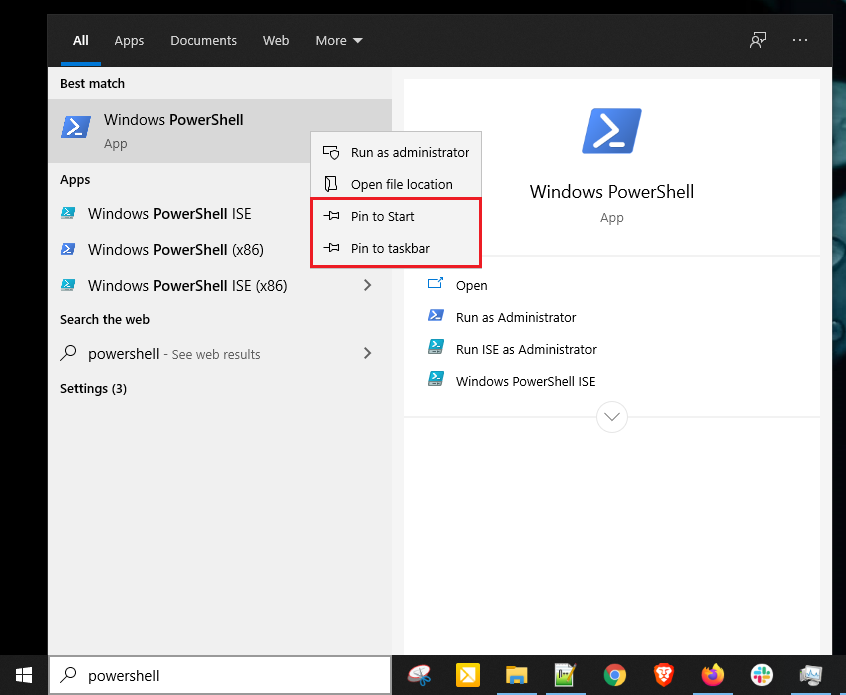
If you pin a program to the start menu or taskbar, you can also right-click on the menu item there as well. With this method, Windows 10 creates a shortcut for PowerShell that is more accessible to you at the start menu or the taskbar.
To run PowerShell as administrator on a pinned item:
- Find the PowerShell icon in the search box again.
- Right-click on the PowerShell icon and select Pin to Start or Pin to Taskbar.
- Click on the Start button
- Look for Windows PowerShell (or PowerShell Core) on the right side of the Start Menu.
- Right-click on the menu item and choose Run as administrator.

Running PowerShell as Administrator Using File Explorer
Are you in Windows’ File Explorer, you can fire up PowerShell as administrator there too!
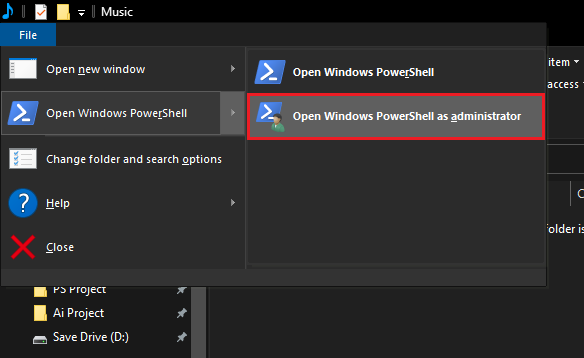
- Open up File Explorer by using Win Key + E shortcut keys or by simply clicking the icon at the taskbar as you can see on the screenshot below.
2. Once in File Explorer, click on File → Open Windows PowerShell → Open Windows PowerShell as administrator as shown below.
Using the PowerShell Executable
Whether you’re using a 32-bit or 64-bit operating system, you can run PowerShell as administrator from its respective location.
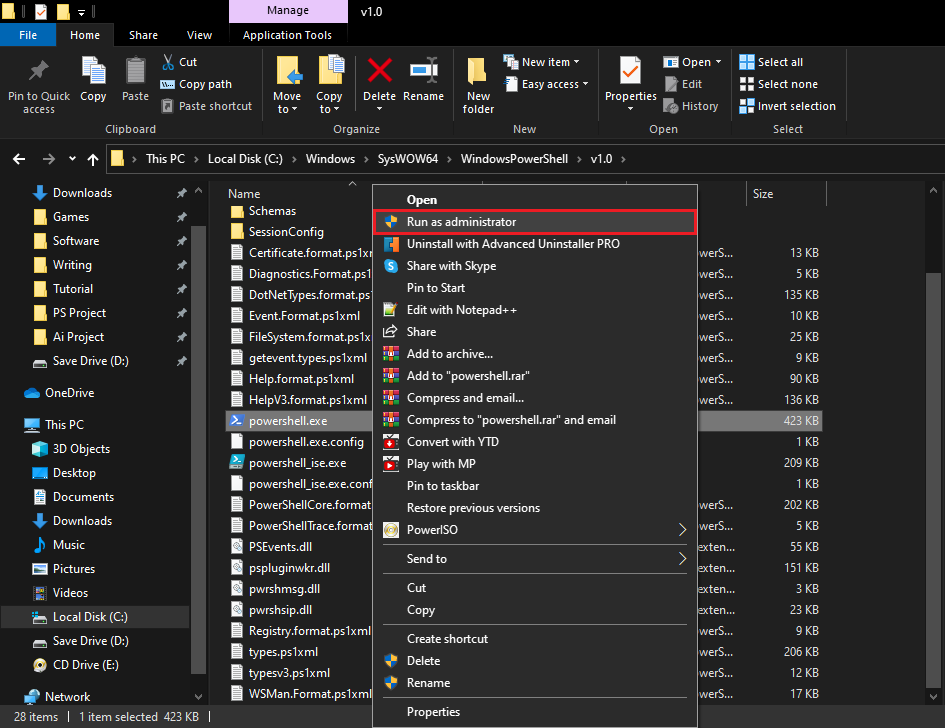
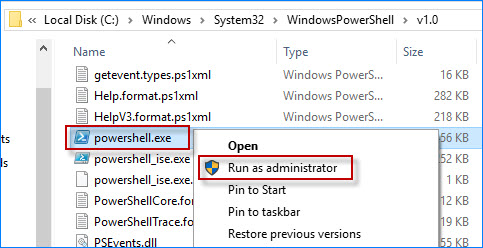
- In File Explorer, navigate to one of the folders below.
- For 32-bit OS: C:\Windows\System32\WindowsPowerShell\v1.0
- For 64-bit OS: C:\Windows\SysWOW64\WindowsPowerShell\v1.0
- Find the powershell.exe file.
- Right-click on powershel.exe and select Run as Adminstrator.
Creating a Shortcut for PowerShell on the Desktop
If you’d like an easy way to invoke PowerShell, you can also create a Windows shortcut for it.
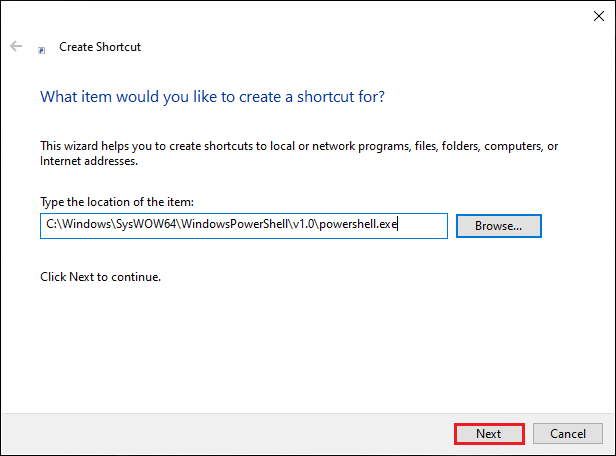
- Once you’ve got the Create Shortcut process started, provide the path to the PowerShell executable. For Windows PowerShell, that path is:
- For 32-bit OS: C:\Windows\SysWOW64\WindowsPowerShell\v1.0\powershell.exe
- For 64-bit OS: C:\Windows\System32\WindowsPowerShell\v1.0\powershell.exe
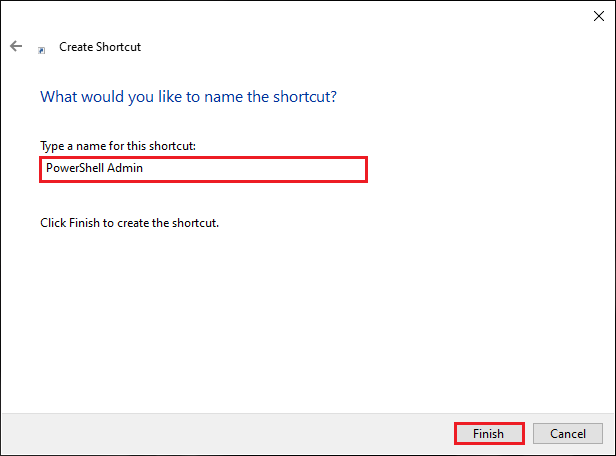
2. Provide the shortcut a handy name (PowerShell Admin for example).
3. Find the shortcut you just created and right-click on it and choose Properties as shown below.
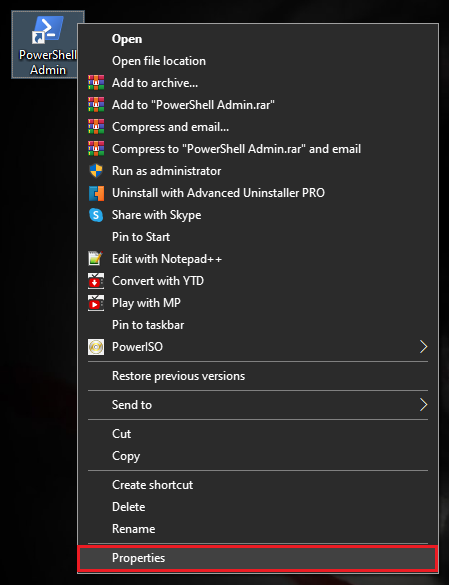
4. Click on Shortcut tab and then on the Advanced button and the Advanced Properties window will pop-up.
5. In the Advanced Properties window, select the Run as administrator checkbox and click OK.
6. Back to the Shortcut Properties, click OK to apply the changes and you’re all set.
Another way to easily access PowerShell is via the Win-X menu as shown in the following screenshot. This menu was never given an official name but was widely referred to as Win-X (or power user menu) as the shortcut to access it is Win Key + X.
Once the menu is up, simply click on Windows PowerShell (Admin) and you’re off to th races.

Using the Run Command Window
The Run Command Window is a powerful tool that lets you run programs without searching for them using the SearchBar, Start Menu or File Explorer. To run PowerShell as administrator via the Run command window:
- Press Win Key + R. A a small window will pop up as shown in the screenshot below.
- Type in powershell and press Ctrl+Shift+Enter or press and hold Ctrl+Shift.
- Click OK to make PowerShell run as administrator.
You’re now running PowerShell as administrator.
Using Task Manager
Task Manager is a tool that lets you monitor or end a process of the programs and services that are currently running on your computer. You can also use it to execute a task such as running PowerShell as administrator manually.
To run PowerShell as administrator via the task manager:
- Open the Task Manager by pressing Ctrl+Shift+Esc keys on your keyboard or as you see in the screenshot below
You can alternatively right-click on the Task Bar and select Task Manager to bring up Task Manager.
2. Once Task Manager opens, go up to File and click on Run new task as shown below.
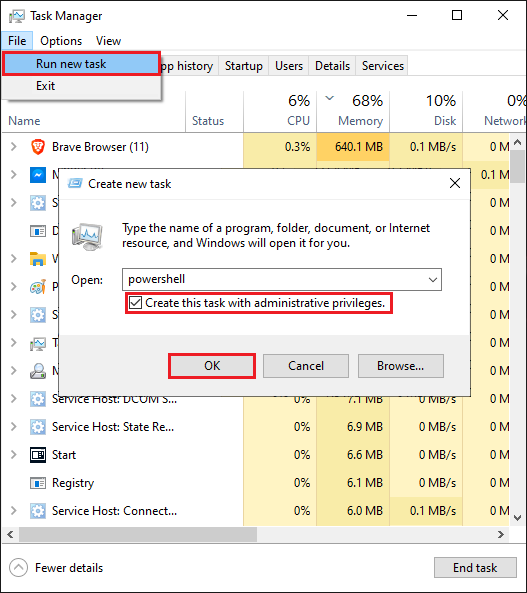
3. You should then see a window pop up that looks similar to the Run window described earlier.
4. Type in powershell ensuring you also check the Create this task with administrative privileges checkbox and click OK to make PowerShell run as administrator.
Running PowerShell as Administrator with the Command Line
If you regularly find yourself on the command line, don’t fret, you can run PowerShell as administrator there too!
If you already have cmd. exe open running as adminstrator using the same techniques described in this article, you can simply run start powershell and it will be running as adminstrator.
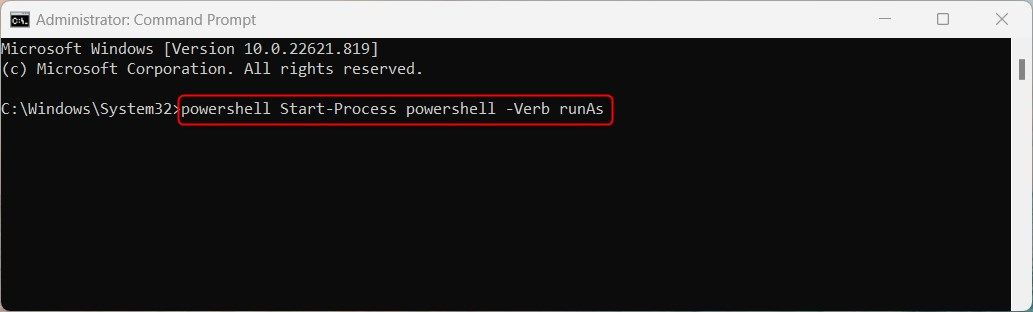
If you’re running a command prompt not as administrator yet, that’s not a problem. Invoke the Start-Process cmdlet with PowerShell from cmd. exe using the -Verb runas parameter.
powershell Start-Process powershell -Verb runAsIf you’re already in a PowerShell window, you can run Start-Process powershell -Verb runas directly to open a new PowerShell instance running as administrator
Creating a Batch File to Run PowerShell as Administrator
So you now know how to invoke PowerShell as administrator from a command prompt. If you already know how to do that, you can create a batch file to automate it!
Open up your favorite text editor, paste in the following line and save the file as PowerShell as admin.bat anywhere you’d like.
Powershell.exe -Command "& {Start-Process Powershell.exe -Verb RunAs}"Run the batch file and you’ll notice up comes a PowerShell window running as administrator!
Creating a Scheduled Task to Run PowerShell as Administrator
Task Scheduler is a built-in app on Windows 10 that lets you virtually run automated tasks. Hence, you can also use it to create a task that runs PowerShell as administrator each time you logon to your computer, for example.
Start up the Create Taskbox and specify the file to run as one of the below:
- For 32-bit OS: C:\Windows\System32\WindowsPowerShell\v1.0\powershell.exe
- For 64-bit OS: C:\Windows\SysWOW64\WindowsPowerShell\v1.0\powershell.exe
In the Create Task windows, provide the values to all of the menu items shown below ensuring the Run with highest privileges checkbox is checked.

Now when the scheduled task is invoked, it will execute PowerShell as administrator!
Further Reading
- PowerShell Objects, Properties and Methods
- How to Set Up and Manage Scheduled Tasks with PowerShell

Like Command Prompt, Windows PowerShell is a command-line window designed in Windows, which is generally for system advanced administration, IT professionals and developers. Actually, Windows PowerShell is more powerful but less known than Command Prompt. In our previous post, we showed how to open Command Prompt as an administrator in Windows 10. Now in this post, we will show five ways to run PowerShell as an administrator in Windows 10.
- Way 1: from start menu
- Way 2: from Win + X menu
- Way 3: from the command prompt
- Way 4: from File Explorer
- Way 5: from task manager
- Way 6: from the Run dialog
Way 1: Run PowerShell as administrator from Start menu search box
Step 1: Bring up the Windows 10 Start menu.
Step 2: Type powershell. In the search result, right click on the Windows PowerShell app and select Run as administrator.
Way 2: Run PowerShell as admin from Win + X menu
Either Command Prompt or Windows PowerShell has usually included in Win + X menu.
Press Win + X keyboard shortcut to bring up Win + X menu. Then from the menu click Windows PowerShell (Admin).
Way 3: Run PowerShell as administrator from an elevated CMD
Step 1: Open Windows 10 Command Prompt as administrator.
Step 2: Type powershell and hit Enter. Then the command prompt will turn to Windows PowerShell.
Way 4: Run PowerShell as administrator from File Explorer
Step 1: Open File Explorer in Windows 10.
Step 2: Navigate to C:\Windows\system32\WindowsPowerShell\v1.0\powershell.exe. Then right-click on the powershell.exe file and select Run as administrator.
Way 5: Run PowerShell as administrator from Task Manager
Step 1: Open Windows 10 task manager.
Step 2: Click on More details in the lower left corner to display the full screen of task manager.
Step 3: Click File > Run new task.
Step 4: In the Create new task dialog box, type powershell, check the box next to Create this task with administrative privileges and then click OK.
Step 1: Bring up Run dialog box by pressing Win + R keys.
Step 2: Type powershell in the box and click OK.
Step 3: A normal Windows PowerShell will open as your current user. Type start –process powershell –verb runAs and hit “Enter” key. This will bring up an elevated PowerShell as an administrator.
PowerShell is a task-based command-line shell and scripting language built on .NET technology. It’s designed especially for system administrators and power users, so it has more features than the standard Command Prompt. If you want to use PowerShell to do anything more than basic tasks, you must run it as an administrator.
In this guide, we’ll show you ten simple ways to open an elevated PowerShell prompt on Windows 11.
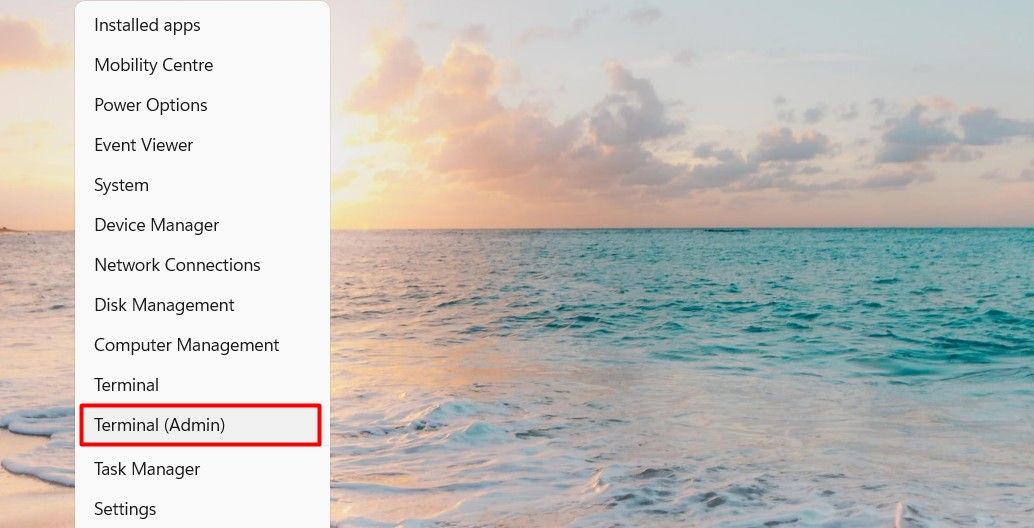
The Power User Menu is a great way to quickly access important system tools and settings in Windows 11. To open Windows PowerShell using the Power User Menu, do the following:
- Right-click on Start to open the quick access menu. You can also access it by pressing Win + X on your keyboard.
-
From the menu list, select Terminal (Admin).

- If UAC appears on the screen, click Yes to grant permission.
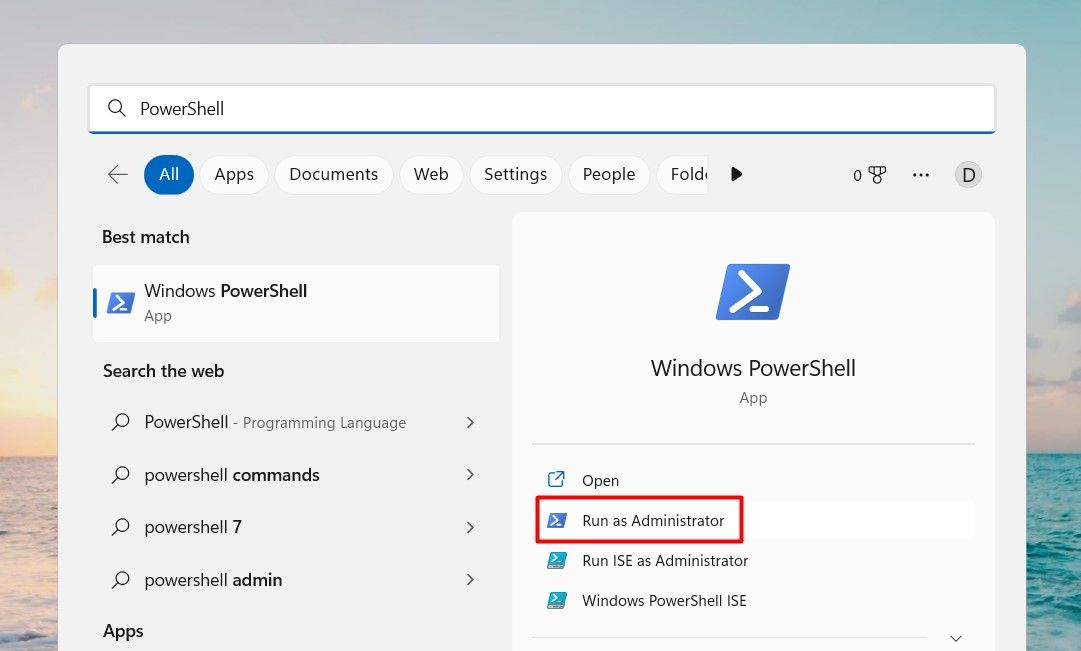
Alternatively, you can open Windows PowerShell as an administrator using the Windows Search tool. This process is relatively simple and only takes a few steps. Here is how to do it:
- Press the Win + S keyboard shortcut to open Windows Search.
- Type «PowerShell» into the search bar.
-
From the right pane, select Run as administrator.

- If User Account Control prompts you, click Yes to grant admin privileges.
PowerShell will now open with administrative privileges. Here you can type any PowerShell command you want to execute. To exit PowerShell, type «Exit» and press Enter.
3. How to Open Windows PowerShell as an Administrator Through the Run Command
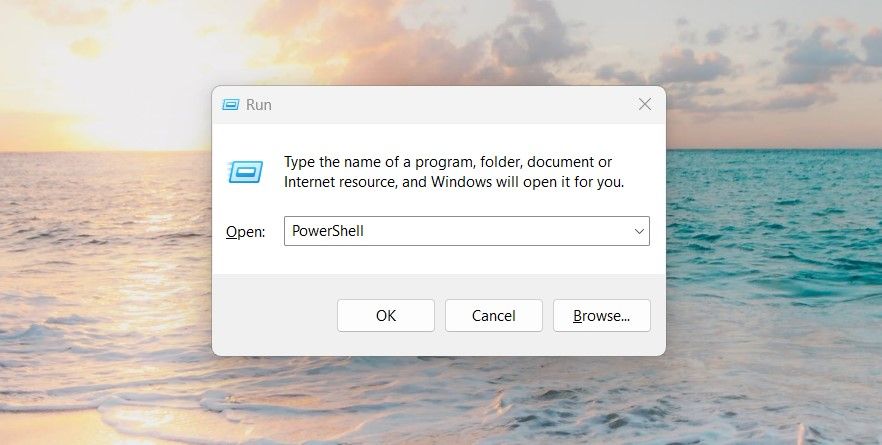
There is a powerful tool in Windows 11 called Run Command that lets you access files, launch programs, and adjust many system settings. You can also use it to launch Windows PowerShell as an administrator. Here’s how:
- Press Win + R on your keyboard. This will open the Run dialog box.
-
From here, type in «PowerShell» and press Ctrl + Shift + Enter key combination.

- If a confirmation prompt pops up, click Yes to continue. This will launch PowerShell as an administrator.
4. How to Open Windows PowerShell as an Administrator From Windows File Explorer
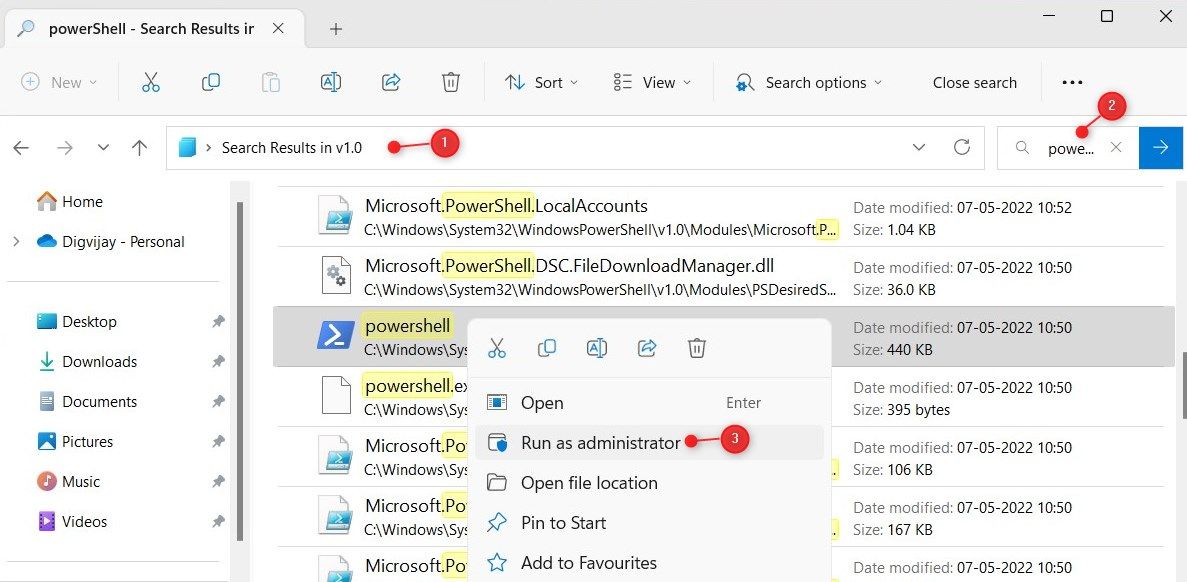
Another method for opening Windows PowerShell as an administrator is through File Explorer’s address bar. To do this, follow these steps:
- Press Win + E on your keyboard to open Windows File Explorer.
-
In the File Explorer address bar, type the following command and press Enter.
C:\Windows\System32\WindowsPowerShell\v1.0\
- Next to the address bar, search for «PowerShell».
-
Right-click on the PowerShell executable file and select Run as administrator.

- When UAC appears, click Yes to grant admin rights.
5. How to Open Windows PowerShell as an Administrator Using Command Prompt
A command prompt lets you run almost any program or application on your Windows device. To run Windows PowerShell using this tool, follow these steps:
-
Run Command Prompt as an Administrator (see how to open the Command Prompt as an administrator for instructions).

-
In the elevated command prompt, copy and paste the given command line:
powershell Start-Process powershell -Verb runAs
As soon as you type the above command line in the elevated command prompt window, Windows PowerShell will start running as an administrator.
The Start Menu contains a wide range of software programs and files that provide a central place for launching applications and other tasks. Start Windows PowerShell with these steps:
- Click the Start button at the bottom left of your screen.
- Select All apps from the upper right corner.
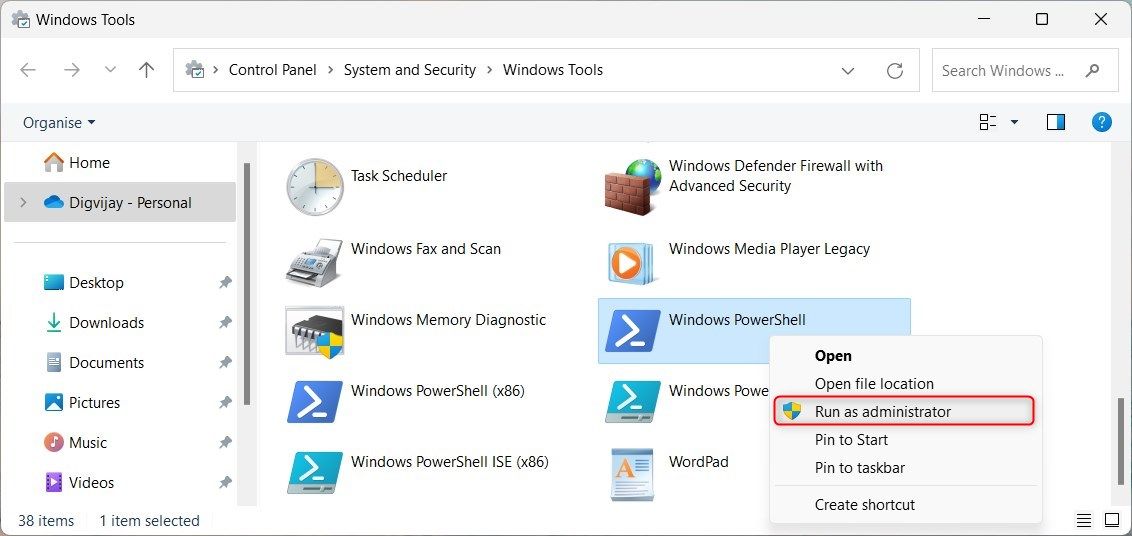
- Scroll down and click the Windows Tools option
-
Now right-click on Windows PowerShell and select Run as administrator.

- The UAC will appear on the screen. If it does, click Yes to grant administrative privileges.
7. How to Open Windows PowerShell as an Administrator Through Task Manager
Task Manager is a powerful tool that can help you troubleshoot and fix problems with your PC. Besides this, you can also use this tool to launch programs on your Windows device.
Here’s how to start Windows PowerShell as an administrator with this tool.
- Press Ctrl + Shift + Esc on your keyboard to open Task Manager (see how to open the Task Manager for more tips).
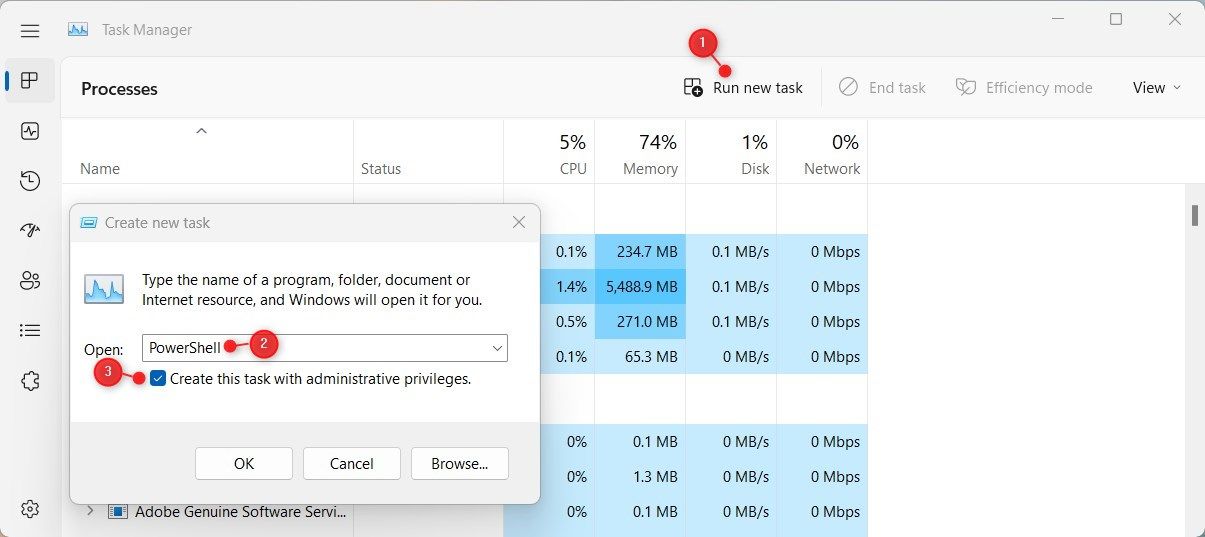
- Select Run new task from the top of the page.
-
In the pop-up menu, type «PowerShell» and check the «Create this task with administrative privileges» box.

- Click OK and Windows PowerShell will start as an administrator.
8. How to Open Windows PowerShell as an Administrator Using the Control Panel
Windows Control Panel is a software program that contains many tools for managing settings on Windows. With this tool, you can launch almost any application installed on your computer. Follow these steps to open Windows PowerShell as an administrator:
- Use one of the many ways to open the Control Panel.
- Click on System and Security.
- Scroll down to the bottom and select Windows Tools.
-
Right-click on Windows PowerShell and select Run as administrator.
- A User Account Control pop-up window will appear asking if you want to allow this app to make changes to your PC; click Yes to continue.
PowerShell will now launch as an administrator, and you can run commands with full privileges. If you need to exit PowerShell, type Exit and press Enter.
9. How to Open Windows PowerShell as an Administrator With a Desktop Shortcut
If you often run commands that require administrative privileges, consider creating a desktop shortcut. Here’s how to do it with Windows PowerShell.
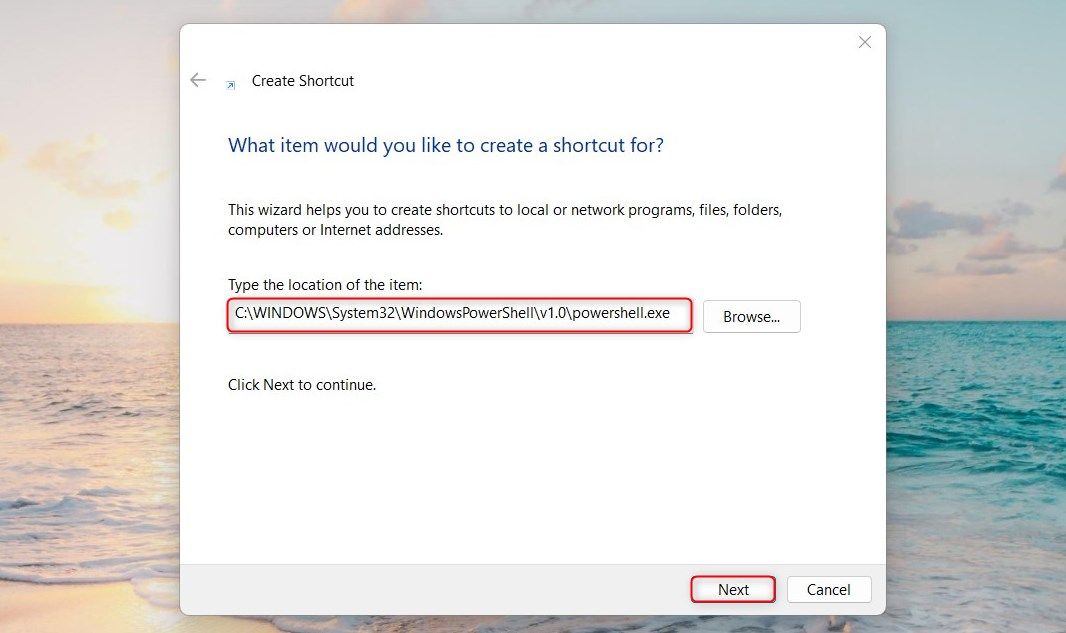
- Right-click on your Desktop and select New > Shortcut.
-
Next, type the following command in the «Create Shortcut» window.
C:\WINDOWS\System32\WindowsPowerShell\v1.0\powershell.exe
-
Then click Next to continue.

- Type in a name for the shortcut and click Finish.
Now, whenever you want to open PowerShell as an administrator, simply double-click on the shortcut.
10. How to Open Windows PowerShell as an Administrator Using a Batch File
This method involves creating a batch file to open Windows PowerShell as an administrator. Here’s how to do it:
- Press Win + R, type «Notepad», and hit Enter to open it (see how to open Notepad for more ways).
-
In Notepad, copy and paste the following command line:
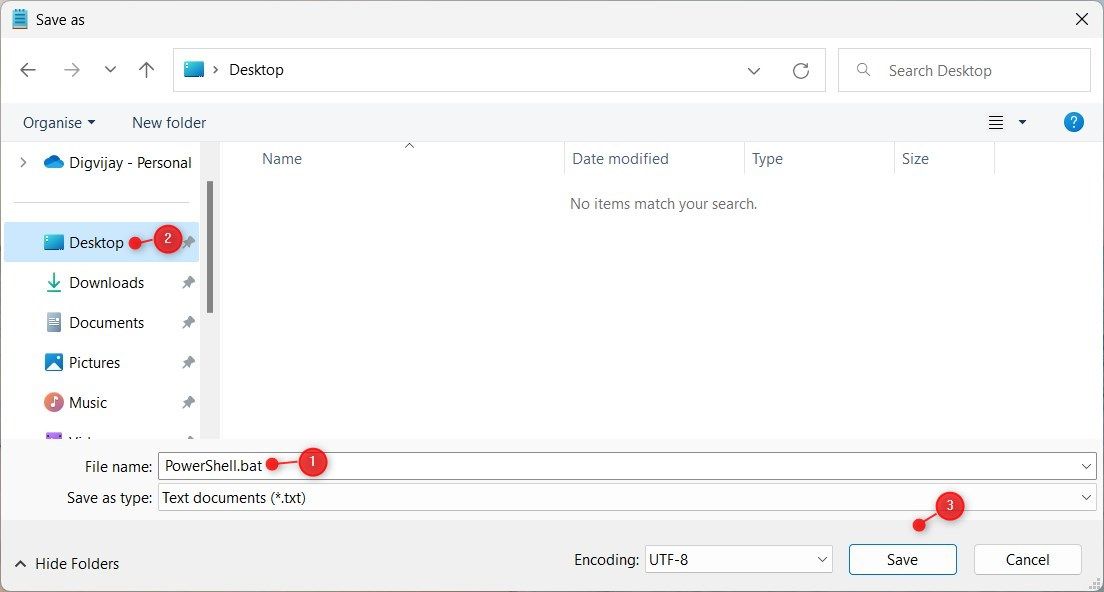
Powershell.exe -Command "& {Start-Process Powershell.exe -Verb RunAs}" - Now click on File and select Save as from the menu list.
- Put «PowerShell.bat» in the file name. You can name your file anything you like with the .bat extension.
-
Choose the location where you’d like to save it, and then click Save.

This will create the Windows PowerShell batch file. To open Windows PowerShell with administrator access, double-click the batch file. When the UAC prompt appears, click Yes to continue.
Get an Elevated Windows PowerShell Running
When you are working with files or folders that need elevated permissions, you may need to open PowerShell as an administrator. This is because some tasks require elevation in order to complete them successfully. As shown above, there are several ways to open Windows PowerShell as an administrator.
Товарищи, добрый день. Так как у меня появились несколько идей для написания будущих статей, я решил немного подготовить сайт. В будущем, нам скорее всего понадобится инструмент PowerShell, который уже сейчас превосходит по возможностям стандартную командную строку, но все равно развивается параллельно ей. Подробнее лучше прочитать на википедии, а у нас практические знания, поэтому переходим к инструкции. И снова у нас несколько способов:
- Через меню «Пуск»
- Через командную строку
- Через проводник
- Заменой командной строки в контекстном меню «Пуск» (только современные операционные системы)
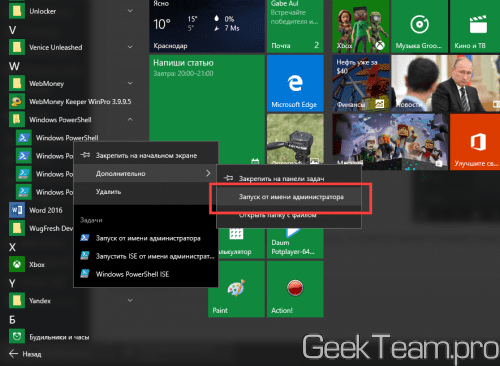
Самый популярный способ у нас будет первым, для Windows 10: открываем меню «Пуск» → «Все программы» → ищем каталог «Windows PowerShell» и выбираем файл нужной разрядности. На 32 битных системах будет только 32 битный исполняющий файл.
Если необходим PowerShell с правами администратора, то кликаем правой клавишей мыши по файлу, выбираем «Дополнительно» и жмем «Запуск от имени администратора».
Для Windows 8.x и старше: Открываем меню «Пуск» → открываем раздел «Все программы» → листаем до раздела служебные и открываем Windows PowerShell этот сриншот сделан на 32 битной системе и здесь уже видно, что файл будет только один.

Запуск от имени администратора по тому же сценарию, правой клавишей по файлу и выбираем «Запустить от имени администратора»

2. Запуск PowerShell через командную строку
Да, для любителей нестандартных путей, тоже способ есть)) Много способов запуска командной строки описаны здесь. Здесь же я опишу способ, который подходит для современных операционных систем. Нажимаем правой клавишей мыши по углу пуск или жмем Win+X, а в открывшемся меню выбираем подходящую командную строку. Если вам необходим PowerShell с правами администратора, то выбираем и командную строку с правами администратора.
В открывшееся окно вводим powershell и жмём Enter. После этого командная строка будет работать полностью как Windows PowerShell.

3. Запуск Windows PowerShell через окно проводника Windows.
Открываем проводник и переходим в одну из папок:
a) 64bit PowerShell если стоит 64 битная система или 32bit PowerShell, если стоит 32 битная система
C:\Windows\System32\WindowsPowerShell\v1.0
b) 32bit PowerShell на 64 битных системах находится в папке:
C:\Windows\syswow64\Windowspowershell\v1.0
Можно просто вставить ссылку в адресную строку.
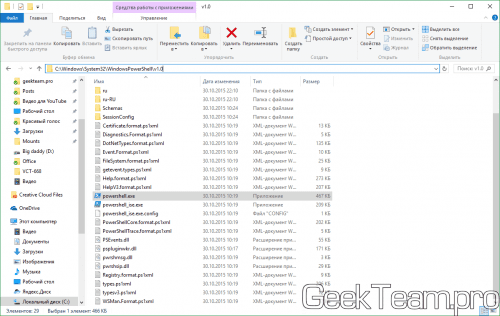
Если вам нужен PowerShell с обычными правами, просто запускаем выделенный файл. Если же с правами администратора, жмём правой клавишей мыши и выбираем «Запуск от имени администратора».

4. Замена командной строки на PowerShell в контекстном меню «Пуск».
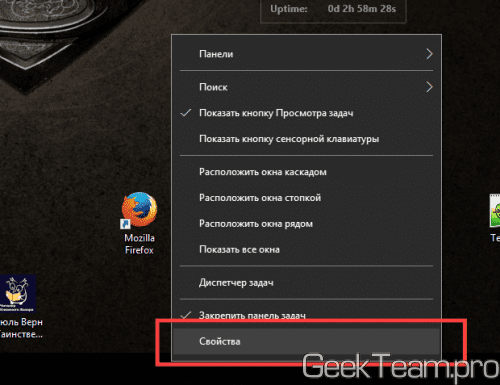
Вот во втором способе, мы использовали контекстное меню «Пуска» и там по-умолчанию добавлена командная строка. Это можно исправить. Скажем для системных администраторов, все чаще нужен PowerShell, вместо командной строки и вместе с добавлением контекстного меню, Microsoft добавили возможность замены командной строки на Windows PowerShell. Для этого, необходимо кликнуть правой клавишей мыши по пустому месту на «Панели задач». И выбрать её «Свойства».
На вкладке «Навигация» ставим галочку на «Заменить командную строку оболочкой Windows PowerShell…» и жмём ОК.
Теперь в контекстном меню можно сразу же запускать Windows PowerShell.
Вроде всё. Надеюсь эта статья оказалась вам полезной, нажмите одну из кнопок ниже, чтобы рассказать о ней друзьям. Также подпишитесь на обновления сайта, введя свой e-mail в поле справа или подписавшись на группу во Вконтакте и канал YouTube.
Спасибо за внимание
Материал сайта geekteam.pro