
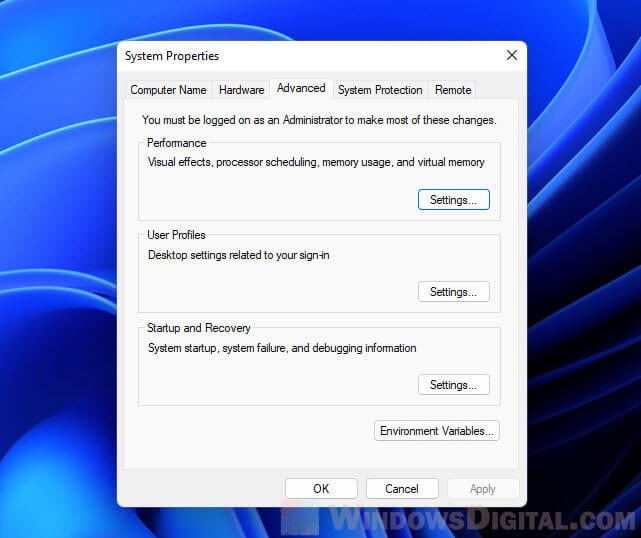
«Свойства системы» — одно из часто используемых диалоговых окон Windows, в котором можно изменить имя компьютера, настроить защиту системы, параметры удаленного доступа, быстродействия и ряд других настроек. Однако, в последних версиях ОС доступ к этому окну не столь очевиден, а пункт «Система» в панели управления открывает новый раздел в «Параметрах».
В этой инструкции подробно о способах открыть «Свойства системы» в Windows 11 и Windows 10, а также дополнительная информация, которая может быть полезной.
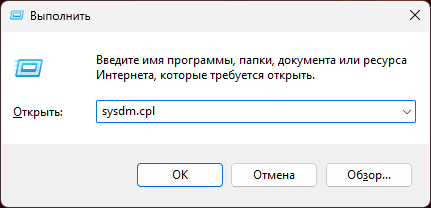
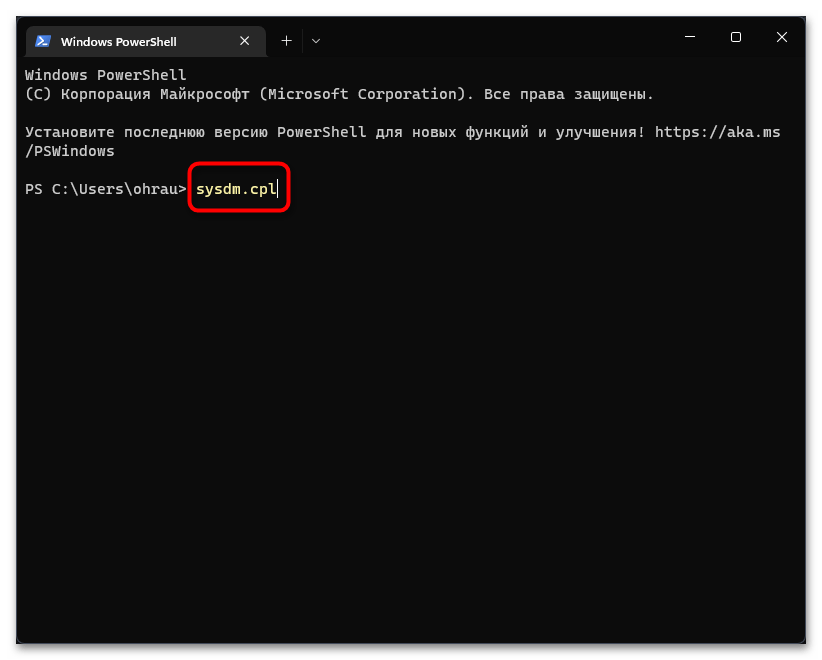
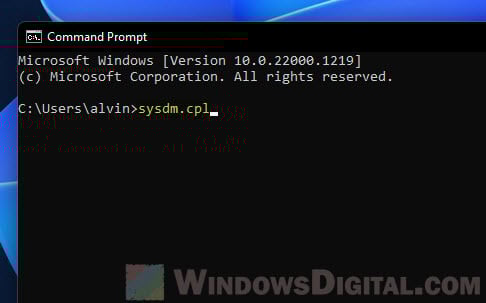
Команда sysdm.cpl
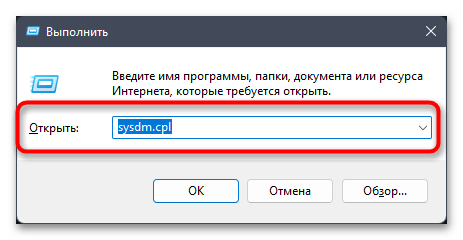
Самый быстрый способ открыть окно «Свойства системы» — использовать команду для её запуска:
- Нажмите клавиши Win+R на клавиатуре, либо нажмите правой кнопкой мыши по кнопке «Пуск» и выберите пункт контекстного меню «Выполнить».
- Введите sysdm.cpl и нажмите Enter.

- Откроется окно «Свойства системы».

Эту же команду можно использовать в командной строке, PowerShell или в поиске на панели задач.
Если вам нужно создать ярлык для открытия свойств системы, используйте команду
control.exe sysdm.cpl
в поле «Объект» при создании ярлыка.
Также вы можете открывать конкретную вкладку окна «Свойства системы», изменив команду, добавив к ней после пробела и запятой номер нужной вкладки, например, для открытия вкладки «Дополнительно» можно ввести
sysdm.cpl ,3
Параметры
Вторая возможность доступа к окну «Свойства системы» — использование системного приложения «Параметры»:
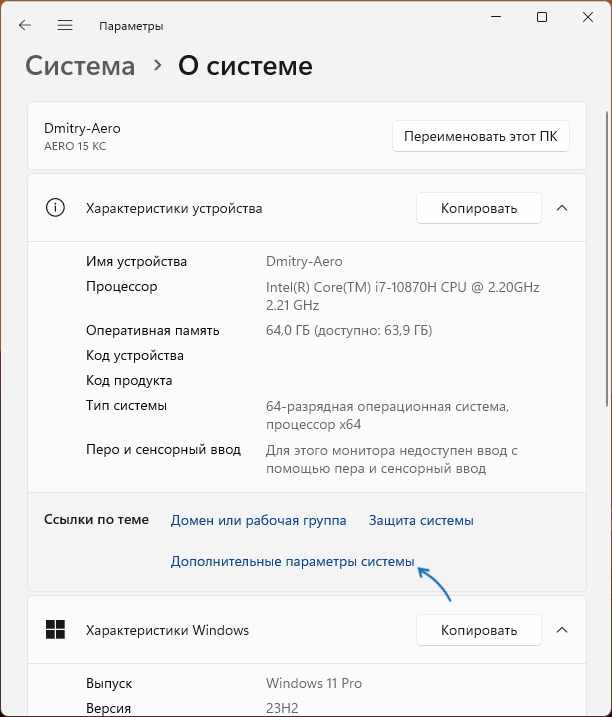
- В Windows 11 откройте Параметры — Система — О системе, а затем нажмите «Дополнительные параметры системы» в разделе «Ссылки по теме».

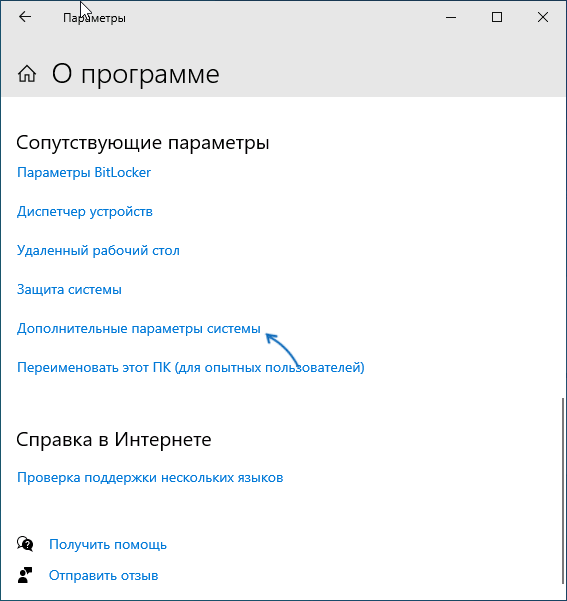
- В Windows 10 откройте Параметры — Система, откройте раздел «О программе», затем нажмите «Дополнительные параметры системы в разделе «Сопутствующие параметры».

Это все основные способы: другие варианты являются лишь различными вариациями запуска sysdm.cpl, но по сути дублируют уже приведенные.
Надеюсь, для кого-то из читателей информация оказалась полезной, нужное окно открыто и можно перейти к настройкам защиты системы, файла подкачки или других параметров, доступных в окне.
Все способы:
- Способ 1: Контекстное меню «Этот компьютер»
- Способ 2: Приложение «Параметры»
- Способ 3: Контекстное меню «Пуска»
- Способ 4: «Панель управления»
- Способ 5: Команда «sysdm.cpl»
- Вопросы и ответы: 0
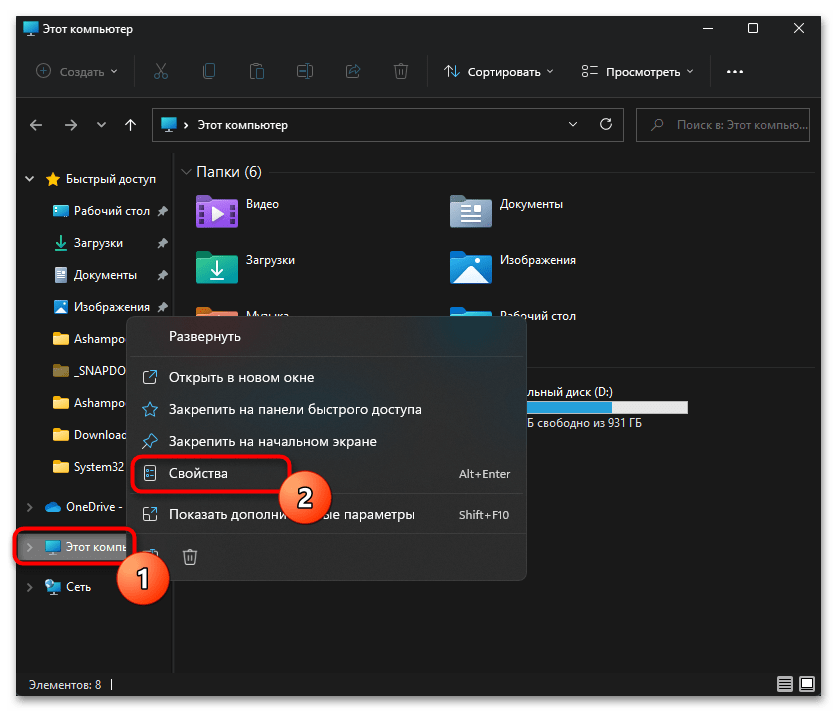
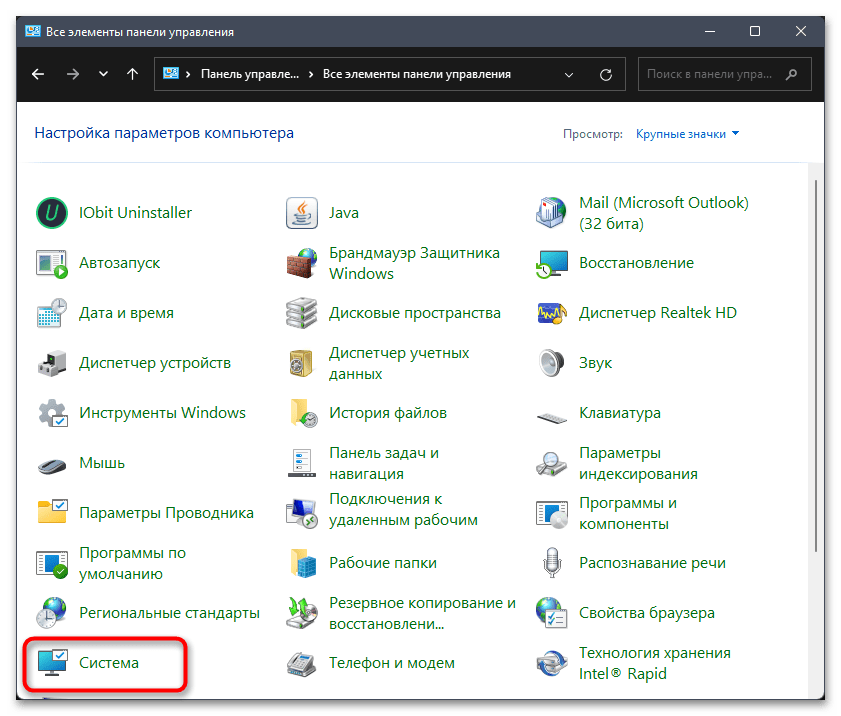
Способ 1: Контекстное меню «Этот компьютер»
В Windows 11 окно со свойствами системы немного изменилось, стало более информативным и функциональным. Поменялось и его расположение, однако его вызов через контекстное меню значка «Этот компьютер» все еще доступен и является одним из самых быстрых существующих методов. Давайте остановимся на нем более детально.
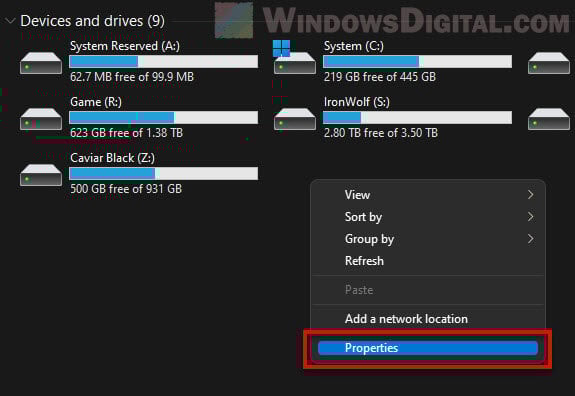
- Откройте «Проводник» любым удобным для вас образом. На панели слева найдите значок «Этот компьютер», кликните по нему правой кнопкой мыши и из появившегося контекстного меню выберите пункт «Свойства».
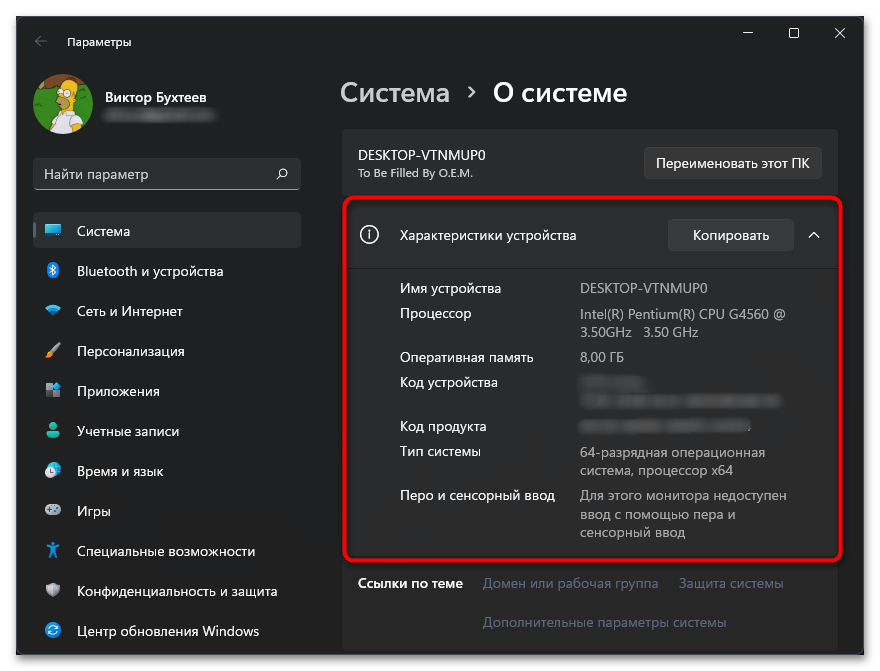
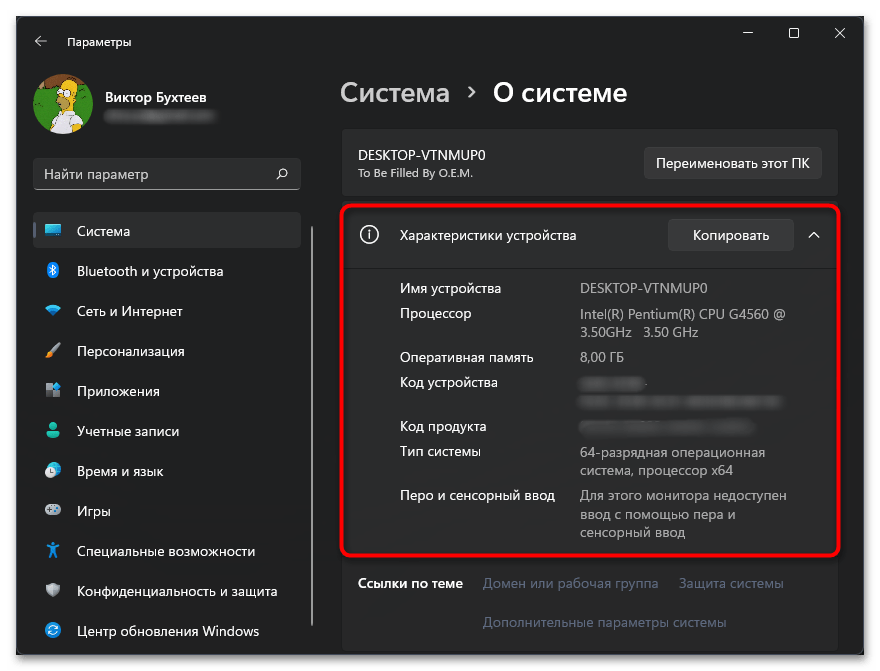
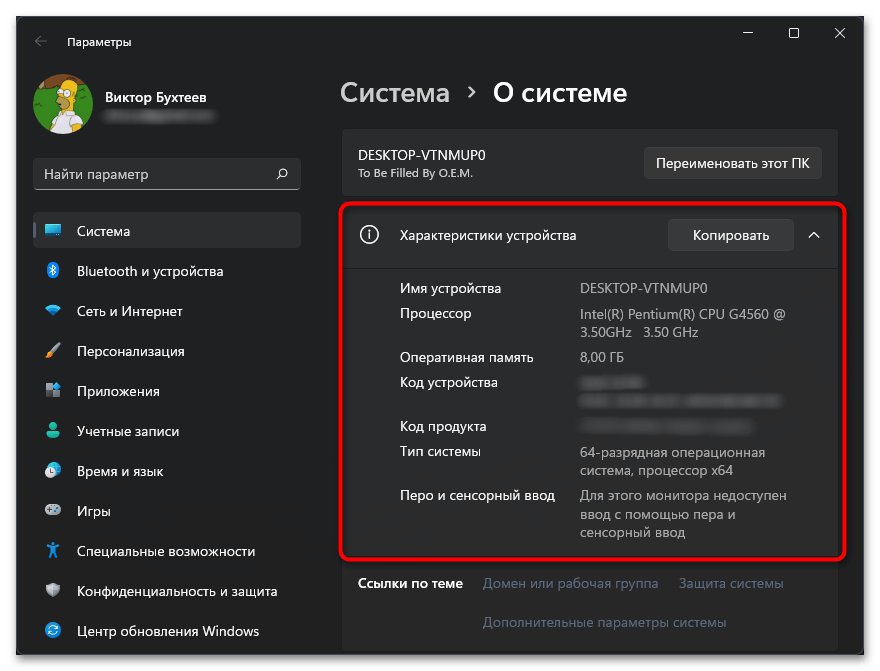
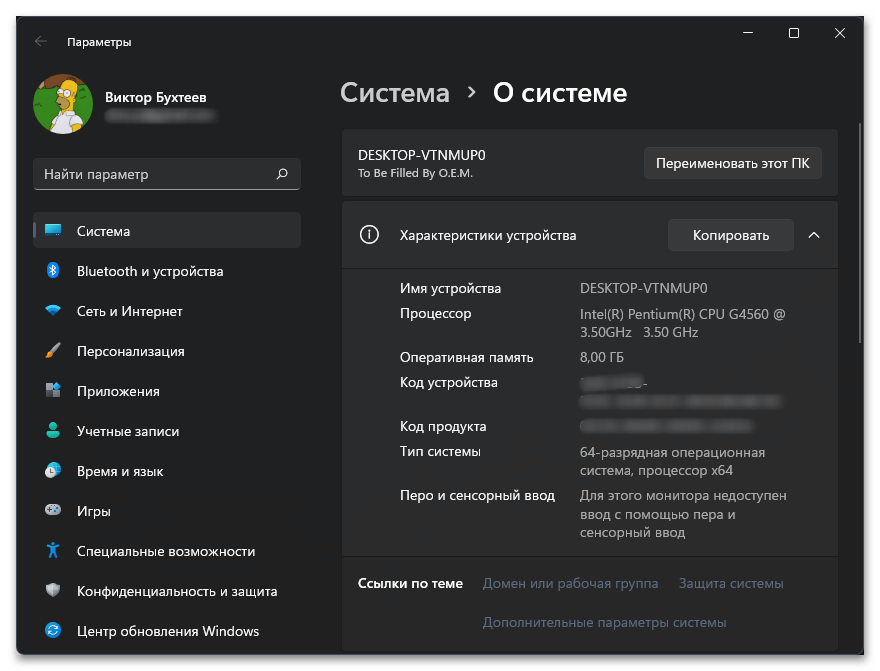
- Вы будете перемещены сразу в соответствующий раздел приложения «Параметры», в котором сверху отображаются основные характеристики устройства. Тут есть имя компьютера, модель процессора, количество оперативной памяти, разрядность операционной системы, идентификационный код устройства и код текущей версии Windows.
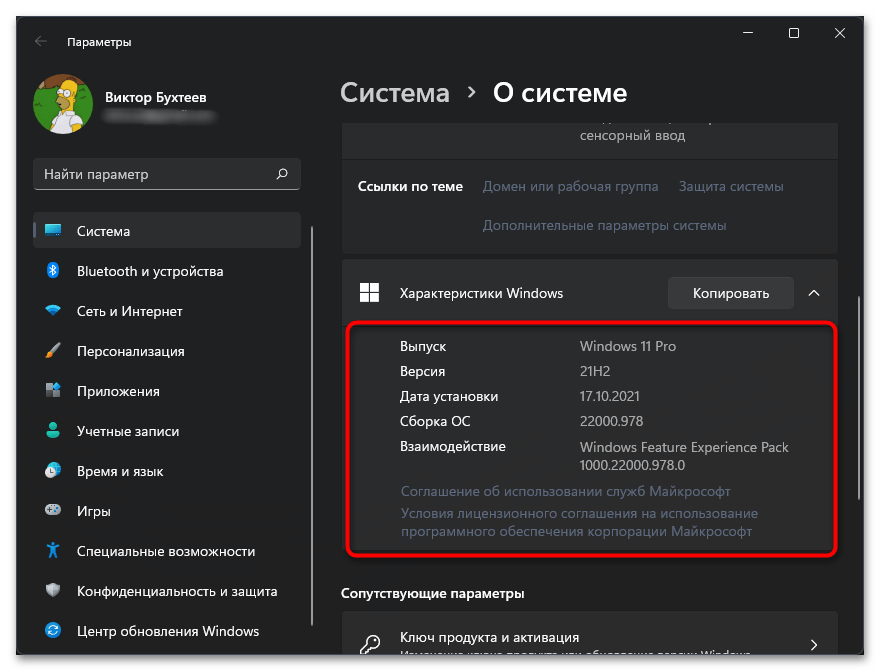
- Ниже есть больше информации именно о характеристиках Windows. Разработчики предоставляют сведения о выпуске, версии, дате установки и сборке. Этого вполне достаточно для большинства пользователей, которых интересуют характеристики используемой операционной системы.
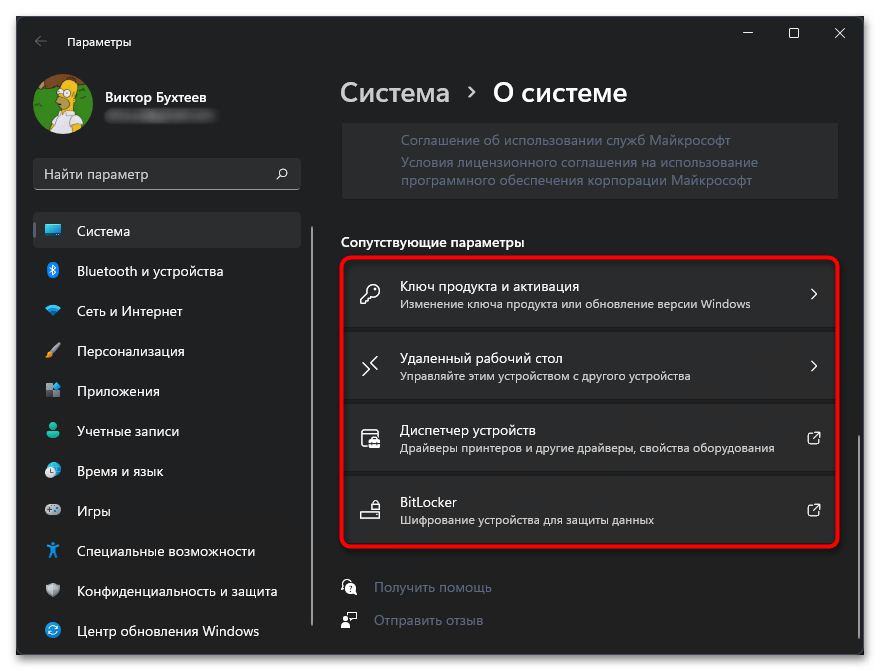
- Если вас интересует изменение настроек, это тоже осуществляется в этом меню. Можно исправить проблемы с активацией или пройти ее, открыть «BitLocker» или настроить удаленный рабочий стол, если это будет необходимо.
Способ 2: Приложение «Параметры»
Из предыдущей инструкции вы узнали, что нужный вам раздел со свойствами системы находится в приложении «Параметры». Соответственно, перейти к нему можно непосредственно через основное окно без использования контекстного меню, если так будет удобнее.
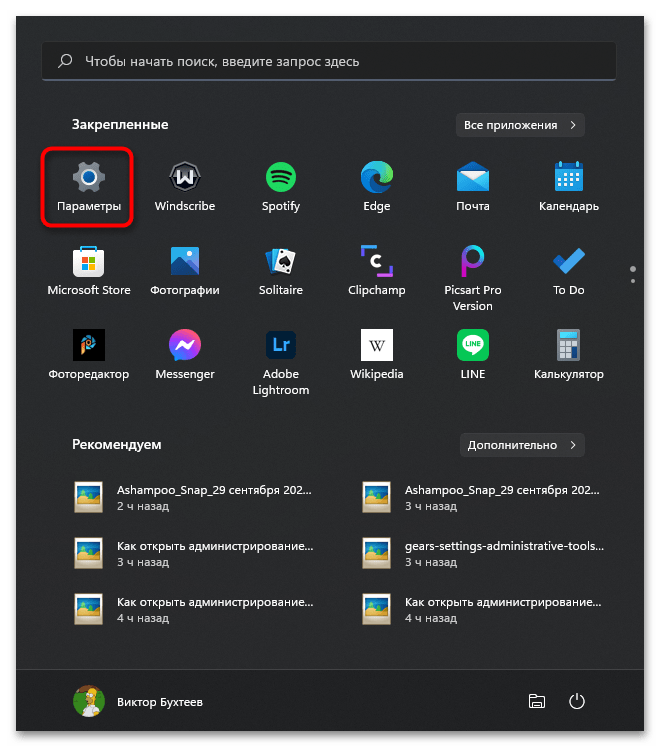
- Вызовите «Пуск» и в списке закрепленных значков найдите «Параметры». Нажмите по нему левой кнопкой мыши для перехода к требуемому окну.
- Выберите раздел «Система» и нажмите по последнему пункту списка с названием «О системе».
- Вы будете перемещены в обновленный раздел со свойствами системы, обо всех составляющих которого уже рассказано в предыдущей инструкции.

Способ 3: Контекстное меню «Пуска»
Рассмотрим еще один быстрый метод перехода к тому же самому окну, о котором речь шла выше. В этот раз осуществляется поставленная задача при помощи контекстного меню, которое вызывается нажатием правой кнопкой мыши по «Пуску». Появится целый список с различными пунктами, среди которых вас интересует «Система».
После его выбора запустится то же самое окно, которое вы видели в двух предыдущих методах. Заново останавливаться на его составляющих не будем, поэтому ищите нужные сведения и управляйте настройками при надобности.
Способ 4: «Панель управления»
В предыдущих Windows переход к окну «Свойства системы» выполнялся именно через «Панель управления», а его вид был совсем другим. Сейчас тоже можно воспользоваться этим классическим приложением, но оно перенаправит вас в другое, обновленное окно, о котором шла речь во всех предыдущих методах.
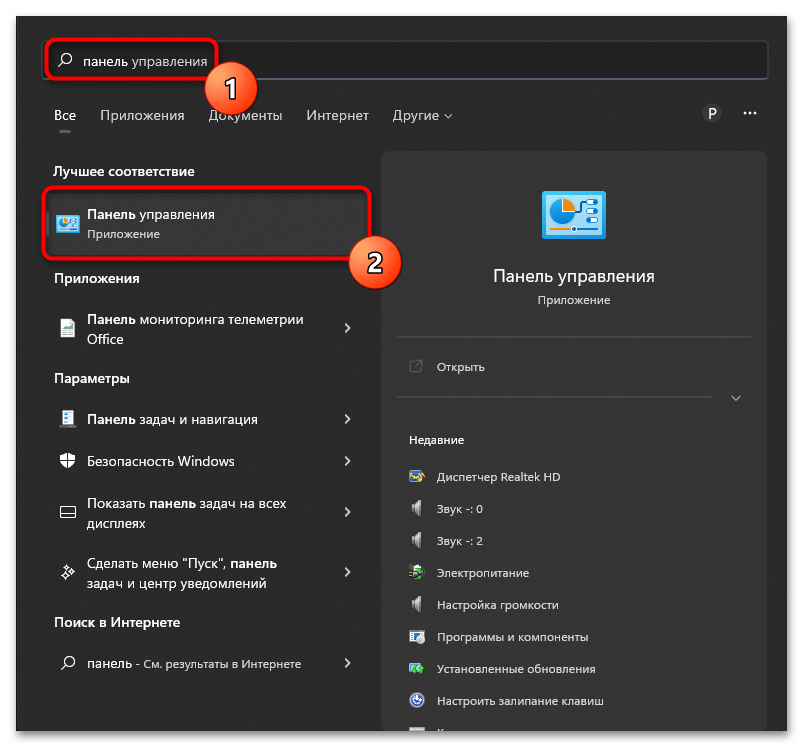
- Откройте меню «Пуск» и через поиск вызовите «Панель управления».
- В списке значков отыщите «Система» и нажмите по нему левой кнопкой мыши.
- Дождитесь загрузки нового окна и приступайте к ознакомлению с необходимой информацией или к изменению системных параметров.
Способ 5: Команда «sysdm.cpl»
В рамках этой статьи вы уже узнали о том, что свойства системы в Windows 11 обновились и теперь имеют другое представление. Однако что делать тем пользователям, кому нужно именно старое окно? Пока что есть вариант его запуска при помощи специальной команды, что мы и рассмотрим в следующей инструкции.
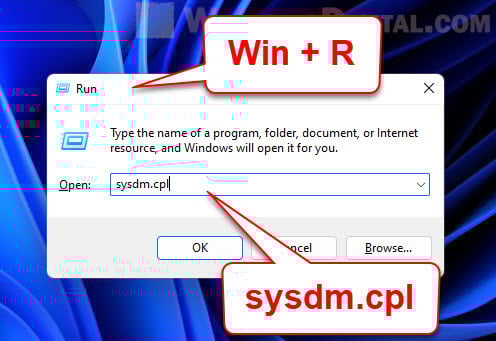
- Проще всего ее ввести через утилиту «Выполнить», которая вызывается путем использования сочетания клавиш Win + R. Введите в строке
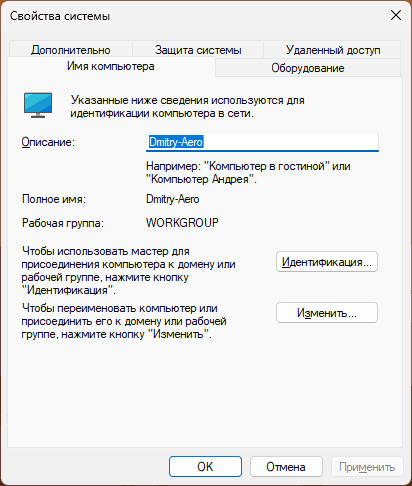
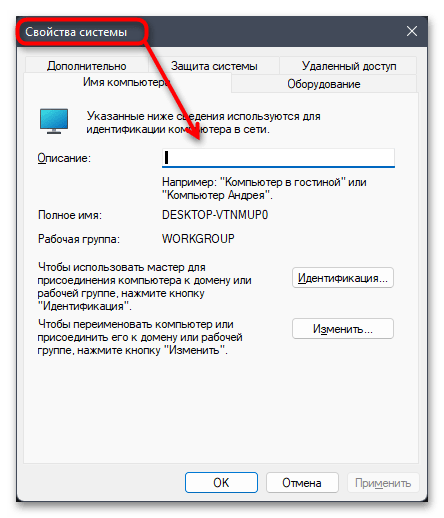
sysdm.cplи нажмите Enter для перехода к окну. - Как уже было сказано выше, вы попадете в старое окно «Свойства системы». В нем есть имя компьютера, название рабочей группы и описание, если такое было добавлено. Теперь сможете переименовать устройство или перейти к другим параметрам.
- Эту же команду можно использовать через «Терминал Windows». Вызовите его через контекстное меню «Пуска», которое открывается нажатием правой кнопкой мыши по соответствующему значку на панели задач.
- Введите команду
sysdm.cplи нажмите Enter. Откроется то же самое окно, которое вы видели на одном из предыдущих скриншотов.
Наша группа в TelegramПолезные советы и помощь
The System Properties window is the place we use to access Windows advanced system settings such as changing the computer or workgroup name, managing page file (virtual memory), enabling or disabling visual effects, configuring system startup and system failure settings, accessing system restore, and managing remote assistance.
As Windows 11 features a new design and some interface changes, especially in the Settings compared to Windows 10, the way to open the System Properties window in Windows 11 is a little different.
Also see: How to Open The Old Advanced Sound Settings in Windows 11
How to open System Properties in Windows 11
Advanced System Settings via Settings app
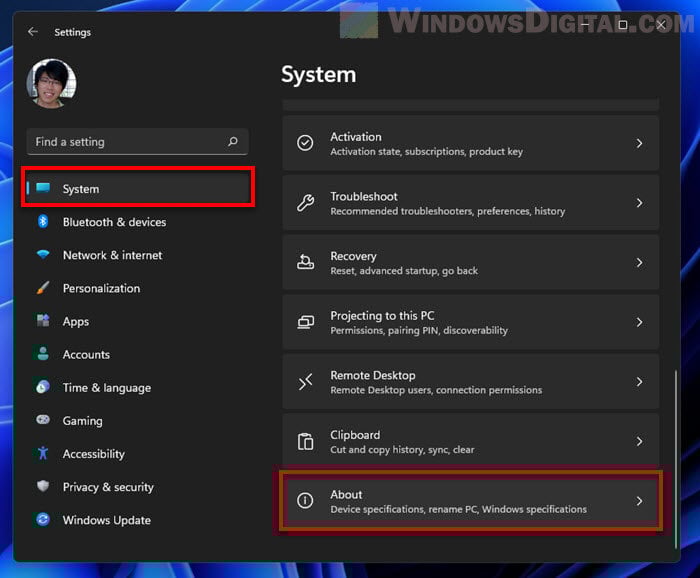
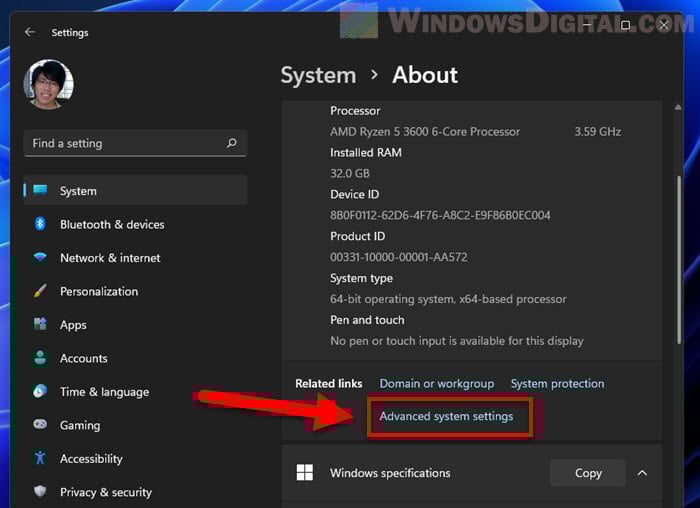
In Windows 11, the most common method to open System Properties is to select the “Advanced System Settings” option in the Settings app.
- Press Win + i keys to open Settings.
- On the left pane, select System.
- Then, on the right, select About.

- In the About page, scroll down and click “Advanced system settings” in the Related links section.

- The System Properties window will be opened.
Alternatively, you can open the System’s About settings directly by right-clicking in the “This PC” directory in File Explorer window and select Properties.
Suggested Tip: How to Create “This PC” Shortcut on Desktop in Windows 11
Use Windows Search
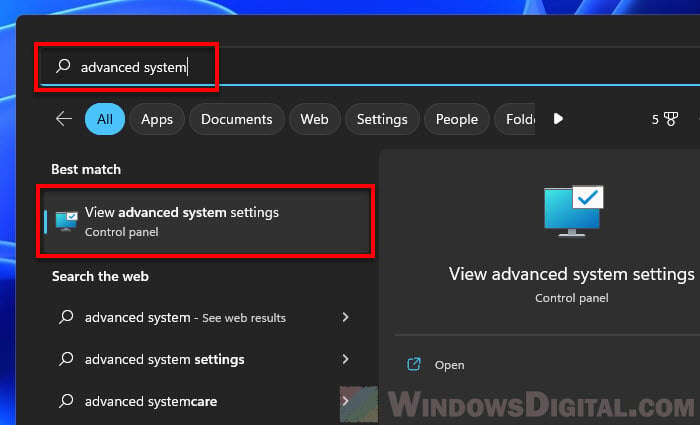
The easiest method would be to simply search for “advanced system settings” via the Start menu search in Windows 11.
Go to the Start menu and search using the keyword “advanced system settings”. Then, select View advanced system settings from the search result to open the System Properties window in Windows 11.
Related: How to Change Computer Name or Workgroup in Windows 11
Run Command
You can also use the Run dialog box to open the System Properties in Windows 11. To do so, first press Win + R keys to open the Run dialog box. Next, in the Open text field, type sysdm.cpl (System Device Manager Control Panel applet) and click OK to open the advanced system settings.
Open System Properties via CMD or PowerShell
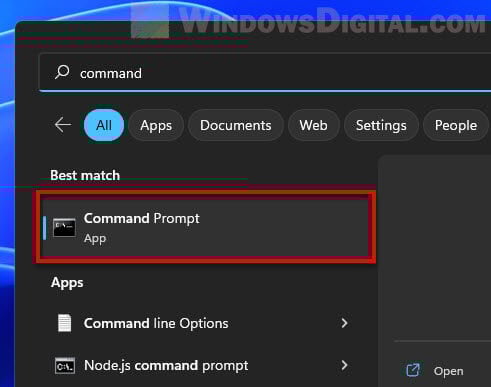
In addition, you can also use the same command line “sysdm.cpl” in Command Prompt, PowerShell or Windows Terminal to open the advanced system settings in Windows 11.
- Open Command Prompt, Windows PowerShell or Windows Terminal via Start.

- In the command prompt window, type
sysdm.cpland press Enter.
- This will directly open the System Properties window.
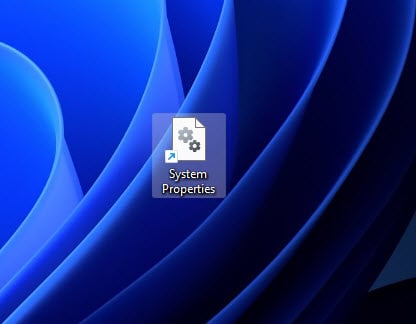
Create a shortcut to instantly open System Properties
If you often find yourself needing to go to the System Properties window, you can create a desktop shortcut to open it directly. You can even set up a keyboard shortcut to open the advanced system settings via the desktop shortcut, which we will show you later.
To create a shortcut to open System Properties in Windows 11, follow the steps below.
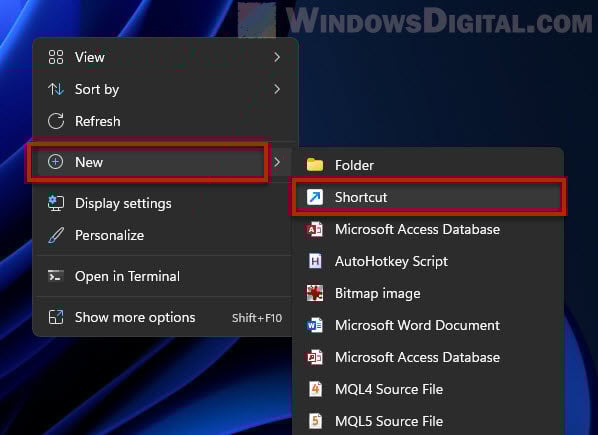
- Right-click any empty area on the desktop, and then select New > Shortcut.

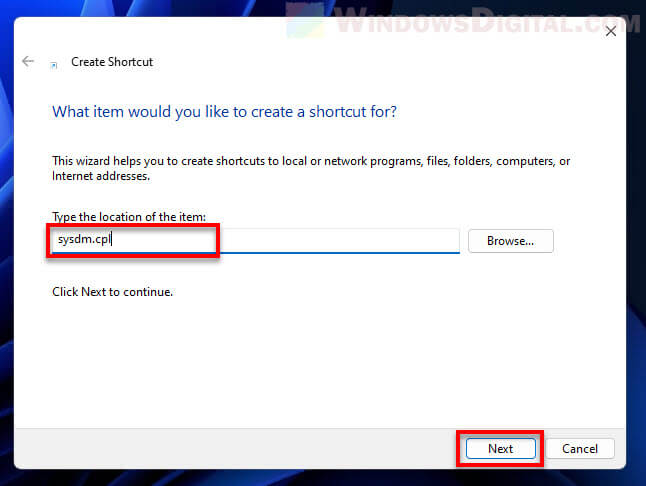
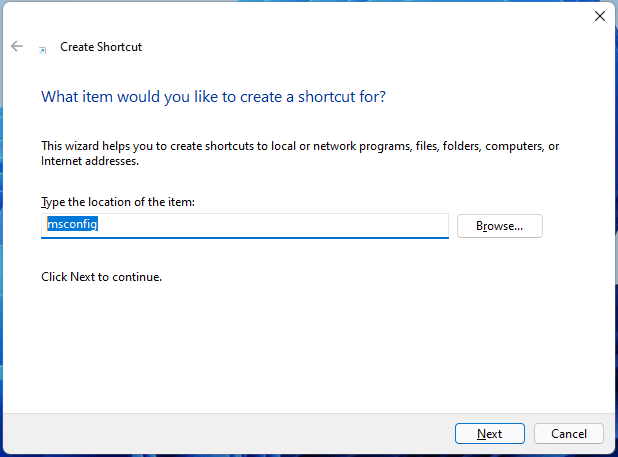
- In the Create Shortcut wizard, type sysdm.cpl in the “Type the location of the item” field. Click Next to continue.

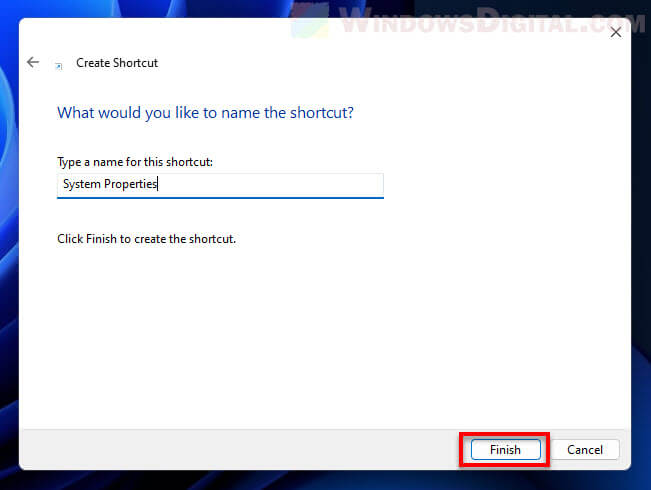
- Next, type a name for the shortcut (any name you like).

- Click Finish to create the shortcut.
- Now, whenever you want to open the System Properties window, simply double-click this desktop shortcut to open it.

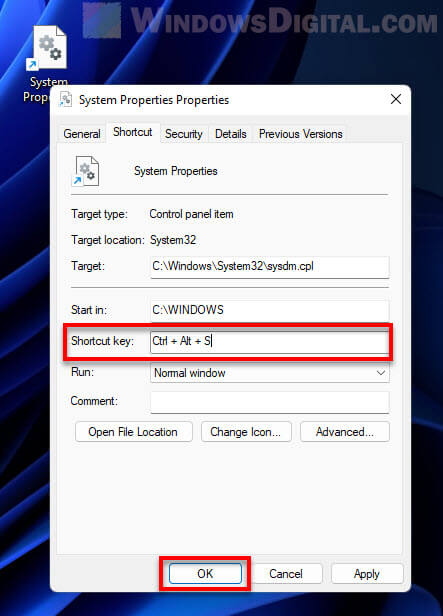
To set up a hotkey to open the System Properties, first follow the steps above to create the desktop shortcut, and then follow the steps below to set a shortcut key to open the shortcut.
- Right-click the desktop shortcut you’ve created and select Properties.
- In the Properties window, click in the text field next to “Shortcut key”.
- Then, press the shortcut keys you want to set to open the System Properties window, for example, Ctrl + Alt + S or any other shortcut key combination you prefer.

- Click OK to save the changes.
- Now, whenever you want to go to the Advanced System Settings, just press the shortcut key you have set earlier.
Windows 11, the latest iteration of Microsoft’s operating system, brings a fresh interface and numerous improvements over its predecessors. Among these enhancements is the way users interact with system settings. The System Properties window, often used for modifying system configurations, accessing hardware settings, and managing system performance settings, is a vital part of managing a Windows machine. In this article, we will explore various methods to open System Properties in Windows 11, outlining each approach in detail.
Understanding System Properties
Before we dive into the methods for opening System Properties, let’s clarify what System Properties actually encompasses. System Properties is a feature within Windows that allows users to view and configure important settings related to their computer. This includes:
- Computer Name: The name assigned to your computer over a network.
- System Protection: Options related to creating restore points and managing system restore settings.
- Remote Settings: Settings that allow remote access to your system.
- Performance Options: Adjustments that affect how programs and the operating system run, including visuals, memory usage, and processing performance.
- User Profiles: Managing user accounts and their settings.
These functionalities are crucial for various tasks such as troubleshooting, optimizing performance, and configuring network settings. Understanding how to access this utility is essential for both novice and experienced users.
Method 1: Using the Settings App
The most user-friendly way to access System Properties in Windows 11 is through the Settings app. Microsoft has enhanced the Settings interface significantly, making it easier to navigate.
Steps to Open System Properties via the Settings App:
-
Open Settings:
- Click on the Start Menu (Windows icon) located on the taskbar or press the Windows key on your keyboard.
- Select Settings (gear icon) from the Start menu.
-
Navigate to System:
- In the Settings window, click on the System option from the left sidebar. This will take you to a list of system-related settings.
-
Access About:
- Scroll down the System settings until you find the About section. Click on it. Here, you will see your device specifications and Windows information.
-
Click on Advanced System Settings:
- In the About section, scroll down to find the Related settings link. Click on Advanced system settings. This action will open the System Properties window, where you can make various adjustments.
Notes:
- The Settings app is the primary method recommended for most users as it fits well with the modern UI of Windows 11.
- Keep in mind that any changes made in this section should be done cautiously, as they can affect your system’s performance and functionality.
Method 2: Using the Run Dialog
Another quick method to access System Properties is by using the Run dialog. This method is more advanced and caters to users who prefer keyboard shortcuts.
Steps to Open System Properties via the Run Dialog:
-
Open Run Dialog:
- Press Windows + R on your keyboard. This shortcut opens the Run dialog box.
-
Enter Command:
- In the Run dialog, type the following command and press Enter:
sysdm.cpl
- In the Run dialog, type the following command and press Enter:
-
System Properties Window Appears:
- Executing the command will bring up the System Properties window directly, giving you immediate access to the various system settings.
Tips:
- The Run dialog is useful for those who are accustomed to using keyboard shortcuts and want to maximize efficiency.
- You can create a shortcut for this command on your desktop for even faster access in the future.
Method 3: Using Control Panel
Though Microsoft has streamlined many features into the Settings app, the Control Panel remains a useful option for accessing System Properties.
Steps to Open System Properties via Control Panel:
-
Open Control Panel:
- Right-click the Start Menu button or press Windows + X.
- Choose Run from the context menu, or directly type Control Panel into the Start Menu search bar and hit Enter.
-
Navigate to System and Security:
- In the Control Panel window, click on System and Security.
-
Select System:
- Now, click on System. This will bring up the basic information about your system.
-
Advanced System Settings:
- On the left sidebar, you will see the link for Advanced system settings. Click on it to open the System Properties window.
Advantages of Using Control Panel:
- The Control Panel provides access to system administration tools that may not be as easily accessible in the Settings app.
- For users who prefer traditional interfaces or are used to the Control Panel from earlier Windows versions, this method is preferable.
Method 4: Using Command Prompt
For advanced users, the Command Prompt provides a powerful interface to interact with the Windows operating system. It can be used to open System Properties as well.
Steps to Open System Properties via Command Prompt:
-
Open Command Prompt:
- Right-click the Start Menu and click on Terminal or search for Command Prompt in the Start Menu and launch it.
-
Enter Command:
- Type the command below and hit Enter:
control sysdm.cpl
- Type the command below and hit Enter:
-
System Properties Window:
- This will open the System Properties window directly, allowing you to view and modify system settings.
Note:
- Using Command Prompt can be intimidating for some users, but it is a powerful method to execute various commands quickly.
- Ensure you run Command Prompt with administrative privileges if you plan to make system-level changes.
Method 5: Using Windows PowerShell
Similar to the Command Prompt, Windows PowerShell is an advanced tool that allows users to perform a variety of tasks more efficiently.
Steps to Open System Properties via PowerShell:
-
Open PowerShell:
- Right-click on the Start Menu button or search for Windows PowerShell in the Start Menu and launch it.
-
Enter Command:
- Type the following command and press Enter:
sysdm.cpl
- Type the following command and press Enter:
-
Access System Properties:
- The System Properties window will appear, presenting the familiar interface for systems configuration.
Conclusion on Using PowerShell:
- Windows PowerShell is a powerful command-line interface that provides greater control over the Windows environment. Users who are familiar with scripting and command-line operations may find using PowerShell advantageous.
Method 6: Creating a Desktop Shortcut
For frequent users of System Properties, creating a desktop shortcut allows for quick access without navigating through the Start menu or commands.
Steps to Create a Desktop Shortcut:
-
Right-click on the Desktop:
- Go to your desktop and right-click on an empty area.
-
Create Shortcut:
- Select New and then Shortcut from the context menu.
-
Enter Location:
- In the location field, type:
C:WindowsSystem32sysdm.cpl - Click Next.
- In the location field, type:
-
Name Your Shortcut:
- Name it something like “System Properties” and click Finish.
-
Accessing Through the Shortcut:
- Double-clicking this shortcut will take you directly to the System Properties window, making it incredibly convenient.
Considerations for Shortcuts:
- Customizing the icon of the shortcut can enhance accessibility and usability.
- This method is especially useful for users who need to access System Properties frequently for performance tuning or system management.
Method 7: Accessing via File Explorer
You can also access System Properties directly through Windows File Explorer.
Steps to Open System Properties via File Explorer:
-
Open File Explorer:
- Click on the File Explorer icon on the taskbar or press Windows + E on your keyboard.
-
This PC:
- Right-click on This PC from the left sidebar.
-
Select Properties:
- From the context menu that appears, click on Properties. This will open the System window, where you can see basic information about your computer.
-
Advanced System Settings:
- Just like before, look for Advanced system settings on the left sidebar to access the System Properties window.
Benefits of Accessibility:
- This method is handy if you are already navigating through your files and want to quickly check system specifications or settings without launching additional apps.
Additional Tips for Using System Properties
-
Backup Before Changes:
- Whenever you make changes in System Properties, especially in Performance Options or System Protection, consider backing up your data to prevent loss in case alterations affect system functionality.
-
Regularly Check for Performance:
- Use the Performance Options feature to regularly review your graphics settings and memory allocations. Adjusting these settings can dramatically improve system speed.
-
Disable Visual Effects for Performance:
- If you are experiencing slow performance, consider disabling unnecessary visual effects under the Performance Options to boost speed.
-
Managing Remote Settings:
- If you require access to your PC remotely, configure settings carefully, ensuring you are aware of what permissions you are granting.
-
Use System Restore Point:
- Regularly create restore points to safeguard your system against unwanted changes or issues. This is especially useful before making significant configuration changes.
-
Documentation:
- Keep a written record of any modifications you make in System Properties for future reference to understand what changes were performed.
Conclusion
The System Properties window in Windows 11 is an essential tool for managing and optimizing your computer’s settings. Whether you are a casual user who wants to check your system specs or a tech-savvy individual looking to configure performance options, knowing how to access System Properties is critical. By using the various methods outlined in this article, you can choose the approach that best fits your needs and workflow.
Windows 11 simplifies many tasks while retaining powerful tools for system management. Ensuring you understand how to navigate these features will provide a smooth experience while using your PC. As always, approach changes thoughtfully and ensure your data is backed up to avoid potential issues in system performance and configuration management.
This post discussed by MiniTool includes two parts. On the one hand, it teaches you solutions for how to open Windows 11 System Configuration app ordered by easiness. On the other hand, this essay offers you several ways to check your system information/specs.
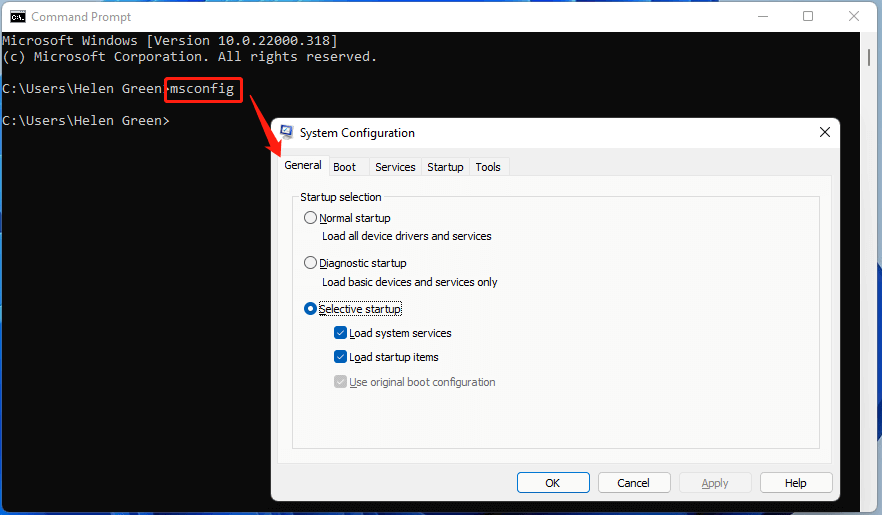
How to Get to Msconfig in Windows 11?
The following will provide multiple methods for getting access to MSConfig (system configuration) in Windows 11.
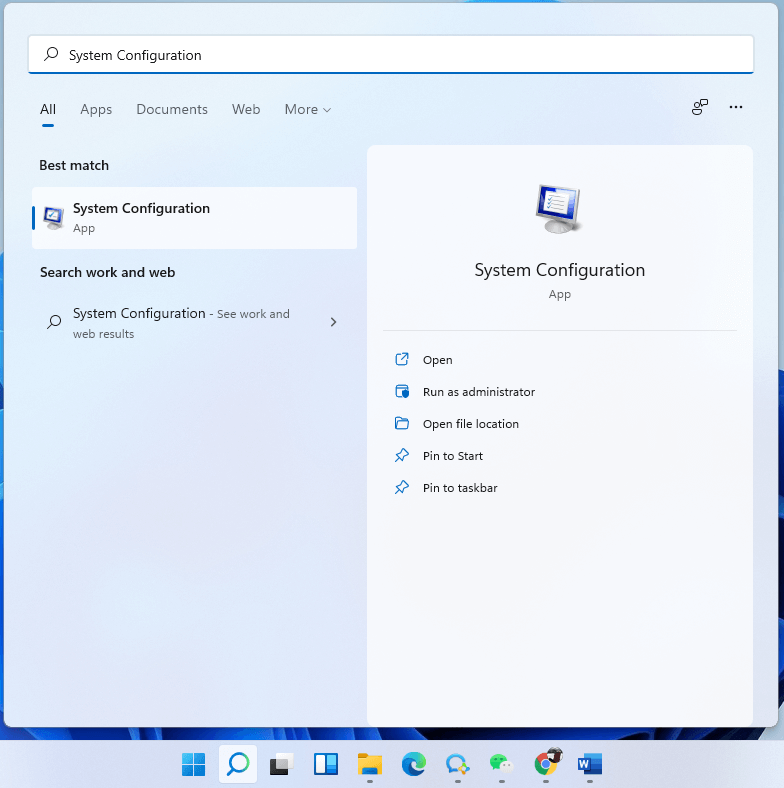
#1 Open Windows 11 System Configuration Through Search
First of all, you can launch the System Configuration application in Windows 11 by searching. Generally, type “system configuration” or “msconfig” in Windows Search and click the result (or click the Open option) to start the app. If you want to open an elevated version, just select Run as administrator.
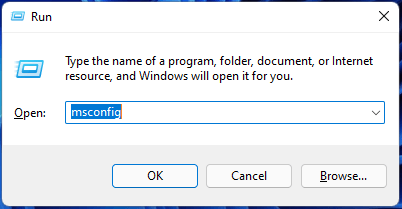
#2 Launch System Configuration Windows 11 with Windows Run
Secondly, you can start System Configuration relying on the Run box. Open Windows 11 Run dialog, input “msconfig” and press Enter key or click OK.
#3 Start Windows 11 System Configuration Within CMD
Thirdly, you are able to trigger the System Configuration program with the help of a command prompt (CMD). Launch CMD in Win11, key in “msconfig” or “start msconfig”, and press Enter.
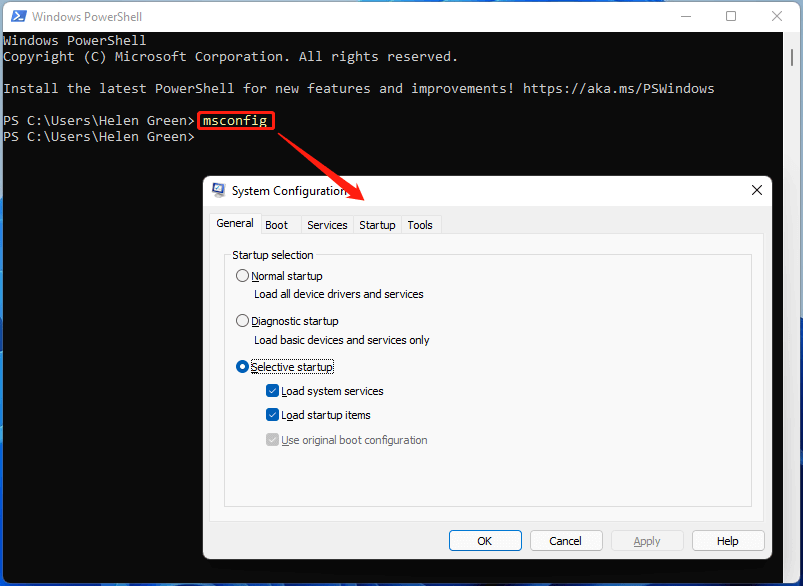
#4 Trigger System Configuration Win11 via PowerShell
Also, you can open Windows 11 System Configuration using a specific command in PowerShell. Start Win 11 PowerShell, type “msconfig” or “start msconfig”, and press Enter key.
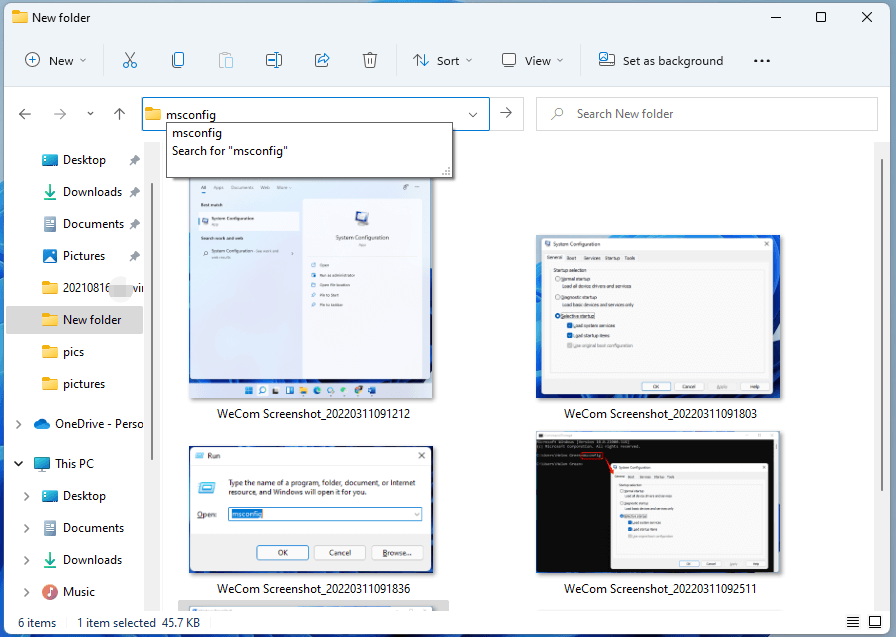
#5 Open System Configuration Windows 11 in File Explorer
Besides, you can initiate System Configuration in Windows eleven under Windows Explorer. Open any Windows File Explorer, input “msconfig” into the address bar, and press Enter.
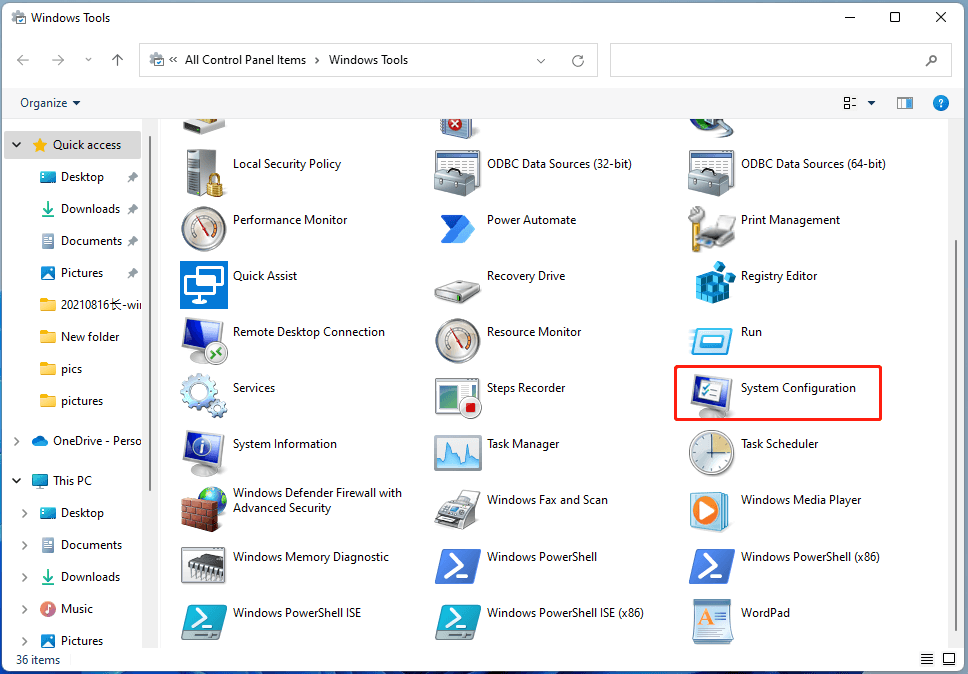
#6 Launch Windows 11 System Configuration by Windows Tools
Next, you can get access to System Configuration from Windows Tools. Open Windows 11 Tools, find and double-click System Configuration there.
#7 Open Windows 11 System Configuration by Creating Shortcut
Finally, you can launch Win11 System Configuration with its desktop shortcut. Right-click on your desktop and choose New > Shortcut. In the popup, input “msconfig” and click OK > Finish.
How to Check System Configuration in Windows 11?
Usually, the purpose that we open System Configuration software is for checking for the current computer’s system information or properties. Yet, you can directly view system information with the below solutions.
#1 Check System Information in Windows Settings
To view system info, just go to Windows 11 Start > Settings > System > About.
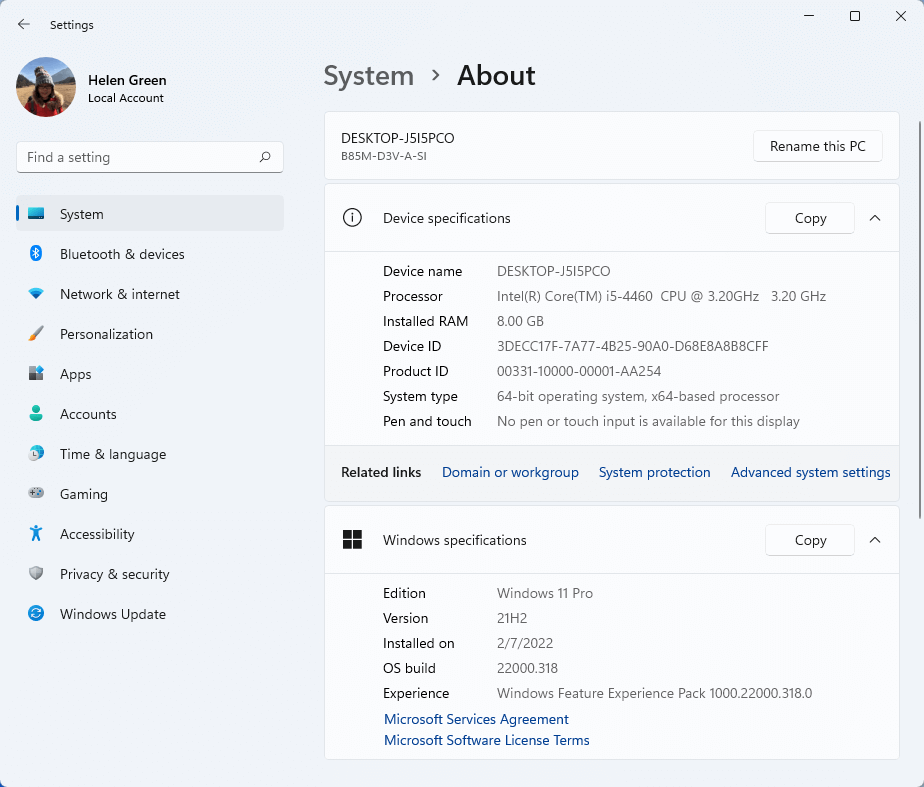
You can also access the above page by right-clicking on This PC and choosing Properties.
#2 View System Information with Its App
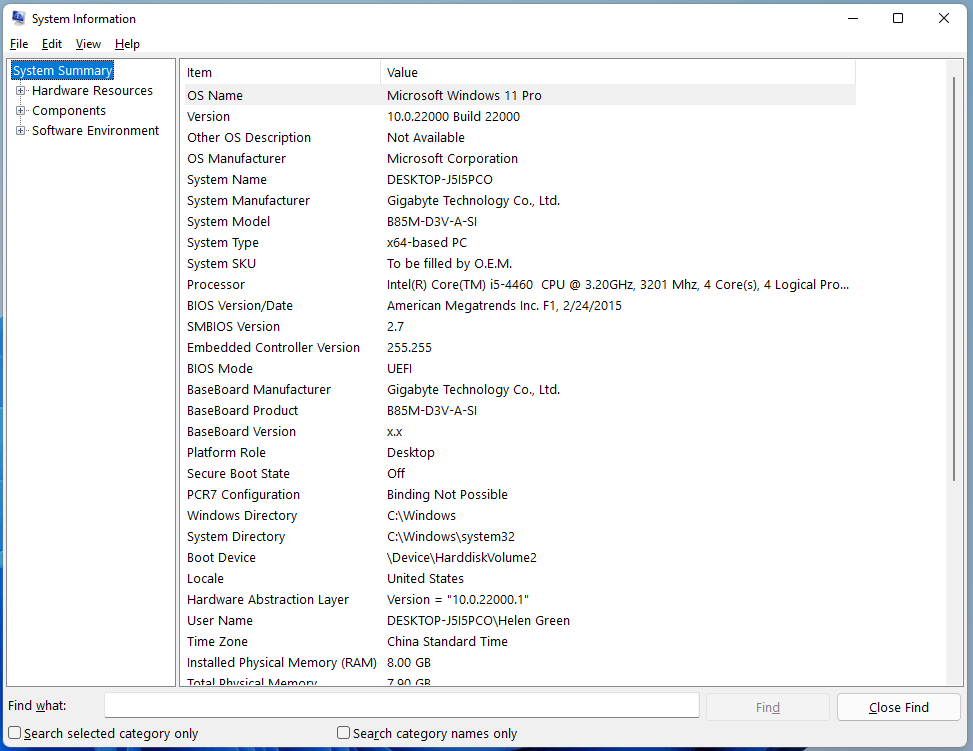
Or, you can take advantage of the System Information app to look at the details.
#3 Find Windows 11 System Information by Command
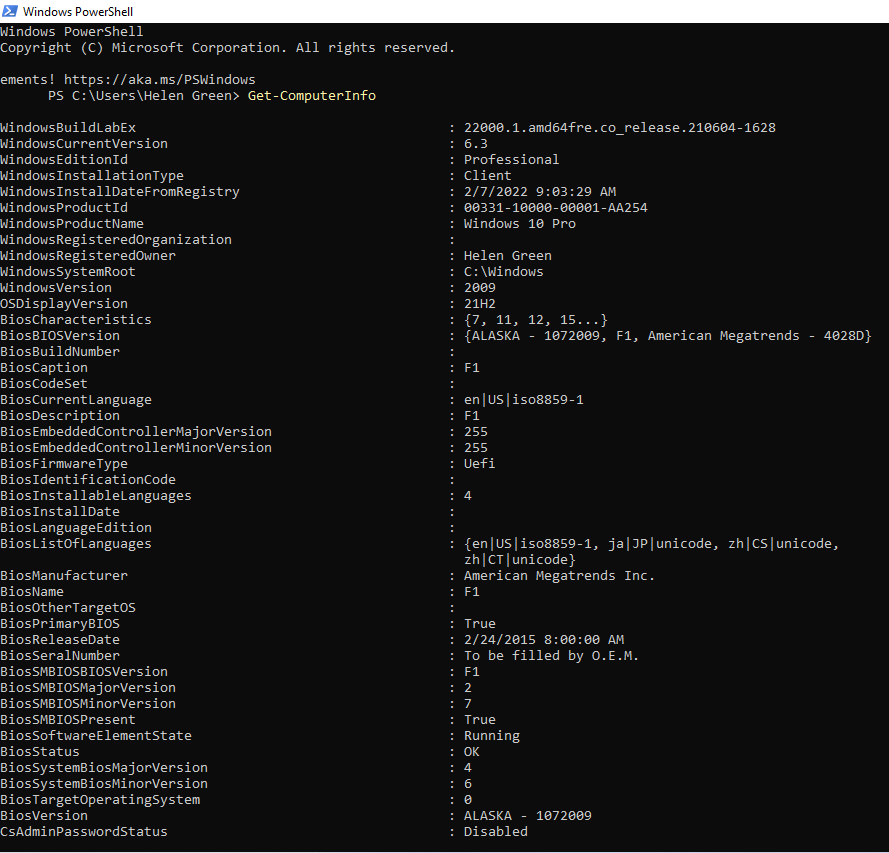
Also, you can rely on a command platform, CMD or PowerShell, to check your OS information. Just make use of systeminfo command.
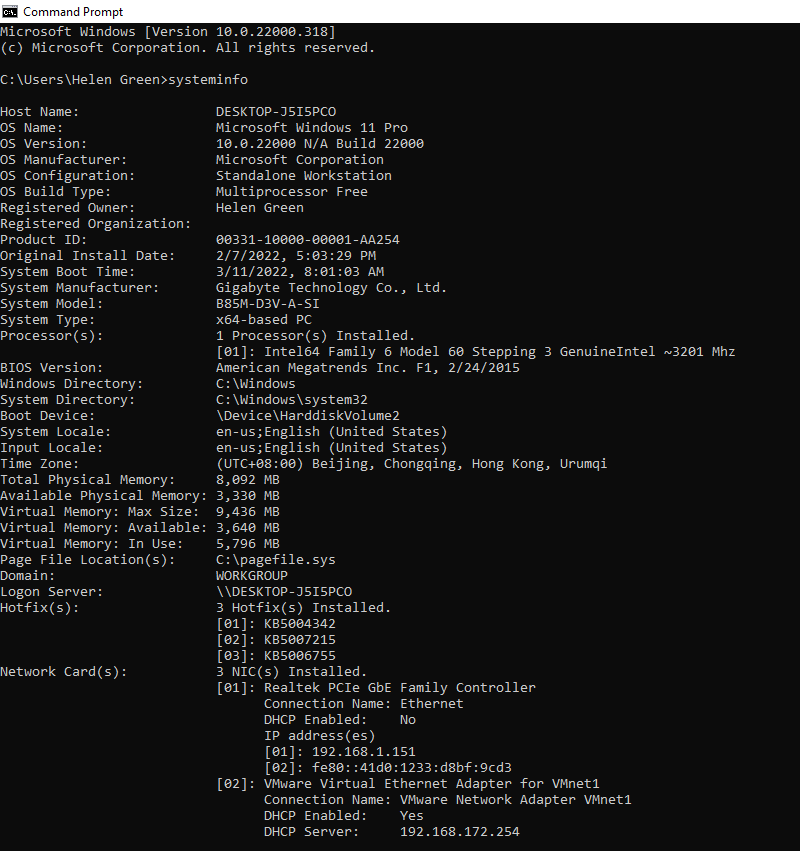
Tip: You can also use the Windows Run box to perform systeminfo command.
Or, input get-computerinfo command in PowerShell.
#4 Check System Info by DirectX Diagnostic Tool
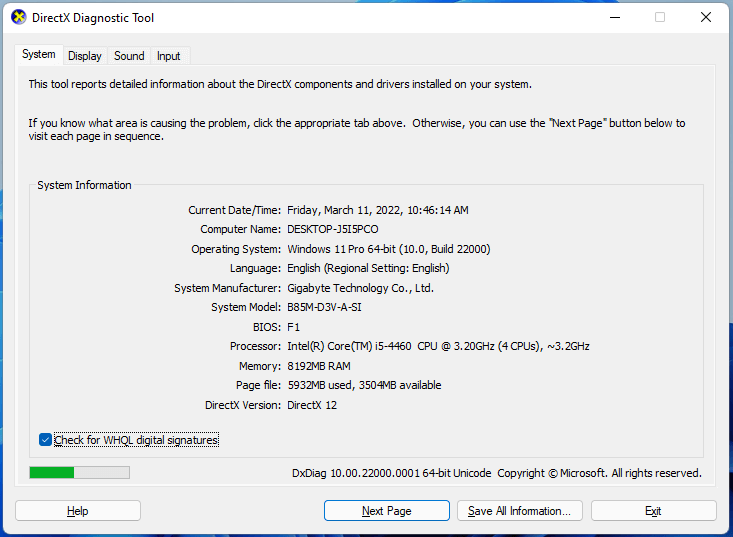
Besides, you are able to view your system information with the DirectX Diagnostic Tool.
#5 View System Information Within Task Manager
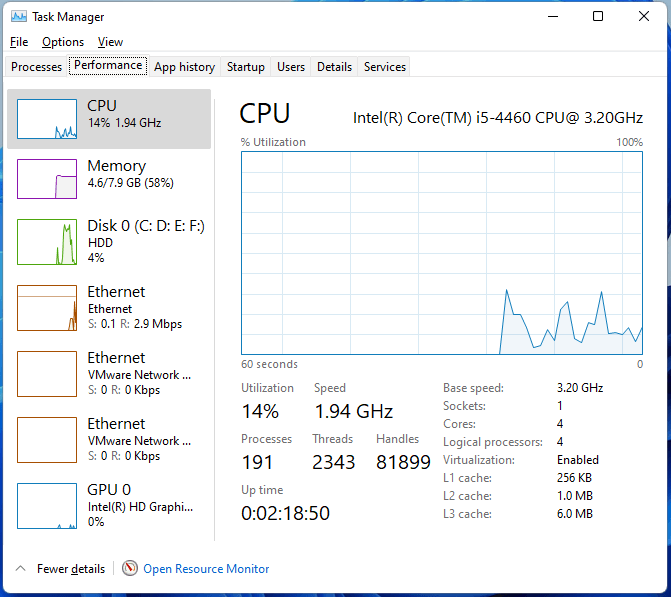
Moreover, you can view your hardware information including CPU, memory, disk, Ethernet, and GPU specifics in the Performance tab in Task Manager.
#6 View System Information with Third-Party Apps
Finally, you can make use of third-party tools to check Windows 11 information like CPU-Z, Speccy, HWiNFO, etc.
Windows 11 Assistant Software Recommended
The new and powerful Windows 11 will bring you many benefits. At the same time, it will also bring you some unexpected damages such as data loss. Thus, it is strongly recommended that you back up your crucial files before or after upgrading to Win11 with a robust and reliable program like MiniTool ShadowMaker, which will assist you to protect your increasing data automatically on schedules!
MiniTool ShadowMaker TrialClick to Download100%Clean & Safe