
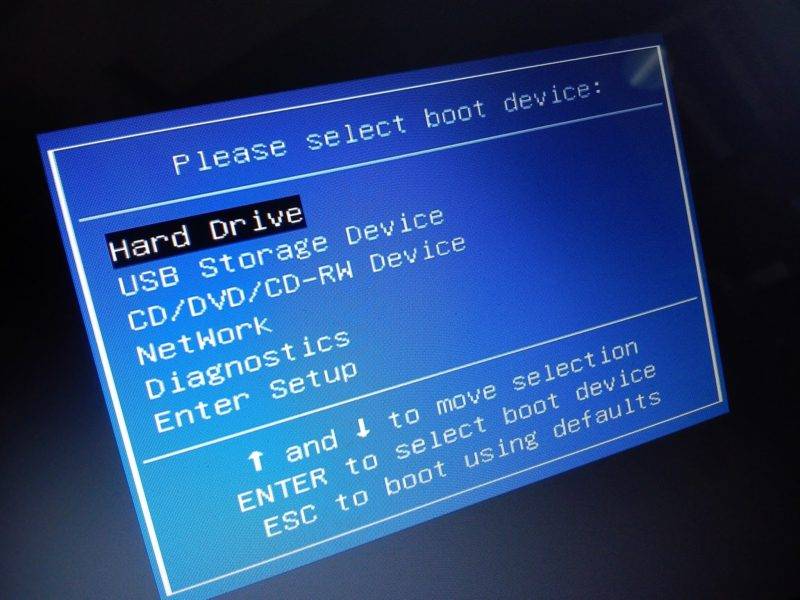
По привычке, либо из-за незнания, некоторые пользователи компьютеров и ноутбуков используют меню BIOS или UEFI, чтобы загрузиться с устройства, на котором находятся файлы для установки Windows, для запуска LiveCD или же резервная копия системы. А ведь для этого можно использовать Boot Menu, тем более, что данный вариант более практичный и прост. Достаточно вызвать меню специальной клавишей и выбрать устройство (жёсткий диск, флешку, DVD-привод), с которого будет осуществляться загрузка.
О том, как зайти в Boot Menu на ноутбуках и компьютерах, вы можете узнать из этого руководства.
Поскольку у производителей нет конкретного правила по назначению кнопки для вызова Boot Menu, каждый из них выбирает ту, которая, как им кажется, идеально подходит для этой задачи. В данной инструкции перечислены клавиши, которые в большинстве случаев позволяют вывести на экран меню загрузки. Кроме того, здесь упомянуты нюансы его вызова на ноутбуках с предустановленной Windows 10 и конкретно приведены примеры для ноутбуков Asus, Lenovo, Samsung и других, а также материнских плат Gigabyte, MSI, Intel и так далее.
Общая информация по входу в меню загрузки БИОС
Как для входа в BIOS или UEFI, так и для вызова Boot Menu производителями предусмотрены специальные клавиши. В первом случае это может быть Del, F2, либо же комбинация Alt + F2. Во втором могут использоваться Esc, F11 или F12, но бывают и исключения, которые приведены далее в статье. Обычно подсказка о клавише для входа в Boot Menu отображается на экране во время запуска компьютера, но это происходит не всегда.
Особенности загрузки Boot Menu на Windows 10
На ноутбуках и компьютерах с Windows 10 вышеуказанные клавиши могут не сработать. Всё потому, что выключение в этой операционной системе не совсем является таковым. Этот процесс больше похож на гибернацию. Поэтому при использовании F12, F11, Esc и других клавиш меню загрузки может не появиться.
В этом случае для входа в Boot Menu может помочь какой-то из способов ниже:
Способ 1:
- Во время нажатия на Завершение работы в меню Пуск удерживайте Shift. Данный способ поможет полноценно выключить компьютер. При его повторном включении клавиши для входа в Boot Menu должны работать.
- Перезагрузите компьютер и войдите в меню загрузки с помощью предназначенной для этого клавиши.
Способ 2:
- Нажмите на Win + S, чтобы вызвать панель поиска.
- Далее введите Панель управления и кликните по найденному разделу.
- Напротив надписи Просмотр выберите Мелкие значки и отыщите Электропитание.
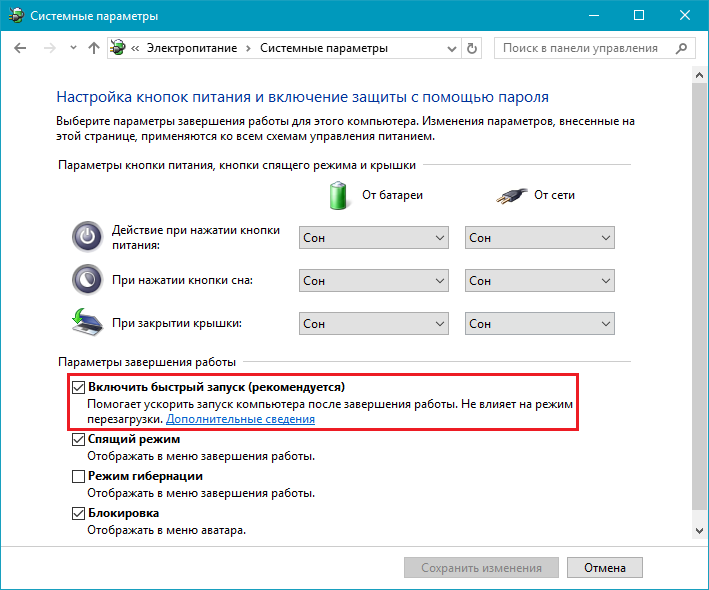
- Открыв данный раздел, нажмите на Действия кнопок питания в левой части экрана. Уберите флажок напротив пункта Включить быстрый запуск (рекомендуется). Если доступ к нему заблокирован, вверху кликните по пункту Изменение параметров, которые сейчас недоступны и повторите попытку.
- Нажмите на кнопку Сохранить изменения.

Как вызвать Boot Menu на Asus
В случае с материнскими платами Asus, вход в Boot Menu можно выполнить с помощью клавиши F8 сразу же после включения компьютера. Собственно, как и при попытке зайти в БИОС или UEFI клавишами Del / F9. На ноутбуках компании ASUS может использоваться один из вариантов — вход в Boot Menu клавишей F8, либо Esc.
Как зайти в Boot Menu на ноутбуках Lenovo
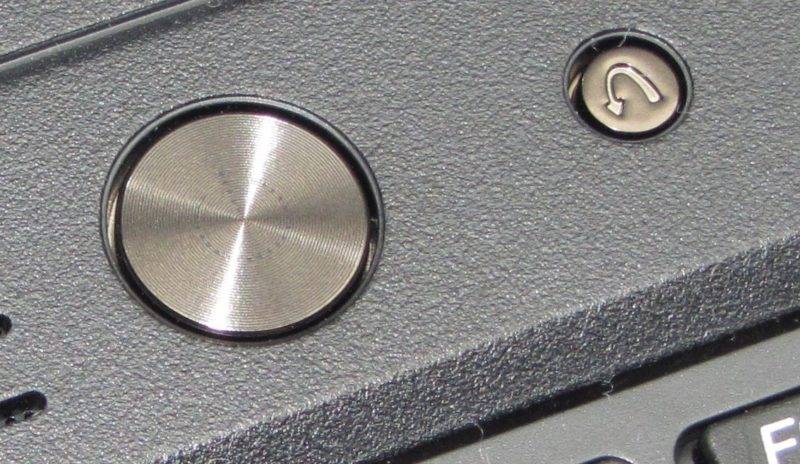
Почти на всех моноблоках и ноутбуках от компании Lenovo за запуск Boot Menu отвечает клавиша F12. Её, как и на других устройствах, нужно нажимать при включении. Есть также модели, где для входа в меню загрузки предусмотрена отдельная маленькая кнопка со стрелкой. Часто она расположена возле кнопки включения.
Как открыть Boot Menu на ноутбуках Acer
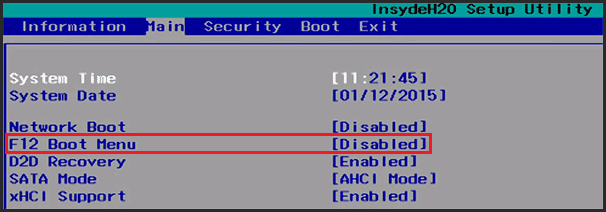
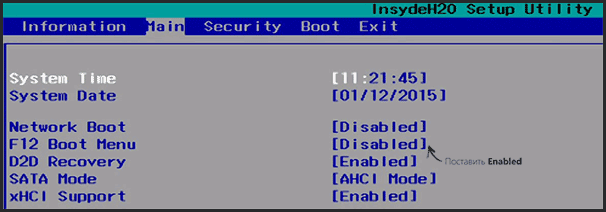
На ноутбуках и моноблоках Acer предусмотрена единая клавиша для входа в Boot Menu — F12. Однако зайти в данное меню можно только после включения специальной опции. Чтобы активировать её, вам нужно при запуске компьютера попасть в БИОС с помощью клавиши F2 и изменить состояние Disabled на Enabled напротив пункта F12 Boot Menu в основных параметрах БИОС.
Остальные модели ноутбуков и материнских плат
Ниже приведён перечень клавиш для входа в Boot Menu на ноутбуках и ПК с материнскими платами от разных производителей.
Материнские платы:
- Gigabyte — F12.
- MSI — F11.
- Intel — Esc.
- AsRock — F11.
- American Megatrends — F8.
Ноутбуки и моноблоки:
- HP — F9, либо Esc, а после клавишу F9.
- Dell — F12.
- Samsung — Esc.
- Sony — F11.
- Toshiba — F12.
- Packard Bell — F12.
Download Article
A quick guide to find the Boot menu on Windows to recover or repair
Download Article
- Using a Keyboard
- Using Windows 11, 10, and 8
- Using Windows 7 and Vista
- Using Windows XP
- Video
- Q&A
|
|
|
|
|
Are you trying to get to the Windows Boot menu through the menu or with a key? If you need to access the Boot menu, you can press the F8 key before the Windows starts. You can also open the Boot menu from the Start menu if you’re already logged into your device. Knowing how to access the Boot menu can help troubleshoot your computer if it’s experiencing issues. This wikiHow will show you how to get into the Boot menu on Windows 11, 10, 8, or 7.
Things You Should Know
- Turn on your computer and press the function key for your PC model.
- To reach the menu from Windows, click «Start» → Power button → hold «Shift» and click «Restart». Click «Troubleshoot» → «Advanced options».
- Use the Boot menu to find actions you can use to repair or troubleshoot issues with Windows.
-

To access the Boot menu, you’ll need to press a key before the operating system fully loads.[1]
- If your computer is on, shut it down first. You can also restart it.
-
This will vary depending on your device. Here’s a list of common BIOS keys by manufacturer:[2]
- Acer: Del or F2
- Asus: F9
- Dell: F12
- HP: Esc or F10
- Lenovo: F1 or F2
- Samsung: F2
- You must press this key before the Windows logo appears. When done correctly, your computer will start in Safe mode.


Advertisement
-
It’s usually at the bottom-left corner of the screen.
- On Windows 11, this will be in the bottom center of the screen.
-
This will be underneath the cog icon.
- A pop-up menu will open.
-
You must hold Shift, otherwise your computer will perform a regular restart.[3]
- The computer will power off and back on. Instead of booting to the desktop, you’ll see a blue menu titled “Choose an option.”
-
This will be underneath Continue.[4]
-
You can find this at the very bottom.[5]
-


Advertisement
-
This will open the Shut Down Windows menu.
-
The options will expand.
-
This will be next to Shut down.[6]
-
The computer will now shut down and restart. As soon as the computer restarts, you will need to act quickly—be ready.
-
You’ll need to press it before the Windows logo appears. Continue holding this key until you see the Advanced Boot Options menu.
- If Windows boots to the desktop, repeat this process to try again.


Advertisement
-
This will open the Windows Security menu.
-
You can find this next to Log Off….
-
This will expand the options.
-
This will be next to Shut down.
-
The computer will now restart. As soon as the computer restarts, you will need to act quickly—be ready.
-
Continue tapping this key until you see the Advanced Boot Options menu—this is the Windows XP boot menu.
- If Windows boots to the desktop, repeat this process to try again.


Advertisement
Add New Question
-
Question
My Lenovo turbo boost laptop hangs by showing boot menu when switching on, what to do?
Amin Moghoomi
Community Answer
Try finding your hard drive in the list. And you can try a Windows installation disk to check your hard drive.
-
Question
I want to boot up using my old Windows XP Pro Disk and use it to format my hard drive, which doesn’t have windows XP on it. Can this be done?
Yes, it can. Insert Your disk. Press the bios key. This depends on your computer. Change the boot order. Save the changes. Reboot your computer. When you see «Press Any Key To Boot From CD», press a key. When you get to «Where Would You Like To Install Windows?», select the drive, press Enter, click «Format As Ntfs» Or «Format As Fat».
-
Question
How can I restart my laptop?
Nolan JP
Community Answer
Open the start menu, then push the power button (it looks like an «O» but with an «I» stuck in the top). Then push the button that says «Restart.» The computer will turn off, then back on.
Ask a Question
200 characters left
Include your email address to get a message when this question is answered.
Submit
Advertisement
Video
Thanks for submitting a tip for review!
About This Article
Thanks to all authors for creating a page that has been read 654,663 times.
Is this article up to date?
Boot Menu (меню загрузки) можно вызывать при включении на большинстве ноутбуков и компьютеров, данное меню является опцией BIOS или UEFI и позволяет быстро выбрать, с какого накопителя загрузить компьютер в этот раз. В этой инструкции покажу, как зайти в Boot Menu на популярных моделях ноутбуков и материнских плат ПК.
Описываемая возможность может быть полезной, если вам потребовалось загрузиться с Live CD или загрузочной флешки для установки Windows и не только — не обязательно менять порядок загрузки в БИОС, как правило, достаточно однократного выбора нужного устройства загрузки в Boot Menu. На некоторых ноутбуках это же меню дает доступ и к разделу восстановления ноутбука.
Сначала напишу общие сведения по входу в Boot Menu, нюансы для ноутбуков с предустановленной Windows 10 и 8.1. А потом — конкретно по каждой марке: для ноутбуков Asus, Lenovo, Samsung и других, материнских плат Gigabyte, MSI, Intel и т.п. Внизу есть так же видео, где показывается и поясняется вход в такое меню.
Общая информация по входу в меню загрузки БИОС
Так же, как для входа в БИОС (или настройки ПО UEFI) при включении компьютера необходимо нажать определенную клавишу, как правило Del или F2, так же и для вызова Boot Menu существует аналогичная клавиша. В большинстве случаев это F12, F11, Esc, но есть и другие варианты, о которых напишу ниже (иногда информация о том, что нужно нажать для вызова Boot Menu появляется сразу на экране при включении компьютера, но не всегда).
Причем, если все что вам требуется — это поменять порядок загрузки и сделать это нужно для какого-то однократного действия (установка Windows, проверка на вирусы), то лучше использовать именно Boot Menu, а не ставить, например, загрузку с флешки в настройках БИОС.

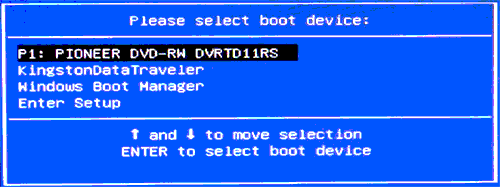
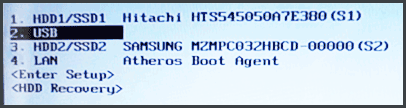
В Boot Menu вы увидите список всех подключенных к компьютеру устройств, с которых в данный момент потенциально возможно загрузка (жесткие диски, флешки, диски DVD и CD), а также, возможно, вариант сетевой загрузки компьютера и запуск восстановления ноутбука или компьютера с резервного раздела.
Особенности входа в Boot Menu в Windows 10 и Windows 8.1 (8)
Для ноутбуков и компьютеров, которые изначально поставлялись с Windows 8 или 8.1, а в скором времени и с Windows 10, вход в Boot Menu с помощью указанных клавиш может не получаться. Связано это с тем, что выключение для этих операционных систем не является в полном смысле этого слова выключением. Это скорее гибернация, а потому меню загрузки может и не открываться при нажатии F12, Esc, F11 и других клавиш.
В этом случае вы можете поступить одним из следующих способов:
- При выборе «Выключение» в Windows 8 и 8.1 удерживать клавишу Shift, в этом случае компьютер должен выключиться полноценно и при включении клавиши для входа в Boot Menu должны сработать.
- Перезагрузите компьютер вместо выключения и включения, при перезагрузке нажмите нужную клавишу.
- Отключите быстрый запуск (см. Как отключить быстрый запуск Windows 10). В Windows 8.1 для этого зайдите в Панель управления (вид панели управления — значки, а не категории), выберите пункт «Электропитание», в списке слева нажмите «Действия кнопок питания» (даже, если это не ноутбук), отключите пункт «Включить быстрый запуск» (для этого может потребоваться нажать «Изменение параметров, которые сейчас недоступны» вверху окна).


Один из указанных способов обязательно должен помочь со входом в меню загрузки, при условии, что все остальное делается правильно.
Вход в Boot Menu на Asus (для ноутбуков и материнских плат)
Практически для всех настольных компьютеров с материнскими платами Asus, вход в меню загрузки осуществляется нажатием клавиши F8 после включения компьютера (тогда же, когда мы нажимаем Del или F9, чтобы зайти в БИОС или UEFI).

А вот с ноутбуками есть некоторая неразбериха. Чтобы зайти в Boot Menu на ноутбуках ASUS, в зависимости от модели, нужно при включении нажать:
- Esc — для большинства (но не для всех) современных и не очень моделей.
- F8 — для тех моделей ноутбуков Asus, название которых начинается с x или k, например x502c или k601 (но не всегда, есть модели на x, где вход в Boot Menu осуществляется клавишей Esc).
В любом случае, вариантов не так много, так что при необходимости можно попробовать каждый из них.
Как зайти в Boot Menu на ноутбуках Lenovo
Практически для всех ноутбуков и моноблоков марки Lenovo для входа в Boot Menu можно использовать клавишу F12 при включении.

Также дополнительные варианты загрузки для ноутбуков Lenovo можно выбрать, нажав маленькую кнопку со стрелкой рядом с кнопкой питания.
Acer
Следующая по популярности модель ноутбуков и моноблоков у нас — это Acer. Вход в Boot Menu на них для разных версий BIOS осуществляется путем нажатия клавиши F12 при включении.
Однако, на ноутбуках Acer есть одна особенность — часто, вход в Boot Menu по F12 на них не работает по умолчанию и для того, чтобы клавиша заработала, необходимо сначала зайти в БИОС, нажав клавишу F2, а потом переключить параметр «F12 Boot Menu» в состояние Enabled, после чего сохранить настройки и выйти из БИОС.
Остальные модели ноутбуков и материнских плат
Для остальных моделей ноутбуков, а также ПК с разными материнскими платами особенностей поменьше, а потому просто приведу клавиши входа в Boot Menu для них в виде списка:
- Моноблоки и ноутбуки HP — клавиша F9 или Esc, а затем — F9
- Ноутбуки Dell — F12
- Ноутбуки Samsung — Esc
- Ноутбуки Toshiba — F12
- Материнские платы Gigabyte — F12
- Материнские платы Intel — Esc
- Материнские платы Asus — F8
- Материнские платы MSI — F11
- AsRock — F11
Кажется, учел все наиболее распространенные варианты, а также описал возможные нюансы. Если вдруг у вас все так же не получается зайти в Boot Menu на каком-либо устройстве, оставляйте комментарий с указанием его модели, я постараюсь найти решение (и не забывайте о моментах, связанных с быстрой загрузкой в последних версиях Windows, о чем я писал выше).
Видео о том, как войти меню устройств загрузки
Ну и, в дополнение ко всему написанному выше, видео инструкция о входе в Boot Menu, возможно, кому-то окажется полезной.
Также может оказаться полезным: Что делать, если БИОС не видит загрузочную флешку в Boot Menu.
Данная лёгкая сборка сделана на основе нового оригинального образа. В процессе сборки был изменён интерфейс, значки, иконки, картинки. Сборка максимально облегчена и предназначена для установки на персональный компьютер. Включен NET Framework 3.5 и поддержка старых игр.
Особенности сборки:
• Основа сборки оригинал SW DVD5 Windows Professional 10 1703.1 64BIT Russian MLF X21 48036;
• Включен NET Framework 4.7
• Включен NET Framework 3.5
• Включена поддержка старых игр.
• Установлены обновления, актуальные на декабрь 2017
• Патчи и твики при сборке не применялись. Прошиты файлы самой операционной системы.
• Установщик Stop SMS Uni Boot v.6.02.10 (Win 10 PE)X86RU
• Активация автоматическая.
• Приоритет: Игры, интернет.
Изменения:
Отключено:
• Контроль учётной записи, печать, файл подкачки. (Всё можно включить.)
Удалено:
• Восстановление системы, Backup, Кэширование страниц браузера, Индексация, Магазин и все приложения;
• Групповая политика, Драйверы на модемы и принтеры (кроме основных), Темы (кроме основных);
• Заставки, Шрифты не поддерживающие кириллицу, Родительский контроль;
• Домашняя группа, Defender, Cortana, EDGE, xBox, TFTP, IME, HID Button, IIS, Рукопись, Речь, Биометрия;
• Сенсорная клавиатура, Максимально очищена папка «winsxs».
Установка:
• Установка только из-под BIOS. Ключ для установки не требуется. Активация проходит автоматически во время установки;
• К сожалению не все настройки можно сделать во время установки операционной системы поэтому на рабочем столе имеется программа «Restart_Desktop», которую нужно запустить обязательно от администратора для завершения настройки системы и только тогда система примет конфигурацию заявленную в описании;
• Система будет автоматически перезагружена;
• После перезагрузки система полностью налажена и готова к работе, а эту программу нужно удалить перетащив её на значок корзины;
• Программа «Restart_Desktop» была написана мной специально для этой сборки и как она поведёт себя на других сборках не известно.
Системные требования:
• 64-разрядный (x64) процессор с тактовой частотой 1 гигагерц (ГГц) или выше.
• 2 ГБ оперативной памяти (ОЗУ).
• 20 ГБ пространства на жестком диске.
• Графическое устройство DirectX 9 с драйвером WDDM версии 1.0 или выше.
• Разрешение экрана: 800×600 и выше, 32-bit.
• Клавиатура, мышь.
• ДВД-привод или USB вход для установки с носителя.
Контрольные суммы:
CRC32: B43C1D8A
MD4: 2704F6235F8A33EF625C2EE7F7B35D9A
MD5: E0A883F7406565BB00F94E15F83F8168
SHA-1: A391D67BD107C693A714DC5E91C639C7FC6967C6
Информация о софте:
Дата выпуска: 15 января 2018 года
Название: Windows 10 Professional
Версия: Warriors of Games
Разработчик/автор сборки: MicroSoft / Novik
Разрядность: x64
Язык интерфейса: Русский
Таблэтка: Не требуется
Размер: 1.52 GB
Entering the Boot Menu in Windows 10 can be a bit daunting, especially for those who are not tech-savvy. But fear not, as we have got you covered with a simple guide to help you navigate this crucial feature. So, let’s delve into the world of Boot Menu and discover how to access it effortlessly.
To enter the Boot Menu in Windows 10, you can start by restarting your computer. Once the computer restarts, keep a close eye on the screen for the BIOS/UEFI prompt. Typically, this prompt appears for a brief moment and provides instructions on how to enter the Boot Menu. It can be a key combination like F12 or ESC or a single key such as F2 or DEL. By pressing the designated key at the right time, you will be able to access the Boot Menu and explore various options to troubleshoot or change your device’s startup settings. Remember, timing is key!
To enter the boot menu in Windows 10, follow these steps:
- Start your computer or restart it if it’s already on.
- Before the Windows logo appears, repeatedly press the F11 or F12 key.
- This will take you to the boot menu screen, where you can select the device you want to boot from.
- Use the arrow keys to navigate and the Enter key to select your choice.

Understanding Boot Menu in Windows 10
When it comes to troubleshooting or making changes to your Windows 10 system, accessing the Boot Menu can be incredibly useful. The Boot Menu allows you to choose which device or operating system to boot from when you turn on your computer. It also provides access to various advanced boot options that can help resolve issues or enhance performance.
In this guide, we will explore different methods to enter the Boot Menu in Windows 10. Whether you need to boot from an external USB drive, access the Advanced Startup options, or change the boot settings, understanding how to access the Boot Menu can be invaluable.
Method 1: Using Hardware Keys
One of the most common ways to access the Boot Menu in Windows 10 is by using hardware keys during the computer’s startup process. The specific key combination may vary depending on your device, so it’s important to consult your computer’s manual or the manufacturer’s website for the correct key combination.
Here are the general steps to enter the Boot Menu using hardware keys:
- First, make sure your computer is turned off.
- Press the power button to turn on your computer.
- Immediately start pressing the designated key combination for accessing the Boot Menu. This is usually one of the function keys (F1, F2, F12), the Escape key, or the Delete key.
- Keep pressing the key combination until the Boot Menu appears on the screen.
Once you have entered the Boot Menu, you can use the arrow keys to navigate through the options and the Enter key to select an option.
Method 2: Using the Windows 10 Settings Menu
Another method to access the Boot Menu in Windows 10 is through the operating system’s Settings menu. This method is particularly useful if you need to change the default boot device or configure advanced boot options.
Here’s how to access the Boot Menu using the Windows 10 Settings menu:
1. Open the Start menu by clicking on the Windows logo button located on the bottom-left corner of the screen.
2. Click on the «Settings» icon, which resembles a gear.
3. In the Settings menu, click on the «Update & Security» option.
4. From the left-hand side menu, click on «Recovery».
5. Scroll down to the «Advanced startup» section and click on the «Restart now» button.
6. Your computer will restart and display the «Choose an option» screen.
7. Click on the «Troubleshoot» option.
8. On the Troubleshoot screen, click on the «Advanced options» button.
9. Finally, click on the «UEFI Firmware Settings» or «Startup Settings» option to access the Boot Menu.
10. You will now be able to choose your boot options or access advanced boot settings.
Method 3: Using System Configuration
If you prefer a more direct method within Windows 10, you can access the Boot Menu through the System Configuration utility. This method allows you to configure boot options and set the default operating system.
Follow these steps to access the Boot Menu using System Configuration:
1. Press the Windows key + R on your keyboard to open the Run dialog box.
2. Type «msconfig» in the Run dialog box and press Enter.
3. In the System Configuration window, go to the «Boot» tab.
4. Click on the «Boot options» button.
5. Check the «Safe boot» box if you want to enable Safe Mode.
6. Select the Boot Menu option that suits your needs, such as booting from an external USB drive or changing the boot order.
7. Click OK and then Apply to save the changes.
8. Restart your computer to access the Boot Menu with the desired options.
Benefits of Accessing the Boot Menu
Accessing the Boot Menu in Windows 10 provides several benefits:
- You can choose which device to boot from, such as a USB drive or a DVD.
- You can access advanced boot options, including Safe Mode, Startup Repair, and System Restore.
- You can change the boot order to prioritize a specific operating system or device.
- You can troubleshoot and resolve various system issues that may be preventing normal startup.
- You can configure boot settings to optimize the performance of your Windows 10 system.
Troubleshooting Boot Menu Issues
If you encounter any issues while accessing or using the Boot Menu, here are a few troubleshooting steps you can try:
- Double-check the hardware key combination for entering the Boot Menu and make sure you are pressing the correct keys.
- Ensure that your keyboard is functioning properly and connected securely to your computer.
- If you are using a wireless keyboard, switch to a wired keyboard to eliminate any potential connection issues.
- Try using a different USB port for your keyboard, as some ports may not be recognized during startup.
- If you are accessing the Boot Menu through the Windows 10 Settings menu and it’s not working, try using the hardware key method instead.
- Update your system’s BIOS or UEFI firmware to the latest version, as outdated firmware can sometimes cause boot menu issues.
- If none of these steps resolve the problem, consider seeking assistance from a professional or contacting your computer’s manufacturer for further guidance.
By following the steps outlined in this guide, you should now have a clear understanding of how to enter the Boot Menu in Windows 10. Whether you need to troubleshoot an issue, boot from an external device, or configure advanced boot options, accessing the Boot Menu can provide the necessary tools for a successful startup.

Entering the Boot Menu in Windows 10
If you’re looking to access the Boot Menu on your Windows 10 computer, there are a few different methods you can try:
- Option 1: Restart your computer and press the «F8» key repeatedly until the Advanced Boot Options menu appears. From there, select «Boot Menu.»
- Option 2: Press the «Shift» key while clicking on the «Restart» button in the Start menu. This will bring up the Troubleshoot menu, where you can select «Advanced Options» and then «UEFI Firmware Settings» or «BIOS Setup,» depending on your computer.
- Option 3: Open the Settings app by pressing the «Windows» key + «I» and then go to «Update & Security» > «Recovery.» Under «Advanced startup,» click on «Restart now.» This will take you to the Advanced Startup Options menu, where you can select «Troubleshoot» > «Advanced Options» > «UEFI Firmware Settings» or «BIOS Setup.»
Once you’ve entered the Boot Menu, you can navigate using the arrow keys and select an option by pressing Enter. This allows you to boot from a different device or perform system diagnostics.
Key Takeaways — How to Enter Boot Menu Windows 10
- Access the boot menu by pressing the correct key during startup.
- For most Windows 10 devices, the key to enter the boot menu is F12.
- If F12 doesn’t work, try using the Esc or Delete key.
- Once in the boot menu, use the arrow keys to navigate and select the desired option.
- Common options in the boot menu include booting from a USB drive or accessing the BIOS settings.
Frequently Asked Questions
Here are some commonly asked questions about entering the boot menu in Windows 10.
1. How do I access the boot menu in Windows 10?
To access the boot menu in Windows 10, follow these steps:
1. Restart your computer.
2. As the computer starts up, look for the manufacturer’s logo or a message indicating which key to press to enter the boot menu. This key varies depending on the manufacturer, but common keys include F12, ESC, F2, or Del.
3. Press the designated key before the Windows logo appears. Keep in mind that you may need to press the key repeatedly.
This will take you to the boot menu, where you can choose to boot from different devices or enter advanced options.
2. Can I access the boot menu from within Windows 10?
No, you cannot access the boot menu from within Windows 10. The boot menu is a pre-Windows environment that allows you to select the device or options to boot from. You need to access it during the startup process before Windows loads.
3. What should I do if I can’t access the boot menu using the designated key?
If you are unable to access the boot menu using the designated key, try the following:
1. Restart your computer and try pressing a different key. Some computers may use a different key to access the boot menu.
2. Check your computer or motherboard’s manual for the correct key to access the boot menu. The key may vary depending on the manufacturer and model.
3. If you are still unable to access the boot menu, you may need to consult your computer manufacturer or a professional technician for further assistance.
4. Can I change the boot order from the boot menu?
Yes, you can change the boot order from the boot menu in Windows 10. This allows you to prioritize which device the computer boots from. To change the boot order, follow these steps:
1. Access the boot menu using the designated key during startup.
2. Use the arrow keys on your keyboard to navigate to the «Boot» or «Boot Order» tab.
3. Select the desired device (e.g., hard drive, USB drive) and use the «+» or «-» keys to change its position in the boot order.
4. Save the changes and exit the boot menu. Your computer will now boot from the selected device according to the new boot order.
5. Are there any risks involved in accessing the boot menu?
Accessing the boot menu itself does not pose any risks to your computer. However, making changes to the boot order or other advanced options without proper knowledge can lead to unintended consequences.
It’s important to exercise caution and only make changes if you understand the potential impact. If you’re unsure, it’s recommended to consult your computer manufacturer or a knowledgeable professional for assistance.
In conclusion, accessing the Boot Menu in Windows 10 is a simple process that can be done through various methods. One of the commonly used ways is by pressing a specific key during the startup process. Options like F12, Esc, Del, or F10 should be tried depending on your computer’s manufacturer. The Boot Menu allows users to select different boot options, such as booting from a USB drive or accessing the BIOS setup. It is an essential tool for troubleshooting and changing the boot order to prioritize different devices.
Alternatively, the Boot Menu can also be accessed from within the operating system. By following a few simple steps through the Start menu, users can easily restart their computer and enter the Boot Menu. This method can be useful if you are experiencing difficulties accessing the Boot Menu during startup or if you prefer not to interrupt the startup process. Overall, being able to enter the Boot Menu in Windows 10 provides users with greater control and flexibility when it comes to managing their computer’s boot options and configurations.