
Все способы:
- Открываем «Локальную политику безопасности» в Windows 10
- Способ 1: Меню «Пуск»
- Способ 2: Утилита «Выполнить»
- Способ 3: «Панель управления»
- Способ 4: Консоль управления Microsoft
- Вопросы и ответы: 17
Каждый пользователь должен заботиться о безопасности своего компьютера. Многие прибегают к включению брандмауэра Windows, устанавливают антивирус и другие защитные инструменты, но этого не всегда хватает. Встроенное средство операционной системы «Локальная политика безопасности» позволит каждому вручную оптимизировать работу учетных записей, сетей, редактировать открытые ключи и производить другие действия, связанные с наладкой защищенного функционирования ПК.
Читайте также:
Включение / отключение Защитника в Windows 10
Установка бесплатного антивируса на ПК
Открываем «Локальную политику безопасности» в Windows 10
Сегодня мы бы хотели обсудить процедуру запуска упомянутой выше оснастки на примере ОС Windows 10. Существуют разные методы запуска, которые станут наиболее подходящими при возникновении определенных ситуаций, поэтому целесообразным будет детальное рассмотрения каждого из них. Начнем с самого простого.
Для запуска этой оснастки версия Windows 10 должна быть Профессиональная (Professional) или Корпоративная (Enterprise)! В версии Домашняя (Home), установленной преимущественно на множестве ноутбуков, ее нет.
Способ 1: Меню «Пуск»
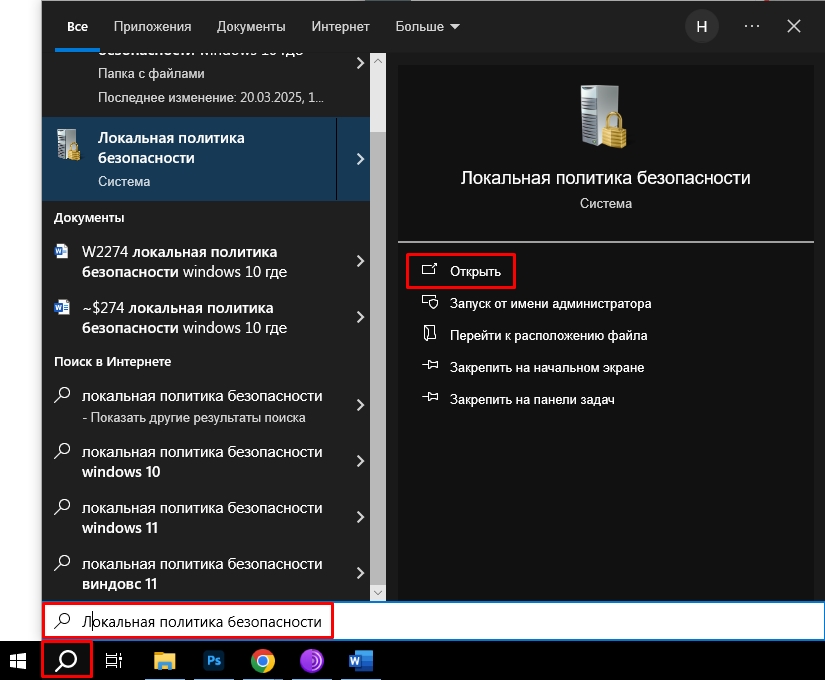
Меню «Пуск» активно задействует каждый пользователь на протяжении всего взаимодействия с ПК. Этот инструмент позволяет осуществлять переход в различные директории, находить файлы и программы. Придет на помощь он и при необходимости запуска сегодняшнего инструмента. Вам достаточно просто открыть само меню, ввести в поиске «Локальная политика безопасности» и запустить классическое приложение.
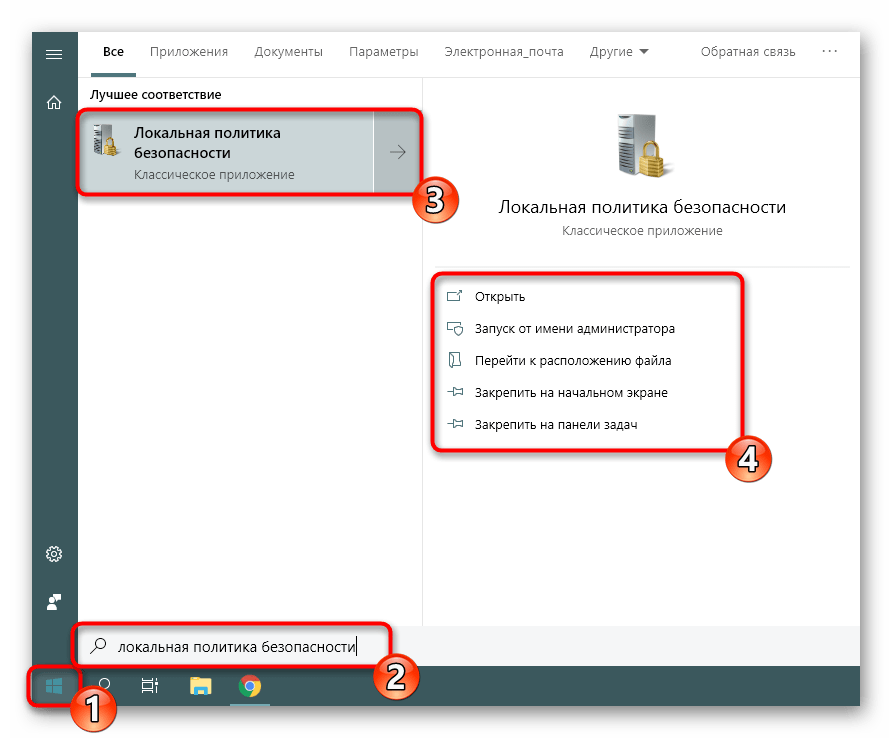
Как видите, отображается сразу несколько кнопок, например «Запуск от имени администратора» или «Перейти к расположению файла». Обратите внимание и на эти функции, ведь они однажды могут пригодиться. Вам также доступно закрепление значка политики на начальном экране или на панели задач, что значительно ускорит процесс ее открытия в дальнейшем.
Способ 2: Утилита «Выполнить»
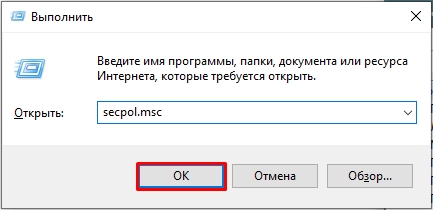
Стандартная утилита ОС Виндовс под названием «Выполнить» предназначена для быстрого перехода к определенным параметрам, директориям или приложениям путем указания соответствующей ссылки или установленного кода. У каждого объекта имеется уникальная команда, в том числе и у «Локальной политики безопасности». Ее запуск происходит так:
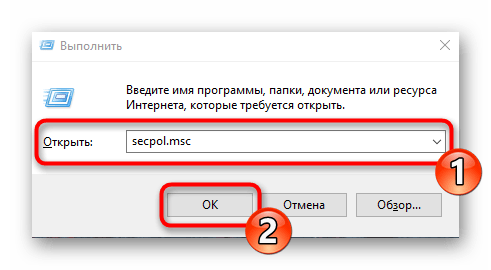
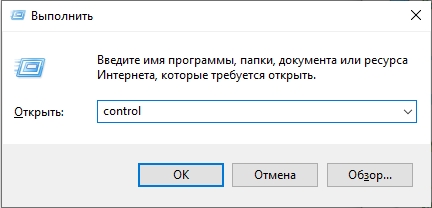
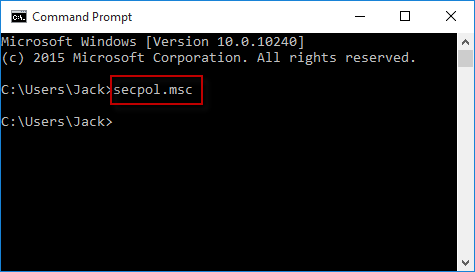
- Откройте «Выполнить», зажав комбинацию клавиш Win + R. В поле пропишите
secpol.msc, после чего нажмите на клавишу Enter или щелкните на «ОК». - Буквально через секунду откроется окно управления политикой.
Способ 3: «Панель управления»
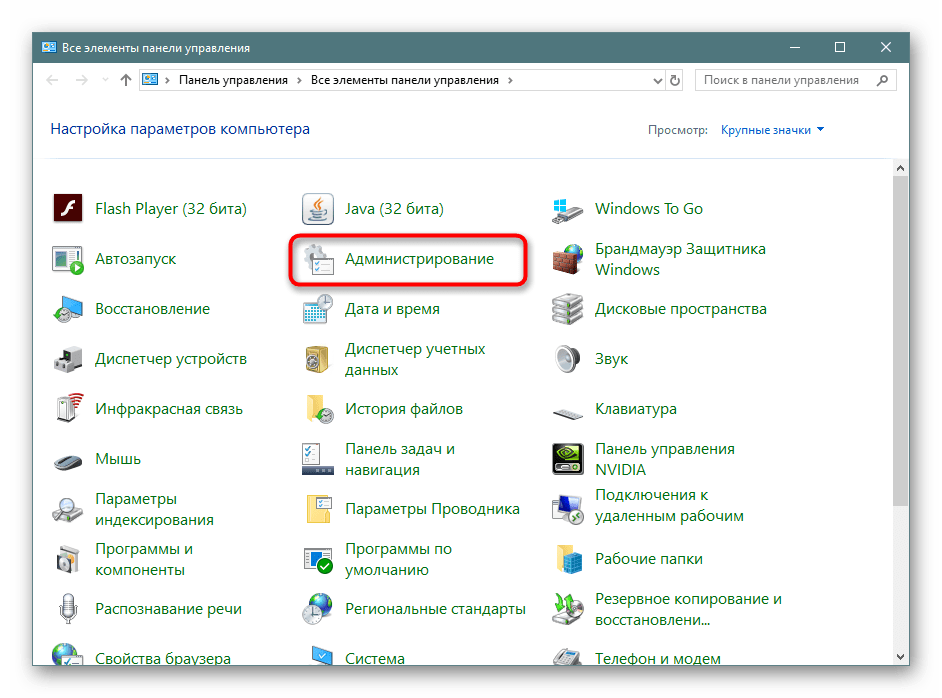
Хоть разработчики операционной системы Виндовс постепенно и отказываются от «Панели управления», перемещая или добавляя многие функции только в меню «Параметры», это классическое приложение все еще нормально работает. Через него тоже доступен переход к «Локальной политике безопасности», однако для этого понадобится выполнить такие шаги:
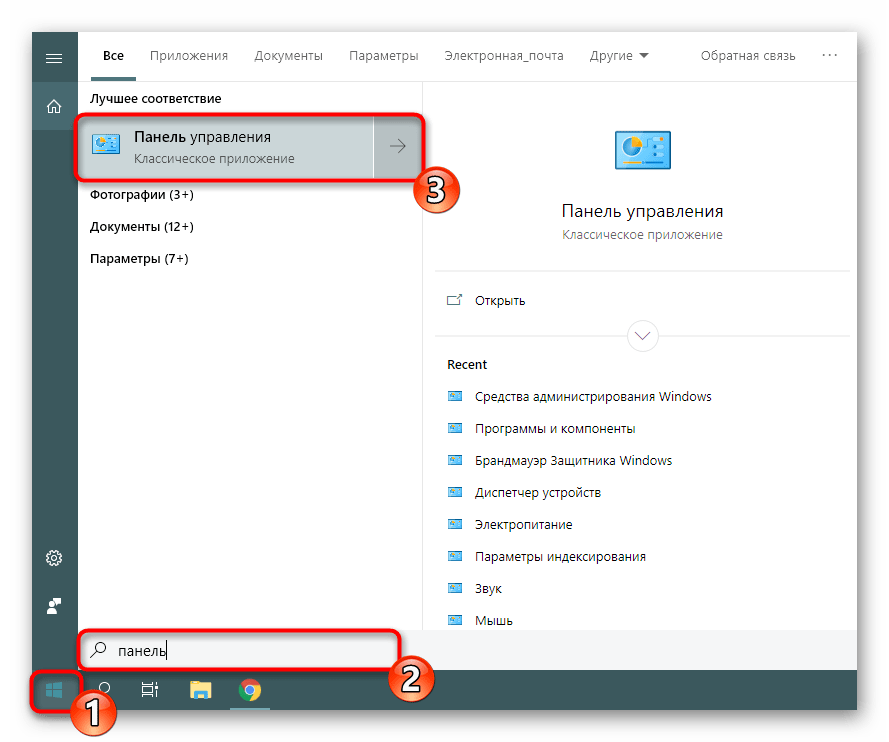
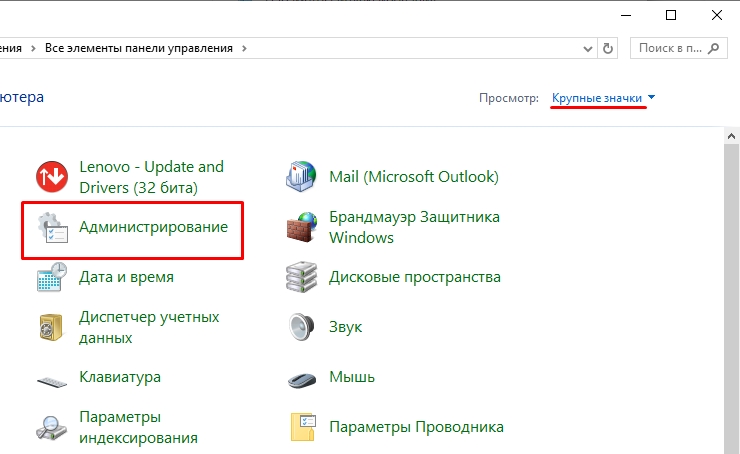
- Откройте меню «Пуск», найдите через поиск «Панель управления» и запустите ее.
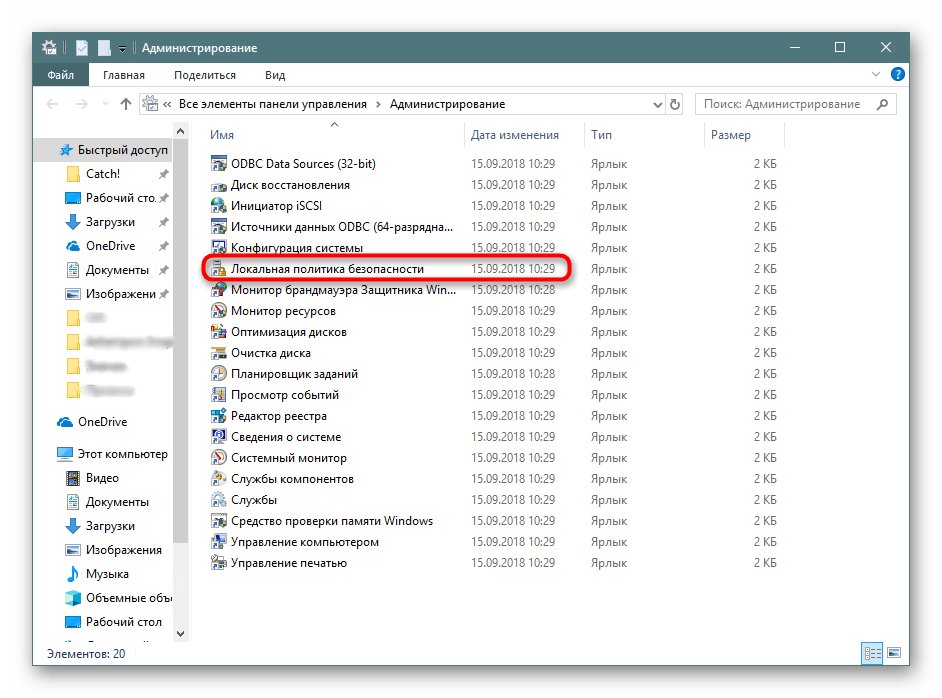
- Перейдите к разделу «Администрирование».
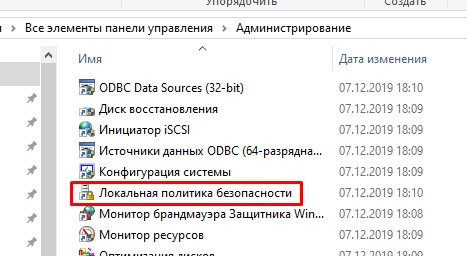
- В списке отыщите пункт «Локальная политика безопасности» и дважды щелкните по нему ЛКМ.
- Дожидайтесь запуска нового окна для начала работы с оснасткой.
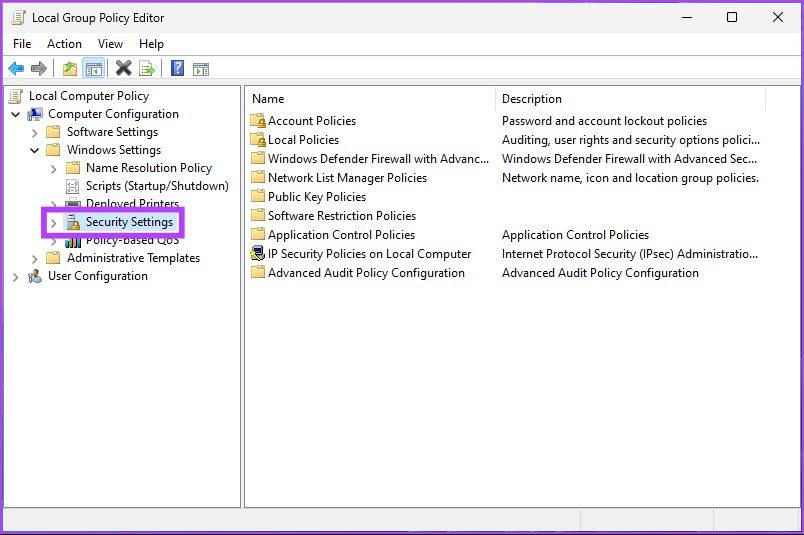
Способ 4: Консоль управления Microsoft
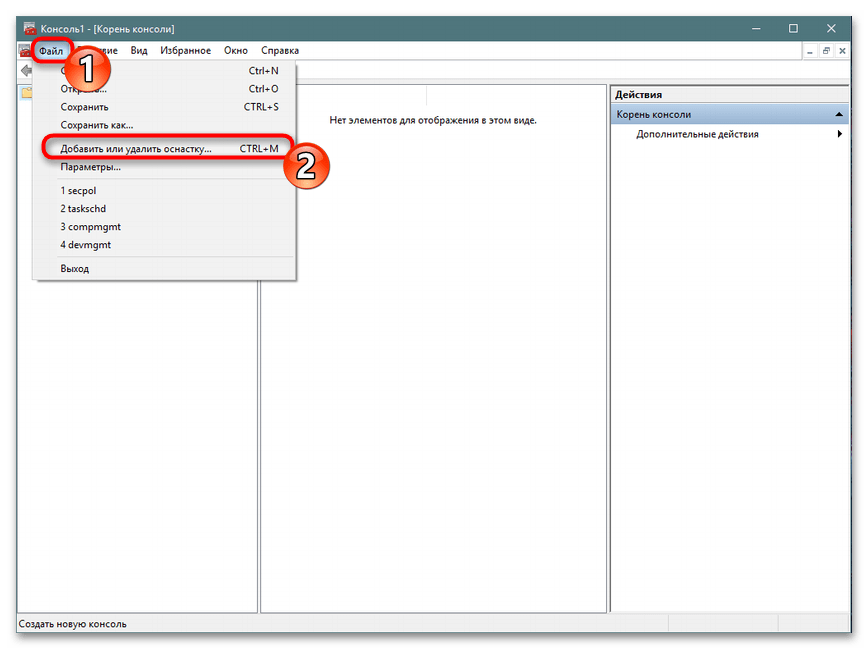
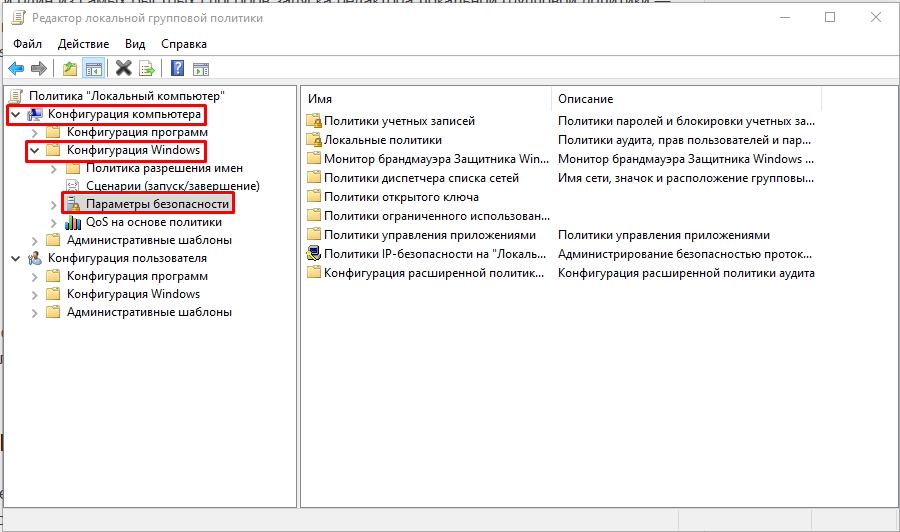
В Консоли управления Майкрософт происходит взаимодействие со всеми возможными в системе оснастками. Каждая из них предназначена для максимально детальной настройки компьютера и применения дополнительных параметров, связанных с ограничениями доступа к папкам, добавлением или удалением определенных элементов рабочего стола и многим другим. Среди всех политик присутствует и «Локальная политика безопасности», но ее еще нужно отдельно добавить.
- В меню «Пуск» найдите
mmcи перейдите к этой программе. - Через всплывающее меню «Файл» приступайте к добавлению новой оснастки, нажав на соответствующую кнопку.
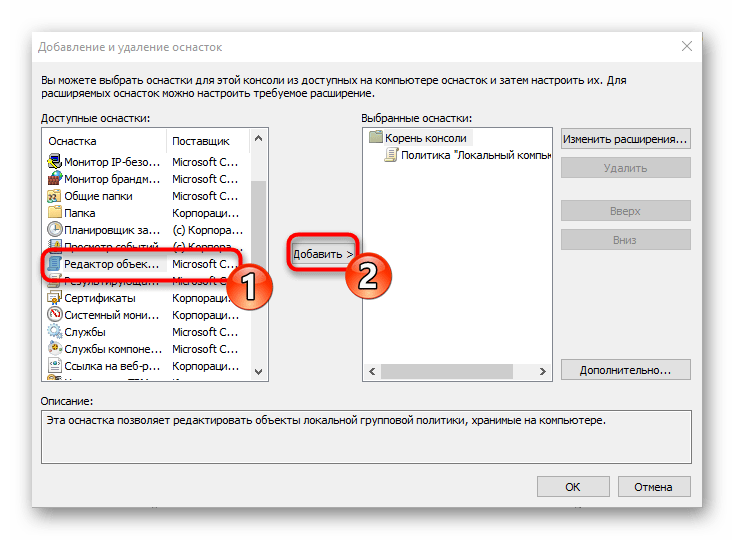
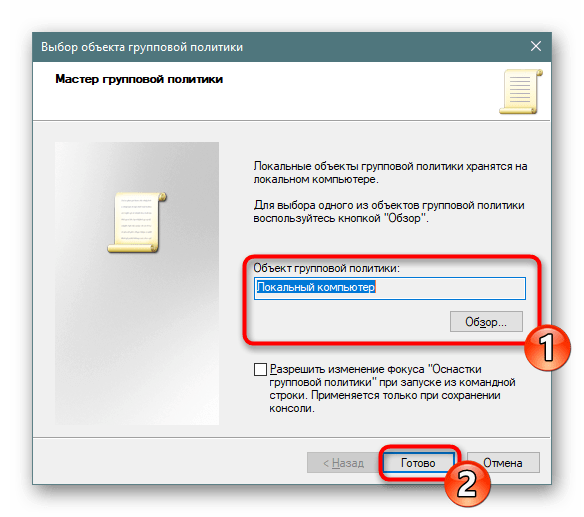
- В разделе «Доступные оснастки» отыщите «Редактор объектов», выделите его и щелкните на «Добавить».
- Поместите параметр в объект «Локальный компьютер» и щелкните на «Готово».
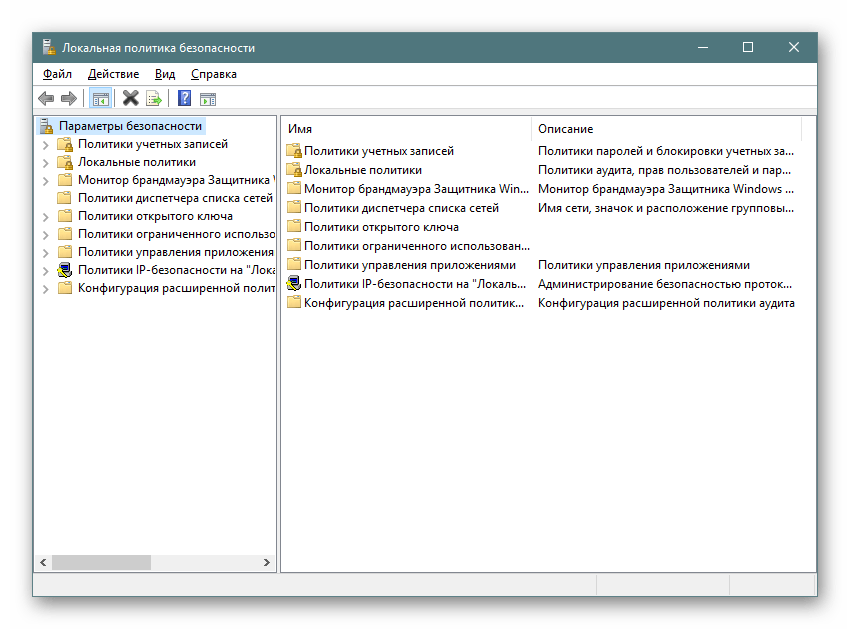
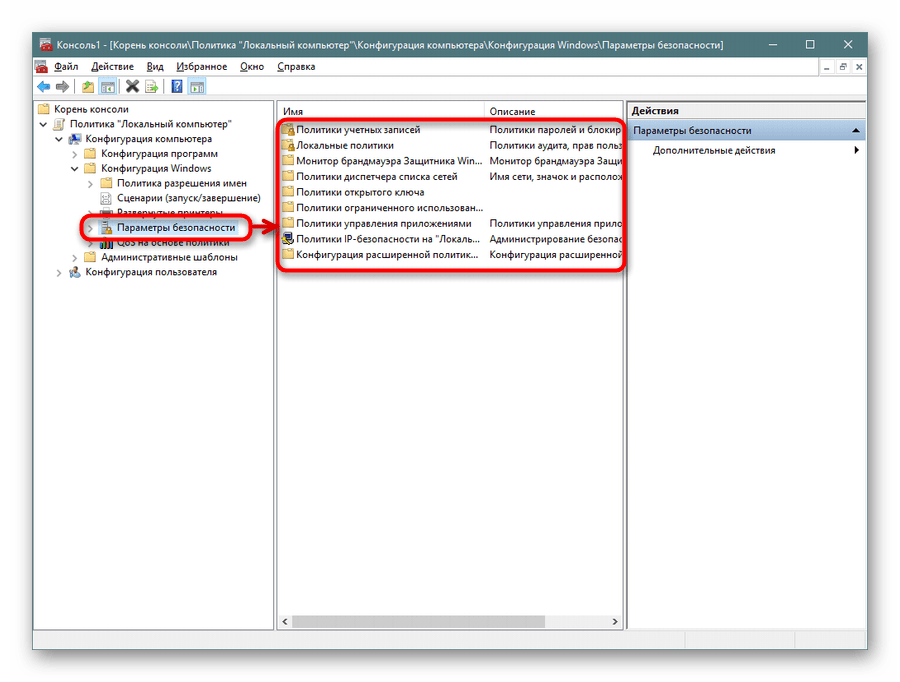
- Осталось только перейти к политике безопасности, чтобы убедиться в ее нормальном функционировании. Для этого откройте корень «Конфигурация компьютера» — «Конфигурация Windows» и выделите «Параметры безопасности». Справа отобразятся все присутствующие настройки. Перед закрытием меню не забудьте сохранить изменения, чтобы добавленная конфигурация осталась в корне.

Приведенный выше способ будет максимально полезен тем юзерам, кто активно использует редактор групповых политик, настраивая там необходимые ему параметры. Если вас интересуют другие оснастки и политики, советуем перейти к отдельной нашей статье по этой теме, воспользовавшись указанной ниже ссылкой. Там вы ознакомитесь с основными моментами взаимодействия с упомянутым инструментом.
Читайте также: Групповые политики в Windows
Что же касается настройки «Локальной политики безопасности», производится она каждым пользователем индивидуально — им подбираются оптимальные значения всех параметров, но при этом существуют и главные аспекты конфигурации. Детальнее о выполнении этой процедуры читайте далее.
Подробнее: Настраиваем локальную политику безопасности в Windows
Теперь вы знакомы с четырьмя различными методами открытия рассмотренной оснастки. Вам осталось только подобрать подходящий и воспользоваться им.
Наша группа в TelegramПолезные советы и помощь
Quick Tips
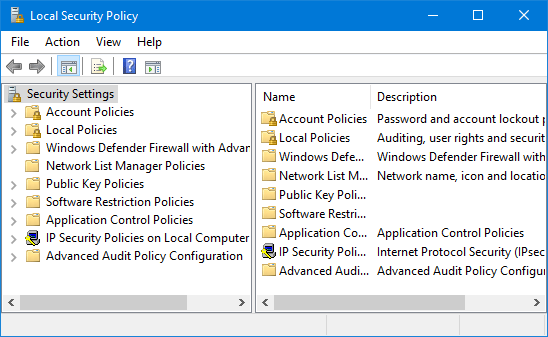
- Local Security Policy lets you manage various security settings, such as local policies, event logs, and more.
- However, you can only access it on Windows 11 Pro, Enterprise, and Education editions.
- Quickly launch Local Security Policy, open the Run Command box > type secpol.msc, and press Enter.
Method 1: Using Windows Search
Step 1: Press the Windows key on your keyboard or click the on-screen Windows icon.
Step 2: Type Local Security Policy and click Run as administrator.

In the prompt, select Yes.
If you cannot see the search bar on your Windows PC, fix the missing search bar by following a few simple steps.
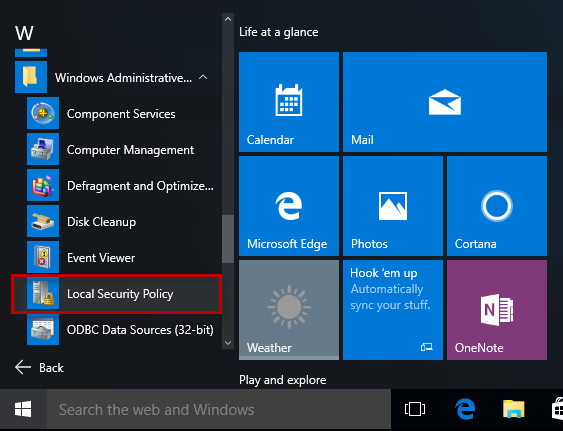
Step 1: Press the Windows key on the keyboard or click the Windows icon on the taskbar and select All apps.
Step 2: From the list of programs, scroll down and click on Windows Tools.
Note: If you are on Windows 10, find the Windows Administrative Tool.

Step 3: Finally, click on Local Security Policy.

If you don’t want to access Windows Tools from the Start Menu, there are multiple ways to do so.
Method 3: Using File Explorer
Step 1: Press the Windows key on your keyboard, type File Explorer, and click Open.
Step 2: Navigate to the address bar, type the below command, and hit Enter.
secpol.msc

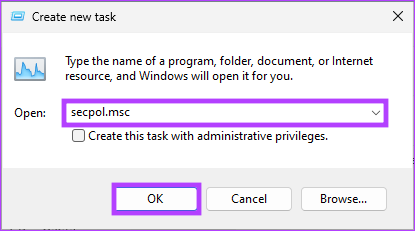
Method 4: Using Task Manager
Step 1: Press the Windows key on your keyboard, type Task Manager, and click Open.
Step 2: Click on Run new task.

Step 3: In the Create new task window, in the text field, type secpol.msc, and click OK.
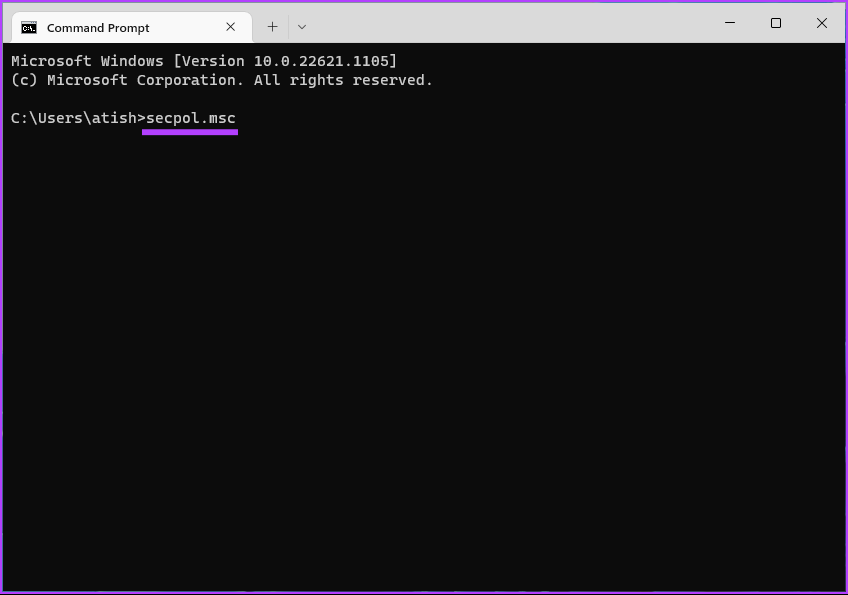
Method 5: From Run Command, Command Prompt, or PowerShell
Step 1: Press the Windows key on your keyboard, type Command Prompt or PowerShell or Windows Terminal, and click Run as administrator.
In the prompt, select Yes.
Step 2: Type the below command and hit Enter.
secpol.msc
Also Read: Top ways to back up the Local Group Policy editor on Windows 11
Method 6: Using Group Policy
Group Policy Editor is an excellent tool for managing Windows settings, including the Windows Firewall.
Step 1: Press the Windows keys on your keyboard, type gpedit, and click Open.
Step 2: In the left pane, under Local Computer Policy, select Computer Configuration.

Step 3: In the right pane, double-click on Windows Settings.

Step 4: Select the Security Settings option.
If you have any queries, check out the FAQ section below.
FAQs
1. Does changing local security policy require a reboot?
It depends on the changes to the local security policy and the operating system being used. Some changes to the local security policy might take effect immediately, while policies such as user rights, password policies, or firewall rules may require a reboot for the changes to take effect.
2. Who can modify a security policy?
It depends on the security policy and the operating system you use. System administrators are usually in charge of security policies because they have the necessary rights and permissions to do so.
Was this helpful?
Thanks for your feedback!
The article above may contain affiliate links which help support Guiding Tech. The content remains unbiased and authentic and will never affect our editorial integrity.
Всем привет! В статье ниже я распишу все основные методы и способы открыть «Локальную политику безопасности» в Windows 10, 11, 7 или 8. Инструкции подойдут для любой современной, и даже старой версии нашей любимой операционной системы. В случае возникновения каких-то проблем – пишите в комментариях, и я постараюсь вам помочь.
Содержание
- Способ 1: Поиск Windows
- Способ 2: Окно «Выполнить».
- Способ 3: Панель управление
- Способ 4: Через «Редактор локальной групповой политики»
- Видео
- Задать вопрос автору статьи

Где находится «Локальная политика безопасности» в Windows 10, 11, 7 или 8. Не важно, что вы ищите, самый простой быстрый способ – это воспользоваться поиском Виндовс. Нажмите по кнопке с изображением лупы или по строке поиска. Её также можно найти, нажав «Пуск». После этого вводим запрос:
Локальная политика безопасности
Вам останется просто выбрать эту системную утилиту и нажать «Открыть».
Читаем – как ускорить компьютер и работу системы на 20-30%.
Способ 2: Окно «Выполнить».
Еще один вариант, это воспользоваться специальной, встроенной утилитой «Выполнить», которая быстро открывает системные программы.
Читаем – как очистить комп от мусора.
- Зажмите клавиши на клавиатуре:
+ R
- Введите:
secpol.msc
- Далее вы увидите нужное вам окошко.
Способ 3: Панель управление
- Тут мы аналогично воспользуемся окном «Выполнить» – зажимаем:
+ R
- Вписываем запрос на открытие панели управления:
control
СОВЕТ! Вы аналогично можете открыть эту панель с помощью поиска.
- Находим раздел «Администрирование». Если вы видите, какую-то другую картинку, как на скриншоте ниже, то поменяйте режим «Просмотра» и поставьте крупные или мелкие значки.
- В списке просто найдите нужный вам элемент.
Способ 4: Через «Редактор локальной групповой политики»
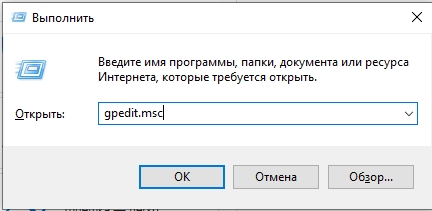
- Жмем:
+ R
- Вводим:
gpedit.msc
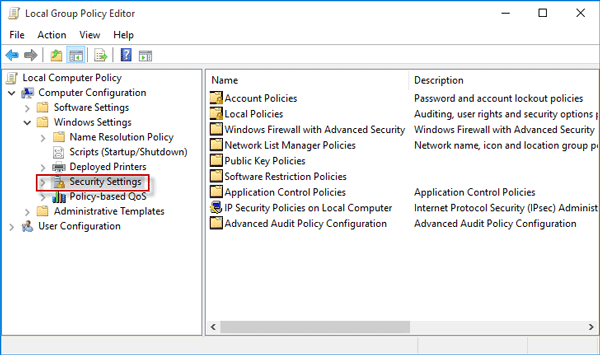
- Теперь откройте основной, глобальный раздел «Конфигурация компьютера».
- Кликаем по подразделу «Конфигурация Windows».
- Раскрываем пункт «Параметры безопасности». Справа вы увидите все пункты, которые и относятся к «Локальной политики безопасности», просто здесь она имеет другое название.
Есть еще один вариант – через консоль управления, но я не думаю, что кто-то будет пользоваться этим методом, так как он достаточно «костыльный». Если вы найдете какой-то свой удобный и интересный способ – поделитесь им в комментариях. Пользователи портала WiFiGiD.RU будут вам благодарны.
Видео
- Blog>
- Windows 10>
- 5 Ways to Open Local Security Policy in Windows 10
Local Security Policy is a built-in desktop app in Windows 10. Sometimes you need to use it to make some security settings for the user accounts on your computer. If you have no idea how to open Local Security Policy in Windows 10, check out this post.
Notes: The Windows 10 Home edition does not come with Local Security Policy. The five ways below apply on Windows 10 Enterprise/Pro/Education. Make sure you are signed in to Windows 10 with an admin account or you have administrative privileges.
Method 1: through Search
Start typing “local security policy” (without quotation marks) in the Search box on the left side of the Windows 10 taskbar. When the Local Security Policy (Desktop app) shows in the search results list, click on it to open it.
Method 2: from Start menu
Bring up the Windows 10 Start menu, and then click All apps > Windows Administrative Tools > Local Security Policy.
Method 3: via Run dialog
Open the Run dialog box using Win + R key, type secpol.msc in the field and click OK. Then the Local Security Policy will open.
Method 4: through Local Group Policy
Open the Local Group Policy Editor, and then go to Computer Configuration > Windows Settings > Security Settings.
Method 5: with Command Prompt or Windows PowerShell
Step 1: Open a Command Prompt window or open a Windows PowerShell window.
Step 2: Type in secpol (or secpol.msc) and press the Enter key. Then the Local Security Policy will open.
How to Open Local Security Policy on Windows 11/10: A Comprehensive Guide
Windows operating systems come equipped with a wealth of features designed to enhance both usability and security. One such feature is the Local Security Policy, which plays a critical role in managing a computer’s security settings. Whether you’re an individual user seeking to tighten your system’s security or an IT professional overseeing a network, understanding how to access and utilize the Local Security Policy is essential. This article provides a thorough guide on how to open the Local Security Policy in Windows 11 and Windows 10, along with insights into its functionalities and tips for effective management.
Understanding Local Security Policy
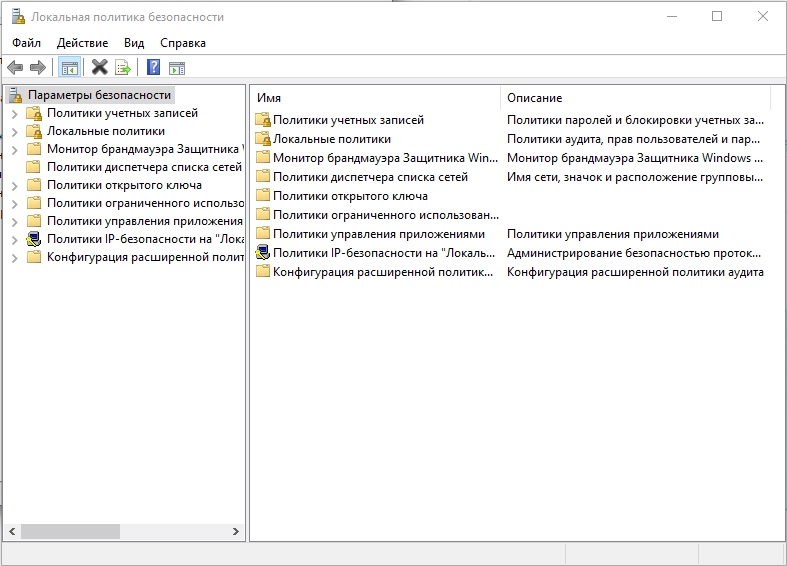
The Local Security Policy is a Microsoft Management Console (MMC) tool that provides a centralized platform to manage the security settings of your computer. These settings are crucial not only for protecting your data but also for ensuring compliance with organizational policies.
Some of the key functions of Local Security Policy include:
- User Rights Assignment: Control what users can or cannot do on their computers.
- Security Options: Manage various security settings, including password policies and account lockout policies.
- Audit Policy: Configure auditing for system security events, allowing for the monitoring and logging of user activity.
Method 1: Using the Run Dialog
- Open the Run Dialog: Press
Windows + Ron your keyboard. - Type the Command: Enter
secpol.mscand hitEnter.- If prompted by User Account Control (UAC), click
Yesto allow access.
- If prompted by User Account Control (UAC), click
- Local Security Policy Window: The Local Security Policy window will now open, displaying various security settings.
- Open the Start Menu: Click on the Start button or press the
Windowskey on your keyboard. - Search for the Policy: Type
Local Security Policyin the search box. - Access the Tool: Click on the Local Security Policy app from the search results. If UAC prompts appear, confirm access.
Method 3: Via Control Panel
- Open Control Panel: Go to the Start menu and search for
Control Panel. - Navigate to Administrative Tools: Click on
Administrative Tools. - Access Local Security Policy: Double-click on
Local Security Policywithin the Administrative Tools window.
Method 4: Using Microsoft Management Console (MMC)
- Open Run Dialog: Press
Windows + R. - Launch MMC: Type
mmcand clickOK. - Add the Local Security Policy Snap-in:
- In the MMC console, go to
File>Add/Remove Snap-in. - In the available snap-ins box, select
Local Security Policyand clickAdd. - Choose
Local Computerand clickFinish, thenOK.
- In the MMC console, go to
- View the Local Security Policy: You’ll now see the Local Security Policy under the console tree.
Method 5: Using Windows Settings (Windows 11)
- Open Settings: Click on the Start Menu and select
Settings. - Navigate to Privacy & security: Click on
Privacy & securityin the left sidebar. - Access Windows Security: Click on
Windows Security. - Explore Security Features: From this menu, you may not have direct access to all Local Security Policies, but you can manage key components such as Windows Defender, firewalls, and more.
Security Policies Within the Local Security Policy
Once you have access to the Local Security Policy, you’ll encounter several categories of security options. Here are some of the most notable sections to explore:
Account Policies
- Password Policy: Here, you can configure whether passwords must meet complexity requirements and set maximum and minimum password ages.
- Account Lockout Policy: This allows you to specify how many failed logon attempts will cause an account to be locked.
- Kerberos Policy: For systems utilizing Kerberos authentication, these settings dictate ticket lifetimes and enforcement.
Local Policies
- User Rights Assignment: This section determines which users can perform specific actions, such as shutting down the system or accessing the system from the network.
- Audit Policy: Set rules for auditing various actions taken on the computer, providing you with logs for security analysis.
- Security Options: Contains a wide range of security settings, including disabling or enabling features such as interactive logon and user account control settings.
Event Log
This area allows you to configure how event logging is handled on your computer. You can adjust settings related to:
- Maximum log size.
- Retention method.
- Whether the system overwrites old events.
Restricted Groups
This feature allows you to define which groups must contain specific users, enabling you to manage user group memberships more effectively.
Tips for Managing Local Security Policy
Regular Review
Regularly reviewing your Local Security Policies is crucial for maintaining security. As new threats emerge, you may need to adjust your settings accordingly.
Document Changes
Whenever you make changes to your Local Security Policy, document them. Keeping a log helps to maintain transparency and assists in troubleshooting any issues later.
Use Group Policy Management for Networks
If you manage multiple computers on a network, consider using Group Policy Management for centralized management. Local Security Policies apply to individual machines, while Group Policies allow you to enforce settings network-wide.
Test Changes in a Controlled Environment
Before applying broad changes, test them in a controlled environment to ensure that there are no adverse effects on system accessibility or stability.
Backup Current Policies
Before making significant changes, backup your current Local Security Policy settings. This will allow you to restore to a previous state if necessary.
Troubleshooting Common Issues
While accessing the Local Security Policy and adjusting settings is typically straightforward, users may encounter issues. Here are some common problems and their solutions:
Unable to Open Local Security Policy
If you’re unable to access the Local Security Policy via any of the methods provided, try these steps:
- Check Your Windows Version: The Local Security Policy is not available in Windows Home editions. Ensure you are using Windows Professional, Enterprise, or Education.
- Run as Administrator: Try running the command as an administrator. Right-click the Start button, select
Windows Terminal (Admin), and entersecpol.msc. - System File Check: Run the System File Checker tool to repair missing or corrupted system files that might be preventing access.
Changes Not Taking Effect
If you’ve made changes to the Local Security Policy but they don’t seem to apply, consider the following troubleshooting tips:
- Log off or Restart: Some changes require you to log off or restart your computer to take effect.
- Check Group Policies: If your computer is part of a domain, Group Policy may override Local Security Policies. Consult with your IT administrator.
Security Policies Not Found
If specific Local Security Policies you expect to see are missing, it might be due to:
- Windows Version Limitations: Certain policies may be exclusive to higher editions of Windows.
- Corrupted Profile: If user profiles are corrupted, it could cause issues. Create a new user profile to see if the policies are accessible there.
Conclusion
Understanding how to access and manage the Local Security Policy in Windows 11 and 10 is crucial for maintaining system security and user compliance. By implementing effective policies, you can enforce security boundaries that protect against unauthorized access and data breaches. Regularly reviewing and adjusting these settings ensures that your system remains resilient to new threats and aligns with best practices.
As you become more familiar with the Local Security Policy, you’ll find that it is a powerful tool in safeguarding your computer and fostering a secure computing environment. By following the methods outlined in this article and applying best practices, you can maintain a robust security posture on your Windows device.