
The Windows Programs and Features tool is a built-in feature in Windows 10 that can be used to uninstall programs, change the settings of programs, and update or upgrade installed programs. It is also known as “appwiz cpl”, “appwiz cpl.exe”, or just “CPL”.
This tool has been around since Windows Vista and it was originally called Add or Remove Programs but was renamed to Programs and Features in Windows 7. It is a very simple interface that allows you to uninstall, change settings for, update or upgrade installed programs.
There are a number of ways to open the Windows Programs and Features tool, which we are going to look at in this article.
1). Using the Run Command Dialog Box
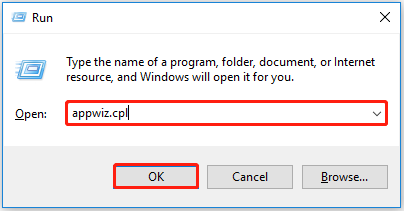
The Windows Programs and Features tool is a built-in utility that allows you to uninstall, change, or repair a program. It’s an appwiz.cpl file that can be accessed by using the Run command dialog box.
There are two ways to open the Run command dialog box:
1) Press the Windows key and type «appwiz cpl» in the search bar.
2) Press the Start button on your desktop and type «appwiz cpl» in the search bar. Then click Ok to open the Programs and Features Tool.
2). Using the Quick Access Menu
The Windows Programs and Features tool is available from the Quick Access Menu. It can help you find and remove programs that you no longer need.
Steps to Using the Quick Access Menu to open The Windows Programs and Features tool:
1) Open the Start menu.
2) Open the Settings app.
3) Click on «Apps» in the left-hand pane of Settings app.
4) Select «Appwiz.»
5) Click on «Cpl.»
3). Using the Windows Search Bar
The Windows Programs and Features tool is a useful tool that allows you to manage your installed programs. In order to access the tool, we will need to use the Search Bar.

To open the Windows Programs and Features tool in Windows 10, follow these steps:
- Click on the search bar at the bottom of your screen.
- Type «programs» and press enter.
- Press on «Windows Settings» under Programs and Features.
4). Using the Control Panel
The Control Panel is a tool in Windows that provides an easy way to manage all the different programs and features that are installed on your computer.

Steps to Use the Control Panel to open The Windows Programs and Features tool:
1. Press the Win+X keys on your keyboard simultaneously.
2. Click on «Control Panel».
3. Select «Programs and Features».
4. Click on «Windows» in the left-hand side of the window, then select «Windows 10».
5. You will now see a list of installed programs in Windows 10, including all programs you have installed as well as all programs installed by default when you first set up Windows 10.
5). Using the Command Prompt or PowerShell
When you want to use the Command Prompt or PowerShell to open The Windows Programs and Features tool, there are a few steps that you need to take.
1) Open Command Prompt or PowerShell (Command Prompt is recommended as it has a more user-friendly interface)
2) Type «appwiz cpl» without quotes and press Enter
3) Click on «Windows features» and then click on «Turn Windows features on or off»
4) Check all of the boxes to turn them on, then click ok.
6). Using the File Explorer
The Windows Programs and Features tool allows users to change settings for their apps and hardware. It is also a good way to find out what software is already installed on your computer.

There are three steps to using the File Explorer to open the Windows Programs and Features tool:
1. Launch File Explorer from the Start menu or taskbar.
2. Click on this icon in the toolbar of File Explorer:
3. Navigate through this folder until you see a file called «Programs and Features».
7). Through System Settings
In order to go through the steps to open The Windows Programs and Features tool, you need to follow a few steps.
Step 1: Press Windows Key + X.
Step 2: Type appwiz cpl in the search bar and hit enter.
Step 3: Click on the Programs and Features tab.
Step 4: Click on Turn Windows features on or off.
Step 5: Check out the checkbox next to Open The Windows Programs and Features tool in order to turn it on or off.
8). Creating a Shortcut For Programs and Features
A Programs and Features shortcut is an appwiz shortcut that automatically opens up the Programs and Features app when you tap on it. This appwiz shortcut is a quick way to find new apps or features in Windows. It lets you quickly get to the right place without having to search through the Start menu.
Creating a Programs and Features shortcut is easy! Here’s how:
- Create a new shortcut on your home screen and give it a name (e.g., «Programs»)
- Click on «Edit» and then click on «Add Shortcut» at the bottom left corner of your screen. This will open up another menu where you can find all your apps, features, and shortcuts.
- Click on your desired app or feature and drag it into this menu.
- When you’re done creating shortcuts, click on «Done.»
FAQs
1). How can I open the Windows Programs and Features Tool?
The Windows Programs and Features tool is a built-in tool in Windows 10 that allows you to manage your installed programs.
The Windows Programs and Features Tool is a built-in tool in Windows 10 that allows you to manage your installed programs. The tools can be accessed from the Control Panel, but it is easier to use this tool as it lets you manage the programs with just one click.
2). What is the Windows Programs and Features Tool?
The Windows Programs and Features tool is a Microsoft utility that allows users to easily manage installed software and features on their computer.
The Windows Programs and Features tool is a Microsoft utility that allows users to easily manage installed software and features on their computer. It can be accessed through the Control Panel of the PC. It can help you find out what programs should be removed, which ones are outdated, or which ones may cause problems with your computer.
The Windows Programs and Features tool is accessible through Control Panel in the PC’s operating system, but it also has an app for mobile devices called «Programs & Features.»
3). Why should I use the Windows Programs and Features Tool?
The Windows Programs and Features Tool is a utility that helps you to uninstall, disable, or change the settings of programs that are currently installed on your computer.
There are many reasons why you should use this tool. It allows you to uninstall unwanted programs and give more space for other programs that are important for your work. It also helps you to disable and change the settings of any program so that it doesn’t interfere with other software or hardware.
The Windows Programs and Features Tool is a must-have utility for all users who have Windows 10 operating system.
4). What does the Windows Programs and Features Tool do?
The Windows Programs and Features Tool is a tool that helps you uninstall, disable, or remove programs.
The Windows Programs and Features Tool is a tool that helps you uninstall, disable, or remove programs from your Windows 10 PC. It can also help you find the most appropriate driver for your device.
The Windows Programs and Features Tool has been available since the release of Windows 10 in 2015.
5). How can I use the Windows Programs and Features Tool?
The Windows Programs and Features Tool can be used to find and remove programs that you don’t need. If a program has been installed by accident, then you can use the tool to uninstall it.
The Windows Programs and Features Tool is a powerful tool for users who want to remove programs on their computer. The program is located in the Control Panel, and it has two main functions:
- Find programs that aren’t necessary
- Remove unnecessary programs
The Windows Programs and Features Tool can be used as a quick way to uninstall software if you have accidentally installed it or if you want to uninstall an application that was installed by mistake.
Не все системные компоненты и даже не все стандартные программы включены в последних версиях Windows по умолчанию: для работы некоторых из них требуется установка со стороны пользователя. Это могут быть «Беспроводный дисплей», Песочница, виртуальные машины Hyper-V, .NET Framework или Telnet, Подсистема Windows для Linux, а в некоторых случаях даже такие программы как «Блокнот», которые тоже теперь относятся к опциональным компонентам.
В этой инструкции для начинающих о том, как установить дополнительные, не установленные по умолчанию, компоненты Windows 11 и Windows 10 — сейчас это выполняется сразу в двух расположениях системы.
- Установка компонентов в панели управления
- Дополнительные компоненты в Параметрах
- Установка в командной строке
Установка компонентов в панели управления
В Windows 11 и последних версиях Windows 10 установка дополнительных компонентов возможна сразу в двух расположениях: через панель управления и в параметрах. При этом компоненты в этих двух расположениях не дублируют друг друга. Сначала об установке компонентов в «Панель управления».
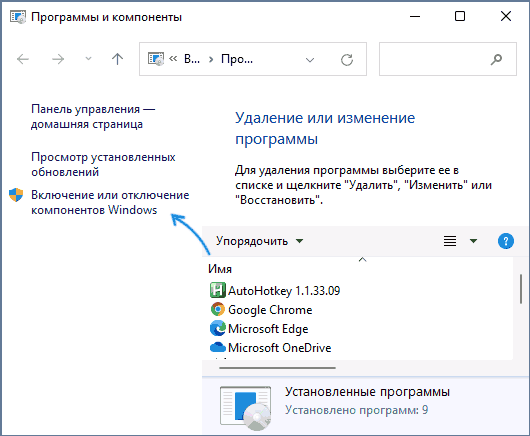
- Зайдите в Панель управления (можно использовать поиск в панели задач) и откройте пункт «Программы и компоненты». Второй путь попасть в нужное окно — нажать клавиши Win+R на клавиатуре, ввести appwiz.cpl и нажать Enter.
- В открывшемся окне слева нажмите «Включение или отключение компонентов Windows».

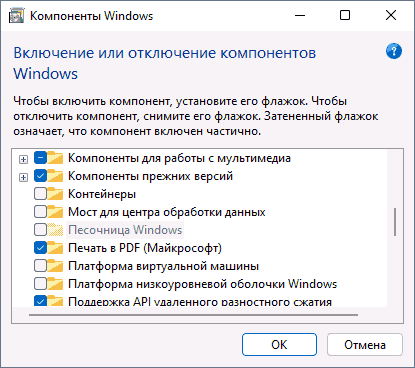
- Отметьте компоненты, которые требуется установить и нажмите «Ок».

- Дождитесь завершения установки, а при запросе на перезагрузку компьютера, выполните перезагрузку.
На этом установка требуемых компонентов будет завершена, и они должны исправно работать.
При необходимости удаления установленных описанным методом компонентов, зайдите в то же окно, снимите отметку с соответствующего компонента и нажмите «Ок»: будет выполнено удаление, для некоторых пунктов — с необходимостью последующей перезагрузки.
Как установить дополнительные компоненты в параметрах
Второе расположение, где выполняется установка дополнительных компонентов в последних версий Windows — «Параметры». Как было отмечено ранее, в списке доступных к установке элементов присутствует отличающийся от «панели управления» набор.
Установка дополнительных компонентов в Параметрах приложений Windows 11
В Windows 11 для установки дополнительных компонентов через Параметры выполните следующие шаги:
- Откройте Параметры (можно нажать клавиши Win+I) и перейдите в раздел «Приложения».
- Откройте пункт «Дополнительные компоненты». Обновление: в Windows 11 24H2 пункт «Дополнительные компоненты» находится в разделе «Система».

- В разделе «Добавление дополнительного компонента» нажмите «Посмотреть функции».

- Отметьте дополнительные компоненты, которые требуется установить и нажмите «Далее».
- Нажмите кнопку «Установить» и дождитесь завершения установки.


Опциональные компоненты в параметрах Windows 10
В Windows 10 все действия очень похожи, присутствуют лишь незначительные отличия в пути к нужным разделам параметров:
- Откройте Параметры и перейдите в раздел «Приложения».
- В пункте «Приложения и возможности» нажмите по ссылке «Дополнительные компоненты».

- Вверху следующего окна нажмите «Добавить компонент».

- Отметьте дополнительные компоненты, которые нужно установить и запустите установку кнопкой внизу окна выбора.


Установка компонентов в командной строке
Существует возможность установки дополнительных компонентов с помощью командной строке и команд Dism.exe. Получить список доступных в вашей версии Windows компонентов и их статус можно командой Dism /online /Get-Features
Последующая установка выполняется в командной строке, запущенной от имени администратора командой вида:
Dism /online /Enable-Feature /FeatureName:ИМЯ_функции /All
Более подробно об управлении дополнительными компонентами с помощью Dism можно прочитать в официальной справке на сайте Майкрософт.
-
Home
-
News
- Ways to Open Windows Programs and Features
By Shirley | Follow |
Last Updated
This article from MiniTool introduces some ways to help you easily open Windows Programs and Features tool in Windows 10. You can choose the most convenient way according to your preference.
The programs on your computer are listed in Windows Programs and Features. You can select them in the program list to change, uninstall, or repair them. So, where is Windows Programs and Features? There are detailed instructions below.
How to Open Windows Programs and Features in Windows 10
Method 1: Using the Windows Search Box
You can directly use the Windows Search Box to search for Programs and Features, which is very useful if you know the name of a certain function.
Step 1: Click the search box of your computer and type Programs and Features to search, and then select Apps and features under Best match.
Step 2: Go to Windows Programs and Features on the right of the Apps and features tab.
Related article: Windows 10 Search Bar Missing? Here Are 6 Solutions
Method 2: Using Windows Settings
We may often use Windows Settings to set the time, language, network, etc. of our computer. At the same time, Windows Settings can also help us access Windows Programs and Features. Here are the major steps:
Step 1: Input Settings in the search box to access Windows Settings.
Step 2: Select Apps > Apps and features. On the right panel, scroll down to find Programs and Features under Related settings.
Related article: What to Do When Windows 10/11 Settings App Is Not Opening?
Method 3: Using Control Panel
The Control Panel allows the user to configure the computer’s accessibility features, add hardware, and more. In addition, the Control Panel also supports us to access Windows Programs and Features to uninstall the program.
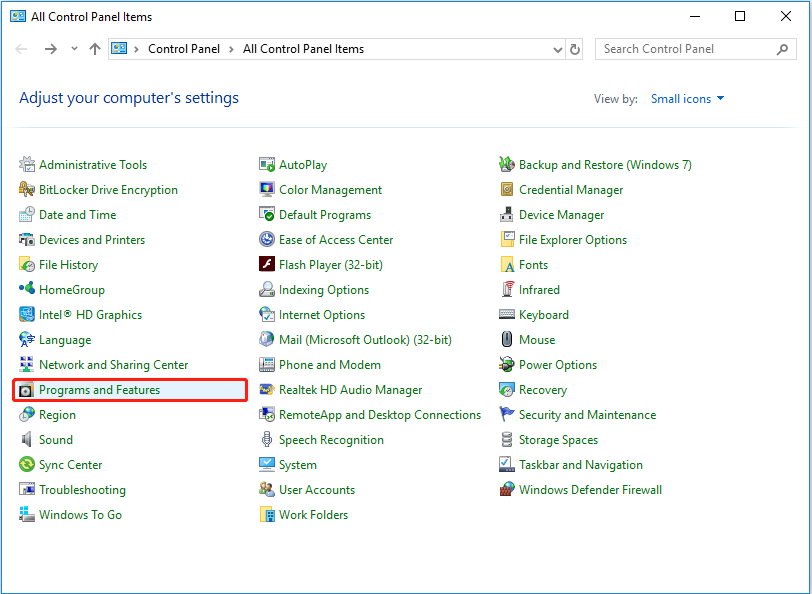
Step 1: Open the Control Panel via the Windows search box.
Step 2: Set to view by small icon and click Programs and Features in the window.
Method 4: Using a Shortcut
Compared with other methods, we may prefer to enter some programs directly from the desktop icon. To achieve this function, we need to create a desktop shortcut for Windows Programs and Features. You can read on to find detailed instructions.
Step 1: Right-click any blank space on the computer desktop. And move the mouse to New, and select Shortcut.
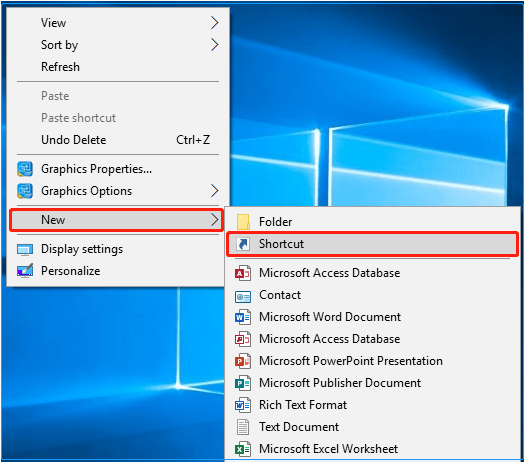
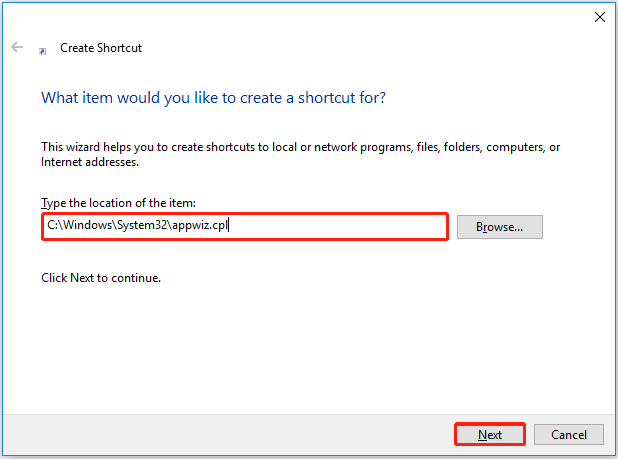
Step 2: Input: C:\Windows\System32\appwiz.cpl in the item location box and click Next.
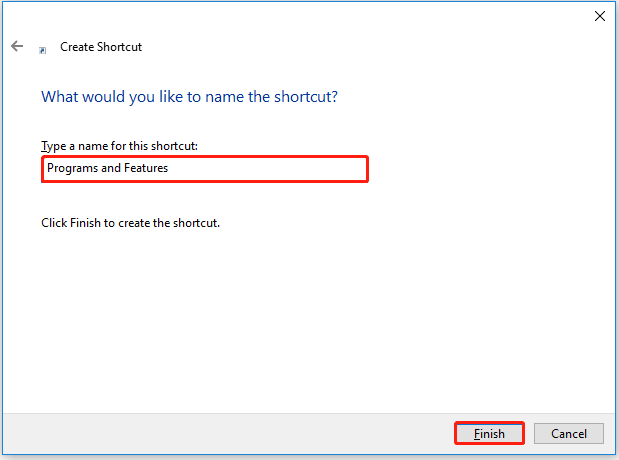
Step 3: Type the name Programs and Features for the new shortcut and click Finish.
Step 4: You can find the shortcut icon of Programs and Features on the computer desktop, and then you can directly click this icon to open Windows Programs and Features.
Method 5: Using CMD
For users who are very proficient in computer use, you can also use CMD to enter Programs and Features. Follow these steps:
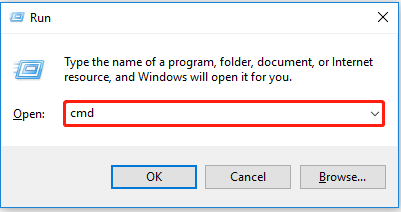
Step 1: Press Windows + R keyboard combination to type cmd in the box and press Enter.
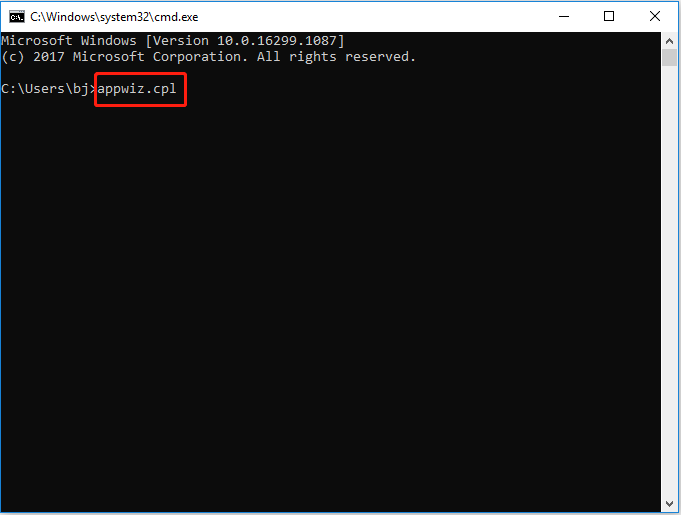
Step 2: Input appwiz.cpl and press Enter to run the command.
Related article: Command Prompt (CMD) Not Working/Opening Windows 10?
Method 6: Using Run
You can also skip CMD and use Run to open Windows Programs and Features directly.
Step 1: Press Windows + R to open the Run window.
Step 2: Input appwiz.cpl in the Run box to open Programs and Features directly.
Bottom Line
This article introduces six methods to open Windows Programs and Features and lists the detailed operation steps. If you have anything to add, you can leave a message in the comment area below to discuss it with us. Go to MiniTool News Center to find more solutions to computer-related problems.
About The Author
Position: Columnist
Shirley graduated from English major and is currently an editor of MiniTool Team. She likes browsing and writing IT-related articles, and is committed to becoming a professional IT problem solver. The topic of her articles are generally about data recovery, data backup, and computer disk management, as well as other IT issues. In spare time, she likes watching movies, hiking and fishing.
Содержание статьи:
- Как найти» эти «компоненты» и вкл.
- Способ 1 (универсальный)
- Способ 2 (для Windows 10/11)
- Как до-установить компоненты, необходимые для игр (когда причина проблем не ясна)
- Таблица с описанием самых популярных компонентов
- Вопросы и ответы: 0
Доброго времени суток!
Несколько дней назад один товарищ сильно просил помочь «разобраться» с его ПК — на нем не запускалась одна игрушка… (причем, видимых каких-то ошибок не возникало). После оказалось, что у него не был включен компонент Direct Play (эта штука используется некоторыми старыми играми. По умолчанию в Windows 10/11 отключена… 👀).
Разумеется, в Windows 10 есть и другие компоненты: и многие из них нужны не только для каких-то сугубо спец. задач, но и для работы некоторого ПО, современных игр!
Вот о том, как найти «эти компоненты», посмотреть, что включено (а что нет) и будет сегодняшняя заметка. Если у вас не работает какая-то программа (игра в том числе) — я бы порекомендовал посмотреть ее полный список требований (с необходимыми ей компонентами), а затем проверить, установлены ли они у вас в Windows (и включены ли).
Итак, теперь ближе к теме… ⚡
*
Как найти» эти «компоненты» и вкл.
Способ 1 (универсальный)
Нажмите сочетание клавиш Win+R и в появившемся окне «Выполнить» используйте команду optionalfeatures (см. пример на скриншоте ниже 👇).
Альтернативный способ: Win+R, и команда appwiz.cpl (в этом случае откроется вкладка «Установка и удаление программ» — в меню слева будет заветная ссылка).
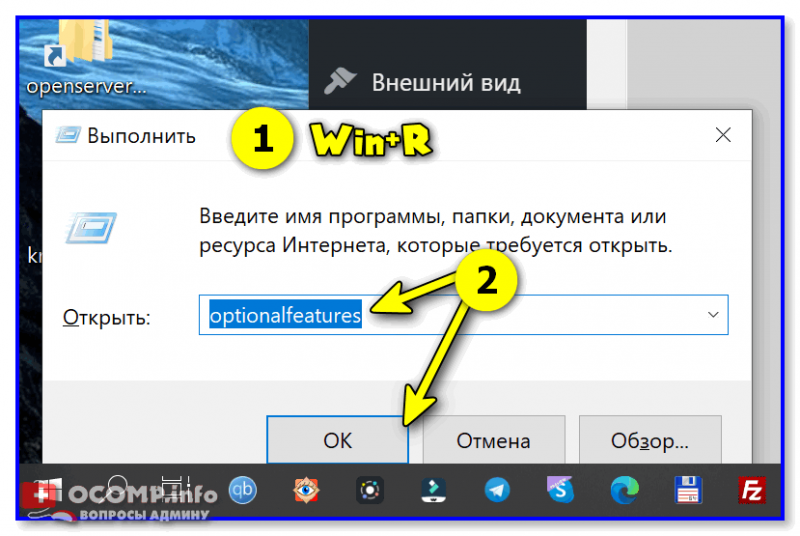
optionalfeatures — команда для откр. вкладки с компонентами
Далее перед вами откроется окно с компонентами Windows. Обратите внимание, что напротив некоторых будут стоять галочки (флажки) — значит этот компонент включен.
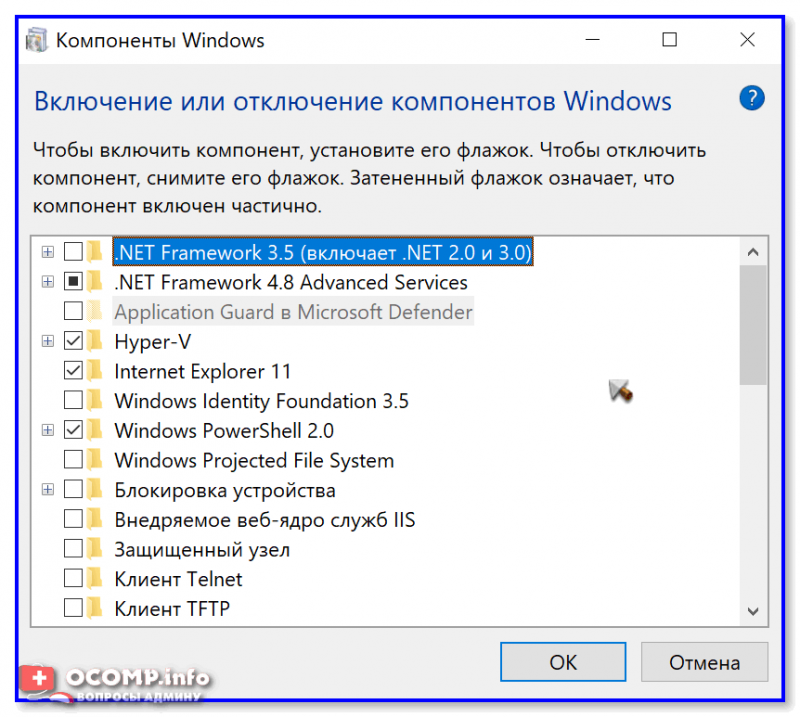
Список компонентов — напротив нужного просто поставить галочку!
👉 Кстати, в моем случае нужно было включить Direct Play — в Windows 10/11 он находится во вкладке «Компоненты прежних версий». 👇
После установки флажка на нужном компоненте — необходимо нажать OK для начала его установки.
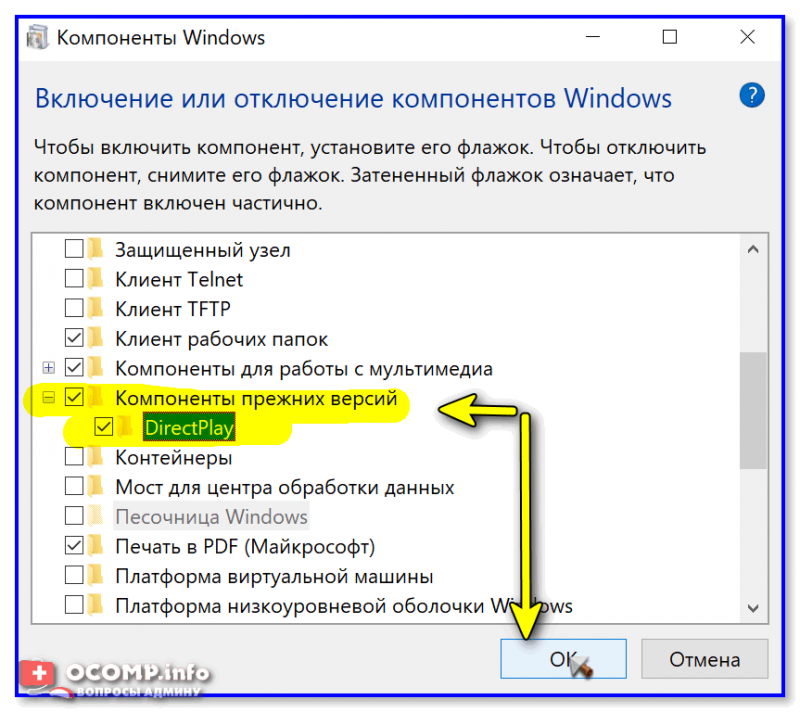
Включаем DirectPlay
Далее Windows автоматически находит и устанавливает его (при работе с некоторыми компонентами может потребоваться перезагрузка ПК).
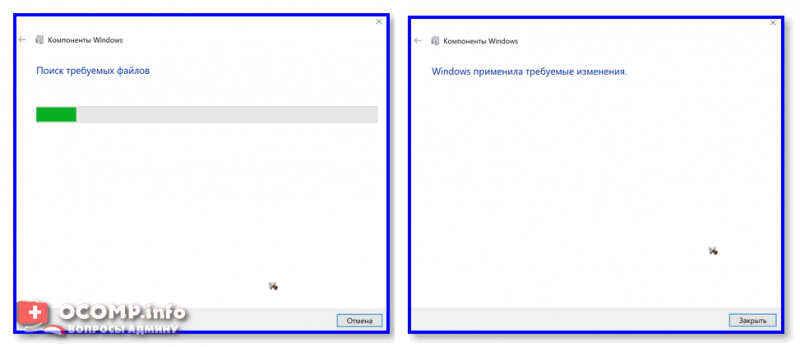
Windows применила требуемые изменения
*
Способ 2 (для Windows 10/11)
В Windows 10 ряд компонентов «вынесен» в отдельное меню (в параметры ОС). Чтобы просмотреть их:
- нажмите сочетание клавиш Win+i (либо откройте параметры через меню ПУСК);
- перейдите во вкладку «Приложения / приложения и возможности»;
- отройте ссылку «Дополнительные компоненты». См. пример ниже. 👇
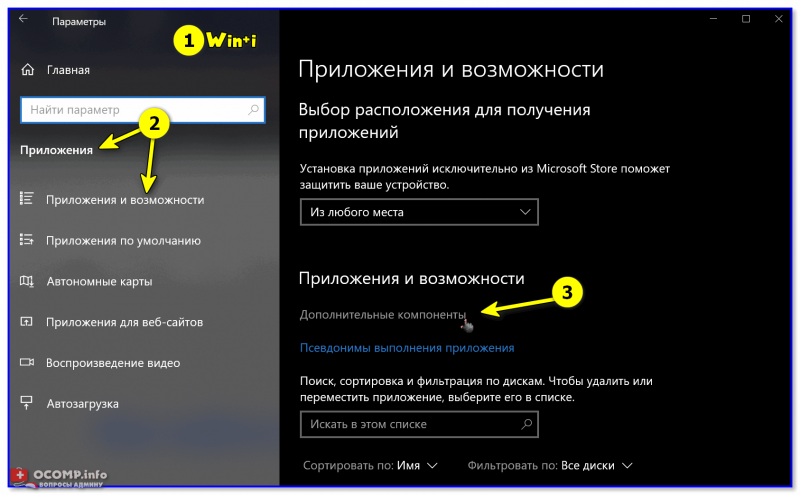
Дополнительны компоненты — параметры в Windows 10
В открывшемся списке вы сможете как добавить доп. компонент, так и удалить уже имеющийся.
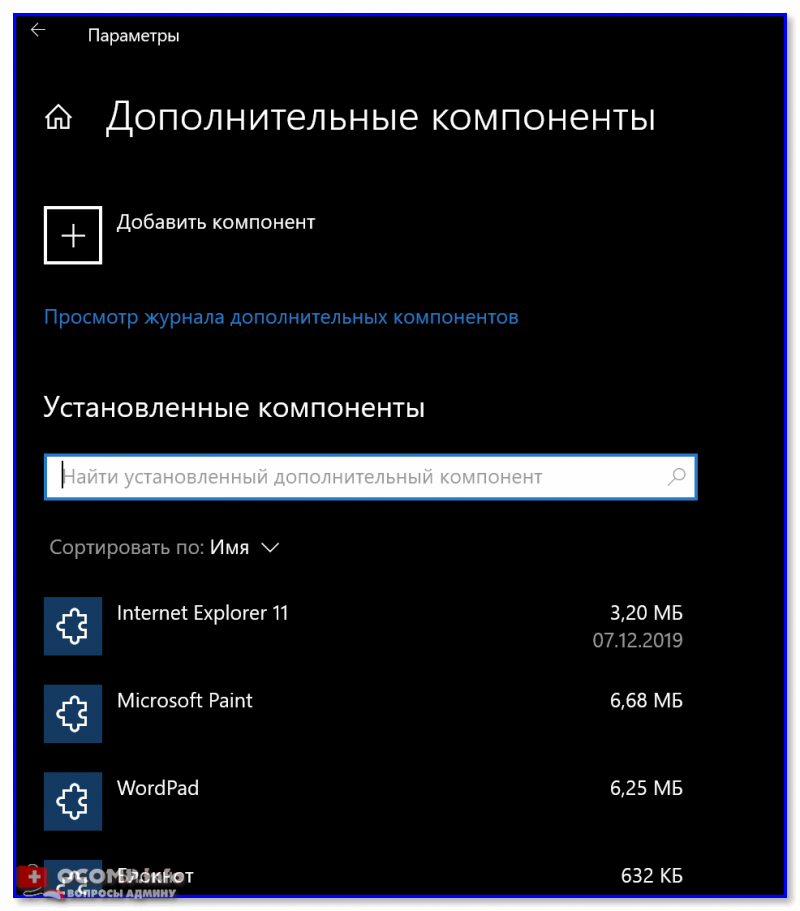
Список компонентов
*
Как до-установить компоненты, необходимые для игр (когда причина проблем не ясна)
Если игра не запускается без какой-то ясной причины (нет ни кода ошибки, ни какого-то сообщения) — часто причина этому отсутствие какого-нибудь компонента (библиотеки): Visual C++, NET FrameWork, Microsoft Silverlight и пр.
Чтобы «вручную» не проверять каждый отсутствующий компонент — можно воспользоваться утилитой 👉 Driver Booster. Драйвера с ее помощью обновлять не обязательно, а вот библиотеки для игр — вполне (она их тоже находит)! Хотя бы узнать, что отсутствует (а для этого бесплатной версии вполне достаточно!).
👉 Также в помощь!
Почему не запускается игра — нет никаких ошибок [см. инструкцию / решение]
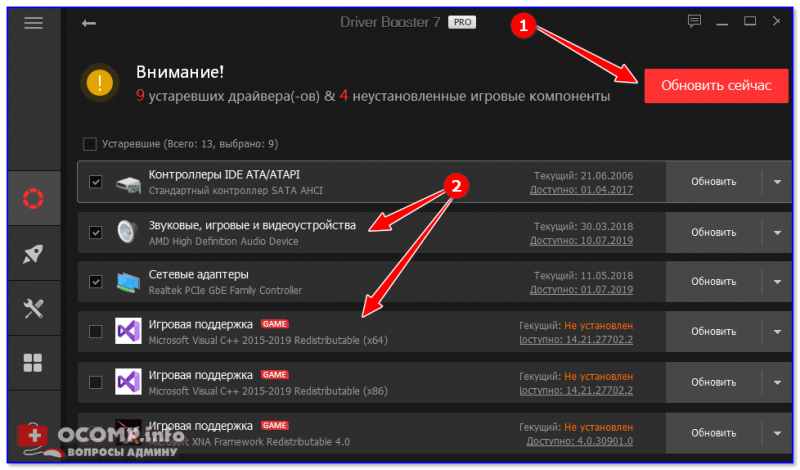
Обновить всё — игровые компоненты, звуковые и игровые устройства и пр. / Driver Booster
*
Таблица с описанием самых популярных компонентов
Заранее предупреждаю: отключать какие-то компоненты, о которых вы ничего не знаете — крайне не рекомендуется! Табличка ниже — справочная (скорее она призвана «заставить» вас что-нибудь «нужное» включить, а не откл. 😉).
| Название компонента |
Описание (для чего он) |
| *.NET Framework 3.5, 4.0 и др. | Это специальный пакет, который призван совместить между собой различное ПО, написанное на разных языках программирования (так, чтобы все работало 😉). Подробнее тут —> |
| Hyper-V | Необходимый компонент для виртуализации от Microsoft. О том, как создать виртуальный ПК с помощью этого компонента — см. здесь. |
| Internet Explorer 11 | Устаревший браузер. Некоторые приложения для своей работы его всё еще используют. |
| SNMP-протокол | Протокол для управления сетевыми устройствами. Считается устаревшим. |
| Windows Identity Foundation 3.5 | Компонент, используемый некоторыми старыми приложениями (обычно, он вкл. автоматически, при установке оного софта). |
| Windows PowerShell | «Продвинутая» командная строка. |
| Блокировка устройства | Используется для настройки входа в систему. |
| Встроенный модуль запуска оболочки | Позволяет запускать приложения в безопасном изолированном пространстве (большинству пользователей это не нужно). |
| Клиент Telnet | Компонент служит для связи с серверами Telnet (рядовым пользователям это не нужно). |
| Клиент TFTP | Протокол устарел (использовался для передачи файлов по сети). |
| Клиент рабочих папок | Синхронизация документов. |
| Компоненты для работы с мультимедиа | Связан с Windows Media Player (сейчас есть более удобные проигрыватели). |
| Компоненты прежних версий | Был частью DirectX, в большинстве случаев устанавливается автоматически (за искл. некоторых игр). |
| Контейнеры | Управление контейнерами Windows Server и Hyper-V. |
| Пакет администрирования диспетчера RAS- подключений | Позволяет создавать профили удаленного доступа для VPN. |
| Песочница Windows | Защищенная среда (по англ. Windows Sandbox). |
| Печать в PDF | Думаю, из названия понятно. В некоторых случаях весьма полезно при работе с документами (см. др. способы создания PDF). |
| Поддержка АРІ удаленного разностного сжатия | Используется для сравнения синхронизированных файлов (нужен для некоторых приложений, вкл. обычно автоматически). |
| Поддержка общего доступа к файлам SMB 1.0/CIFS | Отвечает за совместное использование файлов и принтеров. Из-за этой штуки ПК могут быть не видны друг для друга (кстати!). |
| Простые службы TCPIP | Дополнительных сетевые услуги (используется для настройки корпоративных сетей). |
| Сервер очереди сообщений Майкрософт | При откл. связи — сообщения будут храниться в буфере и отправятся сразу после восстановления. |
| Служба активации Windows | Используется разработчиками ПО. |
| Службы Active Directory | Используется для аутентификации пользователей в корпоративных сетях. |
| Службы IIS | Службы FTP-серверов IIS. |
| Службы XPS | Используется для печати XPS документов. |
| Службы печати документов | Используется для работы с принтерами, сканерами и факсами. |
| Соединитель MultiPoint | Используется для управления данными в корпоративных сетях. |
| Средство просмотра XPS | Работа с документами в формате XPS. |
| Фильтр Windows TIFF IFilter | Используется для работы с TIFF файлами и оптического распознавания символов (OCR). |
*
Дополнения по теме заметки — приветствуются!
Всем успехов!
👋
Sign in to your MUO account
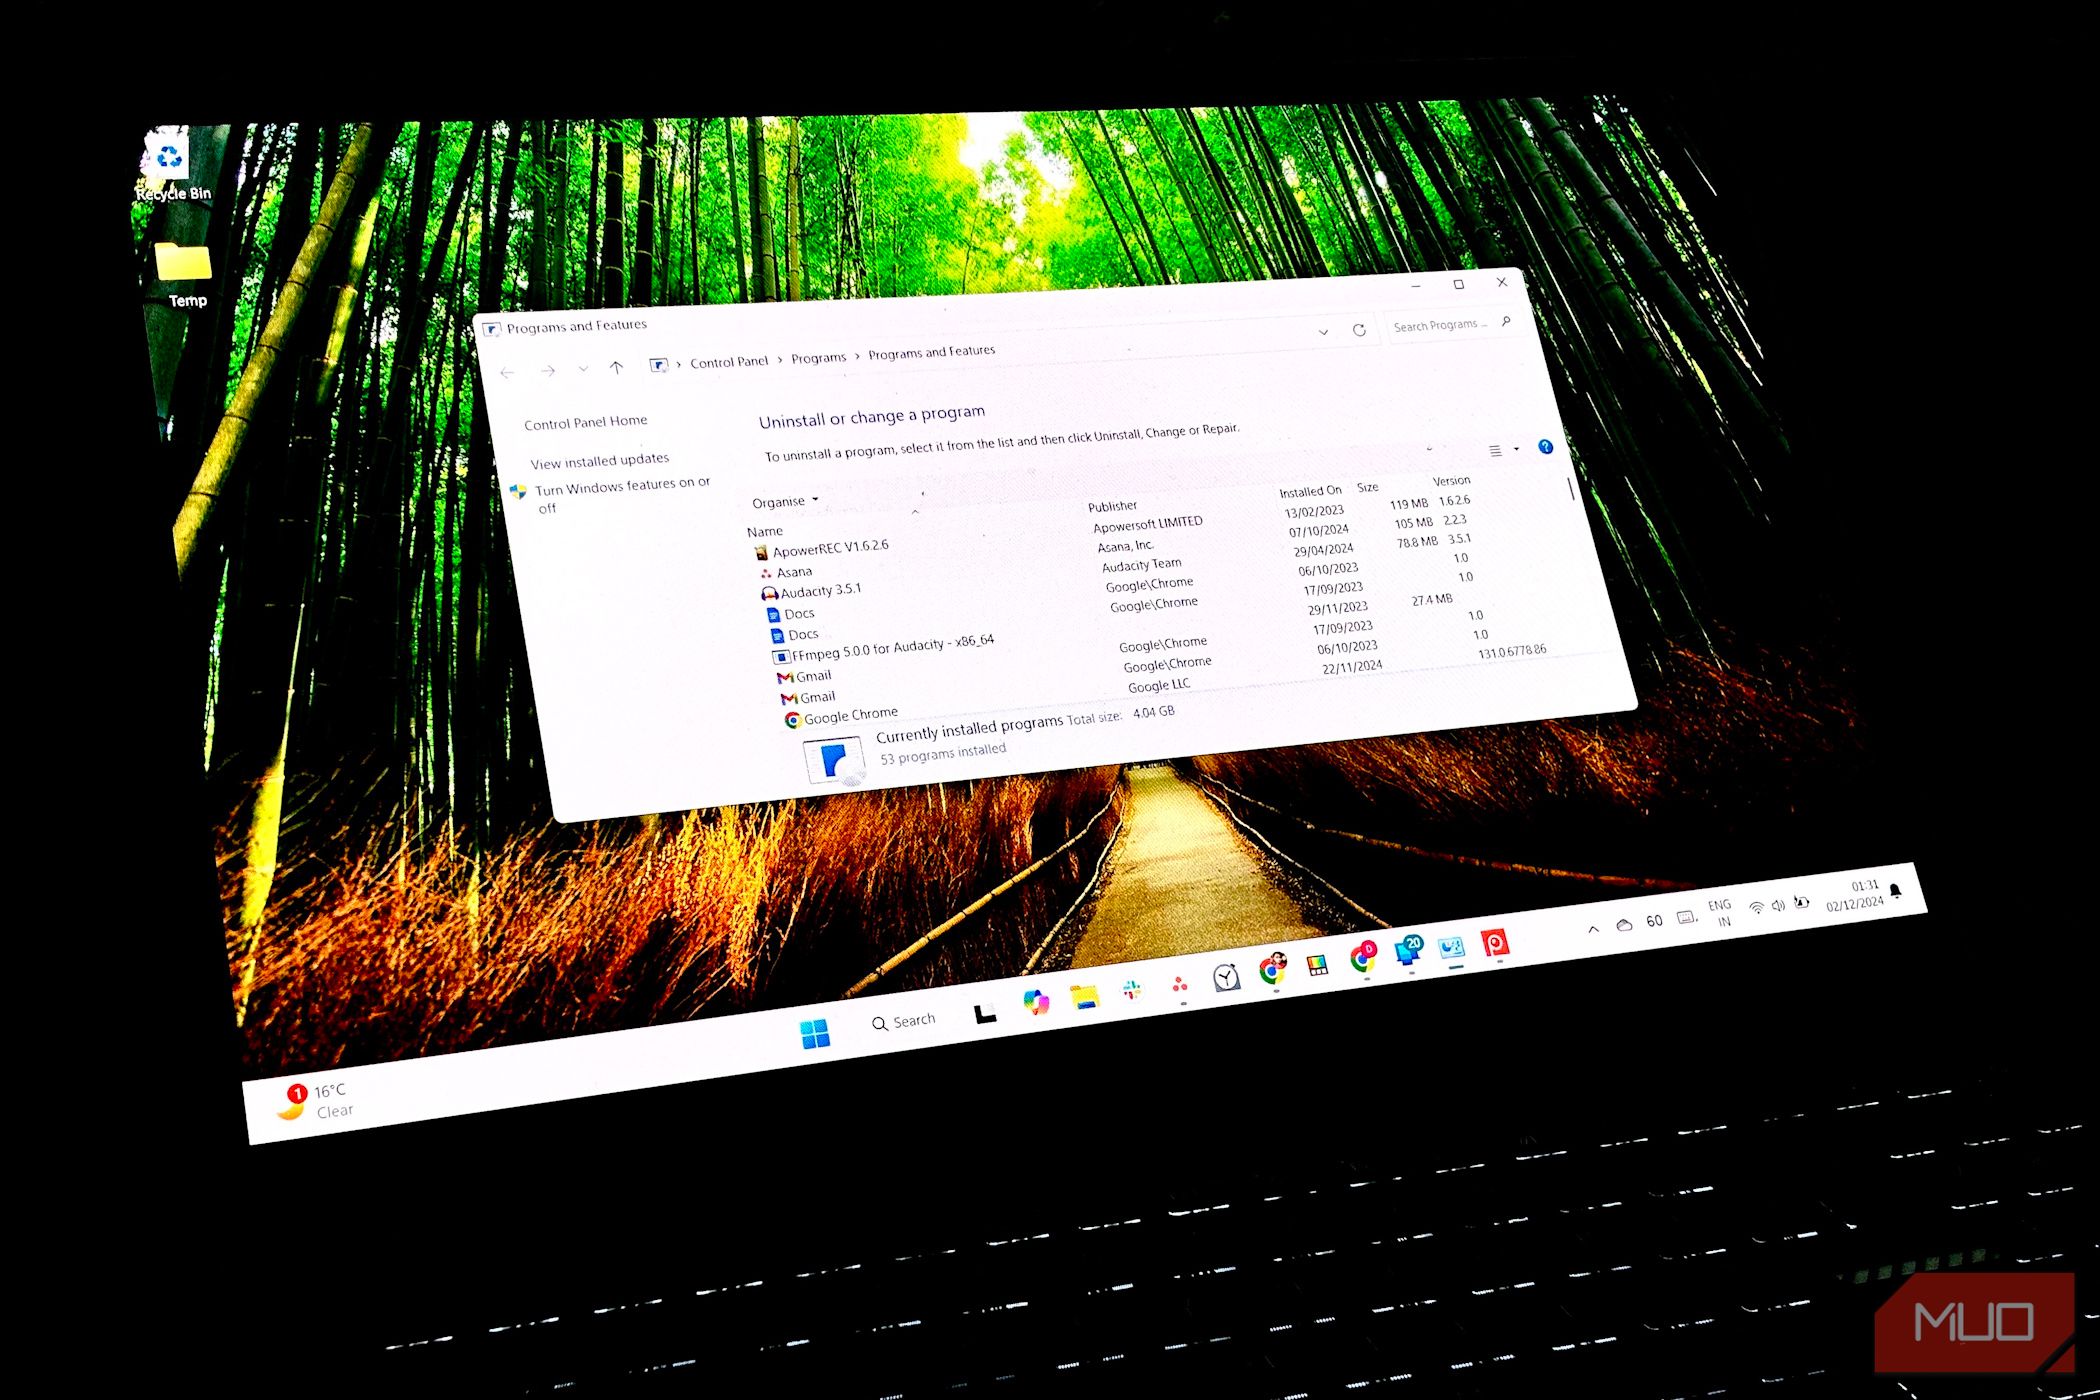
The Programs and Features tool lists all the apps on your PC. It’s a quick and easy way to manage installed programs, updates, and Windows features with just a few clicks. There are several ways to access it; I’ll show you three of the quickest.
1
Use the Run Command
The easiest way to open Programs and Features in Windows 11 or 10 is through the Run command dialog box. Just hit Win + R on your keyboard, and a small window will pop up. Type appwiz.cpl in the text field, then press Enter or click OK.
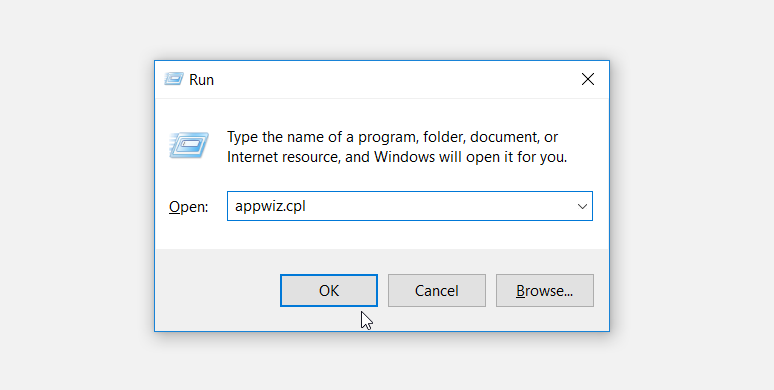
This action is a quick and easy way to get to Programs and Features without clicking through several menu options.
2
Use the Command Prompt
Another method to open Programs and Features is through the Command Prompt, PowerShell, or Windows Terminal. This is handy if you like working on the command line instead of the Windows graphical interface.
To open the Command Prompt, type cmd in the Windows search bar and press Enter. You can also press Win + X to open the Power User Menu and choose Terminal, Command Prompt, or PowerShell (depending on what you’ve selected as the default). For this purpose, they all work the same.
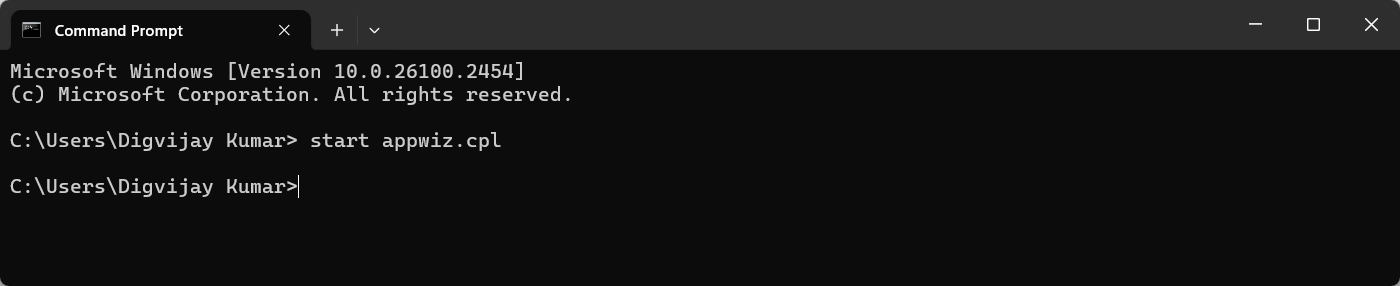
Next, type start appwiz.cpl in the command line and hit Enter. The panel will launch momentarily.
3
Use the Control Panel
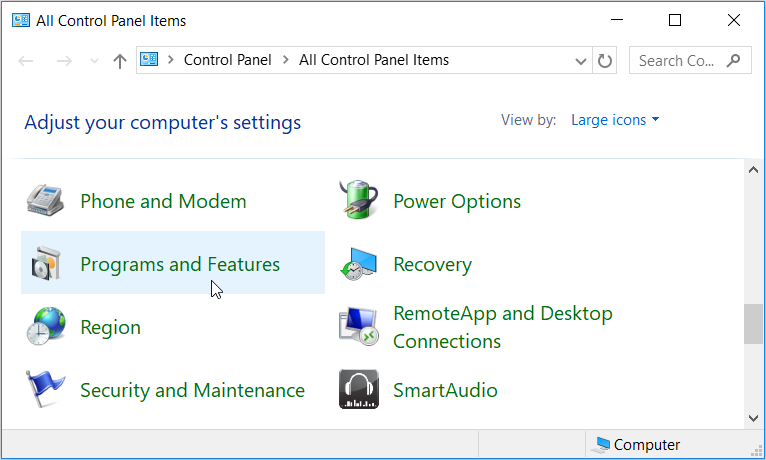
The classic Control Panel is still available in Windows 11, and you can use it to access Programs and Features if you prefer clicking to typing. To open the Control Panel, press the Windows key and type «Control Panel» in the search bar. Then pick the option that pops up. Once you’re in, you can view by Category or Icons at the top-right.
For Category, click on Programs > Programs and Features. If you’re viewing by icons, select Programs and Features. Either way, you’ll end up in the Programs and Features window.
These are the easiest methods to access the Programs and Features window in Windows—through the Run menu, command line, or Control Panel. But don’t forget that this menu is old-school, and many of the same options are available in the modern Settings app under the Apps heading.