
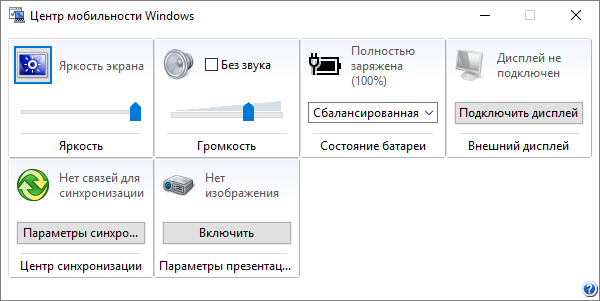
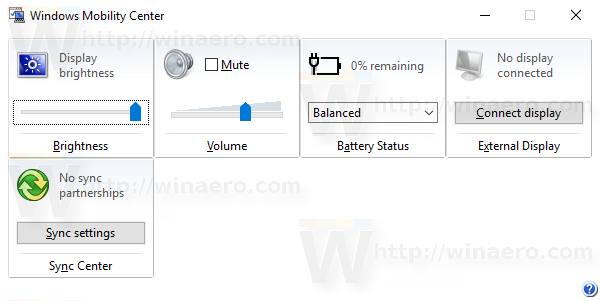
Привет друзья! В комплекте с Windows 7, 8.1 и 10 поставляется специальное приложение, именуемое Центром мобильности. Используется оно в основном на портативных устройствах для быстрого доступа к базовым настройкам яркости, громкости, синхронизации, электропитания, управления ориентацией экрана, параметрами презентации и некоторыми другими компонентами.
Центр мобильности Windows штука полезная, но вы можете столкнуться с ситуацией, когда его нужно будет отключить. В Windows 10 он, к примеру, вообще не особо нужен, так как управлять некоторыми из перечисленных выше настроек можно из Центра действий. Отключить Центр мобильности нетрудно.
Как в Windows 10 включить или отключить Центр мобильности
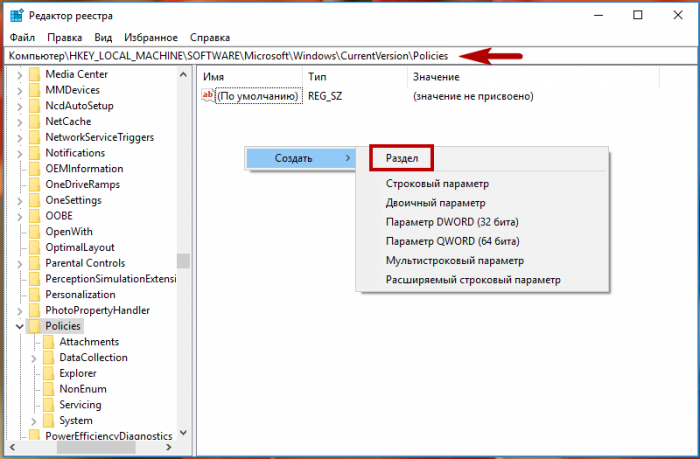
Откройте командой regedit редактор реестра и разверните этот ключ:
HKEY_LOCAL_MACHINE/SOFTWARE/Microsoft/Windows/CurrentVersion/Policies/MobilityCenter
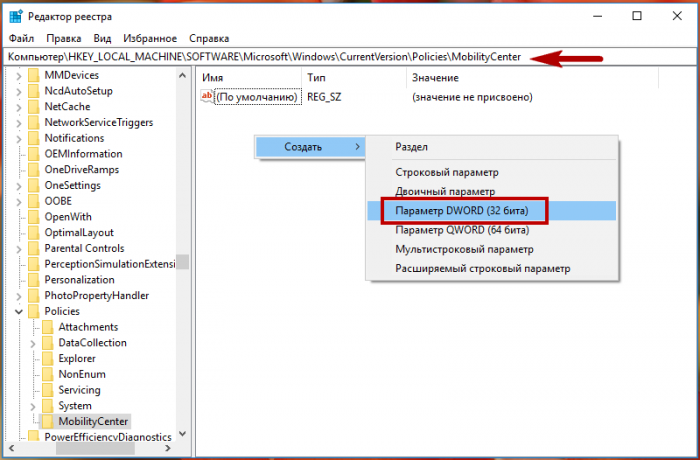
Может статься, что подраздела MobilityCenter у вас не окажется, в этом случае его нужно будет создать вручную. В свою очередь в нем необходимо создать 32-битный параметр типа DWORD с именем NoMobilityCenter и установить в качестве его значения 1.
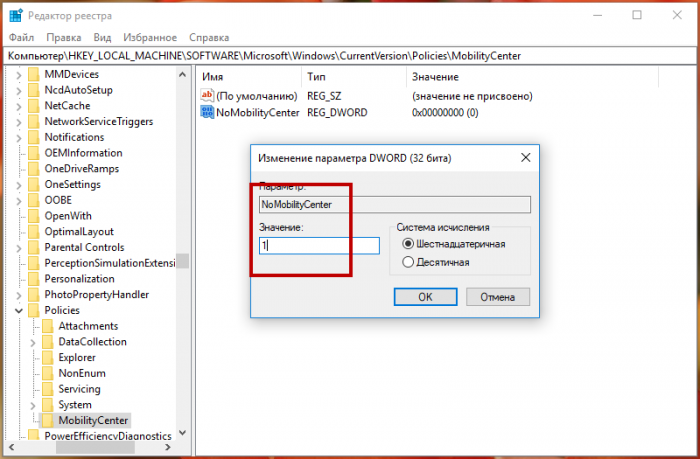
Это действие отключит Центр мобильности для всех пользователей. Если же вы захотите деактивировать приложение для конкретного юзера, то же самое нужно сделать в ключе HKEY_CURRENT_USER/Software/Microsoft/Windows/CurrentVersion/Policies/MobilityCenter.
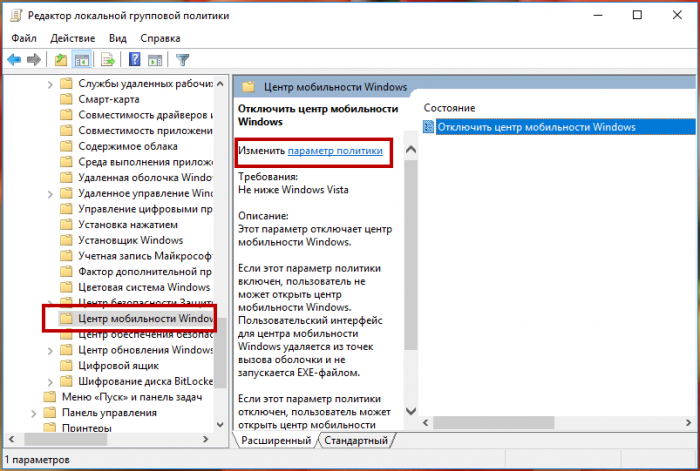
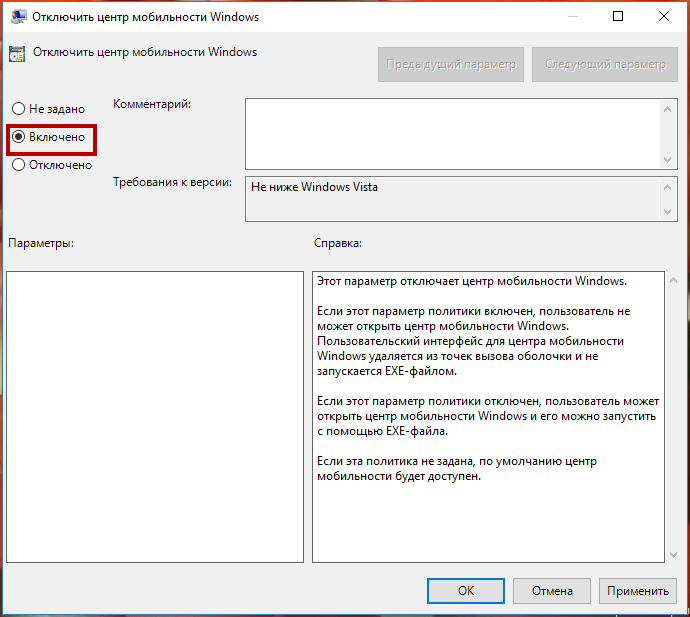
В обоих случаях изменения вступят в силу после перезагрузки компьютера. Для отключения Центра мобильности также можно использовать редактор локальной групповой политики. Открыв его командой gpedit.msc, перейдите по цепочке Конфигурация компьютера → Административные шаблоны → Компоненты Windows → Центр мобильности Windows. Справа нажмите ссылку «»Изменить параметры политики» и установите в открывшемся окошке радиокнопку в положение «»Включено».
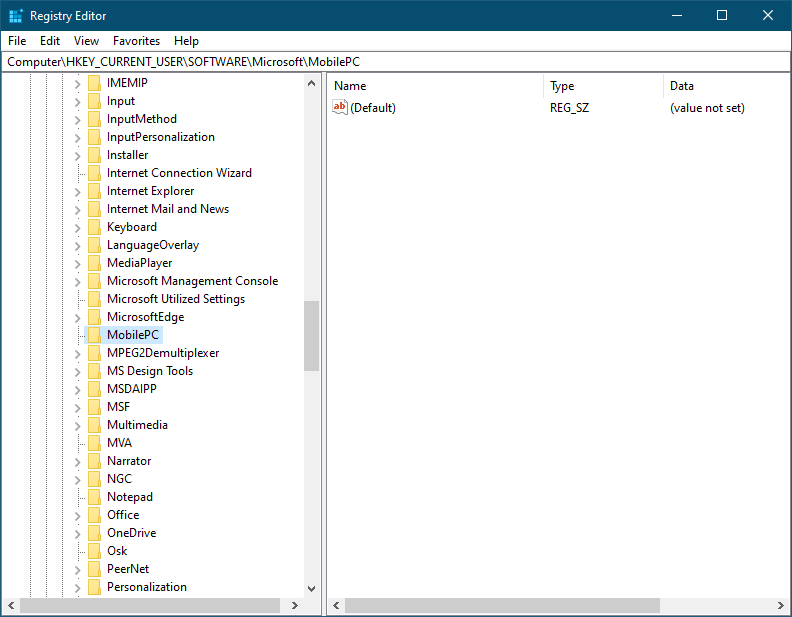
А как вот быть, если нужно как раз наоборот, включить Центр мобильности на десктопном компьютере? По умолчанию это приложение работает только на мобильных ПК и планшетах, если вы хотите пользоваться им на обычном настольном компьютере, нужно применить соответствующий твик реестра. Открыв редактор реестра, разверните ключ HKEY_CURRENT_USER/Software/Microsoft, создайте в последнем подразделе сначала каталог MobilePC, а затем MobilityCenter так, чтобы последний был вложен в предыдущий (см. скриншот).
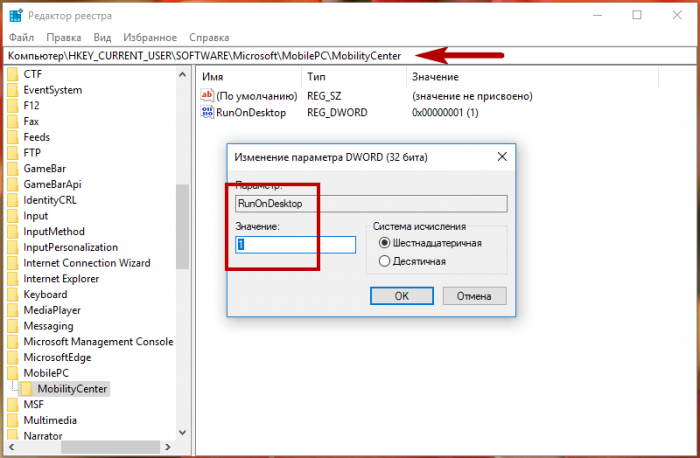
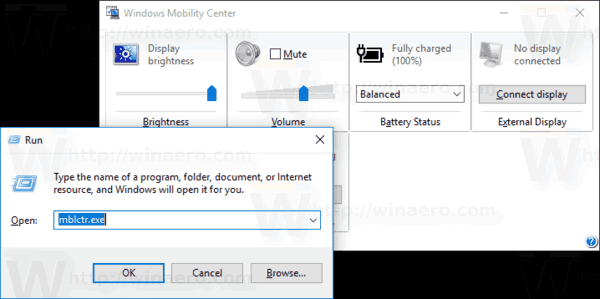
В подразделе MobilityCenter создайте 32-битный DWORD-параметр с именем RunOnDesktop и установите в качестве его значения 1. После перезагрузки вы сможете запускать Центр мобильности командой mblctr из окошка «Выполнить».
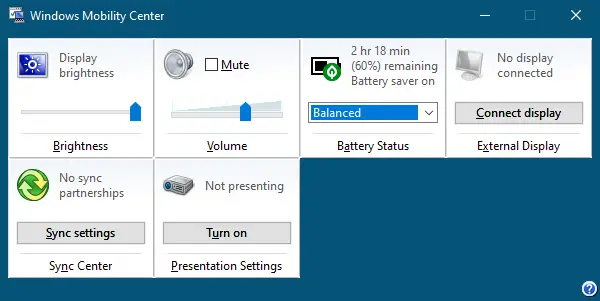
Windows 10 comes with a built-in feature called Windows Mobility Centre. With the help of Windows Mobility Centre on a Windows 10 laptop or notebook, you can quickly and easily access or adjust the display brightness, mute or adjust volume, view and change Power Plans, access the remaining battery percentage, set Sync Settings, and connect to an external display. However, this feature is active by default on laptops only, so you need to allow the same first if you are using Windows 10 on a desktop PC.
This post will guide you through enabling the Windows Mobility Centre on Windows 10 desktop and multiple ways to open it.
How to enable or turn on Windows Mobility Center on Windows 10 desktop computer?
Those who have not enabled the Windows Mobility Center on Windows 10 desktop PC and try to access it will receive a message “Windows Mobility Center is available only on laptops.”
Gentle Reminder: To enable the Windows Mobility Center on Windows 10 desktop computer, you need to modify the Registry; hence, we recommend taking the full backup of the Windows Registry and creating a system restore point. In case something goes wrong, you can revert your PC to a previous working state.
To enable or turn on the Windows Mobility Center on Windows 10 desktop, perform the following steps:-
Step 1. Press the Windows logo + R keys to open the Run dialog box.
Step 2. In the Run dialog box, type the following and hit Enter from the keyboard or click the OK button to open the Windows Registry:-
regedit

Step 3. In the Registry Editor window that opens, navigate to the following key:-
Computer\HKEY_CURRENT_USER\Software\Microsoft\MobilePC
Note: On the MobilePC folder, you need to create two sub-keys, AdaptableSettings and MobilityCenter. If any key is present, you can skip the step.
Step 4. Right-click on MobilePC and select New, and then Key. Name the newly created key as AdaptableSettings.
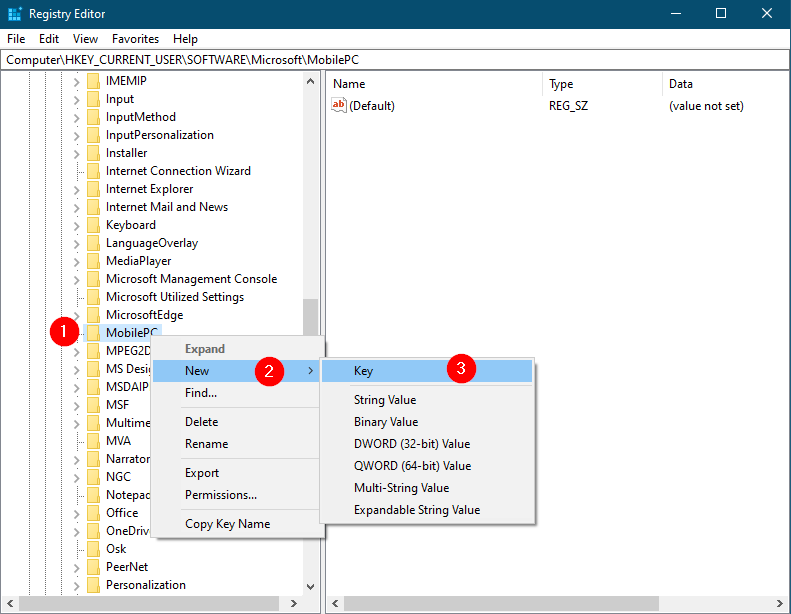
Step 5. Again, right-click on MobilePC, select New, and then Key. Name the newly created key as MobilityCenter.
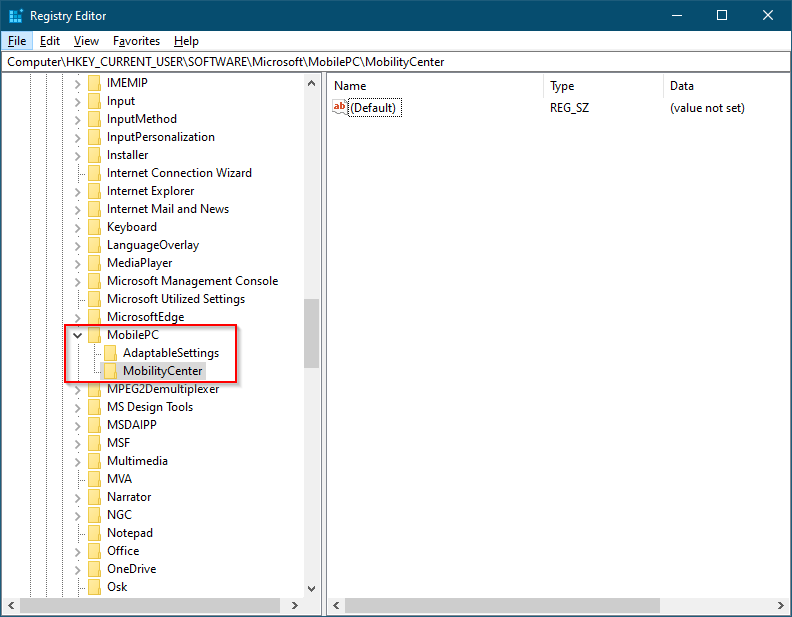
Once both keys are created or already present, it should look like a lead-in image.
Step 6. Now, highlight the AdaptableSettings key on the left side pane by clicking on it, perform a right-click on it, and select New and then DWORD (32-bit) Value.
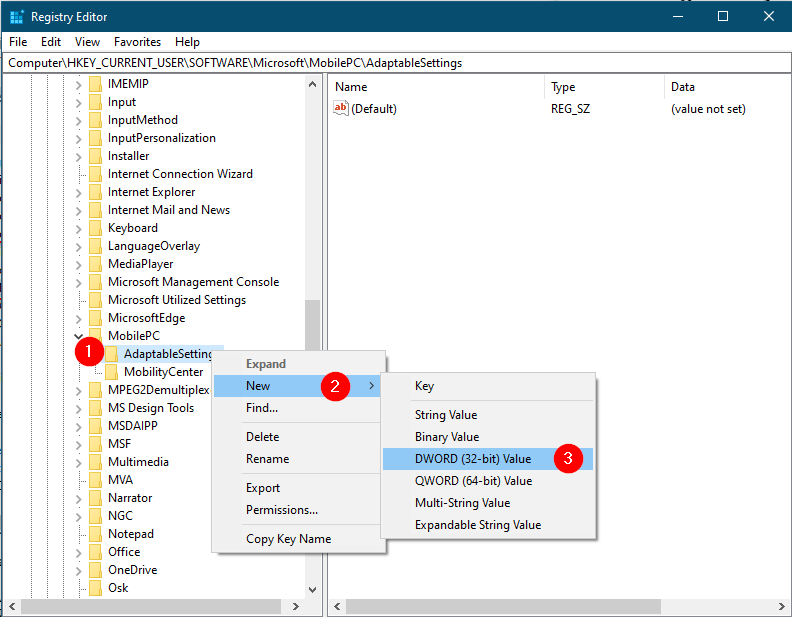
Step 7. Name the newly created DWORD (32-bit) Value as SkipBatteryCheck.
Step 8. On the right side pane of the AdaptableSettings key, double-click on SkipBatteryCheck. Change its Value Data from 0 to 1.
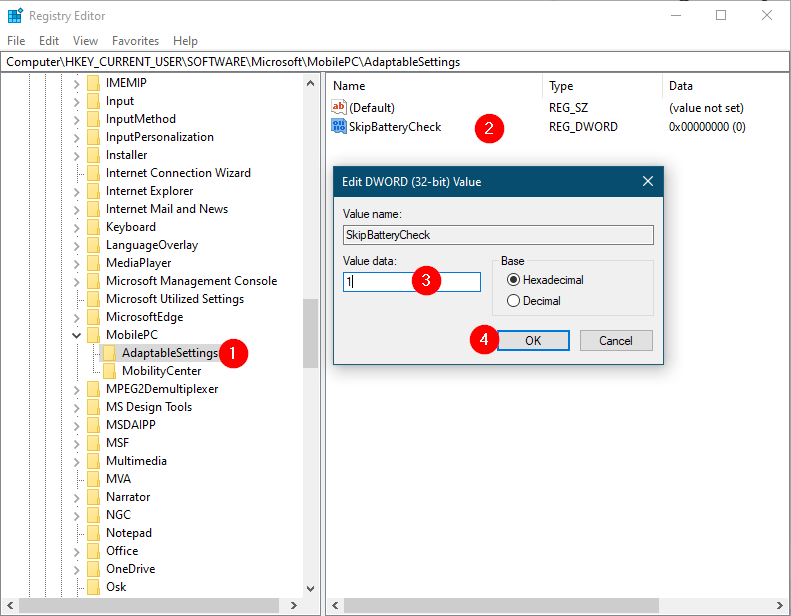
Step 9. Click OK to save the changes.
Step 10. Now, select the MobilityCenter on the left side pane and right-click on it. Choose New and then DWORD (32-bit) Value. Name the newly created DWORD (32-bit) Value as RunOnDesktop.
Step 11. Double-click on the RunOnDesktop on the right side pane and set its Value data to 1.
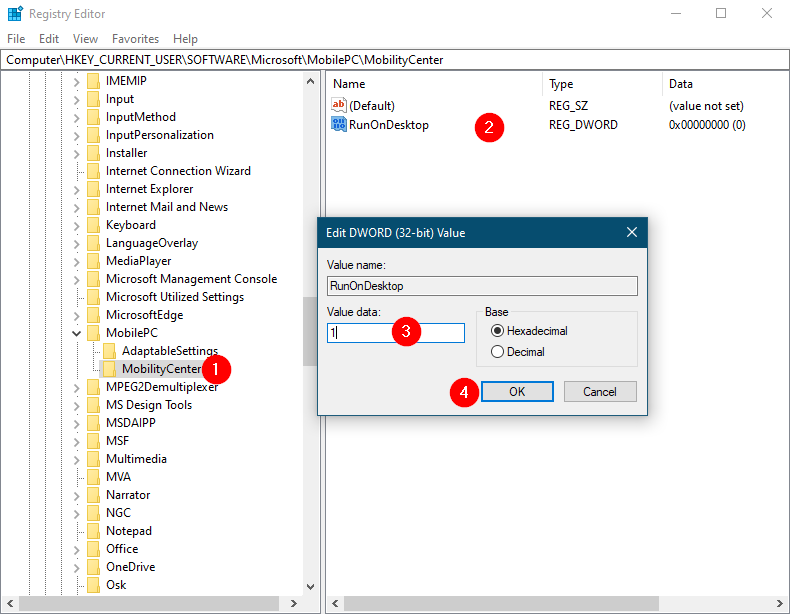
Step 12. Click OK to apply the changes.
Once you complete the above steps, press the Windows logo + R keys to open the Run dialog box. Copy and paste the following path and press Enter from the keyboard:-
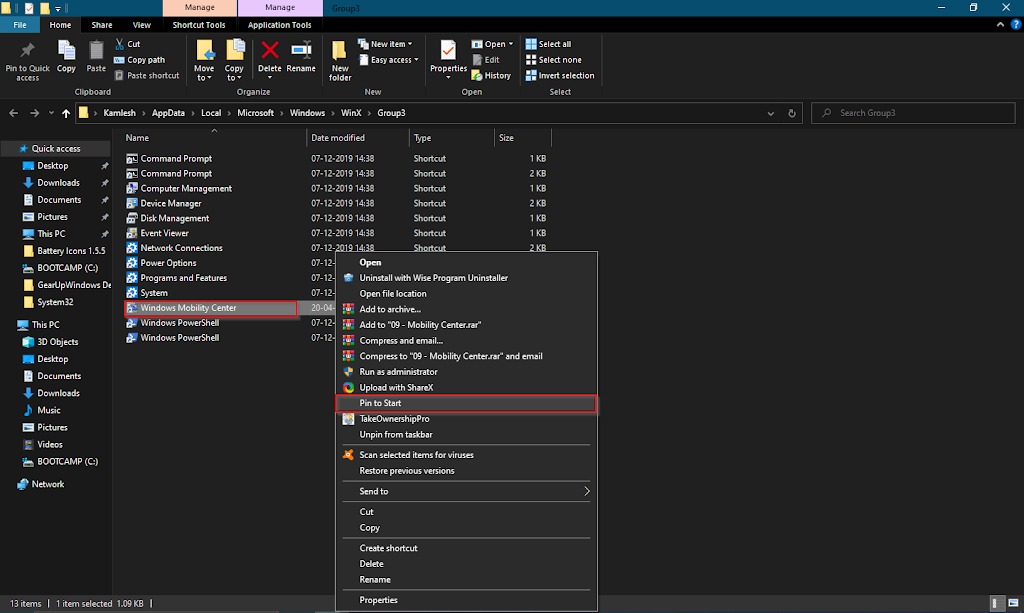
%LocalAppdata%\Microsoft\Windows\WinX\Group3
Here, you will see an executable file of Windows Mobile Center. Double-click on the Windows Mobile Center shortcut to open it. For easy access, you can drag it to the Windows 10 Taskbar or right-click on the program shortcut and select Pin to Start.
After performing the above steps, you should enable Windows Mobility Center on your Windows 10 desktop computer.
The second part of this article is about how to access Windows Mobility Center on Windows 10. There are at least five ways to access Windows Mobility Center on Windows 10 computers or laptops. These are the following:-
- Open Windows Mobility Center using the Search box
- Launch Windows Mobility Center via the Battery icon in the system tray
- Start Windows Mobility Center through Win + X menu
- Begin Windows Mobility Center from the Run Command box
- Open Windows Mobility Center via a shortcut
How to Start Windows Mobility Center on Windows 10 using the Search box?
The search box is the simplest way to open the Windows Mobility Center on Windows 10 PC.
Step 1. To open the Windows Mobility Center, click on the Start button/menu of Windows 10 and type Windows Mobility Center.
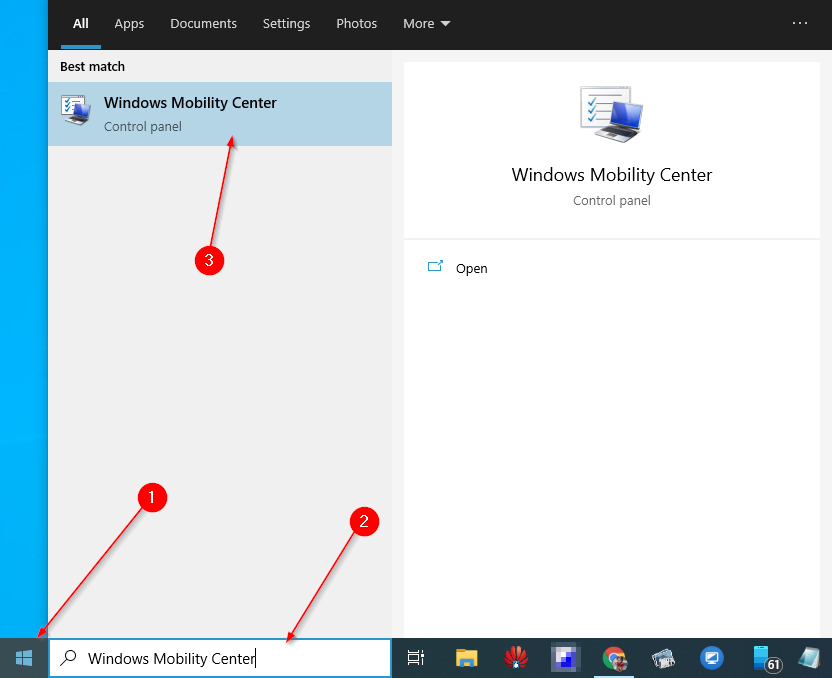
Step 2. From the available top search results, click on the Windows Mobility Center to open it.
How to Launch Windows Mobility Center on Windows 10 using the Battery icon in the system tray?
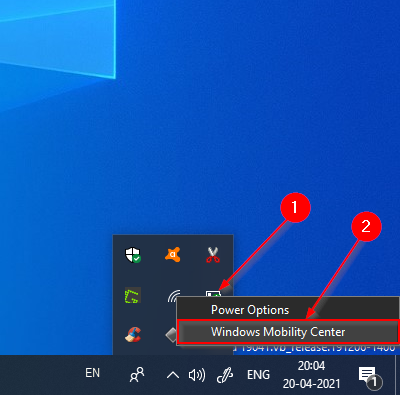
It is yet another straightforward way to open the Windows Mobility Center in Windows 10. Just right-click on the battery icon in the Taskbar system tray and click on the Windows Mobility Centre option to open it. If the battery icon is missing from the Taskbar, you can not perform this task.
How to Open Windows Mobility Center on Windows 10 via the Win + X menu?
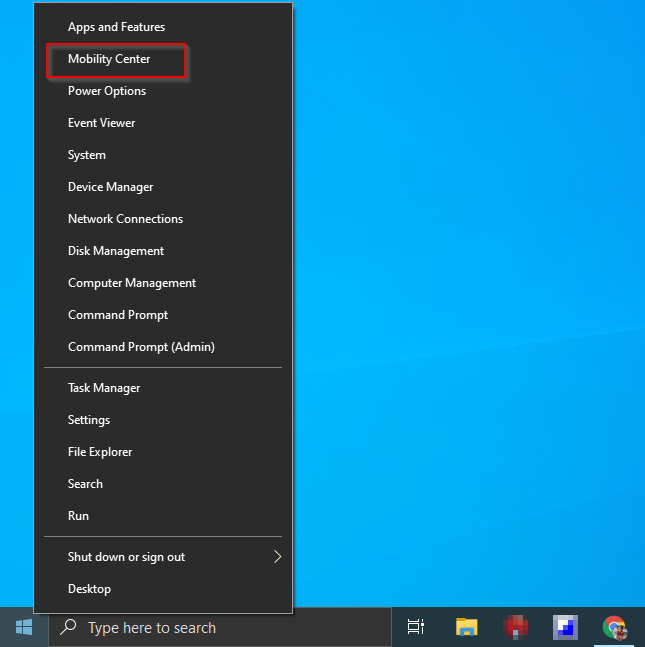
By pressing the Windows logo + X hotkey open the power user menu and then click on the Mobility Centre to open it.
Alternatively, please right-click on the Start button to access the WinX menu and then select the Mobility Centre to open it.
How to Access Windows Mobility Center on Windows 10 using the Run Command box?
It is also possible to open the Windows Mobility Center on Windows 10 using the Run dialog box. Just press the Windows logo + R keys from the keyboard to open the Run box. Type mblctr in the box and hit Enter button from the keyboard to open Windows Mobility Centre.
How to Launch Windows Mobility Center on Windows 10 via a Shortcut?
It is the last option to access the Windows Mobility Center on Windows 10. Press and hold the Windows logo key and then press the R key from the keyboard to open the Run dialog box. Copy and paste the following path and press Enter from the keyboard:-
%LocalAppdata%\Microsoft\Windows\WinX\Group3
It will open a folder Group3, where you will see several system program shortcuts listed. Copy the shortcut of “Windows Mobility Center” and paste it on the Windows 10 desktop to quickly access it. You can also drag the shortcut to Windows 10 Taskbar for easy access. You can even pin it to the Start menu by right-clicking on it and selecting Pin to Start.
That’s all!!!
Conclusion
In conclusion, the Windows Mobility Center is a useful feature built into Windows 10 laptops that allows easy access and adjustment of various settings such as display brightness, volume, power plans, battery percentage, Sync Settings, and external display connection. However, this feature is not enabled by default on desktop PCs, and users need to modify the Registry to activate it. This article has provided a step-by-step guide to enable the Windows Mobility Center on Windows 10 desktop and various ways to access it, such as using the search box, battery icon, Win + X menu, Run Command box, and a shortcut. By following these methods, users can access and use the Windows Mobility Center to adjust their device’s settings quickly and easily.
Today, we are going to guide about the quickest, easiest including other ways to open Windows 10 Mobility Center. The main goal of this app is to let you control the settings of some important component of your computer from a single location. Commonly, you have the ability to use the Mobility Center to manage battery settings, brightness, sound, and presentation mode. Furthermore, it helps to handle the sync center and external display too.
Even though Mobility Center is extremely useful, it couldn’t gain much popularity in Windows 10. Nowadays users prefer Action Center over the tool to get access to the above-mentioned settings quickly. However, if you still want to use the Mobility Center, you need to know how to access it. Power user menu, Windows search bar, keyboard shortcuts come handy to open the utility. Additionally, you can practice Run command, Task manager, control panel, system tray for the same.
Open Windows 10 Mobility Center
Here are 14 Ways to Open Windows 10 Mobility Center –
1] Using the Power User menu – the quickest way
Step-1: Press Windows logo and X keys simultaneously on the keyboard.
Step-2: Power user menu will open showing a list having various options. Click on Mobility Center (second from top).
2] Via Keyboard Shortcut
- To open Windows 10 Mobility Center via keyboard shortcut, hit Win+X and then press B.
3] Through Windows search
- Press Windows key on the keyboard and when Start menu appears, type mblctr.exe.
- Either click on the result from the top or hit Enter.
4] Open Windows 10 Mobility Center From Run Dialog box
- First of all, open Run dialog box by pressing Windows and R keys in one go.
- Write down mblctr.exe in the available space and click the OK button.
5] Direct From Taskbar
- Right-click on the battery icon from the right side of the taskbar.
- Simply, click Windows Mobility Center from the context menu list to launch it.
6] By way of Control Panel
- Press Start icon from the extreme left on the taskbar and type control. Hit enter.
- Next, set the View by option Control Panel to Large icons.
- Find Windows Mobility Center from the visible options and click on it.
7] Open Mobility Center with Command Prompt
- Click on Start, type cmd and then press Enter.
- When Command Prompt comes on the screen, type mblctr hit Enter key.
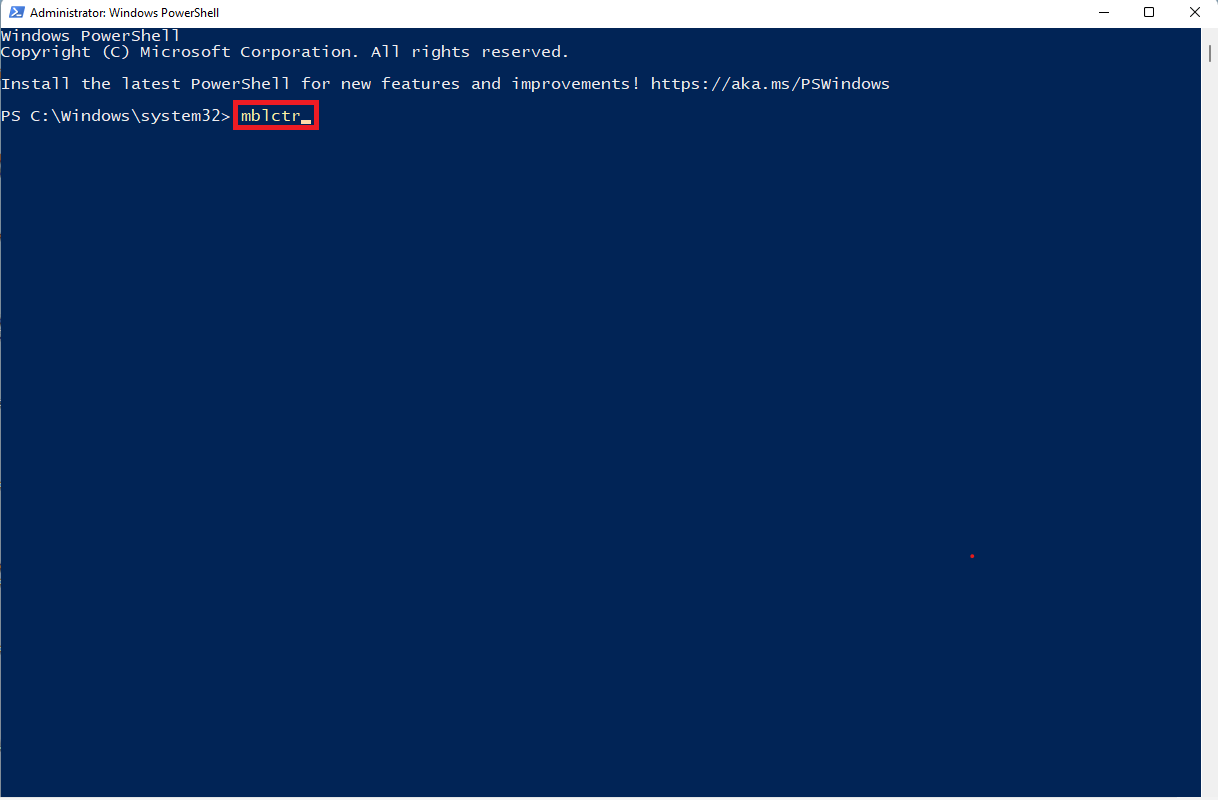
8] Open Mobility Center with the help of Windows PowerShell
- Right click on the Start button and allow the Win+X menu to appear.
- Select Windows PowerShell.
- Once the PowerShell window appears, type “mblctr” and press Enter.
9] Launch Mobility Center by dint of Task Manager (taskmgr.exe)
- Open Task Manager by right clicking on Taskbar and selecting the same.
- From the menu bar, click File and then choose Run new task from dropdown.
- Write mblctr in the provided field and click the OK button.
10] Go through File Explorer to open Windows 10 Mobility Center
- Press Win+E at once to bring up Windows File Explorer.
- When it comes into the sight, right-click on its address bar and select Edit address.
- Here, type mblctr and thereafter press Enter to open Mobility Center right away.
11] By means of System32 directory
- Go to the Desktop screen by pressing the Win logo and D simultaneously.
- Move the cursor to This PC and double-click on the same.
- After a window appears, copy the following path and paste –
C:\Windows\System32. Hit on the enter button.
- Now press Ctrl+F and type mblctr.exe in the search box.
- Double click on “mblctr.exe” to open Windows 10 Mobility Center.
12] Use Windows search
- You need to press Win+S to call up Windows search.
- After coming across, type mblctr in the search bar and hit enter when you see the result.
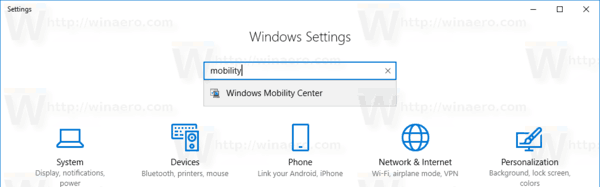
13] Open Windows 10 Mobility Center using Settings app
- Do right-click on the Start icon and select Settings cog or simply press Win+I together.
- When the main interface of Windows Settings app shows up, click the search bar located in the top.
- Now, type “mobility” there and select Windows Mobility Center from the appearing result.
14] Create a desktop shortcut
- Open Run Dialog with any convenient way.
- When it appears, type the following in the given field and hit the OK button – C:\Windows\System32.
- In the consequent window, click the search icon located in the right of the address bar and type mblctr.exe.
- Right-click on “mblctr.exe” and select Send to followed by clicking Desktop (create shortcut).
- Just double click on the shortcut icon to open Windows 10 Mobility Center.
15] Assign a hotkey
- After creating the desktop shortcut, you are able to generate a hotkey to access Mobility Center through the keyboard.
- Right-click on the shortcut you created and select Properties from the fly-out menu.
- When a wizard prompts, click on the box adjacent to Shortcut key.
- Type your preferable key. Ctrl+alt will be automatically added in the beginning.
- Once you are done, click the Apply button and then OK to make the changes effective.
- Finally, press ctrl+alt+your preferable key to Open Windows 10 Mobility Center.
Methods:
1] Using the Power User menu – the quickest way
2] Via Keyboard Shortcut
3] Through Windows search
4] From Run Dialog box
5] Direct From Taskbar
6] By way of Control Panel
7] With Command Prompt
8] With the help of Windows PowerShell
9] By dint of Task Manager
10] Going through File Explorer
11] By means of System32 directory
12] Use Windows search
13] using Settings app
14] Create a desktop shortcut
15] Assign a hotkey
That’s all!!
Windows Mobility Center (mblctr.exe) is a special app that comes bundled with Windows 10. It is present by default on mobile devices like laptops and tablets. It allows changing brightness, volume, power plans, screen orientation, display projection, Sync Center settings, and presentation settings of your device.
Windows Mobility Center was first introduced in Windows 7. Windows 8, Windows 8.1 and Windows 10 also include it, however it is mostly superseded by Action Center’s buttons for quickly toggling these above mentioned settings. Still if you prefer to use Mobility Center, you can activate it on a Desktop computer. It can still be useful because it can be extended by OEMs (your PC vendor) with additional tiles to toggle various system settings like Bluetooth or your monitor.
Tip: By default, the ability to run the app is restricted to mobile devices only. It doesn’t start on desktop PCs. Here is how to unlock it on a Desktop PC. See the following article:
Enable Mobility Center On Desktop in Windows 10
Here are different ways to open Windows Mobility Center in Windows 10.
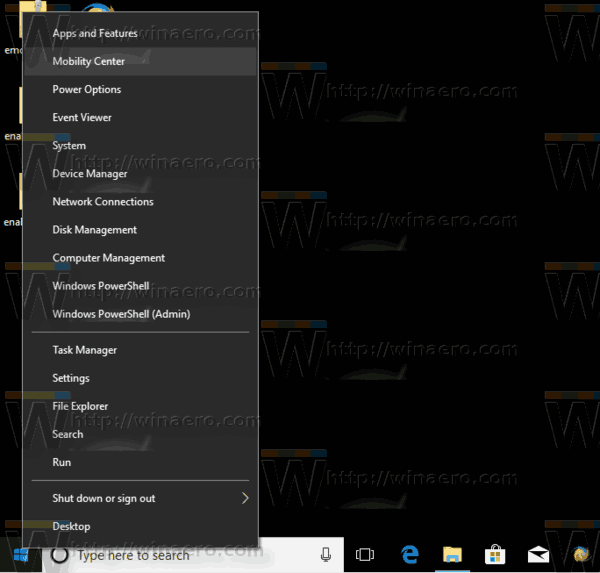
You can quickly open Windows Mobility Center from the Win + X menu. In Windows 8, Microsoft introduced a feature for mouse users which can be accessed with a right click on the bottom left corner of the screen — the Win+X menu. In Windows 8.1 and Windows 10, you can simply right click on the Start button to show it. Although this menu is far from being a Start Menu replacement, it does have shortcuts to useful administrative tools and system functions.
To access the Win + X menu in Windows 10, you have two options:
- Right click the Start button. Instead of the context menu of the taskbar, Windows 10 shows Win + X menu.
- Or, press Win + X shortcut keys on the keyboard.
To open Windows Mobility Center in Windows 10, do the following.
- Open the Win + X menu.
- Click on the Mobility Center item.

Open Windows Mobility Center from Run Dialog
You can the app directly from the run dialog.
- Press the Win + R shortcut keys together on the keyboard.
- Type or copy-paste the following text to the Run box:
mblctr.exe - Hit the Enter key and you are done.

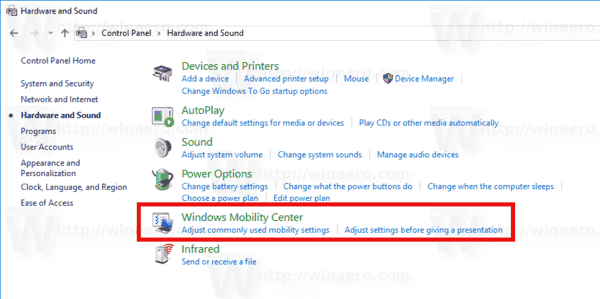
Open Windows Mobility Center from the Control Panel
- Open the classic Control Panel.
- Go to Control Panel\Hardware and Sound.
- There, click on the Windows Mobility Center item.
- Locate the battery icon in the notification area(system tray).
- Right-click the battery icon.
- Select Windows Mobility Center in the context menu.
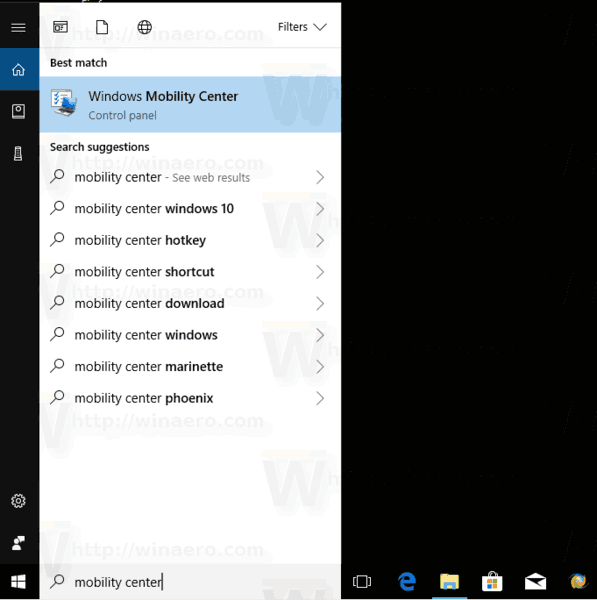
Open Windows Mobility Center from Search
You can open Windows Mobility Center quickly from Search. You can either use search from the Taskbar or from Settings. Type mobility center in the search box to open the app quickly and you are done.
Tip: You can disable Web Search in the taskbar search box(Cortana).
That’s it.
Support us
Winaero greatly relies on your support. You can help the site keep bringing you interesting and useful content and software by using these options:
If you like this article, please share it using the buttons below. It won’t take a lot from you, but it will help us grow. Thanks for your support!
In previous article, I mentioned Drag and Drop is not working in Windows 11 but in this article, I have mentioned how to enable and access Windows Mobility Center in Windows 11.
The Windows Mobility Center is a Windows PC built-in feature that lets users adjust the PC settings on the go.
It offers access to several system settings such as the display brightness, sound volume, Power Plans, battery percentage, Sync Settings, external display, presentation settings, and a few others. You do not only get to access these features, but you can also adjust them easily.
Although you cannot configure every PC feature in the Mobility Center as you would in the System settings app, you will have access to essential and the most primary features for regular PC use.
Knowing how to use this tool can save you more time in Configuring specific PC settings and help to improve your productivity.
This post will show you how to turn on and access the Mobility Center in Windows 11.
How To Turn On Windows Mobility Center
Except you have disabled it, the Windows Mobility Center is active by default in Windows operating systems, and you do not need to turn it on. Also, it is a built-in tool that you cannot download or install.
However, it works perfectly on devices with batteries, and you may get a ‘Windows Mobility Center is available only on laptops’ prompt if you try using it on a PC without a battery.
How To Access Windows Mobility Center
You can access the Windows Mobility Center with different methods. Let’s explore each of them.
Use the Quick Access Menu
One quick way to access the Windows Mobility Center is to use Windows Quick Access Menu. The quick access menu has several system settings and configurations you can access with ease.
To do this:
- Press the Windows button + X on the keyboard or right-click the start button on the taskbar.
- Select Mobility Center from the options that display.

Use the Windows Search Button
Like the Windows Run command, the search button also lets you open several apps and programs on your PC, and it can help you to access the Windows Mobility Center. You can do this with the steps below:
- Click the Search icon on the taskbar or press the Windows button + S on the keyboard.
- Type Windows Mobility Center in the search field.
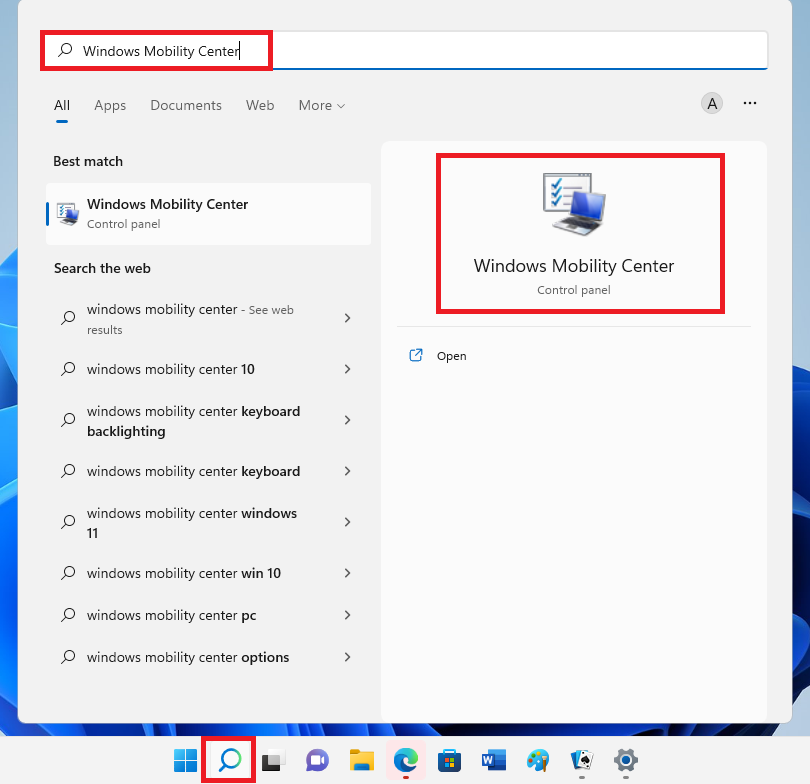
- Click the Windows Mobility Center app from the search results.
Use the Windows Run Command
You can access the Windows Mobility Center in Windows 11 using the Windows Run command. The Run command helps you access different PC programs with ease, and you can do it with the steps below.
- Press the Windows button + R to open the Run command dialog box.
- When the Windows dialog box pops up, type mblctr in the text field.

- Press the Enter button on your keyboard to open the Windows Mobility Center, or you can click OK on the screen
Use the Command Prompt
One of the most functional tools in windows 11 is the command prompt. Follow the steps below to access the Windows Mobility Center from the command prompt.
- Open the command prompt with the search button. Click the search icon and type cmd in the text field.

- Press Ctrl + Shift + Enter or click on Run as an administrator to open the Command Prompt.
- Type mblctr in the command prompt and press Enter, then the Windows mobility Center will open.

- You may need to wait a few seconds for the Windows Mobility Center to display.
Use the PowerShell To Enable Windows Mobility Center
In the same way with the command prompt, you can access the Windows Mobility Center with the PowerShell app. Here are the steps to do this:
- Press the Windows button + R to open the Run command dialog box.
- Type Powershell in the text field and press Ctrl + Shift + Enter to open the PowerShell window.
- Alternatively, you can search for PowerShell and click on Run as an administrator from the search results.
- When the PowerShell opens, type mblctr and press Enter on your keyboard to open the Windows Mobility Center.
Use the Task Manager
The Task Manager is another tool that helps you analyze system processes in Windows 11. You can access the Windows Mobility Center with this tool as follows:
- Press Ctrl + Shift + Esc on the keyboard to open the Task Manager.
- Click on the File tab at the top-right corner of the task manager and select Run new task. If you cannot find the File tab, click on More details in the Task Manager window first.

- A small dialog box will display on the screen. Type mblctr in the text field, and then press Enter on the keyboard or click OK in the dialog box.

How to Create a Windows Mobility Center Shortcut
You can access the Windows mobility Center easily with the methods above, but you can make things easier by creating a Windows Mobility Center Shortcut. To do this, follow the steps below:
- Go to your computer Desktop by closing or minimizing all active windows on your PC.
- You can also press the Windows button + D to access the Desktop.
- Right-click on the Desktop and hover the mouse on New from the context menu, then click on the shortcut option.

- A window will pop up with a field to type the location of the shortcut you want to create.
- Type %windir%\system32\mblctr in the text field, and click Next to continue.

- In the next window, type in a name you prefer for the Windows Mobility Center shortcut. It is advisable to use Windows Mobility Center.

- Click Finish to complete.
Conclusion
That is all on how to turn on and access Windows Mobility Center in Windows 11
You may also like to read:
Export Google Calendar To Excel
Best 5+ Google Calendar Alternatives (Open source)
How to turn Off/ON Real Time protection in Windows 10
How to find Wifi password on windows?
How to Find MAC Address of your Computer