
Navigating the BIOS (Basic Input/Output System) is essential for performing various system-level tasks such as configuring hardware settings, updating firmware, managing boot sequences, and troubleshooting hardware issues. Whether you’re a seasoned IT professional or a casual user, knowing how to access the BIOS on your Lenovo device—be it a standard Lenovo laptop, a ThinkPad, or a Legion series gaming laptop—is crucial. This guide will walk you through the different methods to enter BIOS on Lenovo laptops running Windows 10 and Windows 11.
Table of Contents
- Understanding BIOS
- Why Enter the BIOS?
- Methods to Enter BIOS on Lenovo Devices
- Method 1: Using the Novo Button
- Method 2: Using Function Keys During Startup
- Method 3: Through Windows Advanced Startup
- Model-Specific Instructions
- Lenovo ThinkPad Series
- Lenovo Legion Series
- Standard Lenovo Laptops
- Troubleshooting: What to Do If You Can’t Access BIOS
- Additional Tips and Precautions
- Conclusion
Understanding BIOS
The BIOS is firmware embedded on a motherboard that initializes hardware during the booting process before handing control over to the operating system. It allows users to configure hardware settings, manage system security, and update firmware. Accessing the BIOS is often necessary for tasks such as:
- Changing the boot order to install a new operating system
- Enabling or disabling hardware components
- Updating the BIOS firmware for improved system stability and performance
- Troubleshooting hardware issues
Why Enter the BIOS?
Entering the BIOS can help you:
- Install or Upgrade Operating Systems: Change the boot sequence to prioritize USB drives or optical discs.
- Configure Hardware Settings: Adjust settings for CPU, RAM, and storage devices.
- Manage Security Features: Set up passwords, enable Secure Boot, or configure TPM (Trusted Platform Module).
- Update Firmware: Ensure your system runs the latest BIOS version for optimal performance and security.
- Troubleshoot Hardware Issues: Diagnose and resolve hardware conflicts or failures.
Methods to Enter BIOS on Lenovo Devices
There are multiple ways to access the BIOS on Lenovo laptops, ThinkPads, and Legion series running Windows 10 or Windows 11. The method you choose may depend on your specific device model and configuration.
Method 1: Using the Novo Button
Many Lenovo laptops come equipped with a dedicated Novo button, a small pinhole that provides quick access to system recovery and BIOS settings.
Steps:
- Power Off Your Laptop:
- Ensure your Lenovo device is completely shut down.
- Locate the Novo Button:
- The Novo button is usually a small, recessed button located near the power button, on the side, or on the back of the laptop.
- Look for a button with a curved arrow or the word “Novo.”
- Press the Novo Button:
- Use a paperclip or a similar pointed object to press and hold the Novo button for a few seconds.
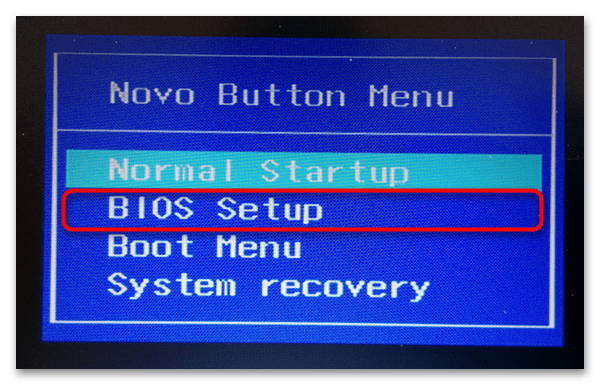
- The laptop should power on and display the Novo Button Menu.
- Select BIOS Setup:
- In the Novo Button Menu, use the arrow keys to navigate and select BIOS Setup.
- Press Enter to enter the BIOS.
Method 2: Using Function Keys During Startup
If your Lenovo laptop doesn’t have a Novo button, you can access the BIOS by pressing specific function keys during the boot process.
Common Function Keys:
- F1: Often used for Lenovo ThinkPad series.
- F2: Commonly used for standard Lenovo laptops and some Legion models.
- Delete: Occasionally used on certain models.
Steps:
- Power Off Your Laptop:
- Ensure your device is completely shut down.
- Power On and Press the Function Key:
- Turn on your Lenovo laptop.
- Immediately start pressing the appropriate function key (F1, F2, or Delete) repeatedly until the BIOS screen appears.
- Timing is crucial; start pressing the key as soon as the laptop starts to boot.
- Access the BIOS:
- Once the BIOS screen appears, you can navigate through the settings using the keyboard.
Method 3: Through Windows Advanced Startup
Windows 10 and Windows 11 provide an advanced startup option that allows you to boot directly into the BIOS without using function keys.
Steps:
- Open Settings:
- Press Windows + I to open the Settings app.
- Navigate to Recovery Options:
- Go to Update & Security > Recovery.
- Advanced Startup:
- Under the Advanced startup section, click Restart now.
- Your computer will restart and present you with a menu.
- Troubleshoot:
- Select Troubleshoot > Advanced options > UEFI Firmware Settings.
- Restart to BIOS:
- Click Restart.
- Your laptop will reboot directly into the BIOS.
Model-Specific Instructions
Different Lenovo models may have slight variations in the process to enter BIOS. Here’s how to access BIOS on specific Lenovo series:
Lenovo ThinkPad Series
ThinkPads are renowned for their robust build and are often used in professional environments. Accessing BIOS on ThinkPads may differ slightly from other Lenovo models.
Steps:
- Power Off the Laptop.
- Press the ThinkVantage Button or F1:
- Older ThinkPad models have a ThinkVantage button. Pressing it during startup takes you to the BIOS.
- On newer models, press and hold the F1 key while powering on the laptop.
- Enter BIOS:
- Release the key when the BIOS screen appears.
Lenovo Legion Series
Lenovo’s Legion series caters to gamers and high-performance users. Accessing BIOS on Legion laptops is straightforward.
Steps:
- Power Off the Laptop.
- Press the Novo Button or F2:
- Some Legion models feature the Novo button. Press it using a paperclip to access the Novo Button Menu, then select BIOS Setup.
- Alternatively, press the F2 key repeatedly immediately after powering on the device.
- Access BIOS:
- The BIOS interface should appear after selecting the appropriate option.
Standard Lenovo Laptops
For standard Lenovo laptops not falling under ThinkPad or Legion series, accessing BIOS follows the general methods outlined above.
Steps:
- Power Off the Laptop.
- Use the Novo Button or Function Keys:
- Locate and press the Novo button to access BIOS via the Novo Button Menu.
- If there’s no Novo button, use F2 or Delete keys during startup.
- Enter BIOS:
- Select BIOS Setup from the Novo Button Menu or proceed with the function key method.
Troubleshooting: What to Do If You Can’t Access BIOS
If you’re having trouble entering the BIOS on your Lenovo device, consider the following troubleshooting steps:
1. Ensure Proper Timing
Press the function key repeatedly immediately after pressing the power button. Missing the right moment can prevent access to BIOS.
2. Use the Novo Button Correctly
Ensure you’re pressing and holding the Novo button long enough to trigger the Novo Button Menu. Use a pointed object like a paperclip for recessed buttons.
3. Disable Fast Startup in Windows
Fast Startup can sometimes interfere with accessing BIOS.
Steps:
- Open Control Panel:
- Press Windows + X and select Power Options.
- Change Power Settings:
- Click Additional power settings > Choose what the power buttons do.
- Change Settings:
- Click Change settings that are currently unavailable.
- Disable Fast Startup:
- Uncheck Turn on fast startup.
- Click Save changes.
- Restart and Try Again:
- Power off and attempt to access BIOS using the standard methods.
4. Disconnect External Devices
Peripheral devices can sometimes interfere with the boot process.
Steps:
- Remove All External Devices:
- Disconnect USB drives, external hard drives, printers, etc.
- Attempt to Enter BIOS:
- Power on the laptop and try accessing BIOS again.
5. Reset CMOS
If all else fails, resetting the CMOS can restore BIOS settings to default, potentially resolving access issues. Note: This is an advanced step and should be performed with caution.
Steps:
- Power Off and Unplug the Laptop.
- Access the Motherboard:
- Open the laptop’s back panel to access the motherboard.
- Locate the CMOS Battery:
- Find the CMOS battery—a small, round battery on the motherboard.
- Remove the CMOS Battery:
- Carefully remove the battery and wait for about 5 minutes.
- Reinsert the Battery and Reassemble:
- Place the battery back, close the laptop, and attempt to access BIOS again.
Warning: Opening your laptop may void the warranty. If unsure, seek professional assistance or contact Lenovo support.
Additional Tips and Precautions
- Backup Important Data: Before making significant changes in BIOS, ensure your data is backed up to prevent potential loss.
- Understand BIOS Settings: Altering BIOS settings can impact system stability. Only change settings you understand.
- Update BIOS Carefully: Updating BIOS can fix issues but carries risks. Follow Lenovo’s official instructions meticulously.
- Use a Stable Power Source: Ensure your laptop is plugged in during BIOS access and updates to prevent power loss.
- Document Changes: Keep a record of any BIOS changes you make for future reference or troubleshooting.
Conclusion
Accessing the BIOS on Lenovo laptops, whether they’re ThinkPads, Legion series, or standard models, is a fundamental skill for managing and troubleshooting your device. By understanding the various methods—using the Novo button, function keys, or Windows Advanced Startup—you can confidently navigate the BIOS to configure settings, update firmware, and optimize your system’s performance.
Remember to proceed with caution when making changes in the BIOS, as incorrect settings can affect your laptop’s functionality. Always refer to Lenovo’s official documentation or seek professional assistance if you’re unsure about specific configurations. With the knowledge from this guide, you can effectively manage your Lenovo device’s BIOS, ensuring it runs smoothly and efficiently.
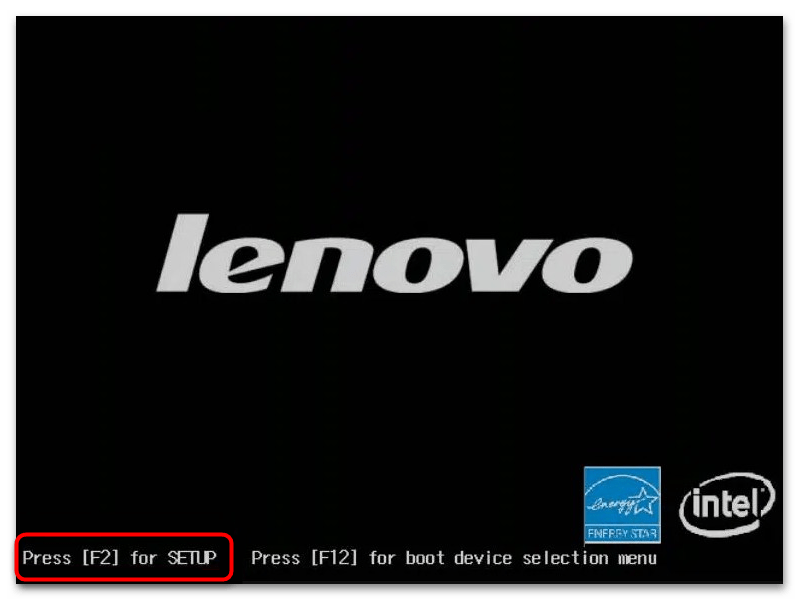
Способ 1: Горячая клавиша
На любом ноутбуке предпочтительным методом входа в BIOS является использование горячей клавиши. Во всех современных лэптопах Lenovo сейчас используется унифицированная клавиша F2. Нажимайте ее быстро несколько раз сразу же с включением ноутбука, чтобы тот вместо дальнейшей загрузки открыл БИОС.
Продолжение включения ноутбука вместо отображения BIOS в большинстве случаев означает, что клавиша для входа отличается. Попробуйте также нажать Fn + F2, F8 или Delete. Еще один вариант: нажмите F12 для отображения меню загрузки («Boot Menu»), откуда выберите «BIOS Setup».
В старых ноутбуках сразу же при включении может отображаться клавиша, отведенная под вход в БИОС. В новых моделях этой информации на экране уже нет.
Способ 2: Специальная кнопка
У лэптопов Леново есть фирменная кнопка «NOVO», расположенная на корпусе. Она предназначена для входа в среду восстановления на случай, если устройство не загружается. Нажав ее, вы вызовете специальное меню, через которое сможете попасть в БИОС.
Расположение кнопки сильно зависит от модели ноутбука. У современных моделей ее можно найти на правой или левой грани нижней части корпуса. Рядом с ней всегда есть иконка в виде дугообразной стрелки влево, как на примере ниже. Скорее всего, это будет утопленная кнопка, нажать которую получится только при использовании стороннего предмета: разогнутой скрепки, ключа для открытия SIM-лотка смартфона и т. п. Не используйте слишком тонкие и ненадежные предметы, которые могут сломаться, такие как иголка, зубочистка.
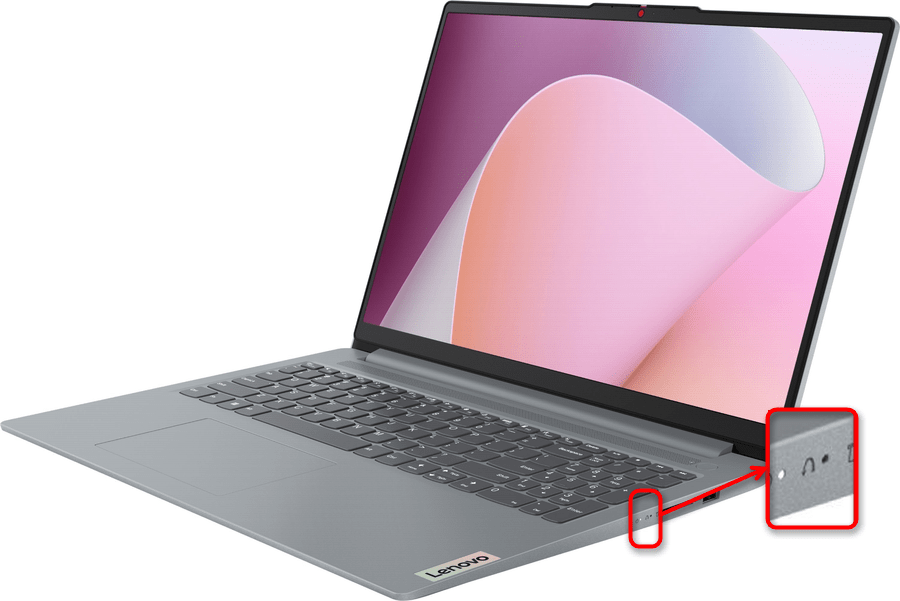
В отдельных устаревших моделях «NOVO» расположена рядом с кнопкой питания и имеет точно такой же значок.

В результате нажатия этой кнопки отобразится меню, из которого выберите «BIOS Setup» и дождитесь перехода в базовое меню ввода-вывода.
Способ 3: Среда восстановления
Современные Windows позволяют попасть в BIOS через среду восстановления. Это можно сделать и когда ОС работает нормально, и при ее отсутствии на ноутбуке (либо когда она повреждена, но ноутбук загружается с флешки без предварительной настройки БИОС).
- У нас на сайте есть отдельная статья со всеми методами входа в среду восстановления. Она предназначена для Windows 10, но одинаково актуальна и для Windows 11. Нажмите по ссылке ниже и выберите подходящую для себя инструкцию.
Подробнее: Как запустить среду восстановления в Windows
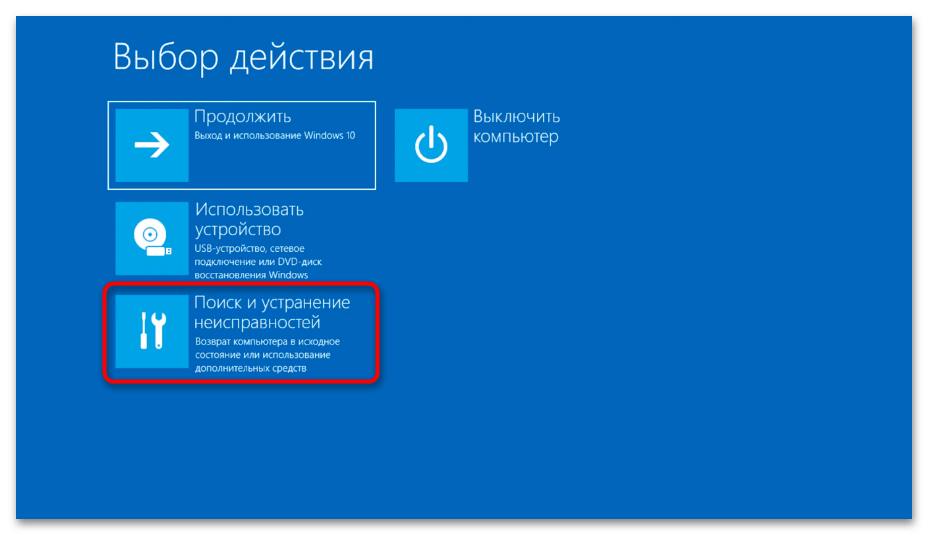
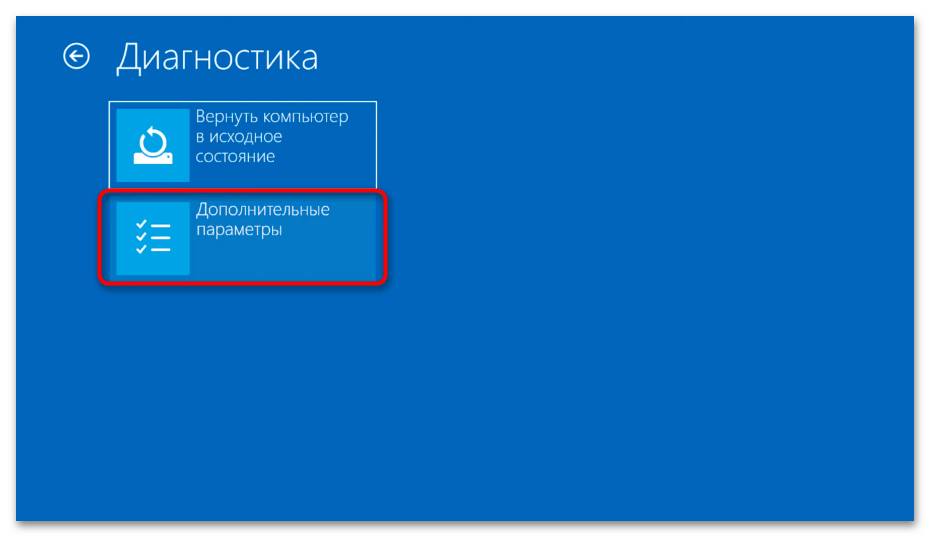
- Оказавшись в среде восстановления, перейдите в раздел «Поиск и устранение неисправностей».
- Затем — в «Дополнительные параметры».
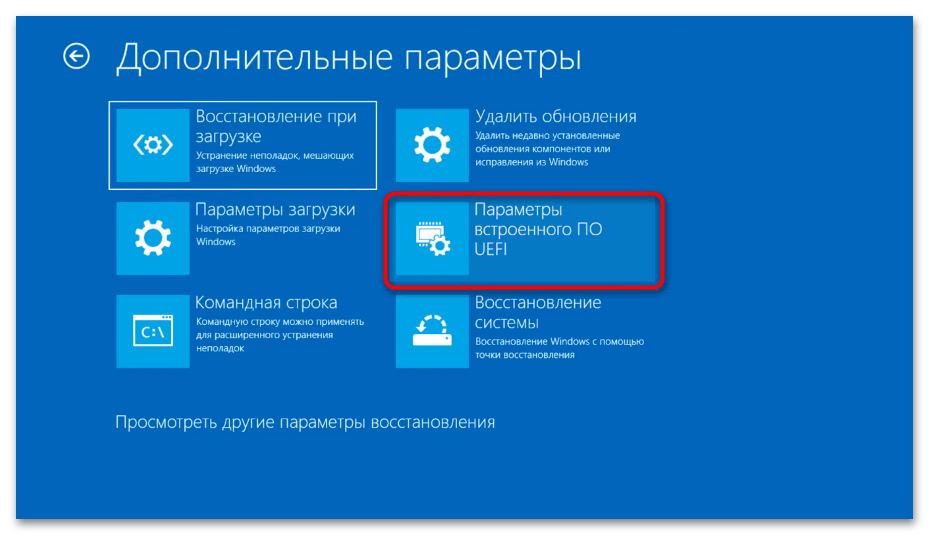
- Здесь нужный вам пункт называется «Параметры встроенного ПО UEFI».
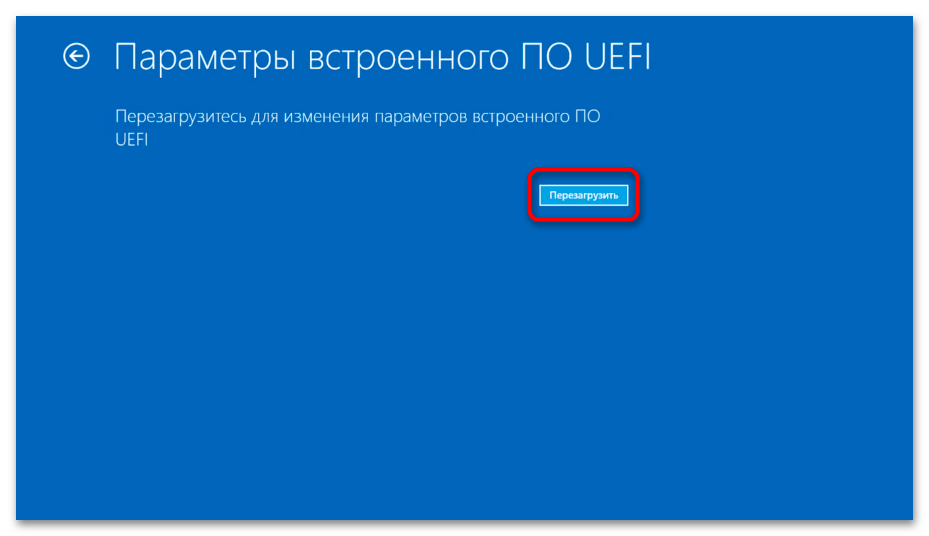
- Будет предложено перезагрузить устройство для автоматического входа в БИОС. Согласитесь с этим.
Наша группа в TelegramПолезные советы и помощь
Entering the BIOS (Basic Input/Output System) on a Lenovo Legion laptop allows users to configure hardware settings, change boot order, and troubleshoot various system issues. This guide provides a detailed, step-by-step explanation of how to access the BIOS menu on Lenovo Legion devices. Understanding this process can empower users to optimize their gaming experience and maintain their system’s performance.
- Understanding the BIOS
- Methods to Access BIOS
- Common BIOS Settings and Options
- Troubleshooting BIOS Access Issues
- A Final Thought: Mastering Your Lenovo Legion’s Core
Understanding the BIOS
The BIOS is a firmware program embedded on a computer’s motherboard. It’s the first software that runs when a computer is powered on. Its primary function is to initialize the hardware components and load the operating system. Accessing the BIOS allows users to modify settings related to CPU, memory, storage devices, and boot sequence. This level of control is crucial for advanced users who want to fine-tune their system.
Methods to Access BIOS
There are several ways to enter the BIOS on a Lenovo Legion. The most common methods involve using specific keys during the boot process or utilizing the Windows advanced startup options. Let’s explore these methods in detail.
Using Function Keys During Startup
This is the most traditional and widely used method. The specific key can vary depending on the Lenovo Legion model, but common keys include F2, Delete, F12, and Fn + F2.
1. Power Down the System: Ensure the Lenovo Legion laptop is completely turned off. A full shutdown is necessary, not just a restart.
2. Locate the Correct Key: Consult the Lenovo Legion’s user manual or the Lenovo support website to determine the correct key for accessing the BIOS on the specific model. If the documentation is unavailable, try the most common keys: F2, Delete, F12, or Fn + F2.
3. Power On and Repeatedly Press the Key: Press the power button to turn on the laptop. Immediately and repeatedly press the designated key (e.g., F2) until the BIOS menu appears. Timing is crucial here; the key must be pressed before the operating system starts to load.
4. Navigating the BIOS: Once the BIOS menu is displayed, use the arrow keys to navigate through the different sections and options. The Enter key is typically used to select an option, and the Esc key is used to go back or exit the menu.
5. Saving Changes and Exiting: Before exiting the BIOS, make sure to save any changes made. Look for an option like “Save and Exit” or “Exit Saving Changes.” Select this option and confirm to save the configurations. The laptop will then restart.
Using the Novo Button
Some Lenovo Legion laptops feature a dedicated “Novo Button” (often indicated by a small, curved arrow icon). This button allows users to access a boot menu, including the BIOS setup.
1. Locate the Novo Button: The Novo Button is usually located on the side or near the power button of the Lenovo Legion laptop.
2. Power Off the System: Ensure the laptop is completely powered off.
3. Press the Novo Button: Use a straightened paperclip or similar object to gently press and hold the Novo Button.
4. Novo Button Menu: The laptop will power on and display the Novo Button Menu. This menu typically includes options such as “Normal Startup,” “BIOS Setup,” “Boot Menu,” and “System Recovery.”
5. Select BIOS Setup: Use the arrow keys to navigate to the “BIOS Setup” option and press Enter.
6. Navigating and Exiting the BIOS: Once in the BIOS, navigate using the arrow keys and make any necessary changes. Remember to save the changes before exiting.
Accessing BIOS Through Windows Advanced Startup
This method is useful if the function key method is not working or if the user prefers to access the BIOS from within the Windows operating system.
1. Accessing Advanced Startup:
- Windows 10: Go to Settings > Update & Security > Recovery. Under “Advanced startup,” click “Restart now.”
- Windows 11: Go to Settings > System > Recovery. Under “Advanced startup,” click “Restart now.”
2. Choose an Option: After the system restarts, a blue screen with several options will appear. Select “Troubleshoot.”
3. Advanced Options: In the “Troubleshoot” menu, select “Advanced options.”
4. UEFI Firmware Settings: Look for an option labeled “UEFI Firmware Settings.” If this option is available, select it and click “Restart.” The system will then boot directly into the BIOS menu.
5. If UEFI Firmware Settings is Missing: If the “UEFI Firmware Settings” option is not available, it may indicate that the system is not using UEFI or that the option is disabled. In this case, try the function key method or the Novo Button method.
Common BIOS Settings and Options
Once inside the BIOS, users can access a variety of settings. Here are some of the most common and useful options:
- Boot Order: This setting determines the order in which the computer attempts to boot from different devices (e.g., hard drive, SSD, USB drive, DVD drive). Changing the boot order is essential when installing a new operating system or booting from a recovery drive.
- CPU Configuration: This section allows users to view and sometimes modify CPU settings, such as clock speed and voltage. However, it’s important to exercise caution when modifying these settings, as incorrect configurations can lead to system instability.
- Memory (RAM) Settings: This section provides information about the installed RAM and allows users to configure memory timings and other advanced settings.
- Storage Configuration: This section allows users to view and configure storage devices, such as hard drives and SSDs. Users can also configure RAID settings if supported.
- Security Settings: This section includes options for setting a BIOS password, enabling or disabling secure boot, and configuring other security features.
Troubleshooting BIOS Access Issues
Sometimes, accessing the BIOS can be problematic. Here are some common issues and their solutions:
- Function Key Not Working: Ensure the correct function key is being used. Try pressing the Fn key along with the function key. Also, check if the function keys are disabled in the operating system settings.
- Fast Startup Interference: Windows Fast Startup can sometimes interfere with the ability to enter the BIOS. Disabling Fast Startup may resolve the issue. To disable Fast Startup, go to Control Panel > Power Options > Choose what the power buttons do. Click “Change settings that are currently unavailable” and uncheck “Turn on fast startup (recommended).”
- Incorrect Timing: The timing of pressing the function key is crucial. Try pressing the key repeatedly as soon as the power button is pressed.
A Final Thought: Mastering Your Lenovo Legion’s Core
Navigating the BIOS might seem daunting initially, but with a clear understanding of the steps and options available, users can unlock a greater level of control over their Lenovo Legion laptops. Whether it’s optimizing boot order, configuring hardware settings, or troubleshooting system issues, mastering BIOS access is a valuable skill for any tech-savvy individual. Embrace the power within your Legion, and elevate your computing experience.
What You Need to Know
Q1: What happens if I make a mistake in the BIOS settings?
A: If you make a mistake in the BIOS settings, the computer might not boot properly or may experience instability. In such cases, you can try resetting the BIOS to its default settings. There is usually an option within the BIOS menu to “Load Default Settings” or “Factory Defaults.” Selecting this option will revert all settings to their original values. If you can’t access the BIOS, you may need to remove the CMOS battery (a small, round battery on the motherboard) for a few minutes to reset the BIOS. Consult your laptop’s manual for specific instructions.
Q2: Is it safe to update the BIOS?
A: Updating the BIOS can improve system stability, compatibility, and performance. However, it’s crucial to perform the update correctly. Always download the BIOS update from the official Lenovo support website for your specific model. Follow the instructions provided by Lenovo carefully. A failed BIOS update can render the system unusable, so it’s important to take precautions and ensure a stable power supply during the update process.
Q3: Can I access the BIOS if my screen is black?
A: If the screen is completely black, it can be difficult to access the BIOS. Ensure that the laptop is receiving power and that the screen is properly connected. Try connecting an external monitor to see if the display is the issue. If the external monitor works, the laptop’s screen may need repair. If neither screen works, there may be a more serious hardware issue. In this case, consider contacting Lenovo support or a qualified technician for assistance.
Как войти в BIOS на компьютерах Lenovo?
Lenovo входит в список крупнейших компаний в мире, которые производят компьютеры. И так как спрос на продукцию данной фирмы растёт, то всё более актуальными для пользователей являются вопросы по правильной работе и эксплуатации техники Леново. И для тех, кто решил переустановить Windows, в самом начале процесса поднимается вопрос: как в Lenovo зайти в биос?

Для начала стоит разобраться, что же такое BIOS и с чем его едят. Итак, BIOS на Lenovo – это специальная микроскопическая программа, которая обеспечивает правильное и стабильное взаимодействие между всеми составляющими ПК и ОС и позволяет настраивать его. А настройка BIOS – это стандартная настройка ПК, помогающая системе вычислить те функции, которые должны быть активированы, и как должна производиться их загрузка. BIOS есть на любом компьютере, будь то Lenovo B560, Lenovo S21 или M5400.
На сегодняшний день создано несколько различных версий Биоса, которые незначительно отличаются по внешнему виду, но что касается функций – здесь всё идентично. Каждая из версий используется для первоначальной настройки компьютера и для его проверки. В функционал BIOS’a входит:

- Установка даты и времени;
- Выбор загрузочного сектора – устройства, с которого будет установлена или загружена операционная система;
- Проверка системных компонентов, включающая проверку исправности оперативной памяти и жёстких дисков;
- Подключение защиты – пароля на вашем ноутбуке для защиты персональных данных.
Как зайти в BIOS
На различных моделях Lenovo методы входа в Биос на ноутбуке могут отличаться. Для начала попробуйте стандартный способ входа – при запуске персонального компьютера нужно нажать кнопку F2 на клавиатуре, иногда перед этим зажав клавишу Fn. Далее произойдёт вызов меню параметров ПК.

Но этот способ не всегда рабочий. Для некоторых моделей Lenovo БИОС не загружается при нажатии F2 или Fn+F2 – например, Lenovo Legion Y520, Lenovo G70, G50-30 или G500. Если вы пытались войти в bios вышеописанным методом, и у вас не получилось, следующая инструкция для вас:
- На боковой грани ноутбука (там, где располагается обычно гнездо зарядки) либо прямо возле кнопки питания должна быть специальная маленькая клавиша с изогнутой стрелочкой. Она называется Novo Button, One Key Recovery или One Key Rescue System. Вам нужно выключить ноутбук и нажать на неё.
- Если вы нажали правильную кнопку, ноутбук запустится, а на экране вы увидите, что мы переходим в специальное меню запуска:

- Normal Startup (обычная загрузка);
- Bios Setup (параметры);
- System Recovery (системное восстановление);
- Boot Menu (загрузочное меню).
- Как вы уже, скорее всего, догадались, чтобы зайти в биос на Lenovo, нужно перейти в пункт BiosSetup. После того как вы его выберете, вы увидите, что ноут зашёл в биос и можете настроить его по своему усмотрению.
Два секрета запуска Bios
Но если у вас так и не получилось запустить BIOS одним из вышеописанных способов, и на ноутбуке установлена операционная система Windows 8.1 и выше, откроем вам два секрета запуска.

- Нужно включить ПК. В запущенном компьютере на рабочем столе тянем указатель мышки в нижний правый угол рабочего стола (вызываем боковое меню).
- Нам открывается меню, где мы выбираем пункты «Параметры» — «Обновление и восстановление» — «Восстановление».
- Здесь, в разделе «Особые варианты загрузки», кликаем на кнопку «Перезагрузить сейчас».
- Далее откроется синий экран с плитками. Открываем плитку «Диагностика», нажав на которую вы попадёте в дополнительные параметры.
- Нужно открыть пункт «Параметры встроенного ПО UEFI» и нажать кнопку «Перезагрузить». Готово! Вы в БИОСе!

Второй секрет. Многие пользователи Win 8.1 при попытке входа в Биос допускают ошибку. Все знают, как попасть в BIOS — нужно нажать определённую кнопку на клавиатуре. Для этого пользователь жмёт на «Завершение работы», ожидает, пока ноутбук выключится, а затем жмет кнопку для входа в Биос, но компьютер запускается по-старому – идёт загрузка ОС.
Вся проблема в том, что операционная система Windows 8.1 работает изначально с функцией быстрого запуска, которая основана на режиме сна – войдите в Биос, не отключая ПК, а перезагружая его.
Несколько полезных советов:

- После того как вход в Bios был осуществлён, перейдите к различным настройкам параметров системы и её загрузки в самом БИОСе. Будьте очень внимательны и осторожны, и лучше не трогайте то, чего не знаете, так как есть риск сделать что-то не так и совсем потерять свой компьютер. А после внесения всех изменений зайдите в раздел «Exit» («Выход») и выберите пункт «Save & exit» («Сохранить и выйти»). После этого ноутбук будет перезагружен, и при новом запуске все настройки, которые вам до этого пришлось установить, будут уже учтены.
- Если вышеописанные способы входа в Биос на ноутбуке Lenovo не работают, попробуйте при запуске устройства зажать и удерживать клавишу F12 вплоть до запуска BIOS’a – на некоторых моделях Леново этот способ работает.
- Очень редко, но всё же бывает – в кое-каких моделях работает клавиша F1 (нужно нажать её несколько раз, пока ноутбук включается).
- Производители рекомендуют настраивать параметры ПК в Биосе только с полностью заряженным аккумулятором ноутбука, так как если в процессе настройки ваш ноутбук отключится из-за того, что разрядился, то это, скорее всего, вызовет кое-какие проблемы системы в дальнейшем.
- Перед тем как выйти из БИОСа, обязательно сохраняйте все изменения, чтобы не сбились.
Помните, что настройка Bios – это очень серьёзное действие, требующее максимального понимания процесса и большой внимательности к деталям. Вы должны знать, что при неверной настройке некоторые компоненты системы могут работать некорректно, что приносит дополнительные сложности в эксплуатации. И если вы сомневаетесь в том, что знаете, как правильно нужно делать – лучше вызвать квалифицированных специалистов, это сохранит и деньги, и время, и нервы. Надеемся, что данная статья помогла вам разобраться с тем, как зайти в Bios.
Источник
Как зайти в БИОС на ноутбуке Lenovo — 5 простых способов
Как зайти в BIOS
На различных моделях Lenovo методы входа в Биос на ноутбуке могут отличаться. Для начала попробуйте стандартный способ входа – при запуске персонального компьютера нужно нажать кнопку F2 на клавиатуре, иногда перед этим зажав клавишу Fn. Далее произойдёт вызов меню параметров ПК.
Но этот способ не всегда рабочий. Для некоторых моделей Lenovo БИОС не загружается при нажатии F2 или Fn+F2 – например, Lenovo Legion Y520, Lenovo G70, G50-30 или G500. Если вы пытались войти в bios вышеописанным методом, и у вас не получилось, следующая инструкция для вас:
- На боковой грани ноутбука (там, где располагается обычно гнездо зарядки) либо прямо возле кнопки питания должна быть специальная маленькая клавиша с изогнутой стрелочкой. Она называется Novo Button, One Key Recovery или One Key Rescue System. Вам нужно выключить ноутбук и нажать на неё.
- Если вы нажали правильную кнопку, ноутбук запустится, а на экране вы увидите, что мы переходим в специальное меню запуска:
- Normal Startup (обычная загрузка);
- Bios Setup (параметры);
- System Recovery (системное восстановление);
- Boot Menu (загрузочное меню).
- Как вы уже, скорее всего, догадались, чтобы зайти в биос на Lenovo, нужно перейти в пункт BiosSetup. После того как вы его выберете, вы увидите, что ноут зашёл в биос и можете настроить его по своему усмотрению.
Открываем BIOS на ноутбуке Lenovo с помощью клавиши на клавиатуре
Ничего сложного в этом нет. Чаще всего используется клавиша F2. Ее нужно активно нажимать сразу после включения ноутбука (после нажатия на кнопку включения).
Сразу должно открыться меню BIOS. На моем ноутбуке оно выглядит примерно вот так:
Редко, но бывает, что необходимо нажимать сочетание клавиш Fn+F2. Это зависит от модели ноутбука.
В итоге так же должно появится необходимое нам меню с настройками. Кстати, сменить порядок загрузки можно на вкладке «Boot».
Я не знаком со всеми ноутбуками от Lenovo, у них очень много моделей. Но мне кажется, что на каждом есть эта кнопка со стрелкой. Насколько я понял, называется она Recovery. Чаще всего находится возле кнопки включения, или на боковой грани.
На некоторых новых моделях (например, на Lenovo IdeaPad 320-15IAP), эта кнопка утоплена в корпус, и нажать на нее можно только чем-то острым и тонким. Там просто отверстие.
Пользоваться этой кнопкой очень просто. Выключаем ноутбук, и нажимаем на кнопку «Recovery» (со стрелкой). Ноутбук включится, и появится Novo Button Menu. Нам нужно выбрать «BIOS Setup». Так же с этого меню можно запустить восстановление системы и зайти в загрузочное меню, о котором я писал в начале статьи.
Выбираем «BIOS Setup» и попадаем в необходимое нам меню.
Комбинации клавиш
К счастью, компания Леново почти для всех моделей своих ноутбуков установила единую комбинацию клавиш: Fn + F2, где Fn — особая «функциональная» кнопка, располагающаяся обычно в левом нижнем углу.
Значительно реже для того, чтобы зайти в БИОС, приходится использовать другую комбинацию Fn + F1 или просто нажать клавишу Delete (Del).
В целом порядок действий пользователя сводится к двум шагам:
- Открыть меню «Пуск» и, нажав на виртуальную кнопку питания, выбрать один из вариантов — выключение или перезагрузку.
- Снова включить ноутбук Леново или дождаться, пока он запустится после перезагрузки, и воспользоваться одной из перечисленных выше комбинаций клавиш, чтобы зайти в БИОС — это не сложнее, чем разобраться в преимуществах UEFI Boot.
Если всё выполнено верно, юзер увидит перед собой меню BIOS. Теперь он может настроить БИОС, установить очерёдность загрузки операционной системы и выполнить иные требуемые манипуляции — если потребуется, предварительно введя пароль.
Совет: если ноутбук Леново запускается слишком быстро или не получается войти в BIOS после перезагрузки, имеет смысл выключить его с помощью физической кнопки, нажав и подержав её несколько секунд.
Теперь, дав ноутбуку Lenovo немного «отдохнуть», следует снова запустить его — и не забыть вовремя воспользоваться одной из перечисленных выше комбинаций, позволяющих зайти в БИОС.
Владельцы ноутбуков Леново линейки ThinkPad, а также некоторых других моделей, могут зайти в BIOS, не используя комбинации клавиш — достаточно применить специальную кнопку NOVO, располагающуюся рядом с кнопкой питания или на торце устройства.
Выключив ноутбук Lenovo, следует нажать на NOVO и подержать её несколько секунд; выбрав в появившемся окне пункт BIOS Setup, юзер сможет наконец зайти в БИОС — и продолжить работу в базовой системе ввода-вывода.
Совет: иногда вместо кнопки NOVO на корпусе устройства находится специальное отверстие, около которого размещена та же пиктограмма. В этом случае открыть меню BIOS можно, вставив в разъём специальную скрепку для Айфона или смартфона или обычную канцелярскую и слегка надавив на контакт в течение двух-трёх секунд.
Способы как войти в BIOS на ноутбуке Леново
Владельцы ноутбуков Леново линейки ThinkPad, а также некоторых других моделей, могут зайти в BIOS, не используя комбинации клавиш — достаточно применить специальную кнопку NOVO, располагающуюся рядом с кнопкой питания или на торце устройства.
Выключив ноутбук Lenovo, следует нажать на NOVO и подержать её несколько секунд; выбрав в появившемся окне пункт BIOS Setup, юзер сможет наконец зайти в БИОС — и продолжить работу в базовой системе ввода-вывода.
Совет: иногда вместо кнопки NOVO на корпусе устройства находится специальное отверстие, около которого размещена та же пиктограмма. В этом случае открыть меню BIOS можно, вставив в разъём специальную скрепку для Айфона или смартфона или обычную канцелярскую и слегка надавив на контакт в течение двух-трёх секунд.
Некоторые модели Lenovo имеют специальную кнопку Novo для замены ключа настройки BIOS. Он, как правило, расположен рядом с разъемом питания с логотипом. Если у вас есть кнопка Novo на вашем ноутбуке, вы можете ввести BIOS намного легче. Все, что вам нужно сделать, это нажать кнопку «Ново», когда ваш ноутбук выключен . Затем ноутбук включится автоматически и покажет вам меню. Вы можете выбрать «BIOS Setup» в меню для входа в BIOS.
Вот вам клавиши для входа в BIOS для разных моделей ноутбуков Lenovo.
| Модель Lenovo | Ключ настройки BIOS |
| Серия Ideapad N | F2 |
| Серия Ideapad P | F2 на логотипе Lenovo |
| Серия Ideapad S | Новая кнопка, некоторые модели: F2 |
| Серия Ideapad U | Новая кнопка, некоторые модели: F2 |
| Серия Ideapad V | F2 |
| Серия Ideapad Y | F2 |
| Серия Ideapad Z | Новая кнопка, некоторые модели: F2 |
| Серия B | Новая кнопка, некоторые модели: F2 |
| Серия E | Новая кнопка, некоторые модели: F2 |
| Edge Series | Кнопка Ново |
| Серия Flex | Кнопка Ново |
| Серия G | F2 |
| Серия K | F1 |
| Серия M | F1 |
| Серия N | F2 |
| Серия S | Кнопка Ново |
| Серия V | F1 |
| Серия Y | Кнопка Ново |
| Серия Z | Кнопка Ново |
| Серия йоги | Кнопка «Ново», некоторые модели: F2 / (Fn + F2) |
| ThinkPad Yoga 12 | F1 |
Этот способ подойдет для версий Windows 8/8.1/10.
Перед тем, как приступить к первому пункту данного способа, попробуйте, зажав клавишу Shift, перезагрузить ваше устройство через меню Пуск. Если таким образом вы попали в меню Выбор действий, то сразу переходите к шагу 4 данного способа.
Нажмите сочетание клавиш Windows
+ i для перехода в параметры системы;
В этом окне выбираем раздел Обновление и безопасность
Далее переходим на вкладку Восстановление системы и в пункте Особые варианты загрузки нажимаем кнопку Перезагрузить сейчас, после чего вы попадете в меню Выбор действий
Выберите пункт Поиск и устранение неисправностей.
Далее выбираем пункт Дополнительные параметры
Параметры встроенного ПО UEFI
И уже в последнем меню выбрать кнопку перезагрузить. После этого ваше устройство само перейдет в настройки BIOS.
ВНИМАНИЕ! Если ни один из этих способов не подошел, то, предварительно отключив от сети ноутбук и отсоединив аккумулятор, открыть его корпус (нижнюю крышку) и вытащить плоскую батарейку из материнской платы на 10-15 минут. Это сбросит настройки БИОС. Далее возвращайте все обратно и, при включении, снова попробуйте первые 2 способа.
Способы входа в BIOS [Lenovo]
1) Стандартные «горячие» клавиши для входа
На подавляющем большинстве ноутбуков этой марки — должна подействовать кнопка F2 или F1 (нажимать нужно сразу после включения ноутбука. Модельный ряд: ThinkPad, IdeaPad, 3000 Series, ThinkCentre, ThinkStation).
В некоторых моделях — может потребовать нажатие сочетания кнопок Fn+F2 (например, в G50).
Дополнение. Совсем уж редко встречается клавиша F12 (Fn+F12 — вход в Boot Menu) — для входа в BIOS (модель Lenovo b590). Рекомендую так же попробовать.
Fn+F2 — клавиатура ноутбука Lenovo
2) Специальная кнопка recovery «со стрелкой»
Некоторые модели ноутбуков Lenovo оснащены специальными кнопками на корпусе устройства для входа в BIOS. Речь идет, например, об этих: g505, v580c, b50, b560, g50, g500, g505s, g570, g570e, g580, g700, z500, z580, Z50, B70 и другие.
Они при включении — могут вообще никак не реагировать на ваши нажатия кнопок F2. Для входа в BIOS, в этом случае, нужно использовать специальную кнопку Recovery (со стрелкой). Нажимать ее нужно вместо кнопки включения (т.е. когда ноутбук выключен).
Располагается кнопка Recovery на корпусе устройства, рядом с кнопкой включения (на некоторых моделях это кнопка находится сбоку).
Lenovo G700 — кнопка входа в настройки устройства (в том числе BIOS)
Lenovo B70 — кнопка для входа в BIOS рядом с входом для питания. Нажимать удобнее всего карандашом или ручкой
После того, как вы нажмете на эту кнопку «со стрелочкой» — ноутбук включится и вы увидите небольшое сервисное меню (обычно состоит из нескольких пунктов): Normal startup (нормальная загрузка), Bios Setup (настройки BIOS), Boot Menu (загрузочное меню, например, чтобы загрузится с флешки без изменения очереди загрузки) и др.
После вашего выбора Bios Setup — вы перейдете в самые обычные настройки BIOS (как в других ноутбуках) и сможете задать необходимые параметры.
3) Кнопка ThinkVantage
Если у вас есть голубая кнопка ThinkVantage на корпусе устройства — то ее нужно нажать сразу после включения ноутбука — пока еще горит приветствие и показывается марка производителя устройства (см. фото ниже).
Далее вы увидите меню из нескольких пунктов, среди которых будет и вход в BIOS — кнопка F1 (см. стрелка-1 на скрине ниже).
Модель Lenovo SL510 — вход с помощью ThinkVoltage
4) Отверстие вместо кнопки recovery и ThinkVantage…
У ряда моделей ноутбуков Lenovo нет никаких кнопок вовсе, но есть небольшое отверстие на боковой стороне устройства (как правило там, где подключается питание).
Например, у ноутбука Lenovo 100 кнопки recovery (которая со стрелочкой) нет вообще. Есть маленькое отверстие (рядом с отверстием такая же стрелочка). Кнопка сама расположена в этом отверстии, чтобы ее нажать — нужно использовать, например, скрепку или спицу.
Lenovo 100 — отверстие для входа в BIOS
Производители, видно, стараются исключить случайные нажатия на кнопку — всё таки входить в BIOS подавляющему большинству пользователей приходится очень редко.
Про некоторые глюки…
1) Некоторые модели ноутбуков не позволяют войти в BIOS если он работает от аккумулятора. Не могу сказать, что это 100% глюк — но настройка весьма спорная. Чтобы проверить наверняка — подключите устройство к сети и попробуйте войти в BIOS описанными выше способами.
2) У модели Lenovo v580c иногда возникает очень неприятный глюк: если вы очистили диск и установили новую Windows — кнопки входа в BIOS у вас перестанут работать.
Чтобы снова войти в BIOS (инструкция для опытных пользователей!) — выключите ноутбук, затем отключите его от сети, выньте аккумулятор. Далее снимите крышку и достаньте маленькую батарейку с мат. платы. Через 5-10 минут — соберите устройство.
При включении BIOS будет загружен автоматически для установки базовых параметров. Вам нужно открыть вкладку «Startup»: в пункте с настройкой «UEFI / Legacy boot» есть три параметра (Both, UEFI Only, Legacy Only) — нужно выбрать«Both». В пункте «UEFI / Legacy Boot Priority», нужно выставить «Legacy». Далее сохраните настройки и перезарузите ноутбук. Все должно заработать, как положено.
Два секрета запуска Bios
Но если у вас так и не получилось запустить BIOS одним из вышеописанных способов, и на ноутбуке установлена операционная система Windows 8.1 и выше, откроем вам два секрета запуска.
- Нужно включить ПК. В запущенном компьютере на рабочем столе тянем указатель мышки в нижний правый угол рабочего стола (вызываем боковое меню).
- Нам открывается меню, где мы выбираем пункты «Параметры» — «Обновление и восстановление» — «Восстановление».
- Здесь, в разделе «Особые варианты загрузки», кликаем на кнопку «Перезагрузить сейчас».
- Далее откроется синий экран с плитками. Открываем плитку «Диагностика», нажав на которую вы попадёте в дополнительные параметры.
- Нужно открыть пункт «Параметры встроенного ПО UEFI» и нажать кнопку «Перезагрузить». Готово! Вы в БИОСе!
Второй секрет. Многие пользователи Win 8.1 при попытке входа в Биос допускают ошибку. Все знают, как попасть в BIOS — нужно нажать определённую кнопку на клавиатуре. Для этого пользователь жмёт на «Завершение работы», ожидает, пока ноутбук выключится, а затем жмет кнопку для входа в Биос, но компьютер запускается по-старому – идёт загрузка ОС.
Вся проблема в том, что операционная система Windows 8.1 работает изначально с функцией быстрого запуска, которая основана на режиме сна – войдите в Биос, не отключая ПК, а перезагружая его.
Несколько полезных советов:
- После того как вход в Bios был осуществлён, перейдите к различным настройкам параметров системы и её загрузки в самом БИОСе. Будьте очень внимательны и осторожны, и лучше не трогайте то, чего не знаете, так как есть риск сделать что-то не так и совсем потерять свой компьютер. А после внесения всех изменений зайдите в раздел «Exit» («Выход») и выберите пункт «Save & exit» («Сохранить и выйти»). После этого ноутбук будет перезагружен, и при новом запуске все настройки, которые вам до этого пришлось установить, будут уже учтены.
- Если вышеописанные способы входа в Биос на ноутбуке Lenovo не работают, попробуйте при запуске устройства зажать и удерживать клавишу F12 вплоть до запуска BIOS’a – на некоторых моделях Леново этот способ работает.
- Очень редко, но всё же бывает – в кое-каких моделях работает клавиша F1 (нужно нажать её несколько раз, пока ноутбук включается).
- Производители рекомендуют настраивать параметры ПК в Биосе только с полностью заряженным аккумулятором ноутбука, так как если в процессе настройки ваш ноутбук отключится из-за того, что разрядился, то это, скорее всего, вызовет кое-какие проблемы системы в дальнейшем.
- Перед тем как выйти из БИОСа, обязательно сохраняйте все изменения, чтобы не сбились.
Помните, что настройка Bios – это очень серьёзное действие, требующее максимального понимания процесса и большой внимательности к деталям. Вы должны знать, что при неверной настройке некоторые компоненты системы могут работать некорректно, что приносит дополнительные сложности в эксплуатации. И если вы сомневаетесь в том, что знаете, как правильно нужно делать – лучше вызвать квалифицированных специалистов, это сохранит и деньги, и время, и нервы. Надеемся, что данная статья помогла вам разобраться с тем, как зайти в Bios.
Источник
- This guide will walk you through the steps on how to enter BIOS in your Lenovo Legion laptop, making your journey into the heart of your system a breeze.
- You can usually find the BIOS Setup Utility within the Lenovo Vantage app or the Windows settings.
- Once you’ve made your desired changes, press the F10 key to save the settings and exit the BIOS.
The BIOS (Basic Input/Output System) is the fundamental software that boots your Lenovo Legion laptop. It’s where you can tweak settings like boot order, adjust system performance, and even enable advanced features. Knowing how to enter BIOS can be invaluable for troubleshooting issues, optimizing your laptop’s performance, or even overclocking your components. This guide will walk you through the steps on how to enter BIOS in your Lenovo Legion laptop, making your journey into the heart of your system a breeze.
Before diving into the steps, let’s understand why entering BIOS is essential. Here are some compelling reasons:
- Boot Order Adjustment: You can prioritize booting from your hard drive, USB drive, or even a network drive, which is crucial for installing operating systems or troubleshooting boot issues.
- System Performance Tuning: The BIOS lets you adjust settings like CPU frequency, RAM timings, and fan speeds to optimize your laptop’s performance for tasks like gaming or video editing.
- Security Configuration: BIOS settings allow you to enable or disable security features like Secure Boot, which can help protect your system from malware and unauthorized access.
- Hardware Configuration: You can enable or disable specific hardware components like integrated graphics, Bluetooth, or Wi-Fi.
- Overclocking: For advanced users, the BIOS allows you to manually adjust clock speeds and voltages to push your processor and graphics card to their limits.
Understanding the Different BIOS Access Methods
Lenovo Legion laptops offer multiple ways to access the BIOS. The most common methods are:
- Using the Function Keys (F1, F2, F10, or F12): This is the most straightforward approach. During the boot process, you need to press the designated function key repeatedly before the operating system starts loading. The specific key varies depending on the model, so check your laptop’s documentation or Lenovo’s support website for the correct key.
- Using the BIOS Setup Utility: This method involves accessing the BIOS through the operating system itself. You can usually find the BIOS Setup Utility within the Lenovo Vantage app or the Windows settings.
- Using the Boot Menu: This menu allows you to select your boot device, but it can also be used to access the BIOS. To access the Boot Menu, press the appropriate function key during the boot process, often F12.
Step-by-Step Guide to Accessing BIOS via Function Keys
Now, let’s walk through the process of entering BIOS using function keys.
1. Power Off Your Laptop: Ensure your Lenovo Legion laptop is completely shut down.
2. Press the Power Button: Turn on your laptop.
3. Press the Function Key: Immediately after the Lenovo logo appears, press the designated function key repeatedly. The most common keys are F1, F2, F10, or F12.
4. Enter BIOS: Once you’ve pressed the correct key, you should see the BIOS setup screen.
Accessing BIOS Using the Lenovo Vantage App
If you prefer a more graphical interface, the Lenovo Vantage app can help.
1. Open Lenovo Vantage: Launch the Lenovo Vantage app from your Start menu or taskbar.
2. Navigate to System Settings: Click on the “System Settings” option.
3. Choose BIOS Setup Utility: Locate the “BIOS Setup Utility” option and click on it.
4. Confirm BIOS Access: A confirmation dialog box will appear. Click “Yes” to proceed.
5. Enter BIOS: Your system will reboot, and you’ll be taken to the BIOS setup screen.
Once you’re in the BIOS, you’ll be greeted with a menu-driven interface. The layout and options may differ slightly depending on your Lenovo Legion model.
- Use the Arrow Keys: Navigate through the menus using the arrow keys on your keyboard.
- Select Options: Use the Enter key to select options and sub-menus.
- Save Changes: Once you’ve made your desired changes, press the F10 key to save the settings and exit the BIOS.
- Cancel Changes: If you want to discard your changes, press the Esc key to return to the previous menu.
BIOS Settings Explained
The BIOS offers a wide range of settings, but here are some of the most common and useful ones:
- Boot Order: Determines the order in which your system tries to boot from different devices, such as your hard drive, USB drive, or network drive.
- System Time and Date: Sets the current time and date for your system.
- CPU Configuration: Allows you to adjust CPU settings like clock speed, voltage, and power management.
- Memory Configuration: Enables you to configure RAM settings, including timings and frequency.
- Storage Configuration: Manages hard drives, SSDs, and other storage devices.
- Security Settings: Includes features like Secure Boot, password protection, and Trusted Platform Module (TPM).
Exiting BIOS and Saving Changes
After making your desired changes, it’s crucial to save them before exiting the BIOS.
1. Press F10: This key usually initiates the saving process and exits the BIOS.
2. Confirm Save and Exit: A confirmation prompt will appear. Press Enter to confirm and save your changes.
Beyond the Basics: Advanced BIOS Features
For more experienced users, the BIOS offers advanced features that can significantly impact system performance and security.
- Overclocking: Allows you to manually adjust CPU and GPU clock speeds and voltages to boost performance.
- XMP Profiles: Enable you to load predefined performance settings for your RAM.
- System Monitoring: Provides real-time data on system temperature, fan speeds, and other hardware parameters.
- Advanced Security Options: Includes features like UEFI Secure Boot, Trusted Platform Module (TPM), and BitLocker drive encryption.
The Final Word: Mastering Your Lenovo Legion’s BIOS
Knowing how to enter BIOS is a valuable skill for any Lenovo Legion user. It empowers you to troubleshoot issues, optimize your system’s performance, and unlock advanced features. Remember to always consult your laptop’s documentation or Lenovo’s support website for specific BIOS settings and their implications.
Frequently Asked Questions
Q: What if I forget my BIOS password?
A: If you’ve forgotten your BIOS password, you may need to contact Lenovo support or a qualified technician to reset it.
Q: Can I damage my laptop by making changes in the BIOS?
A: Yes, making incorrect changes in the BIOS can potentially damage your laptop’s hardware. Always proceed with caution and consult your laptop’s documentation or Lenovo’s support website for guidance.
Q: How often should I enter the BIOS?
A: You don’t need to enter the BIOS frequently. However, it’s a good idea to check it periodically to ensure your settings are optimized for your needs or to troubleshoot any issues you might be experiencing.
Q: Is it safe to overclock my CPU or GPU in the BIOS?
A: Overclocking can increase performance, but it also carries risks. It can lead to instability, overheating, and even hardware damage. Only overclock if you understand the risks and have appropriate cooling solutions in place.
Q: What if I can’t access the BIOS at all?
A: If you’re unable to access the BIOS, it could be due to a hardware issue or a problem with the BIOS itself. Contact Lenovo support for assistance.
Was this page helpful?YesNo