
If your PC is running Windows 7, Windows Vista & Windows XP, to enter safe mode, you can refer steps below:
1) Restart your PC. Before the Windows logo appears, tap the F8 key in 1-second intervals
2) On your keyboard, press the arrow key to select Safe Mode or Safe Mode with Networking (If you need internet access, select this mode.).
3) Press the Enter key to enter the mode you selected.
After you finish troubleshooting, to exit safe mode, you only need to restart your device.
Hopefully, this post helped. Please feel free to leave a comment below if you have any questions or suggestions.
This guide explains how to boot into Safe Mode for the following Windows versions: Windows XP, Vista, 7, 8, 8.1 and 10
About the Safe Mode
In Safe Mode, your computer is running with non-core components disabled which makes it easier to fix potential errors or remove various software that, in normal conditions, can’t be fixed or removed.
If you boot into Safe Mode, you can use various diagnostic tools:
- System Restore
- Various settings for your Windows version
- Device Manager, where you can update and remove devices and drivers from your computer
- Event Viewer
- System Information, where you can view information about the hardware
- Command Prompt
- Registry Editor
For more information on how to run these diagnostic tools, go to Diagnostic tools in Safe Mode.
In Windows XP, the Windows Advanced Options Menu shows the Safe Mode option available:
Advanced Options Menu in Windows XP
Usually, you can choose from 3 options: Safe Mode, Safe Mode with Networking and Safe Mode With Command Prompt:
- Safe Mode
- Safe Mode with Networking
- Safe Mode with Command Prompt
In Windows Vista, the equivalent of Windows Advanced Options Menu of Windows XP, the Advanced Boot Options, also lists the 3 options available for Safe Mode:
Advanced Options Menu in Windows Vista
Windows 7 is the same:

Advanced Options Menu in Windows 7
Windows 8 has the same options, but the interface is different:
Startup Settings screen in Windows 8
And the Windows 10 screen is slightly different as well:

Startup Settings screen in Windows 10
Options
The Safe Mode of Windows has 3 options available:
- Safe Mode. This is the most used option. It gives you a minimal set of devices, drivers and services to run Windows
- Safe Mode with Networking. This loads the same devices, drivers and services as the Safe Mode option with the additional drivers necessary to load networking.
- Safe Mode with Command Prompt. This option loads the same drivers and services as the Safe Mode option, but loads Command Prompt (cmd.exe) instead of Windows Explorer (graphical interface)
How to boot into Safe Mode
To boot into Safe Mode, you need to press the F8 key while your Windows is booting, but before the logo appears.
For Windows 8 and Windows 10, the combination of Shift and F8 keys might work, but it work for computers with UEFI/EFI.
For Windows-specific steps, follow the steps below.
Safe Mode in Windows XP
For Windows XP to start in Safe Mode, follow these steps:
- Reboot your computer. It’s recommended to remove all external cables and media and leave only the essentials: monitor, keyboard, mouse etc.
- Press the F8 key as your Windows starts, before the Windows XP logo appears
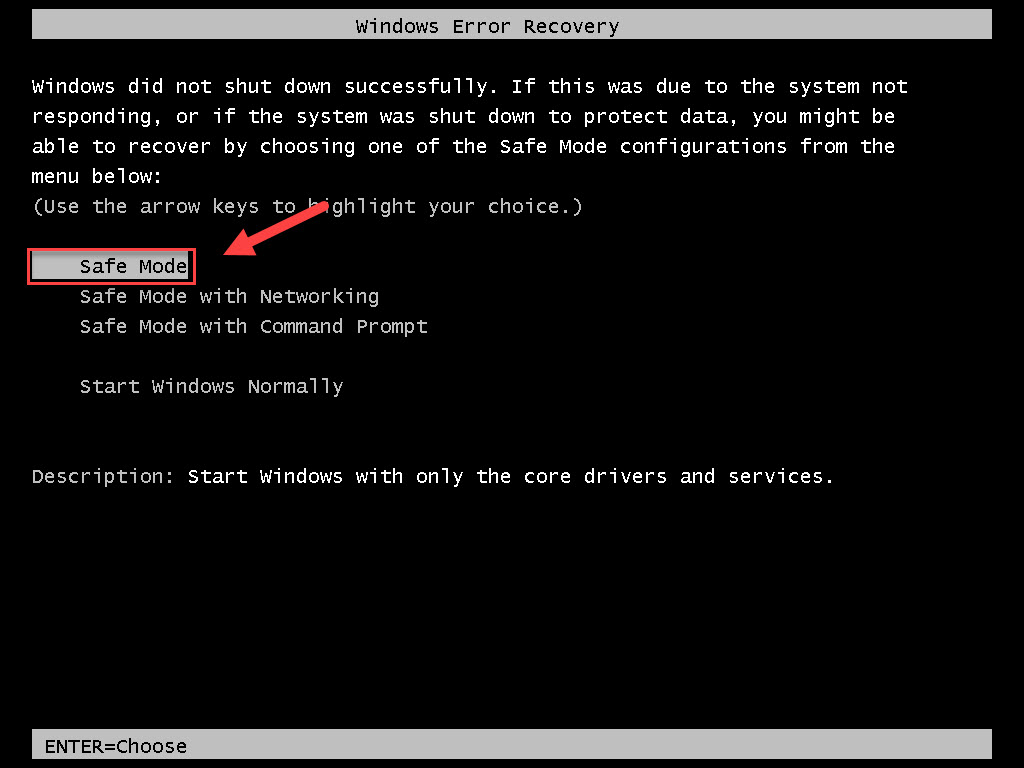
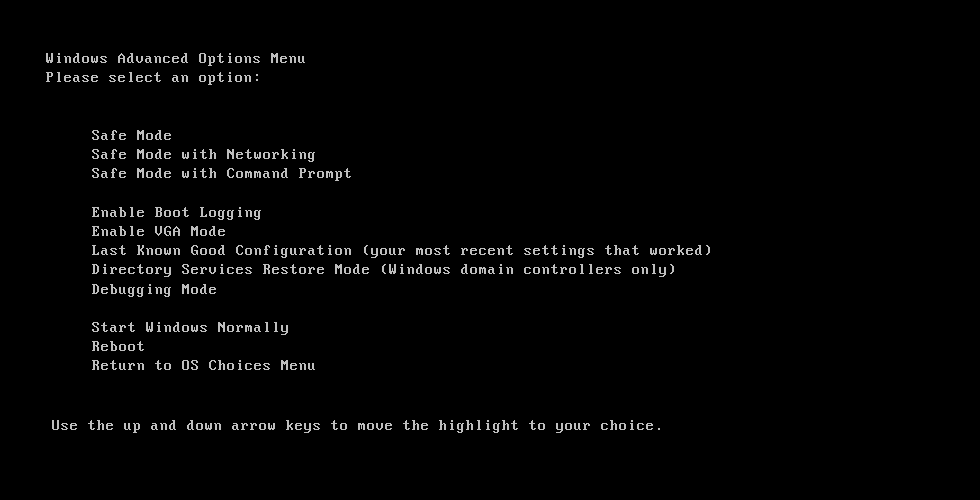
- The Windows Advanced Options Menu should now appear
- Choose Safe Mode
- Hit Enter

Advanced Options Menu in Windows XP
Safe Mode in Windows Vista
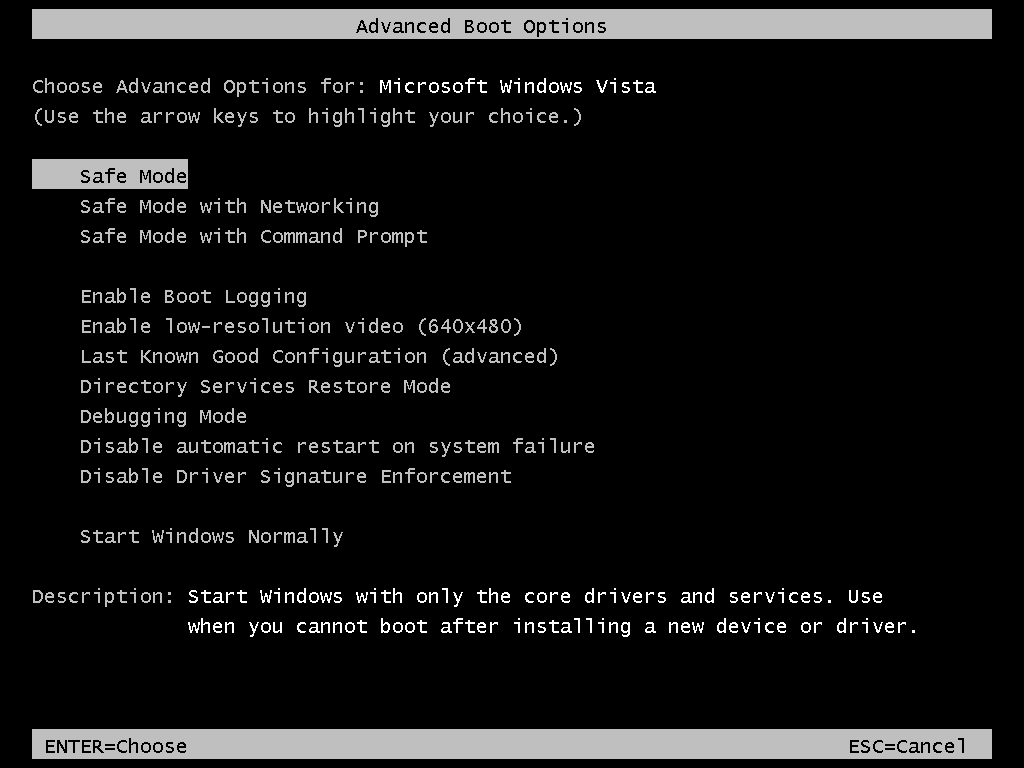
For Windows Vista to start in Safe Mode, follow these steps:
- Remove all CDs, DVDs or USBs from your computer. Make sure you don’t have any printers, scanners etc. connect
- Reboot the computer
- Press F8 as your computer start. You need to press this button before the Windows Vista logo appears.If you have more than 1 operating system, use the arrows keys to select which operating system you want to boot into Safe Mode and press Enter.
- At the Advanced Boot Options, use the arrows keys to select Safe Mode
- Press Enter
- Login in as an administrator, if prompted to do so
Advanced Options Menu in Windows Vista
Safe Mode in Windows 7
The steps to boot a Windows 7 system into Safe Mode are similar to those of Windows Vista:
- Remove any peripherals from your computer
- Restart your computer
- Press the F8 key before the Windows 7 logo appears.If you have more than 1 operating system installed on the same computer, use the arrows keys to navigate and select which operating system you want to boot into Safe Mode.
- Select Safe Mode using the arrows keys and press Enter
- If prompted to do, login as an administrator
Advanced Options Menu in Windows 7
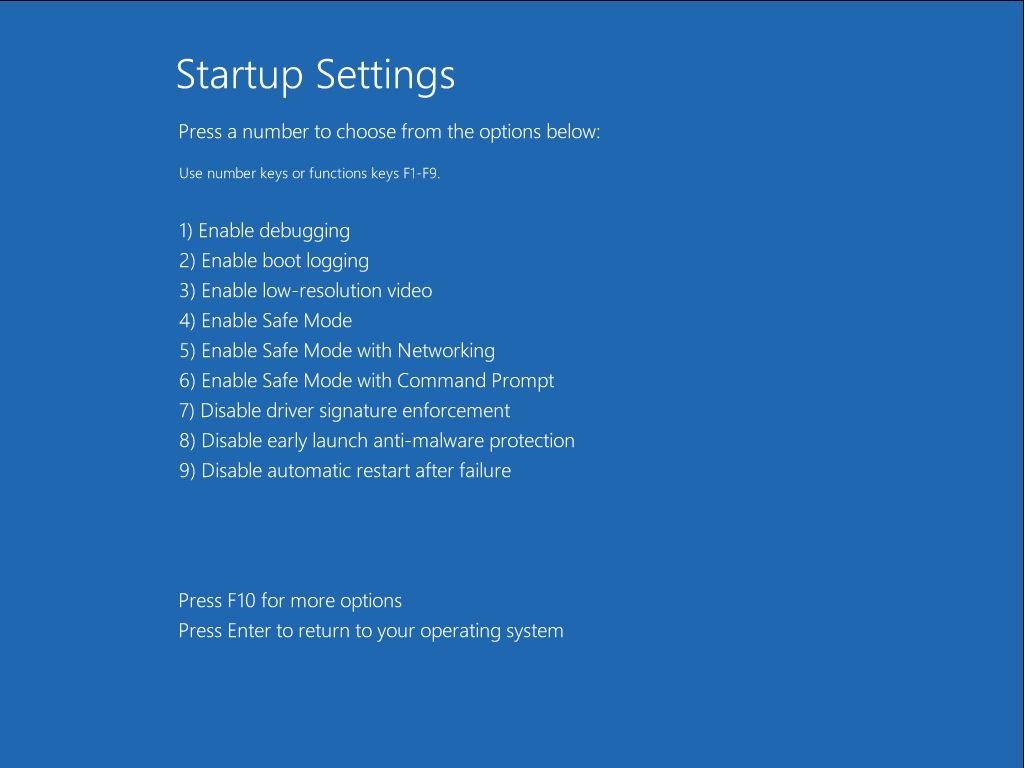
Safe Mode in Windows 8, 8.1 and Windows 10
For Windows 8 or Windows 10 to boot into Safe Mode, follow these steps if you can boot into Windows:
- Restart the computer
- Press F8 or Shift + F8 during the boot, but before the Windows logo appears
If F8 or Shift + F8 doesn’t work, go to Windows 8 – F8 key not working or follow the alternative instructions below:
- Boot into Windows
- Press the and R keys to open Run
- Type
msconfig - Click the Boot Tab
- At the Boot options section, check the Safe Boot checkbox and the Minimal checkbox
- Click OK
- Restart the computer. If prompted by the System Configuration window, click Restart – not Exit without Restart.
Boot options menu in Windows
Another method is the combination of Shift and Restart keys at the login window:
- Boot into Windows until the login screen appears, but do not login as a user. If you don’t have a login screen showing, boot into the system and click on Settings
- Press the Power button
- While holding the Shift key, click Restart
- At the Choose an option screen, select Troubleshoot
- Select Advanced options
- Select Startup Settings
- Click Restart
- Your computer may restart and open the Startup Settings screen automatically
- Press the F4 key to boot into Safe Mode. For the other 2 options of Safe Mode, press F5 to boot into Safe Mode with Networking or press F6 to boot into Safe Mode with Command Prompt
Windows Startup Settings screen
It is also possible to use the installation CD/DVD to boot into Safe Mode:
- Insert the disc in the optical drive
- Reboot the system
- Press any key to boot from the CD/DVD
- Choose a keyboard layout
- Click Repair your computer
- Click Troubleshoot > Advanced options > Startup Settings
- Click Restart
- The computer should restart with the Startup Settings screen automatically
- Press F4 to boot into Safe Mode. Press F5 to boot into Safe Mode with Networking. Press F6 to boot into Safe Mode with Command Prompt.

Windows 8 Setup Screen
Diagnostic tools in Safe Mode
You can run various diagnostic tools in Safe Mode.
System Restore
- Boot into Safe Mode
- Go to Start
- Click All Programs
- Go to Accessories
- Click System Tools
- Click System Restore
- Enter the administrator password, if you are prompted to do so
For more details on System Restore, follow our guide Windows System Restore.
Device Manager
Follow these instructions on how to open and edit configuration in Device Manager while in Safe Mode:
- Boot your Windows into Safe Mode
- Click Start
- Click Control Panel
- Click System and Maintenance
- Click Device Manager
- Enter an administrator password, if prompted to do so

Device Manager in Windows Vista
You can use Device Manager and edit configurations only if you are logged in as an administrator. Changes that you do under a non-administrative account will apply to that user only.
Event Viewer
Follow these instructions on how to open Event Viewer while in Safe Mode:
- Boot into Safe Mode
- Click Start
- Click Control Panel
- Click System and Maintenance
- Click Administrative Tools
- Double-click on Event Viewer
Command Prompt
Follow these instructions on how to open Command Prompt while in Safe Mode:
- Boot into Safe Mode
- Click Start
- Click All Programs
- Click Accessories
- Click Command Prompt

Command Prompt screen
Troubleshoot
Safe Mode not working
If you can’t boot into Safe Mode, consider the following tips:
- Check if you have a Keyboard Support USB option in BIOS. If so, make sure it’s Enabled not Disabled.
- If you have a keyboard with F-lock functionality, make sure it’s Off
If the F keys don’t work to boot into Safe Mode even after following the above tips, you can also run msconfig from within Windows (you need to boot into Windows first):
- Boot into Windows
- Click Start
- Click Run
- Type
msconfig - Click OK
- Go to the Boot tab (or Boot.ini for Windows XP users)
- Check the Safe Boot checkbox (or the /SAFEBOOT for Windows XP users)
- Click OK
- Click Restart
- Wait for your Windows to automatically start in Safe Mode
Msconfig screen in Windows
Windows 8, 8.1 and 10 users can open Run by pressing the and R keys.
If you can’t boot into Windows to run msconfig, you can use the original installation disc or Easy Recovery Essentials to run Command Prompt and run chkdsk and bootrec commands.
chkdsk and bootrec utilities will attempt to fix any issues found on your hard drive or during the booting process of your Windows. After that, you can try again to boot into Safe Mode.
For more information on chkdsk, read our guide: chkdsk. For more information on Bootrec, read our guide: Bootrec.
The instructions for Windows XP are:
- Insert the installation CD in the optical drive
- Restart your computer
- At the “Press any key” message, press any key to make sure you boot from the CD
- Press R at the Windows Options menu to open Recovery Console
- Enter the administrator password
- When Command Prompt appears, type this command:
chkdsk C: /r
Replace
C:with the letter of the drive where Windows XP is installed - Press Enter
- You can also run the equivalent of bootrec found in Vista, 7, 8 for Windows XP, the bootcfg:
bootcfg /rebuild
- Press Enter
- When done, type
exit, press Enter and restart the computer
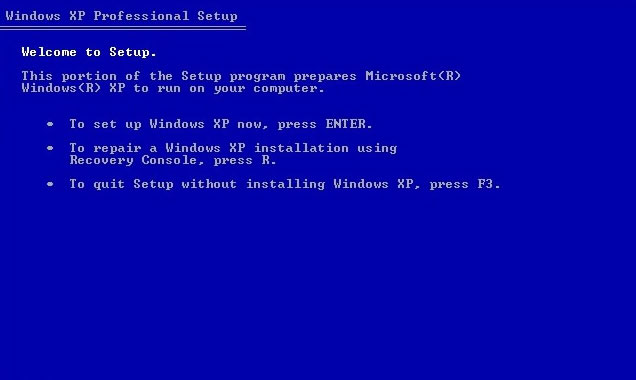
Windows XP setup screen
The instructions for Windows Vista, 7, 8, 8.1 and 10 are:
- Insert the original installation disc
- Reboot your computer
- Press any key to boot from the installation media: CD, DVD or USB drive
- Click Repair your computer
- Select your operating system
- Click Command Prompt
- Run these commands in order and press Enter after each:
chkdsk /r
bootrec /FixBoot
bootrec /FixMbr

Windows 7 setup screen
If you don’t have an original installation disc, you can run Command Prompt from Easy Recovery Essentials:
- Download Easy Recovery Essentials
- Burn the ISO Image. Follow our instructions on how to burn a bootable ISO image. If you’d like to have a recovery USB instead, follow our instructions on how to make a recovery USB.
- Boot into Easy Recovery Essentials
- Select Launch Command Line


Windows 8, 10 – F8 key not working
If you use Windows 8 or Windows 8.1 and have a computer with UEFI/EFI, the F8 key would not work to boot into Safe Mode as Windows 8 and Windows 10 are optimized to boot very quickly.
To enable the F8 key, follow these steps:
- Open the Command Prompt
- If you’re logged into Windows, click to run it as an administrator
- Type this command:
bcdedit /set bootmenupolicy legacy
- Press Enter
- A success message should appear:
The operation completed successfully.
- Restart your computer

Bcdedit utility results screen
If you can’t boot into Windows to run Command Prompt, you can open it from the installation disc (CD/DVD for Windows 8 and Windows 10; USB drive for Windows 8.1):
- Insert the disc in the optical drive and restart the computer
- Press any key to boot from the disc
- Choose a keyboard layout
- Click Next
- Click Repair your computer
- Click Troubleshoot
- Click Advanced options
- Click Command Prompt
If you don’t have the installation disc, use Easy Recovery Essentials to have access to Command Prompt:
- Download Easy Recovery Essentials
- Burn the ISO Image. Follow our instructions on how to burn a bootable ISO image. If you’d like to have a recovery USB instead, follow our instructions on how to make a recovery USB.
- Boot into Easy Recovery Essentials
- Select Launch Command Line
More Information
Support Links
- Easy Recovery Essentials for Windows – our repair and recovery disk.
It’s an easy-to-use and automated diagnostics disk. It’s available for Windows 8, Windows 7 and Windows Vista. It’s also available for Windows XP and Windows Server.
Read more at Windows Recovery Disks.
- The NeoSmart Support Forums, member-to-member technical support and troubleshooting.
- Get a discounted price on replacement setup and installation discs: Windows XP, Windows Vista, Windows 7, Windows 8, Windows 10.
Applicable Systems
This Windows-related knowledgebase article applies to the following operating systems:
- Windows XP (all editions)
- Windows Vista (all editions)
- Windows 7 (all editions)
- Windows 8 (all editions)
- Windows 8.1 (all editions)
- Windows 10 (all editions)
- Windows Server 2003 (all editions)
- Windows Server 2008 (all editions)
- Windows Server 2012 (all editions)
Propose an edit
What is Safe Mode?
Safe Mode is a troubleshooting mode in Windows operating systems, including Windows Vista, that allows you to start your computer with only the essential drivers and services necessary for it to run. It is designed to help users diagnose and resolve issues with their computer system by preventing any conflicting or problematic software or drivers from loading.
When you start your computer in Safe Mode, it loads a basic set of drivers and services that are necessary for the operating system to function. This means that third-party software, startup programs, and non-essential services are disabled, providing a clean environment for troubleshooting purposes. By running your computer in Safe Mode, you can identify and address any software or driver-related problems that might be causing your system to malfunction or crash.
In Safe Mode, the screen resolution is set to a default value, and only basic keyboard and mouse functionality is available. This minimalistic approach prevents unnecessary processes from running, which can help isolate the root cause of any issues you may be experiencing.
Safe Mode also enables you to uninstall recently installed software or drivers that might be causing conflicts with other system components. It can be particularly helpful in situations where you encounter blue screen errors or system crashes immediately after installing new software or drivers.
Overall, Safe Mode is a powerful troubleshooting tool that allows you to diagnose and resolve issues with your Windows Vista computer system without the interference of third-party software or services. It provides a safe and controlled environment for troubleshooting, enabling you to identify and fix problems that may otherwise be difficult to diagnose in the normal operating mode.
There are several reasons why you might want to start your Windows Vista computer in Safe Mode. Safe Mode is a valuable troubleshooting tool that can help resolve various issues and allow you to regain control of your system. Here are some common situations where starting Windows Vista in Safe Mode can be beneficial:
- Troubleshooting Startup Problems: If your computer is experiencing problems during startup, such as freezing or crashing, starting it in Safe Mode can help you identify and fix the underlying issue. By booting in Safe Mode, you can isolate problematic software or drivers that may be causing the startup problem, allowing you to take the necessary steps to resolve it.
- Removing Malware: If you suspect that your computer is infected with malware, running it in Safe Mode can be an effective way to remove the malicious software. Safe Mode limits the number of running processes, which makes it harder for malware to operate. This provides a more controlled environment to scan for and eliminate any malicious files or programs.
- Resolving Driver Conflicts: Sometimes, incompatible or corrupt drivers can cause system instability or other issues. Starting Windows Vista in Safe Mode can help you troubleshoot and resolve driver conflicts. In Safe Mode, only essential drivers are loaded, which allows you to identify problematic drivers and potentially update or uninstall them to restore system stability.
- Undoing Changes: If you recently made changes to your system settings or installed new software or drivers that caused issues, starting in Safe Mode allows you to undo those changes. It provides a clean environment where you can safely uninstall problematic software or roll back system changes, helping you restore your computer to a stable state.
- Diagnosing Software Issues: If specific software is causing your computer to behave erratically or crashes frequently, Safe Mode can be used to diagnose whether the problem is related to that particular software. By disabling unnecessary startup programs and services, you can narrow down the cause of the issue and take appropriate action, such as updating or reinstalling the problematic software.
Starting Windows Vista in Safe Mode provides a controlled and secure environment for troubleshooting and resolving various system issues. It allows you to isolate and address problems that may not be easily identifiable in normal operating mode, making it an invaluable tool for any Windows Vista user.
How to Start Windows Vista in Safe Mode using the F8 Key
Starting Windows Vista in Safe Mode using the F8 key is a quick and straightforward method. Follow these steps:
- First, make sure your computer is turned off.
- Press the power button to turn on your computer.
- As soon as you see the manufacturer’s logo appear on the screen, start pressing the F8 key. You need to do this before the Windows Vista loading screen appears.
- You will be presented with the “Advanced Boot Options” menu. Use the arrow keys on your keyboard to navigate to the “Safe Mode” option.
- Press Enter to select the “Safe Mode” option and start Windows Vista in Safe Mode.
Once Windows Vista starts in Safe Mode, you will notice that the screen resolution is set to a default value, and only essential drivers and services are loaded.
To exit Safe Mode and restart your computer in normal mode, simply restart your computer. Windows Vista will boot into the normal mode by default.
Note: In some cases, you might find that pressing the F8 key doesn’t bring up the “Advanced Boot Options” menu. If this happens, it could be due to a fast boot setting in your computer’s BIOS. To access the BIOS settings, restart your computer and look for a message that instructs you to press a specific key (often F2 or Del) to enter BIOS setup. Once in the BIOS, navigate to the “Boot” section and disable the “Fast Boot” option. Save your changes and restart your computer. It should now allow you to access the “Advanced Boot Options” menu by pressing the F8 key.
Starting Windows Vista in Safe Mode using the F8 key is a useful method to quickly troubleshoot and resolve various issues. It provides a safe environment to diagnose software conflicts, remove malware, or undo recent changes that may have caused system instability.
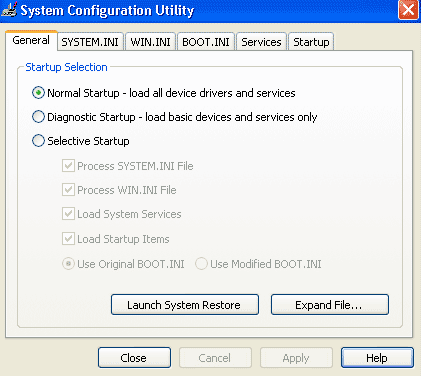
How to Start Windows Vista in Safe Mode using the System Configuration Tool
Another method to start Windows Vista in Safe Mode is by using the System Configuration tool, also known as MSConfig. This utility allows you to configure various startup settings, including booting into Safe Mode. Follow the steps below to use the System Configuration tool:
- Press the Windows key + R on your keyboard to open the Run dialog box.
- Type “msconfig” (without quotes) in the Run dialog box and press Enter. This will open the System Configuration utility.
- In the System Configuration window, click on the “Boot” tab.
- Under the “Boot options” section, check the box next to “Safe boot”.
- Choose the type of Safe Mode you want to start your computer with. You can select “Minimal” for basic functionality, “Alternate shell” for a command prompt without the Windows GUI, or “Network” if you need network connectivity in Safe Mode.
- Click on “Apply” and then “OK”. A dialog box will appear, asking if you want to restart your computer. Click on “Restart” to boot into Safe Mode.
After your computer restarts, it will automatically boot into the selected type of Safe Mode. Once in Safe Mode, you can troubleshoot and resolve any issues you are encountering with your Windows Vista system.
To exit Safe Mode and start your computer in normal mode, follow the same steps as above, but uncheck the “Safe boot” option in the System Configuration tool. Click on “Apply” and then “OK”, and restart your computer. It will now boot into the normal operating mode.
The System Configuration tool provides a convenient way to configure your computer’s startup settings, including booting into Safe Mode. It is especially useful if you have difficulty accessing the Advanced Boot Options menu through the F8 key or need to switch to Safe Mode frequently for troubleshooting purposes.
How to Start Windows Vista in Safe Mode when the F8 key doesn’t work
If you find that the F8 key doesn’t bring up the Advanced Boot Options menu on your Windows Vista computer, there are alternative methods you can try to start your system in Safe Mode:
Method 1: Using the System Configuration Tool (MSConfig)
- Press the Windows key + R on your keyboard to open the Run dialog box.
- Type “msconfig” (without quotes) in the Run dialog box and press Enter.
- In the System Configuration window, click on the “Boot” tab.
- Under the “Boot options” section, check the box next to “Safe boot”.
- Choose the type of Safe Mode you want to start your computer with.
- Click on “Apply” and then “OK”.
- A dialog box will appear, asking if you want to restart your computer. Click on “Restart” to boot into Safe Mode.
Method 2: Using the Windows Recovery Environment (WinRE)
- Insert your Windows Vista installation disc or a recovery disc into your computer.
- Restart your computer and boot from the disc. You may need to adjust the boot priority settings in your BIOS to ensure that the disc boots first.
- When prompted, select your language preferences and click “Next”.
- Click on “Repair your computer”.
- In the System Recovery Options window, select your Windows Vista installation and click “Next”.
- Click on “Command Prompt”.
- In the Command Prompt window, type “bcdedit /set {default} safeboot minimal” (without quotes) and press Enter.
- Restart your computer. It should now boot into Safe Mode.
After your computer starts in Safe Mode, you can troubleshoot and resolve any issues you are experiencing. Remember to undo the changes made using the System Configuration Tool or the bcdedit command once you no longer need to start your computer in Safe Mode.
If all else fails, you may need to seek further assistance from a technical expert or contact the customer support of your computer manufacturer or Microsoft for guidance on how to start your Windows Vista computer in Safe Mode.
How to Start Windows Vista in Safe Mode using the Command Prompt
Starting Windows Vista in Safe Mode using the Command Prompt can be a useful alternative if other methods are not working for you. Here’s how you can do it:
- Press the Windows key + R on your keyboard to open the Run dialog box.
- Type “cmd” (without quotes) in the Run dialog box and press Enter. This will open the Command Prompt.
- In the Command Prompt window, type “bcdedit /enum all” (without quotes) and press Enter. This command will display a list of your system’s boot configuration data.
- Look for the “identifier” line that includes “Windows Boot Loader” and “osdevice”. Take note of the alphanumeric code next to the “identifier” field for the Windows Vista entry.
- In the Command Prompt window, type the following command: “bcdedit /set {identifier} safeboot minimal” (without quotes), replacing “{identifier}” with the alphanumeric code you noted in the previous step.
- Press Enter to execute the command. You should see a message confirming that the operation was completed successfully.
- Close the Command Prompt window and restart your computer.
- Upon restart, your computer should boot into Safe Mode automatically.
To exit Safe Mode and start your computer in normal mode again, you’ll need to use the Command Prompt to remove the Safe Mode boot settings. Follow these steps:
- Press the Windows key + R on your keyboard to open the Run dialog box.
- Type “cmd” (without quotes) in the Run dialog box and press Enter.
- In the Command Prompt window, type the following command: “bcdedit /deletevalue {identifier} safeboot” (without quotes), replacing “{identifier}” with the alphanumeric code for the Windows Vista entry.
- Press Enter to execute the command. You should see a message confirming that the operation was completed successfully.
- Close the Command Prompt window and restart your computer.
- Your computer will now boot into the normal operating mode.
Using the Command Prompt to start Windows Vista in Safe Mode can be helpful when other methods are not accessible. However, exercise caution when modifying boot settings through the Command Prompt, as incorrect changes can lead to system instability.
Tips for Troubleshooting in Safe Mode
When you start Windows Vista in Safe Mode, you enter a diagnostic environment where you can identify and resolve various system issues. Here are some helpful tips for troubleshooting in Safe Mode:
- Scan for Malware: Use your preferred antivirus software to perform a thorough scan for malware and malicious files. Safe Mode provides a secure environment that can help detect and remove stubborn malware that might be causing problems in normal mode.
- Uninstall Problematic Software: If you suspect a particular program is causing issues, uninstall it while in Safe Mode. Access the Control Panel and navigate to “Programs” or “Add or Remove Programs” to uninstall the problematic software.
- Disable Startup Programs: Some startup programs might be conflicting with your system, leading to performance issues or crashes. Use the System Configuration tool (msconfig) to disable unnecessary startup programs and services, and then restart your computer in normal mode to see if the problem persists.
- Update Drivers: Outdated or incompatible drivers can cause system instability. Use Safe Mode to update your device drivers, especially graphics and network drivers, which are commonly associated with issues. You can download the latest drivers from the manufacturer’s website and install them while in Safe Mode.
- Perform System Restore: If you recently made changes to your system that resulted in problems, use Safe Mode to perform a System Restore. This allows you to revert your system back to a previous state when it was functioning correctly. Access the System Restore utility through the Control Panel or by typing “rstrui” (without quotes) in the Run dialog box.
- Check Disk for Errors: Run a disk check utility to identify and fix any errors on your hard drive. In Safe Mode, open the Command Prompt and type “chkdsk /f” (without quotes) followed by the drive letter of your system partition (e.g., “C:”) and press Enter.
- Perform Clean Boot: A clean boot starts your computer with a minimal set of drivers and startup programs, similar to Safe Mode. It can help identify if the problem is caused by third-party software or services. Use the System Configuration tool (msconfig) to perform a clean boot and troubleshoot the issue.
- Keep a Record of Changes: As you troubleshoot in Safe Mode, keep track of the changes you make, such as uninstalling software or updating drivers. This will help you revert any unsuccessful changes or track down the root cause of the problem during troubleshooting.
Remember that Safe Mode provides a controlled environment for troubleshooting, allowing you to isolate and address various system issues more effectively. Take advantage of these tips to diagnose and resolve problems while in Safe Mode, improving the stability and performance of your Windows Vista computer.
Статья обновлена: 26 октября 2023
ID: 493
Оптимальная защита для Windows
Kaspersky for Windows защищает вашу цифровую жизнь, выходя за рамки обычного антивируса.
Загрузите компьютер в безопасном режиме для устранения неполадок. Безопасный режим запуска Windows выполняется с использованием ограниченного набора файлов и драйверов. Это уменьшает вероятность сбоев при загрузке и позволяет исправить ошибки в операционной системе.
Для загрузки компьютера в безопасном режиме вам нужно знать пароль пользователя с правами администратора.
Как загрузить компьютер с Windows 10 и 11 в безопасном режиме
Как загрузить компьютер с Windows 8, 8.1 в безопасном режиме
Как загрузить компьютер с Windows Vista, 7 в безопасном режиме
Как загрузить компьютер с Windows XP в безопасном режиме
Как выбрать жесткий диск при загрузке компьютера и запустить безопасный режим
Что делать, если безопасный режим не загружается
Спасибо за ваш отзыв, вы помогаете нам становиться лучше!
Спасибо за ваш отзыв, вы помогаете нам становиться лучше!