Hello! Windows Server is a system focused on the business sector. In addition, Microsoft developed it as a safe, functional, and practical system. However, it is also susceptible to failure. Such as errors in drivers, services, or parameters of both the system itself and other components. To solve this type of failure, the Redmond company has incorporated the Safe Mode. With this mode, the system will start in a basic state. In other words, it will only make use of a limited set of files and drivers. Consequently, it will be much easier to rule out bugs and problems. So by being able to enter the system using this mode, we can then reverse any changes responsible for the malfunction. For that reason, it is important to know how to use this function. So let’s see, how to start in safe mode in Windows Server 2019/2016.
How to start in safe mode from the system.
Before we go any further, it is important to clarify that the safe mode has two options:
- Safe mode: load basic controllers.
- Safe mode with network functions. Includes network drivers and services needed to access the Internet and other computers on the local network.
In order to set up the safe mode, it is necessary to start the system in the advanced mode. If you are running the system, then you have a couple of options to start in advanced mode:
- Press the Shift key and the off button at the same time. Once there, click on restart.
- Press the Win+I combination to enter the Windows Settings. Then follow the path: Update & Security> Recovery. Once there, click on Restart Now.

How to start in safe mode, using a Windows Server 2019/2016 installation media.
For this method, it is necessary to have some means of installing Windows Server. Either a DVD or a USB boot. Then, you have to start the process as if you were going to install the system. On the welcome screen, click on Next.

Please click on Repair computer.

A window with several options will be displayed immediately. Please click on Troubleshoot.

Then select Command Prompt:

This will cause the CMD to be deployed. Please run this command:
bcdedit /set {bootmgr} displaybootmenu yes

This is a command line tool to manage the data associated with the boot configuration of the system.
Once this line is executed, we will execute the following:
bcdedit /set {bootmgr} timeout 15

After executing this command, execute the Exit command to exit the console. And back to the previous menu, turn off the system.

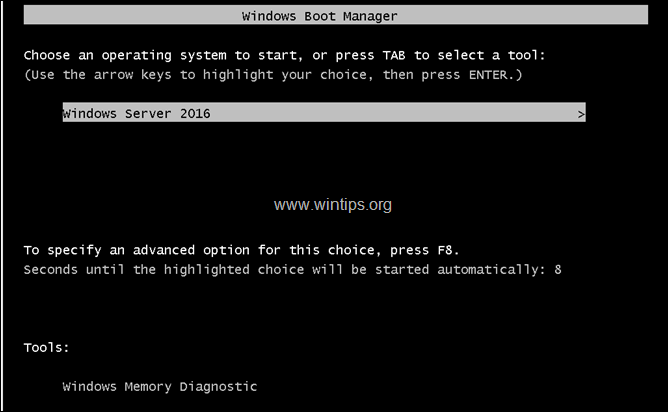
When you reboot the system, you will see the boot manager. Please select Windows Server. Then, press F8 to enter advanced start options.

Then, just click on Safe Mode to start the system.

Eventually, the system will boot into Safe Mode.

Conclusion
Ultimately we have seen how to start in Safe Mode in Windows Server 2019/2016. This mode allows you to start the system with a minimum of drivers and files. This allows for troubleshooting. In addition, these instructions are common to both versions. I hope you find them useful in managing your servers. Before saying goodbye, I invite you to see our post about VMware on Windows 10. See you!
— Advertisement —
Everything Linux, A.I, IT News, DataOps, Open Source and more delivered right to you.
Subscribe
«The best Linux newsletter on the web»
UPDATED: March 2018
If you have worked on Windows 8 or newer, you will know that Microsoft has removed the F8 boot functionality. They did this to decrease boot times. What is odd is that they applied this logic to servers; I would not have. Regardless the F8 Safe Mode functionality is not truly removed, it is just turned off.
To turn F8 boot on in Server 2012 you need to get to an elevated CMD prompt. If your server is functional that is easy. If your server won’t boot (hence the need for F8) then you can boot off of a Windows Server install DVD and select REPAIR YOUR COMPUTER option, the Troubleshooting, then Command Prompt.
Once you have a Command Prompt (as an administrator) open enter the following commands which are self explanatory:
- bcdedit /set {bootmgr} displaybootmenu yes
- bcdedit /set {bootmgr} timeout 10
Reboot your machine and enjoy pressing F8 and getting back into SAFE MODE or LAST KNOWN GOOD to work out your problem.
This will also work on Windows 8 and Windows 10.
Note that the BCDEDIT commands do NOT work from PowerShell. They NEED to be run from CMD.EXE :
Thanks to a number of blogs including THIS one.
Thanks

10 May 2021
To enable F8 boot in Windows Server 2012 / Windows Server 2016, / Windows Server 2019 you need to go to an elevated CMD prompt.
If your server does not start (hence the need for F8), you can boot from a Windows Server installation DVD and select the option REPAIR YOUR COMPUTER, Troubleshoot, then Command Prompt.
Once you have opened a command prompt (as an administrator), enter the following commands:
|
bcdedit /set {bootmgr} displaybootmenu yes bcdedit /set {bootmgr} timeout 10 |
Restart your server and press F8
Views: 8535
Always eager to communicate with other system engineers and administrators. I enjoy all aspects of my job, designing, deploying and updating server, desktop, network and storage systems. I blog regularly and contribute wherever possible to the Microsoft community.
Number of visits :
Total : 1216204 Visits
Yesterday : 125 Visits
,
In this tutorial you ‘ll find instructions on how to enable the F8 key on Windows Server 2012, 2016 or 2019, in order to access the ‘Advanced Boot Options menu’ (Safe Mode, Safe Mode with Networking, etc.), if your server fails to start normally.
As you probably know in Windows Server 2012, 2016 and 2019, the F8 key is enabled by default in order to access the Advanced Boot Options menu when needed. But, if Windows does not function properly and especially if Windows is unable to boot normally, the F8 key does not work.
How to Turn On the F8 Boot Menu if Server 2012/2016/2019 Fails to Start.*
* Note: If you can boot to Windows, then you don’t need to apply these steps, because the F8 key is already enabled. So, test it, and only if it doesn’t work, open an elevated command prompt and give the two (2) commands mentioned below from Windows.
1. Boot the Server from a Windows Installation Media (DVD or USB).
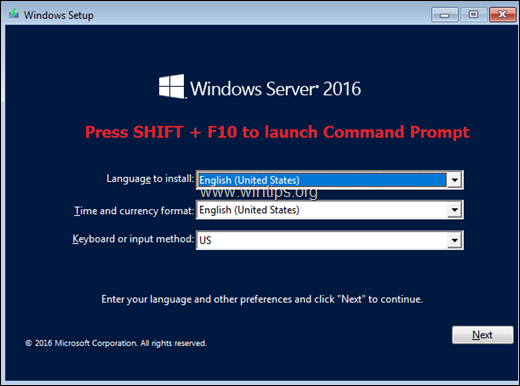
2. At the Windows Setup screen press SHIFT + F10 to access command prompt, or choose Next –> Repair your computer –> Troubleshoot –> Advanced Options –> Command Prompt.

3. In command prompt, type the following commands in order:
- bcdedit /set {bootmgr} displaybootmenu yes
- bcdedit /set {bootmgr} timeout 10

4. Close all windows and reboot the server.
5. After reboot, press the F8 key at the Windows Boot Manager screen to access the Advanced Boot Options menu.

That’s it! Let me know if this guide has helped you by leaving your comment about your experience. Please like and share this guide to help others.
If this article was useful for you, please consider supporting us by making a donation. Even $1 can a make a huge difference for us in our effort to continue to help others while keeping this site free:
- Author
- Recent Posts
Konstantinos is the founder and administrator of Wintips.org. Since 1995 he works and provides IT support as a computer and network expert to individuals and large companies. He is specialized in solving problems related to Windows or other Microsoft products (Windows Server, Office, Microsoft 365, etc.).
At some point, you may have experienced your OS not starting when you’ve tried to turn on your computer. Without thinking too much about it, you might have turned your computer off and on again, and then by pressing the F8 key, accessed the Windows Advanced Options menu from where you select the Safe Mode option. The reason we do this is that Safe Mode is Windows, diagnostic mode and uses a minimal set of drivers and services. The F8 (see Figure 10.5) option can be used in the OSes, Windows NT to Windows Server 2003. For Windows Vista to Windows Server 2016, Microsoft offers Advanced Startup Options to recover OSes. Regardless, you can access Safe Mode with them too, but in other ways.
One of them is explained as follows: …
