
Итак, начнем с теории. Active Directory (далее AD) — служба каталогов корпорации Microsoft для ОС семейства WindowsNT. AD позволяет администраторам использовать групповые политики для обеспечения единообразия настройки пользовательской рабочей среды, разворачивать ПО на множестве компьютеров через групповые политики посредством System Center Configuration Manager, устанавливать и обновлять ОС. AD хранит данные и настройки среды в централизованной базе данных. Сети AD могут быть различного размера: от нескольких десятков до нескольких миллионов объектов.

Приступим.
2. Подготовка
Что бы установить роль AD нам необходимо:
1) Задать адекватное имя компьютеру
Открываем Пуск -> Панель управления -> Система, слева жмем на «Изменить параметры«. В «Свойствах системы» на вкладке «Имя компьютера» нажимаем кнопку «Изменить» и в поле «Имя компьютера» вводим имя (я ввел ADserver) и жмем «ОК«. Появится предупреждение о необходимости перезагрузки системы, что бы изменения вступили в силу, соглашаемся нажав «ОК«. В «Свойствах системы» жмем «Закрыть» и соглашаемся на перезагрузку.
2) Задать настройки сети
Открываем Пуск -> Панель управления -> Центр управления сетями и общим доступом -> Изменить параметры адаптера. После нажатия правой кнопкой на подключении выбираем пункт «Свойства» из контекстного меню. На вкладке «Сеть» выделяем «Протокол интернета версии 4 (TCP/IPv4)» и жмем «Свойства«.
Я задал:
IP-адрес: 192.168.10.252
Маска подсети: 255.255.255.0
Основной шлюз: 192.168.10.1
Предпочтительный DNS-сервер: 127.0.0.1 (так как тут будет располагаться локальный DNS-сервер)
Альтернативный DNS-сервер: 192.168.10.1

После чего жмем «ОК» и «Закрыть«.
Подготовка закончилась, теперь преступим к установке роли.
3. Установки роли
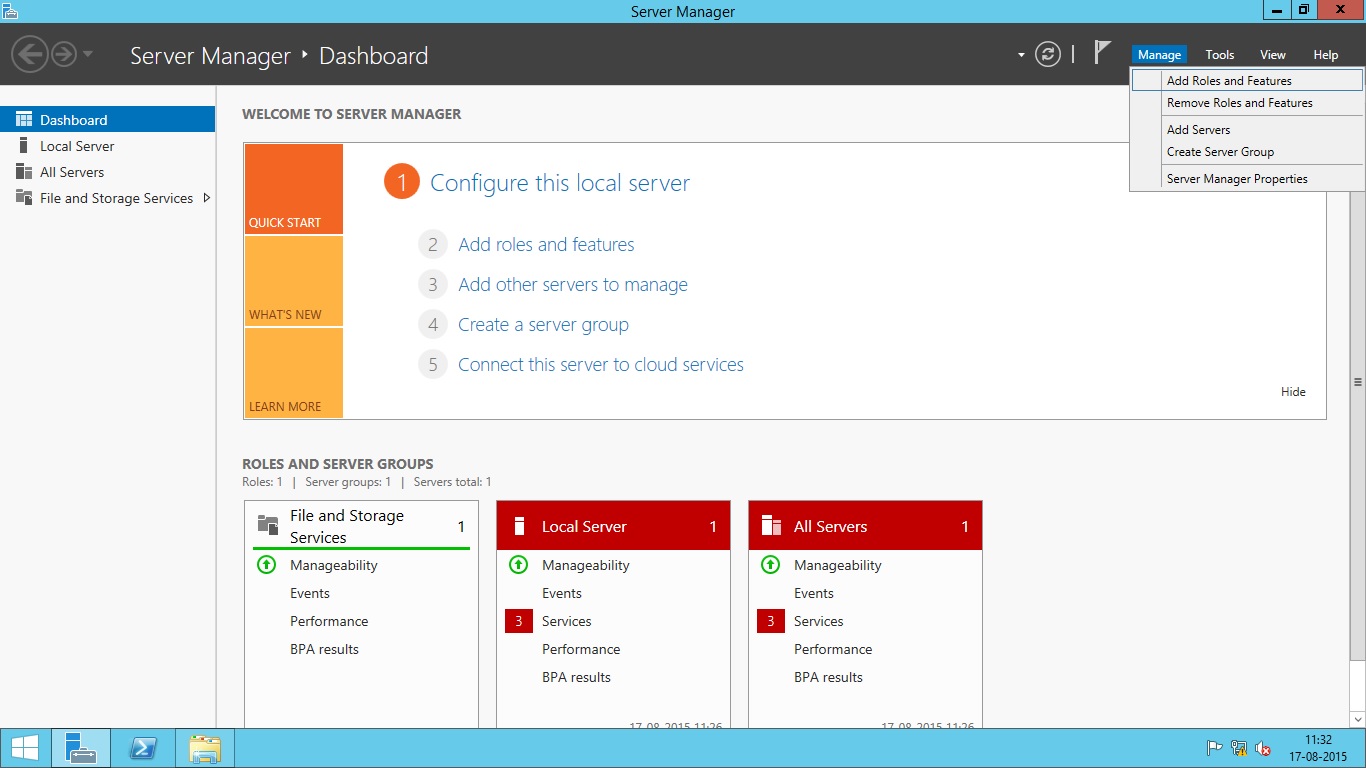
Для установки роли AD на компьютер откроем Пуск -> Диспетчер сервера. Выберем «Добавить роли и компоненты«.

После чего запустится «Мастер добавления ролей и компонентов«.
3.1 На первом этапе мастер напоминает, что нужно сделать перед началом добавления роли на компьютер, просто нажимаем «Далее«.

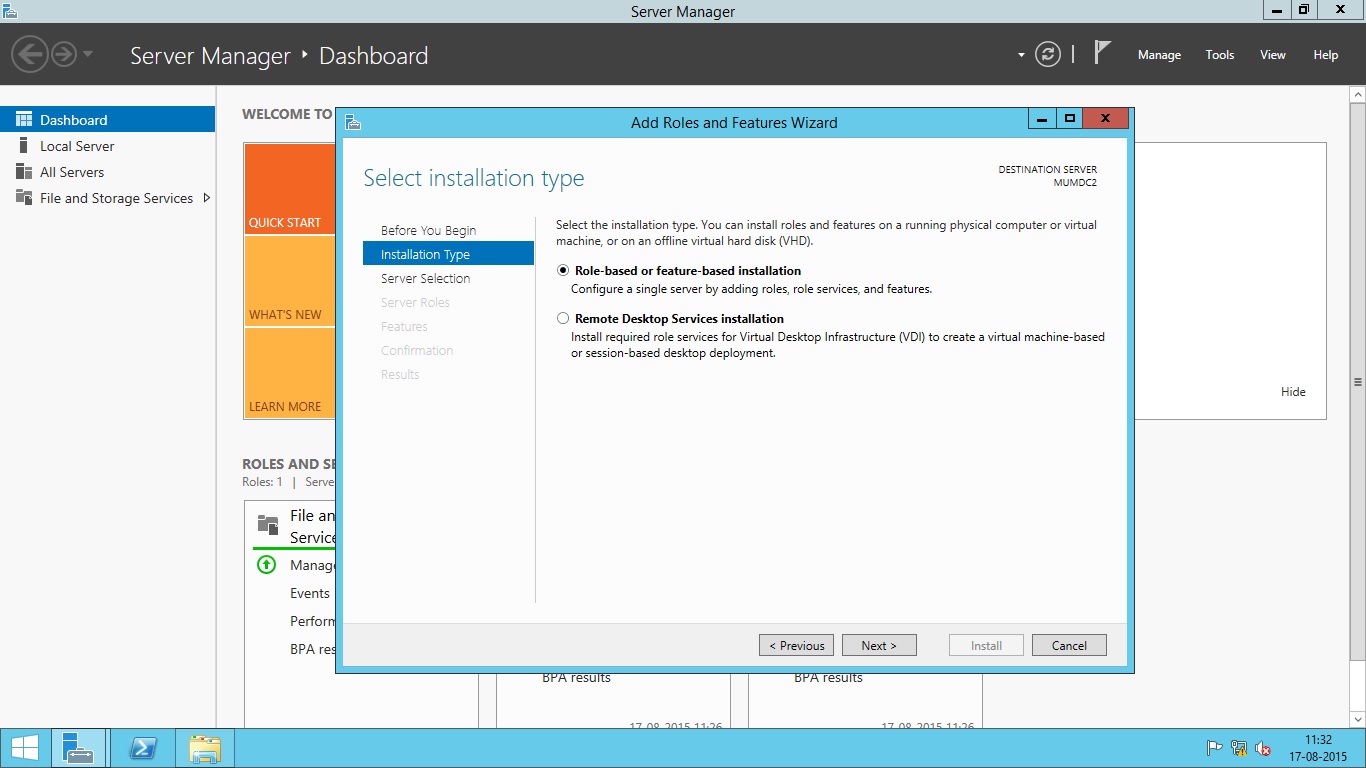
3.2 Теперь выбираем «Установка ролей и компонентов» и жмем «Далее«.

3.3 Выберем компьютер, на котором хотим установить роль AD и опять «Далее«.

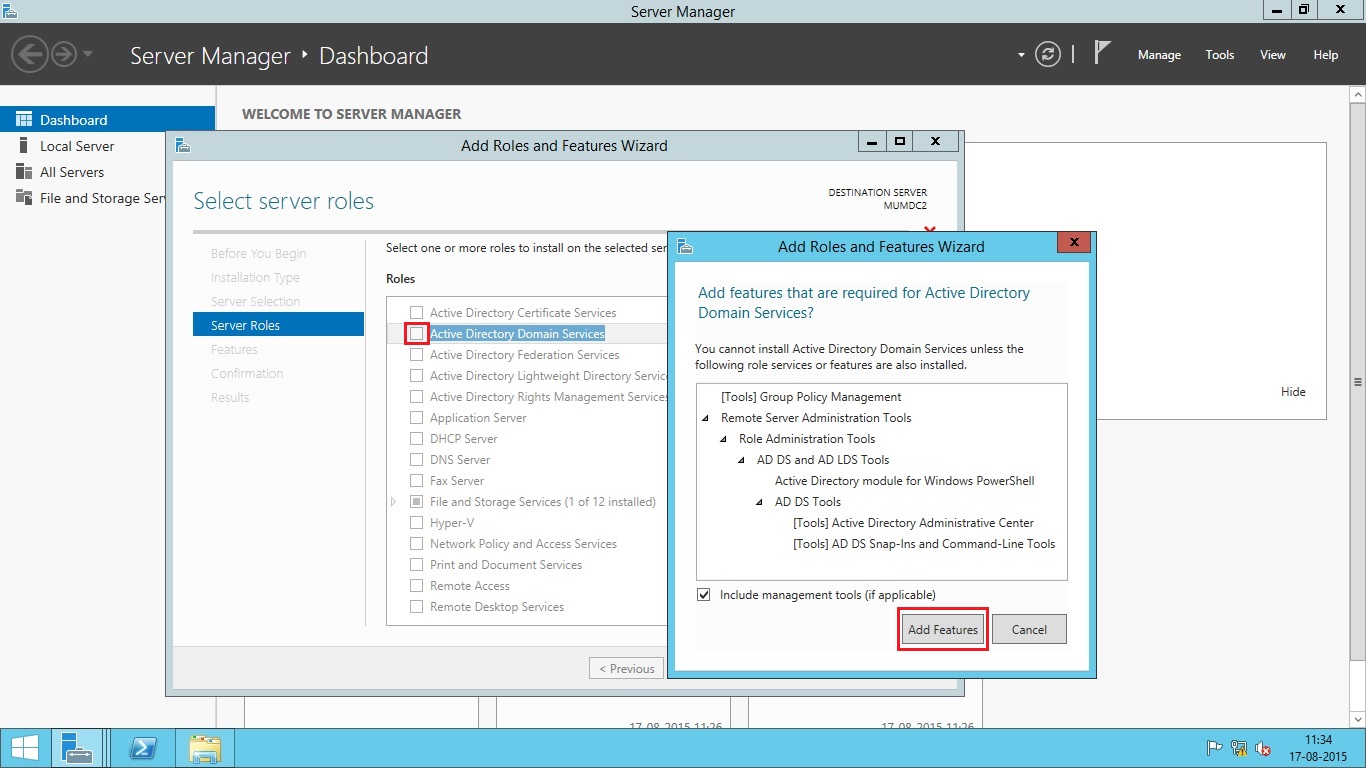
3.4 Теперь нужно выбрать какую роль мы хотим установить, выбираем «Доменные службы Active Directory» и нам предложат установить необходимые компоненты и службы ролей для роли AD соглашаемся нажав «Добавить компоненты» и опять «Далее«.

3.5 Тут предложат установить компоненты, но нам они пока не нужны, так что просто жмем «Далее«.

3.6 Теперь нам выведут описание роли «Доменных служб Active Directory«. Прочитаем внимательно и жмем «Далее«.

3.7 Мы увидим, что же именно мы будем ставить на сервер, если все хорошо, то жмем «Установить«.

3.8 После установки просто жмем «Закрыть«.

4. Настройка доменных служб Active Directory
Теперь настроим доменную службу запустив «Мастер настройки доменных служб Active Directory» (жмем на иконку «Уведомления» (флажок) в «Диспетчере сервера» и после этого выбираем «Повысить роль этого сервера до уровня контроллера домена«).

4.1 Выбираем «Добавить новый лес» и вписываем наш домен в поле «Имя корневого домена» (я решил взять стандартный домен для таких случаев test.local) и жмем «Далее«.

4.2 В данном меню можно задать совместимость режима работы леса и корневого домена. Так как у меня все с нуля я оставлю по умолчанию (в режиме работы «Windows Server 2012«). А еще можно отключить DNS-сервер, но я решил оставить это, так как хочу иметь свой локальный DNS-сервер. И еще необходимо задать пароль DSRM(Directory Service Restore Mode — режим восстановления службы каталога), задаем пароль и тыкаем «Далее«.

4.3 На данном этапе мастер настройки предупреждает нас, что домен test.local нам не делегирован, ну это и логично, нам ни кто его не давал, он будет существовать только в нашей сети, так, что жмем просто «Далее«.

4.4 Можно изменить NetBIOS имя, которое было автоматически присвоено, я не буду этого делать, так, что жмем «Далее«.

4.5 Тут можем изменить пути к каталогам базы данных AD DS (Active Directory Domain Services — доменная служба AD), файлам журнала, а так же каталогу SYSVOL. Не вижу смысла в изменении, так что просто жмем «Далее«.

4.6 Теперь мы видим небольшой итог, какие настройки мы выбрали.

Тут же, нажав на кнопку «Просмотреть сценарий» мы можем увидеть PowerShell сценарий для развертывания AD DS выглядит он примерно так:

Жмем «Далее«.
4.7 Мастер проверит соблюдены ли предварительные требования, видим несколько замечаний, но они для нас не критичны, так что жмем кнопку «Установить«.

4.8 После завершения установки, компьютер перезагрузится.
5. Добавление нового пользователя
5.1 Запустим Пуск -> Панель управления -> Администрирование -> Пользователи и компьютеры Active Directory. Или через панель управления сервером:


5.2 Выделяем название домена (test.local), нажимаем правой кнопкой и выбираем «Создать» -> «Подразделение«.

После чего вводим имя подразделения, а так же можем снять защиту контейнера от случайного удаления. Нажимаем «ОК«.

Подразделения служат для того, что бы удобно управлять группами компьютеров, пользователей и т.д. Например: можно разбить пользователей по группам с именами подразделений соответствующих именам отделов компаний, в которой они работают (Бухгалтерия, ИТ, отдел кадров, менеджеры и т.д.)
5.3 Теперь создадим пользователя в подразделении «Пользователи«. Правой кнопкой на подразделение и выбираем в нем «Создать» -> «Пользователь«. И заполняем основные данные: Имя, Фамилия, логин.
Подразделения служат для того, что бы удобно управлять группами компьютеров, пользователей и т.д. Например: можно разбить пользователей по группам с именами подразделений соответствующих именам отделов компаний, в которой они работают (Бухгалтерия, ИТ, отдел кадров, менеджеры и т.д.)

Жмем «Далее«.
Теперь зададим пароль, для пользователя. Так же тут можно задать такие вещи как:
— Требовать смены пароля пользователя при следующем входе в систему — при входе пользователя в наш домен, ему будет предложено сменить пароль.
— Запретить смену пароля пользователем — отключает возможность смены пароля пользователем.
— Срок действия пароля не ограничен — пароль можно не менять сколько угодно.
— Отключить учетную запись — делает учетную запись пользователя не активной.
Жмем «Далее«.

И теперь «Готово«.

5.4 Выделим созданного пользователя и в контекстном меню выберем «Свойства«. На вкладке «Учетная запись» ставим галочку напротив «Разблокировать учетную запись«, после чего нажимаем «Применить«, затем «ОК«.

6. Ввод компьютера в домен
6.1 Для начала, создадим новую виртуальную машину с Windows 7 на борту. Зададим ему настройки сети, где:
IP-address: 192.168.10.101
Subnet mask: 255.255.255.0
Default gateway: 192.168.10.1 (vyatta, где настроен NAT из мой прошлой заметки)
Preferred DNS server: 192.168.10.252 (AD сервер, который мы настраивали выше)
Alternate DNS server: 192.168.10.1 (опять vyatta, так как он проксирует DNS запросы на Google DNS сервер 8.8.8.8)

6.2 Переходим в Start -> правой кнопкой на Computer -> Properties -> Change settings. Жмем кнопку Change напротив The rename this computer or change its domain or workgrup, click Change. Зададим имя компьютера и введем имя домена: test.local и жмем «ОК«.
Введем логин и пароль заново

После успешного добавления в домен увидим сообщение:
6.3 После перезагрузки компьютера увидим сообщение о логине в систему. Жмем Switch User.

Нажмем на Other User.

И введем логин и пароль.

Вот мы и залогинились как пользователь домена. Ура!)
В этой статье я хотел бы рассказать об установке и настройке роли ActiveDirectory на компьютере под управлением Windows Server 2012. После установки роли Active Directory на нём настраивается контроллер домена, после чего с помощью этого сервера можно будет централизованно управлять сетевой инфраструктурой. С помощью групповых политик домена, вы сможете управлять пользователями вашей сети (открывать или блокировать им доступ к определённым ресурсам сети, хранить данные о каждом пользователе, такие как Ф.И.О, адреса, телефоны, почту и многое другое). Так же вы сможете развёртывать приложения на всех или только на группе компьютеров входящих в ваш домен. Подготовка Для начала давайте подготовим Windows Server 2012 к установке роли Active Directory (далее AD). Нам необходимо сделать две вещи:
- Задать осмысленное имя компьютеру.
Для этого откроем “свойства системы”, нажимаем (Пуск -> Панель управления –> Система) после чего жмём “Изменить параметры”. Далее в “свойствах системы” на вкладке “Имя компьютера” нажимаем кнопку “Изменить” после чего в поле “Имя компьютера” задаём компьютеру имя и нажимаем “OK”. Нам покажут предупреждение, что компьютер необходимо перезагрузить, жмём “OK”. В “Свойствах системы” нажимаем “Закрыть” после чего нам предлагают перезагрузить компьютер прямо сейчас или сделать это позже, выбираем первый вариант и компьютер перезагружается. В этом примере я задал компьютеру имя Server.

- Задать статический IP адрес и маску подсети сетевому адаптеру конечно если ваш сетевой адаптер не получает настройки по DHCP.
Открываем “свойства сетевого подключения” (Пуск -> Панель управления -> Центр управления сетями и общим доступом -> Изменить параметры адаптера), далее вызываем контекстное меню сетевого подключения и нажимаем “свойства”. Далее на вкладке “Сеть” выделяем “Протокол интернета версии 4 (TCP/IPv4)” и нажимаем “свойства”. Задаём IP адрес и маску подсети, после чего нажимаем “OK” а затем “Закрыть”. На этом подготовку компьютера к установке роли AD можно считать законченной. В этом примере я задал следующие параметры, IP адрес: 192.168.0.1 маска подсети: 255.255.255.0

Установка роли После того как компьютер будет подготовлен приступаем к установке роли AD на компьютер. Для этого откроем “Диспетчер сервера” (Пуск -> Диспетчер сервера). Выберем “Добавить роли и компоненты” тем самым запустив “Мастер добавления ролей и компонентов”, в этот статье я кратко опишу добавление роли AD на сервер, т.к. роли добавляются одинаково, подробную установку вы можете прочитать в моих прошлых статьях про установку роли NAT и DHCP. 1. На первом этапе мастер напоминает, что необходимо сделать перед началом добавления роли на сервер, нажимаем ”Далее”. 2. На втором шаге выбираем “Установка ролей и компонентов” и нажимаем “Далее”. 3. Выбираем сервер, на который мы установим роль AD и снова нажимаем ” Далее ”. 4. На этом шаге нам нужно выбрать роль, которую мы хотим добавить на компьютер, отмечаем галочкой “Доменные службы Active Directory”, после чего нам предлагают добавить «службы ролей или компоненты» необходимые для установки роли AD, нажимаем кнопку “Добавить компоненты” после чего жмём “Далее”. 5. На следующем шаге нам предлагают выбрать компоненты, просто жмём “Далее” 6. Попадаем на описание роли “Доменных служб Active Directory”. Читаем описание роли и пункт “на что обратить внимание” после чего нажимаем “Далее” 7. На этом шаге нам показывают, что будет добавлено на сервер, проверяем, если всё верно нажимаем “Установить”. 8. После того как установка будет завершена нажимает “Закрыть” Настройка доменных служб Active Directory После того как роль была добавлена на сервер, необходимо настроить доменную службу, для этого запустим “Мастер настройки доменных служб Active Directory” (нажмите на иконку “уведомления” в “диспетчере сервера” после чего нажмите “Повысить роль этого сервера до уровня контроллера домена”) 1. Выберете пункт “Добавить новый лес”, после этого впишите имя домена в поле “Имя корневого домена” и нажмите “Далее” 2. На этом шаге мы можем изменить совместимость режима работы леса и корневого домена. В моём примере я оставляю эти настройки по умолчанию (в режиме работы “Windows Server 2012 RC”). Так же мы может отключить возможность DNS-сервера, я оставил эту настройку включенной. В низу нам необходимо задать пароль для DSRM (Directory Service Restore Mode — режим восстановления службы каталога), задаём пароль и нажимаем “Далее” 3. На этом шаге мастер предупреждает нас о том, что делегирование для этого DNS-сервера создано не было, нажимаем “Далее”. 4. Здесь мы можем изменить NetBIOS имя, которое было присвоено нашему домену, изменяем, если требуется и нажимаем “Далее”. 5. Теперь мы можем изменить пути к каталогам базы данных AD DS (Active Directory Domain Services – доменная служба Active Directory), файлам журнала, а так же папке SYSVOL. Если требуется, измените, пути расположения каталогов и нажимайте «Далее». 6. В этом шаге, можно проверить какие параметры мы выбрали, так же мы можем посмотреть “Сценарий Windows PowerShell для развертывания AD DS ”. Нажимаем “Далее”. 7. Мастер проверит, соблюдены ли предварительные требования, после чего покажет нам отчёт. Одно из обязательных требований, это установленный пароль на профиль локального администратора. В самом низу мы может прочитать предупреждение мастера о том что после того как будет нажата кнопка “Установить” уровень сервера будет повышен до контроллера домена, после чего произойдёт автоматическая перезагрузка. Нажимаем “Установить”. 8. После того как установка будет закончена, компьютер перезагрузится, вы совершите первый ввод компьютера в ваш домен. Для этого введите логин и пароль администратора домена и нажмите “Войти”. Добавление нового пользователя Теперь нам нужно добавить новых пользователей в наш домен, ниже я покажу, как создать новое подразделение и добавить в него пользователя, после чего можно присоединить компьютер к домену и войти в домен под новым пользователем. 1. Для начала работы запустите оснастку “Пользователи и компьютеры Active Directory” (Пуск -> Панель управления -> Администрирование -> Пользователи и компьютеры Active Directory) 2. Выделите название домена и вызовите контекстное меню, в котором выбираете (Создать -> Подразделение). После чего вводим имя для подразделения, а так же можем снять защиту контейнера от случайного удаления, эту опцию я оставил включённой. Нажимаем “OK”. Подразделения служат для того что бы удобно управлять группами компьютеров пользователей и т.д. Например: можно разбить пользователей по группам с именами подразделений соответствующих именам отделов компании, в которой они работают (Бухгалтерия, отдел кадров, менеджеры и т.д.) 3. Теперь создадим нового пользователя в контейнере. Выделяем контейнер “Пользователи”, вызываем контекстное меню и выбираем в нём (Создать -> Пользователь). Заполняем поля имя и фамилия, в полях имя входа пользователя указываем логин пользователя, под которым он будет заходить в домен. Логин может содержать точки, например: Ivan.Ivanov Нажмите кнопку “Далее”, задайте пароль для пользователя (пароль должен соответствовать политике безопасности Windows), так же доступны четыре опции для изменения
- Требовать смены пароля пользователя при следующем входе в систему – при входе пользователя в ваш домен ему будет предложено сменить пароль.
- Запретить смену пароля пользователем – отключает возможность смены пароля пользователем
- Срок действия пароля не ограничен – пароль можно не менять сколь угодно долго
- Отключить учётную запись – делает учётную запись пользователя не активной
Нажмите “Далее”, затем нажмите “Готово”. 4. Выделите созданного пользователя и в контекстном меню выберите “Свойства”. Перейдите на вкладку “Учётная запись” и поставьте галку напротив “Разблокировать учётную запись”, после чего нажмите “Применить”, затем «OK». Ввод компьютера в домен После проделанных манипуляций мы создали новое подразделение “Пользователи” и добавили в него нового пользователя “Иван Иванов” с логином “Ivan.Ivanov”.Давайте теперь введём компьютер в наш домен и попробуем залогиниться под новым пользователем. Для этого на компьютере пользователя делаем следующие: 1. Укажем на клиентском компьютере DNS-адрес. Для этого открывает “Свойства сетевого подключения” (Пуск –> Панель управления –> Центр управления сетями и общим доступом -> Изменить параметры адаптера), вызываем контекстное меню подключения и нажимаем «Свойства». После чего выделяем “Протокол Интернета версии 4 (TCP/IPv4)”, нажимаем “Свойства”, выбираем “Использовать следующие адреса DNS-серверов” и в поле “Предпочитаемый DNS -сервер” указываем адрес вашего DNS-сервера. 2. Открываем “Свойства системы” (Пуск -> Панель управления -> Система -> Изменить параметры), нажимаем кнопку “Изменить»
")
3. Выберете “Компьютер является членом домена” и введите имя домена. Нажмите “OK”, после чего введите имя пользователя и пароль созданного вами пользователя, нажмите “OK” после чего выскочит приветствие “Добро пожаловать в домен”. Подтверждаем “OK” и видим предупреждение, что компьютер необходимо перезагрузить, жмём “OK” потом “Закрыть” затем “Перезагрузить сейчас”.
4. После того как клиентская машина будет перезагружена, вводим в поле «Пользователь» имя домена/Ivan.Ivanov в поле пароль указываем пароль от учётной записи пользователя. Нажимаем “Войти”.

Заключение В этой статье была описана установка роли доменных служб Active Directory, развёртка домена, создание подразделения и добавление нового пользователя. А так же ввод компьютера в домен.
↑Как установить такие кнопки?↑
Friend me:
Windows Server 2012 introduces a plethora of new features with a key emphasis on Cloud integration being the buzz word in the industry over the last 24 months. Windows continues to grow and mature as an operating system with the latest iteration being more secure, reliable and robust and more importantly making it easily interoperable with other systems.
This post will focus on Installing a Windows 2012 Server and then promoting it as the first domain controller in a new Forest. Even though the logical steps haven’t really changed dramatically since the introduction of Windows 2008, the interface has! especially with the new metro look. So let’s begin our journey with Windows Server 2012 as this will be the first of many articles on configuring different components that Windows Server 2012 has to offer.
Installing Windows Server 2012
The first step is to boot up from the CD or ISO image and select your language settings.

Select your Language and input options and then click on Next.

Click Install Now
Select the operating system you want to install. I have selected Windows Server 2012 Release Candidate Server with a GUI. The other option is server core which was first introduced in Windows 2008 and is a minimal install with no GUI but provides remote management through Windows PowerShell and other tools.

Click Next
Accept the License terms

Click Next

We are performing a new installation of Windows Server, so click on Custom.

Partition your drives and then click Next.
The Installation of Windows then proceeds.

The installation will eventually re-start your Windows Server where it will go through the final stages of preparing the environment for first time use.

You will eventually be prompted to enter a password for the built-in Administrator account.

Click Finish
You will now be presented with the new Windows Login Screen, which is a fair change to what we have been accustomed to with previous releases of Windows Server.

Hit Ctrl – ALT – Delete to sign in, and enter your password.
You will be presented with the new Server Manager Screen which really simplifies the administration and configuration of your new server. Our main goal for this article is to configure Active Directory and its related services such as DNS.

First thing I want to do is change the computer name. Windows goes ahead and provides a default unique name in the form of WIN-<random characters>
To do so, from the Server Manager > Dashboard screen, click on Local Server and then click on the computer name hyperlink.

This will take you to the all familiar System Properties

Click Change, enter a more desirable Computer Name and then click OK.
You will then be prompted to restart your computer to apply the changes. Click Ok and then Click on restart now.
After your computer has restarted, we will be presented with the Server Manager Screen. Now we are ready to configure this server as an Active Directory Controller.
Adding the Active Directory Domain Services Role
From the Dashboard click on “Add roles and features”. You will be presented with the “Before you begin screen. Click Next. In the “Installation Type” screen click on “Role-base or feature-based installation”.

Click Next
You will be presented with the following screen asking you to select a destination server. This is a new feature of Windows 2012 where you have the ability to deploy roles and features to remote servers and even offline virtual hard disks.
In our case, we are selecting the current server from the server pool.

Click Next
We are now back in familiar territory (if you have worked with Windows 2008 Server) and we will select the “Active Directory Domain Services” and DNS Server if it hasn’t already been provisioned.

You will then be prompted to add features that are required for Active Directory Domain Services.
Click on Add Features
Click Next
If you want to add additional features, you can do so from the next screen, otherwise click Next
You will now be presented with the Active Directory Domain Services (AD DS) screen outlining some information about AD DS and its requirements. You will notice that DNS is a MUST and has always been the case.

Click next
You now provided with a summary of installation selections

The installation will now begin

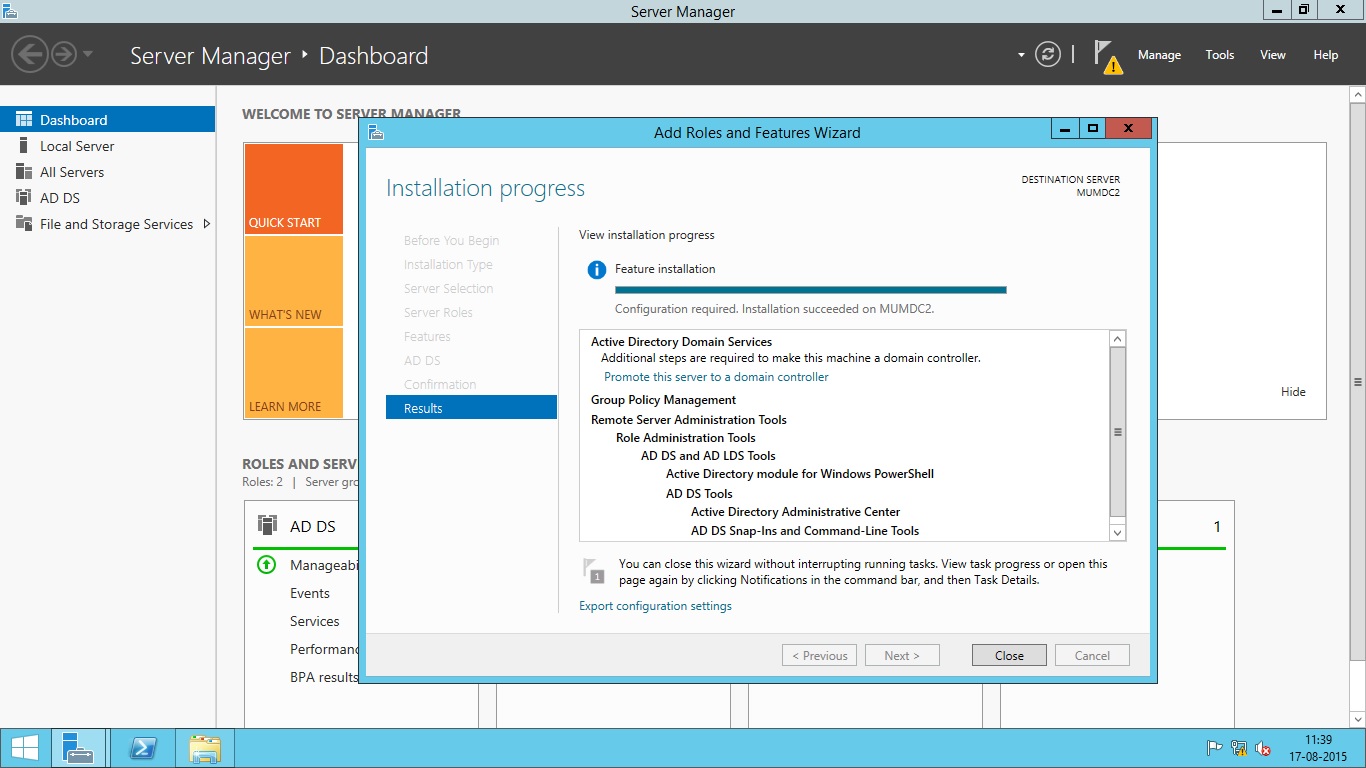
Upon completion you will be presented with an installation succeeded message.

Click Close.
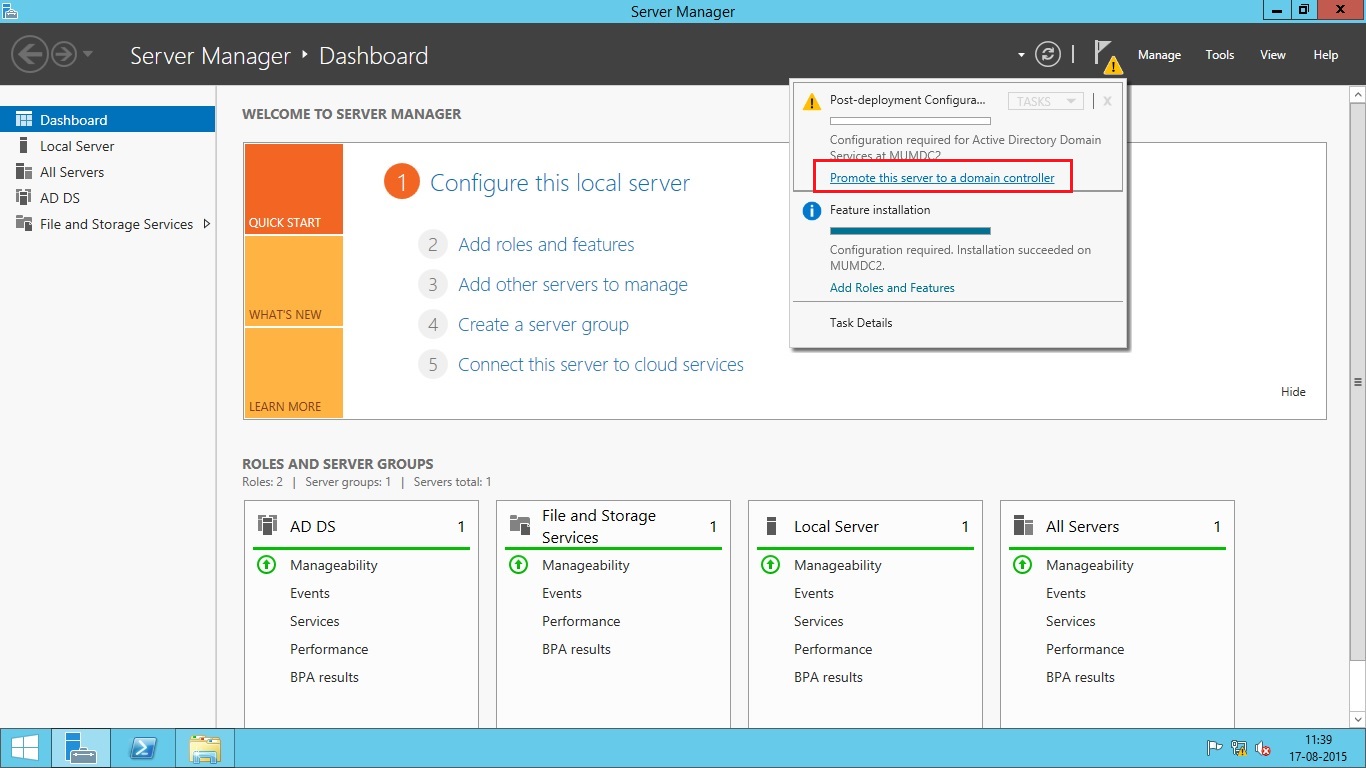
Back in Server Manager, you will notice that AD DS has been added to the left navigation tree. Click on it and then click on More on the right navigation pane where it states that Configuration is required for Active Directory Domain Services.

You will now be presented with the All Servers Task Details, in which you will click on Promote this server to a domain controller under Action.
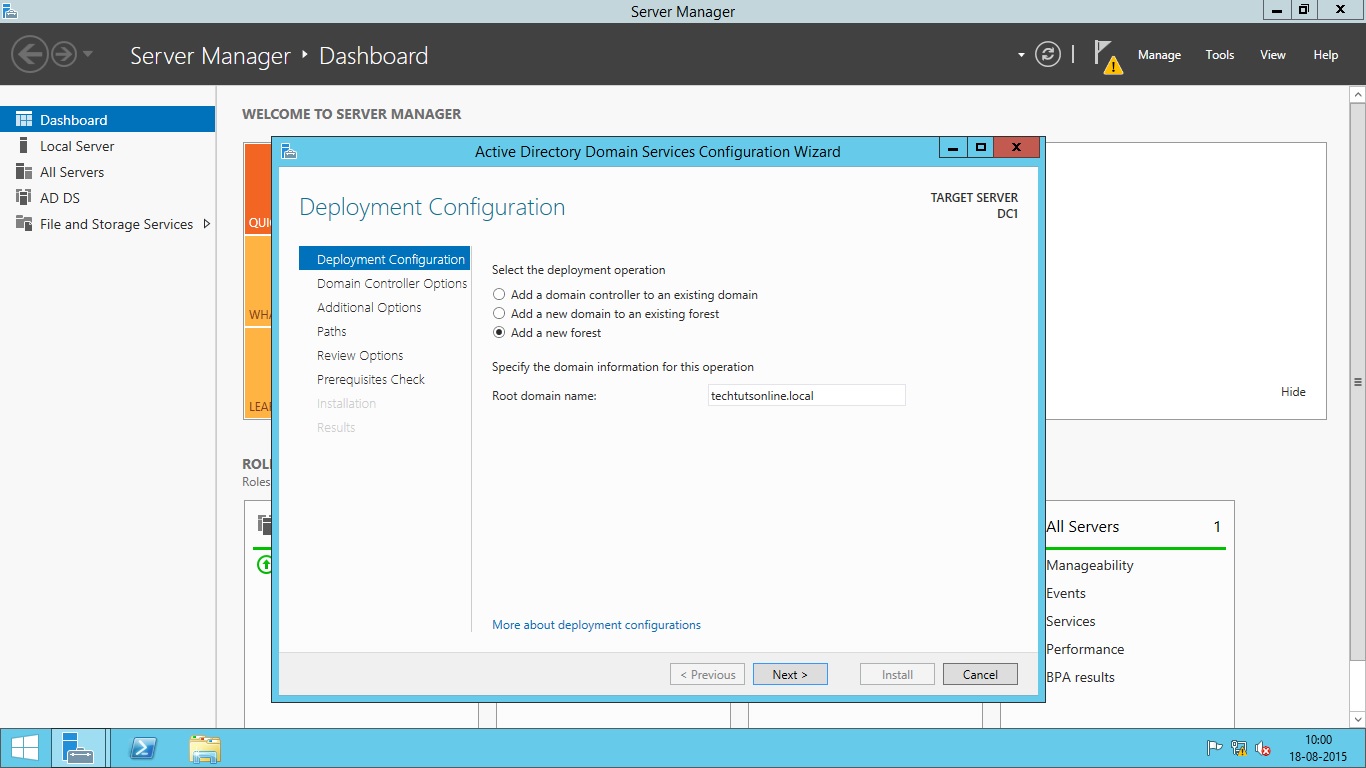
The Deployment Configuration screen appears and we will select “Add a new forest” as this is the first domain controller.

Enter your Root domain name and then click Next.
The following screen will then appear in which you will enter and select your Domain Controller Options.

You will then get the below warning in which you can ignore for now.

Click Next
The NetBIOS domain name will then be inputted automatically. In the event of a conflict, it will suggest an alternative by appending the original name with a 0.

Click Next
Confirm or change the locations of your database folder, log folder and SYSVOL folder.

Click Next
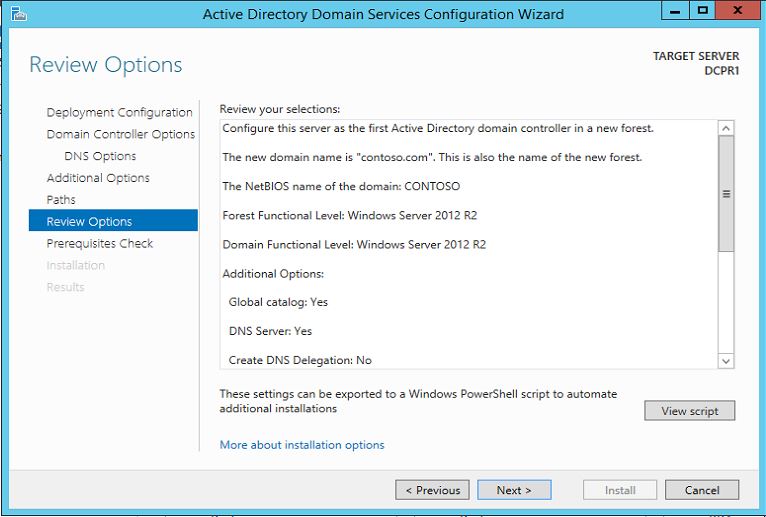
Review your selections and then Click Next.
If all of the prerequisites checks have passed successfully, you will be able to click on Install to proceed.

Click Install
The installation will now proceed and you will see the progress being displayed.

The computer will most likely restart on its own to complete the installation so don’t be alarmed if it does. You will receive a brief warning advising so.
Upon restart, you should be able to login using your domain credentials for the user administrator.
So let’s add our first user! We can do so via the new Active Directory Administrative Center or via the well known Active Directory Users and Computers. For something different, lets try the former.
Once Server Manager has launched, click on Tools > Active Directory Administrative Center
You will be greeted with the below Welcome screen.

Click on your domain on the left navigation pane, in my instance it is corp (local).

Let’s begin by creating our first Organizational Unit that will house our corporate users (I am not a fan of using the default Users). On the right navigation pane under Taks > <domain name> click on New and then select “Organizational Unit”.
Enter the mandatory details.

Click OK
This will immediately create the Organizational Unit in the designated location. Double click on your newly created Organizational Unit and on the left navigation pane, select New User. The below screen appears in which you will fill in the necessary details.

Make sure you scroll down to the bottom and fill in all the necessary sections such as Groups, Profile Settings and Organization settings.
Once completed, Click OK.
Your newly created user will now be listed in the middle navigation pane.

As you can see it is relatively straight forward configuring your first domain controller in a new forest using Windows Server 2012, in particular if you have had experience with Windows Server 2008.
The team at GKM2 Solutions are proficient and certified with all version of Windows Server dating back to 2000 and 2012 will be no different. If you require any assistance with your Windows Server migration needs or Active Directory in General, don’t hesitate to contact us via our website form or call us on 1300 797 288. We will be more than glad to help with your IT requirements.
Resources
Windows 2012 Resource Center http://technet.microsoft.com/en-us/windowsserver/hh534429.aspx
Table of Contents
If you are already familiar to the process of promoting a server to domain controller, you would be surprised to know that DCPROMO (legacy domain controller promotion) tool is now deprecated in Windows Server 2012 and above. Now you can do this using Server Manager or via Windows PowerShell. Another important fact I would like to mention is that the PowerShell remoting is enabled by default in Windows Server 2012. So, you can now use PowerShell remoting to start Active Directory Domain Services (AD DS) deployment process right from one server and without logging into other remote servers.
I will show you how to install active directory domain services using Server Manager GUI as well as using PowerShell. Remember that if you come across to a server core installation which do not have GUI installed, you have to complete the whole process using Windows PowerShell.
Active Directory Deployment using Server Manager GUI
To deploy the first Windows Server 2012 or Windows Server 2012 R2 domain controller in a new forest, you can run Windows PowerShell commands directly on the server by either logging on locally to the server or by using Remote Desktop. Another option is to use Windows PowerShell remoting, which enables you to run Windows PowerShell commandlets (cmdlets) on one or more remote computers simultaneously by using the WS-Management protocol. In this section, I am going to show you the process using Server Manager.
Before starting, configure the static IP address and DNS address on each server. Make sure all of your Servers which you are going to promote to domain controllers can communicate (ping) each other. You may need to modify the Windows firewall on your servers.
Best Practices for DNS settings on Domain Controllers
- In single DC/DNS in a domain environment, DC/DNS server must point to its private IP address (not to loopback 127.x.x.) as preferred DNS server in TCP/IP property.
- If multiple DCs/DNS servers are in a domain environment, recommendation to have all DCs point to their own private IP address in preferred DNS server field and other DNS server in alternate DNS server field. Add 127.0.0.1 (loopback) as tertiary DNS server entry (in Advanced settings).
- Each DC must have one IP address and one network adapter is enabled (disable unused NICs).
- IPv6 should not be disabled on DC’s NIC card. Set it to “obtain IPV6 address automatically” and “obtain DNS server address automatically”
- If multiple NICs (enabled and disabled) are present on server, make sure the active NIC should be on top in NIC binding.
- Contact your ISP and get valid DNS IPs from them and add it in to the forwarders, Do not set public DNS server in TCP/IP settings of DC.
Once the above settings are done and all servers can ping each other, you begin the deployment process. Follow the steps shown below to install Active Directory in Windows Server 2012 R2:
- Open Server Manager.
- Click Manage drop-down and then select Add Roles and Features option as shown below.
- Press Next on welcome screen and select Role-based or feature-based installation under Installation Type screen and then click Next.
- Select a server from pool. Make sure the server you want to promote is selected then click Next.

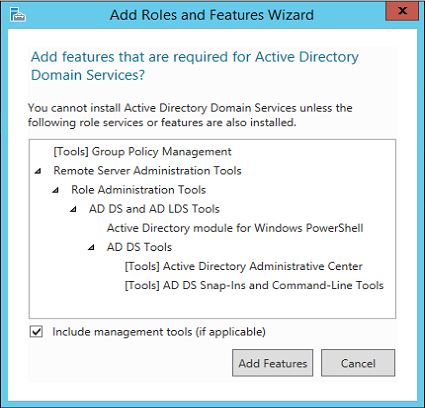
- Select the checkbox in front of Active Directory Domain Services. As soon as you select this option, you will be prompted with Add features that are required by AD DS. Simply click Add Features button as shown below.
- Press Next and then click Install to begin the installation of Active Directory Domain Services binaries. Once the installation is complete, click Close button.

- Once the process is complete, you will be asked for Post deployment configuration by Server Manager. Look at the top right side of Server Manager, you will see yellow triangle near to Flag icon indicating unread notification. Click on the notification and select the option Promote this server to a domain controller.
- Once you click at the option ‘Promote this server to a domain controller’, you will see Active Directory Domain Services Configuration Wizard. Now, select one option depending upon your environment. At this stage I assume that you are creating a new AD Forest. So, this server is going to be your first domain controller of first domain in the new forest. Enter the name of your Root domain and click Next. See the diagram below:
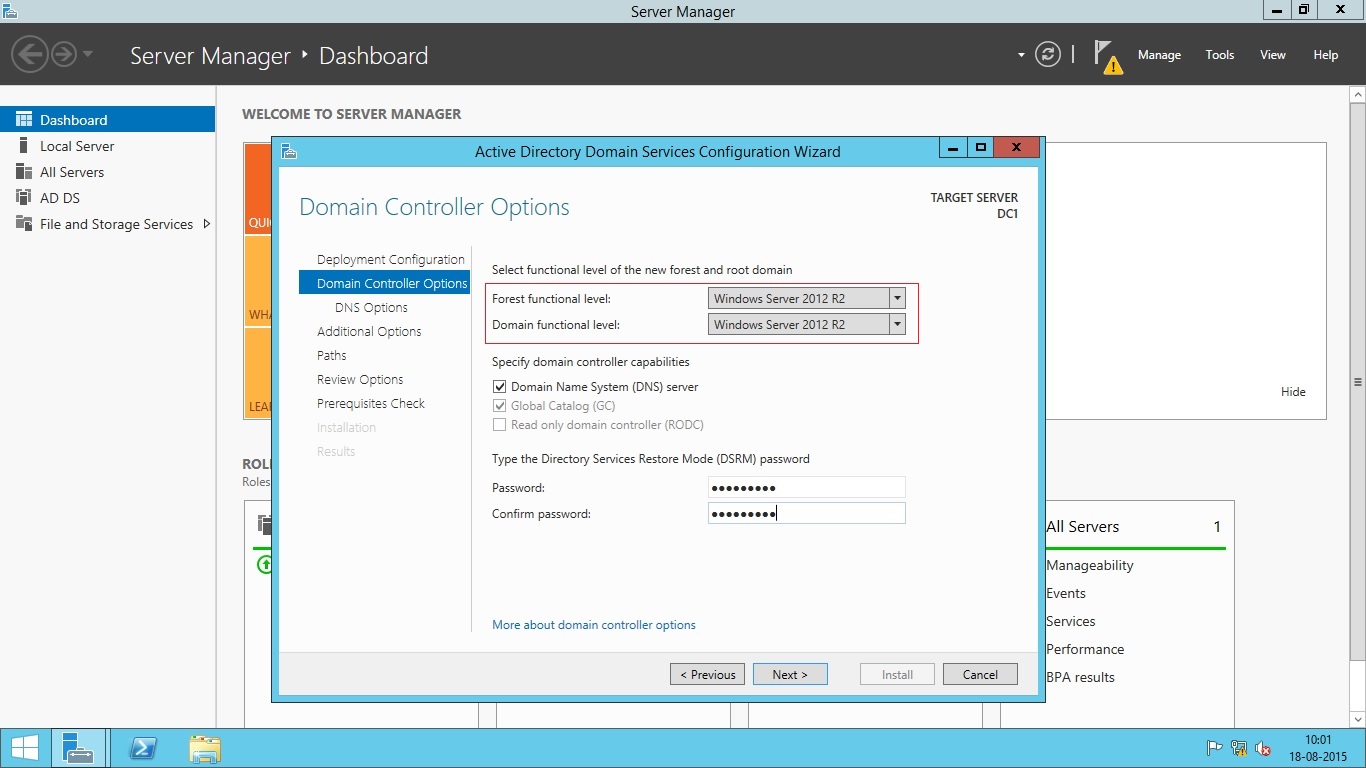
- In this screen you have to select domain controller options like Forest and Domain Functional Level. You also need to specify whether to install DNS service on this server. The Directory Service Restore Mode (DSRM) password is also entered here. This password will be used when you want to start the server in Active Directory Restore Mode for Recovery operations. Notice that the Global Catalog (GC) and Read Only Domain Controller (RODC) options are greyed since this is a first domain controller in this new forest. So, It must be a Global Catalog and it can not be a RODC at first place.
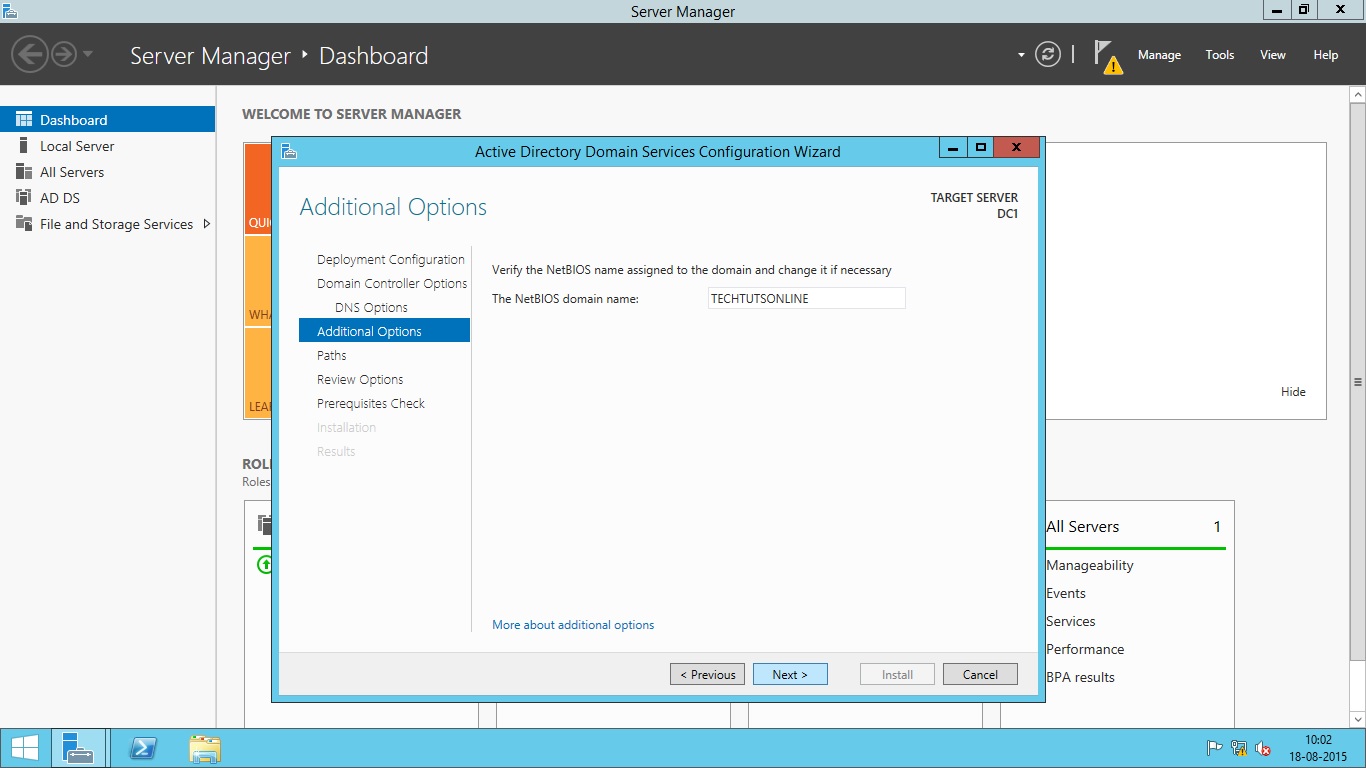
- Press Next and you will be asked to enter the netBIOS name for this server. Leave it default and press Next.
- Note that if you are adding domain controller to existing domain, you will see Install from Media (IFM) or Replicate from existing domain controllers options at next screen. Install from Media is the option which helps you save your network bandwidth if you are adding a new domain controller to existing domain. Because replication traffic can be huge depending upon the Active Directory infrastructure size, and if you are using slow network link between this server and other domain controllers, it will be a good idea to choose Install from Media option. You can use the Ntdsutil.exe tool to create installation media for additional domain controllers that you are creating in a domain. By using the Install from Media (IFM) option, you can minimize the replication of directory data over the network. In this screen, you can also select a particular domain controller to replicate the data from.
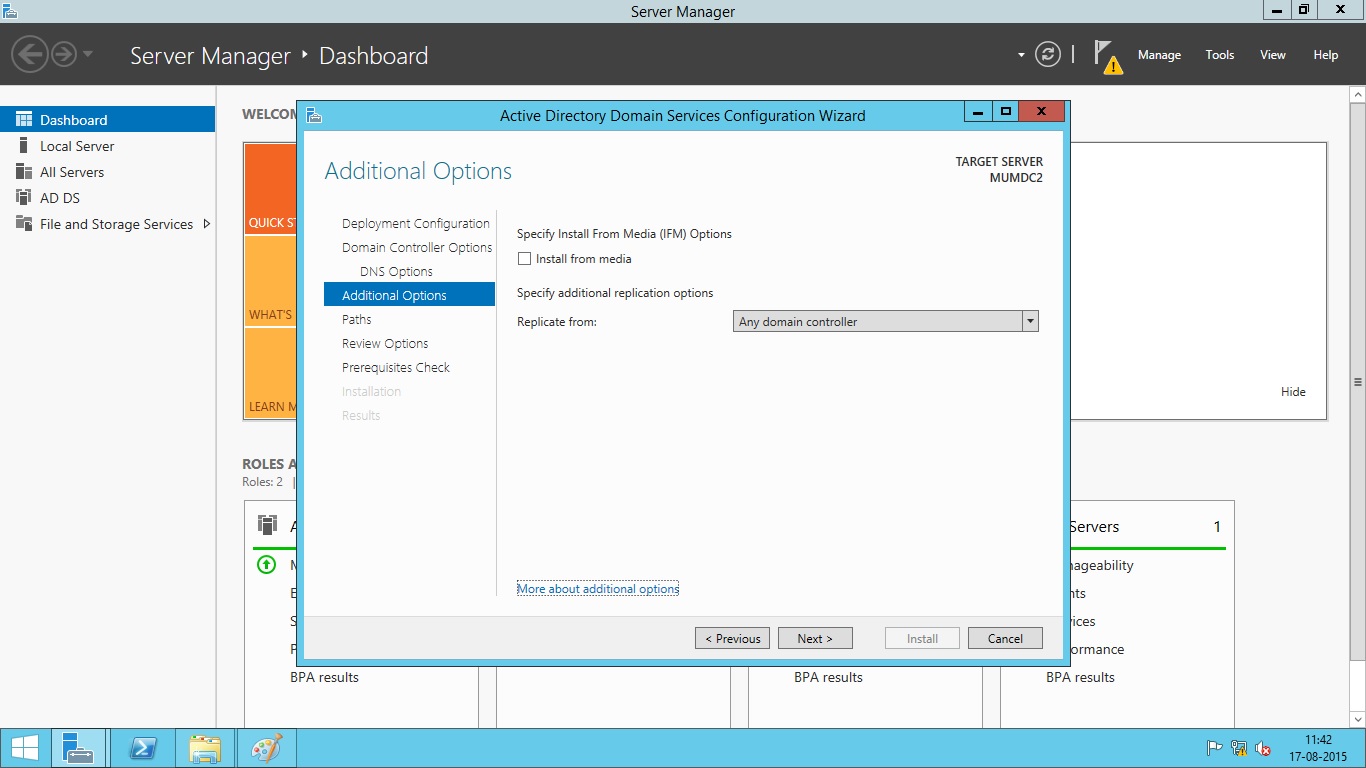
If you are creating a new Forest, you will not see the above options.
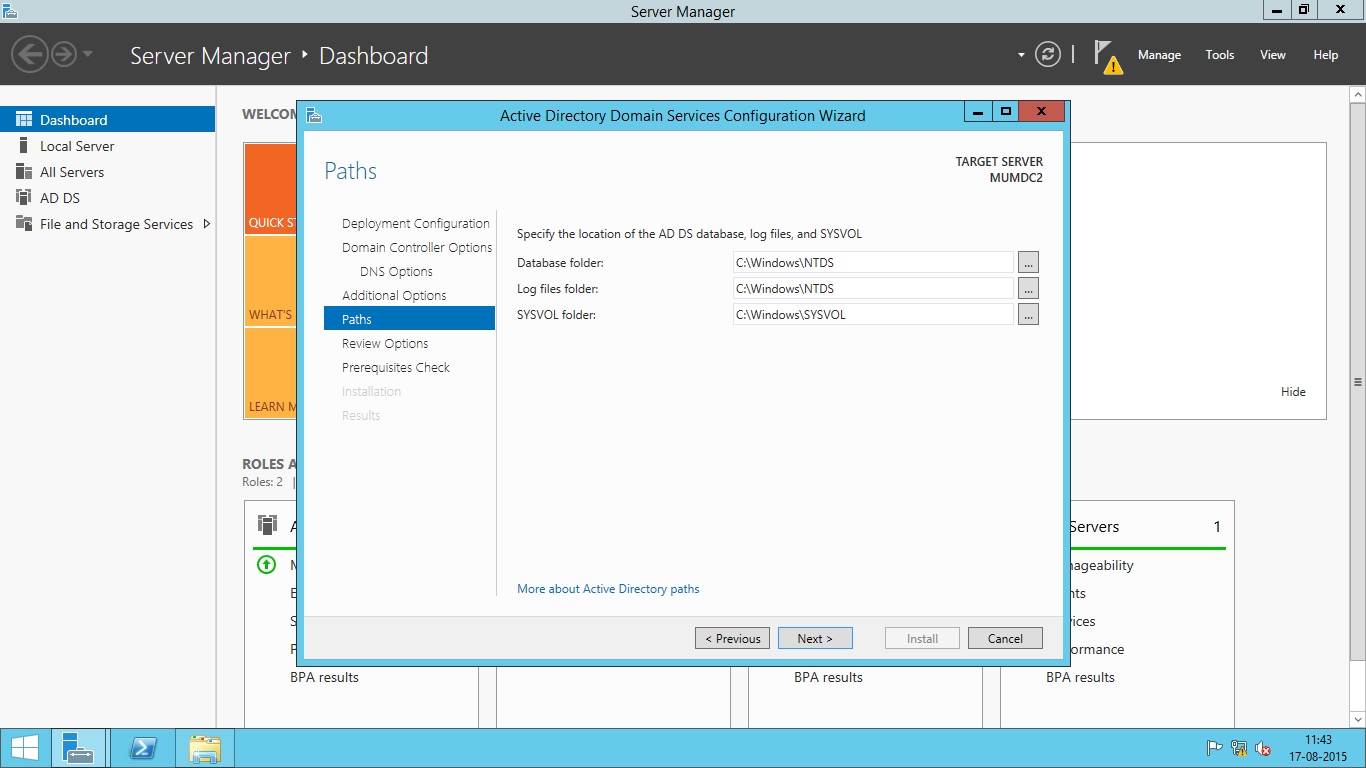
- In the next screen, you will have to choose the location of active directory database, log files and sysvol folders. After selecting the location, press Next.
- Now the server will verify the prerequisites needed for active directory domain services. Once this is completed, press Install button to begin the install operation.
- Restart the server after the installation completes.
Active Directory Deployment using Windows PowerShell
This topic explains how to accomplish common server configuration tasks, such as changing computer name, configuring network properties and promoting the server to a domain controller while the server is in Server Core mode where you do not have any GUI or if you want to do everything using command-line interface.
Change Computer Name
When you install Windows Server 2012 R2 on any system, by default the computer name is set randomly. To change the computer name, you can use the following PowerShell command.
PS C:\>Rename-Computer -NewName DC1 -Restart
You should know that promoting a server to domain controller need a static IP address configured on server. Active Directory will not work when the server is set to obtain IP address automatically from DHCP. So, the first step is to set static IP address.
Set a Static IP address
-
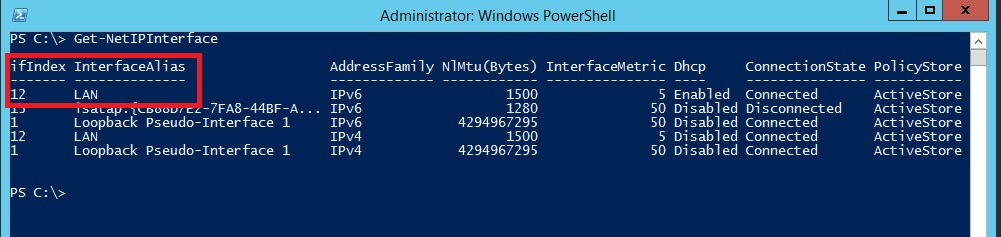
In Windows PowerShell, run Get-NetIPInterface cmdlet.
-
Make a note of the number shown in the IfIndex column of the output for your IP interface or the InterfaceAlias string. If your computer has more than one network adapter, make a note of the number or string corresponding to the interface for which you wish to set a static IP address. See the Figure below:

In this Figure, IfIndex is 12 for which we will set the IP address.
-
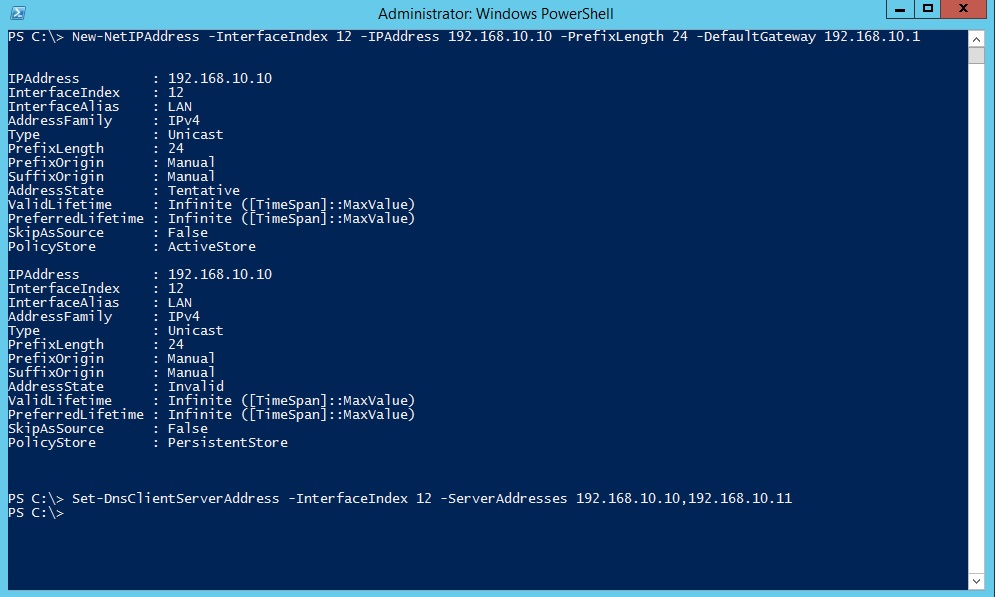
In Windows PowerShell, run the command New-NetIPAddress –InterfaceIndex 12 –IPAddress -192.168.10.10 –PrefixLength 24 –DefaultGateway -192.192.168.10.1
Where:
InterfaceIndex is the value of IfIndex from Step 2 (in this example, 12).
IPAddress is the static IP address you intend to set (in this example, 192.168.10.10).
PrefixLength is the prefix length (another form of subnet mask) for the IP address you intend to set (in this example, 24).
DefaultGateway is the default gateway (in this example, 192.168.10.1).
-
In Windows PowerShell, run the command Set-DNSClientServerAddress –InterfaceIndex 12 -ServerAddresses 192.168.10.10,192.168.10.11
Where:
InterfaceIndex is the value of IfIndex from Step 2 (In this example, 12).
ServerAddresses is the IP address of your DNS server. You can enter multiple addresses separated by comma.

If you need to switch to using DHCP, use the Windows PowerShell command: Set-DnsClientServerAddress –InterfaceIndex 12 –ResetServerAddresses
Setup Windows PowerShell Remoting
As I have already mentioned that you can install active directory domain services on local computer or on remote computer using Windows PowerShell without the need to login into the remote computer. Windows Server 2012 has PowerShell remoting enabled by default.
Windows PowerShell remoting is primarily intended for remotely managing domain-joined computers, and if you are preparing to deploy the first domain controller in a new forest there is no domain to join yet. In other words, the remote server that will be promoted to a domain controller is initially in a workgroup, not a domain. In addition, the local computer from which you will be performing the deployment might also be in a workgroup. If you try to run any command on remote server, you will get the error as shown below:
PS C:\> Get-WindowsFeature -ComputerName DELDC2
Get-WindowsFeature : WinRM cannot process the request. The following error occurred while using Kerberos authentication: Cannot find the computer DELDC2. Verify that the computer exists on the network and that the name provided is spelled correctly.
At line:1 char:1
+ Get-WindowsFeature -ComputerName DELDC2
+ ~~~~~~~~~~~~~~~~~~~~~~~~~~~~~~~~~~~~~~~
  + CategoryInfo     : DeviceError: (Microsoft.Manag...rDetailsHandle):CimException) [Get-WindowsFeature], Exception
  + FullyQualifiedErrorId :  UnSupportedTargetDevice,Microsoft.Windows.ServerManager.Commands.GetWindowsFeatureCommand
Notice that the error message says Error occurred while using Kerberos authentication. This is because by default WS-Man protocol uses Kerberos authentication. Since all the Servers are yet in workgroup environment; the Kerberos is not supported.
In this situation, you need to enable the two stand-alone computers to talk to each other using the WS-Management protocol. If the computer from which you are performing the deployment is also running Windows Server 2012 or Windows Server 2012 R2, you just need to add the name of the remote server to the TrustedHosts list in the local computer’s WinRM configuration. Doing this enables the local computer to connect to the remote server using NTLM as the authentication mechanism instead of Kerberos, which is used in domain-based environments.
I am currently on server DELDC1 and I have other 3 servers named DELDC2, MUMDC1 and MUMDC2. By default, the TrustedHosts list is empty on every server. So, it does not allow commands to any remote computer which is not in domain.
PS C:\> Get-Item WSMan:\\localhost\client\TrustedHosts

   WSManConfig: Microsoft.WSMan.Management\WSMan::localhost\Client

Type            Name                           SourceOfValue   Value
----            ----                           -------------   -----
System.String   TrustedHosts
Now, I will add the 3 servers to TrsutedHosts list using Set-Item cmdlet as shown below:
PS C:\> Set-Item WSMan:\\localhost\client\TrustedHosts -Value DELDC2 -Concatenate -Force
PS C:\> Set-Item WSMan:\\localhost\client\TrustedHosts -Value MUMDC1 -Concatenate -Force
PS C:\> Set-Item WSMan:\\localhost\client\TrustedHosts -Value MUMDC2 -Concatenate -Force
Note that the –Concatenate parameter is mandatory, otherwise every time you run the Set-Item command, it will keep overwriting the old values in TrustedHosts list. The -force parameter is however optional, which is used to suppress the confirmation (Yes/No) prompt. Now, take a look on TrustedHosts list again.
PS C:\> Get-Item WSMan:\\localhost\client\TrustedHosts

   WSManConfig: Microsoft.WSMan.Management\WSMan::localhost\Client

Type            Name                           SourceOfValue   Value
----            ----                           -------------   -----
System.String   TrustedHosts                                   DELDC2,MUMDC1,MUMDC2
DELDC2, MUMDC1 and MUMDC2 servers are now listed under TrsustedHosts. You can now run PowerShell remoting commands on these remote servers from your local server (DELDC1).
PS C:\> Get-WindowsFeature -ComputerName DELDC2 AD-Domain-Services

Display Name                                            Name                       Install State
------------                                            ----                       -------------
[ ] Active Directory Domain Services                    AD-Domain-Services             Available
You did not get any error this time; remote commands are now working. The windows feature ‘Active Directory Domain Services’ in now listed as available on remote server.
Install Active Directory Domain Services
Next step is to Install the AD DS binaries as we did using Server Manager GUI. The interesting thing is that the Server Manager also uses Windows PowerShell cmdlets behind the scenes. Whatever command you give in Server Manager GUI, it is converted to relevant PowerShell cmdlet and run in background.
To install AD DS binaries run the command as shown below:
PS C:\> Install-WindowsFeature AD-Domain-Services

Success Restart Needed Exit Code      Feature Result
------- -------------- ---------      --------------
True    No             Success    {Active Directory Domain Services}
The ADDSDeplyment PowerShell module is installed when you run the above shown command on the server. Notice that the server is not yet promoted to domain controller. We have just installed the required binaries for AD DS.
Now, you need to import the ADDSDeployment module using Import-Module command. See below example:
PS C:\> Import-Module ADDSDeployment
If you did not get any error message as shown above, it means the module is loaded.
The Windows PowerShell cmdlets for adding a new forest, adding new domain, deploying domain controllers and performing other deployment tasks are found in the ADDSDeployment module. To see a list of the available cmdlets in this module, use the Get-Command cmdlet as follows:
PS C:\> Get-Command -Module ADDSDeployment

CommandType     Name                                               ModuleName
-----------     ----                                               ----------
Cmdlet          Add-ADDSReadOnlyDomainControllerAccount            ADDSDeployment
Cmdlet          Install-ADDSDomain                                 ADDSDeployment
Cmdlet          Install-ADDSDomainController                       ADDSDeployment
Cmdlet          Install-ADDSForest                                 ADDSDeployment
Cmdlet          Test-ADDSDomainControllerInstallation              ADDSDeployment
Cmdlet          Test-ADDSDomainControllerUninstallation            ADDSDeployment
Cmdlet          Test-ADDSDomainInstallation                        ADDSDeployment
Cmdlet          Test-ADDSForestInstallation                        ADDSDeployment
Cmdlet          Test-ADDSReadOnlyDomainControllerAccountCreation   ADDSDeployment
Cmdlet          Uninstall-ADDSDomainController                     ADDSDeployment
To add a new forest, we will use the Install-ADDSForest cmdlet listed above.
But before actually installing, we need to make sure if our server is ready for this process. We can test this using Test-ADDSForestInstallation cmdlet. This cmdlet will run a prerequisite check on server and will notify us if installation will be successful or not. The Prerequisites check is a new feature in AD DS 2012 domain configuration. These checks will alert you with suggested options, and inform you of new security changes that will affect older operating systems. This test is also run when you add a domain controller to existing domain.
PS C:\> Test-ADDSForestInstallation

cmdlet Test-ADDSForestInstallation at command pipeline position 1
Supply values for the following parameters:
DomainName: techtutsonline.local
SafeModeAdministratorPassword: *********
Confirm SafeModeAdministratorPassword: *********
WARNING: Windows Server 2012 R2 domain controllers have a default for the security setting named "Allow cryptography
algorithms compatible with Windows NT 4.0" that prevents weaker cryptography algorithms when establishing security
channel sessions.

For more information about this setting, see Knowledge Base article 942564
(http://go.microsoft.com/fwlink/?LinkId=104751).

WARNING: A delegation for this DNS server cannot be created because the authoritative parent zone cannot be found or it
 does not run Windows DNS server. If you are integrating with an existing DNS infrastructure, you should manually
create a delegation to this DNS server in the parent zone to ensure reliable name resolution from outside the domain
"techtutsonline.local". Otherwise, no action is required.

Message                       Context                                      RebootRequired                        Status
-------                       -------                                      --------------                        ------
Operation completed succes... Test.VerifyDcPromoCore.DCP...                         False                       Success
I have run Test-ADDSForestInstallation command in PowerShell and then I am prompted to enter Domain Name. After that I am prompted to enter DSRM password. Finally I got the message that Operation completed successfully. This was only a test; no AD forest and domain is yet created.
To use Install-ADDSForest cmdlet, it is a good idea to take a look at the help page for this cmdlet. This command will show us the syntax and all the parameters this cmdlet can accept as shown below:
PS C:\> Get-Help Install-ADDSForest

NAME
    Install-ADDSForest

SYNTAX
    Install-ADDSForest -DomainName <string> [-SkipPreChecks] [-SafeModeAdministratorPassword <securestring>]
    [-CreateDnsDelegation] [-DatabasePath <string>] [-DnsDelegationCredential <pscredential>] [-NoDnsOnNetwork]
    [-DomainMode <DomainMode> {Win2008 | Win2008R2 | Win2012 | Win2012R2 | Default}] [-DomainNetbiosName <string>]
    [-ForestMode <ForestMode> {Win2008 | Win2008R2 | Win2012 | Win2012R2 | Default}] [-InstallDns] [-LogPath <string>]
    [-NoRebootOnCompletion] [-SkipAutoConfigureDns] [-SysvolPath <string>] [-Force] [-WhatIf] [-Confirm]
    [<CommonParameters>]

[output cut]
Take a look at all the parameters and note down which one you have to use in your command.
Install AD DS Forest
To create a new forest and Add the local server as a first domain controller to this forest, Run the following command:
PS C:\> Install-ADDSForest –domainname techtutsonline.local –DomainMode Win2012R2 –ForestMode Win2012R2 –DatabasePath "D:\NTDS" –SYSVOLPath "D:\SYSVOL" –LogPath "D:\NTDS" -Force

SafeModeAdministratorPassword: *********
Confirm SafeModeAdministratorPassword: *********
The target server will be configured as a domain controller and restarted when this operation is complete.
Do you want to continue with this operation? [Y] Yes [A] Yes to All [N] No [L] No to All [S] Suspend [?] Help (default is "Y"): A
If you want to run this command on remote server (DC2), you can use the above command in the following fashion:
PS C:\> Invoke-Command -ComputerName DC2 -ScriptBlock {Install-ADDSForest –domainname techtutsonline.local –DomainMode Win2012R2 –ForestMode Win2012R2 –DatabasePath "D:\NTDS" –SYSVOLPath "D:\SYSVOL" –LogPath "D:\NTDS" -Force
}
Note that I have changed the path of database, log files and sysvol. Also note that I had not added -SafeModeAdministratorPassword parameter in command. So, the PowerShell prompted me to enter the password when I hit enter. I have not included this parameter here because PowerShell accepts password as a secure string and it will be complicated for you if are new to PowerShell. If you wish to provide the password in the command, then it must be a Secure string using the ConvertTo-SecureString cmdlet. You can add –SafeModeAdministratorPassword (ConvertTo-SecureString ‘Abc@123’ –AsPlainText –Force) at the end of command.
If you typed A at confirmation prompt, then the server will be prompted to domain controller and it will restart automatically after installation. You can add –NoRebootOnCompletion parameter in command if you want to suppress the automatic restart of server.
Add Additional Domain Controller to Existing Domain
You can use the Install-ADDSDomainController cmdlet to install an additional domain controller in an existing domain. For example, the following command installs and promotes a new domain controller and DNS server in the techtutsonline.local domain using domain administrator credentials:
PS C:\>Install-ADDSDomainController -InstallDns -Credential `
(Get-Credential techtutsonline\administrator) -DomainName techtutsonline.local
You will be prompted to provide and confirm the DSRM password and password for techtutsonline\administrator during the installation process.
Add Read-Only Domain Controller
You can use the Add-ADDSReadOnlyDomainControllerAccount cmdlet to create an RODC account that can be used to install an RODC in your forest. After you have created the RODC account, you can use the Install-ADDSDomainController cmdlet with the –ReadOnlyReplica parameter to deploy a new RODC in an existing domain.
To Remove AD DS using PowerShell
To uninstall AD DS and demote the Operation Master Roles from server, you can use Uninstall-ADDSDomainController cmdlet. If the logged on user does not have enough privileges, you can use -credential argument to run the command with Enterprise Admins privilege:
PS C:\> Uninstall-ADDSDomainController –Forceremoval -Demoteoperationmasterrole
Back
This tutorial will explain how to install AD on server 2012 R2.
Requirement:
Minimum: 1.4 Ghz 64-bit processor
Minimum: 512 MB RAM
Minimum: 32 GB or greater
The first step is to get server 2012 install on a server. it is very similar to server 2008 install and in one of my previous posts i have discribe how to do the install in details.
Next thing we need to do is get network interfaces configured. it is obvious to use static ip address for the server. Since the server will be act as DNS server, for DNS server field you can use local host address 127.0.0.1
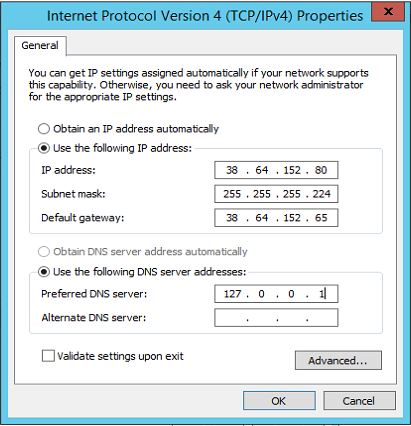
It is recommend to use meaning full name as the server name. in demo i renamed it as «DCPR1»
After this we are ready to start on the AD install. As per my next step i will start DNS role install first. This is not must to do, you also can install dns during the AD install. But as per best practice i always prefer to add DNS role first.
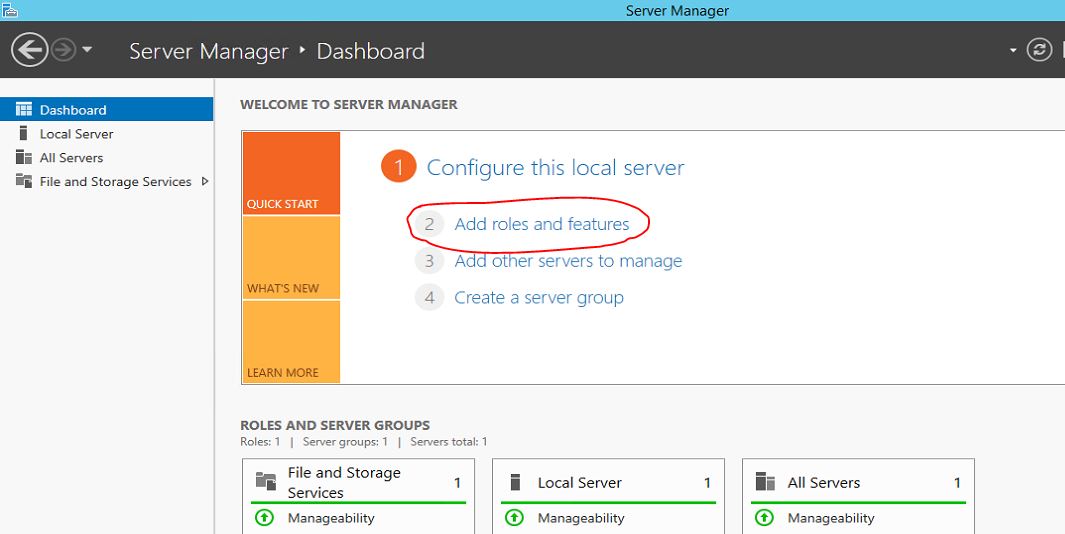
To do this we need to start «Server Manager» it can opne using shortcut on task bar or from Start > Server Manager
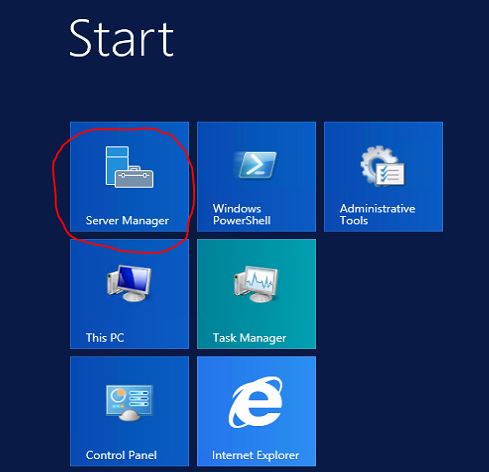
Then in Server Manager window click on option «Add roles and features» option.
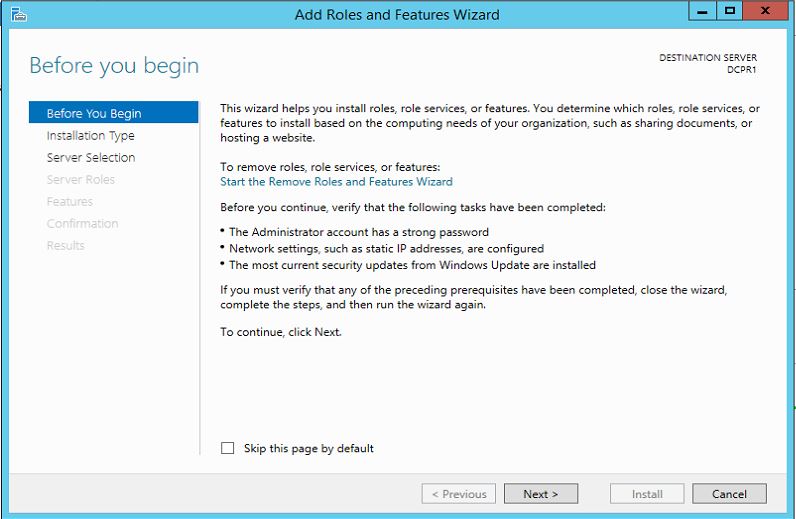
Then it will load the «Add Role Wizard», Click next to continue
In next window keep «Role-based or feature-based installation» default selection and click on next.

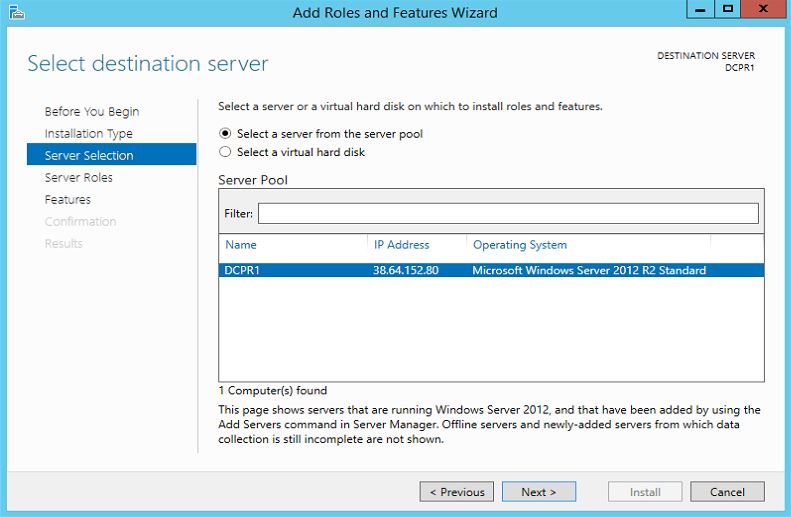
In next window we can select which server to install role. in our case it will be local. so keep the default selection and click on next.
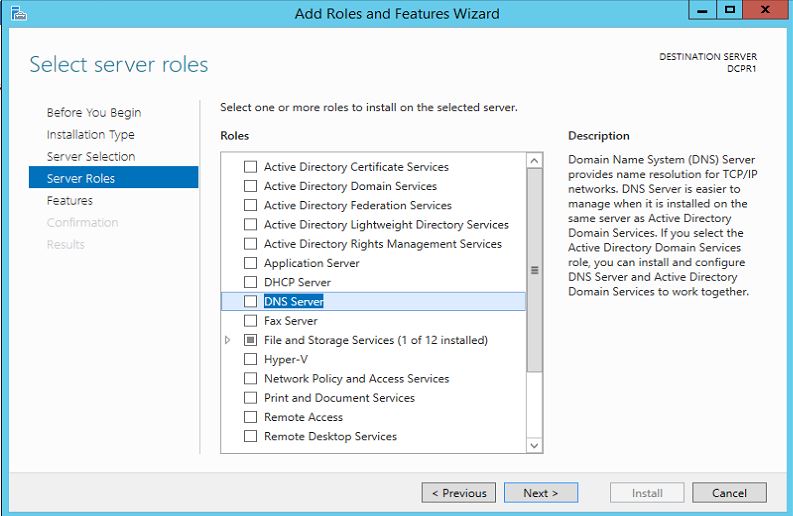
In next window it give option to select the roles. select the «DNS Server» and click on box to tick it.
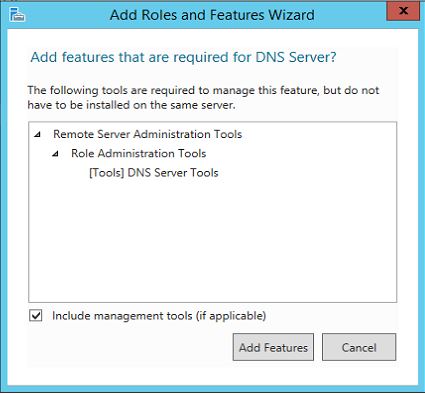
Then it will prompt window to inform about the related additional features which DNS role need. click on «Add features» to continue.
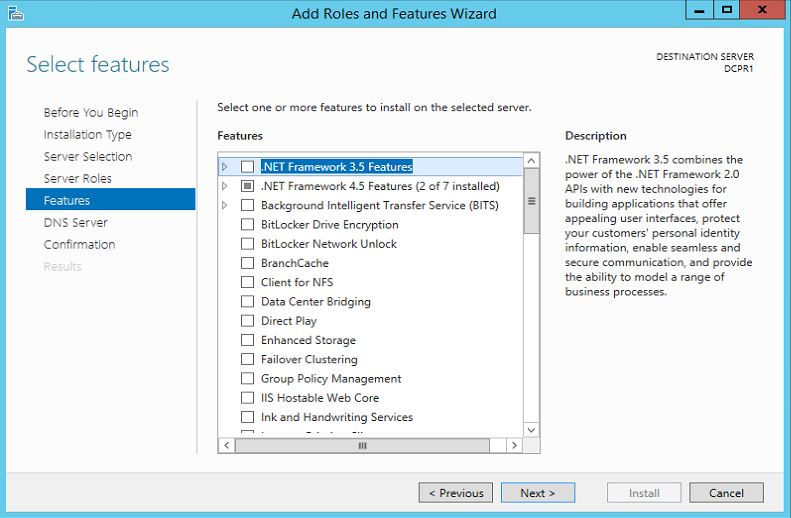
In next window it gives option to select any additional feature, but in here i will keep it default. click on next to continue
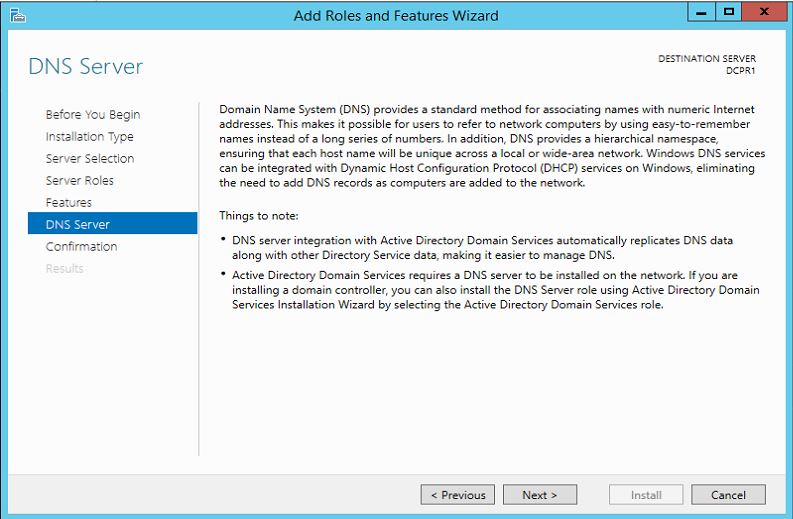
Then it will give brief introduction about the DNS role, click on next button to continue
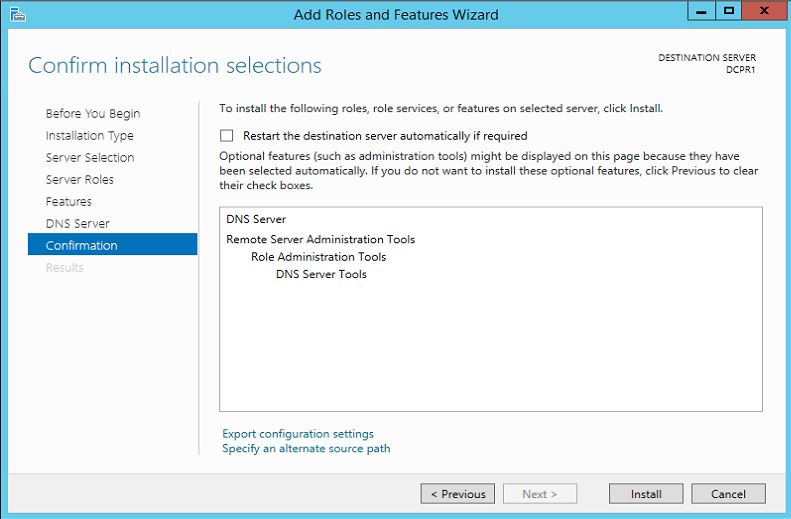
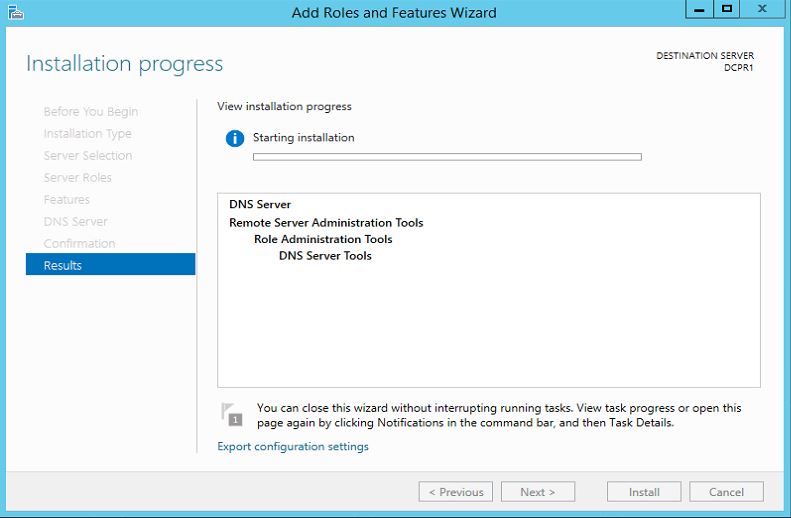
In next window it will give details about the selected features and click on «Install» to begin the installation
Then it will begin the installation and we need to wait till it completes.
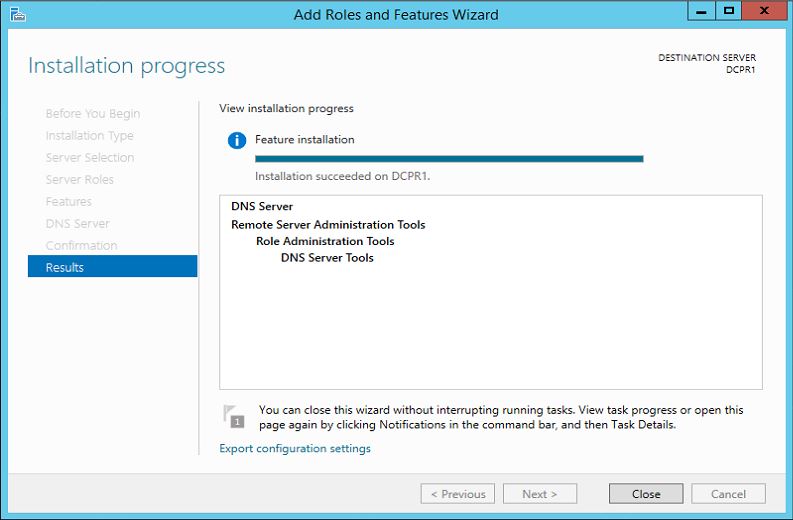
Once its completes click on close.
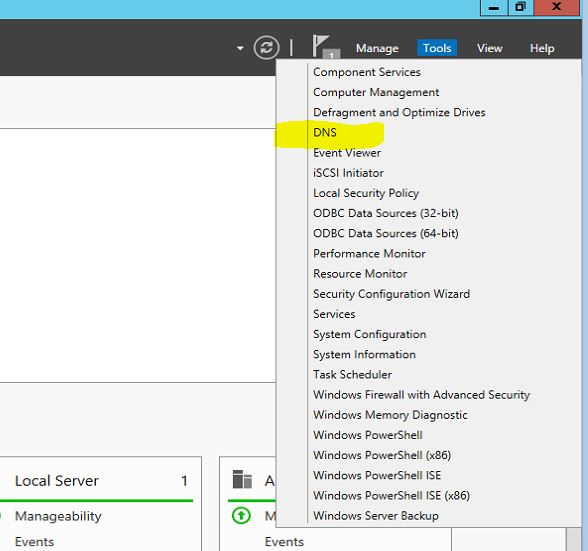
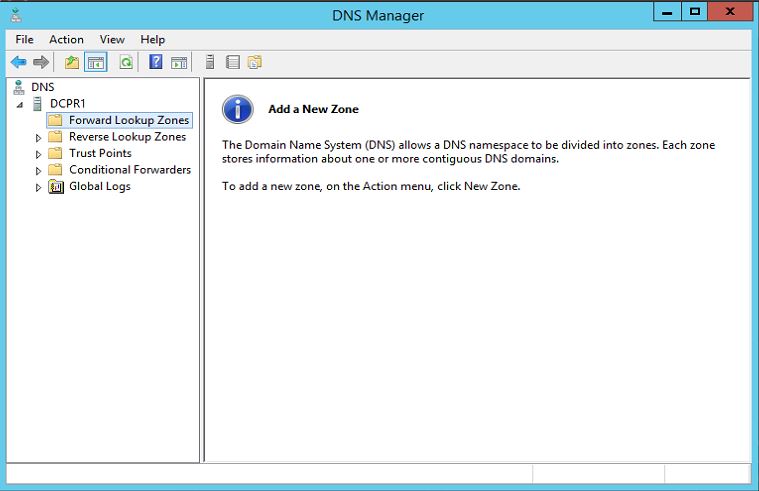
Then you can access DNS server using server manager > tools > DNS
Now we have every thing ready for AD install. so lets load server manager again and click on «Add roles and features»
Then it will load the «Add roles and features» wizard. click on next to continue.
In next window keep «Role-based or feature-based installation» default selection and click on next.
In next window we can select which server to install role. in our case it will be local. so keep the default selection and click on next.
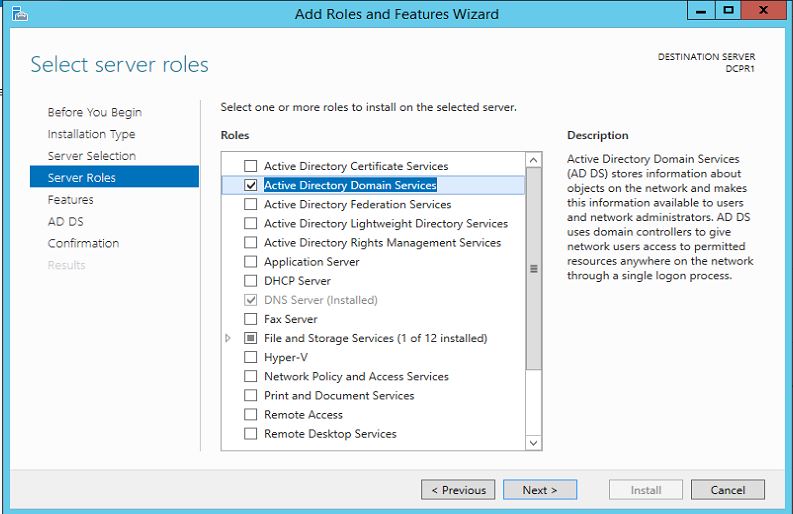
In next window it gives option to select the roles. select and click on tick box «Active Directory Domain Services»
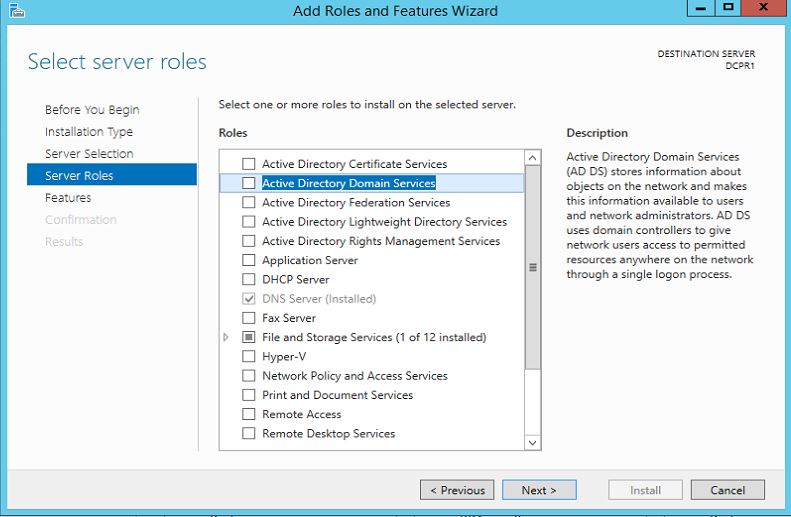
Then it will prompt window to indicate the additional feature installations related to selected role. click on «Add Features» to continue.
Then in next window click on next to continue
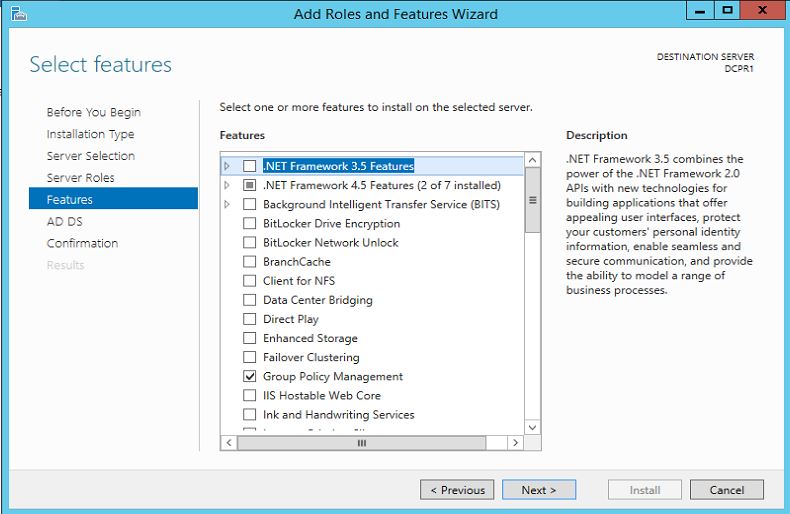
In next window it will give option to select addtional feature to install. but i will keep the default selection. click next to install.
In next window it give brief description about the AD service. click on next to continue.
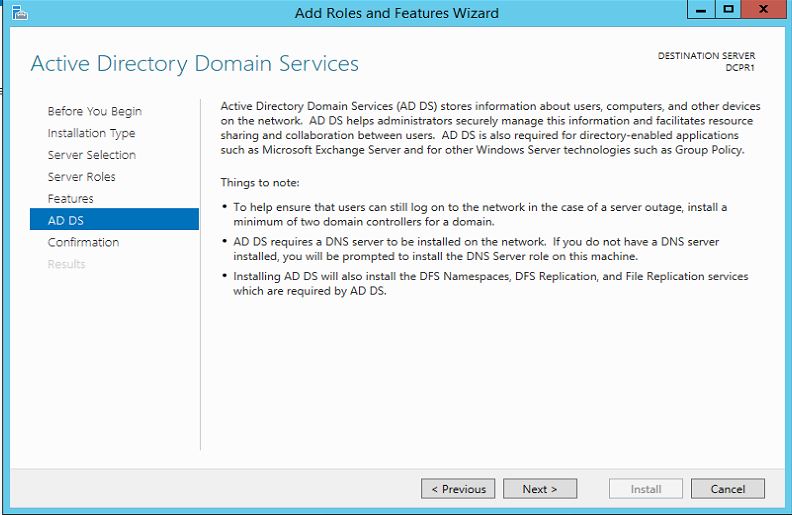
In next window it gives brief about the installation. click on «install» to start the installation.

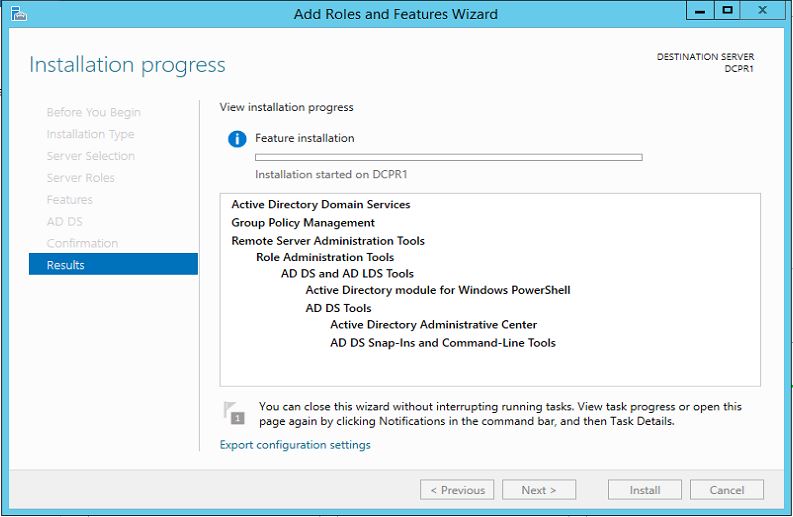
In next window it will begins the service install and we have to wait till it finish.
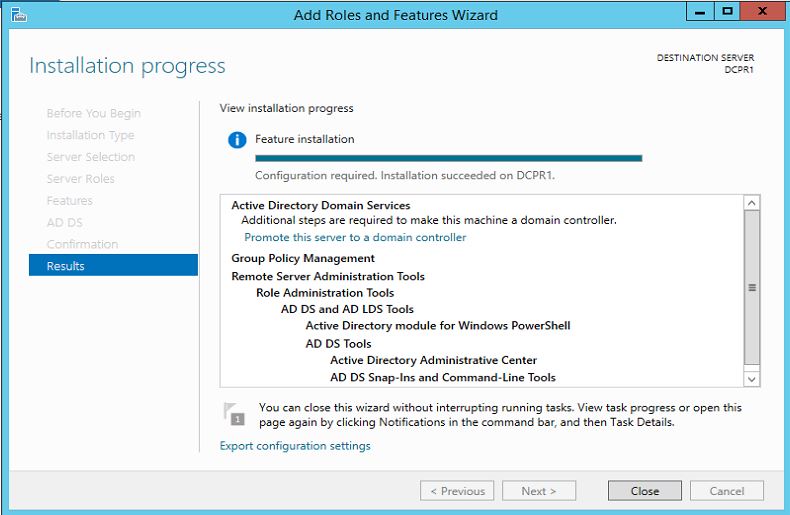
Once it finish click on «close» to exit from the wizard. then next step is to reboot the server to complete the installation.
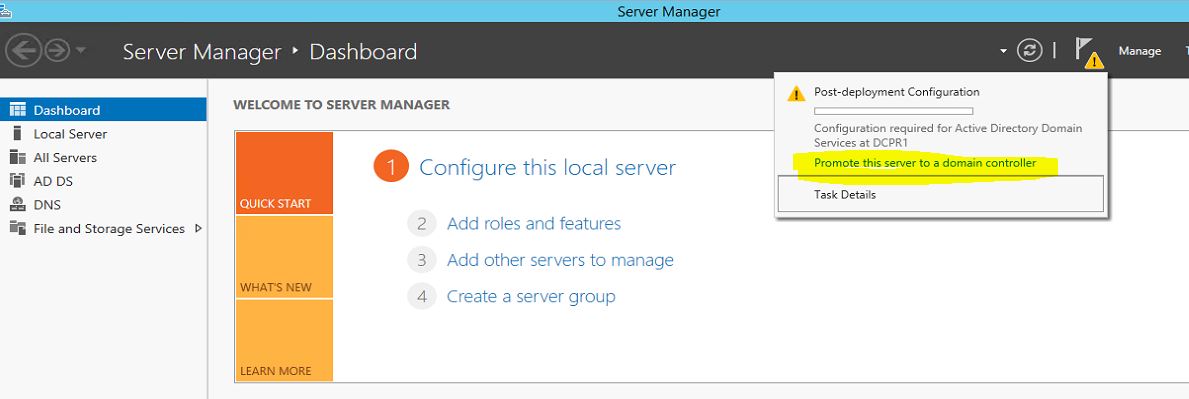
After that completes we need to start on the DC setup. to start that open the «Server Manager» and click Task flag on right hand corner. then it will list option as below picture. click on «promote this server to a domain controller» option ( highlighted with yellow in picture)
Then it starts the DCPROMO wizard. on the first window since its going to be new forest i have selected option «Add a new forest» and i typed the domain name «contoso.com» which i will be using on the forest. once fill the info click on «next» to continue.

In next window we can select the forest and domain functional levels. i will keep it default. then in domain controller capabilities its by default selected DNS server and Global Catalog as its first DC in the forest. then we need to defined password to use in DC recovery. click on next to continue.

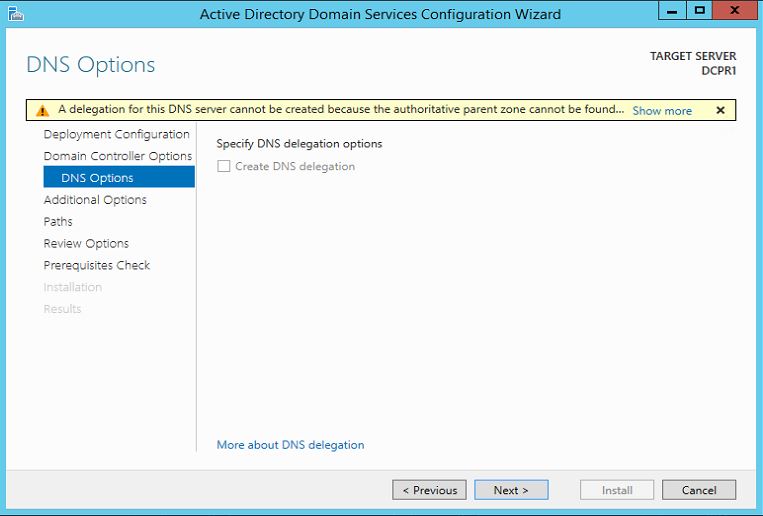
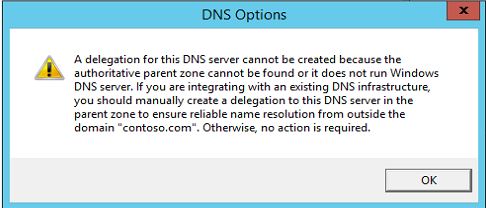
In next window it will give following error but it can be ignore. click on next to continue.
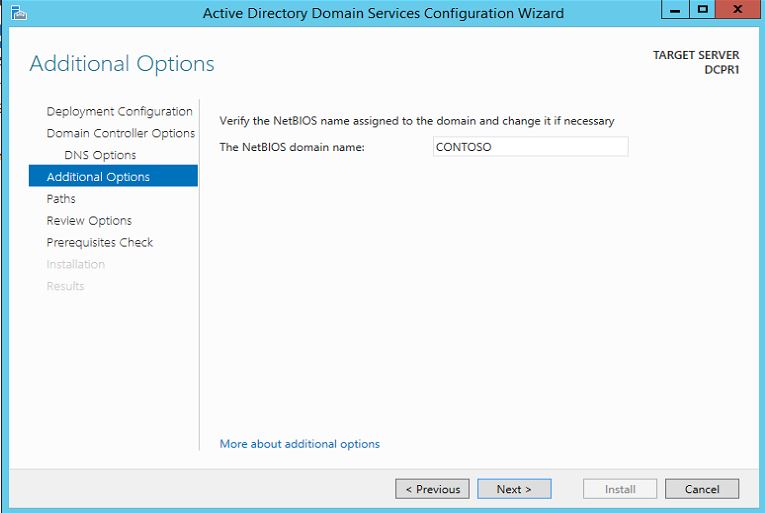
In next window it ask for the netbios name. we can keep it default and click on next to continue.
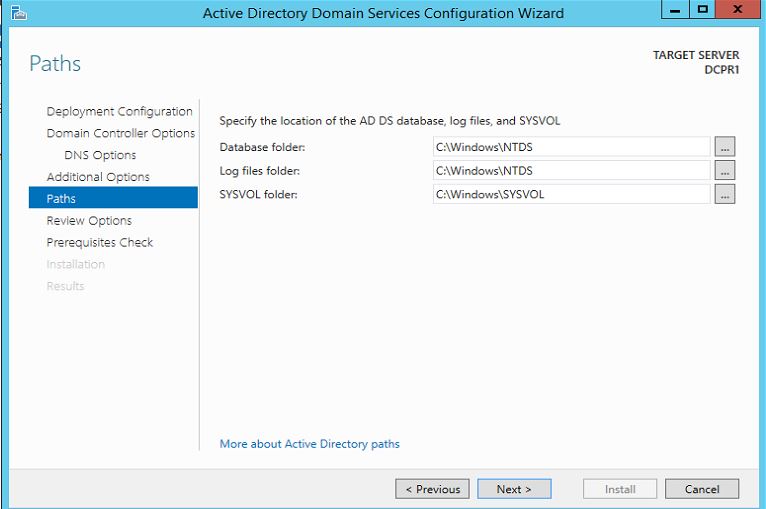
In next window it give option to change file paths for AD database, log files and SYSVOL files. we can change the paths or keep them defaults. once changes are done click on next to continue.
In next window it gives description about the installation. click on next to continue.
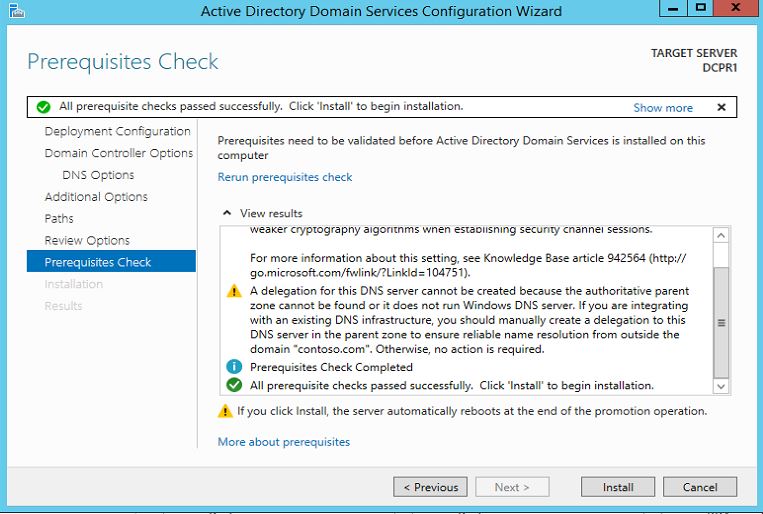
In next window it will run system check and verify system is compatible with the selected installation. once test completes successfully click on install button to begin the installation. if its passes any critical errors those needs to be address before the installation begin.
then it will start the install and we need to wait till it finishes.
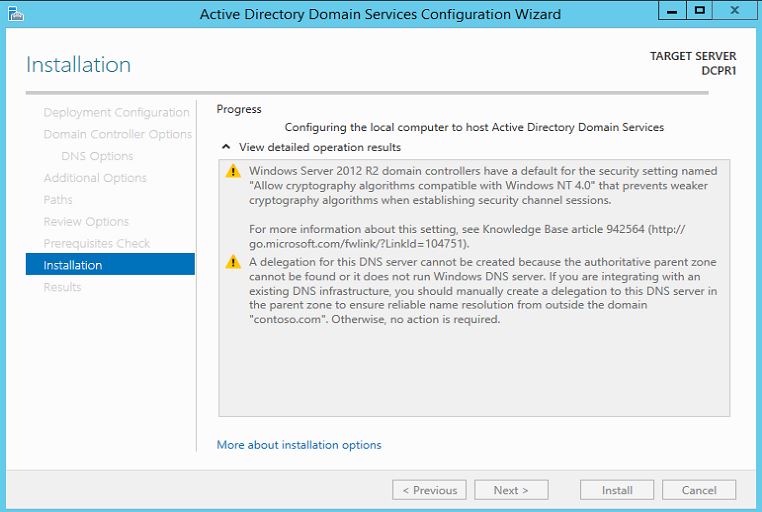
Once its complete the install it will automatically reboot the server.
Once server is rebooted log in to server using domain admin credentials.
In our demo it will be in format of
user : contoso\Administrator
password : XXXXXXXXX
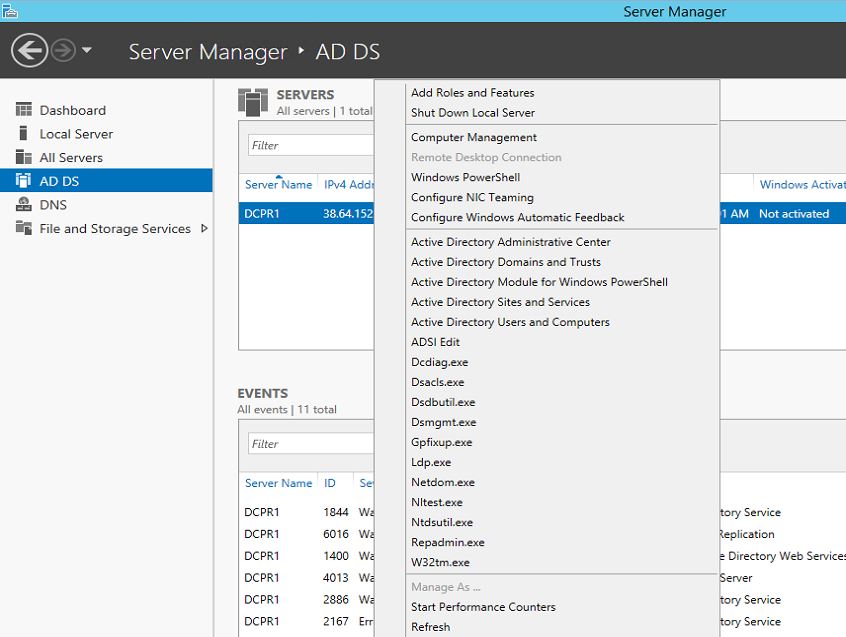
Once login, load the «Server manager» and click on «AD DS» option in right hand list. then select and right click as showed in screenshot to start with AD configuration.
Now we successfully completed with the DC setup on server 2012 R2. if you have any issue about the steps feel free to contact me on rebeladm@live.com