
Applies ToWindows 11 Windows 10
В этой статье описываются действия входа, выхода, блокировки и переключения учетных записей пользователей в Windows. Чтобы узнать больше, разверните следующие разделы.
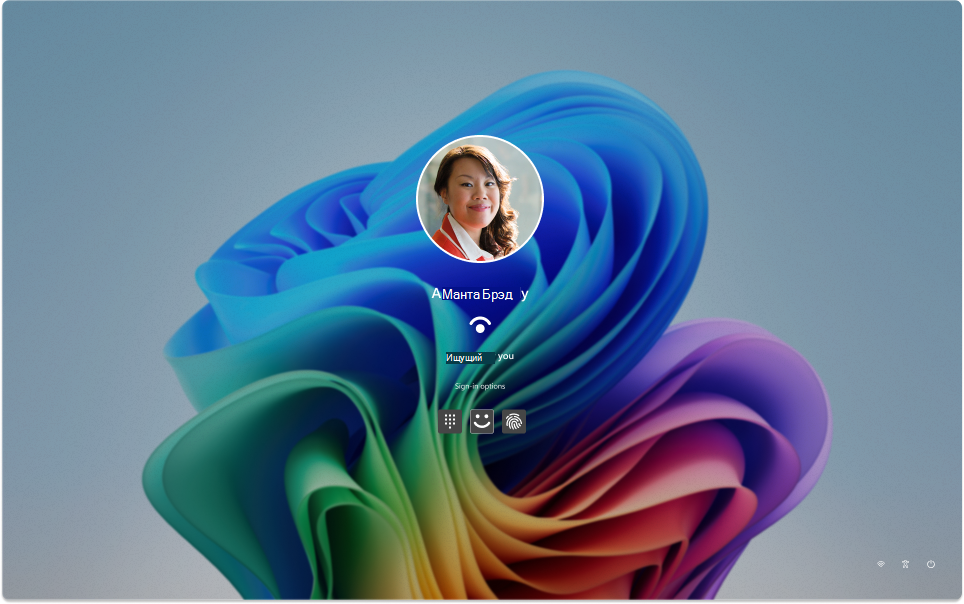
Вход в Windows — это процесс проверки личности для получения доступа к устройству с Windows. Этот процесс помогает защитить персональные данные и параметры от несанкционированного доступа.
При входе вы можете использовать пароль, ПИН-код или биометрические данные, такие как отпечатки пальцев или распознавание лиц, если у вас настроено Windows Hello.
-
Включите устройство. Если он уже включен, убедитесь, что вы находитесь на экране входа.
-
При появлении запроса выберите свою учетную запись. Если вы единственный пользователь, ваша учетная запись должна быть выбрана по умолчанию.
-
Введите пароль или ПИН-код, если он настроен. Если вы используете учетную запись Майкрософт, убедитесь, что используете пароль для этой учетной записи.
Если вы настроили Windows Hello, вы можете использовать распознавание лиц, отпечатки пальцев или ПИН-код вместо пароля для более быстрого и безопасного входа.
После ввода учетных данных нажмите клавишу ВВОД или щелкните стрелку входа, чтобы получить доступ к рабочему столу Windows.
Если у вас возникли проблемы со входом, вы можете сбросить пароль или ПИН-код на экране входа. Найдите ссылку Я забыл пароль или забыл ссылки на ПИН-код , чтобы начать процесс сброса.
-
Проблемы с Windows Hello см. в статье Устранение неполадок с Windows Hello
-
Для локальной учетной записи следуйте инструкциям в разделе Сброс пароля локальной учетной записи Windows.
-
Сведения о пин-коде см. в статье Сброс ПИН-кода, если вы не вошли в Windows.
Выход из Windows — это процесс закрытия сеанса и обеспечения того, чтобы ваша учетная запись больше не была активна на устройстве. Это помогает обеспечить безопасность и конфиденциальность вашей учетной записи, так как запрещает другим пользователям доступ к вашим личным файлам, приложениям и параметрам.
При выходе все открытые приложения закрываются, и несохраненные трудоемки могут быть потеряны. Всегда рекомендуется сохранить работу перед выходом.
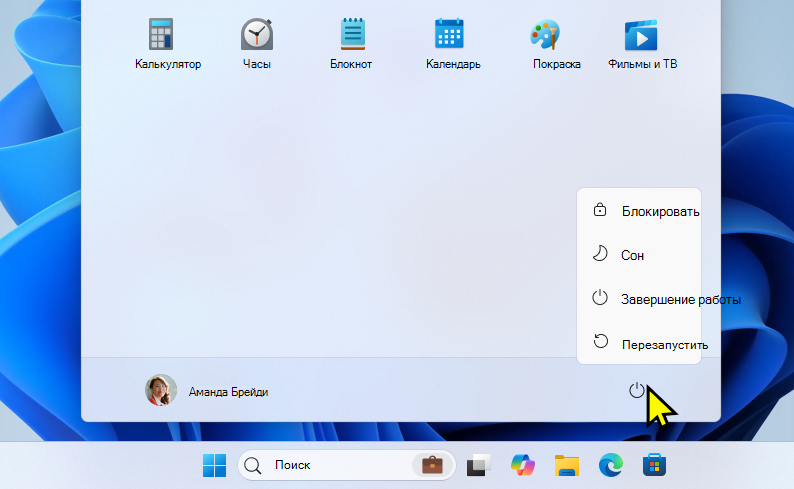
Чтобы выйти из Windows, нажмите кнопку Пуск , выберите изображение пользователя или значок Учетные записи и нажмите кнопку Выйти.

Блокировка устройства с Windows позволяет быстро защитить устройство, сохраняя приложения и файлы открытыми в фоновом режиме. При блокировке устройства любой пользователь, пытающийся получить к нему доступ, должен ввести пароль, ПИН-код или использовать биометрическую проверку подлинности, если вы настроили Windows Hello. Это полезно, если вам нужно отойти от устройства, но не хотите закрывать все, над чем вы работаете.
Чтобы заблокировать устройство с Windows, вы можете:
-
НажмитеКлавиша Windows + L на клавиатуре
-
Кроме того, выберите Пуск, щелкните значок питания и нажмите кнопку Заблокировать.
Примечание: В более ранних версиях Windows 11 действие «Блокировка» отображалось в меню «Учетные записи».
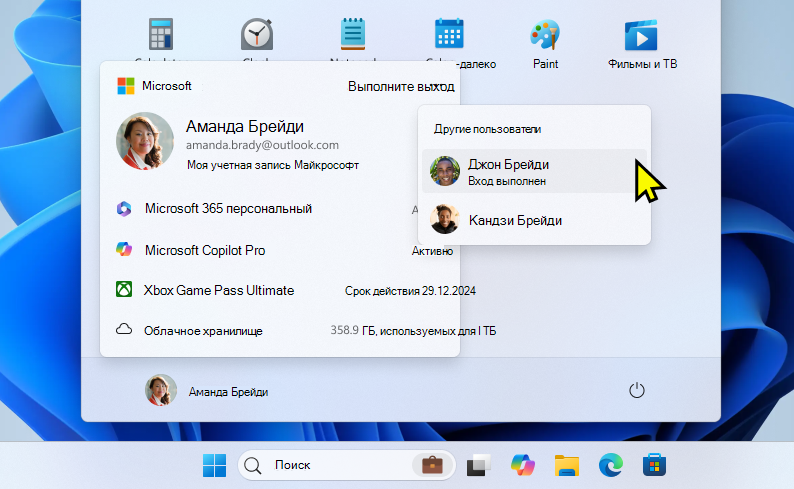
При переключении учетных записей пользователей в Windows вы перемещаетесь между разными учетными записями пользователей на одном устройстве, не закрывая приложения и не завершая текущий сеанс. Это позволяет нескольким пользователям быстро получить доступ к своим учетным записям и рабочим областям, не нарушая поток работы. Это особенно полезно, если устройство совместно используется несколькими пользователями.
Чтобы переключить пользователя, нажмите кнопку Пуск , выберите изображение пользователя или значок Учетные записи и выберите . Затем выберите учетную запись пользователя, на которую вы хотите переключиться.
Примечание: на устройствах, управляемых организацией, у вас есть дополнительный параметр Переключить пользователя.
Нужна дополнительная помощь?
Нужны дополнительные параметры?
Изучите преимущества подписки, просмотрите учебные курсы, узнайте, как защитить свое устройство и т. д.
Switching users in Windows 11 is a straightforward process that allows multiple people to use the same computer without closing each other’s programs or logging out. You just need to navigate through the Start Menu and select the desired user. This feature is especially useful for families or shared computers in an office setting, where different individuals need to access their personal files and settings without interrupting others. Follow the steps below to switch users seamlessly and efficiently in Windows 11.
Switching users in Windows 11 enables different people to use the same computer without signing out of any ongoing sessions. This can be handy when multiple users share a PC and want to access their files and settings without disrupting others. Let’s dive into the steps.
Step 1: Open the Start Menu
Click on the Start button located at the bottom-left corner of the screen.
The Start Menu is your gateway to all things Windows. Clicking it opens up various options like installed applications, system settings, and quick access to user accounts. Familiarize yourself with this section as it’s key to navigating Windows 11.
Step 2: Access the User Icon
Locate and click on your user icon in the lower-left corner of the Start Menu.
This icon usually shows your profile picture or just a simple silhouette. By clicking on it, a menu will appear showing all the user accounts available on the computer, making it easy to select and switch to another user.
Step 3: Select Another User
Choose the desired user account from the list that appears.
Each listed account represents a different user profile saved on your Windows 11 system. Clicking on a different user account will prompt Windows to switch to that account without signing you out of your current session.
Step 4: Enter the Password
If prompted, enter the password for the selected user account.
Depending on the security settings, you might need to enter a password or use another form of authentication, such as a PIN or fingerprint, to access the selected account. This step ensures that only authorized users can access their own profiles.
Step 5: Wait for the Profile to Load
Allow the system a moment to load the new user’s profile.
Windows will take a few seconds to switch to the selected user, during which it loads the desktop, applications, and settings associated with that account. Patience is key here, especially if the user’s profile is resource-heavy.
After you complete these actions, Windows 11 will switch to the selected user account, and the new user’s desktop and settings will appear. This seamless transition allows multiple users to access their accounts without disrupting each other’s work or open applications.
Tips for Switching Users in Windows 11
- Ensure all unsaved work is saved before switching users to prevent data loss.
- Set up a password or PIN for each user to maintain privacy.
- Regularly update your Windows 11 to get the latest features and security patches.
- Use the Windows key shortcut (Ctrl + Alt + Del) for quicker access to user switching.
- Customize profiles with unique backgrounds to easily identify each account.
Frequently Asked Questions
Can I switch users without logging out?
Yes, switching users lets you change accounts without logging out, keeping your apps and work intact.
What if I forget my password when switching users?
Use the “Forgot Password” option or reset your password using another admin account.
Is it possible to have multiple user accounts on Windows 11?
Absolutely! You can create several user accounts, each with unique settings and files.
Does switching users affect open applications?
No, switching users preserves the state of open applications in each user’s profile.
Can I switch users while an application is running?
Yes, but it’s best to save all work to avoid losing data during the switch.
Summary
- Open the Start Menu.
- Access the user icon.
- Select another user.
- Enter the password.
- Wait for the profile to load.
Conclusion
Switching users in Windows 11 is a breeze once you get the hang of it. It’s like having multiple virtual rooms in one house, each customized to its inhabitant’s liking. You don’t have to pack up your things each time someone else wants to use the space—everything remains as you left it, ready for when you return.
By following these simple steps, you can easily navigate between user accounts, ensuring a smooth and uninterrupted computing experience for everyone involved. Whether you’re in a bustling office or a busy household, knowing how to switch users efficiently can save you time and hassle.
For more tech tips and tricks, keep exploring the vast landscape of Windows 11. It’s packed with features designed to enhance your digital life. Happy computing!
Matthew Burleigh has been writing tech tutorials since 2008. His writing has appeared on dozens of different websites and been read over 50 million times.
After receiving his Bachelor’s and Master’s degrees in Computer Science he spent several years working in IT management for small businesses. However, he now works full time writing content online and creating websites.
His main writing topics include iPhones, Microsoft Office, Google Apps, Android, and Photoshop, but he has also written about many other tech topics as well.
Read his full bio here.
Все способы:
- Способ 1: Меню «Пуск»
- Способ 2: Окно завершения работы
- Способ 3: Окно параметров безопасности
- Способ 4: «Диспетчер задач»
- Способ 5: «PowerShell» (только Windows 11 Pro и Enterprise)
- Способ 6: Создание ярлыка (только Windows 11 Pro и Enterprise)
- Вопросы и ответы: 0
Способ 1: Меню «Пуск»
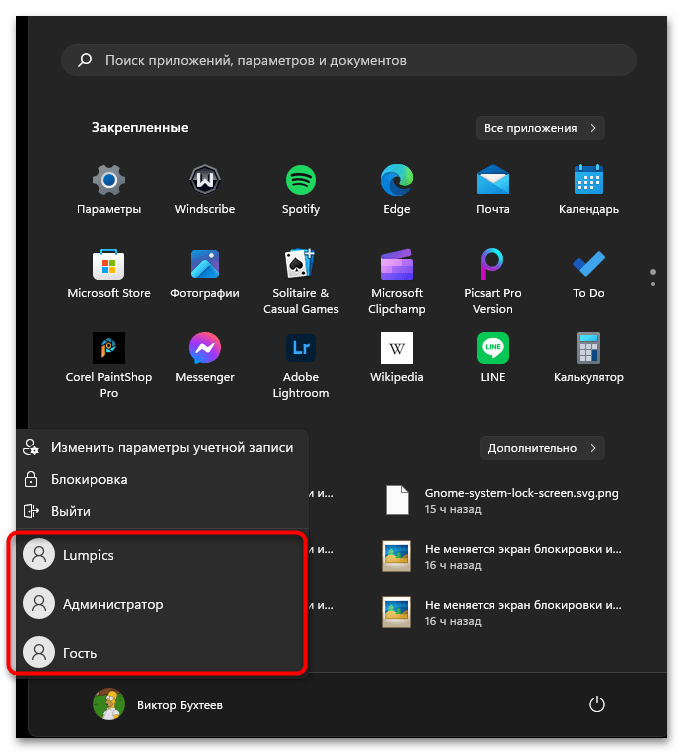
Смена пользователя в Windows 11 осуществляется несколькими разными методами, каждый из которых будет удобен в определенных ситуациях. При помощи нужного списка в «Пуске» можно вызвать список существующих учетных записей и выбрать, на которую из них переключиться. Это самый удобный вариант для тех, кто не хочет использовать горячие клавиши.
- Вызовите меню «Пуск» и нажмите по имени текущей учетной записи.
- В списке вы увидите перечень других созданных профилей. Достаточно кликнуть левой кнопкой мыши по нужной, чтобы запустить процесс переключения.
- Дополнительно можно выбрать вариант «Блокировка» или «Выйти». Одним из этих действий вы переключаетесь на экран блокировки, с которого можно не только повторно войти в текущую учетную запись, но и выбрать другую для переключения.

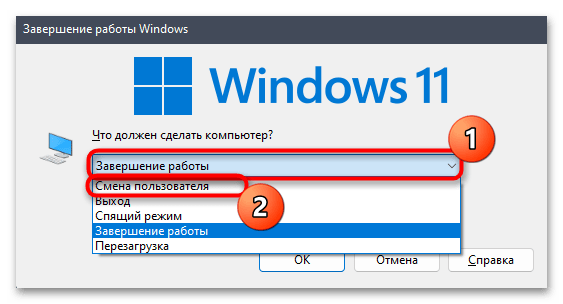
Способ 2: Окно завершения работы
В Виндовс 11 можно при помощи сочетания клавиш Alt + F4 вызвать окно завершения работы, в котором по умолчанию выбирается действие выключения, но его можно поменять, раскрыв список и выбрав пункт «Смена пользователя». Если собираетесь использовать данное сочетание, то учитывайте, что зажимать его нужно на рабочем столе. Если сделать это в активном окне, то оно будет просто закрыто.
Способ 3: Окно параметров безопасности
Вы наверняка слышали о комбинации клавиш Ctrl + Alt + Del и, возможно, даже использовали ее, когда не получалось взаимодействовать с графическим меню операционной системы, но нужно было выключить компьютер, перезагрузить его или открыть тот же «Диспетчер задач» для завершения процессов. Эта комбинация клавиш отвечает за открытие окна с параметрами безопасности. Ниже вы видите обозначение каждой клавиши из сочетания на клавиатуре.
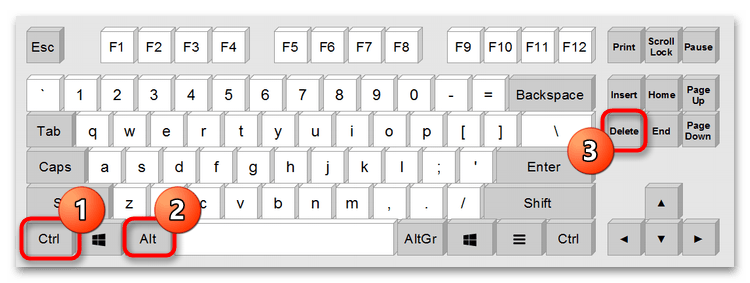
Нажмите Ctrl + Alt + Del и дождитесь отображения списка с доступными действиями. Выберите пункт «Сменить пользователя» и ожидайте перехода на приветственный экран операционной системы.
Учитывайте, что все задачи и активные процессы, которые сейчас развернуты для текущей учетной записи, будут завершены при переключении. Не забудьте перед этим сохранить все изменения, чтобы не потерять важную информацию.
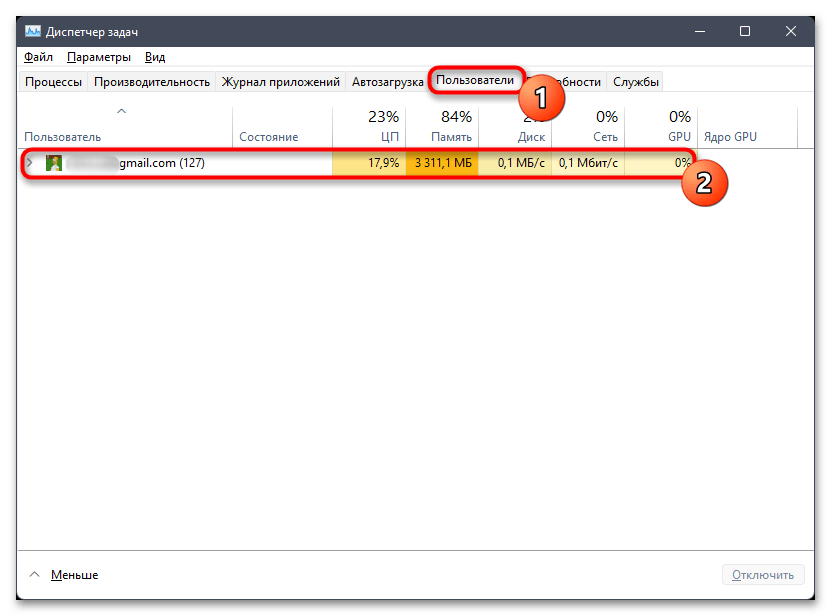
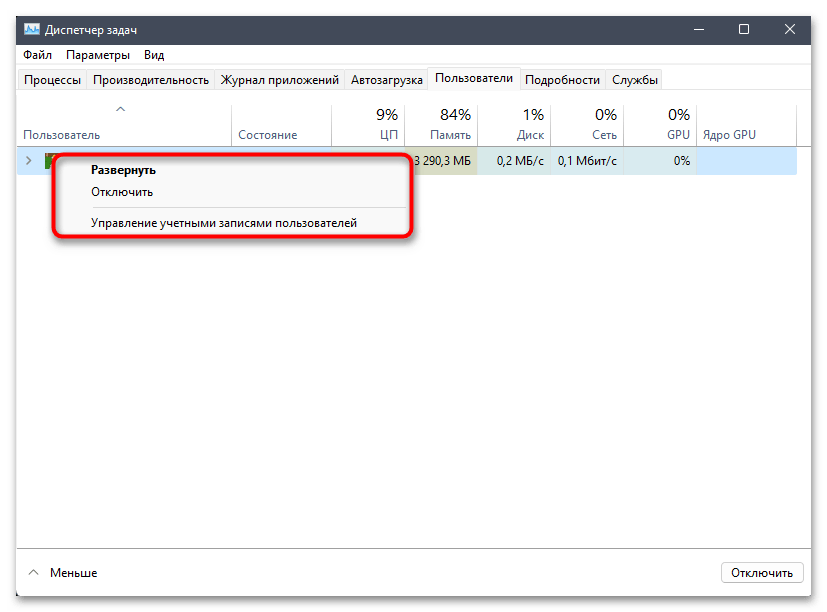
Способ 4: «Диспетчер задач»
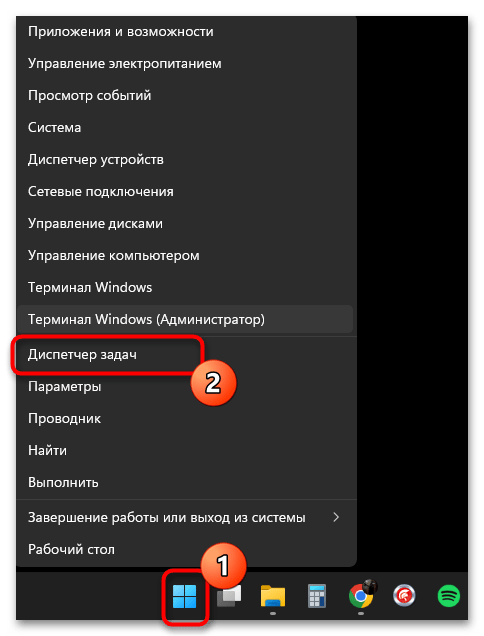
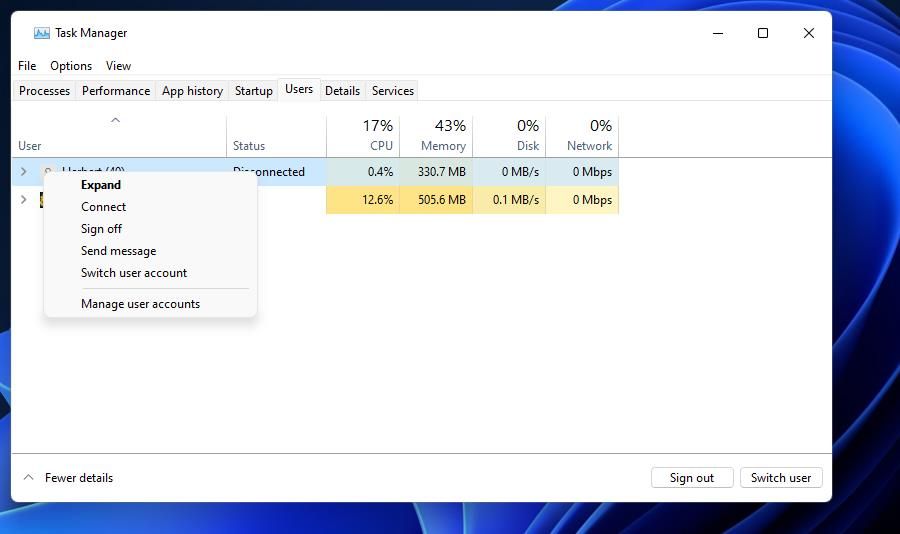
Метод с использованием «Диспетчера задач» подойдет в тех случаях, когда вы уже авторизовали в операционной системе второго пользователя, то есть переключались между учетными записями одним из других предложенных методов. В таком случае в соответствующем разделе данного приложения создается запись об активности профиля, через контекстное меню которой можно выбрать пункт для быстрого переключения.
- Щелкните правой кнопкой мыши по «Пуску» и из появившегося контекстного меню выберите пункт «Диспетчер задач».
- Перейдите на вкладку «Пользователи» и посмотрите, есть ли здесь дополнительные профили помимо текущего.
- Если да, нажмите по тому, на который хотите переключиться, ПКМ и выберите из появившегося меню пункт «Сменить учетную запись». Далее произойдет стандартное переключение на профиль другого пользователя.
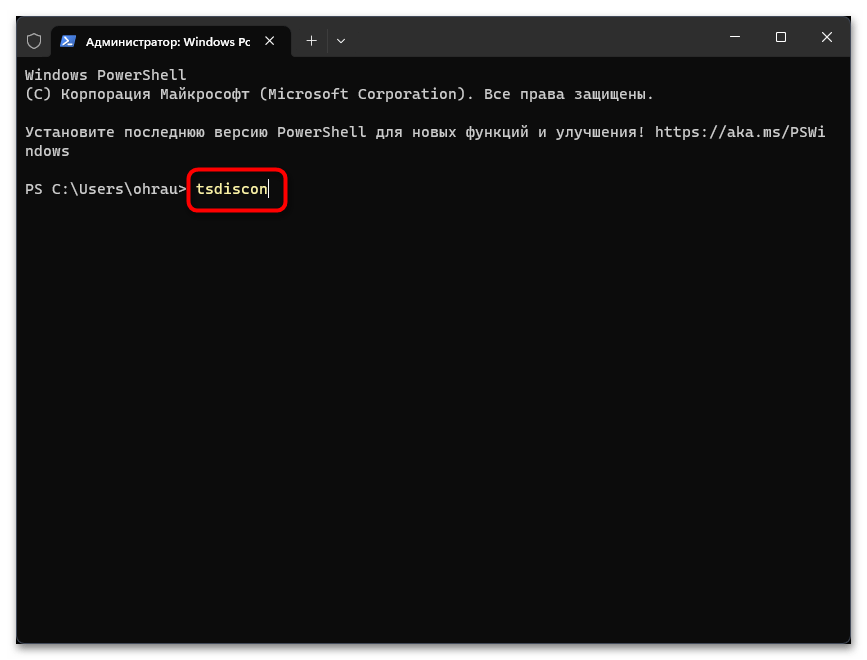
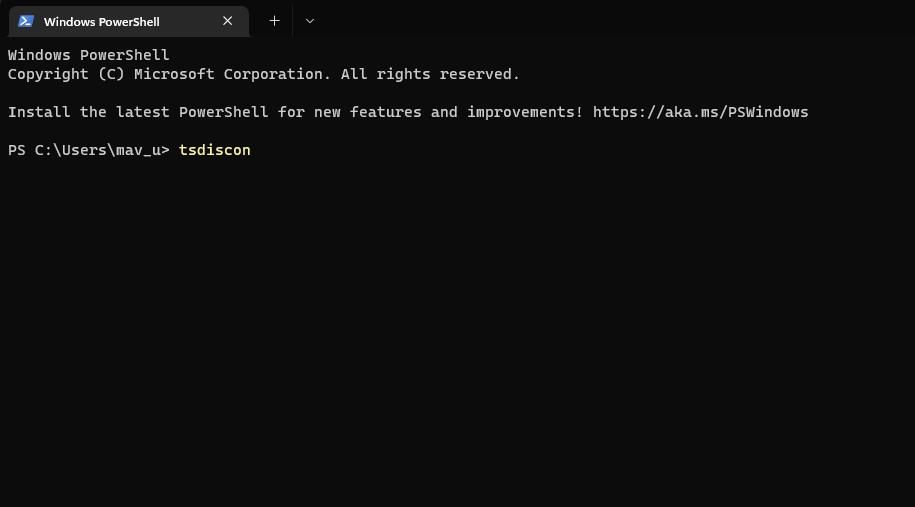
Способ 5: «PowerShell» (только Windows 11 Pro и Enterprise)
Для редакций Windows 11 Pro и Enterprise доступны некоторые уникальные функции, которые отсутствуют в других. Сюда относится и одна из команд для «PowerShell», при помощи которой можно быстро перейти к смене учетной записи. Она инициирует переход на экран блокировки, откуда вы уже вызываете список профилей и выбираете нужный для авторизации в операционной системе.
- Нажмите правой кнопкой мыши по «Пуску» и из списка выберите пункт «Терминал Windows (Администратор)».
- В появившемся окне консоли введите команду
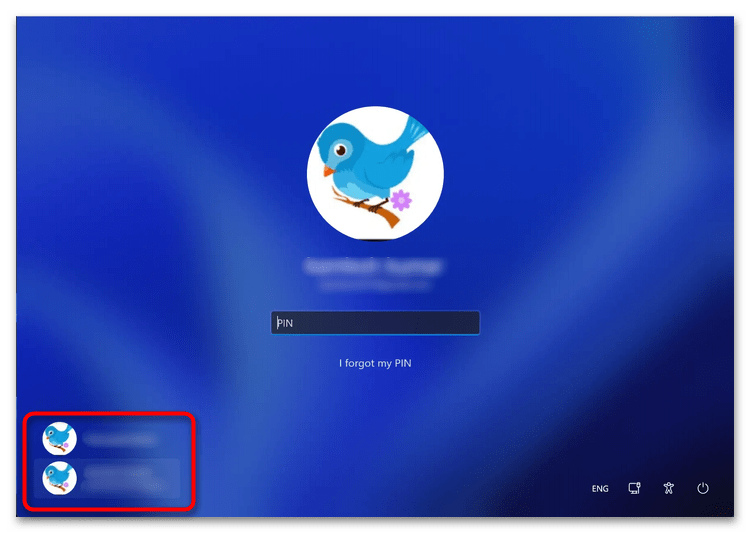
tsdisconи нажмите Enter для ее подтверждения. - После перехода на экран блокировки посмотрите на список пользователей слева и выберите, на который из них вы хотите переключиться. При наличии PIN-кода или пароля понадобится сначала ввести его, чтобы разблокировать аккаунт.
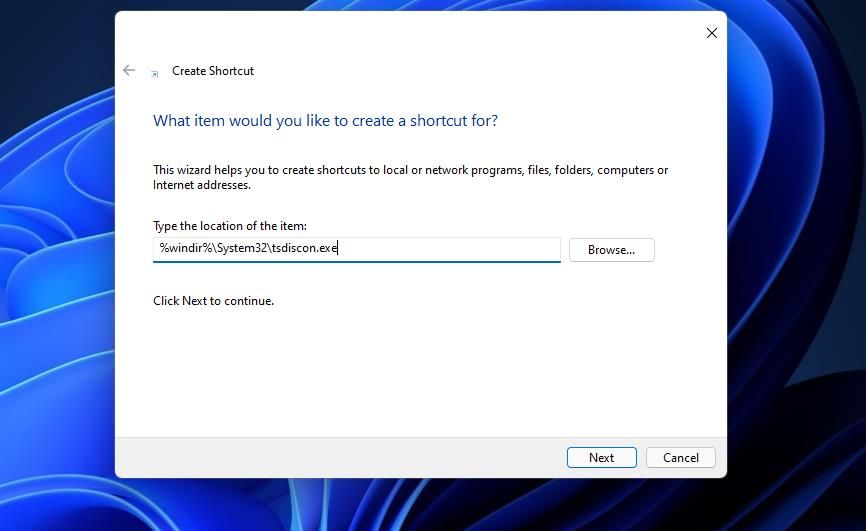
Способ 6: Создание ярлыка (только Windows 11 Pro и Enterprise)
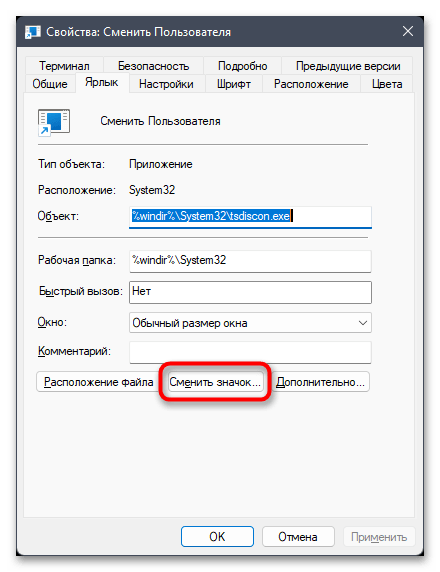
Следующий способ тоже подходит исключительно для Windows 11 Pro и Enterprise, поскольку подразумевает обращение к той же самой утилите, которая использовалась в предыдущем методе. Однако на этот раз ее вызов будет инициирован через ярлык на рабочем столе или в любой удобном для вас каталоге. Нужно только создать его с правильными параметрами и для красоты поставить иконку.
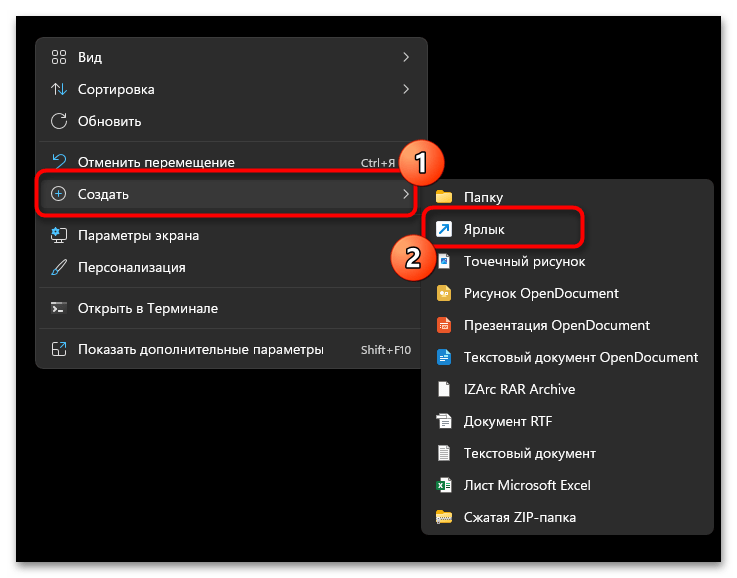
- Нажмите по пустому месту на рабочем столе правой кнопкой мыши, наведите курсор на «Создать» и выберите пункт «Ярлык».
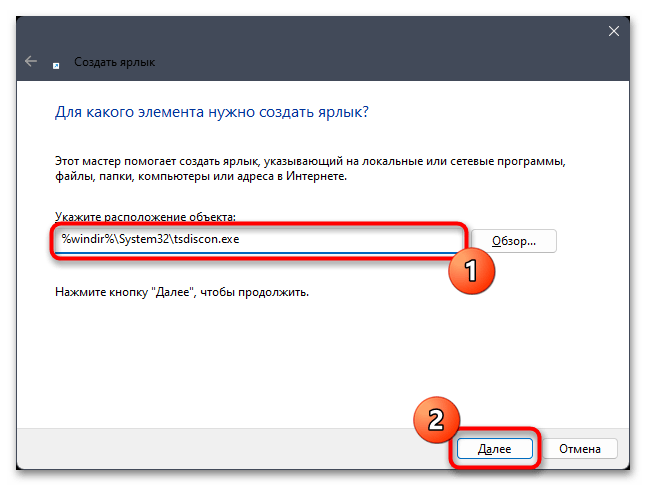
- В качестве расположения объекта укажите
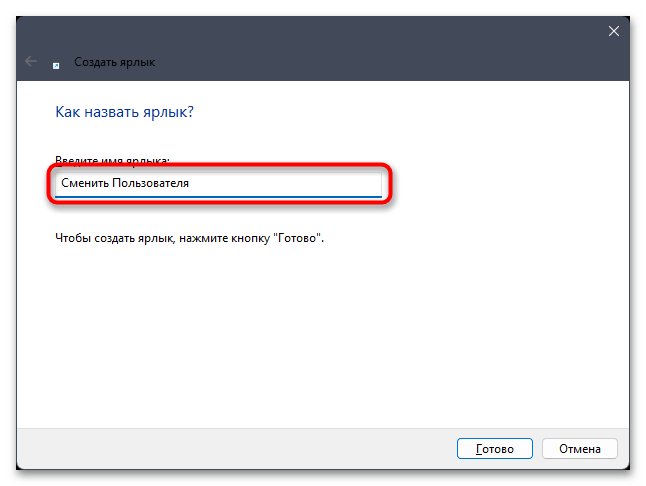
%windir%\System32\tsdiscon.exeи переходите к следующему шагу, нажав по «Далее». - Задайте любое удобное название для данного ярлыка, чтобы вы понимали, для чего он предназначен.
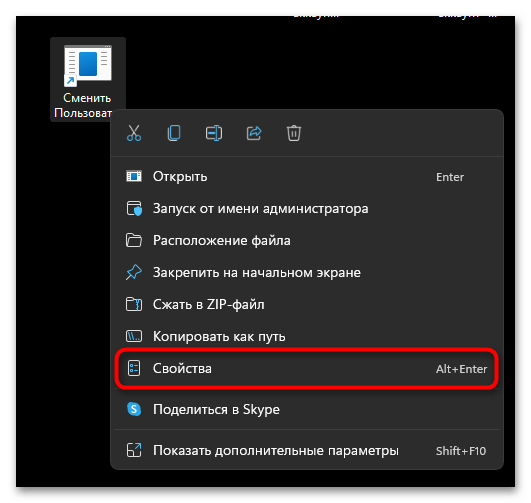
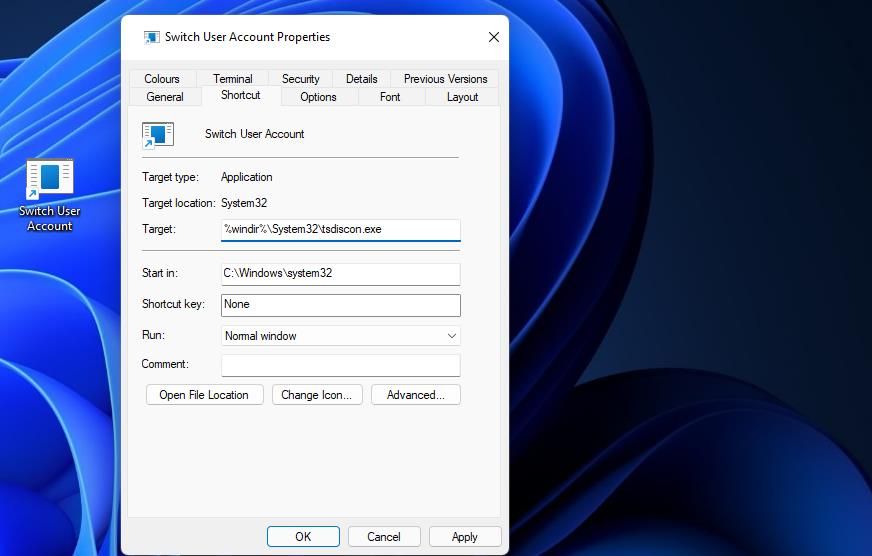
- Его создание заканчивается после нажатия по кнопке «Готово», и ярлык уже можно использовать для смены пользователя. Однако для него не будет присвоена иконка. Давайте поменяем это, перейдя в «Свойства» ярлыка через его контекстное меню.
- В новом окне нажмите по «Сменить значок».
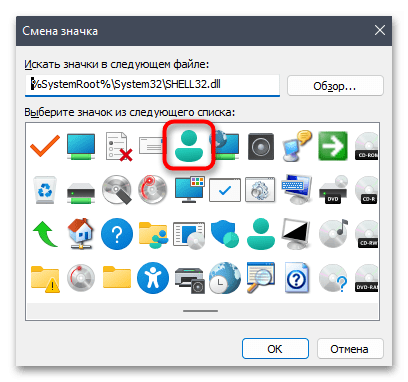
- Найдите в списке стандартных иконок ту, которая кажется вам наиболее подходящей. Вы также можете скачать иконку из интернета (в формате ICO) и воспользоваться ей.
- Подтвердите свой выбор и переходите к использованию ярлыка. Щелкните по нему дважды и дождитесь отображения экрана блокировки. Через него переключите пользователя, чтобы войти в ОС.
Наша группа в TelegramПолезные советы и помощь
Do you have multiple user accounts on your Windows 11 PC? If so, you might sometimes need to sign in to a different user account to access files in it.
However, you don’t have to shut down or restart Windows to log in to another user account. You can instead quickly switch to a different user account while keeping the current one in the background. Here are six alternative ways to switch user accounts in Windows 11.
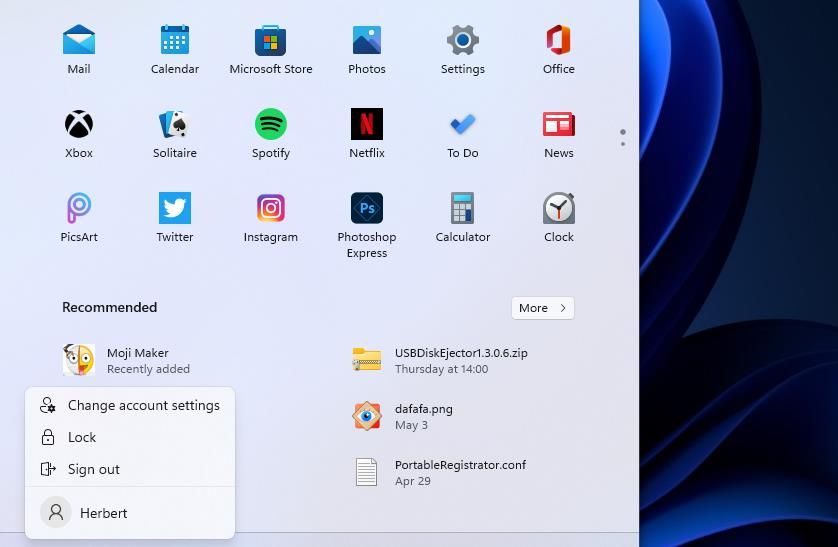
The Start menu includes an account profile icon. That icon’s menu includes a few user account options. You can select to switch accounts via that account profile icon like this:
- Press Start to view that button’s menu.
- Click the account profile icon at the bottom of the Start menu.
-
Select a user account to switch to from that menu.

- Enter the password for the selected account to sign in to it.
- Then can quickly switch between both accounts you’ve signed into from the Start menu without entering login details again.
2. Switch User Accounts With a Hotkey
Windows 11 has a rather useful Ctrl + Alt + Delete hotkey that opens a menu with five different options on it. Many users press that keyboard shortcut to access Task Manager and terminate non-responsive programs. However, you can also select a Switch user option on that menu to do just that. Then you can select a different user account from the login screen to sign in to it.
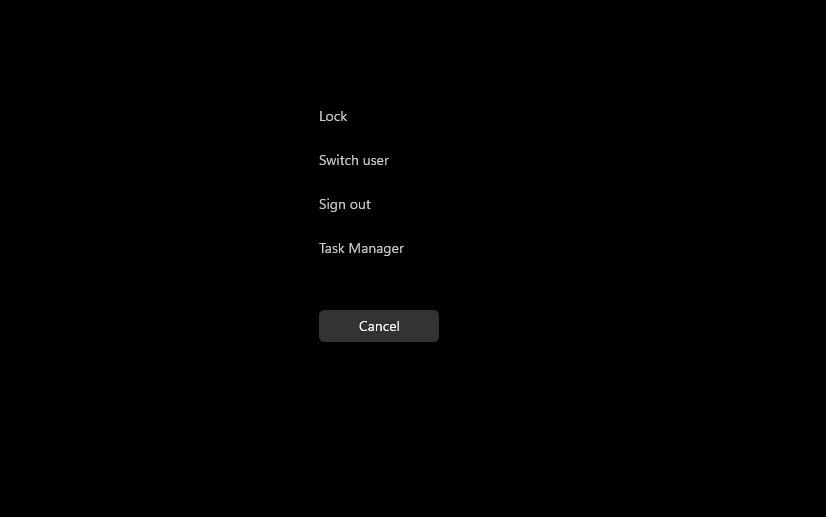
The Windows + L hotkey is another keyboard shortcut for switching users. Pressing that hotkey takes you to the lock screen. Then you can click once reach to reach the login screen, select a different account, and sign in to it.
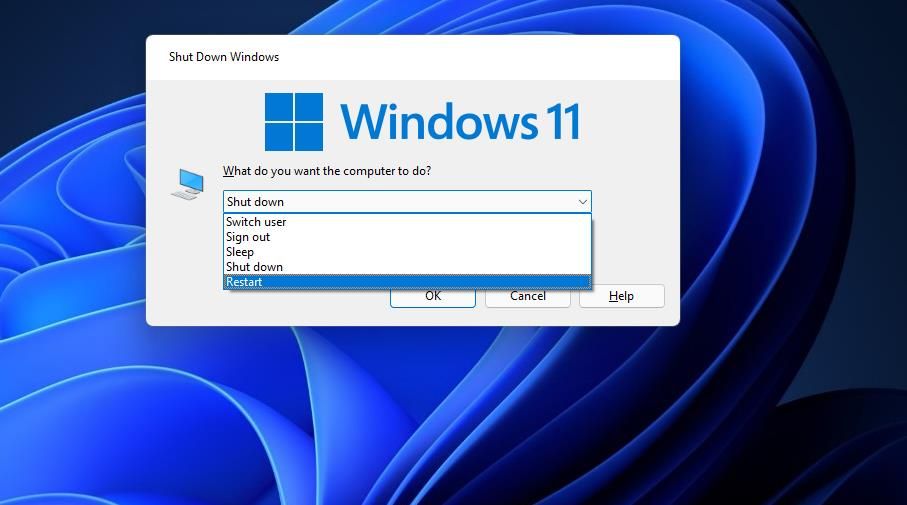
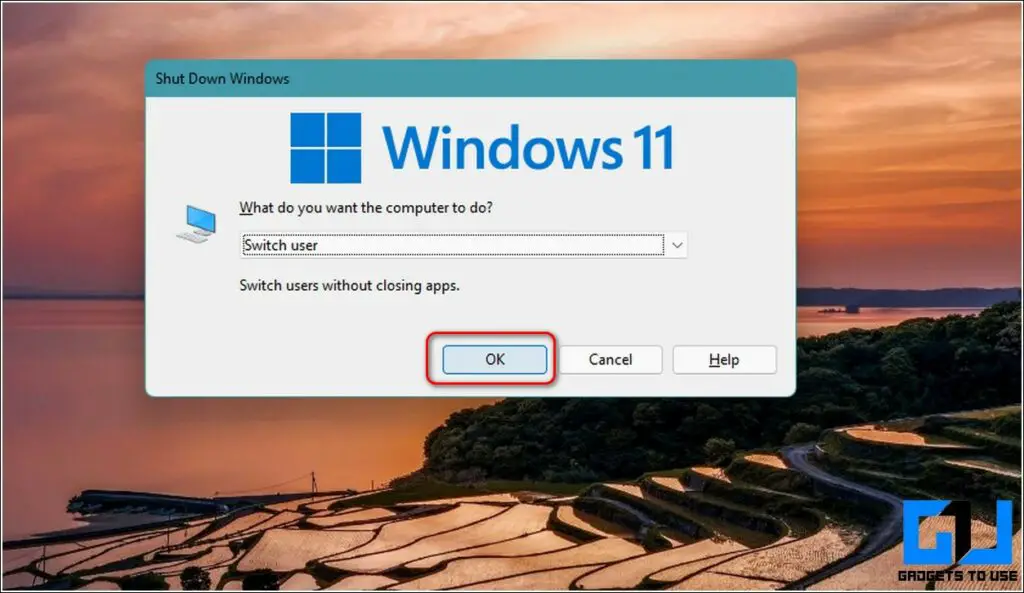
3. Switch User Accounts via the Shut Down Windows Window
The Shut Down Windows dialog is a window that includes five alternative shutdown options. Among them is a Switch user option you can select to, yup you guessed it, change to another account. This is how to switch users via the «Shut Down Windows» dialog:
- Press the Alt + F4 keys simultaneously.
-
Click the drop-down menu on the Shut Down Windows dialog to select Switch user.

- Select OK to return to the login screen.
- Then log in to a different account from there.
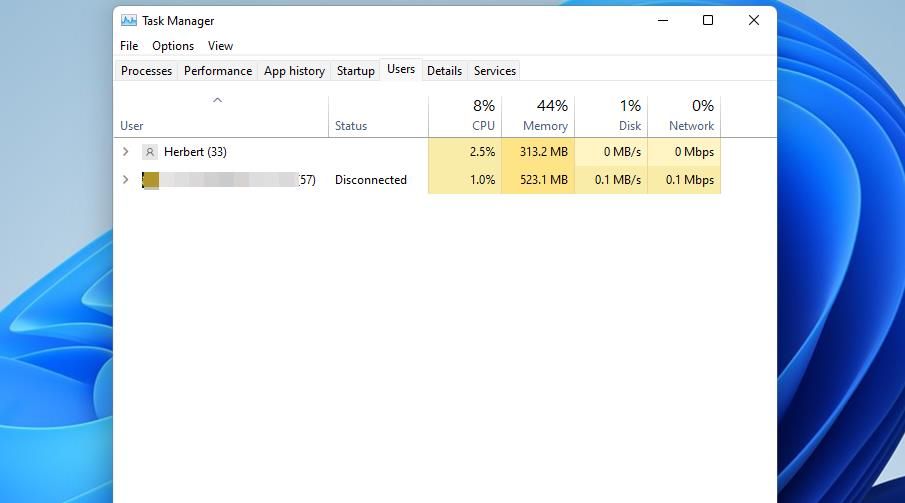
4. Switch User Accounts via Task Manager
Task Manager includes a Users tab that displays accounts you’ve signed in to. When you’ve already signed in to multiple accounts, you can select to switch users from that tab. These are the steps for switching users with Task Manager:
- Right-click somewhere on your taskbar to select the Task Manager context menu option.
-
Click the Users tab shown directly below.

-
Right-click an account to go to and select Switch user account.

- Type in login details for the user account you’re switching to.
5. Switch User Accounts via Windows Terminal (Windows 11 Pro and Enterprise Only)
Windows 11 Pro and Enterprise editions have a «tsdiscon» command-line utility for disconnecting from remote desktop sessions. You can switch between user accounts in Windows Terminal with tsdiscon in the Pro and Enterprise editions of Windows 11. This is how to switch accounts with tsidscon:
- Press and hold the Windows key and X simultaneously to view a Power User menu.
- Select the Windows Terminal (Admin) shortcut from that menu.
-
Input tsdiscon in a PowerShell or Command Prompt tab within Windows Terminal.

- Press Enter to execute the tsdiscon command, which locks the PC.
- Click to unlock the screen and select a user account to switch.
- Input the required password or code to sign in.
Windows 11 Home can’t switch users with the tsdiscon command. However, you can sign out of accounts in all Windows editions by entering a shutdown /l command instead. Executing that command closes all open software and signs you out of your current account. Then you can select to log in to a different account.
6. Switch User Accounts With a Desktop Shortcut (Windows 11 Pro and Enterprise Only)
You can set up a desktop shortcut for switching users based on tsidiscon. Again, however, this method is only applicable to Windows 11/10 Pro and Enterprise editions. These are the steps for adding a switch user shortcut to the desktop:
- Click an area of your desktop with the right mouse button and select New.
-
Select Shortcut on the context menu’s submenu.

-
Input %windir%\System32\tsdiscon.exe in the location text box, and select the Next option.

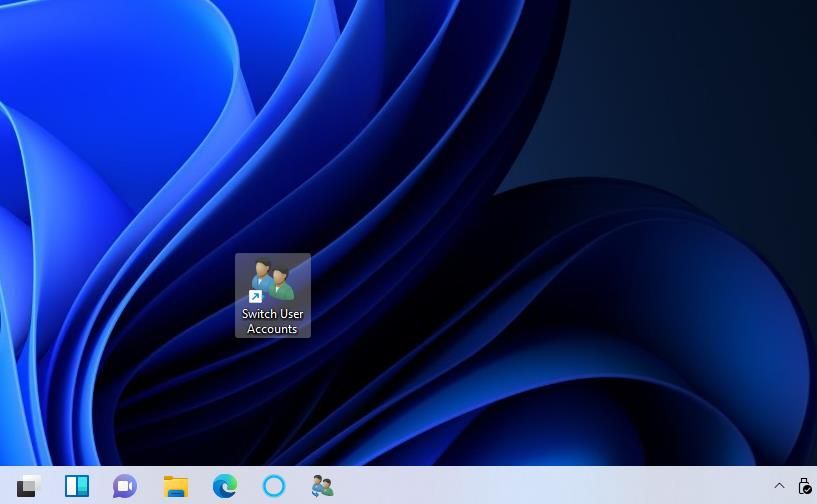
- Enter Switch User Account to be the shortcut’s title.
- Click Finish to add the Switch User Account shortcut.
- Now you can double-click your new Switch User Account shortcut on the desktop to return to the login screen. From there, you can sign in to a different account.
You can select a more appropriate icon for the Switch User Account shortcut if you like. The imageres.dll has some user-themed icons to choose from. This is how you can select an imageres.dll icon for your shortcut:
- Click the Switch User Account shortcut with the right mouse button to select Properties.
-
Select Change Icons on the Shortcut tab.

- Click the Browse button.
- Then select the imageres.dll file at the C:\Windows\System32\imageres.dll folder path.
- Click the Open button.
-
Choose an appropriate user account icon, and click the OK option.

- Click the Apply option to change your shortcut’s icon.
- Select OK to exit the shortcut’s properties window.
That desktop shortcut can be a taskbar or Start menu one if you prefer. Right-click the Switch User Account shortcut to select Show more options. Select the Pin to taskbar or Pin to Start menu option on the classic context menu. Then you can remove the Switch User Account shortcut from the desktop by right-clicking it to select Delete.
Which Method for Switching User Accounts Do You Prefer?
Switching user accounts with the methods above will enable you to enter different accounts without signing out and closing all open software in another. So, it’s more convenient to switch user accounts than completely signing out of one to log in to a different one. Choose whatever method for switching user accounts you prefer.
Quick Answer
- Similar to Command Prompt method, you can also use the Windows Powershell utility app to switch to a different user account in Windows 11.
- If you’ve logged in to your Windows 11 system and wish to change your user account, then you can easily do it with the help of the start menu.
- If you’ve multiple accounts in your Windows 11 system, you will see the listing of all the available accounts in the bottom left corner of the sign-in window.
Like previous versions, Windows 11 also offers the feature of multiple accounts to their users. Using this feature, you can seamlessly switch between multiple user accounts present on a single system hence boosting productivity. Later on, you can anytime remove accounts from your system. In this article, we will take about ways to switch user accounts in Windows 11.
Suggested | 3 Ways to Turn Off Startup Sounds in Windows 11
Ways to Switch User Accounts in Windows 11
Switch User Accounts from Windows Lockscreen
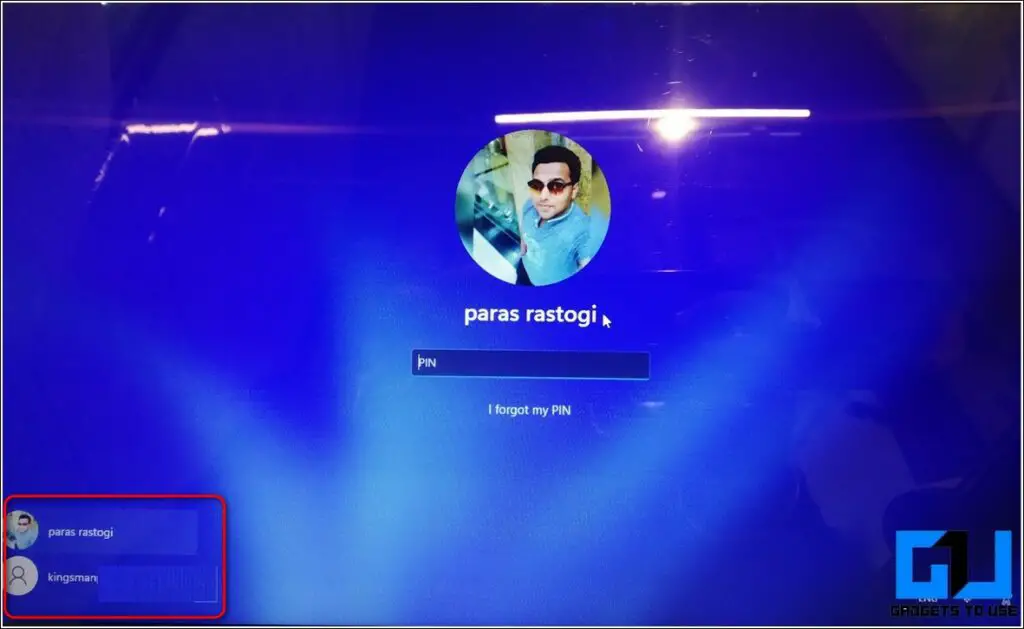
One of the easiest methods to switch user accounts in Windows 11 is with the help of its lock screen. Follow these steps to quickly change your user account using Windows 11 lock screen.
- First, you need to move to the Windows lock screen. If you’ve just booted up your system, the lock screen will be the first window to appear for login. If you’ve logged in already, you can enable the lock screen by pressing Windows + L key combination.

- Click anywhere on the lock screen to move to the Sign In Window.
- If you’ve multiple accounts in your Windows 11 system, you will see the listing of all the available accounts in the bottom left corner of the sign-in window.
- Click on the available account and sign in with the appropriate credentials to log in to that account.
Use Start Menu to Change User Account
If you’ve logged in to your Windows 11 system and wish to change your user account, then you can easily do it with the help of the start menu.
- Press the Windows key to open the start menu.
- Click on the User Account name in the bottom left corner of the start screen.
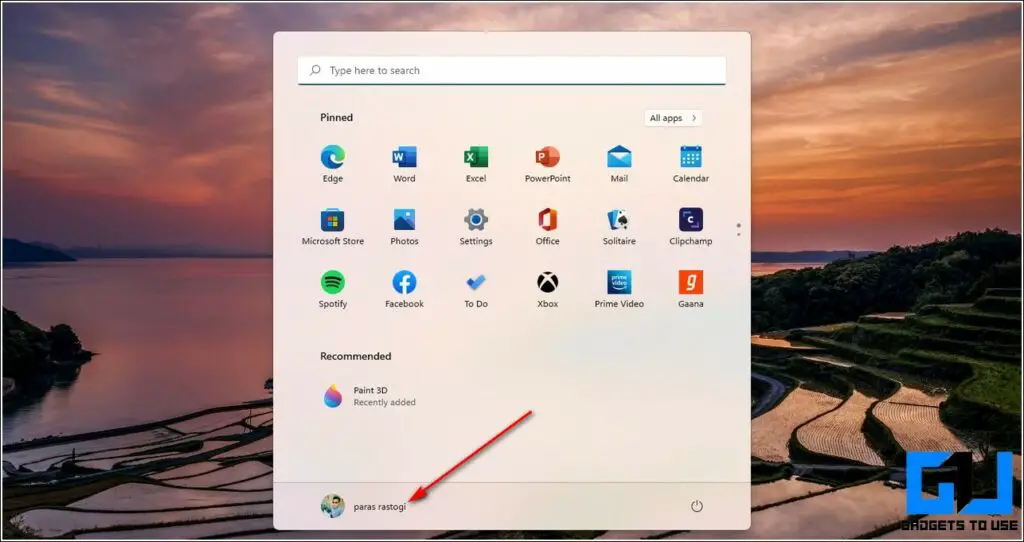
- You will see the list of all the available accounts along with the account settings option.
- Click on your preferred user account name to switch to that account.

- You will be instantly navigated to the sign-in screen of the chosen user account. Enter the required credentials here to sign in and switch to the user account.
Use Command Prompt to Navigate Between User Accounts
Command Prompt is one of the fastest methods to switch instantly between multiple user accounts on Windows 11. Follow these easy steps to do the same.
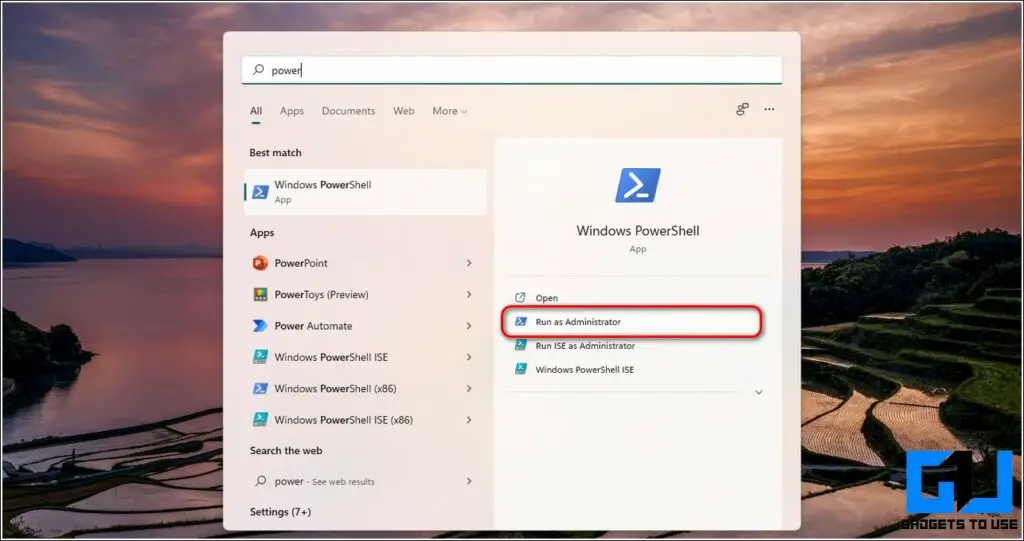
- Press the Windows key and search for the Command Prompt app.
- Click on the Run as Administrator option to run the app with administrative privileges.
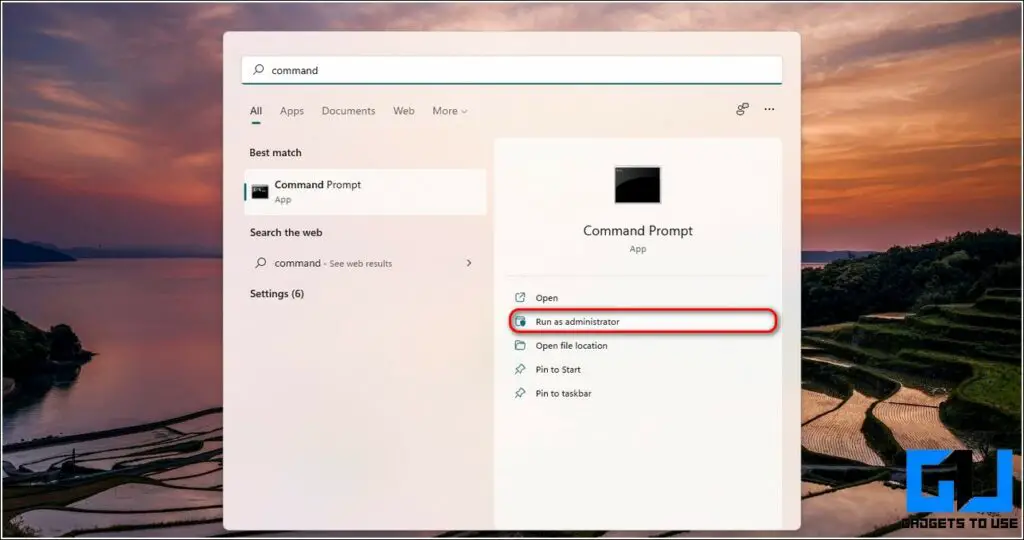
- For this method, you need to know the name and password of the user account that you wish to switch to.
- Enter the following command:
runas /user:<User Account Name> explorer.exe
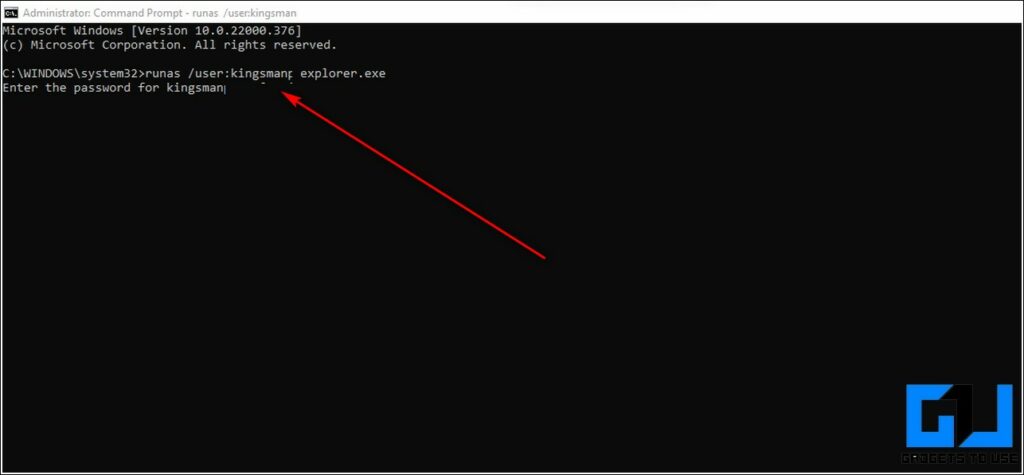
- You will be prompted to enter the password for the entered user account. Type the password in the window and hit Enter to switch to the entered user account.
- Congratulations. You’ve successfully switched to your preferred user account using Command Prompt.
Use Windows Powershell to Switch User Accounts in Windows 11
Similar to Command Prompt method, you can also use the Windows Powershell utility app to switch to a different user account in Windows 11.
- Press the Windows key and search for the Powershell app.
- Click on the Run as Administrator option to run the app with administrative privileges.
- Type the following command in the Powershell window:
runas /user:<User Account Name> explorer.exe
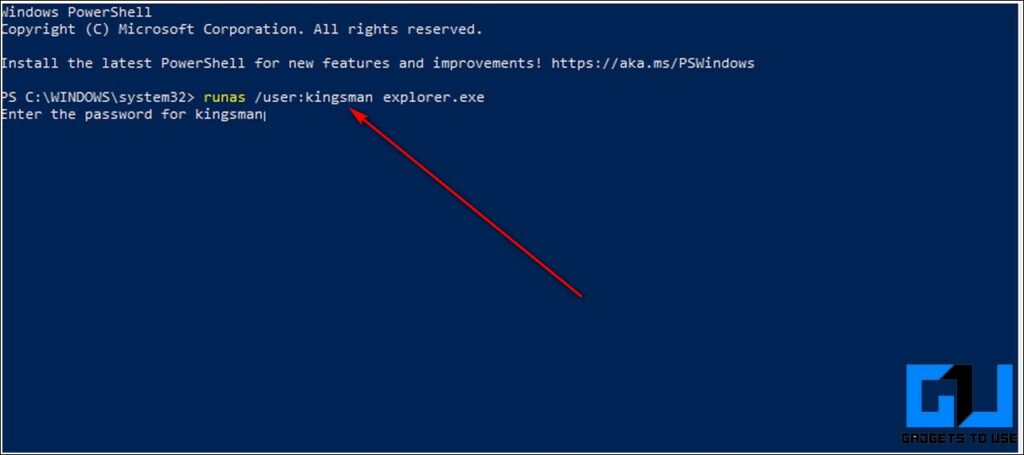
- You will be instantly prompted to enter the associated user account password.
- Upon entering the correct password, you will be able to access the entered user account.
Switch to a Different User Account Using Security Keys Combo
Microsoft Windows 11 also offers you the option to quickly switch user accounts with the help of the security hotkey combination. This hotkey comprises simultaneously pressing the CTRL, ALT, and DEL keys. Follow these easy steps to achieve the same.
- Press CTRL + ALT + DEL key simultaneously on your keyboard to open the Security Menu.
- Click on the Switch User button to browse through available user accounts.

- You will be instantly redirected to the sign-in page where you have to enter the associated credentials to log into the user account.
Bonus Tip: Use Classic ShutDown Window to Switch Between User Accounts
If you prefer the classic method to switch between multiple user accounts on Windows 11 then, you need to follow these simple steps to achieve it.
- Navigate to your Windows desktop and press the ALT+F4 Key combination to open the Shut Down Window popup.
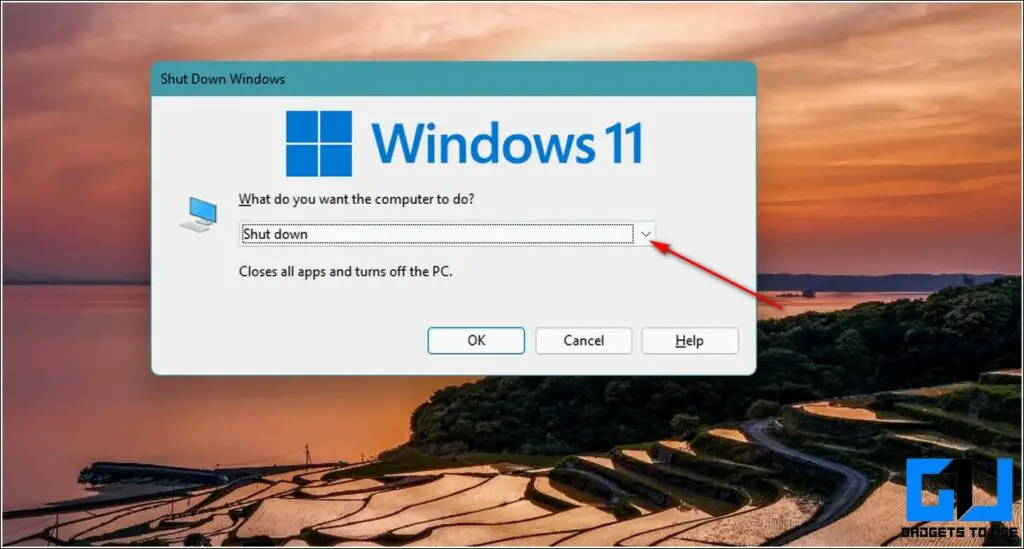
- Click on the arrow icon to show the drop-down list and choose the Switch User option. Click on the OK button to apply your selection.
- You will be instantly navigated to the Sign-in screen where you can choose from the available user accounts to log in to the system.
Wrapping Up: Switching Multiple User Accounts
So, that’s a wrap for the 6 effective ways to switch user accounts in Windows 11. We hope that you’ve now learned to seamlessly navigate to your account in the Windows environment. If this article has helped you in achieving the same then, hit the Like button and share this with your friends to assist them in using Windows 11. Stay tuned for more informative reads.
You may also like:
- 11 Hidden Windows 11 Features
- Customize the Windows 11 Start Menu
- 6 Privacy Features of Windows 11
You can also follow us for instant tech news at Google News or for tips and tricks, smartphones & gadgets reviews, join GadgetsToUse Telegram Group, or for the latest review videos subscribe GadgetsToUse Youtube Channel.
Was this article helpful?
YesNo