
Enabling the Administrator account on Windows Server 2012 R2 gives you elevated privileges and access to perform various administrative tasks. In this tutorial, we will walk through the steps on how to enable the Administrator account on Windows Server 2012 R2. By following these steps, you will have full control and unrestricted access to manage your server effectively.
Step 1: Accessing the Local Users and Groups Manager
– Press the Windows key + R on your keyboard to open the Run dialog box.
– Type «lusrmgr.msc» and press Enter to open the Local Users and Groups Manager.
Step 2: Navigating to the Users folder
– In the Local Users and Groups Manager, click on «Users» in the left pane.
– Look for the «Administrator» account in the middle pane.
Step 3: Enabling the Administrator account
– Right-click on the «Administrator» account and select «Properties.«
– In the General tab, uncheck the «Account is disabled» option.
– Click «OK» to save the changes.
Step 4: Setting a Password for the Administrator account (optional)
– Right-click on the «Administrator» account again and select «Set Password.«
– Follow the prompts to set a new password for the Administrator account.
Step 5: Logging in with the Administrator account
– Log out of your current user account.
– At the login screen, click on the «Administrator» account.
– Enter the password (if set) and press Enter to log in with the Administrator account.
Pros Cons
1. Elevated privileges: 1. Increased security risk.
The Administrator account Since the Administrator account has unrestricted access to the system, it can be targeted by malicious actors if not used or secured properly.
allows you to perform various
administrative tasks and
troubleshoot system issues.
2. Full control: 2. Risk of accidental modifications.
By enabling the With great power comes great responsibility. It’s important to exercise caution while using the Administrator account to avoid unintended modifications that may affect system stability.
Administrator account,
you have complete control over
the server, including installing,
configuring, and managing
software and services.
3. Flexibility and compatibility: 3. Limited usage scenarios.
Enabling the Administrator While the Administrator account is beneficial for system administration tasks, it may not be suitable for everyday use. Regular user accounts provide better security and stability for general usage.
account ensures compatibility
with certain applications and
software that may require
Administrator access.
By following these steps, you can enable the Administrator account on Windows Server 2012 R2. Remember to use the Administrator account responsibly and take necessary precautions to secure your server.
Enabling the Windows administrator account can be useful in certain situations where you need full administrative privileges. Here are the steps to enable the Windows administrator account:
1. Open the Command Prompt as an administrator: Right-click on the Start button and select «Command Prompt (Admin)» from the context menu. If you’re using Windows 10, you can also use the Windows key + X keyboard shortcut to access the Power User menu, and then choose «Command Prompt (Admin)«.
2. In the Command Prompt, type the following command and hit Enter:
«`
net user administrator /active:yes
«`
3. If the command executes successfully, you will see a message confirming that the command completed successfully.
4. Restart your computer to apply the changes.
After following these steps, you should now have the Windows administrator account enabled on your PC. Keep in mind that the administrator account should be used with caution. It has full control over your system and can make changes that may affect the stability and security of your computer.
It is worth mentioning that enabling the Windows administrator account may not be necessary for most users. It is recommended to use a standard user account for everyday tasks and only switch to the administrator account when you need to perform administrative actions.
How to find administrator password Windows Server 2012 R2?
As a tech blogger, I can provide guidance on finding the administrator password on Windows Server 2012 R2. It’s important to note that access to administrator passwords should only be sought for legitimate purposes and within the legal scope. Here’s a step-by-step guide to help you:
1. Method 1: Resetting the Administrator Password
a. Start by booting the Windows Server 2012 R2 system.
b. When the initial boot screen appears, press the F8 key to access the Advanced Boot Options menu.
c. Using the arrow keys, select «Safe Mode» or «Safe Mode with Networking» and press Enter.
d. Once the system boots into Safe Mode, log in with the built-in Administrator account or any other account with administrative privileges.
e. Open the «Control Panel» and navigate to «User Accounts» or «User Accounts and Family Safety.«
f. Select «Manage another account» and choose the user account for which you want to reset the password.
g. Click on «Change the password» and enter a new password for the account.
h. Restart the system and log in with the newly set password.
2. Method 2: Using the Offline NT Password & Registry Editor
a. Download the Offline NT Password & Registry Editor from its official website or a trusted source.
b. Create a bootable USB drive or CD containing the tool using a different system (follow the instructions provided on the website).
c. Insert the bootable USB drive or CD into the Windows Server 2012 R2 system where you need to find the administrator password.
d. Restart the system and boot from the USB drive or CD.
e. Follow the on-screen instructions provided by the Offline NT Password & Registry Editor to locate the administrator account and reset the password.
f. Once the password has been reset, remove the USB drive or CD and restart the system.
Remember to exercise caution and use these methods responsibly and as per local laws and regulations. It is also recommended to consult official documentation or seek professional advice if you are unfamiliar with these processes or have any concerns about system security.
How do I restore administrator privileges?
Restoring administrator privileges can be essential in various scenarios, such as regaining access to certain settings or making system-level changes on your device. Here are the steps you can follow to restore administrator privileges:
1. Check your current user account: Make sure you are signed in with an account that has administrative access. On Windows, you can verify this by going to the Control Panel, accessing User Accounts, and checking the account type under your username. On macOS, administrative accounts are labeled as «Admin» under the Users & Groups section in System Preferences.
2. Use the «Run as administrator» option: If your account doesn’t have full administrator privileges, you can often perform specific actions with elevated privileges using the «Run as administrator» option. Right-click on the program or application you want to run with elevated privileges, and choose the «Run as administrator» option from the context menu. This might prompt you to enter the credentials of an account with administrative privileges.
3. Enable the built-in administrator account: On Windows, there is a built-in administrator account that you can enable to regain administrative privileges. Open the Command Prompt or PowerShell with administrative rights by searching for «cmd» or «PowerShell» in the Start Menu, right-clicking on the application, and selecting «Run as administrator.» Then, enter the command «net user administrator /active:yes» and press Enter. You can now sign in using the «Administrator» account.
4. Restore from a system restore point: If you recently lost administrator privileges due to system changes or modifications, you can use system restore points (Windows) or Time Machine backups (Mac) to revert your computer to a previous state when you had administrative access. This process will undo system changes but may not revert personal files.
5. Contact technical support: If none of the above steps are applicable or successful, it may be necessary to seek technical support from your device’s manufacturer, the operating system’s support forum, or an IT professional. They can guide you through specific troubleshooting steps or provide further assistance to restore your administrator privileges.
Remember, restoring administrator privileges should only be done if necessary, and it is essential to exercise caution when making system-level changes to avoid any unintended consequences or security issues.
How do you unlock administrator settings?
Unlocking administrator settings can vary depending on the specific operating system or device you are using. Here are the general steps to unlock administrator settings on various platforms:
1. Windows:
– Click on the «Start» button and select «Settings» (or press the Windows key + I).
– In the Settings window, click on «Accounts» and then select «Your info» on the left sidebar.
– Under the «Your info» section, click on «Manage my Microsoft account» or «Sign in with a local account instead» if you are using a local account.
– Follow the on-screen prompts to sign in or switch to an administrator account.
2. macOS:
– Click on the Apple menu in the top-left corner and select «System Preferences.«
– In the System Preferences window, click on «Users & Groups.«
– If the lock icon at the bottom-left corner of the window is locked, click on it and enter the administrator password.
– Select the user account you want to promote to administrator, click on the padlock icon again to unlock it, and then click on the checkbox next to «Allow user to administer this computer.«
3. iOS (iPhone/iPad):
– Open the «Settings» app on your device.
– Tap on your name at the top of the Settings screen.
– Scroll down and select «iCloud» or «iTunes & App Store.«
– If prompted, enter your Apple ID password.
– In the next screen, toggle on the «Administer Settings» or similar option to grant administrative privileges.
4. Android:
– Open the «Settings» app on your device.
– Scroll down and tap on «System» or «About phone.«
– Look for «Build number» or «Software information» and tap on it seven times quickly.
– After tapping seven times, you should see a message like «You are now a developer!» or similar.
– Go back to the main Settings screen, scroll down, and you should find a new option called «Developer options» or «Developer settings.«
– Tap on «Developer options,» and you should be able to access administrator settings.
These steps are general guidelines, and the exact process might vary depending on the specific version of the operating system or device you are using. It’s always recommended to refer to the official documentation or support resources provided for your specific device or operating system for detailed instructions.
How do I unblock system administrator?
To unblock a system administrator, you need to follow these steps:
1. Identify the specific system or application that you are referring to. It’s important to know which system administrator you want to unblock and the context behind the block.
2. Communicate. Reach out to the system administrator via an alternate means of communication like email, phone, or in person if possible. Explain the situation or concern politely and express your desire to have the block lifted.
3. Provide necessary information. Be prepared to provide any relevant details or documentation that supports your reasoning for requesting the unblock. This may include user identification, account credentials, or any other information requested by the system administrator.
4. Seek resolution. Engage in a constructive conversation with the system administrator to understand why you were blocked and discuss potential resolutions. It’s important to remain respectful and open to their perspective while effectively communicating your concerns.
5. Follow their instructions. If the system administrator provides instructions on how to proceed, follow them diligently. This could involve taking specific actions, changing certain settings, or meeting specific requirements.
6. Demonstrate responsible behavior. Once the unblock has been granted, ensure that you abide by the system’s terms and guidelines moving forward. This includes adhering to any rules, security protocols, or guidelines set by the system administrator to maintain a positive and secure computing environment.
Remember, unblocking a system administrator is typically a process of communication, understanding, and accepting responsibility. It’s crucial to approach the conversation respectfully and cooperatively to achieve a favorable outcome.
How to unlock Windows Server 2012 administrator account?
Unlocking the Windows Server 2012 administrator account can be done through several methods. Here’s a guide on how to accomplish this:
1. Method 1: Using the Command Prompt
a. Log in to the server using another administrator account or an account with administrative privileges.
b. Press the Windows key + X and select «Command Prompt (Admin)» or «Windows PowerShell (Admin)«.
c. In the command prompt, type «net user administrator /active:yes» and press Enter. This command activates the administrator account.
d. Restart the server, and the administrator account should now be unlocked. You can log in to the server using the administrator credentials.
2. Method 2: Using the Computer Management Snap-in
a. Log in to the server using another administrator account or an account with administrative privileges.
b. Press the Windows key + R to open the Run dialog box. Type «compmgmt.msc» and press Enter. This opens the Computer Management snap-in.
c. In the Computer Management window, expand «System Tools» and navigate to «Local Users and Groups» > «Users«.
d. Right-click on the Administrator account and select «Properties«.
e. Uncheck the «Account is disabled» checkbox if it is selected. Then click «OK«.
f. Now, the administrator account should be unlocked. You can log in to the server using the administrator credentials.
3. Method 3: Using the Server Manager
a. Log in to the server using another administrator account or an account with administrative privileges.
b. Open the Server Manager by clicking on the Windows icon in the taskbar and selecting «Server Manager«.
c. In the Server Manager window, click on «Local Server» on the left-hand side.
d. Under «Properties» on the right-hand side, click on the text next to «Administrator» to open the «Local Users and Groups» window.
e. Right-click on the Administrator account and select «Properties«.
f. Uncheck the «Account is disabled» checkbox if it is selected. Then click «OK«.
g. The administrator account should now be unlocked, and you can log in to the server using the administrator credentials.
Remember to exercise caution when making changes to administrator accounts and be sure to adhere to your organization’s security policies and best practices.
Как перейти от Waterfall к Agile
EggHead 06.05.2025
Каскадная модель разработки Waterfall — классический пример того, как благие намерения превращаются в организационный кошмар. Изначально созданная для упорядочивания хаоса и внесения предсказуемости. . .
Оптимизация SQL запросов — Продвинутые техники
Codd 06.05.2025
Интересно наблюдать эволюцию подходов к оптимизации. Двадцать лет назад всё сводилось к нескольким простым правилам: «Избегайте SELECT *», «Используйте индексы», «Не джойните слишком много таблиц». . . .
Создание микросервисов с gRPC и Protobuf в C++
bytestream 06.05.2025
Монолитные приложения, которые ещё недавно считались стандартом индустрии, уступают место микросервисной архитектуре — подходу, при котором система разбивается на небольшие автономные сервисы, каждый. . .
Многопоточность и параллелизм в Python: потоки, процессы и гринлеты
py-thonny 06.05.2025
Параллелизм и конкурентность — две стороны многопоточной медали, которые постоянно путают даже бывалые разработчики.
Конкурентность (concurrency) — это когда ваша программа умеет жонглировать. . .
Распределенное обучение с TensorFlow и Python
AI_Generated 05.05.2025
В машинном обучении размер имеет значение. С ростом сложности моделей и объема данных одиночный процессор или даже мощная видеокарта уже не справляются с задачей обучения за разумное время. Когда. . .
CRUD API на C# и GraphQL
stackOverflow 05.05.2025
В бэкенд-разработке постоянно возникают новые технологии, призванные решить актуальные проблемы и упростить жизнь программистам. Одной из таких технологий стал GraphQL — язык запросов для API,. . .
Распознавание голоса и речи на C#
UnmanagedCoder 05.05.2025
Интеграция голосового управления в приложения на C# стала намного доступнее благодаря развитию специализированных библиотек и API. При этом многие разработчики до сих пор считают голосовое управление. . .
Реализация своих итераторов в C++
NullReferenced 05.05.2025
Итераторы в C++ — это абстракция, которая связывает весь экосистему Стандартной Библиотеки Шаблонов (STL) в единое целое, позволяя алгоритмам работать с разнородными структурами данных без знания их. . .
Разработка собственного фреймворка для тестирования в C#
UnmanagedCoder 04.05.2025
C# довольно богат готовыми решениями – NUnit, xUnit, MSTest уже давно стали своеобразными динозаврами индустрии. Однако, как и любой динозавр, они не всегда могут протиснуться в узкие коридоры. . .
Распределенная трассировка в Java с помощью OpenTelemetry
Javaican 04.05.2025
Микросервисная архитектура стала краеугольным камнем современной разработки, но вместе с ней пришла и головная боль, знакомая многим — отслеживание прохождения запросов через лабиринт взаимосвязанных. . .
Всем доброго дня, подскажите по проблеме:
Возникла несрочная необходимость создать домен в небольшой сети, для этого уже еще раньше установил Windows Server 2012, наконец то собрался поднять домен, раньше подымал домен без проблем на 2008, а тут возникла неприятность — добавил роль Active Directory Domain Services, начал создание АД, вот примерно по этому руководству https://jakondo.ru/razvorachivaem-kontroller-domen…, создал лес, задал пароль который был запрошен в процессе настройки, пароль для восстановления режима служб каталогов (DSRM), потом дальше пошла куча системных сообщений об установке и настройки после чего винда сама перезагрузилась после чего собственно и возникла проблема, я немогу в нее зайти, при поднятии АД винда не запросила у меня создание админской учетки АД, при входе в винду, но уже в созданный домен стоит имя той же учетки в которой я работал до создания домена, т.е. локально, Admin, но прежний пароль не подходит, пароль DSRM также неподходит, пробовал зайти по прежнему локально, т.е. подставив в качестве домена имя компа, т.е. имякомпа\Admin и прежний пароль, но это также не работает, подскажите так как все таки зайти в винду? Как воспользоваться паролем DSRM, или как вернуть все как было отменив создание домена, совет переустановка винды негодится
-
Вопрос задан
-
253 просмотра
When your users use RemoteApp programs or desktops that you have made available through the RDS solution, it’s possible that one program crashes on the server.
It’s also possible that their session has a problem and that you are the only one who can solve this problem. Indeed, only the administrator has access to the physical server to manage the sessions and the use of its resources.
- Close processes or the session from the GUI
- Close processes or the session from the command line
- Close a process on a specific session
- Close a specific session
1. Close processes or the session from the GUI
By using the graphical interface of your server, you can help your users with the task manager.
As an administrator, by clicking on the «More details» option in the task manager, you will be able to manage open sessions on your session host server, as well as open processes in each session.
For example, as an administrator, you could close a RemoteApp program (in this case : Microsoft Excel) remotely.
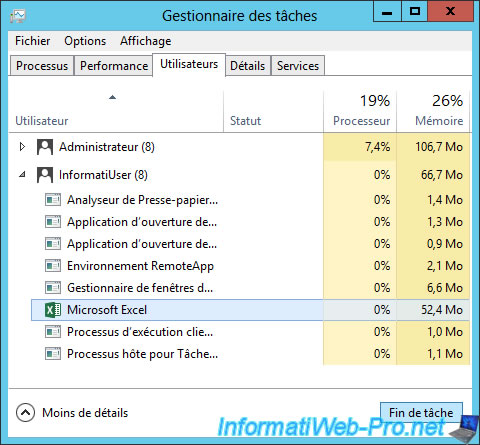
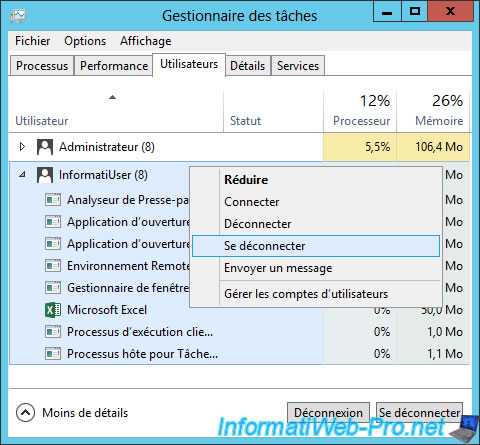
Or completely close the session of the remote user by right clicking «Sign off» (or «Log off») on it.
Then, your user will be able to access the desktops and/or programs RemoteApp they can use.
From the server manager, you can also disconnect or log off a user.
To do this, go to «Remote Desktop Services -> Collections -> Name of the collection (optional).
Then, in the list of connections, locate the name of your user and right-click «Log off» on it.
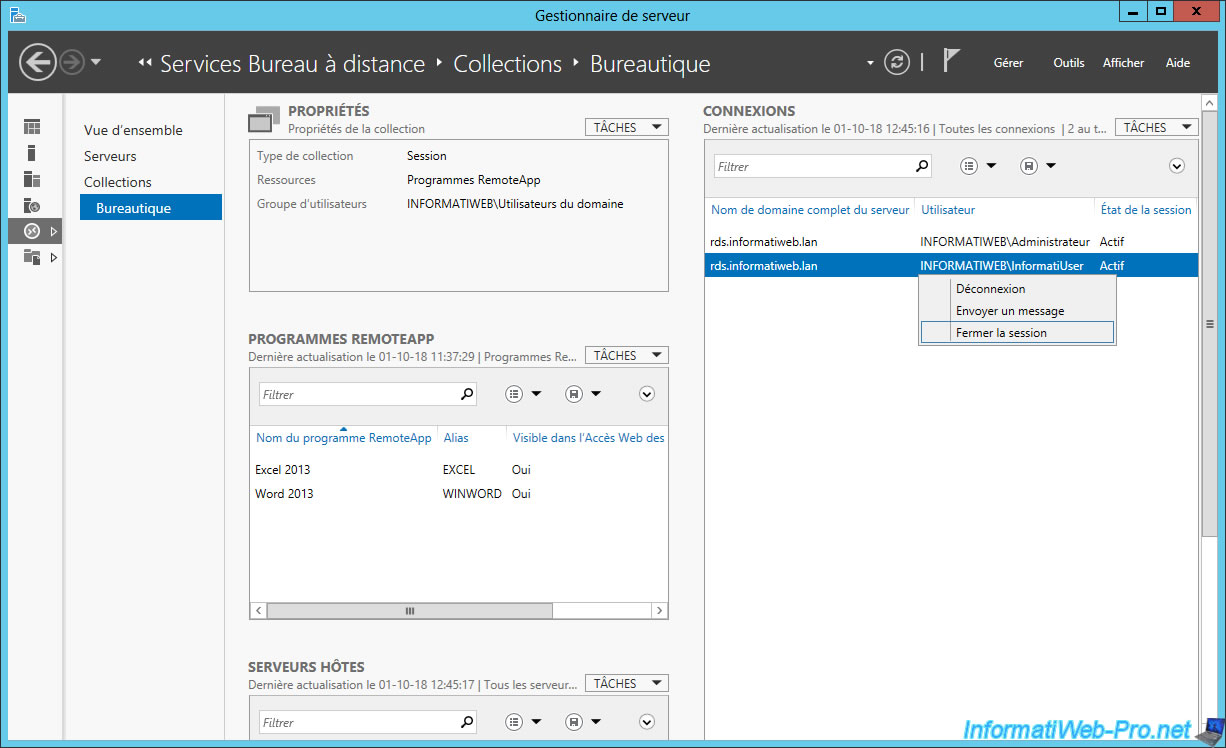
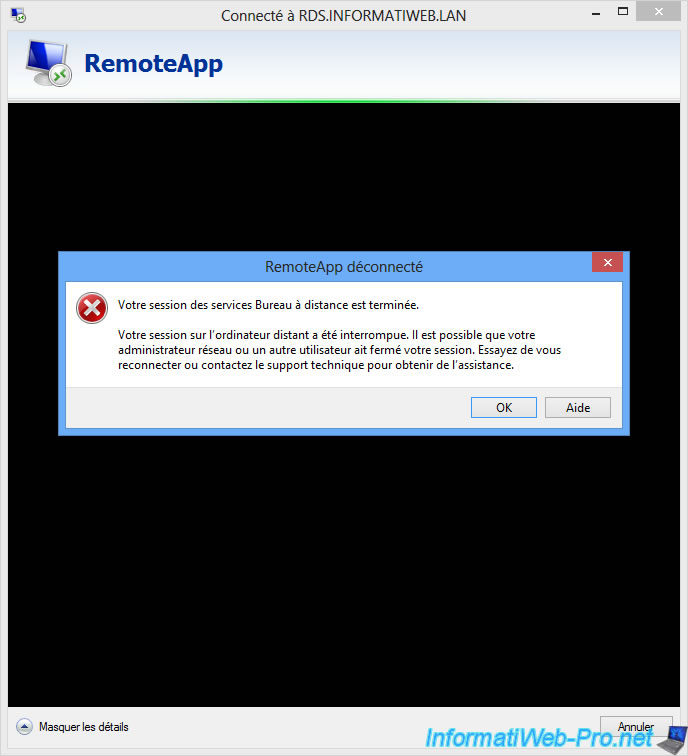
Once the session is closed from the server, your user will receive the following error message :
Plain Text
Your Remote Desktop Services session has ended.
...
Your network administrator or another user might have ended your session.
...
2. Close processes or the session from the command line
For fans of the command line or those who have installed a server in Core mode, here is how to close the processes and sessions of your users.
2.1. Close a process on a specific session
To begin, you must retrieve the session ID that corresponds to the session of the desired user (in our case : InformatiUser).
Batch
query session
This command will display a list of Terminal Server sessions open on the current server.
Plain Text
 SESSIONNAME       USERNAME                 ID  STATE   TYPE        DEVICE

 services                                    0  Disc
>console           Administrator             1  Active
 rdp-tcp#0         InformatiUser             2  Active
 rdp-tcp                                 65536  Listen
To close RemoteApp programs or other processes on one of these sessions, you will need to specify on which session you want to close the process.
If you don’t specify this information as a parameter, the process will be closed on your session and not the user’s one.
To list the processes launched on a specific session, you will have to use the «query process» command by specifying the ID of the desired session.
Batch
query process /ID:2
Which give :
Plain Text
 USERNAME              SESSIONNAME         ID    PID  IMAGE
 system                rdp-tcp#0            2   3500  csrss.exe
 system                rdp-tcp#0            2   2564  winlogon.exe
 dwm-2                 rdp-tcp#0            2    328  dwm.exe
 informatiuser         rdp-tcp#0            2   1220  taskhostex.exe
 informatiuser         rdp-tcp#0            2   2936  rdpclip.exe
 informatiuser         rdp-tcp#0            2   2732  rdpinit.exe
 informatiuser         rdp-tcp#0            2   2292  rdpshell.exe
 informatiuser         rdp-tcp#0            2   1192  excel.exe
Or by specifying the name of the user.
Batch
query process InformatiUser
In this case, you will see only those launched as [user name]. The system processes will not be displayed.
Plain Text
 USERNAME              SESSIONNAME         ID    PID  IMAGE
 informatiuser         rdp-tcp#0            2   1220  taskhostex.exe
 informatiuser         rdp-tcp#0            2   2936  rdpclip.exe
 informatiuser         rdp-tcp#0            2   2732  rdpinit.exe
 informatiuser         rdp-tcp#0            2   2292  rdpshell.exe
 informatiuser         rdp-tcp#0            2   1192  excel.exe
To close a process on the right user session, the quickest is to target the process with its ID (which is unique per process per session).
Important : the PID changes each time the process is closed and restarted.
In our case, we will close «Microsoft Excel» which corresponds to the «excel.exe» process whose ID is : 1192
Batch
taskkill /PID 1192 /F
Display again the list of processes launched on this session.
Batch
query process InformatiUser
As you can see, the process «excel.exe» has disappeared from the list.
Plain Text
 USERNAME              SESSIONNAME         ID    PID  IMAGE
 informatiuser                              2   1220  taskhostex.exe
 informatiuser                              2   2936  rdpclip.exe
 informatiuser                              2   2732  rdpinit.exe
 informatiuser                              2   2292  rdpshell.exe
We then relaunched our Microsoft Excel RemoteApp program from the client computer to show you another technique.
For those who would like to close a process with the name of the executable file on a specific session, here are 2 possibilities.
1st possibility :
- use the «SESSION» filter to target a specific session. In our case, this is the session with ID : 2.
- use the «im» (which means : image) parameter to target a process by its name. In our case : excel.exe.
Batch
taskkill /FI "SESSION eq 2" /im:excel.exe /F
Plain Text
SUCCESS: The process "EXCEL.EXE" with PID 2220 has been terminated.
2nd possibility :
- use the «USERNAME» filter to target a specific session. In our case, this is the session opened by this user : InformatiUser.
- use the «im» (which means : image) parameter to target a process by its name. In our case : excel.exe.
Batch
taskkill /FI "USERNAME eq InformatiUser" /im:excel.exe /F
Plain Text
SUCCESS: The process"EXCEL.EXE" with PID 1552 has been terminated.
2.2. Close a specific session
To begin, list the active sessions on your session host server.
Batch
query session
This command will allow you to know the open sessions on your server, as well as the ID of each session.
Plain Text
 SESSIONNAME       USERNAME                 ID  STATE   TYPE        DEVICE

 services                                    0  Disc
>console           Administrator             1  Active
 rdp-tcp#0         InformatiUser             2  Active
 rdp-tcp                                 65536  Listen
To close a session using its ID, use this command :
Batch
logoff 2
If you want to use the name of the session (which has nothing to do with the name of your user), use the command like this.
The name of the session being what is indicated in the «SESSION» column of the result returned by the «query session» command mentioned above.
Batch
logoff rdp-tcp#0
After the session is closed, your user will receive an error message :
Plain Text
Your Remote Desktop Services session has ended.
You were logged off the remote computer.
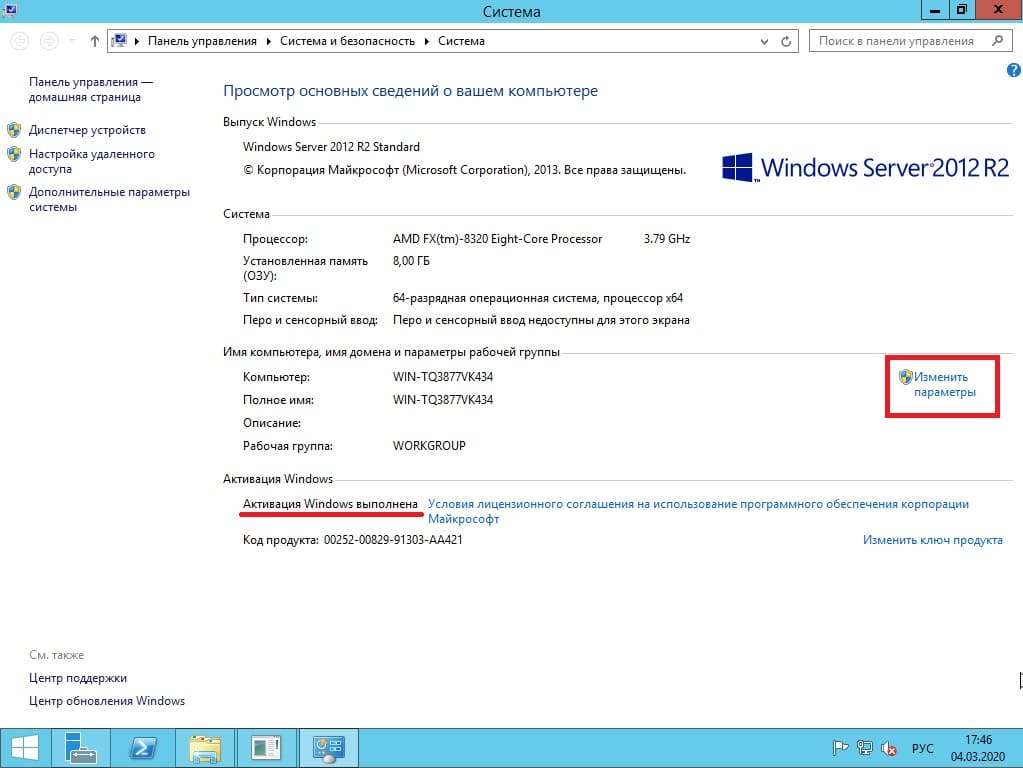
В данной статье пошагово со скриншотами рассмотрим самые базовые настройки Windows Server 2012 R2 (любых версий: Standard, Datacenter, Essentials). В них входит настройка AD, DNS, DHCP, а так же лицензирование терминального сервера (настройка сервера RDP). Эти настройки как правило подходят для большинства задач и являются стандартными для использования их в Windows Server.
С процессом установки и самой начальной настройки как активация сервера, и получение обновлений Windows Server 2012 R2 можете ознакомиться в нашей прошлой статье.
1) Итак, начнем. Для начала нам нужно задать имя сервера, чтобы оно было в последующем корректно указано в различных настройках для подключений. Зайдем в меню «Свойство системы» => Изменить параметры => Далее в окне «Имя компьютера» нажимаем кнопку «Изменить» => После в строке ввода «Имя сервера» задаем имя в произвольном порядке. У нас оно будет просто Server.
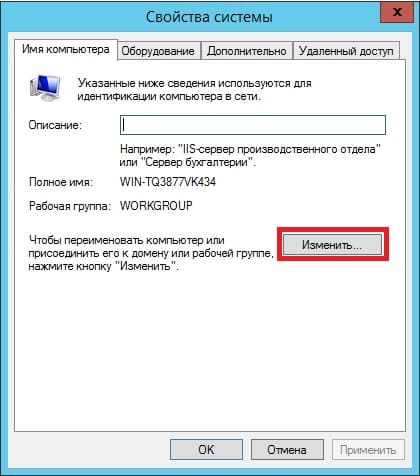
Чтобы настройки применились перезагрузите Ваш компьютер.
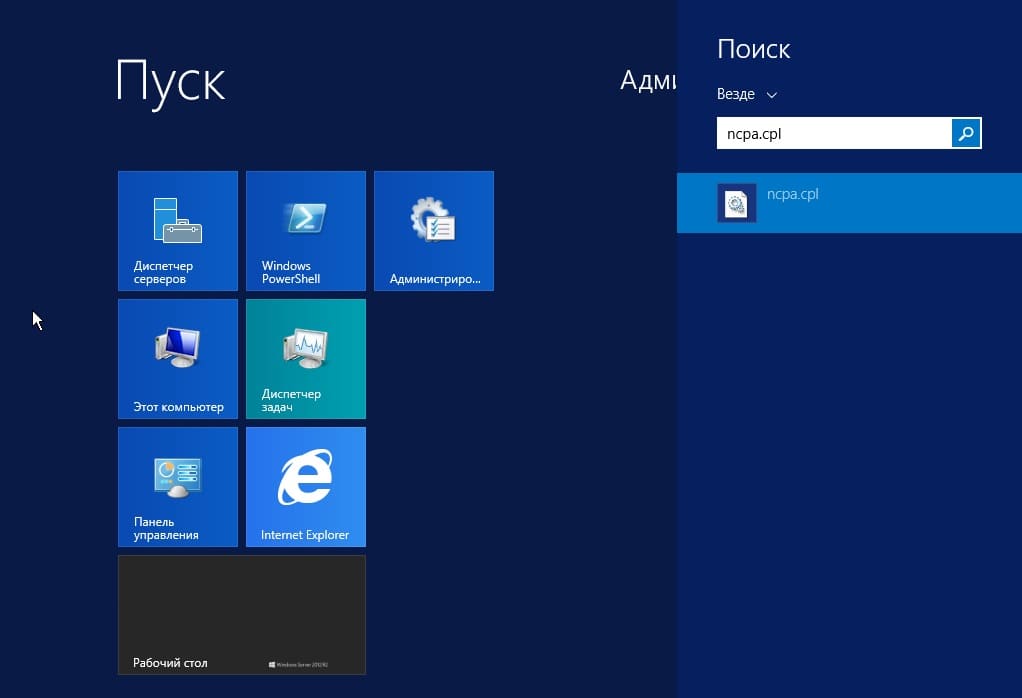
2) Следующая, тоже очень важная процедура — это задать локальный статический IP адрес серверу. Для быстроты переходим в меню «Пуск», далее в поиске вводим ncpa.cpl.
На Вашем основном сетевом адаптере щелкаем правой кнопкой мыши => Свойства
Выделяем протокол IPv4 и нажимаем «Свойства».
И задаете серверу статический IP адрес в зависимости от Вашей сети. (далее в статье рассмотрим настройку DHCP, чтобы Ваш сервер сам мог раздавать свой диапазон IP адресов). Чтобы посмотреть текущий локальный IP адрес и шлюз — Вам нужно открыть командную строку, в поиске введите «Cmd» => Далее введите команду «ipconfig». Как DNS сервера в предпочтительных можем оставить IP адрес Вашего шлюза (роутера, маршутизатора), а как альтернативный адрес Google — 8.8.8.8
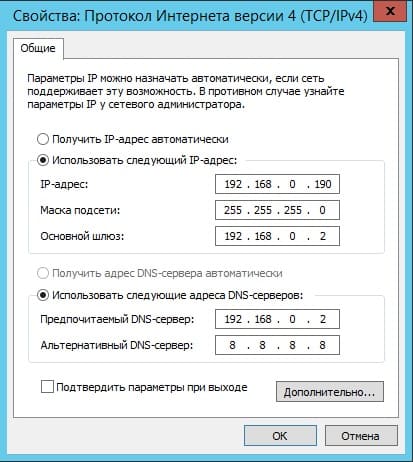
После применяете настройки и проверяете Ваше соединение с интернетом, если все работает, значит Ваши настройки корректные.
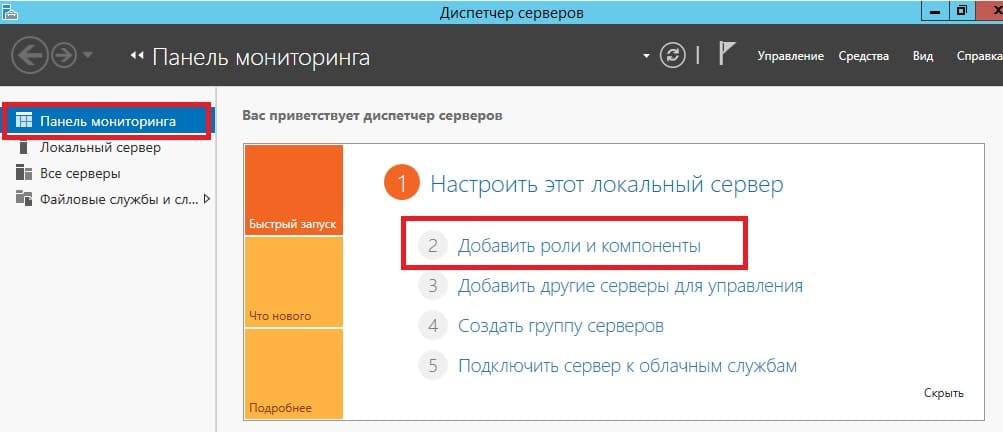
3) С настройками IP адресов пока закончено, перейдем к добавлению ролей и компонентов. Заходим в диспетчер серверов. Меню «Панель мониторинга» => Добавить роли и компоненты
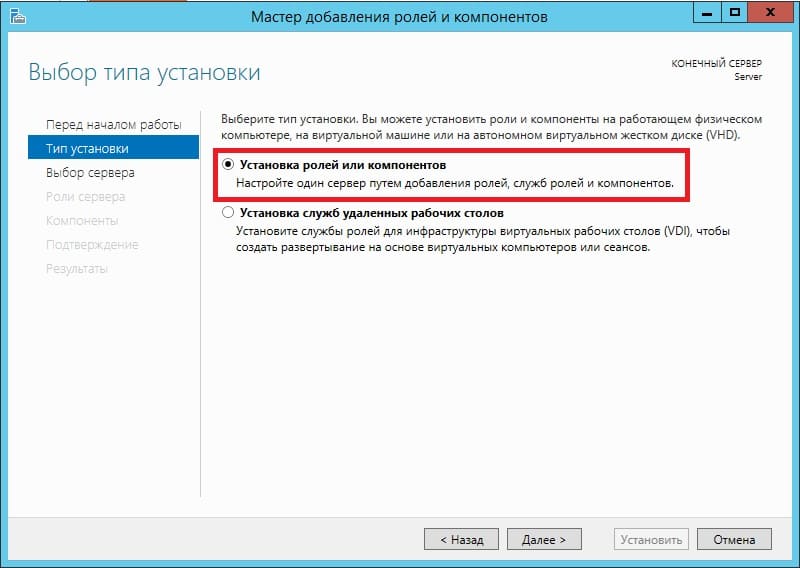
Переходим в пункт «Тип установки» и выбираем «Установка ролей или компонентов».
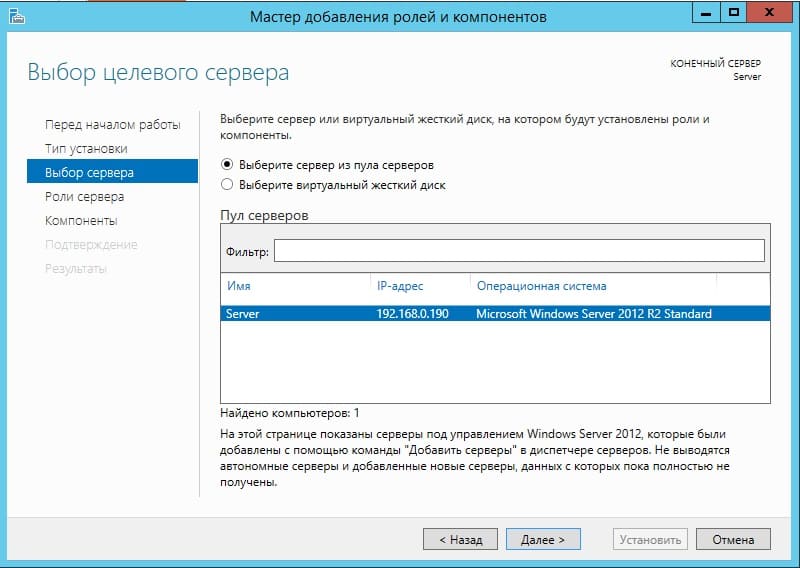
Выбираете Ваш сервер в меню выбора серверов.
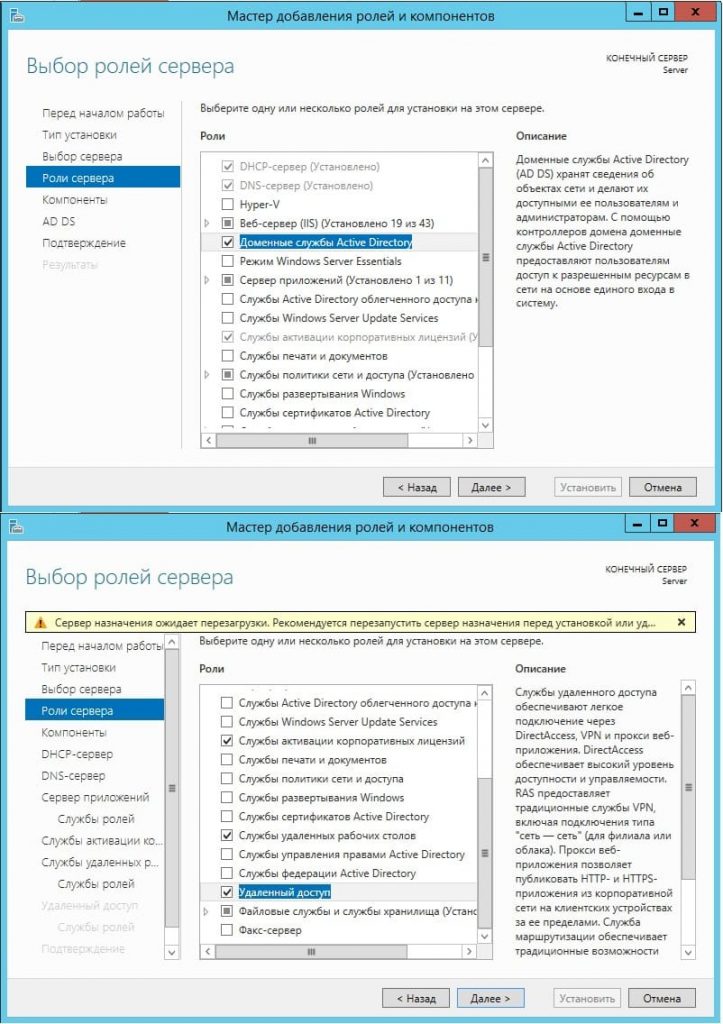
В ролях сервера мы в данном случае выбираем самые стандартные роли, которые используются как правило в большинстве задач. Можете сделать так же.
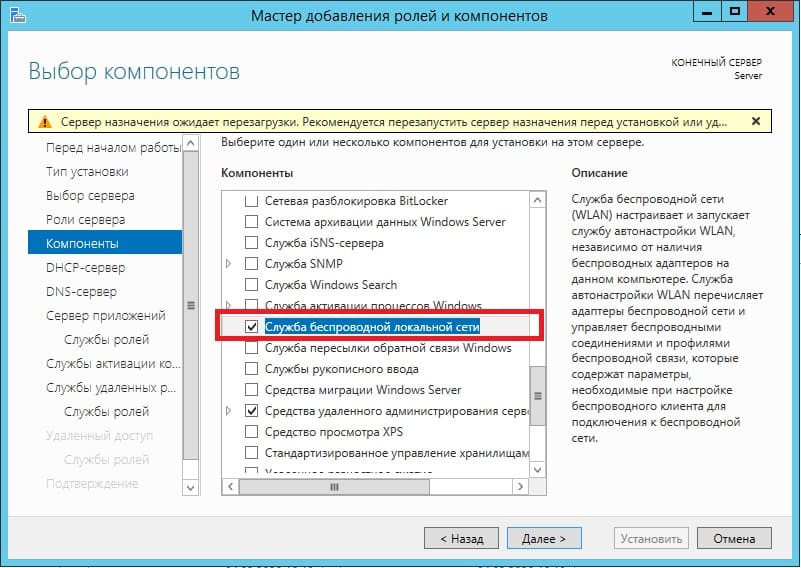
В компонентах оставляем все по стандарту. За исключением того, если у Вас сервер будет работать по Wi-FI, т.е в нем будет какой-либо Wi-Fi адаптер, то без компонента «Службы беспроводной локальной сети» — беспроводное соединение работать не будет. Отмечаете галкой его, если Вам требуется такой функционал.
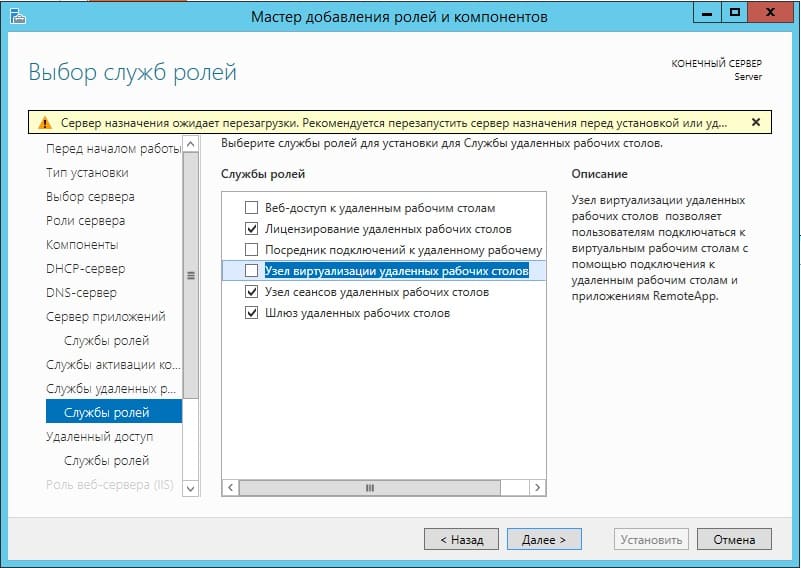
Далее доходим до меню «Службы ролей» для удаленных рабочих столов. Отмечаем галкой то, что нужно для работы с RDP.
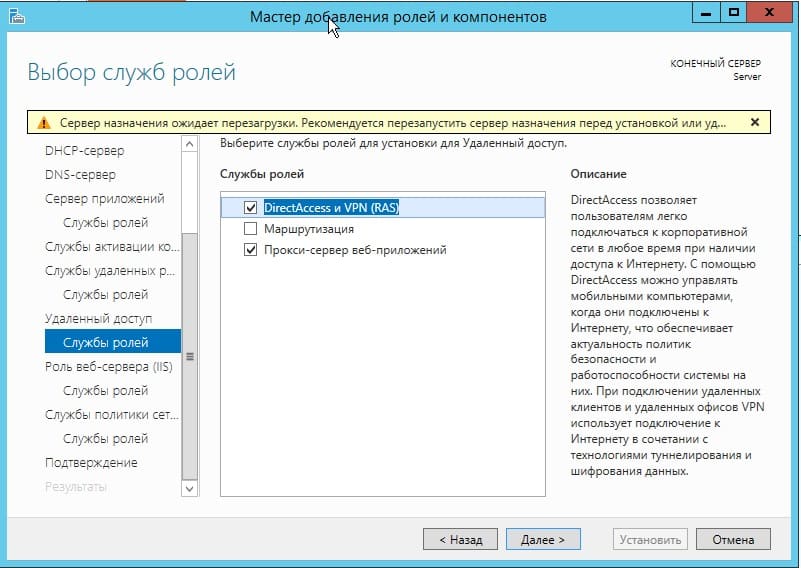
В службах «Удаленный доступ» по желанию можете выбрать работу с приложением для смены IP-адреса и прокси-сервером, это как правило многим не нужно. На Ваш выбор.
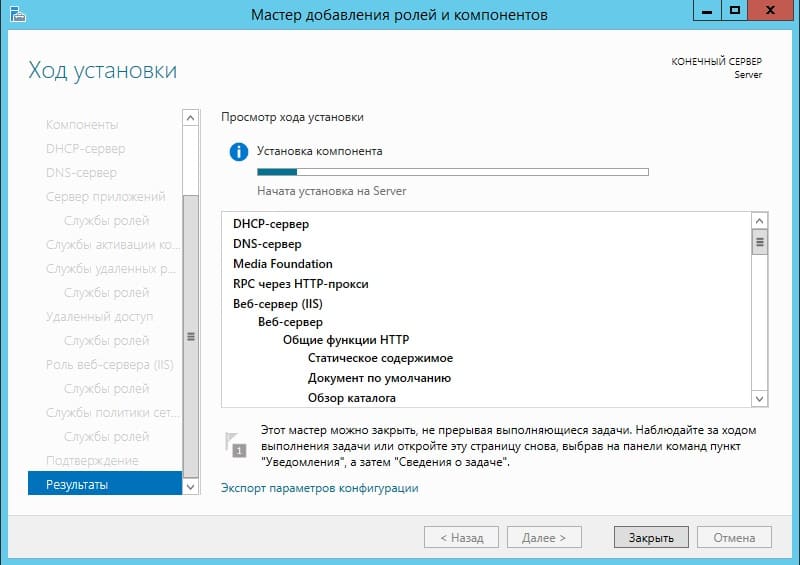
Доходим до пункта «Подтверждение», отмечаем галкой автоматический перезапуск после установки и жмем «Установить». Ожидаем пока все установится.

4) Теперь переходим к настройкам тому, что мы только что устанавливали. В конкретном случае к настройкам DNS. Заходим снова в меню «Диспетчер серверов» => Нажимаем на флажок => И выбираем пункт «Повысить роль этого сервера до контроллера домена».

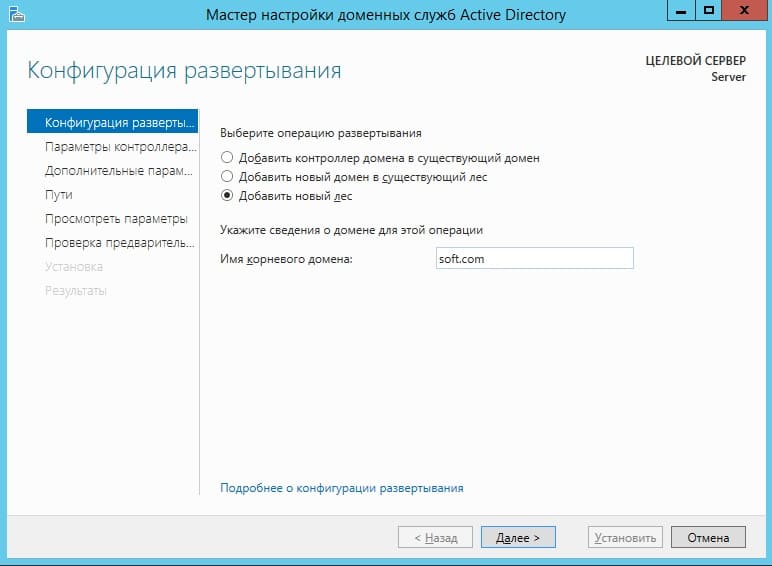
В конфигурации развертывания отмечаем пункт «Добавить новый лес» и придумываем имя корневого домена. В вашем случае это может быть абсолютно любое название, которое Вам понравится, мы назовем как пример «soft.com».
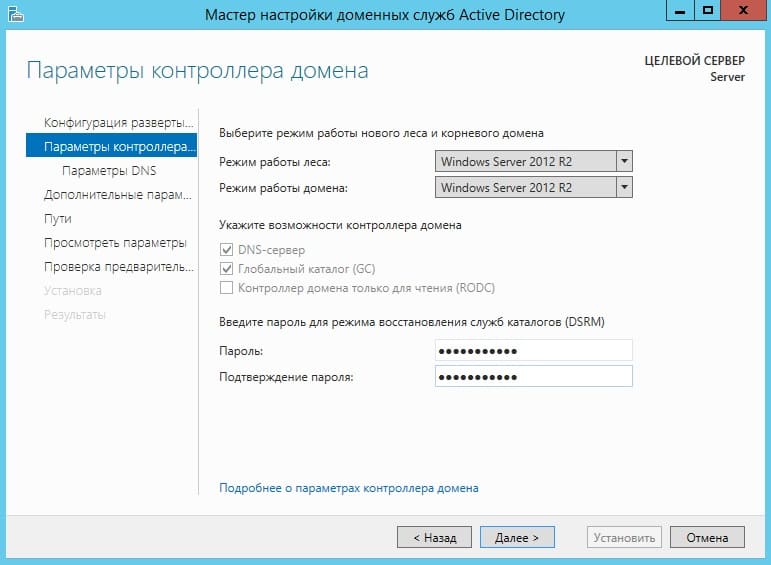
В параметрах контроллера придумываем Ваш пароль для Вашего домена и жмем «Далее».
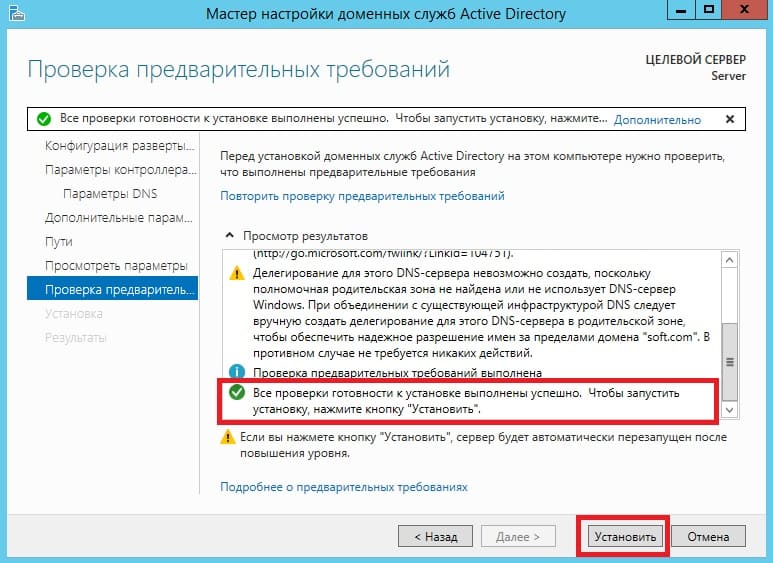
Теперь можем дойти сразу до предварительной проверки всех настроек. Все будет корректно если у Вас будет в окне указано, что «Все проверки готовности к установке выполнены успешно …«. Нажимаем установить. После установки перезагружаем сервер.
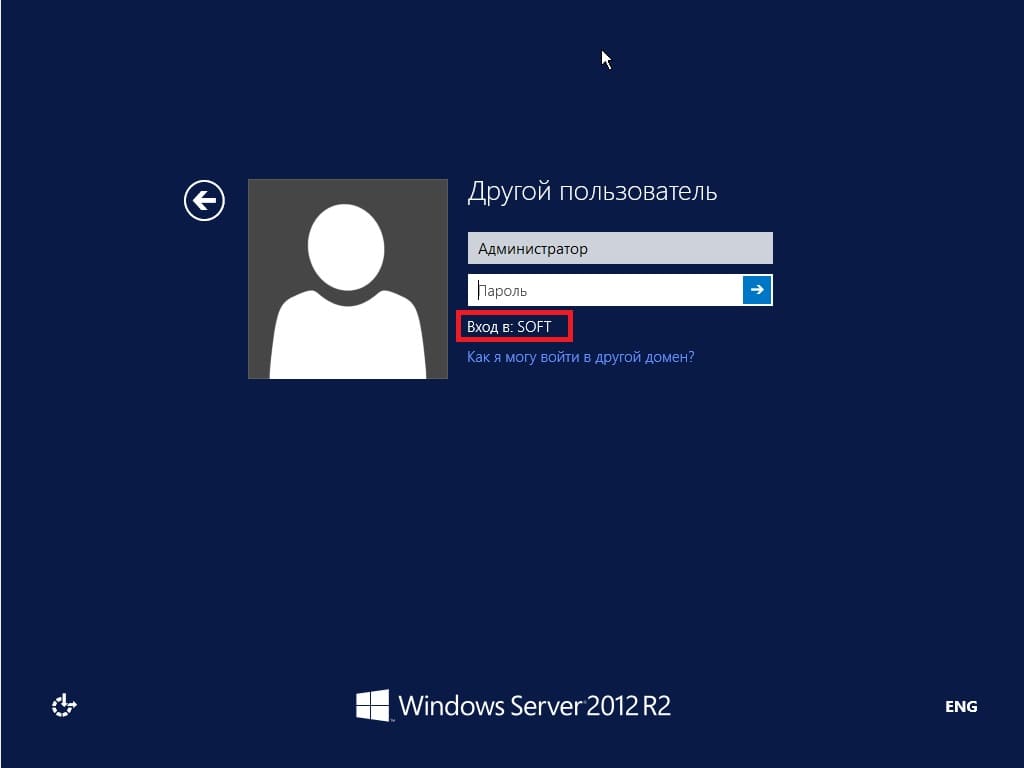
После перезагрузки как будете вводить пароль администратора, Вы можете заметить, что Ваш сервер уже добавлен в домен.
Но это еще не все, нам нужно его до конца настроить. Снова переходим в «Диспетчер серверов» => меню «Свойства» => DNS
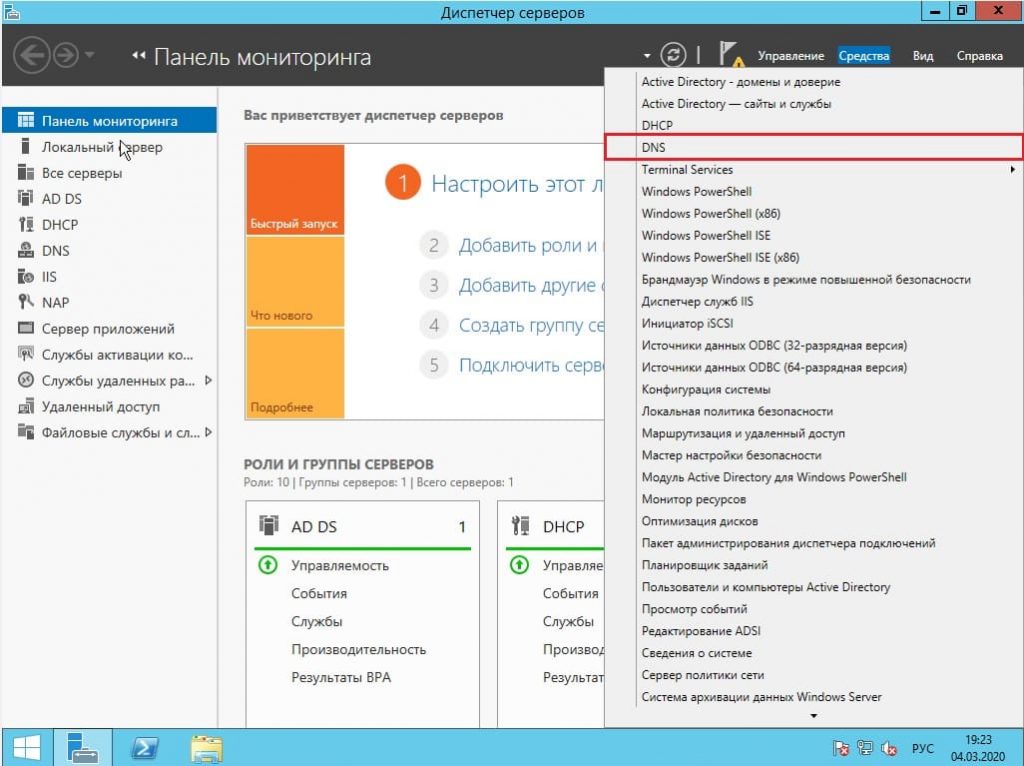
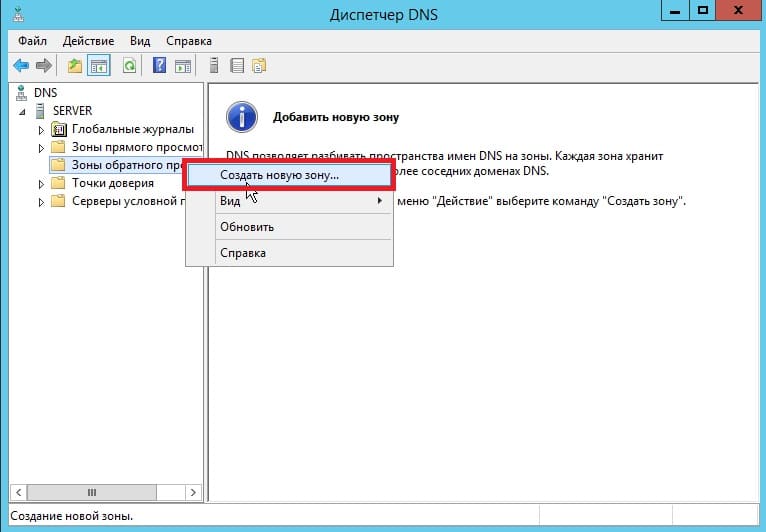
Мы перешли в «Диспетчер DNS». Разворачиваем дерево DNS => SERVER (Имя Вашего сервера) => Зоны обратного просмотра => Щелкаем правой кнопкой мыши и нажимаем на пункт «Создать новую зону».
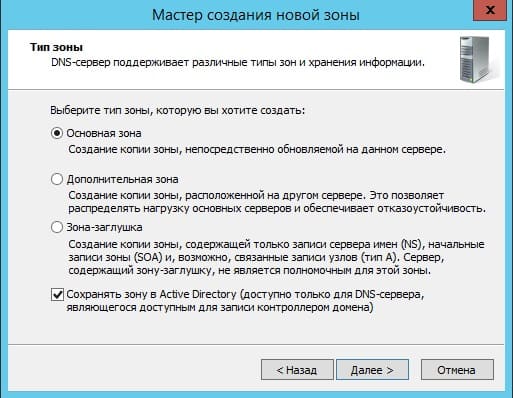
Выбираем «Основная зона» и отмечаем галкой «Сохранять зону в Active Directory …«.
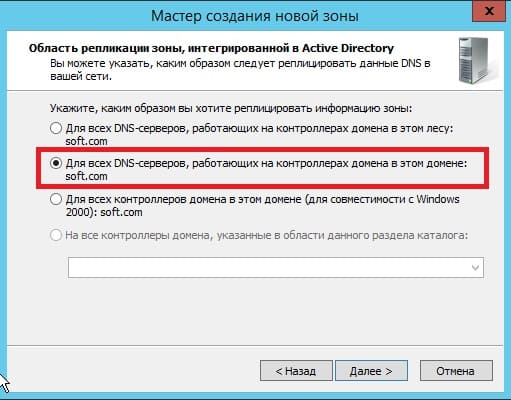
Следующим окном выбираем пункт «Для всех DNS-серверов, работающих на контроллерах домена в этом домене: «ваш домен»«.
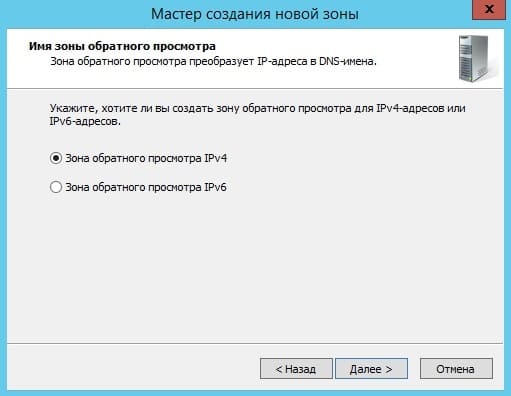
Далее выбираем пункт с IPv4 соответственно.
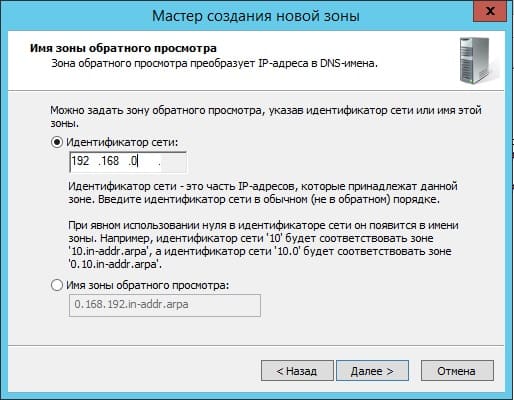
В индефикаторе сети для данного DNS выбираем Ваш IP диапазон или имя зоны. Мы на примере выберем DNS по IP диапазону.
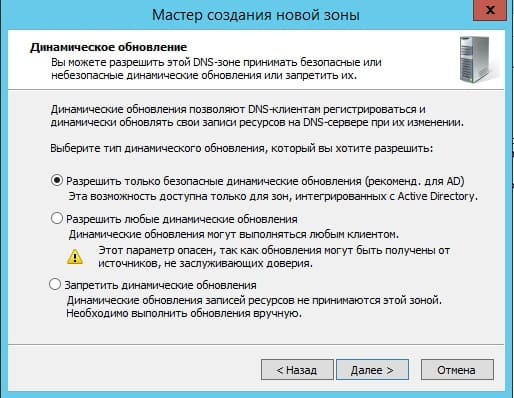
Разрешим динамические обновления, т.к это рекомендуемый параметр для настроек AD.
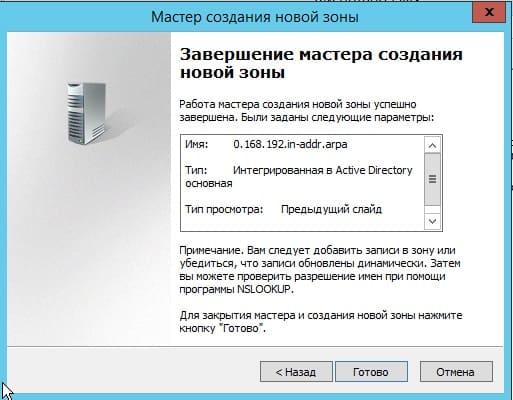
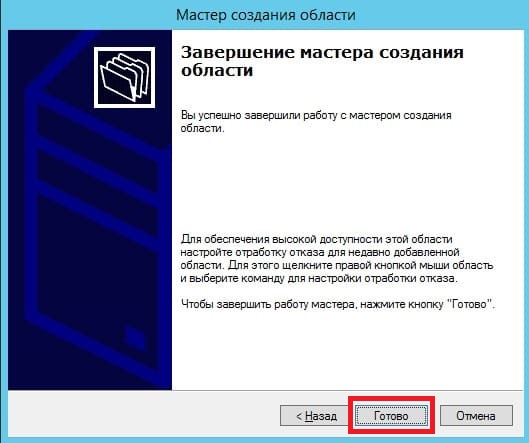
На этом все, нажимаем готово.
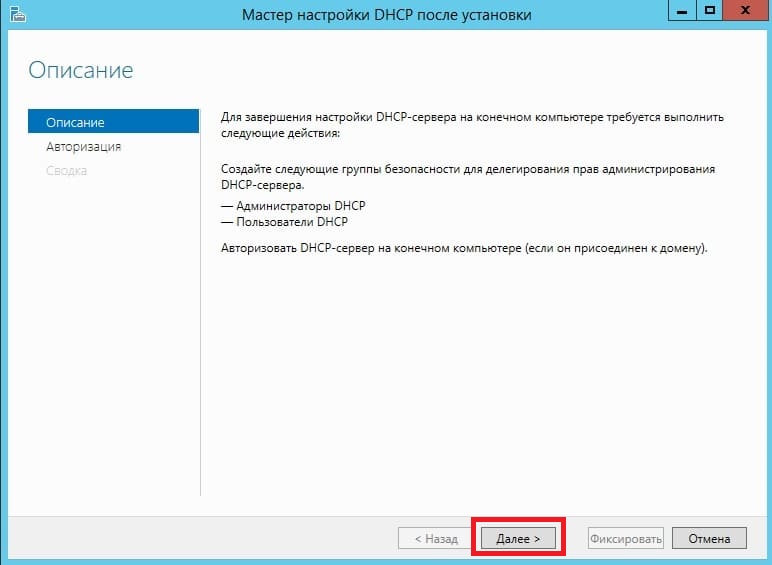
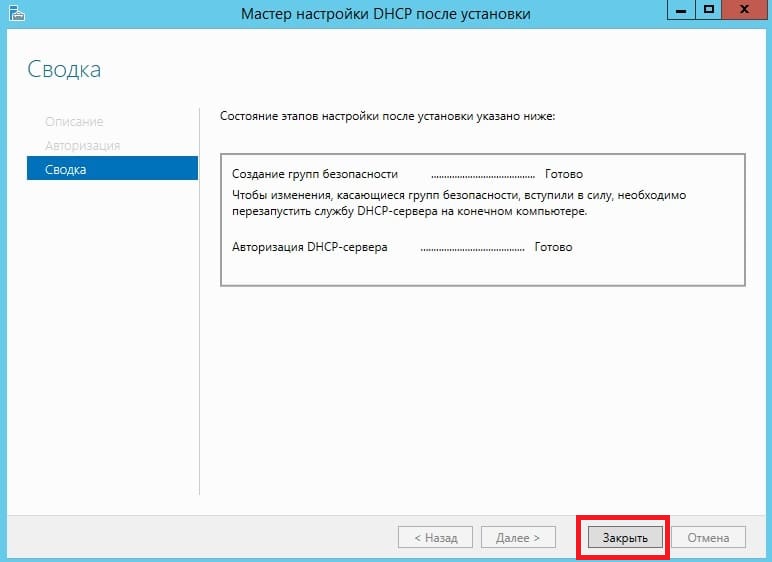
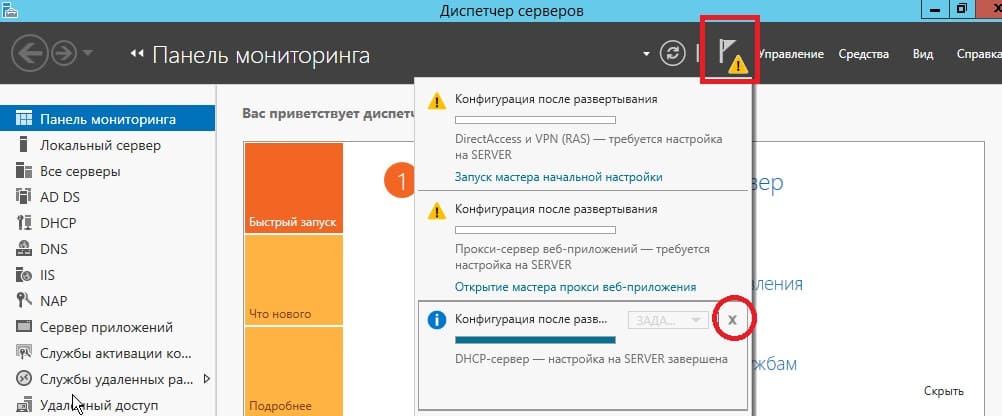
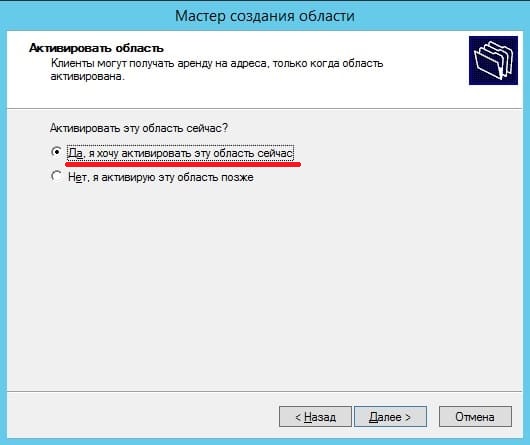
5) Теперь рассмотрим настройки DHCP (чтобы Ваш сервер мог раздавать свой диапазон IP адресов). Переходим в меню «Диспетчер серверов» и выбираем пункт «Завершение настройки DHCP».
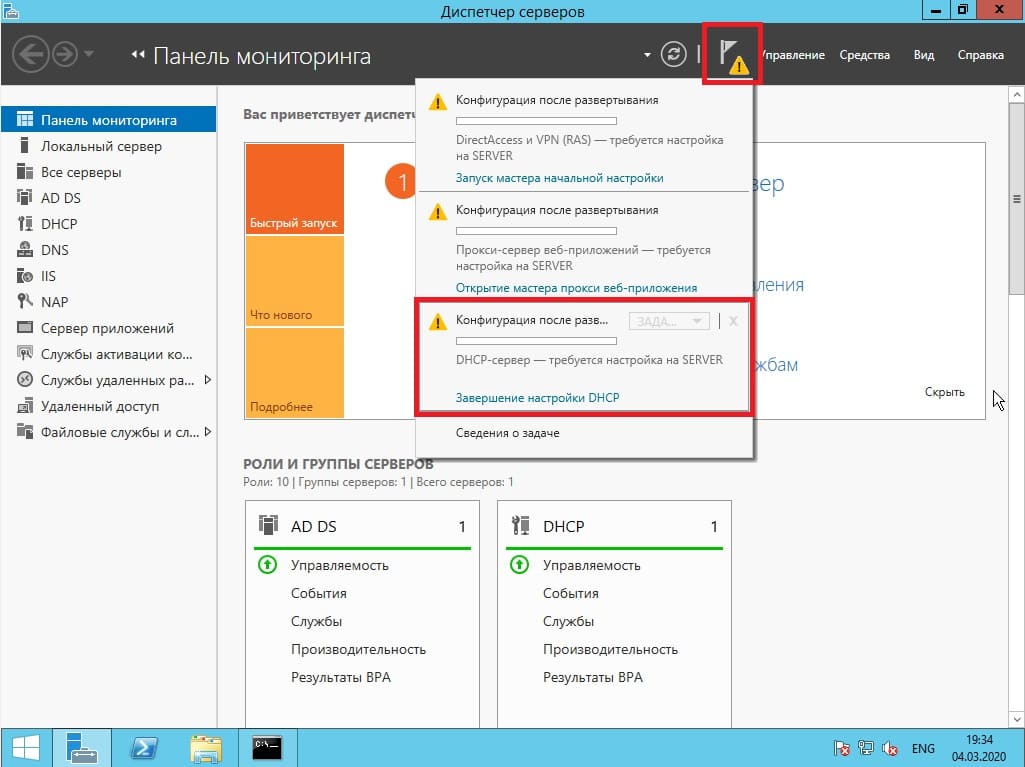
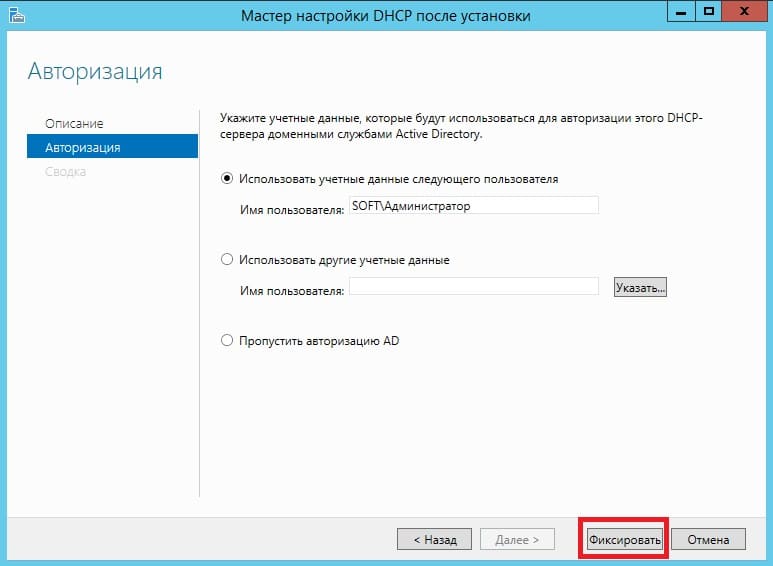
В меню «Авторизация» для удобства выбираем пункт «Использовать учетные данные текущего пользователя«. И нажимаем «Фиксировать».
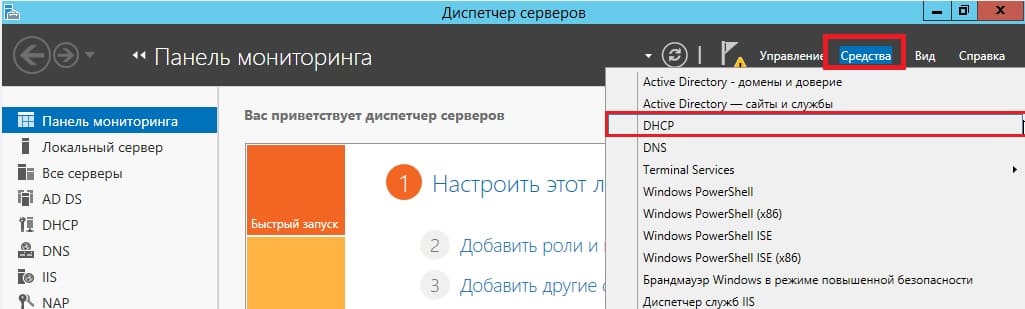
Теперь заходим в меню «Средства» => DHCP.
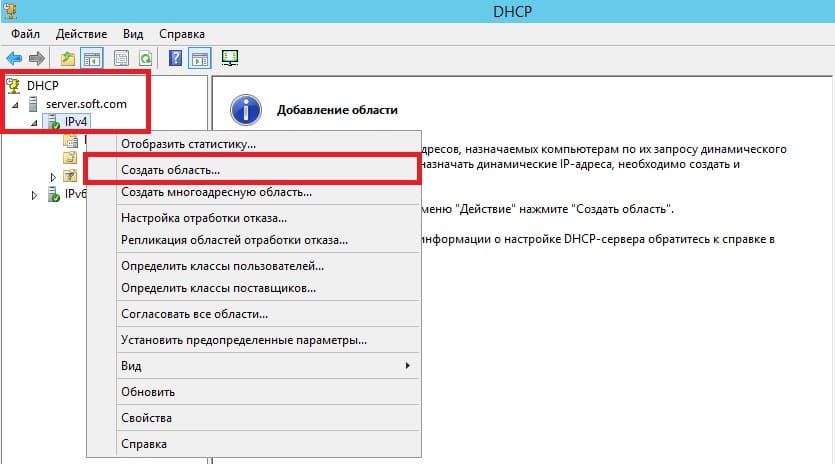
Разворачиваем дерево DHCP => «Имя вашего домена» => нажимаем на IPv4 правой кнопкой мыши => Создать область.
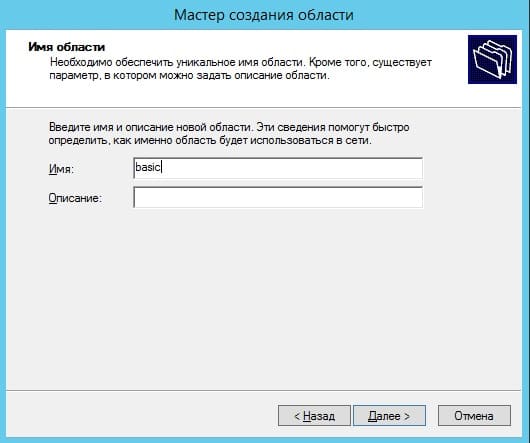
Задаем имя области, как пример «Basic», Вы можете задать любое название.
Теперь прописываем диапазон IP адресов, который будет раздавать Ваш сервер путем DHCP. Например 192.168.1.1/245. Диапазон задается по Вашему желанию.

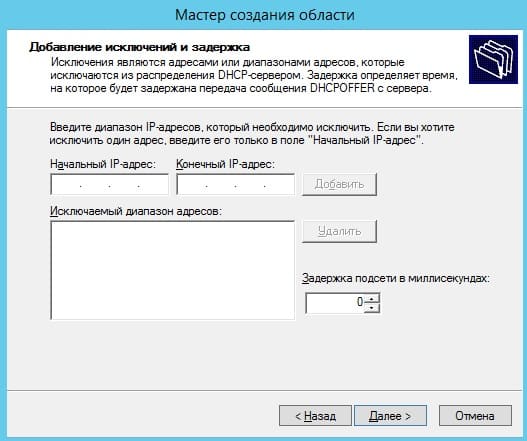
В следующем окне можете исключить какой-либо диапазон, например определенные IP адреса. На примере мы его пропустим.
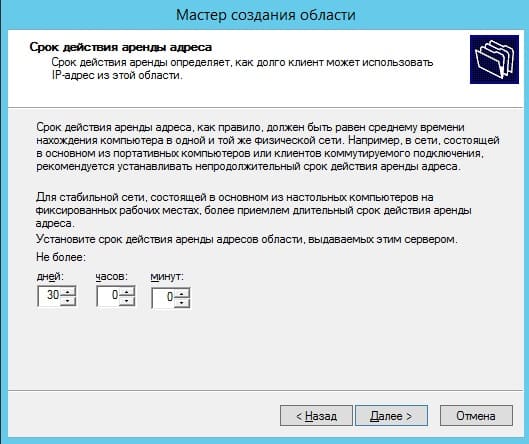
Задаем срок действия IP адреса для устройства, после которого динамически он сменится на другой. Можете задать любой срок в зависимости от Ваших задач, мы поставим 30 дней как пример.
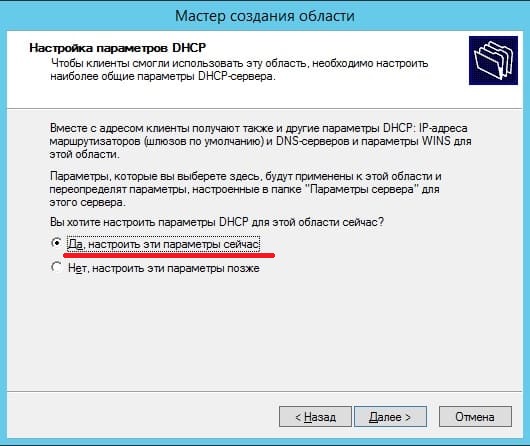
Можете добавить Ваш маршутизатор в эту область, либо пропустить этот шаг.

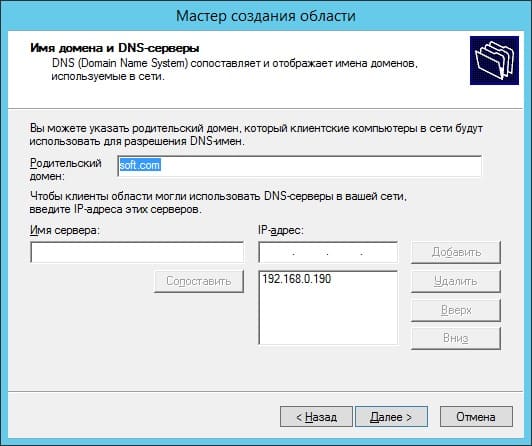
Укажите имя Вашего домена как родительский.
6) Теперь Вам можно уже настроить удаленные рабочие столы для пользователей. Для этого на Вашем сервере нужно лицензировать сервер удаленных рабочих столов. С инструкцией как происходит настройка RDP на сервере можете ознакомиться в нашей прошлой статье на следующей странице. Приобрести ключ активации для лицензирования Windows Server User/Device CAL можете в нашем каталоге. Быстрая доставка ключа в течении нескольких часов на Вашу электронную почту.
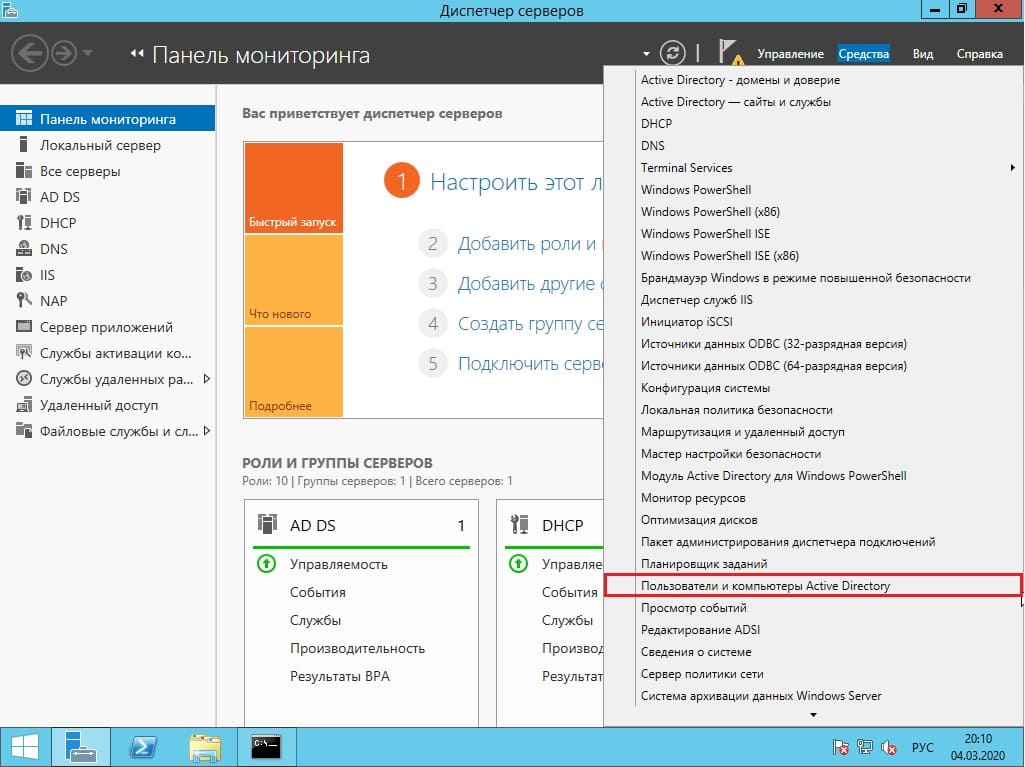
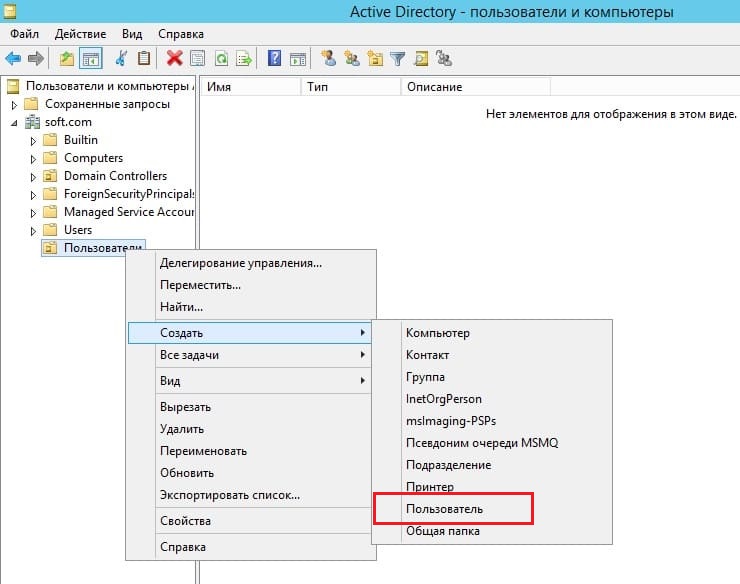
7) Теперь, после того как Вы успешно лицензировали сервер удаленных рабочих столов, можно добавить первого пользователя для подключения по RDP. Заходим в «Диспетчер серверов» => Средства => Пользователи и компьютеры Active Directory.
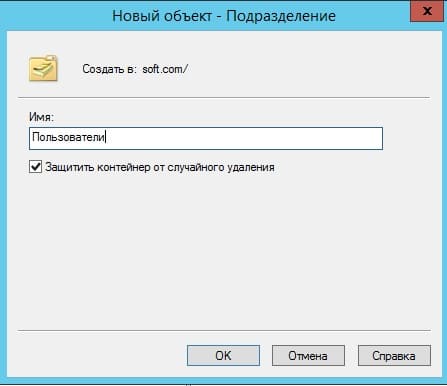
Разворачиваем дерево «Пользователи и компьютеры» => Правой кнопкой мыши на название Вашего домена или просто имя сервера => Создать => Подразделение.
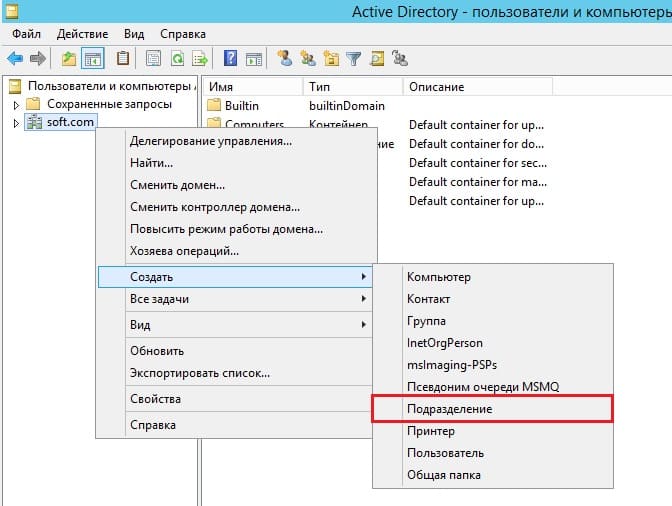
Чтобы было понятно, что за подразделение можете задать ему имя «Пользователи», или «Клиенты».
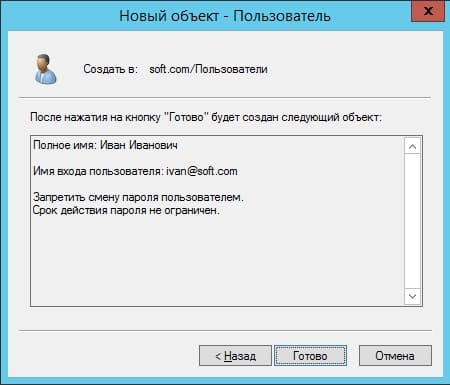
Далее в новом разделе «Пользователя» (в зависимости от того, как Вы назвали Ваше подразделение). Нажимаете на него правой кнопкой мыши => Создать => Пользователь.
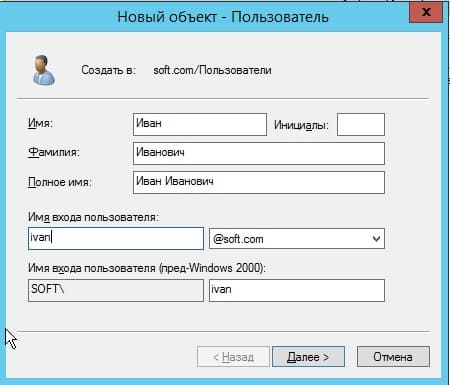
Теперь в карточке пользователя задаем параметры для пользователя, его имя, фамилию, имя для входа на латинице.
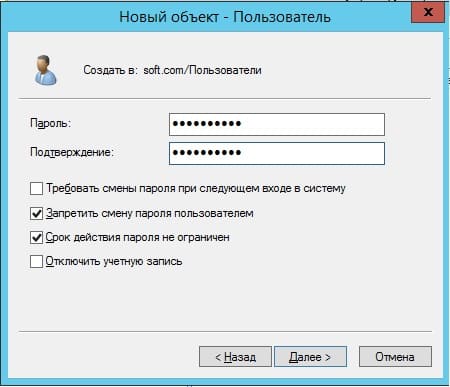
Задаем пароль для входа пользователю на сервер. Так же, по желанию, можете запретить смену пароля пользователям (желательно), поставить неограниченный срой действия пароля, чтобы в дальнейшем заново не задавать его.
Добавление пользователя закончено. Теперь по RDP пользователь может подключиться к серверу со своими данными.
На этом все, мы закончили самую базовую настройку.