
Все способы:
- Шаг 1: Активация учетной записи администратора
- Способ 1: «Локальные пользователи и группы»
- Способ 2: «Редактор локальных групповых политик»
- Способ 3: «Командная строка»
- Шаг 2: Вход в учетную запись администратора
- Вопросы и ответы: 1
Шаг 1: Активация учетной записи администратора
По умолчанию учетная запись администратора в Windows 10 скрыта, но каждый пользователь, обладающий повышенными привилегиями, способен ее активировать одним из нескольких доступных способов.
Примечание! Если ваш профиль не имеет прав администратора, предварительно их нужно будет получить. Делается это двумя способами, каждый из которых описан в отдельной статье на нашем сайте. Перейдите по ссылке ниже, чтобы ознакомиться с изложенной там информацией.
Подробнее: Получение прав Администратора на компьютере с Windows 10
Способ 1: «Локальные пользователи и группы»
Проще всего активировать учетную запись администратора через специальную утилиту, для этого потребуется выполнить следующие действия:
-
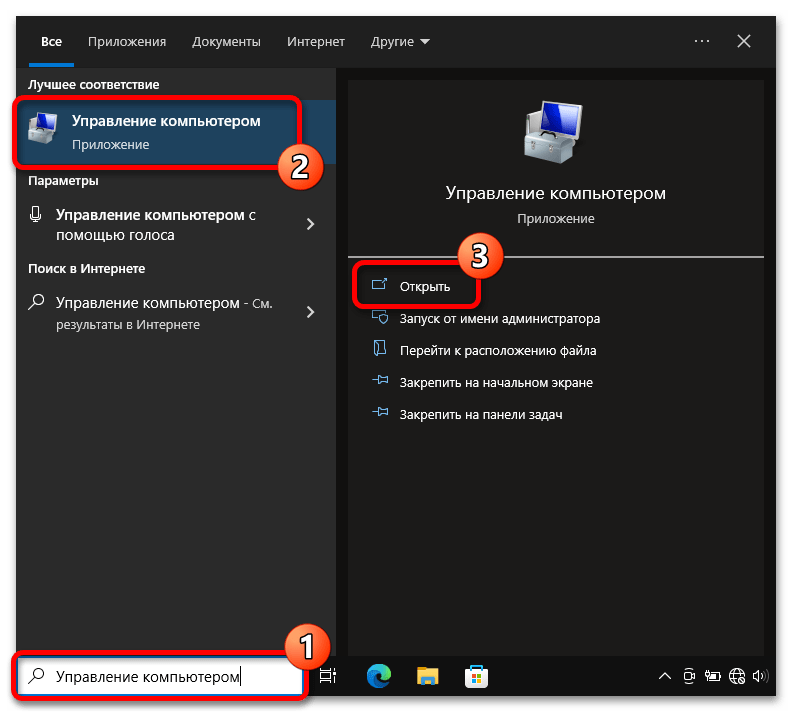
Откройте окно «Управления компьютером» любым доступным способом. Например, сделать это можно посредством поискового запроса. Установите курсор в соответствующее поле на панели задач, введите «Управление компьютером», а затем в результатах выдачи кликните по одноименному приложению.

Читайте также: Способы запуска «Управления компьютером» в Windows 10
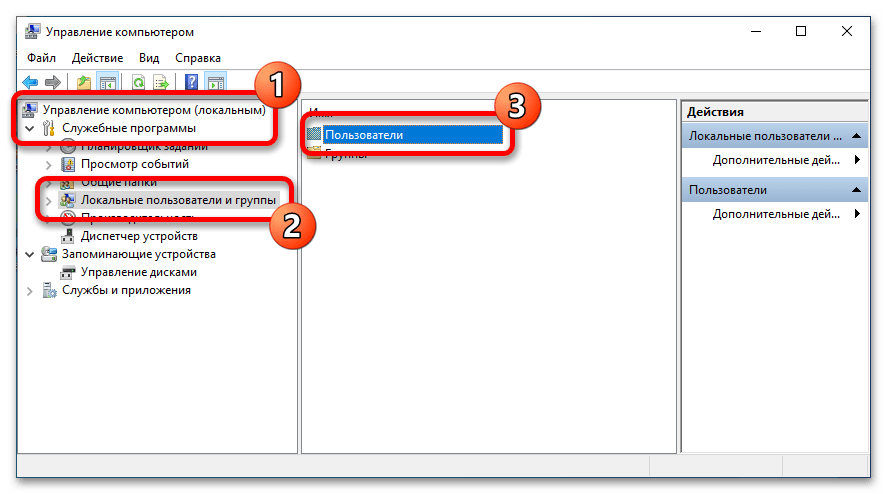
- В появившемся окне, воспользовавшись навигацией в левой части интерфейса, перейдите в раздел «Локальные пользователи и группы», а затем в основной области откройте папку «Пользователи».
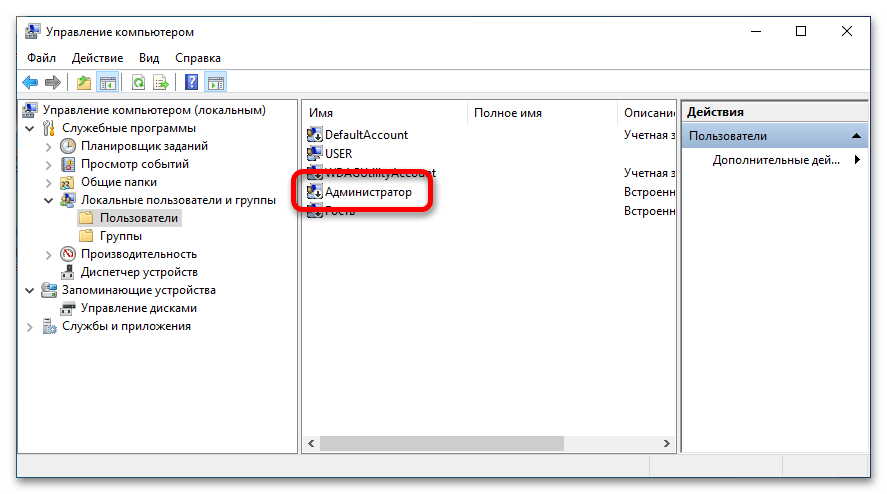
- В списке всех аккаунтов найдите «Администратор» и откройте его свойства. Для этого дважды кликните левой кнопкой мыши по имени.
- В появившемся окне, находясь на вкладке «Общие», уберите отметку с пункта «Отключить учетную запись». Сохраните внесенные изменения, щелкнув по кнопке «Применить», а затем «ОК».

После этого все запущенные окна можно закрыть и переходить к следующему шагу текущего руководства.
Способ 2: «Редактор локальных групповых политик»
Активировать учетную запись администратора в Windows 10 можно и через «Редактор локальных групповых политик». Это специальная утилита, которая позволяет вносить правки в работу операционной системы путем изменения отдельных ее параметров.
Важно! Этим способом можно воспользоваться только в том случае, если у вас редакция Windows 10 «Корпоративная» или «Профессиональная». Иначе указанной утилиты в операционной системе попросту не будет.
-
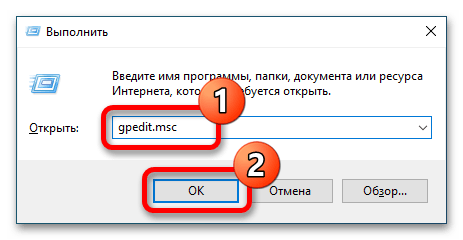
Откройте «Редактор локальных групповых политик» любым доступным способом. Проще всего это сделать через окно «Выполнить». Сначала вызовите его нажатием сочетания клавиш Win + R, а затем введите приведенную ниже команду и нажмите по кнопке «ОК».
gpedit.msc
Читайте также: Все способы запуска «Редактора локальных групповых политик» в Windows 10
-
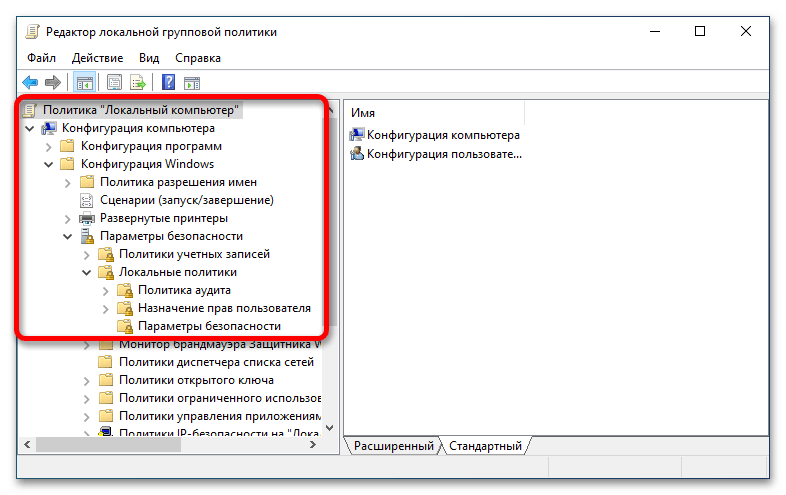
В открывшемся окне, воспользовавшись навигацией в левой части интерфейса, перейдите по указанному ниже пути.
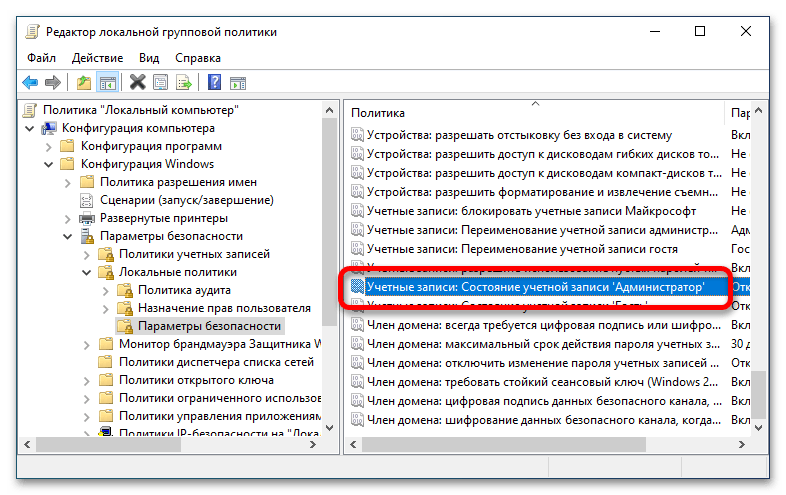
«Конфигурация компьютера» → «Конфигурация Windows» → «Параметры безопасности» → «Локальные политики» → «Параметры безопасности» - Находясь в целевой директории, в списке всех параметров найдите «Учётные записи: Состояние учётной записи ‘Администратор’» и щелкните по названию дважды левой кнопкой мыши, чтобы открыть свойства.
- В появившемся окне проследуйте во вкладку «Параметр локальной безопасности», переведите переключатель в положение «Включен», а затем кликните по кнопке «Применить» и «ОК».
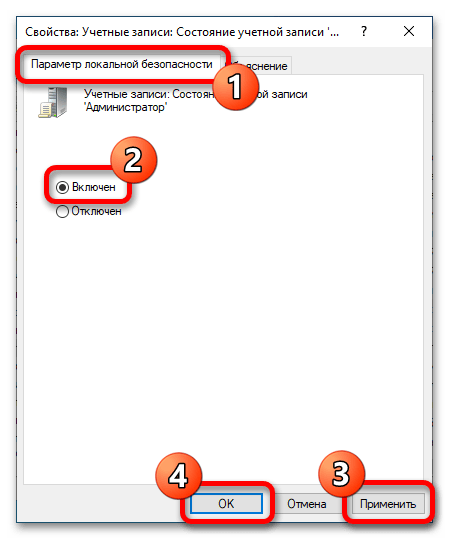
После этого можно закрыть все окна и переходить к следующему шагу текущей инструкции — учетная запись администратора активирована.
Способ 3: «Командная строка»
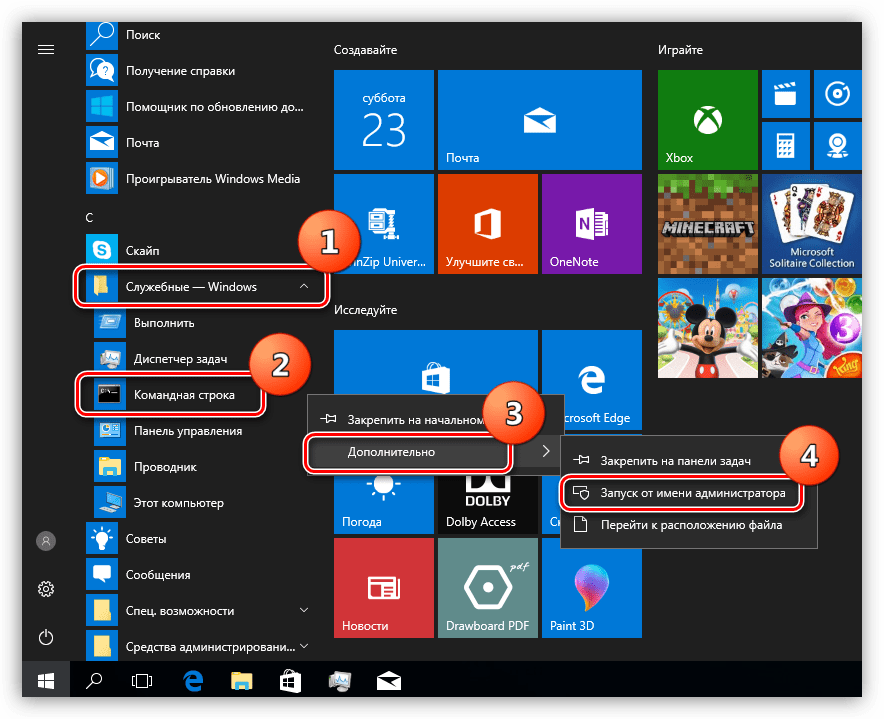
Быстрее всего включить профиль администратора можно путем ввода специальной консольной команды. Все действия в этом случае выполняются в «Командной строке», запущенной от имени администратора. В Windows 10 сделать это можно различными способами, например, через контекстное меню кнопки «Пуск». Нажмите по ней правой кнопкой мыши и выберите «Командная строка (администратор)».
Читайте также: Запуск «Командной строки» от имени администратора
После появления на экране черного окна консоли необходимо ввести приведенную ниже команду, чтобы произвести активацию учетной записи администратора. Обратите внимание, что при успешном ее выполнении появится соответствующая надпись. Это будет означать, что все сделано верно.
net user администратор /active:yes

Шаг 2: Вход в учетную запись администратора
После того как учетная запись администратора была активирована, в нее можно войти. Далее будет приведен способ, подразумевающий, что вы изначально находитесь в профиле обычного пользователя.
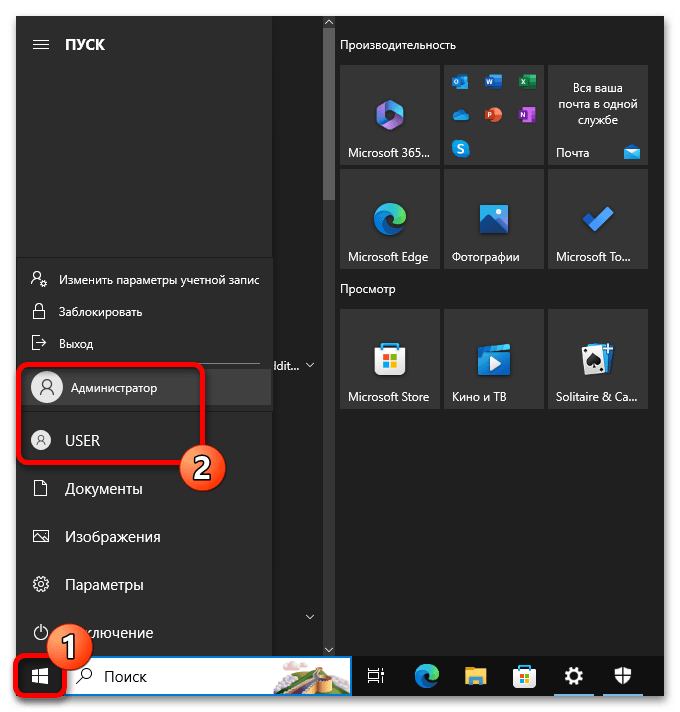
Откройте меню «Пуск» и кликните единожды по иконке своего профиля в левой части интерфейса. В появившемся контекстном меню нажмите по строке «Администратор».
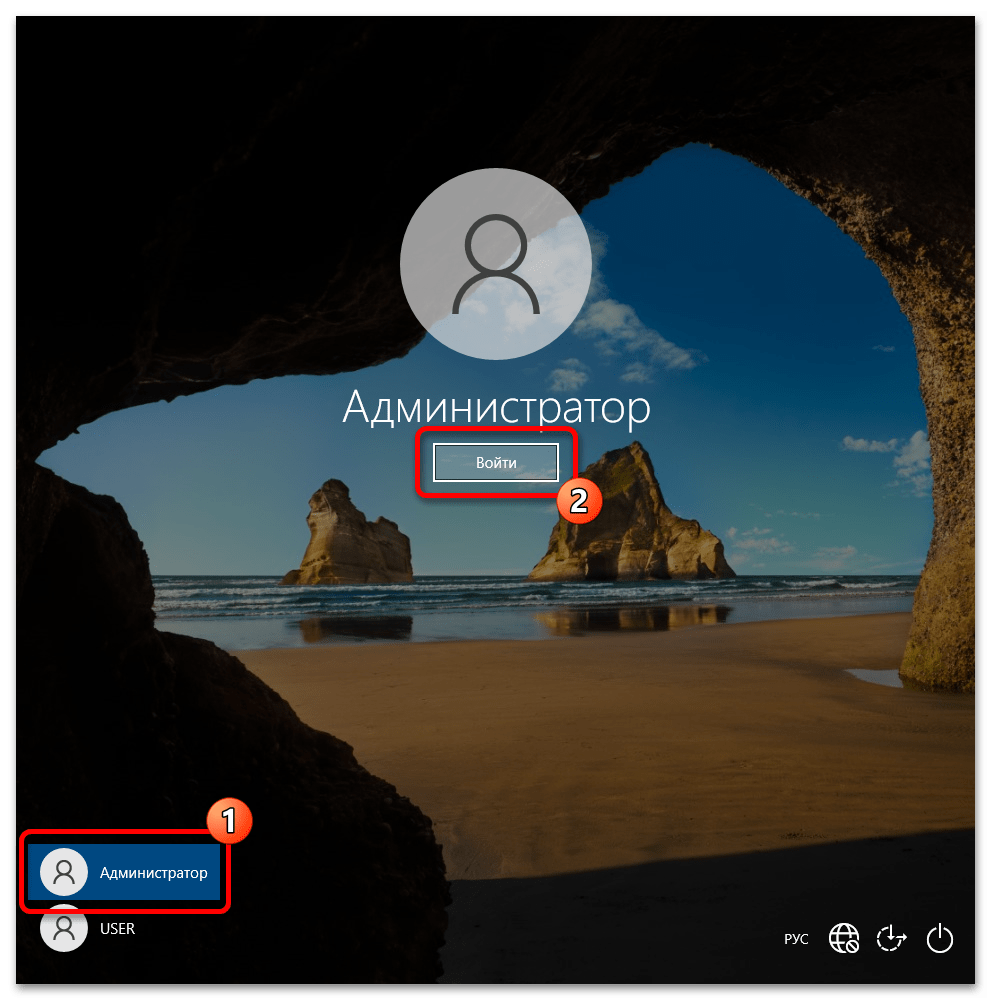
После этого будет осуществлен выход из текущей учетной записи на начальный экран Windows 10. В левой нижней части выберите аккаунт «Администратор», а затем щелкните по кнопке «Войти».
Сразу после этого будет осуществлена авторизация в учетную запись администратора. В будущем эти же действия нужно будет выполнять при запуске компьютера, каждый раз выбирая соответствующий профиль на приветственном экране Windows 10
Наша группа в TelegramПолезные советы и помощь
Download Article
Step-by-step administrator login guide for Windows 10
Download Article
- Making an Account an Administrator (Control Panel)
- Making an Account an Administrator (Settings)
- Enabling Administrator Account in CMD
- Enabling Administrator Account in PowerShell
- Logging In as an Administrator
- Video
- Expert Q&A
- Tips
|
|
|
|
|
|
|
An administrator (admin) account can change security settings, install and uninstall software, access every file, and change settings for other users. When you first start up Windows 10 or 11, you’re walked through the setup of the first user account, which is set to administrator. This wikiHow will show you how to log in as an administrator in Windows 10.
Administrator Login: Quick Steps
- Open the Control Panel.
- Go to User Accounts > User Accounts.
- Click Change account type on your account.
- Select Administrator and click Change account type.
-

If you want to make your own account an administrator on this PC or give admin rights to another account, you can do so in the Control Panel. You will need the current administrator password to do this. To get started, type control panel into the Windows search bar, then click Control Panel.[1]
- Alternatively, you can use the command line to open the control panel.
- You can also use this method to give administrator rights to another user account on this PC.
-
It’s the green text next to an icon that resembles a person. It’s on the right side.
Advertisement
-
It’s next to an icon that resembles two people. This will show you a page with information about the Windows user account you are currently logged in to.
-
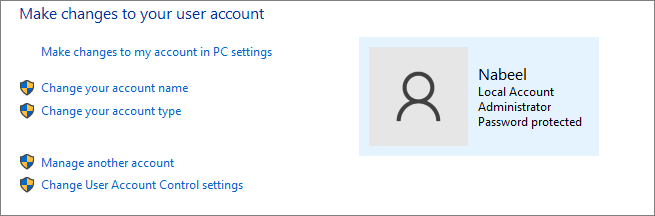
In the profile box on the right side of the User Accounts page, you’ll see “Administrator” under the username if the account is an administrator. If you’re already an administrator, you don’t need to proceed—you have full admin access to the system.
- You can check the status of other accounts by click Manage another account in this menu.
- If you are not using a Microsoft account, you will see «Local Account» above «Administrator.»
-
If your account isn’t an administrator, you can change it to one (if you know the administrator login information). To do so:[2]
- Click Change your account type.
- Click the Administrator option.
- Click Change account type.
- Type the admin password when prompted.
- You’re done! Your user account can now perform all tasks as an administrator.


Advertisement
-
If you want to make your own account an administrator on this PC, or give admin rights to another account, it’s easy to do in Settings. You will need to be using an administrator account to do this, or have the password for an administrator-level account. Start by opening the Start menu and selecting Settings.
-
This opens the Accounts settings.
-
You’ll see this in the left panel on Windows 10. If you’re using Windows 11, select Other users in the right panel instead.[3]
-
You may need to click the name of the user first.
-
When prompted, enter the administrator password or click Yes to confirm. This makes the selected account an administrator.
- The «Administrator» account type gives the selected account full admin permissions. Whenever this account logs in to this particular computer, it will be an administrator and can perform all tasks that the administrator account can.


Advertisement
-
If you want to be able to log in with the «Administrator» username and password, you will need to enable the Administrator account, which is disabled by default. To get started, press the Windows key and type cmd.[4]
- You will need to be logged in to an account that has administrative permissions to enable the Administrator account in Windows 10.
-
Click Yes in the box that pops up to continue.
-
You’ll see text confirming your entry. If you see an error, you may have mistyped the command. The default Windows 10 administrative account is active but not password protected.
-
To log in as an administrator, the account will need a password. To set the admin password, type net user administrator * and press Enter. When prompted, enter and confirm a new password for the administrator account.[5]
-
You can access the option to Sign out from your profile picture in the Start Menu. Or, to keep your account logged in, select Switch User instead to return to the login screen.
-
If you don’t see it, click Other Accounts and enter .\Administrator as the username.
-
Click the submit arrow button. This will log you into Windows as an administrator.


Advertisement
-
To enable the administrator account in PowerShell, you’ll need to run PowerShell as an administrator. To do this:
- Press the Windows key on your keyboard.
- Type powershell into the Search bar.
- Right-click Windows PowerShell and select Run as administrator.
- Click Yes to continue.
-
At the prompt, type net user administrator /active:yes and press Enter. This enables the «Administrator» user, but it will not work until you create a password.
-
To do this, you’ll need to enter the following command, but replace «NewPassword» with the password you would like to assign to the Administrator account:
- Set-LocalUser -Name "Administrator" -Password (ConvertTo-SecureString -AsPlainText "NewPassword" -Force).
- Once the password is assigned, you can now log in with the Administrator account.


Advertisement
-
If you’re logged in to Windows already and want to switch to an Administrator account, you can click the Start menu, select your profile photo, and click Sign Out to return to the login screen.
- Alternatively, click your profile photo and select Switch user if you don’t want to log your current account out of the system.
- If you’re at the login screen, skip to step 3 instead.
-
If you are not prompted to enter a username, choose this option to bring up the username and password fields.[6]
-
If you’re signing in as the local «Administrator» account, type .\Administrator as the username, then type the password of the local admin account. Once your password is accepted, you’ll be logged in to the computer as an administrator.
- If you need to log in as the domain administrator, use domain_name\Adminstrator instead.
-
After entering your password, click the arrow to log in as an administrator.


Advertisement
Add New Question
-
Question
I typed in the command on CMD and it said «Access is denied». So what do I do now?
Kyle Smith is a wikiHow Technology Writer, learning and sharing information about the latest technology. He has presented his research at multiple engineering conferences and is the writer and editor of hundreds of online electronics repair guides. Kyle received a BS in Industrial Engineering from Cal Poly, San Luis Obispo.
wikiHow Technology Writer
Expert Answer
Try checking the administrator status of your account by going to Control Panel > User Accounts > User Accounts. If you’re not an administrator but you know who is, ask them for the admin password. Or, ask them to make your account an administrator.
Ask a Question
200 characters left
Include your email address to get a message when this question is answered.
Submit
Advertisement
Video
Thanks for submitting a tip for review!
Advertisement
About This Article
Article SummaryX
1. Run Command Prompt as an administrator.
2. Type net user administrator /active:yes and press Enter.
3. Close Command Prompt.
4. Log out.
5. Click the Administrator account from the login page.
Did this summary help you?
Thanks to all authors for creating a page that has been read 304,575 times.
Is this article up to date?
An administrator account in Windows 10 possesses all the privileges, such as changing security and configuration settings, installing and uninstalling applications, and allowing/limiting other users’ access.

Windows 10 asks to set up an administrator account after a successful installation. After this, an administrator account can create more «administrator» or «standard» accounts. If you’re using Windows 10, and want to log in as an administrator to make necessary changes, you’re on the right page. This article will share how to log in as an administrator in Windows 10.
Login As an Administrator From Control Panel
The first way is to log in as an administrator from the Control Panel. Here’s how to do it in five simple steps.
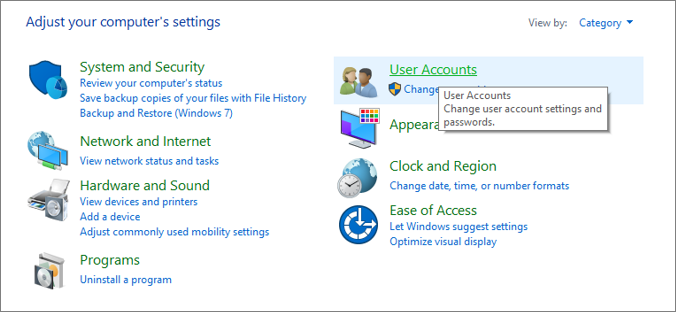
Step 1. Open Control Panel by typing «Control Panel» in the Windows 10 search bar.
Step 2. Click on the «User Accounts».
Step 3. After that, click again on the «User Accounts» option. Here, you can confirm whether you’re already logged in as an administrator. If you’re logged in as an administrator, it will be visible under your account name and account type.
Step 4. You can also confirm the status of other accounts by clicking «Manage another account».
Step 5. You can change the status of your account if you’re not an administrator (if and only if you have the credentials of the administrator’s account). To do so, apply the following operation:
- Click on your current profile
- Select «Change the account type»
- Click the «Administrator option»
- Enter the admin password when prompted
Login As an Administrator From Command Prompt
The second option to log in as an administrator is from the command prompt. Follow the below steps to complete the process.
Step 1. Search for «cmd» in the search bar, then right-click the search result and click «Run as Administrator». Also, allow this app to make changes to your system.
Step 2. Type net user administrator /active:yes in the cmd interface and press Enter. You’ll see the message «The command completed successfully». By doing this, you have successfully activated the default Windows 10 administrative account without password protection. You can also type net user administrator * to change the password.

Step 3. Now, log out of your current session. To do so, click on the Windows icon and then your profile picture icon. Here, click on the «Sign out» option.
Step 4. After the sign-out, click the Administrator user account.
Step 5. Type the password for the account (if you set up any) to log in as an administrator.
Conclusion
Windows 10 offers two different ways to create a user account. One is a Microsoft account, and the other is a local account. On top of this, you can either log in as an «administrator» or as a «standard user». There are two simple ways to log in as an administrator in Windows 10, which have been discussed in this article. Now, you can easily change a «standard user» to an «administrator» within a couple of steps.
FAQs
1. Can you change the status of your account?
Yes, you can change the status of your account if you have the password of the administrator’s account.
2. How many ways to create a user account in Windows 10?
There are only two ways to create a user account in Windows 10; one is from a Microsoft account, and the other is a local account.
3. How many users can I have on Windows 10?
There is no limit on the number of accounts you can have in Windows 10.
Права администратора Windows 10 как включить? Есть парочка методов:
- Консолью.
- Инструкцией Локальной политики безопасности.
- Инструкцией Локальных пользователей и групп.
- Инструкцией Управления компьютера.
Но важно помнить, что обладатели версии ОС «Домашняя» не сумеют применить вышеуказанные методы, чтобы активировать учетную запись администратора в Виндовс 10 и использовать её в будущем.
Как стать администратором в Виндовс 10 с помощью командной строки
В Виндовс 10 и 11 стандартная учетная запись администратора изначально отключена и скрыта, но её можно активировать при необходимости. Это делается через командную строку, что позволяет включить доступ к этой учетной записи и использовать её для выполнения системных задач. Пошаговые действия:
1. Запустите поиск на вашему ПК и впишите «cmd».
2. Найдите в результатах консоль и кликните «Запуск от имени администратора».
3. В консоль впишите: net user administrator /active:yes. Нажмите Enter.
4. Выполнив команду, перезапустите компьютер. После этого у вас появится возможность выбрать учетную запись администратора для входа в систему.
После активации вы сможете использовать эту учетную запись для выполнения административных задач, но помните, что её не рекомендуется использовать для повседневной работы из соображений безопасности.
Желательно так же установить новый пароль для администратора при помощи инструкции «net user Администратор *», вводится в строку, при этом новые данные пароля необходимо ввести два раза.
Как сделать себя администратором в Windows 10 с помощью инструкции Локальная политика безопасности
Через окно «Выполнить» вводим инструкцию «secpol.msc», далее следующее:
В появившемся окне выбираем из списка графу «Локальная политика», далее графу «Параметры безопасности», дальше выбираем «Учетные записи: Состояние учетной записи Администра…» появляется новая вкладка, в которой выбираем «Параметр локальной безопасности», ставим отметку напротив «Включен». Все, включение администратора в Windows 10 закончено.
Так же запустить выше представленную инструкцию можно следующим способом:
Нажимаем на кнопку «Пуск», далее выбираем из списка «Панель управления», далее снова из списка «Администрирование».
Как зайти от имени администратора Windows 10 с помощью инструкции Локальные пользователи и группы
Через окно «Выполнить» вводим инструкцию «lusrmgr.msc», через появившееся новое окно выбираем каталог «Пользователи» (находится в левой стороне). Появится новый список со всеми пользователями, которые зарегистрированы на данном ПК. Кликаем на графе «Администратор», посредством чего снимается отметка графы «Отключение учетных записей».
Далее нажимаем кнопку «ОК», сохраняем проделанные исправления.
Как получить права администратора в Виндовс 10 с помощью инструкции Управление компьютером
Через окно «Выполнить» вводим инструкцию «compmgmt.msc», далее открывается новая вкладка со списками, где необходимо проделать следующие действия:
Из списка слева выбираем пункт «Управление компьютером», далее пункт «Служебных программ», после пункт «Локальных пользователей», затем просто «Пользователи», где выбираем графу «Администратор»,
два раза кликаем на ней и в новом контекстном меню снимаем отметку возле надписи «Отключение учетной записи».
Выключение
С вопросом как включить администратора в Windows 10 разобрались, а вот как выключить эту функцию? Все действия по выключению проводятся теми же утилитами и функциями ПК, но только вместо включения параметров, последние выключаются. Необходимо помнить то, что применять права администратора необходимо в исключительных моментах, работать регулярно из нее не желательно, так же как и оставлять ее долго включенной.
Так же всегда старайтесь использовать на своем компьютере исключительно лицензионное Программное Обеспечение, ключи для которого вы всегда можете приобрести В НАШЕМ ИНТЕРНЕТ МАГАЗИНЕ по доступной стоимости. Только в этом случае вы будете застрахованы от множества ошибок и сбоев в работе вашего ПК.
In Windows 10, knowing how to run programs as administrator is very important. By default, apps and games in Windows 10 run without administrator permissions, to prevent unauthorized changes to your system. However, there are times when some programs require administrator permissions to work properly or to run specific commands. Windows 10 offers you the ability to run programs as admin without having to disable anything. Here are all the methods to use «Run as administrator» on any desktop app in Windows 10:
First things first: About UAC and Run as administrator
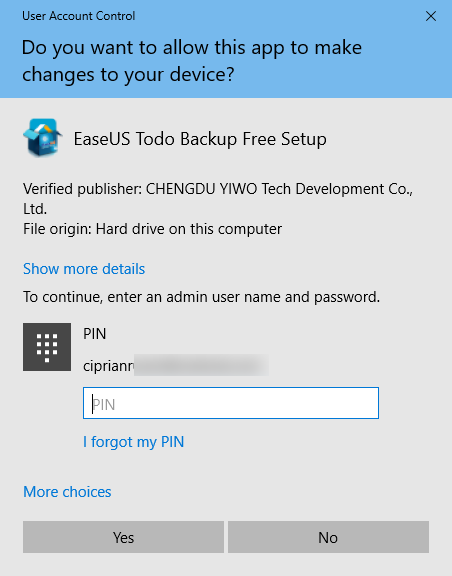
In early versions of Windows, applications had system-wide privileges, which was a security risk. All of Microsoft’s operating systems from Windows Vista onward, including Windows 10, include UAC or User Account Control, a security feature that prevents unauthorized changes to the operating system. Trying to run an application as administrator is one of the changes that require administrative privileges. Before the selected program is launched, a UAC prompt is triggered, asking for permission. If you run the application from an account without administrator permissions, the UAC prompt asks you to enter an administrator password. Without the admin password, the program does not launch.
In Windows 10, you can only run a program with administrator permissions if it is a desktop app. Some of these applications, like security software, cannot run correctly without having administrative permissions. Windows apps that are installed from the Microsoft Store cannot be run with administrative privileges in Windows 10. Furthermore, they have the same level of permissions as a normal user account, so they are not allowed to make changes to advanced system settings or the Windows Registry.
You can learn more about the difference between desktop apps and UWP apps and figure out which ones you can «Run as administrator» by reading What is a Windows app? How is it different from a desktop app or a program?.
1. Run a program as admin from the contextual menu of its Start Menu shortcut or tile
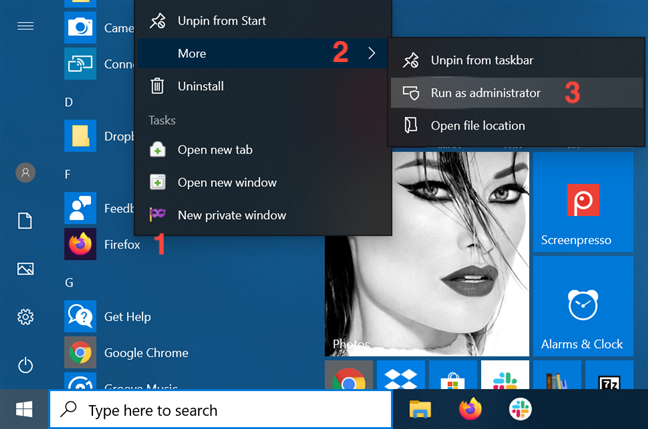
In Windows 10, you can launch a program with administrative permissions by using the contextual menu of its Start Menu shortcut. First, open the Start Menu. Then, find the shortcut of the program you want to launch in the All apps list, and right-click or press-and-hold on it to open a contextual menu. Click, tap, or hover over the More option, and then click or tap on «Run as administrator.«
If you have a tile for your desktop app available in the Start Menu, right-click or press-and-hold on it to open a contextual menu. Access More and then click or tap on «Run as administrator.«
2. Run as administrator using «Ctrl + Shift + Click» on its Start Menu shortcut or tile
Open the Start Menu and locate the shortcut of the program you want to launch as administrator. Hold down both the Ctrl and the Shift keys on your keyboard and then click or tap on that program’s shortcut.
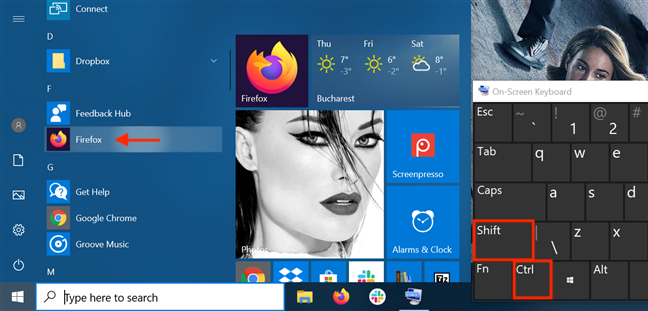
You can also use the «Ctrl + Shift + Click/Tap» shortcut on an app’s Start Menu tile to run it with administrator permissions in Windows 10.
During our tests, this method did not work every time, so if that is the case for you, either try again or consider running the app as administrator another way.
3. Run a program as administrator from its desktop shortcut
Find the desktop shortcut for the program you want to run as admin or create one yourself. Then, right-click or press-and-hold on it to open a contextual menu. Click or tap on the «Run as administrator» option.

4. Run a desktop app as administrator from its taskbar shortcut
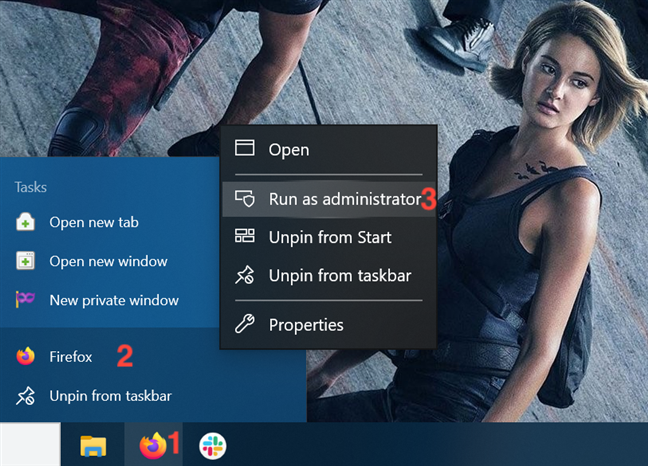
In Windows 10, you can also run a desktop app with administrator permissions from its taskbar shortcut. Right-click or press-and-hold on the shortcut, and then right-click or press-and-hold again on the program’s name. Then, from the menu that opens, choose «Run as administrator.»
You can also use the «Ctrl + Shift + Click/Tap» shortcut on an app’s taskbar shortcut to run it with administrator permissions in Windows 10.
5. Run a program as administrator from its right-click menu
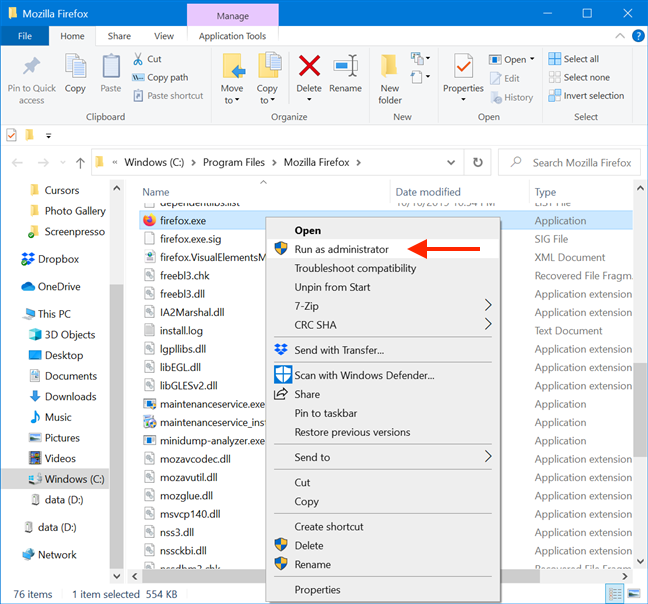
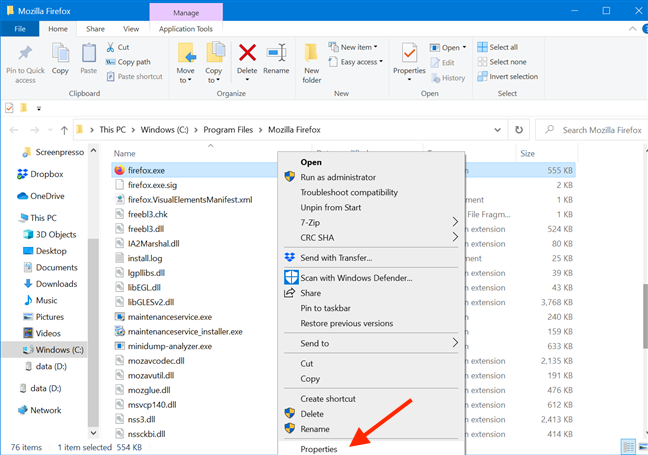
Although easier to find, shortcuts are not the only way to run a program as administrator in Windows 10. You can perform the same action from the main executable file’s contextual menu.
Open File Explorer and find the desktop app’s executable. Right-click or press-and-hold on it to open the contextual menu, and then click or tap on «Run as administrator.«
6. Use «Run as administrator» from File Explorer’s ribbon
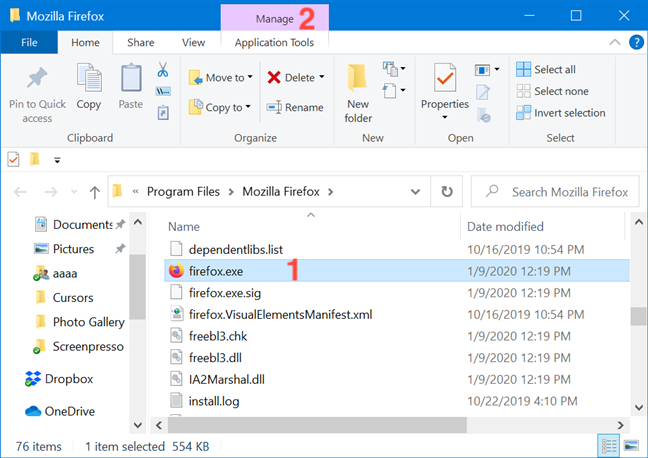
Find the program’s main executable in File Explorer. Select it, and then click or tap on the Manage tab from the ribbon.
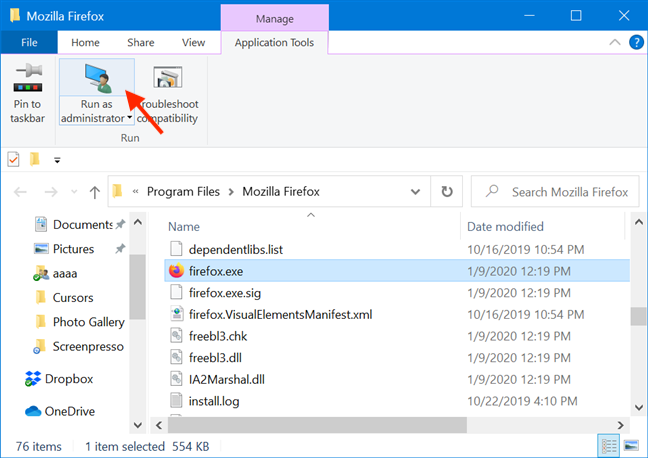
The option you need is displayed in the Run section of Application Tools. Click or tap on the upper half of the «Run as administrator» button to give the selected app admin permissions.
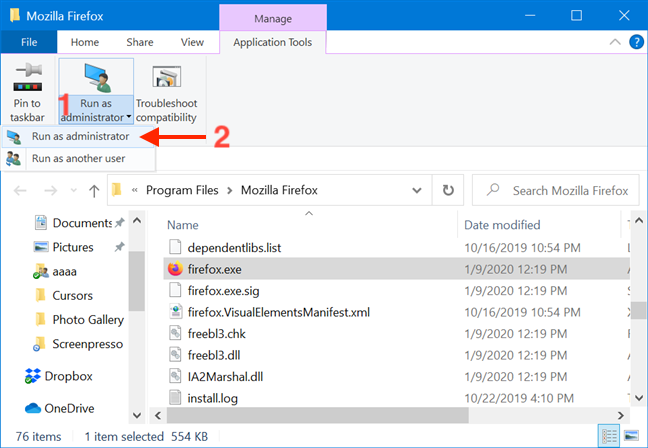
As an alternative, you can also press the lower half of the «Run as administrator» button and then click or tap on the «Run as administrator» option from the drop-down menu.
7. Run a desktop app as admin from the Search window
In the taskbar search field, type in the name of the program that needs to run with administrator permissions. Then, click or tap on the «Run as administrator» option displayed on the right side of the Search window.
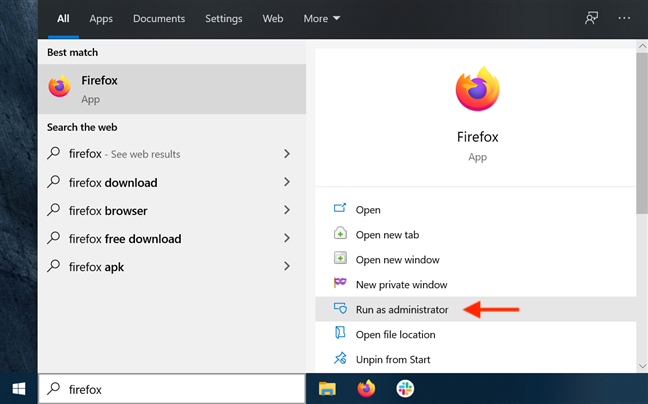
Obviously, when you see the UAC prompt asking for permission to run the app as admin, click or tap Yes.
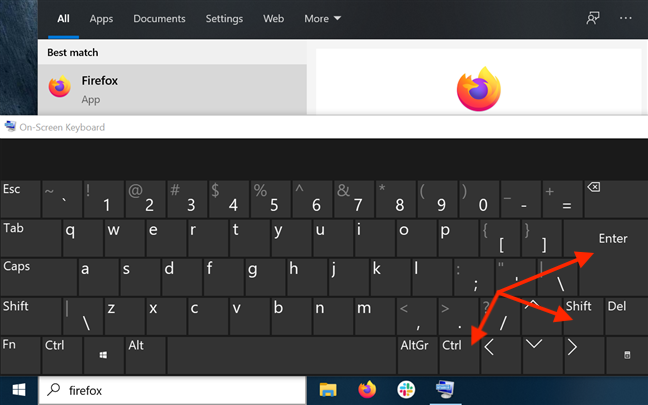
8. Run a program as administrator using «Ctrl + Shift + Enter» on its taskbar search result
Type the name of the program in your taskbar’s search field. If there are multiple results, use the arrow keys on your keyboard to highlight the program you want to run as administrator. Then, simultaneously press the Ctrl + Shift + Enter keys on your keyboard.
9. Run a program as administrator from the Run window
Open the Run window and type in the name of the executable for the program you want to run as administrator. Then hold down the Ctrl and Shift keys on your keyboard and click or tap on OK.
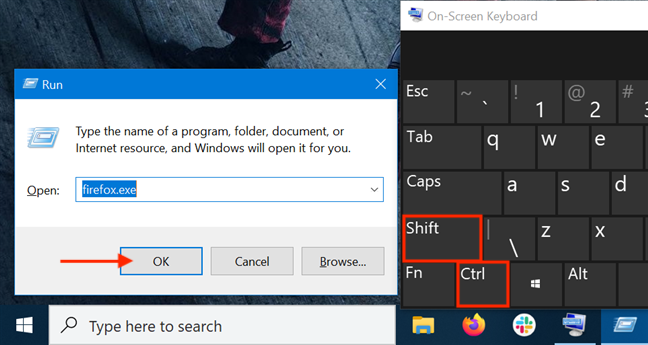
Alternatively, after typing in the name of the program’s main executable, press the Ctrl + Shift + Enter keys on your keyboard at the same time.

10. Run as admin from the Task Manager
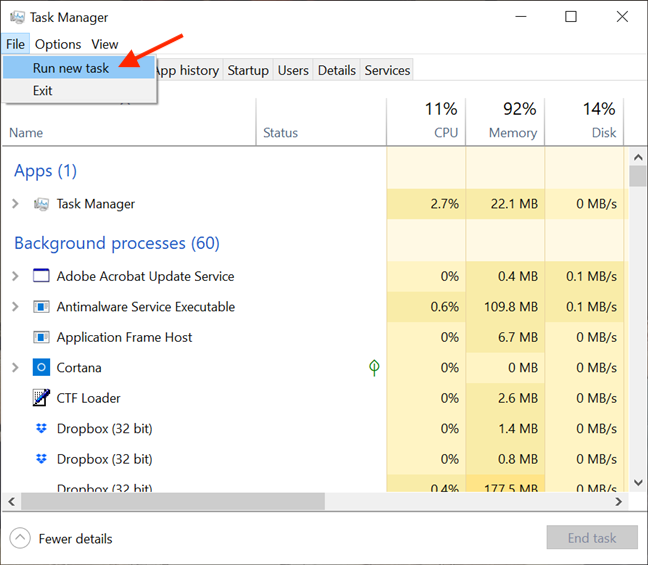
Another way to launch a program as administrator in Windows 10 is to start it using the Task Manager. To begin, open the Task Manager. Then, if it opens up in its compact view, click or tap on the More details button.
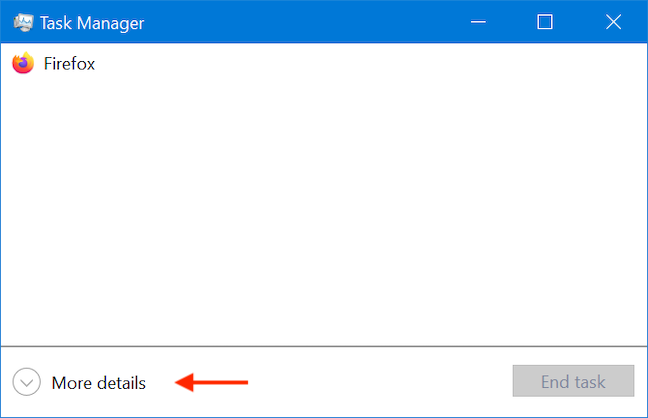
In the expanded Task Manager, open the File menu and click or tap on «Run new task.«
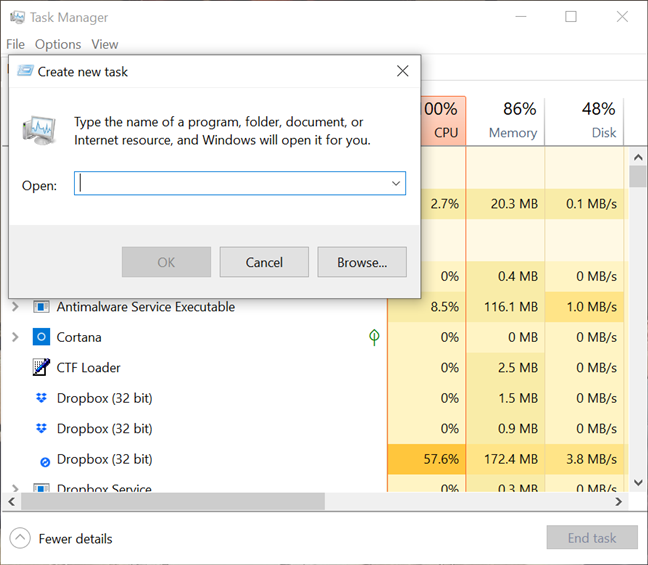
This opens the «Create new task» window. You can use its Open field to enter the path to the program you want to launch as administrator, or you can click or tap on Browse to navigate to it. Then, make sure to check the «Create this task with administrative privileges.» option and click or tap on OK.
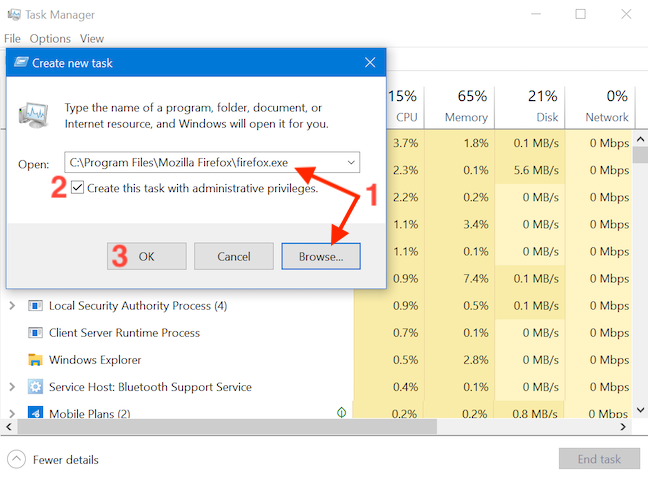
TIP: An advantage of using this method to launch programs as administrator is that you skip the UAC part of the process. That is because the app automatically inherits the permissions of the Task Manager — in our case, administrator permissions — so all you have to do is check the box to enable the option, as seen above. The option is missing if you only have standard user permissions on the device.
11. Run a desktop app as admin using the RunAs command in Command Prompt (CMD) or PowerShell
If the command line is your favorite way of asking your computer to do what you want, you can also access Command Prompt or PowerShell to run a program as administrator. Enter the following command in the CMD or PowerShell window, adjusting it to fit your needs:
runas /user:»your_computer_name\administrator_name» «C:\path\program.exe«
Replace your_computer_name with your computer’s name, administrator_name with the name of a user account that is an administrator on your system, and C:\path\program.exe with the complete path to the program that you want to run as administrator.
As seen in the image below, if you enter the command correctly, you are also asked to enter the administrator’s password. Then, press Enter on your keyboard once again.
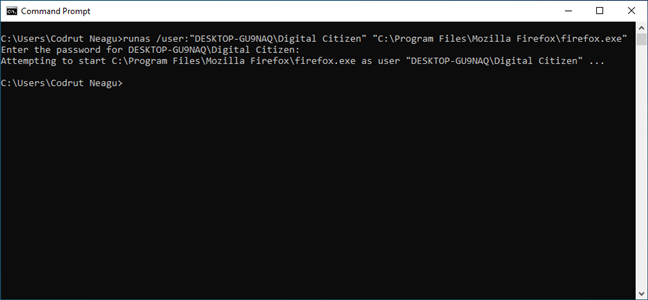
TIP: Using this method to launch programs as administrators, you skip the UAC part of the process.
12. Always run a program with administrator permissions
To avoid constantly having to use the methods illustrated above on desktop apps accessed on a regular basis, you can set a program to always run with administrator permissions.
First, open File Explorer and find the main executable of the program you want to run. Right-click or press and hold on it to open the contextual menu. Then, click or tap on Properties.
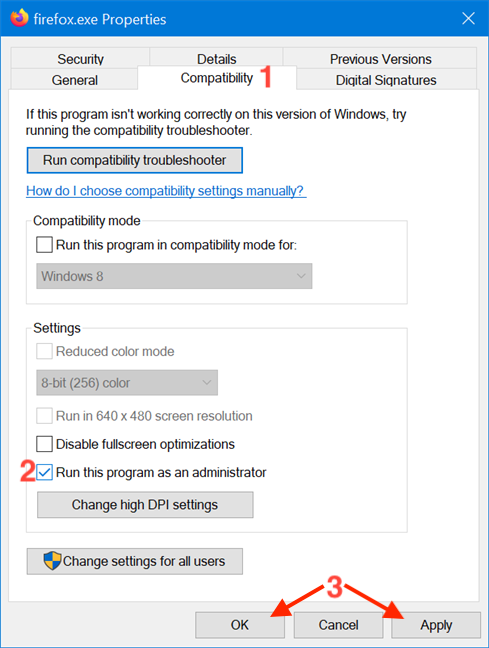
In the Properties window, go to the Compatibility tab. At the bottom of the window, check the box next to the «Run this program as an administrator» option, and then click or tap on Apply or OK.
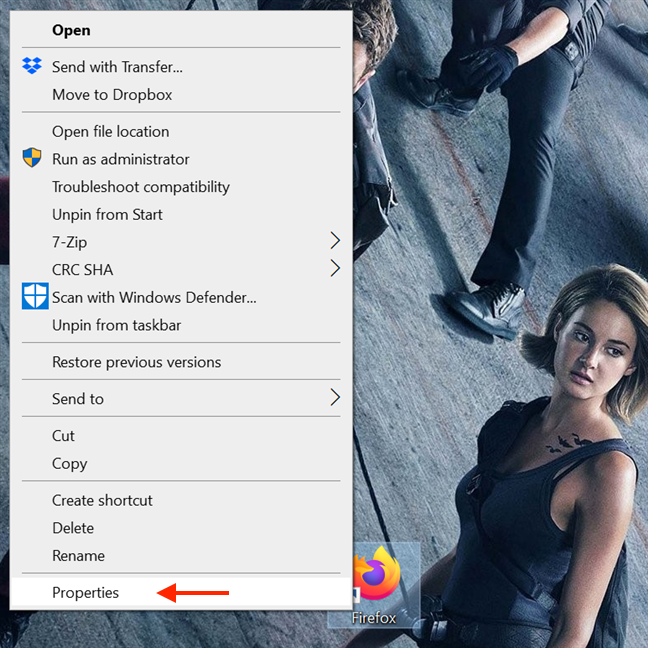
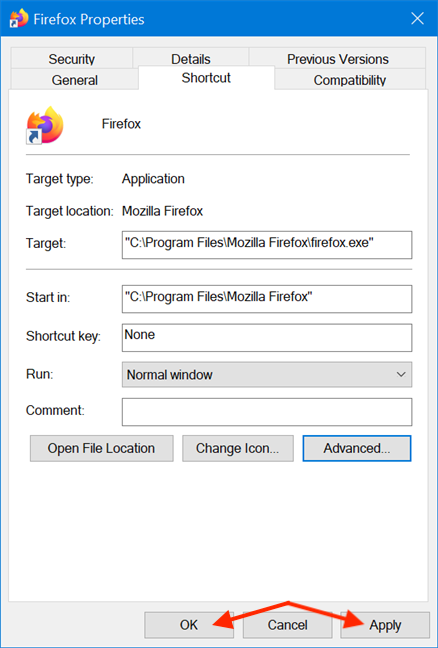
This setting is applied, and, from now on, the program always runs with administrator permissions. Follow the same steps if you want to disable the option. You can also edit the Properties of a program’s shortcut to avoid tampering with its main executable. To begin, right-click or press-and-hold on a program’s shortcut to access its contextual menu, and click or tap on Properties.
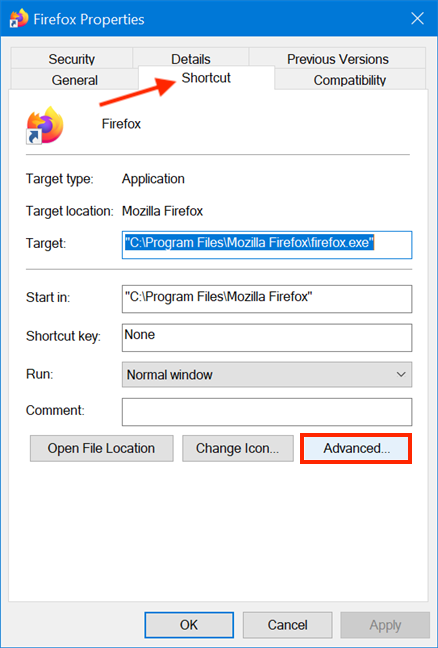
Then, in the shortcut’s Properties window, select the Shortcut tab. Click or tap on the Advanced button to open Advanced Properties.
In the Advanced Properties window, check the box next to «Run as administrator» and then click or tap OK.
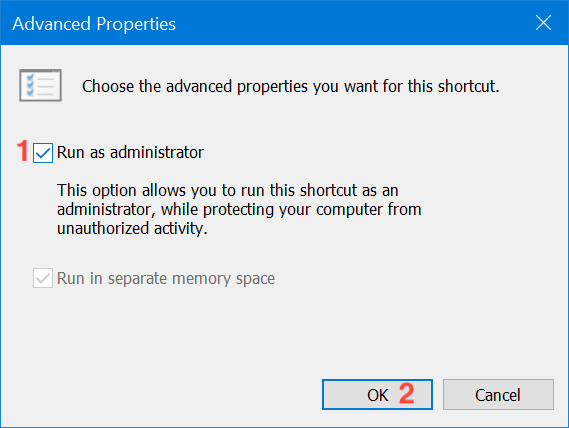
Finally, you are returned to the Properties window, where you have to click or tap on OK or Apply, and you are done.
The settings are applied, and your program works with administrative permissions as long as you open it using the same shortcut. When you use the methods in this section, the UAC prompts you as soon as you try to launch the app.
13. Run a program with administrator permissions and without a UAC prompt
Using the Task Scheduler, you can run a program as administrator without being prompted by the UAC (User Account Control) every time. It is simple, and you don’t have to disable UAC, thus compromising Windows 10’s security. We put together a detailed step by step guide to help you: Use the Windows Task Scheduler to run apps without UAC prompts and admin rights.
Which method(s) do you plan to use?
In Windows 10, there are fewer apps that need to run with administrator permissions than in older versions of Windows. However, a few legitimate programs still require elevated privileges. The main thing to remember is that even if you are logged in with an administrator account, you regularly run apps as a standard user. This means that if you need to run a program that requires administrator permissions, you can just use one of the methods described above and then approve it in the UAC prompt. Which of the method(s) illustrated do you plan to use? Did you already use some of them? Let us know in a comment.