
Вариант 1: Мышь
Наиболее распространенный способ изменения размера окна предполагает использование компьютерной мыши. Чтобы им воспользоваться, наведите курсор к одной из границ окна, пока его стандартный вид (обычная стрелка) не изменится на один из представленных ниже.

Как только это произойдет, зажмите левую кнопку мыши и переместите курсор в одно из указанных направлений. В этот момент окно начнет менять свой размер. Когда будет достигнут оптимальный, просто отпустите зажатую кнопку мыши и оно будет зафиксировано.
Примечание! Направление стрелок измененного курсора, пример которых представлен на изображении выше, указывает, в какой плоскости можно будет изменить размер окна: горизонтальной, вертикальной или диагональной.
Вариант 2: Клавиатура
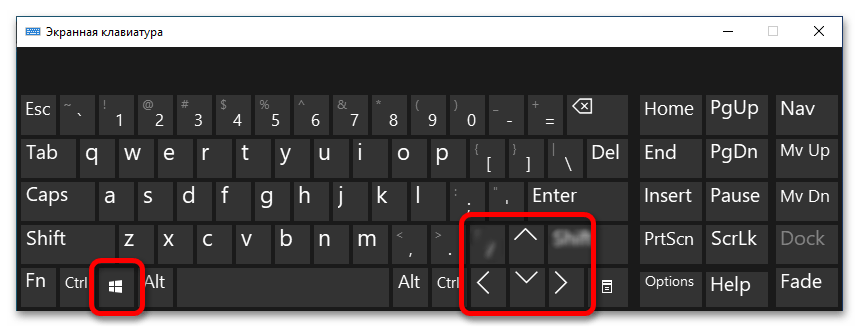
В операционной системе Windows 10 есть набор горячих клавиш для управления окнами. С их помощью можно быстро изменить размер любого такого объекта на экране, но недостатком этого метода является невозможность задать произвольные значения, они заранее предопределены. Для того чтобы управлять размером окон с помощью клавиатуры, воспользуйтесь одной из представленных ниже комбинаций.
| Комбинация клавиш | Место размещения окна |
|---|---|
| Win + ← | Левая половина экрана |
| Win + → | Правая половина экрана |
| Win + ↑ | Весь экран |
| Win + ↓ | Возврат в исходное положение после раскрытия на весь экран |
| Win + ← + ↓ | Левая нижняя четверть экрана |
| Win + ← + ↑ | Левая верхняя четверть экрана |
| Win + → + ↓ | Правая нижняя четверть экрана |
| Win + → + ↑ | Правая верхняя четверть экрана |
Точное месторасположение всех задействованных клавиш вы можете видеть на изображении ниже. Эти комбинации применимы практически ко всем типам окон, только если разработчик не задал фиксированный размер на уровне программного кода.
Вариант 3: Контекстное меню
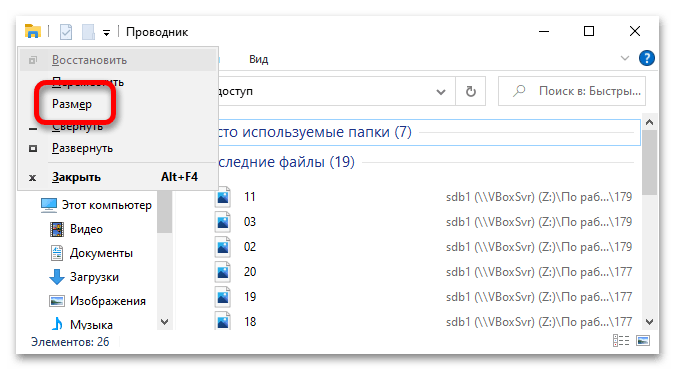
Если к компьютеру не подключена мышка или аналогичный ей манипулятор, но вам нужно изменить размер окна в произвольном формате, это можно сделать через контекстное меню, вызываемое с клавиатуры.
- Откройте контекстное меню окна, которое нужно изменить. Если мышка подключена, просто наведите курсор на заголовок приложения и кликните правой кнопкой. В противном случае воспользуйтесь сочетанием клавиш Alt + Пробел. По итогу появится меню, продемонстрированное на изображении ниже.
- В открывшемся списке опций выберите «Размер». Сделать это можно с помощью мышки, нажав левой кнопкой по пункту, либо путем использования стрелок на клавиатуре. В данном случае после появления контекстного меню потребуется нажать два раза вниз, а затем Enter.
- После проделанных действий курсор переместится в центр окна и примет вид, продемонстрированный на изображении ниже. Это будет означать, что вы перешли в режим изменения размера окна.
Воспользуйтесь стрелками на клавиатуре, чтобы осуществить поставленную задачу. Клавиши ← и → позволяют изменять размер по горизонтали, а ↑ и ↓ — по вертикали.

Когда вы придадите окну нужные пропорции, нажмите клавишу Enter для сохранения изменений. Чтобы отменить их, воспользуйтесь кнопкой Esc.
Обратите внимание! На нашем сайте есть отдельная статья, в которой рассказывается о том, как разделить рабочее пространство экрана на несколько частей для удобного размещения в них окон приложений. В ней вы также рассматривается специальная программа, которая позволяет заранее задать рабочие области, чтобы в дальнейшем можно было быстро изменить размер окна в Windows 10. При необходимости ознакомьтесь с изложенной там информацией.
Подробнее: Как разделить экран на две части в Windows 10

Наша группа в TelegramПолезные советы и помощь
Have you ever wanted to quickly change the size of the window you’re working on without dragging its corners? Or maybe change the size of the text, apps, and everything else on your screen? Windows 11 has different ways to manage your screen space, but usually, you need to click around a lot. This guide talks about how to use shortcut keys to resize windows effortlessly with a tool called Sizer. We’ll also look into whether you can use shortcut keys for adjusting screen scaling settings in Windows 11 or 10. Here’s a heads up: the answer might not be what you’re hoping for, but keep reading for all the details.
Also see: How to Make Everything Smaller or Bigger on Windows 11
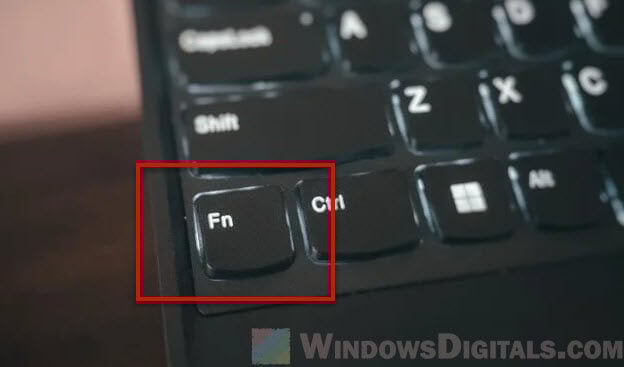
Is there a keyboard shortcut to adjust scaling settings in Windows 11?
One big question about this topic is if you can actually use keyboard shortcuts to change scaling settings. For Windows 11 and even Windows 10, usually, the answer is an unfortunate no. There isn’t a direct shortcut in the OS that is able to change the “Scale and layout” settings, which affect how big or small text, apps, and other elements appear.
But some laptops and desktops do have this feature. Some brands do have their own shortcuts for screen settings, which might include scaling. If you’re using a branded laptop like a Dell, HP, ASUS or Acer, try to take a look at your device’s manual or check the manufacturer’s website to see if there is any relevant info about shortcut keys for scaling (usually involve the Fn key).
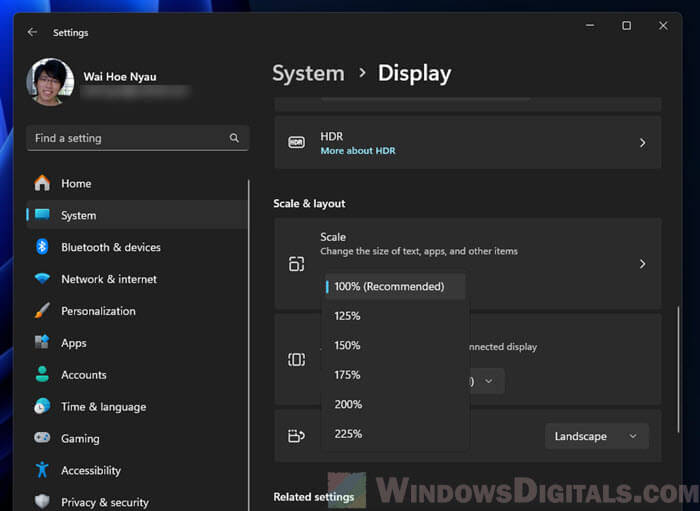
Well, to change these settings manually in Windows 11, you’ll need to do the following:
- Right-click on the desktop and choose Display settings.
- Head to the Scale and layout section.

- You’ll see a dropdown menu under Change the size of text, apps, and other items. Pick the scaling percentage you want from this menu.
Useful guide: How to Zoom Out Desktop Screen on Windows 11
What is Sizer and what does it do?
Sizer is a third-party tool that allows you to manually change the size of each individual window (but it doesn’t really let you adjust the overall “Scale and layout” settings in Windows 11). If what you want to do is to resize specific windows rather than change the scale of text, apps, and other items, Sizer can probably help you out.
This tool is especially useful for web developers, designers, or anyone who often needs multiple windows at specific sizes for convenient viewing, testing, or other purposes. It fits right into the Windows context menu so you can quickly resize any window with just a right-click.
In the sections below, we’ll show you how to install and use Sizer, set up custom sizes, and create keyboard shortcuts for quick window changes.
Pro tip: How to Use Snap Layouts to Snap Apps in Windows 11
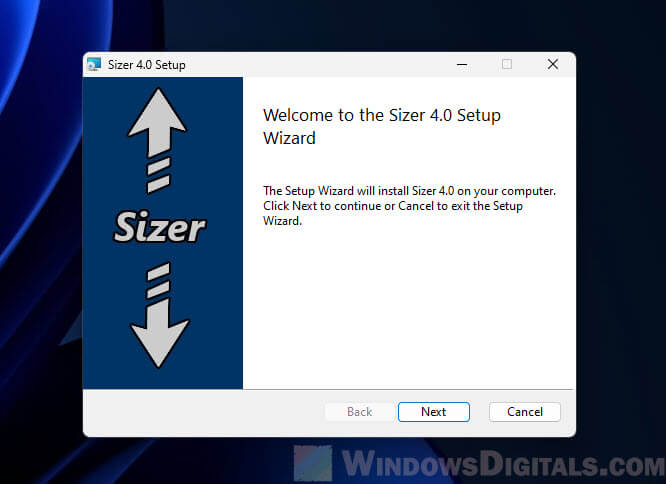
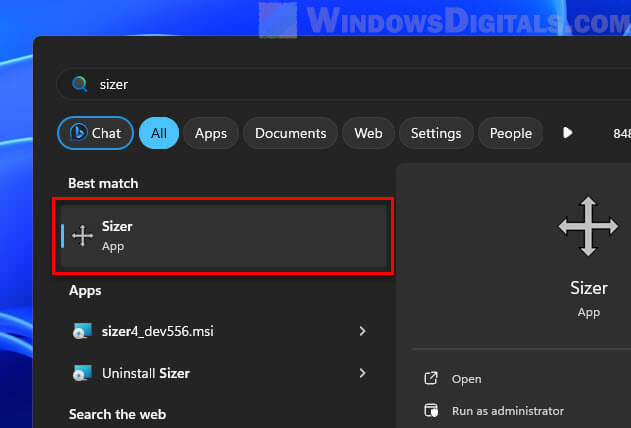
How to install and use Sizer in Windows 11
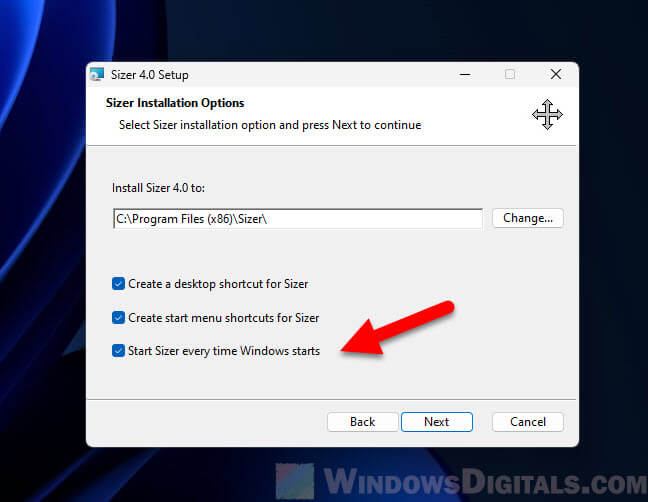
The following steps will show you where you can download the Sizer software, how to correctly install it so it can start up automatically, and some basic usage.
- You can download the installer from
https://www.softpedia.com/get/System/OS-Enhancements/Sizer.shtml, or look for it online to find other places to download it. Just make sure the source is trustworthy. - Find the file you downloaded and double-click on it to start setting it up.

- Follow the steps the setup wizard shows you. When it’s done, Sizer usually adds an icon in the system tray.

- If Sizer doesn’t start right after installing, look for the Sizer icon in the Start menu or system tray and click on it.

- Focus on the window you want to resize.
- Right-click on the window’s maximize/minimize handle (usually at the top right corner) to open Sizer’s context menu.
- Pick one of the sizes listed, and your window will change to that size right away.

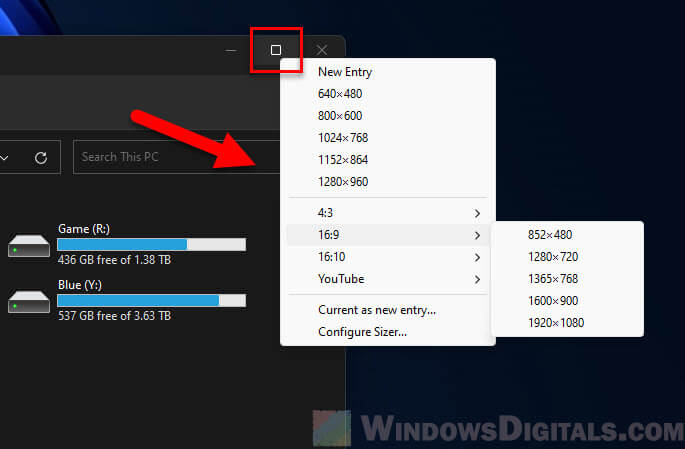
Just a few clicks and your window is the exact size you need. To assign shortcut keys for any predefined size, or to add a custom size, go to the next section.
Linked issue: Screen Size Smaller or Larger Than Monitor in Windows 10/11
Set up keyboard shortcuts to adjust window size
Below are how you can add custom sizes, set up keyboard shortcuts and other things you can do with Sizer.
Add custom sizes and setting keyboard shortcuts
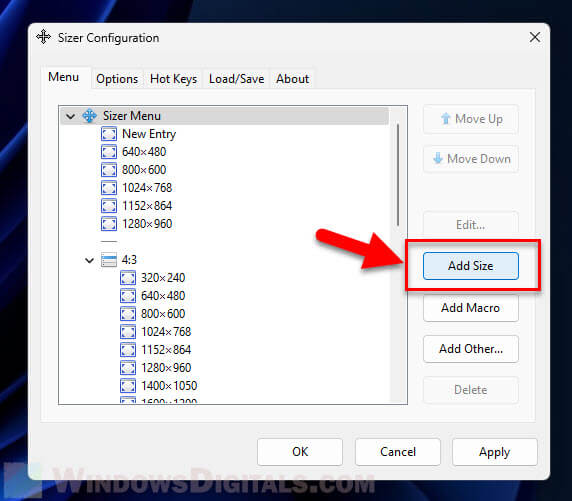
- Right-click on the Sizer icon in the system tray and choose Configure Sizer.

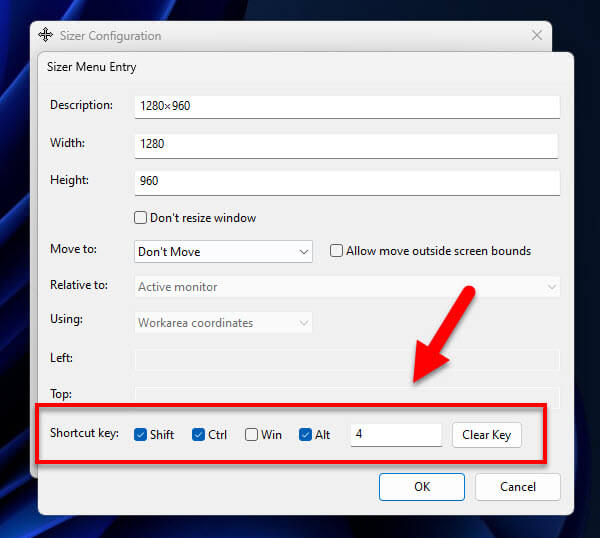
- In the settings window, click the Add Size button to create a new custom size.

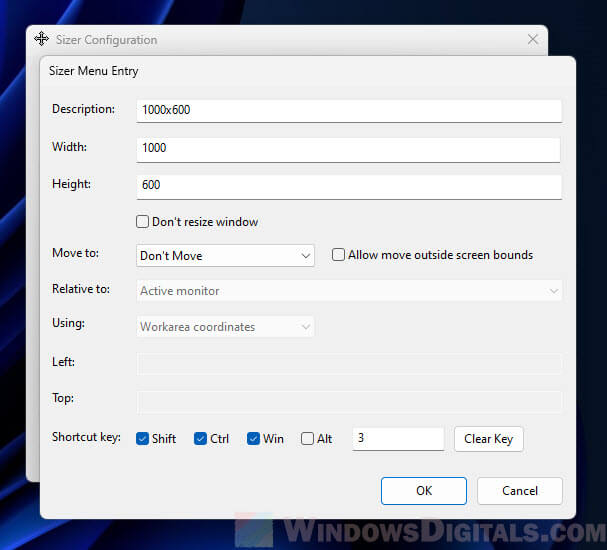
- You’ll need to enter the width and height you want for the window, among other settings:
-
- Give your custom size a name that will show up in the menu.
- Type in the width and height you want, in pixels.
- Decide if you want the window to move when you resize it. If not, choose “Don’t Move”.
- Pick a reference point for resizing, like the active monitor.
- Choose the type of coordinates to use for positioning.
-
- Back in the Sizer Menu Entry window, you can pick shortcut keys for this size in the Shortcut key section. Choose the key combination you want to use. This can include Shift, Ctrl, Win, and Alt keys.

- Click OK to save your new custom size. It will now show up in the menu whenever you want to change the size of a window.

Related resource: Windows 11 Screen Resolution Greyed Out, What to do?
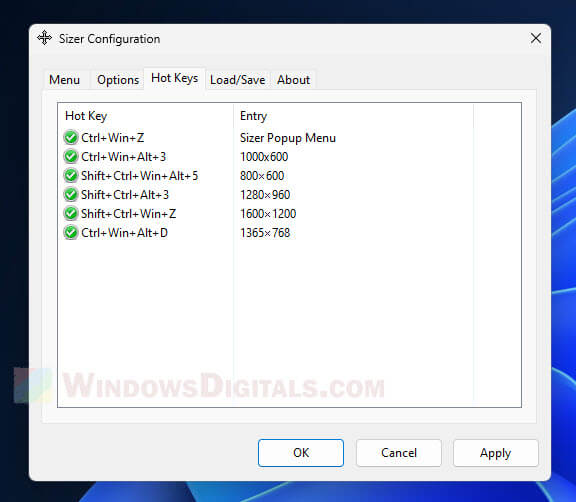
Assign keyboard shortcuts for existing sizes
- Pick the size you want to have a shortcut for.
- Click the Edit button to open the Sizer Menu Entry window.

- In the Shortcut key section, pick the keys you want to use as a shortcut for this size. This can include Shift, Ctrl, Win, and Alt keys.

- Click OK to save the shortcut.

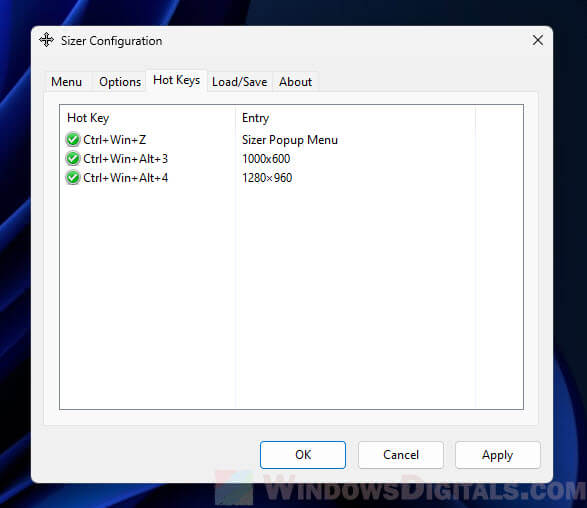
In the Sizer Configuration window, go to the Hot Keys tab. Here, you’ll see all the hotkeys you’ve set up, along with their sizes.

This tutorial will show you different ways to resize an open window for your account in Windows 10 and Windows 11.
You can resize an open window to change its horizontal and vertical sizes to what you want.
Contents
- Option One: Change Size of Window using Keyboard Shortcuts
- Option Two: Change Size of Window by Dragging Borders
- Option Three: Change Size of Window from Title Bar
- Option Four: Change Size of Window from Taskbar Icon
- Option Five: Change Size of Window from Taskbar Thumbnail Preview
Option One
Change Size of Window using Keyboard Shortcuts
1 While the window is in focus, press the Alt + Space keys to open the title bar menu.
2 Press the S key to select «Size» in the menu.
Size will be grayed out if the window is minimized or maximized.
3 Perform an action below you want to resize the window:
- Press the Up arrow key to select the top border, and then press the Up arrow and/or Down arrow keys to change the size to what you want.
- Press the Down arrow key to select the bottom border, and then press the Up arrow and/or Down arrow keys to change the size to what you want.
- Press the Left arrow key to select the left border, and then press the Left arrow and/or Right arrow keys to change the size to what you want.
- Press the Right arrow key to select the right border, and then press the Left arrow and/or Right arrow keys to change the size to what you want.
- Press the Up arrow and Left arrow keys to select the top left corner, and then press the Up arrow, Down arrow, Left arrow and/or Right arrow keys to change the size to what you want.
- Press the Up arrow and Right arrow keys to select the top right corner, and then press the Up arrow, Down arrow, Left arrow and/or Right arrow keys to change the size to what you want.
- Press the Down arrow and Left arrow keys to select the bottom left corner, and then press the Up arrow, Down arrow, Left arrow and/or Right arrow keys to change the size to what you want.
- Press the Down arrow and Right arrow keys to select the bottom right corner, and then press the Up arrow, Down arrow, Left arrow and/or Right arrow keys to change the size to what you want.
4 Press the Enter key when finished to stop resizing.
Option Two
Change Size of Window by Dragging Borders
1 Drag the top border, bottom border, left border, right border, and/or corners of the window to the size you want.
Option Three
Change Size of Window from Title Bar
1 Right click on the title bar of the window you want to resize, and click/tap on Size. (see screenshot below)
Size will be grayed out if the window is minimized or maximized.

2 Perform an action below you want to resize the window:
- Press the Up arrow key to select the top border, and then either press the Up arrow and/or Down arrow keys or use the mouse or touchpad to change the size to what you want.
- Press the Down arrow key to select the bottom border, and then either press the Up arrow and/or Down arrow keys or use the mouse or touchpad to change the size to what you want.
- Press the Left arrow key to select the left border, and then either press the Left arrow and/or Right arrow keys or use the mouse or touchpad to change the size to what you want.
- Press the Right arrow key to select the right border, and then either press the Left arrow and/or Right arrow keys or use the mouse or touchpad to change the size to what you want.
- Press the Up arrow and Left arrow keys to select the top left corner, and then either press the Up arrow, Down arrow, Left arrow and/or Right arrow keys or use the mouse or touchpad to change the size to what you want.
- Press the Up arrow and Right arrow keys to select the top right corner, and then either press the Up arrow, Down arrow, Left arrow and/or Right arrow keys or use the mouse or touchpad to change the size to what you want.
- Press the Down arrow and Left arrow keys to select the bottom left corner, and then either press the Up arrow, Down arrow, Left arrow and/or Right arrow keys or use the mouse or touchpad to change the size to what you want.
- Press the Down arrow and Right arrow keys to select the bottom right corner, and then either press the Up arrow, Down arrow, Left arrow and/or Right arrow keys or use the mouse or touchpad to change the size to what you want.
3 Left click or press the Enter key when finished to stop resizing.
Option Four
Change Size of Window from Taskbar Icon
1 Press the Shift key while right clicking on the taskbar icon of the opened window you want to resize, and click/tap on Size. (see screenshot below)
Size will be grayed out if the window is minimized or maximized.

2 Perform an action below you want to resize the window:
- Press the Up arrow key to select the top border, and then either press the Up arrow and/or Down arrow keys or use the mouse or touchpad to change the size to what you want.
- Press the Down arrow key to select the bottom border, and then either press the Up arrow and/or Down arrow keys or use the mouse or touchpad to change the size to what you want.
- Press the Left arrow key to select the left border, and then either press the Left arrow and/or Right arrow keys or use the mouse or touchpad to change the size to what you want.
- Press the Right arrow key to select the right border, and then either press the Left arrow and/or Right arrow keys or use the mouse or touchpad to change the size to what you want.
- Press the Up arrow and Left arrow keys to select the top left corner, and then either press the Up arrow, Down arrow, Left arrow and/or Right arrow keys or use the mouse or touchpad to change the size to what you want.
- Press the Up arrow and Right arrow keys to select the top right corner, and then either press the Up arrow, Down arrow, Left arrow and/or Right arrow keys or use the mouse or touchpad to change the size to what you want.
- Press the Down arrow and Left arrow keys to select the bottom left corner, and then either press the Up arrow, Down arrow, Left arrow and/or Right arrow keys or use the mouse or touchpad to change the size to what you want.
- Press the Down arrow and Right arrow keys to select the bottom right corner, and then either press the Up arrow, Down arrow, Left arrow and/or Right arrow keys or use the mouse or touchpad to change the size to what you want.
3 Left click or press the Enter key when finished to stop resizing.
Option Five
Change Size of Window from Taskbar Thumbnail Preview
1 Hove on the taskbar icon of the opened window you want to resize until you see the thumbnail preview, right click on the thumbnail preview, and click/tap on Size. (see screenshot below)
Size will be grayed out if the window is minimized or maximized.

2 Perform an action below you want to resize the window:
- Press the Up arrow key to select the top border, and then either press the Up arrow and/or Down arrow keys or use the mouse or touchpad to change the size to what you want.
- Press the Down arrow key to select the bottom border, and then either press the Up arrow and/or Down arrow keys or use the mouse or touchpad to change the size to what you want.
- Press the Left arrow key to select the left border, and then either press the Left arrow and/or Right arrow keys or use the mouse or touchpad to change the size to what you want.
- Press the Right arrow key to select the right border, and then either press the Left arrow and/or Right arrow keys or use the mouse or touchpad to change the size to what you want.
- Press the Up arrow and Left arrow keys to select the top left corner, and then either press the Up arrow, Down arrow, Left arrow and/or Right arrow keys or use the mouse or touchpad to change the size to what you want.
- Press the Up arrow and Right arrow keys to select the top right corner, and then either press the Up arrow, Down arrow, Left arrow and/or Right arrow keys or use the mouse or touchpad to change the size to what you want.
- Press the Down arrow and Left arrow keys to select the bottom left corner, and then either press the Up arrow, Down arrow, Left arrow and/or Right arrow keys or use the mouse or touchpad to change the size to what you want.
- Press the Down arrow and Right arrow keys to select the bottom right corner, and then either press the Up arrow, Down arrow, Left arrow and/or Right arrow keys or use the mouse or touchpad to change the size to what you want.
3 Left click or press the Enter key when finished to stop resizing.
That’s it,
Shawn Brink
-
Move.png
4.2 KB
· Views: 52
Last edited:
-
-
#2
Hi Brink
Thi Change Size of Window using Keyboard Shortcuts is not working for me
nothing happens
update
I just noticed i was doing it on firefox
-
- OS
- Windows 11
- Computer type
- PC/Desktop
- Manufacturer/Model
- MSI
Ghot
Well-known member
-
-
#3
I like Option #2.
-
- OS
- Win 11 Home ♦♦♦26100.3775 ♦♦♦♦♦♦♦24H2 ♦♦♦non-Insider
- Computer type
- PC/Desktop
- Manufacturer/Model
- Built by Ghot® [May 2020]
- CPU
- AMD Ryzen 7 3700X
- Motherboard
- Asus Pro WS X570-ACE (BIOS 5002)
- Memory
- G.Skill (F4-3200C14D-16GTZKW)
- Graphics Card(s)
- EVGA RTX 2070 (08G-P4-2171-KR)
- Sound Card
- Realtek ALC1220P / ALC S1220A
- Monitor(s) Displays
- Dell U3011 30″
- Screen Resolution
- 2560 x 1600
- Hard Drives
- 2x Samsung 860 EVO 500GB,
WD 4TB Black FZBX — SATA III,
WD 8TB Black FZBX — SATA III,
DRW-24B1ST CD/DVD Burner
- PSU
- PC Power & Cooling 750W Quad EPS12V
- Case
- Cooler Master ATCS 840 Tower
- Cooling
- CM Hyper 212 EVO (push/pull)
- Keyboard
- Ducky DK9008 Shine II Blue LED
- Mouse
- Logitech Optical M-100
- Internet Speed
- 300/300
- Browser
- Firefox (latest)
- Antivirus
- Bitdefender Internet Security
- Other Info
- Speakers: Klipsch Pro Media 2.1
-
- Operating System
- Windows XP Pro 32bit w/SP3
- Computer type
- PC/Desktop
- Manufacturer/Model
- Built by Ghot® (not in use)
- CPU
- AMD Athlon 64 X2 5000+ (OC’d @ 3.2Ghz)
- Motherboard
- ASUS M2N32-SLI Deluxe Wireless Edition
- Memory
- TWIN2X2048-6400C4DHX (2 x 1GB, DDR2 800)
- Graphics card(s)
- EVGA 256-P2-N758-TR GeForce 8600GT SSC
- Sound Card
- Onboard
- Monitor(s) Displays
- ViewSonic G90FB Black 19″ Professional (CRT)
- Screen Resolution
- up to 2048 x 1536
- Hard Drives
- WD 36GB 10,000rpm Raptor SATA
Seagate 80GB 7200rpm SATA
Lite-On LTR-52246S CD/RW
Lite-On LH-18A1P CD/DVD Burner
- PSU
- PC Power & Cooling Silencer 750 Quad EPS12V
- Case
- Generic Beige case, 80mm fans
- Cooling
- ZALMAN 9500A 92mm CPU Cooler
- Mouse
- Logitech Optical M-BT96a
- Keyboard
- Logitech Classic Keybooard 200
- Internet Speed
- 300/300
- Browser
- Firefox 3.x ??
- Antivirus
- Symantec (Norton)
- Other Info
- Still assembled, still runs. Haven’t turned it on for 15 years?
-
-
#4
I’m with @Ghot on this one too
-
- OS
- Windows 11 Pro 22631.3810/Windows 11 RP 24H2 VM
- Computer type
- Laptop
- Manufacturer/Model
- Lenovo
- CPU
- Intel Celeron N4000 @ 1.10GHz Gemini Lake 14nm
- Motherboard
- LENOVO LNVNB161216 (U3E1)
- Memory
- 8GB Ram
- Graphics Card(s)
- Intel UHD Graphics 600 (Lenovo)
- Sound Card
- Realtek High Definition Audio Intel Display Audio
- Monitor(s) Displays
- Generic PnP Monitor (1920×1080@60Hz)
- Screen Resolution
- 1920×1080
- Hard Drives
- 512GB Western Digital WDC PC SN530 SDBPMPZ-512G-1101 (Unknown (SSD))
- Keyboard
- Laptop Keyboard
- Mouse
- G5 Gaming Mouse
- Internet Speed
- 50mbps/50mbps
- Browser
- Chrome/Edge
- Antivirus
- Microsoft Defender
-
- Operating System
- Windows 11 RP 24H2 VM
- Computer type
- Laptop
- Manufacturer/Model
- Lenovo
- CPU
- Intel Celeron N4000 @ 1.10GHz Gemini Lake 14nm
- Motherboard
- LENOVO LNVNB161216 (U3E1)
- Memory
- 8GB Ram
- Graphics card(s)
- Intel UHD Graphics 600 (Lenovo)
- Sound Card
- Realtek High Definition Audio Intel Display Audio
- Monitor(s) Displays
- Generic PnP Monitor (1920×1080@60Hz)
- Screen Resolution
- 1920×1080
- Mouse
- G5 Gaming Mouse
- Keyboard
- Laptop Keyboard
- Internet Speed
- 50mbps/50mbps
- Browser
- Chrome/Edge
- Antivirus
- Microsoft Defender
-
-
#5
I didn’t know about all the keyboard ways but it’s not surprising since I don’t know about a lot of other things, but why in the world would anyone go through all that when Option 2 is so easy. I guess the keyboard method would come in handy for folks who have made the mistake of changing the properties of a window to run maximized and then seen that their mouse can’t grab the edges.
-
- OS
- Windows 11 Pro 24H2 26100.3775
- Computer type
- PC/Desktop
- Manufacturer/Model
- Dell Optiplex 7080
- CPU
- i9-10900 10 core 20 threads
- Motherboard
- DELL 0J37VM
- Memory
- 32 gb
- Graphics Card(s)
- none-Intel UHD Graphics 630
- Sound Card
- Integrated Realtek
- Monitor(s) Displays
- Benq 27
- Screen Resolution
- 2560×1440
- Hard Drives
- 1tb Solidigm m.2 nvme+256gb SKHynix m.2 nvme /External drives 512gb Samsung m.2 sata+1tb Kingston m2.nvme+ 4gb Solidigm nvme
- PSU
- 500w
- Case
- MT
- Cooling
- Dell Premium
- Keyboard
- Logitech wired
- Mouse
- Logitech wireless
- Internet Speed
- so slow I’m too embarrassed to tell
- Browser
- #1 Edge #2 Firefox
- Antivirus
- Defender+MWB Premium
-
- Operating System
- Windows 11 Pro 24H2 26100.3775
- Computer type
- PC/Desktop
- Manufacturer/Model
- Dell Optiplex 9020
- CPU
- i7-4770
- Motherboard
- stock Dell
- Memory
- 24 gb
- Graphics card(s)
- integrated
- Sound Card
- integrated
- Monitor(s) Displays
- Benq 27
- Screen Resolution
- 2560×1440
- Hard Drives
- 256 gb Toshiba BG4 M.2 NVE SSB and 1 tb hdd
- PSU
- 500w
- Case
- MT
- Cooling
- Dell factory
- Mouse
- Logitech wireless
- Keyboard
- Logitech wired
- Internet Speed
- still too embarrassed to tell
- Browser
- Firefox
- Antivirus
- Defender
-
-
#6
I don’t resize windows, I have every stinking window perfectly sized and set…, that’s why I always flip out when Windows fecks it up!!!
-
- OS
- Windows 11
- Computer type
- PC/Desktop
- Manufacturer/Model
- ASUS ROG Strix
-
- Operating System
- Windows 11
- Computer type
- Laptop
- Manufacturer/Model
- ASUS VivoBook
-
-
#7
I don’t resize windows, I have every stinking window perfectly sized and set…, that’s why I always flip out when Windows fecks it up!!!
That makes 2 of us.
-
- OS
- Windows 11 Home Version 23H2 OS Build 22631.5039
- Computer type
- PC/Desktop
- Manufacturer/Model
- Centre Com Karuza Taurus Core i5 12400F RTX 4060 Ti Gaming PC
- CPU
- Intel Core i5-12400F 2.5GHZ 18M LGA1700 Processor
- Motherboard
- MSI B660M-A PRO WIFI DDR4 DDR4 LGA1700 mATX
- Memory
- Corsair Vengeance RGB RS 16GB (2x8GB) DDR4 3200MHz C16 RAM
- Graphics Card(s)
- Gigabyte GeForce RTX 4060 Ti EAGLE 8G Graphics Card
- Sound Card
- Realtek High Definition Audio
- Monitor(s) Displays
- 27″ Benq GW2760
- Screen Resolution
- 1920 x 1080
- Hard Drives
- Kingston SNV2S/1000G NV2 1TB PCIe 4.0 NVMe M.2 2280 SSD
- PSU
- Corsair RM750e 80+ Gold 750W Power Supply
- Case
- Cooler Master MasterBox K501L ARGB Tempered Glass Side Panel MCB-K501L-KGNN-SR3
- Cooling
- Cooler Master Hyper 212 Spectrum V3 CPU Cooler — Cooler Master MasterFan MF120 Halo ARGB 120mm Fan
- Keyboard
- Logitech G213
- Mouse
- Steelseries Sensei Ten
- Internet Speed
- Download Mbps 933.65 Upload Mbps 47.44
- Browser
- Firefox 136.0.2 (64-bit)
- Antivirus
- Eset Internet Security v18.0.12.0
- Other Info
- Canon iX6860 Inkjet Printer
Brother MFC-L2880DW Laser Printer
Mercusys MR90X AX6000 8-Stream Wi-Fi 6 Router
Logitech 5.1 Speakers
-
-
#8
I’m not sure if Windows has this feature, but if there’s a way to preserve aspect ratio when resizing, it would be great to have it explained here!
(Often times, image/video software have built-in settings for this, but sometimes they don’t)
-
- OS
- Windows 11
- Computer type
- Laptop
-
-
#9
What a horror-show for the Windows way! Personally I use Sizer used it for years and still use it after reading the above.
-
- OS
- Win 11 Pro. 24H2
- Computer type
- PC/Desktop
- Manufacturer/Model
- Customised «Chillblast Apex Intel Core i7 Office PC»
- CPU
- Intel Core i7-14700 (Raptor Lake)
- Motherboard
- ASUS Prime B760M-A WiFi D4
- Memory
- 32GB Corsair Vengeance LPX (DDR4)
- Graphics Card(s)
- Intel UHD 770 — onboard standard as supplied by Intel/Asus
- Monitor(s) Displays
- Dell P2421 24 inch WUXGA (1920×1200) 16:10 Monitor
- Screen Resolution
- 1920×1200
- Hard Drives
- First (Boot Drive Only): 2TB Samsung SSD 990 Pro.
Second (Data Drive) 2TB Samsung SSD 990 Pro.
- PSU
- 850W Corsair RM850x 80 Plus Gold
- Cooling
- Just standard fans for both the case and CPU.
- Keyboard
- Unicomp Model M (IBM Style keyboard)
- Mouse
- Wired Mouse
- Internet Speed
- 1.6 MB/s
- Browser
- Firefox
- Antivirus
- Microsoft’s Defender
-
- Operating System
- Win 11 Pro 24H2
- Computer type
- Laptop
- Manufacturer/Model
- Lenovo Legion Pro 7i Gen 9 (16″ Intel)
- CPU
- 14th Generation Intel® Core™ i9-14900HX
- Memory
- 32 GB DDR5-5600MHz
- Graphics card(s)
- NVIDIA® GeForce RTX™ 4080 Laptop GPU 12GB GDDR6
- Monitor(s) Displays
- 16″ WQXGA (2560 x 1600), IPS, Anti-Glare, Non-Touch, HDR 40
- Screen Resolution
- 2560 x 1600
- Hard Drives
- First (Boot): 1 TB SSD M.2 2280 PCIe Gen4 TLC
Second (Data): 1 TB SSD M.2 2280 PCIe Gen4 TLC
- Mouse
- Wired Mouse
- Keyboard
- Per-Key RGB-Coloured Backlit — English (UK)
- Internet Speed
- 1.6 MB/s
- Browser
- Firefox
- Antivirus
- Microsoft’s Defender
В этой статье вы узнаете, как эффективно расширить приложение на весь экран вашего компьютера, независимо от операционной системы и типа программного обеспечения. Многие пользователи сталкиваются с ситуацией, когда рабочее пространство программы ограничено, что существенно снижает продуктивность и комфорт работы. Представьте, что вы пытаетесь сосредоточиться на важном проекте, а интерфейс приложения занимает лишь часть экрана, оставляя ценное пространство неиспользованным. В этом материале мы подробно разберем все возможные способы масштабирования окон, от базовых горячих клавиш до продвинутых настроек операционных систем. К концу статьи вы будете владеть полным набором инструментов для оптимизации рабочего пространства вашего компьютера.
Основные методы изменения размера окон приложений
Существует несколько универсальных подходов к расширению приложений на весь экран, которые работают практически во всех современных операционных системах. Первый и наиболее очевидный способ – использование кнопок управления окном в правом верхнем углу. Здесь расположены три знакомые всем значка: свернуть, развернуть и закрыть. При нажатии на среднюю кнопку (квадрат или две стрелочки) окно автоматически расширяется до максимальных размеров монитора. Этот метод работает во всех популярных браузерах, офисных приложениях и большинстве программного обеспечения.
Однако профессиональные пользователи часто предпочитают более быстрые способы управления окнами через комбинации клавиш. Например, сочетание Windows + стрелка вверх моментально разворачивает активное окно на весь экран в операционной системе Windows. Аналогичная функциональность доступна и в macOS через комбинацию Control + Command + F, которая переводит приложение в полноэкранный режим. Интересно отметить, что эти горячие клавиши могут быть особенно полезны при работе с несколькими мониторами, позволяя быстро переключать приложения между экранами.
Для тех, кто работает с множеством окон одновременно, существуют продвинутые техники управления рабочим пространством. В Windows 10 и выше можно использовать функцию Snap Assist, которая позволяет быстро размещать окна по половинам или четвертям экрана. Достаточно просто потянуть окно за заголовок к краю экрана, и система предложит варианты его размещения. Подобную функциональность можно найти и в Linux-дистрибутивах, где менеджеры окон предоставляют гибкие возможности для организации рабочего пространства.
Когда речь идет о специализированных приложениях, таких как графические редакторы или видео плееры, часто доступны собственные инструменты масштабирования. Например, в Adobe Photoshop есть специальный полноэкранный режим, который можно активировать через меню “Вид”. В медиаплеерах VLC и других подобных программах переход в полноэкранный режим обычно осуществляется через клавишу F или соответствующую кнопку на панели управления.
Примечательно, что современные операционные системы предлагают различные режимы отображения, которые могут влиять на поведение приложений. В Windows это настройки масштабирования, доступные через параметры системы, где можно задать процентное соотношение для элементов интерфейса. В macOS аналогичные настройки находятся в разделе “Мониторы” системных настроек. Эти параметры особенно важны для пользователей с высоким разрешением экрана, так как позволяют адаптировать размеры интерфейсов под конкретные задачи и комфорт восприятия.
Сравнительная таблица методов расширения окон
| Метод | Windows | macOS | Linux |
|---|---|---|---|
| Горячие клавиши | Windows + стрелка ↑ | Control + Command + F | Super + F |
| Мышь | Кнопка развернуть | Зеленая кнопка | Перетаскивание |
| Специальные функции | Snap Assist | Mission Control | Tiling Window Managers |
Пошаговые инструкции для разных операционных систем
Рассмотрим детальные руководства по расширению приложений на весь экран в различных операционных системах, начиная с Windows. Для классического разворачивания окна достаточно нажать на кнопку в виде двух пересекающихся стрелок в правом верхнем углу окна. Альтернативно, можно использовать комбинацию клавиш Windows + стрелка вверх, которая моментально увеличивает размер активного окна до максимальных размеров. При необходимости вернуть окно к исходному размеру используется обратная комбинация Windows + стрелка вниз.
В macOS процесс несколько отличается из-за особенностей интерфейса. Зеленая кнопка в левом верхнем углу окна может работать по-разному в зависимости от настроек системы. По умолчанию она переводит приложение в полноэкранный режим, но это поведение можно изменить в настройках. Для быстрого перехода в полноэкранный режим рекомендуется использовать комбинацию Control + Command + F. Интересной особенностью macOS является возможность создания нескольких рабочих пространств через Mission Control, где каждое приложение может быть развернуто на свой экран.
Linux-системы предлагают наиболее гибкие возможности для управления окнами благодаря различным оконным менеджерам. В GNOME, например, можно использовать сочетание Super + стрелка вверх для разворачивания окна. Для более продвинутых пользователей доступны тайловые менеджеры окон, такие как i3 или AwesomeWM, где управление размерами окон происходит через текстовые команды или горячие клавиши. Особенностью Linux является возможность глубокой настройки горячих клавиш и поведения окон через конфигурационные файлы.
Для мобильных операционных систем, таких как Chrome OS, также существуют свои механизмы управления окнами. Здесь реализована удобная система перетаскивания окон к краям экрана, аналогичная Snap Assist в Windows. При этом многие приложения поддерживают автоматическое масштабирование при повороте устройства или изменении ориентации экрана. Важно отметить, что в некоторых случаях поведение приложений может зависеть от их версии и настроек разработчика.
Общим для всех операционных систем является наличие дополнительных настроек масштабирования, которые влияют на отображение интерфейсов приложений. В Windows это настройки дисплея, где можно задать масштабирование от 100% до 500%. В macOS аналогичные параметры находятся в разделе “Мониторы”, а в Linux они зависят от используемого окружения рабочего стола. Эти настройки особенно важны при работе с приложениями, которые плохо адаптируются к высокому разрешению экрана.
Алгоритм решения проблем с масштабированием
- Проверьте текущее разрешение экрана в настройках системы
- Убедитесь, что видеодрайверы обновлены до последней версии
- Попробуйте стандартные методы разворачивания окна
- Проверьте настройки масштабирования интерфейса
- При необходимости переустановите проблемное приложение
Экспертное мнение: взгляд профессионала на организацию рабочего пространства
Александр Петров, сертифицированный IT-специалист с 15-летним опытом в области пользовательского интерфейса и оптимизации рабочего пространства, делится своим профессиональным видением проблемы. Обладая степенью магистра компьютерных наук и сертификатами Microsoft Certified Solutions Expert (MCSE), Александр специализируется на повышении производительности пользователей через эффективную организацию цифрового рабочего места.
“В своей практике я часто сталкиваюсь с ситуациями, когда пользователи неэффективно используют доступное экранное пространство. Особенно это заметно при работе с многооконными интерфейсами. Рекомендую использовать комбинированный подход, сочетающий горячие клавиши и визуальное управление. Например, в Windows я настоятельно советую освоить функцию Snap Assist не только для базового деления экрана пополам, но и для создания сложных конфигураций с несколькими окнами.”
Особое внимание эксперт уделяет вопросам эргономики рабочего пространства: “При работе с несколькими мониторами важно правильно распределить приложения между экранами. Я рекомендую использовать основной монитор для активных задач, а второстепенный – для справочной информации или коммуникационных приложений. Это помогает минимизировать когнитивную нагрузку и повысить концентрацию.”
Александр также подчеркивает важность правильной настройки DPI: “Многие пользователи игнорируют настройки масштабирования, что приводит к дискомфорту при длительной работе. Оптимальное значение зависит от физического размера монитора и расстояния до глаз пользователя. Как правило, для Full HD мониторов размером 24-27 дюймов оптимальным является масштабирование 125-150%.”
Часто задаваемые вопросы по расширению приложений на весь экран
- Почему некоторые приложения не разворачиваются на весь экран? Это может быть связано с ограничениями самого приложения или устаревшей версией программы. Попробуйте обновить приложение или проверить его настройки.
- Как вернуть окно, которое вышло за пределы экрана? Используйте комбинацию Alt + Space, затем выберите “Переместить” и используйте стрелки для возвращения окна в видимую область.
- Что делать, если горячие клавиши не работают? Проверьте настройки системы на предмет конфликта горячих клавиш или отключенных функций. Возможно, потребуется переопределить сочетания клавиш в настройках.
- Как настроить автоматическое разворачивание приложений? В Windows это можно сделать через реестр системы, создав соответствующие правила для конкретных программ. В macOS используются настройки Mission Control.
- Почему приложение становится больше размера экрана? Проблема может быть связана с настройками разрешения или масштабирования. Проверьте параметры дисплея и настройки DPI в системе.
Заключение и рекомендации по оптимизации рабочего пространства
Подводя итоги, важно отметить, что эффективное управление размерами приложений на экране – это комплексный процесс, требующий понимания как технических аспектов, так и принципов эргономики. Мы рассмотрели различные методы расширения приложений, начиная от базовых механических действий до продвинутых системных настроек. Каждый пользователь может выбрать подходящий именно ему способ, исходя из своих задач и предпочтений.
Для достижения максимальной продуктивности рекомендуется комбинировать различные методы управления окнами. Например, можно использовать горячие клавиши для быстрого переключения между режимами отображения, а при работе с несколькими приложениями применять функции деления экрана. Не забывайте регулярно проверять обновления как операционной системы, так и самих приложений, чтобы иметь доступ к новым возможностям управления интерфейсом.
Если вы столкнулись с проблемами при масштабировании приложений, первым шагом всегда должна быть проверка базовых настроек системы и обновление драйверов. При необходимости обратитесь к документации конкретного приложения или свяжитесь с технической поддержкой. Начните с малого – освойте основные горячие клавиши и постепенно переходите к более сложным методам управления рабочим пространством.