
Рассмотрим несколько способов, которые помогут вам запретить доступ к отдельным сайтам, URL и IP адресам в Windows без использования сторонних программ. Обычно блокировку сайтов наиболее эффективно настраивать на уровне сетевого шлюза (роутер, маршрутизатор, Wi-Fi точка доступа, через которую вы выходите в Интернет), или с помощью стороннего ПО (фильтры контента, DNS фильтры и т.д.). В нашем случае мы попробуем заблокировать определенный сайт с помощью встроенных средств Windows 10 и автоматизации PowerShell.
Содержание:
- Блокировка сайтов в Windows с помощью файла hosts
- Блокировка сайтов через DNS
- Блокируем IP адрес сайта в брандмауэре Windows
- PowerShell: правила блокировки сайтов по имени и IP адресу в брандмауэре Windows
Блокировка сайтов в Windows с помощью файла hosts
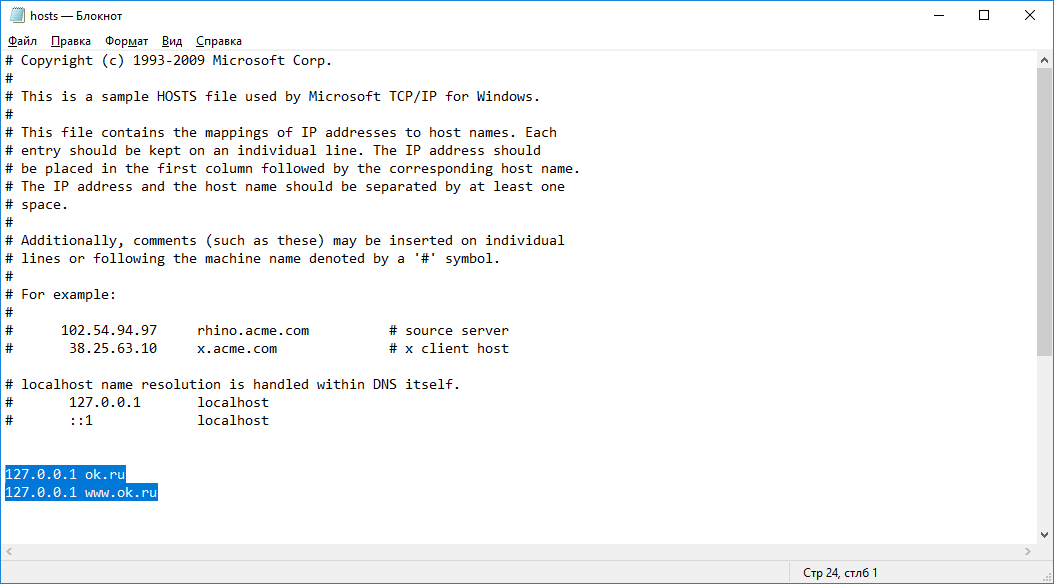
Самый известный способ заблокировать определенный сайт в Windows – отредактировать файл hosts. Обычно файл находится в каталоге %windir%\system32\drivers\etc\. Обратите внимание, что у файла hosts нет расширения.
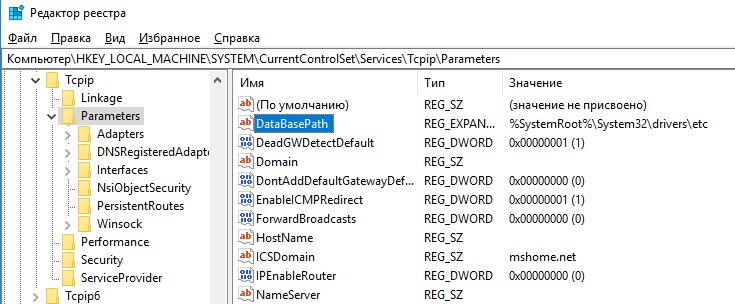
Путь к каталогу с файлом hosts задается в параметре DataBasePath в ветке реестра HKEY_LOCAL_MACHINE\SYSTEM\CurrentControlSet\Services\Tcpip\Parameters. По-умолчанию это %SystemRoot%\System32\drivers\etc.
Файл hosts используется для ручного назначения соответствий между IP адресами и DNS именами. При выполнении разрешении имен файл hosts имеет приоритет над DNS серверами, указанными в настройках сетевых подключений,
Чтобы заблокировать определенный сайт (например, ok.ru), откройте на редактирование файл hosts (с правами администратора) и добавьте в него строки вида:
127.0.0.1 ok.ru
127.0.0.1 www.ok.ru
Сохраните файл и перезагрузите компьютер (или очистите DNS кэш командой:
ipconfig /flushdns
).
После этого при попытке открыть сайт ok.ru в любом браузере будет появляется сообщение “Страница не найдена” / “Страница не доступна”.
Вы можете добавлять новые строки с URL сайтов в файл hosts с помощью такого bat файла:
@echo off
set hostspath=%windir%\System32\drivers\etc\hosts
echo 127.0.0.1 www.facebook.com >> %hostspath%
echo 127.0.0.1 facebook.com >> %hostspath%
exit
Либо можно воспользоваться следующими PowerShell функциями для автоматизации блокировки (разблокировки) определенных сайтов в списке запрещенных доменов в файле hosts.
Function BlockSiteHosts ( [Parameter(Mandatory=$true)]$Url) {
$hosts = 'C:\Windows\System32\drivers\etc\hosts'
$is_blocked = Get-Content -Path $hosts |
Select-String -Pattern ([regex]::Escape($Url))
If(-not $is_blocked) {
$hoststr="127.0.0.1 ” + $Url
Add-Content -Path $hosts -Value $hoststr
}
}
Function UnBlockSiteHosts ( [Parameter(Mandatory=$true)]$Url) {
$hosts = 'C:\Windows\System32\drivers\etc\hosts'
$is_blocked = Get-Content -Path $hosts |
Select-String -Pattern ([regex]::Escape($Url))
If($is_blocked) {
$newhosts = Get-Content -Path $hosts |
 Where-Object {
$_ -notmatch ([regex]::Escape($Url))
}
Set-Content -Path $hosts -Value $newhosts
}
}

Теперь чтобы добавить определенный сайт в заблокированные достаточно выполнить функцию:
BlockSiteHosts ("vk.com")
Чтобы разблокировать сайт запустите:
UnBlockSiteHosts ("vk.com")
Блокировка сайтов через DNS
Если ваши клиенты пользуются одним DNS сервером, вы можете аналогичным образом заблокировать определенный сайты с помощью создания DNS записи в этом DNS, указывающей на 127.0.0.1 (или что-то в таком роде). По такому принципу, кстати, работают большинство коммерческих контент фильтров DNS (OpenDNS, SkyDNS, Яндекс.DNS и т.д.).
Блокируем IP адрес сайта в брандмауэре Windows
Также вы можете заблокировать определенные сайты с помощью встроенного Windows Firewall. Главный недостаток такого метода – вы не сможете использовать имя домена или сайта в правиле блокировке. Брандмауэр Windows в качестве источника/назначения позволяет указать только IP адрес или подсеть.
Сначала нужно определить IP адрес сайта, который вы хотите заблокировать. Проше всего это сделать командой nslookup.
nslookup ok.ru
Как вы видите в результатах команды присутствует несколько IP адресов, которые назначены сайту. Вам нужно заблокировать их все.
Теперь нужно запустить панель настройки Windows Firewall (Панель управления \Все элементы панели управления\Брандмауэр Защитника Windows\Дополнительные параметры или firewall.cpl).
В секции “Правила для исходящих подключений” создайте новое правило со следующими параметрами:
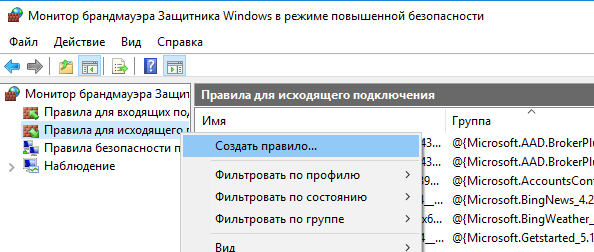
- Тип правила: Настраиваемые;
- Программа: Все программы;
- Тип протокола: Любой;
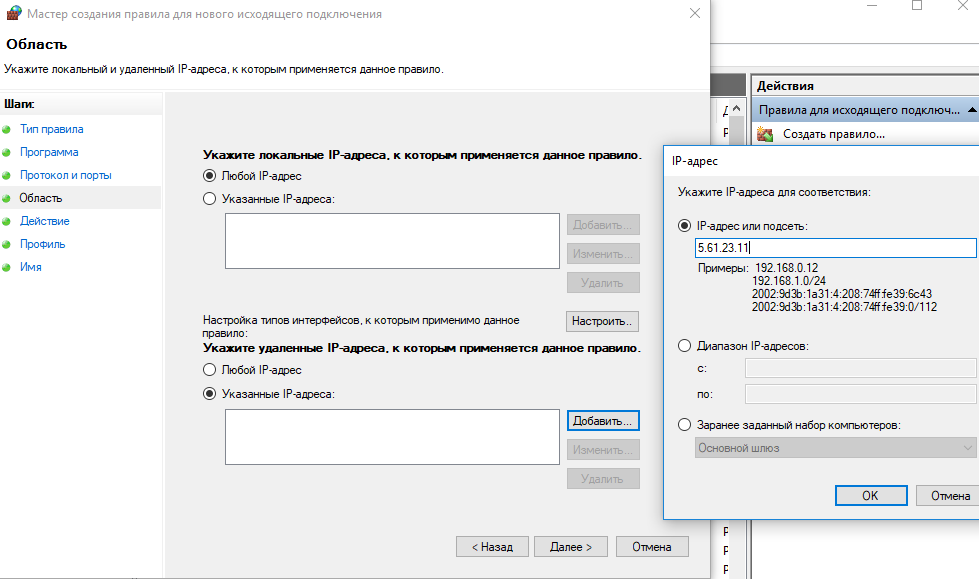
- Область: в секции “Укажите удаленные IP адреса, к которым применяется данное правило” выберите пункт “Указанные IP адреса” -> Добавить. В открывшемся окне укажите IP адреса, IP подсети или диапазон IP адресов сайтов, которые нужно заблокировать.
Нажмите OK-> Далее -> Действие: “Блокировать подключение”.
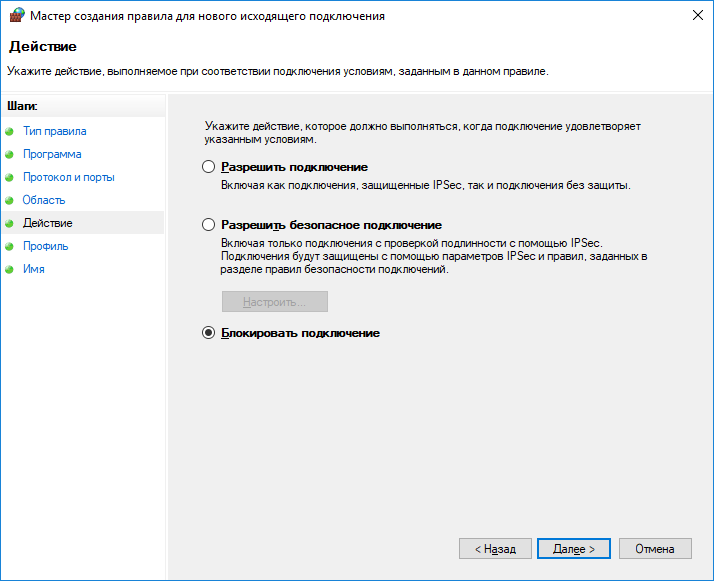
В окне со списком профилей брандмауэра, к которым применяется это правило оставьте все опции. Осталось указать имя правила и сохранить его.
После этого Брандмауэр Защитника Windows будет блокировать все соединения с данным сайтом. В браузере при подключении к заблокированному сайту будет появляться ошибка:
Unable to connect
или
Доступ в Интернет закрыт
Возможно, подключение заблокирована брандмауэром или антивирусным ПО.
ERR_NETWORK_ACCESS_DENIED
В домене AD вы можете распространить на компьютеры пользователей политику блокирующую сайт с помощью GPO. Но еще раз скажем, это нецелесообразно. Фильтровать сайты правильнее на шлюзе доступа в Интернет.
PowerShell: правила блокировки сайтов по имени и IP адресу в брандмауэре Windows
Вы также можете с помощью PowerShell создать правило брандмауэра, блокирующее исходящие подключения к определенному сайту:
New-NetFirewallRule -DisplayName "Block Site" -Direction Outbound –LocalPort Any -Protocol Any -Action Block -RemoteAddress 217.20.147.1, 217.20.141.0/26
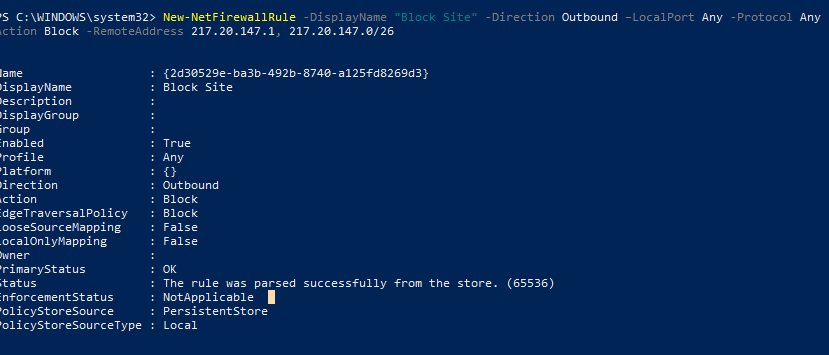
Строка “ The rule was parsed successfully from the store” говорит о том, что правило новое правило брандмауэра успешно применено. Вы можете найти его в графическом интерфейсе Windows Firewall.

Чтобы не резолвить имя сайта в IP адреса вручную можно использовать PowerShell командлет Resolve-DnsName для получения IP адресов сайтов.
Resolve-DnsName "ok.ru"| Select-Object -ExpandProperty IPAddress

Таким образом мы можем преобразовать имя домена в IP адреса и сразу добавить запрещающее правило для блокирования доступа к сайту:
$IPAddress = Resolve-DnsName "ok.ru"| Select-Object -ExpandProperty IPAddressNew-NetFirewallRule -DisplayName "Block Site" -Direction Outbound –LocalPort Any -Protocol Any -Action Block -RemoteAddress $IPAddress
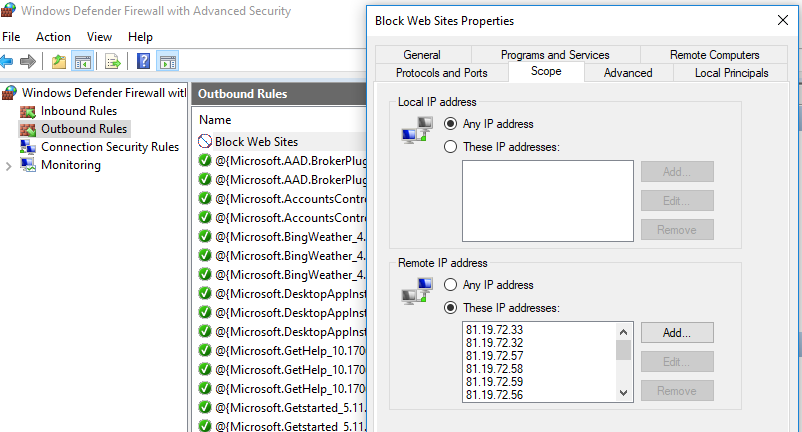
Получается, что теперь вы можете добавить запрещающее правило в Windows Firewall сразу для нескольких сайтов:
$SitesToBlock = “lenta.ru”,”mail.ru”,”facebook.com”
$IPAddress = $SitesToBlock | Resolve-DnsName -NoHostsFile | Select-Object -ExpandProperty IPAddress
New-NetFirewallRule -DisplayName "Block Web Sites" -Direction Outbound –LocalPort Any -Protocol Any -Action Block -RemoteAddress $IPAddress
У командлета Resolve-DnsName я добавил параметр –NoHostsFile, чтобы не использовать при проверке файл hosts.
Проверим, что блокирующее правило для исходящего появилось в консоли.
Эта статья прежде всего разминка для ума. В корпоративной сети для ограничения доступа к сайтам нужно использовать фильтрацию на уровне шлюза доступа в интернет или прокси-сервере. Блокировка доступа на уровне хостов не столь эффективна.
Blocking an IP address on Windows 10 is a useful way to prevent unwanted access to your computer or network. By configuring your Windows Firewall settings, you can easily block specific IP addresses and enhance your security. Let’s walk through the steps in detail.
In this guide, we’ll cover how to block an IP address using Windows Firewall. This will help you restrict access from specific IP addresses, improving your computer’s security and privacy.
Step 1: Open Windows Defender Firewall
First, open Windows Defender Firewall.
You can do this by clicking on the Start menu, typing «Windows Defender Firewall» into the search bar, and selecting it from the list.
Step 2: Access Advanced Settings
Next, access the advanced settings.
In the Windows Defender Firewall window, click on the link that says «Advanced settings.» This will open a new window with more detailed options.
Step 3: Create a New Rule
Now, create a new rule.
In the left-hand pane, click on «Inbound Rules,» then in the right-hand pane, click on «New Rule…» This will start the New Inbound Rule Wizard.
Step 4: Choose Rule Type
Choose the rule type as custom.
When prompted, select «Custom» as the rule type and click «Next.» This choice gives you the most control over the rule’s specifications.
Step 5: Specify the IP Address
Specify the IP address you want to block.
In the wizard, select «These IP addresses» and then click «Add» to enter the IP address you wish to block. Click «Next» when you are done.
Step 6: Block the Connection
Set the action to block the connection.
When asked what the rule should do, select «Block the connection» and click «Next.» This ensures that any traffic from the specified IP address will be blocked.
Step 7: Apply the Rule
Finally, give your rule a name and apply it.
Name your rule something descriptive like «Block IP 192.168.1.1» and click «Finish» to apply the rule.
After completing these steps, your Windows 10 computer will block incoming traffic from the specified IP address. This can help protect your system from unwanted access or malicious activities.
Tips for Blocking an IP Address on Windows 10
- Specificity is Key: Be sure to specify the exact IP address you want to block to avoid accidentally blocking legitimate traffic.
- Use Descriptive Names: Name your rules descriptively to easily identify and manage them later.
- Regular Updates: Regularly update your firewall rules based on new threats or changes in your network.
- Test the Rule: After creating the rule, test it to ensure it’s working as intended without disrupting normal traffic.
- Documentation: Keep a log of the rules you create, including the IP addresses and reasons for blocking, for future reference.
Frequently Asked Questions
Can I unblock an IP address after blocking it?
Yes, you can unblock an IP address by deleting or disabling the rule in the Windows Defender Firewall advanced settings.
Will blocking an IP address affect my connection speed?
No, blocking an IP address should not affect your connection speed. It simply prevents traffic from the specified IP address.
Can I block multiple IP addresses at once?
Yes, you can create multiple rules to block multiple IP addresses, or use a range of IP addresses in a single rule.
Is it possible to block outgoing traffic to an IP address?
Yes, you can create an outbound rule in Windows Defender Firewall to block outgoing traffic to a specific IP address.
What happens if I block a wrong IP address?
If you mistakenly block a wrong IP address, you can easily delete or disable the rule in the firewall settings to restore normal access.
Summary
- Open Windows Defender Firewall.
- Access advanced settings.
- Create a new rule.
- Choose rule type as custom.
- Specify the IP address.
- Block the connection.
- Apply the rule.
Conclusion
Blocking an IP address on Windows 10 is a straightforward process, but it’s essential to follow each step carefully to ensure you’re only blocking unwanted traffic. By navigating through the Windows Defender Firewall settings and creating a custom rule, you can enhance your computer’s security and protect it from potential threats. Regularly reviewing and updating your firewall rules is also a good practice to maintain optimal security.
If you found this guide helpful, consider exploring other ways to secure your network, such as enabling two-factor authentication and keeping your system software up-to-date. Taking these steps not only fortifies your defenses but also gives you peace of mind knowing your digital environment is safe. Happy computing!
Kermit Matthews is a freelance writer based in Philadelphia, Pennsylvania with more than a decade of experience writing technology guides. He has a Bachelor’s and Master’s degree in Computer Science and has spent much of his professional career in IT management.
He specializes in writing content about iPhones, Android devices, Microsoft Office, and many other popular applications and devices.
Read his full bio here.

Learn how to block IP address using Windows Defender Firewall in Windows 10. With this tutorial, you’ll be able to block a single or specific IP address, or a range of IP addresses at once using Windows Defender Firewall.
Basically, you’ll need this blocking rule on your Windows 10 computer to stop or block problematic incoming connection. The reason I’m posting this article is to make sure you have a clear instruction of how to block IP address such as to block popups from Avire Free Antivirus.
See also how to fix and resolve an IP address conflict on Windows computer.
How to block IP address using Windows Defender Firewall in Windows 10
- On your Windows 10 computer, press Win+R to open the Run dialogue box.
- Type
wf.mscand press Enter to open Windows Defender Firewall with Advanced Security window. - Under Windows Defender Firewall with Advanced Security on Local Computer, select Inbound Rules.
- Under Actions, select New rule to open New Inbound Rule Wizard window.
- On Rule Type page, select Custom.
- Select Next.
- On Program page, select All programs (if you have a specific program, you can select This program path: and input the full program path).
- Select Next.
- On Protocol and Ports page, leave as default.
- Select Next.
- On Scope page, under Which remote IP addresses does this rule apply?, select These IP addresses. Click Add button to add the problematic IP addresses (you can add multiple IP addresses at once or their range). Once added, click Ok button.
- Select Next.
- On Action page, select Block the connection.
- Select Next.
- On Profile page, leave as default and click Next button.
- On Name page, enter any name you preferred (to give the rule a name).
- Select Finish.
That’s it. You have successfully created a new inbound rule to block a problematic IP address on your Windows 10 using Windows Firewall.
You can do the same for Outbound Rule if you want to block programs on your Windows 10 computer from connecting to the server. The steps to block the program are similar to the above.
If you have any question, just let me know in the comment below.
Other articles you might like:
Windows — Block IP address using the command-line
Windows — Block IP address using the command-line
Would you like to learn how to block an IP address on Windows? In this tutorial, we will show you how to configure the Windows firewall to block IP addresses on a computer running Windows.
• Windows 2019
• Windows 2016
• Windows 2012 R2
• Windows 10
• Windows 7
Equipment list
Here you can find the list of equipment used to create this tutorial.
This link will also show the software list used to create this tutorial.
Windows Related Tutorial:
On this page, we offer quick access to a list of tutorials related to Windows.
Tutorial Windows — Block IP address using the command-line
As an administrator, start an elevated command prompt.

Configure the Windows firewall service to start automatically.
Start the Windows firewall service.
Enable the Windows firewall profiles.
Create a firewall rule to deny the input of packets from a specific IP address.
In our example, we configured the Windows Firewall to block the input of packets coming from the IP address 10.10.10.10.
Create a firewall rule to deny the output of packets to a specific IP address.
In our example, we configured the Windows firewall to block the output of packets sent to the IP address 10.10.10.10.
Congratulations! You configured the Windows firewall to block an IP address.
Tutorial Powershell — Block IP address on Windows
As an Administrator, start an elevated version of the Powershell command-line.

Configure the Windows firewall service to start automatically.
Start the Windows firewall service.
Enable the Windows firewall profiles.
Create a firewall rule to deny the input of packets from a specific IP address using Powershell.
Here is the command output.
In our example, we configured the Windows Firewall to block the input of packets coming from the IP address 10.10.10.10.
Create a firewall rule to deny the output of packets to a specific IP address using Powershell.
Here is the command output.
In our example, we configured the Windows Firewall to block the output of packets sent to the IP address 10.10.10.10.
Congratulations! You configured the Windows firewall to block an IP address using Powershell.
Tutorial Windows — Verify the firewall configuration
Start the application named Windows Defender Firewall with Advanced Security.

Verify the input rule blocking the IP address.

Verify the output rule blocking the IP address.

You are able to verify the firewall configuration.
VirtualCoin CISSP, PMP, CCNP, MCSE, LPIC22020-12-10T09:45:42-03:00
Related Posts
Page load link
Ok
Whitelisting an IP address on Windows 10 is easier than you might think. You only need to tweak a few settings in Windows Firewall. Here’s a quick rundown: Open Windows Firewall, create a new rule, specify the IP address you want to whitelist, and save your changes. With that done, your chosen IP address will be granted access.
In this section, we’ll go through each step to whitelist an IP address on Windows 10. We’ll be working within the Windows Firewall settings to make sure the specified IP address is allowed through.
Step 1: Open Windows Firewall
Open the Start Menu and type “Windows Firewall” into the search bar, then click on “Windows Defender Firewall with Advanced Security.”
You’ll be directed to the Windows Firewall settings where you can manage rules for incoming and outgoing connections. This is where you’ll create a rule to whitelist an IP address.
Step 2: Click on Inbound Rules
On the left side of the Windows Firewall window, click on “Inbound Rules.”
Inbound Rules control traffic that is coming into your computer. By setting a rule here, you ensure that the specified IP address can send data to your machine.
Step 3: Create a New Rule
Click on “New Rule” in the right-hand side panel.
This action will start a new rule wizard. This wizard will guide you through the process of setting up a new rule to whitelist an IP address.
Step 4: Select Rule Type
Choose “Custom” as the rule type, then click “Next.”
Custom rules offer more flexibility than standard ones. This will allow you to specifically whitelist an IP address among other settings.
Step 5: Specify IP Address
Under “Which remote IP addresses does this rule apply to?” select “These IP addresses” and then click “Add.” Enter the IP address you want to whitelist and click “OK.”
This step ensures that only the specified IP address is whitelisted, providing an extra layer of security by not opening up your system to a range of addresses.
Step 6: Configure Settings
Continue through the wizard, configuring any additional settings as needed. Click “Next” until you reach the “Name” step, then give your rule a name and click “Finish.”
This final step saves your rule and makes it active. Naming the rule helps you easily identify it later.
Once you complete these steps, the IP address you specified will have access through the Windows Firewall. This means it can send data to your computer without being blocked.
Tips for How to Whitelist IP Address Windows 10
- Always double-check the IP address you are whitelisting to prevent unintentional security risks.
- Regularly review your firewall rules to ensure they are still needed.
- Use descriptive names for your firewall rules to easily identify them later.
- Consider creating separate rules for different IP addresses for better management.
- Backup your firewall settings before making significant changes.
Frequently Asked Questions
What does whitelisting an IP address do?
Whitelisting an IP address allows that specific IP to bypass certain security measures, like a firewall, to interact with your computer.
Can I whitelist multiple IP addresses at once?
Yes, you can create multiple rules or add several IP addresses within one rule.
Is it safe to whitelist an IP address?
It’s generally safe if you know and trust the IP address. However, whitelisting unknown IPs can create security vulnerabilities.
How can I remove an IP from the whitelist?
Navigate to the rule you created in Windows Firewall, right-click it, and select “Delete” or “Disable.”
Why would I need to whitelist an IP address?
You might need to whitelist an IP address to allow trusted external services or devices to communicate with your computer.
Summary
- Open Windows Firewall.
- Click on Inbound Rules.
- Create a New Rule.
- Select Rule Type.
- Specify IP Address.
- Configure Settings.
Conclusion
Whitelisting an IP address on Windows 10 ensures that trusted devices and services can communicate with your computer without being blocked by the firewall. This straightforward process involves creating a new rule in Windows Firewall, specifying the IP address, and configuring a few settings.
It’s crucial to be cautious when whitelisting IP addresses, as allowing access to an untrusted IP can pose a security risk. Regularly reviewing and updating your firewall rules can help maintain the security of your system.
Feel confident? Go ahead and whitelist that IP address. Your computer will thank you for the added security and functionality!
Matt Jacobs has been working as an IT consultant for small businesses since receiving his Master’s degree in 2003. While he still does some consulting work, his primary focus now is on creating technology support content for SupportYourTech.com.
His work can be found on many websites and focuses on topics such as Microsoft Office, Apple devices, Android devices, Photoshop, and more.