
Наверняка каждый пользователь операционных систем Windows сталкивался с ситуацией, когда значок сетевого подключения в панели задач отображался с желтым треугольником, что означает отсутствие подключения к Интернету.
То же самое можно увидеть и в свойствах сетевого подключения. Каким же образом операционная система определяет, есть ли на данном сетевом интерфейсе соединение с Интернетом, или только доступ к локальной сети?
А дело в том, что в операционных системах Microsoft начиная с Windows Vista есть такая функция, как индикатор статуса сетевого подключения (Network Connectivity Status Indicator, NCSI). Эта функция вызывается службой сведений о подключенных сетях (Network Awareness) при подключении к любой сети.

Для определения возможностей сети в NCSI есть множество различных методов, одним из которых является определение возможности выхода в Интернет. Проверка проводится в два этапа:
• При подключении к сети система посылает HTTP-запрос по адресу http://www.msftncsi.com/ncsi.txt. Это обычный текстовый файл, в котором содержится всего одна строка Microsoft NCSI. В случае успешного запроса от сервера должен прийти ответ с заголовком 200 ОК, содержащий эту строку;
• На втором этапе проверяется работоспособность службы DNS, для чего NCSI пытается разрешить в IP-адрес имя dns.msftncsi.com. Ожидаемое значение 131.107.255.255
По завершении проверки, если оба этапа были успешно пройдены, система считает что доступ в Интернет имеется. Если файл ncsi.txt недоступен, а dns.msftncsi.com не разрешается или разрешается с другим IP-адресом, то система сообщает о невозможности подключения к Интернет. В том случае, если ncsi.txt недоступен, но dns.msftncsi.com разрешается в правильный IP — система выдает сообщение о необходимости аутентификации через браузер.
Настройки NCSI находятся в системном реестре, в разделе HKLM\System\CurrentControlSet\Services\NlaSvc\Parameters\Internet, при желании их можно отредактировать. Вот наиболее важные параметры для IPv4 (для IPv6 просто добавляем префикс V6):
EnableActiveProbing — наличие автоматической проверки подключения к интернет (1 — проверка включена, 0 — отключена);
ActiveDNSProbeContent — IP-адрес для проверки DNS;
ActiveDNSProbeHost — имя хоста для проверки DNS;
ActiveWebProbeHost — адрес веб-сайта для проверки;
ActiveWebProbePath — путь к файлу проверки;
ActiveWebProbeContent — содержимое файла.

Используя эти настройки, можно изменить дефолтные адреса на свои, и подняв веб-сервер, по его логам отслеживать подключения нужных компьютеров. Впрочем, смысла особого в этом лично я не вижу.
From Wikibooks, open books for an open world
Windows computers have a system for detecting internet connectivity known as Network Location Awareness (NLA). It controls many aspects of how Windows categorizes internet connections, such as whether to assign networks as private or public.[1] When you adjust firewall setting based on whether the network is «private» and «public», the definition of private and public is whether or not your network is currently connected to a network you define as private or public.[2]
Network Location Awareness also has the ability to check and alert you whenever you are connected to the internet through a task force called Network Connectivity Status Indicator (NCSI). NCSI itself is an API for other programs to use when they need to know how good your internet connection is[3].
But since Network Connectivity Status Indicator is itself an API, how the software detects whether you have internet connectivity is not exposed and can thus be hidden. However, a simple test can show what NCSI can do to check your internet connection[4]. Here is the method below:
- Check for website connection
- NCSI looks up
www.msftncsi.comusing your DNS. - If the HTTP response header has a 200 OK status code, then it requests
http://www.msftncsi.com/ncsi.txt[5]. Note that if you go to that url, the text file reads «Microsoft NCSI«.
- NCSI looks up
- Check for DNS connection
- Also, NCSI does a check for the existence of
dns.msftncsi.comthrough your DNS. - If it exists, then NCSI checks whether the IP is
131.107.255.255. - If there is any problem in either getting a response for the DNS lookup or the IP doesn’t match, the internet is assumed to have an issue.
- If the error dns_probe_finished_bad_config then try to get a static ip using vpn or contacting your internet service provider.[7]
- Also, NCSI does a check for the existence of
- Check for IPv6 connection
- Similar, but
dns.msftncsi.comis expected to resolve tofd3e:4f5a:5b81::1, and in HTTP testwwwis changed toipv6in text file URL.
- Similar, but
If #2 works and #1 fails (the definition of fails is if there isn’t a response or a redirect), then Windows alerts you that some kind of authentication might be blocking your internet connectivity (like a need to sign-in before using the internet) [4].
If #2 fails (the definition of fails is if there isn’t a response [resolution failure] or the wrong address is returned), then Windows alerts you that you have no internet connection [4].
Note that sometimes, you might get a yellow warning sign/exclamation mark indicating that you have no internet, yet can connect fine. In this case, judging by the above cases, it should mean that #2 failed but #1 works.
The configuration parameters for NCSI uses the Registry. The key is located at HKEY_LOCAL_MACHINE\SYSTEM\CurrentControlSet\Services\NlaSvc\Parameters\Internet. The list of the typical values are here
List of typical values at the Key (Windows 10)
| Name | Type | Data |
|---|---|---|
| (Default) | REG_SZ | (value not set) |
| ActiveDnsProbeContent | REG_SZ | 131.107.255.255 |
| ActiveDnsProbeContentV6 | REG_SZ | fd3e:4f5a:5b81::1 |
| ActiveDnsProbeHost | REG_SZ | dns.msftncsi.com |
| ActiveDnsProbeHostV6 | REG_SZ | dns.msftncsi.com |
| ActiveWebProbeContent | REG_SZ | Microsoft NCSI |
| ActiveWebProbeContentV6 | REG_SZ | Microsoft NCSI |
| ActiveWebProbeHost | REG_SZ | www.msftncsi.com |
| ActiveWebProbeHostV6 | REG_SZ | ipv6.msftncsi.com |
| ActiveWebProbePath | REG_SZ | ncsi.txt |
| ActiveWebProbePathV6 | REG_SZ | ncsi.txt |
| EnableActiveProbing | REG_DWORD | 0x00000001 (1) |
| PassivePollPeriod | REG_DWORD | 0x0000000f (15) |
| StaleThreshold | REG_DWORD | 0x0000001e (30) |
| WebTimeout | REG_DWORD | 0x00000023 (35) |
As you can see, changing the data of the name will change the behavior of what NCSI does. For example, changing ActiveWebProbeHost will change what website it will check. EnableActiveProbing is a boolean value that, if set to 0, turns off NCSI. Any other value turns it on. The last three names, PassivePollPeriod; StaleThreshold; and WebTimeout, have no predictable effect on the system [4].
As a side note, on the Microsoft documentation page describe how NCSI works, they mention that
- IIS logs are stored on the server at www.msftncsi.com. These logs contain the time of each access and the IP address recorded for that access. These IP addresses are not used to identify users, and in many cases, they are the address of a network address translation (NAT) computer or proxy server, not a specific client behind that NAT computer or proxy server[6].
- ↑ «Network Location Awareness». TechNet. Microsoft Docs. Retrieved 2021-10-22.
- ↑ MichaelPlatts [msft] (2010-09-08). «Network Location Awareness (NLA) and how it relates to Windows Firewall Profiles». Networking Blog. TechNet Blogs. Archived from the original on 2017-11-05.
- ↑ «Network Awareness in Windows Vista and Windows 7». Microsoft Docs. Microsoft. Retrieved 2021-10-22.
- ↑ a b c d MichaelPlatts. «Windows 7 Network Awareness: How Windows knows it has an internet connection». superuser community blog. StackExchange. Retrieved 01/11/2016. ; ;
- ↑ Changed to
http://www.msftconnecttest.com/connecttest.txtin Windows 10 build 1607 (Anniversary Update), new text file reads «Microsoft Connect Test« - ↑ «Appendix K: Network Connectivity Status Indicator and Resulting Internet Communication in Windows Vista». TechNet. Microsoft. Retrieved 2021-10-22.
Encryption and storage: NCSI does not use encryption (both the requests it sends and the responses it receives are standardized, as shown in the table earlier in this subsection). IIS logs are stored on the server at www.msftncsi.com. These logs contain the time of each access and the IP address recorded for that access. These IP addresses are not used to identify users, and in many cases, they are the address of a network address translation (NAT) computer or proxy server, not a specific client behind that NAT computer or proxy server.
If you have ever encountered the prompt “Connected, No internet access” or “In-browser authentication is required in your Windows, then you must surely be curious about it. How does our computer know when there is internet available and when it disappears?
How does Windows know exactly when the computer is connected to the Internet?
This article answers the question by explaining the whole process of Internet connection monitoring in Windows.
Table of Contents
Network Connectivity Status Indicator
The Network Connectivity Status Indicator (NCSI) is a mechanism that controls the internet connectivity display in the Taskbar, among various other functionalities. NCSI is part of the Network Awareness program which was first introduced in Windows Vista and has been carried out ever since in each version of Windows.
This mechanism is considered to be a smart notification system for users to know about their current internet status. If the NCSI is unable to perform its function, it will indicate that there is no internet availability, even though the computer is able to access the internet through the browser and ping other IP addresses.
How NCSI works
The NCSI works in two critical steps to check the internet’s status that the computer is connected to. These two tasks are performed independently.
- NCSI performs a DNS lookup for www.msftconnecttest.com, and then sends out an HTTP Get request to http://www.msftncsi.com/ncsi.txt and downloads the text file. This is a plain-text file that contains “Microsoft connect test.”
- NCSI also performs a DNS lookup for dns.msftncsi.com and checks to see if the corresponding IP address is 131.107.255.255.
From step 1, if the text file is received containing the exact match, Windows establishes that the computer is connected to the internet. If, however, the text file is not downloaded or has been redirected, NCSI moves on to the second step.
Once NCSI resolves for dns.msftncsi.com, it then checks if the page is accessible. If the page is accessible, the network icon in the notification tray shows that it has internet access.
However, if the page is inaccessible, it prompts that additional authentication may be required. But if the DNS resolution fails entirely, or returns to a different IP address, the network icon displays “No internet access.”
A similar scenario may occur if you are working behind a firewall and it blocks all inbound and outbound traffic, and only allows certain traffic to pass through. This would mean that NCSI would not be able to communicate with www.msftncsi.com and www.msftconnecttest.com. This would in-turn prompt Windows to show that there is no internet available on your computer.
A workaround for this is to allow both inbound and outbound communication through the firewall for the above-mentioned URLs.
What about your privacy?
According to the documentation provided by Microsoft on NCSI, their servers store the time of access as well as the IP addresses when a DNS lookup request is made to www.msftncsi.com. Although they claim that the information is kept confidential, some people can still be uncomfortable with it.
A workaround for this is by disabling the NCSI feature on your Windows. It can be achieved by altering the System Registries, as well as from the Group Policy Editor.
How to disable NCSI from Registry Editor
- Open the Registry Editor by typing in regedit in Run.
- From the left pane, navigate to the following:
HKEY_Local_Machine -> System -> CurrentControlSet -> Services -> NlaSvc -> Parameters -> Internet - Now double-click EnableActiveProbing in the right pane, and set the Value Data to 0.

Click Ok and restart the computer

How to disable NCSI from Group Policy Editor
The same functionality can also be achieved through the Group Policy Editor.
- Launch the editor by typing in gpedit.msc in Run.
- From the left pane, navigate to the following:
Computer Configuration -> Administrative Templates -> System -> Internet Communication Management -> Internet Communication Settings
- In the right pane, double-click Turn off Windows Network Connectivity Status Indicator active tests and then select Enabled. Click Ok.
- Now open the Command Prompt by typing in cmd in Run.
- Enter gpupdate /force to enforce the changes made to the Group Policies.

Note that changing this parameter will stop your operating system from communicating with the NCSI servers, hence no more prompts will be given on whether the browser requires additional authentication.
On the contrary, the Notification tray will now show that there is no internet access, even when there is.
Some people have experienced problems with their applications such as Office 365, Skype, OneDrive, and Outlook after disabling NCSI. However, in our case, all the applications were functioning as usual.
We hope that you find this information valuable.
Распознавание голоса и речи на C#
UnmanagedCoder 05.05.2025
Интеграция голосового управления в приложения на C# стала намного доступнее благодаря развитию специализированных библиотек и API. При этом многие разработчики до сих пор считают голосовое управление. . .
Реализация своих итераторов в C++
NullReferenced 05.05.2025
Итераторы в C++ — это абстракция, которая связывает весь экосистему Стандартной Библиотеки Шаблонов (STL) в единое целое, позволяя алгоритмам работать с разнородными структурами данных без знания их. . .
Разработка собственного фреймворка для тестирования в C#
UnmanagedCoder 04.05.2025
C# довольно богат готовыми решениями – NUnit, xUnit, MSTest уже давно стали своеобразными динозаврами индустрии. Однако, как и любой динозавр, они не всегда могут протиснуться в узкие коридоры. . .
Распределенная трассировка в Java с помощью OpenTelemetry
Javaican 04.05.2025
Микросервисная архитектура стала краеугольным камнем современной разработки, но вместе с ней пришла и головная боль, знакомая многим — отслеживание прохождения запросов через лабиринт взаимосвязанных. . .
Шаблоны обнаружения сервисов в Kubernetes
Mr. Docker 04.05.2025
Современные Kubernetes-инфраструктуры сталкиваются с серьёзными вызовами. Развертывание в нескольких регионах и облаках одновременно, необходимость обеспечения низкой задержки для глобально. . .
Создаем SPA на C# и Blazor
stackOverflow 04.05.2025
Мир веб-разработки за последние десять лет претерпел коллосальные изменения. Переход от традиционных многостраничных сайтов к одностраничным приложениям (Single Page Applications, SPA) — это. . .
Реализация шаблонов проектирования GoF на C++
NullReferenced 04.05.2025
«Банда четырёх» (Gang of Four или GoF) — Эрих Гамма, Ричард Хелм, Ральф Джонсон и Джон Влиссидес — в 1994 году сформировали канон шаблонов, который выдержал проверку временем. И хотя C++ претерпел. . .
C# и сети: Сокеты, gRPC и SignalR
UnmanagedCoder 04.05.2025
Сетевые технологии не стоят на месте, а вместе с ними эволюционируют и инструменты разработки. В . NET появилось множество решений — от низкоуровневых сокетов, позволяющих управлять каждым байтом. . .
Создание микросервисов с Domain-Driven Design
ArchitectMsa 04.05.2025
Архитектура микросервисов за последние годы превратилась в мощный архитектурный подход, который позволяет разрабатывать гибкие, масштабируемые и устойчивые системы. А если добавить сюда ещё и. . .
Многопоточность в C++: Современные техники C++26
bytestream 04.05.2025
C++ долго жил по принципу «один поток — одна задача» — как старательный солдатик, выполняющий команды одну за другой. В то время, когда процессоры уже обзавелись несколькими ядрами, этот подход стал. . .
On Windows 11, the ability to determine wireless or wired network connection information (such as IP, DNS, and default gateway addresses) can come in handy in many situations.
For example, you may need the connection details to diagnose and resolve connectivity issues to the local network or internet or determine whether you have to update specific settings. You can quickly find the router’s IP address with the default gateway information. You can learn whether the laptop is using the correct wireless network. It can also be helpful if you try to set up a remote desktop connection.
Whatever the reason, Windows 11 includes multiple ways to quickly check your computer’s network configuration using the Settings app, Task Manager, Control Panel, Command Prompt, and PowerShell. However, depending on your chosen option, the available details may vary.
In this how-to guide, I’ll explain the different ways to check your computer’s network configuration.
Recent updates
These instructions has been updated to ensure accuracy and reflect changes to the process in the operating system.
How to check network configuration from Settings
On Windows 11, the Settings app lets you review the network connection configuration for each interface (Wi-Fi and Ethernet) and check various details for all interfaces.
Wi-Fi network settings
To view the wireless connection configuration on Windows 11, use these steps:
- Open Settings.
- Click on Network & internet.
- Click the Wi-Fi page on the right side.
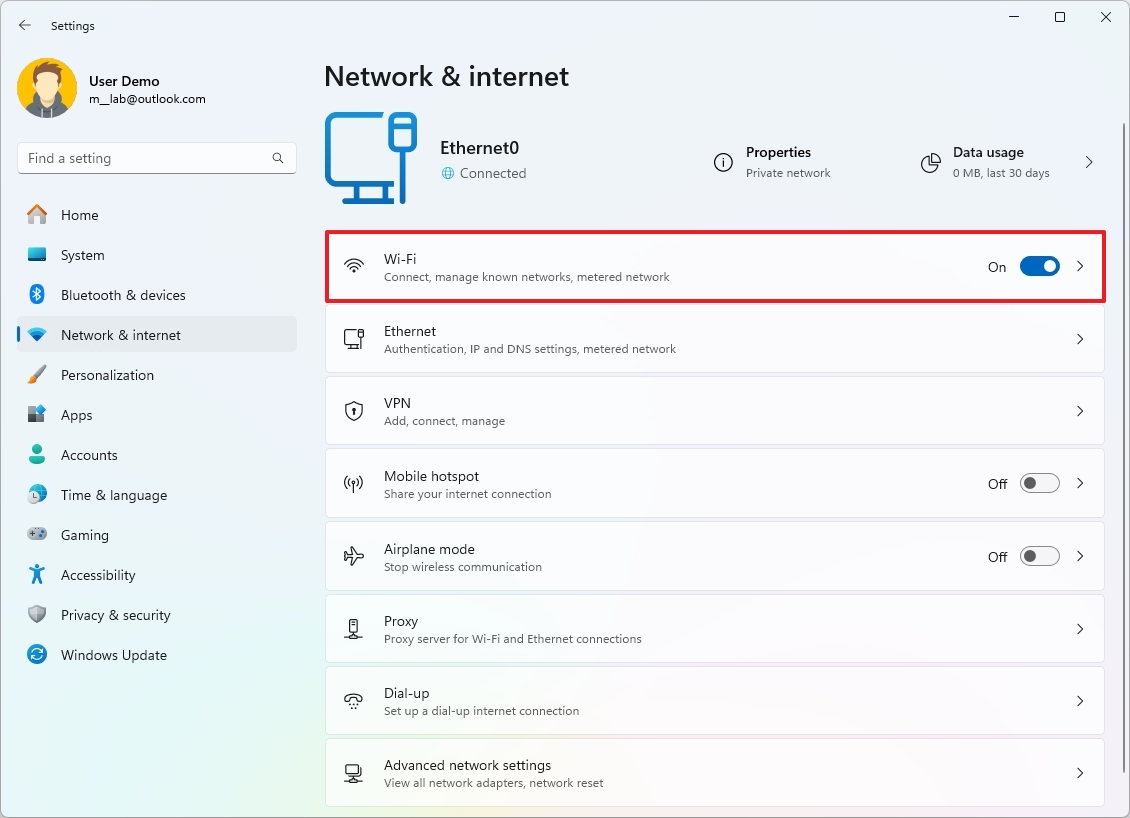
- Click the connection properties setting.
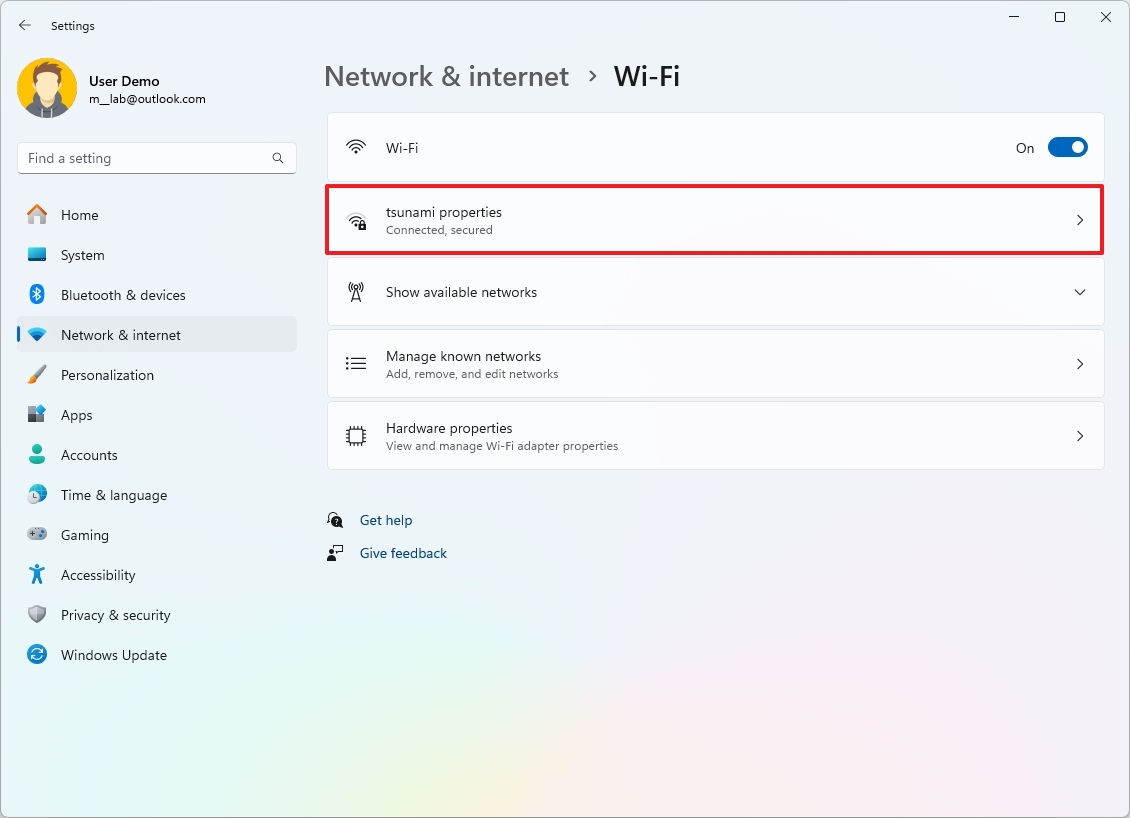
- Confirm the wireless network settings on Windows 11.
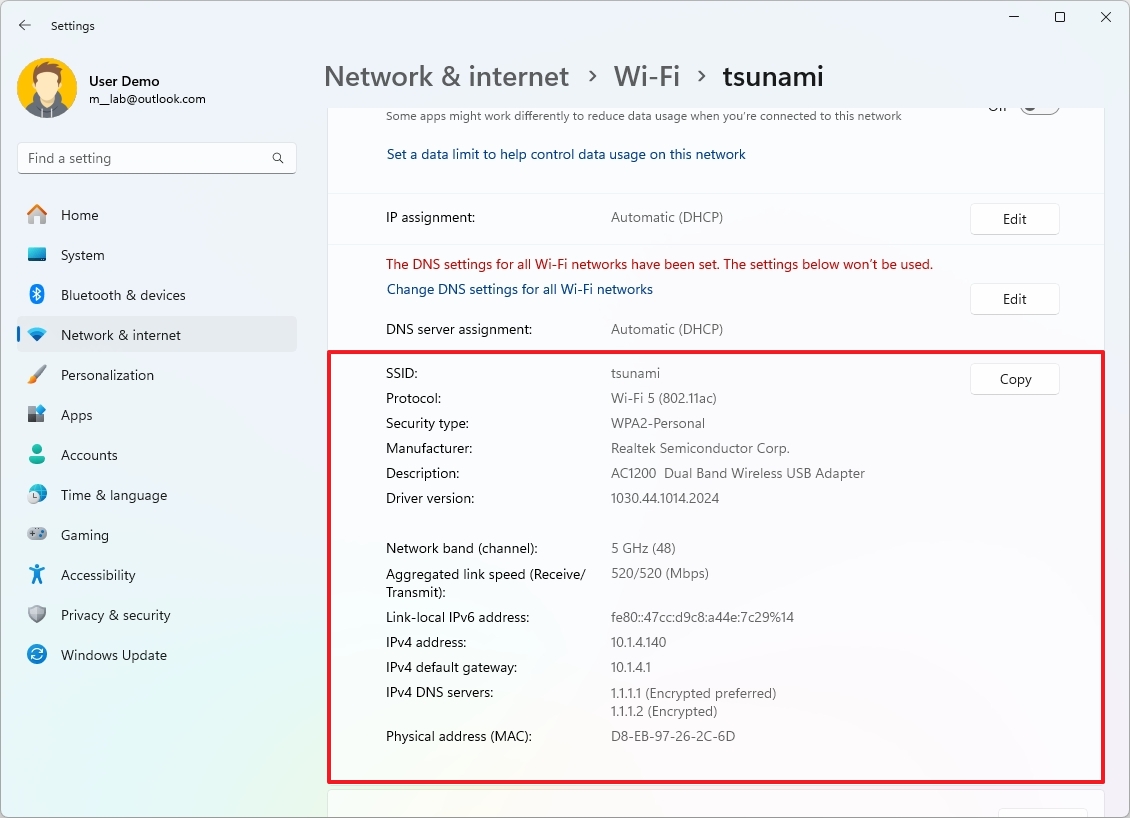
On the «Wi-Fi» page, you can determine many settings about the connection, including:
All the latest news, reviews, and guides for Windows and Xbox diehards.
- Service Set IDentifier (SSID).
- Protocol.
- Security type.
- Manufacturer.
- Driver version.
- Network band.
- Network channel.
- Link speed.
- IPv6 addresses.
- IPv4 address.
- IPv4 DNS servers.
- Physical address (MAC).
Also, it’s possible to determine whether the TCP/IP address and DNS server addresses are static or dynamically assigned by the DHCP server and the network profile type the connection is using.
Ethernet network settings
To view the wired connection configuration on Windows 11, use these steps:
- Open Settings.
- Click on Network & internet.
- Click the Ethernet page on the right side.
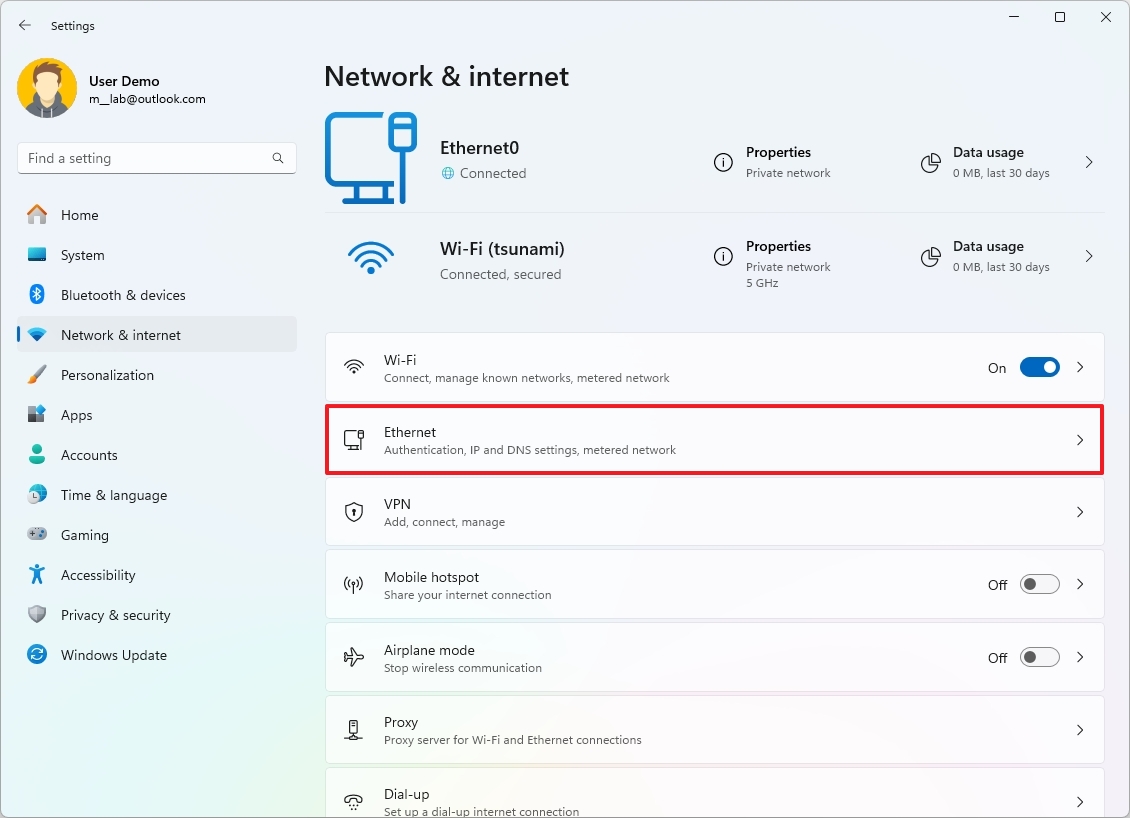
- Confirm the Ethernet network settings on Windows 11.
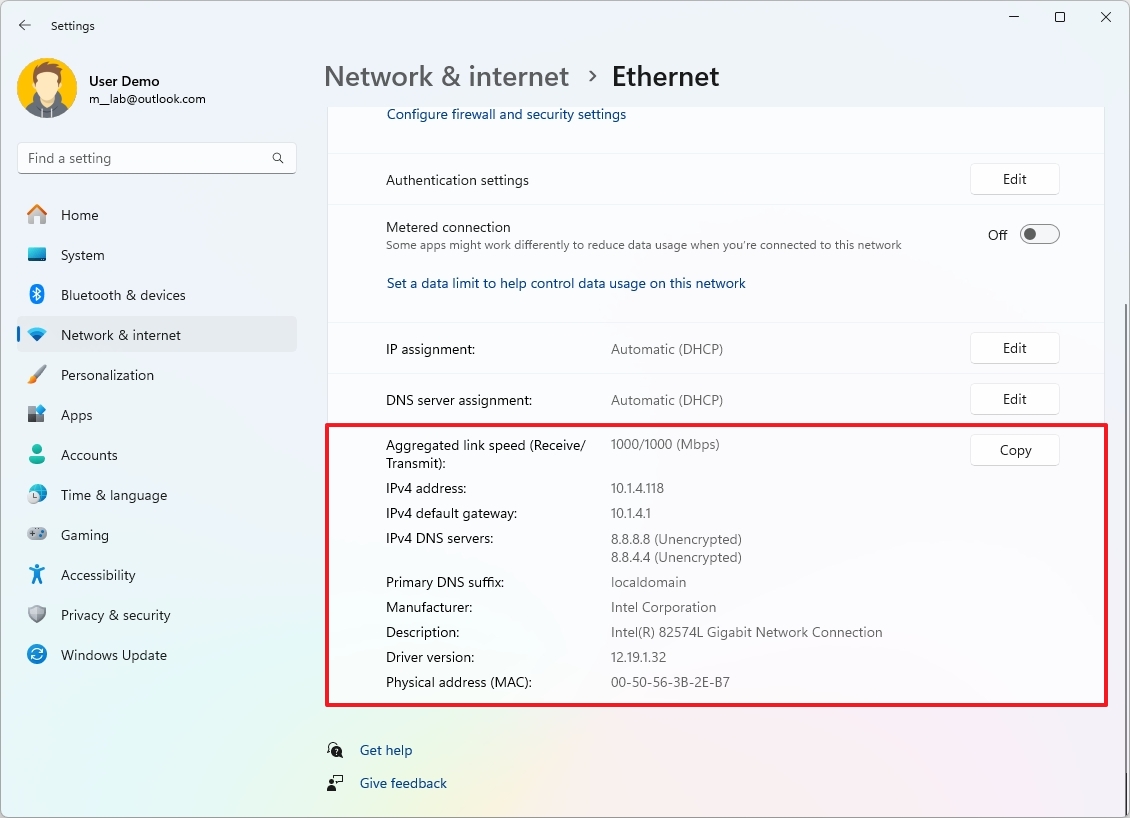
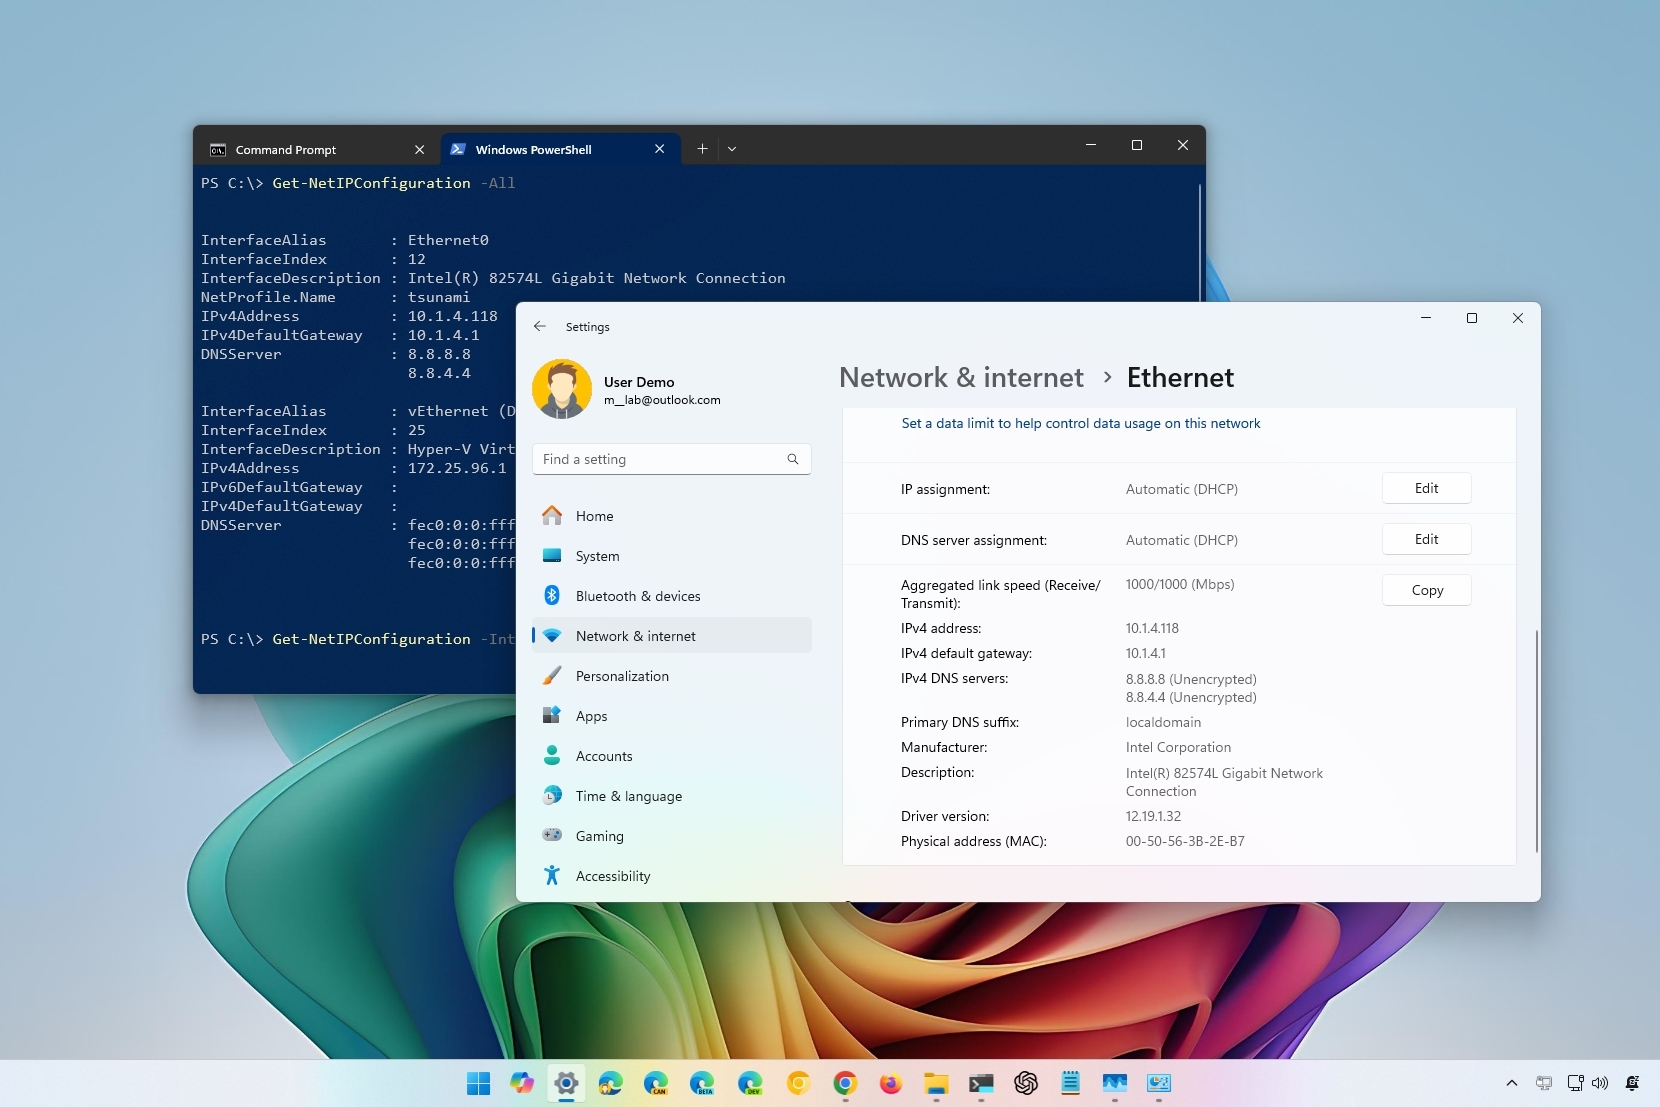
On the «Ethernet» page, you can determine many settings about the connection, including:
- Link speed.
- IPv6 addresses.
- IPv4 address.
- IPv4 DNS servers.
- Primary DNS suffix.
- Manufacturer.
- Driver version.
- Physical address (MAC).
All network settings
To view the network configuration for all the interfaces on Windows 11, use these steps:
- Open Settings.
- Click on Network & internet.
- Click the Advanced network settings page on the right side.

- Click the «Hardware and connection properties» setting under the «More settings» section.
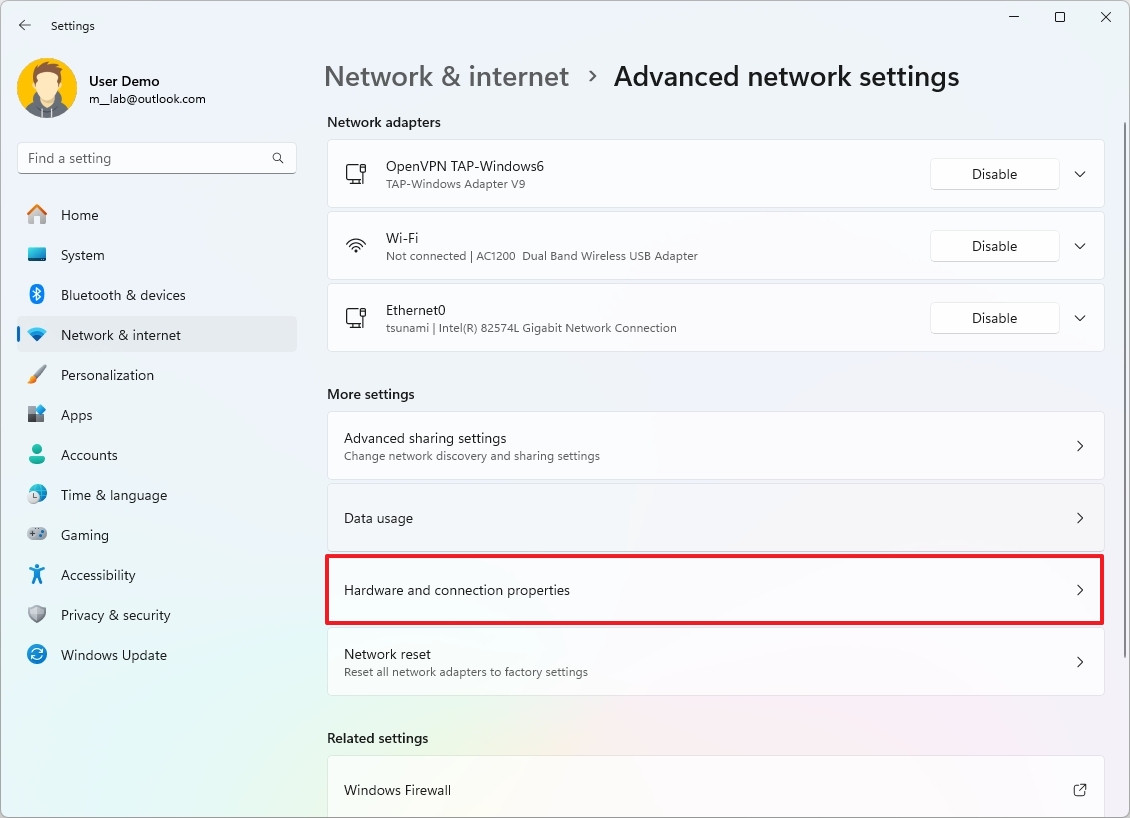
- Confirm all the network interfaces settings on Windows 11.
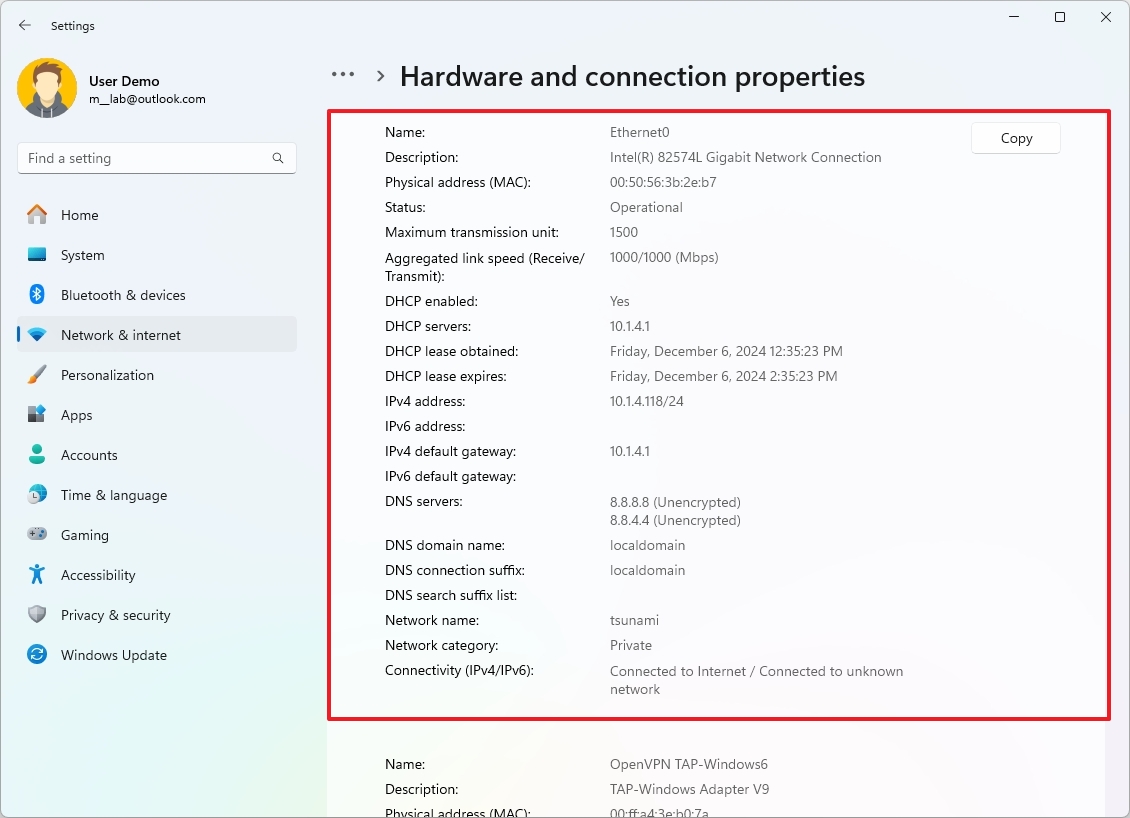
The «Hardware and connection properties» page lists all the network connections, including wireless, wired, and virtual adapters. Some available information includes TCP/IP address, MAC address, status, maximum transmission unit (MTU), network category, link speed, and more.
You can also click the «Copy» button to copy the network information to the clipboard and paste it into a text file.
How to check network configuration from Task Manager
If you only need to find out the current TCP/IP address of the connection, you can also use Task Manager with these steps:
- Open Start.
- Search for Task Manager and click the top result to open the app.
- Quick tip: You can always open the app quickly with the «Ctrl + Shift + Esc» shortcut or right-clicking the «Start» button and selecting the «Task Manager» option.
- Click the Performance tab.
- Select the network adapter from the left side.
- Confirm the current IPv4 and IPv6 addresses, connection type, DNS name, and adapter name.
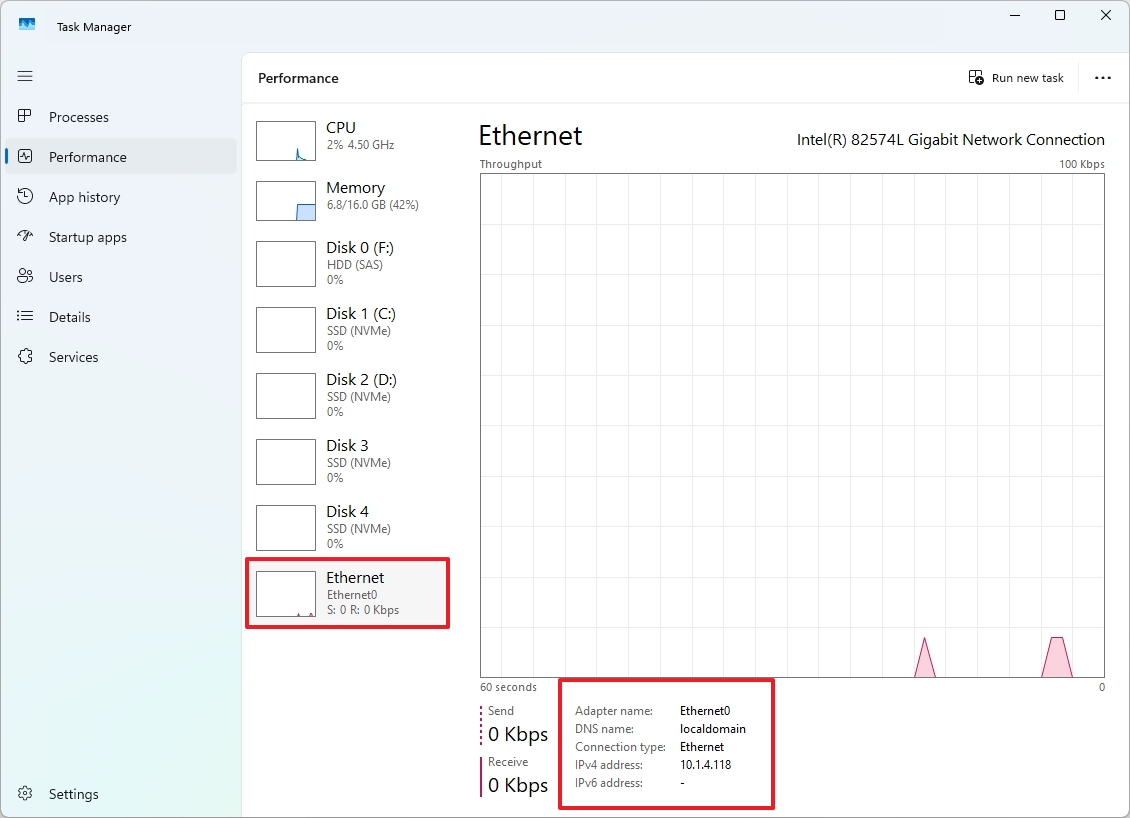
Once you complete the steps, you will know the basic configuration of the network adapter and activity.
How to check network configuration from Control Panel
To check the network adapter configuration with Control Panel, use these steps:
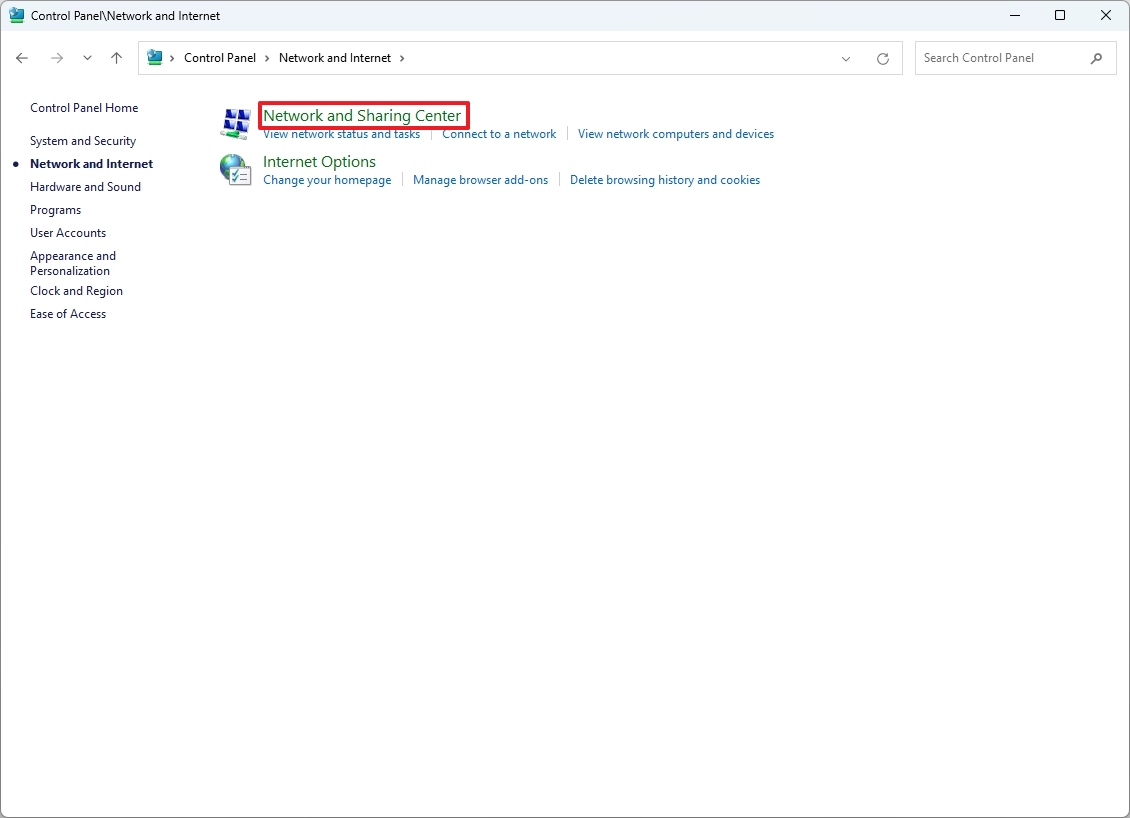
- Open Control Panel.
- Click on Network and Internet.
- Click on Network and Sharing Center.
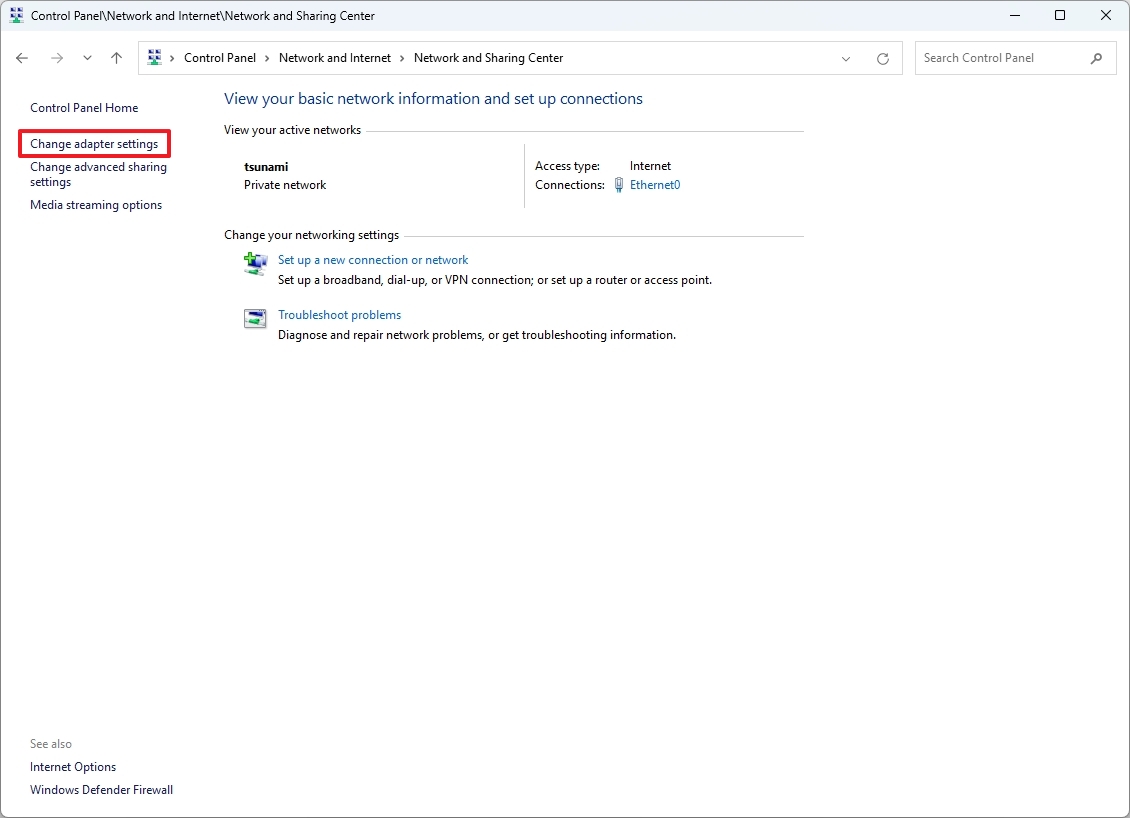
- Click on «Change adapter settings» from the left navigation pane.
- Double-click the network adapter.
- (Optional) Confirm the sent and received packets to determine the link activity.
- Click the Details button.
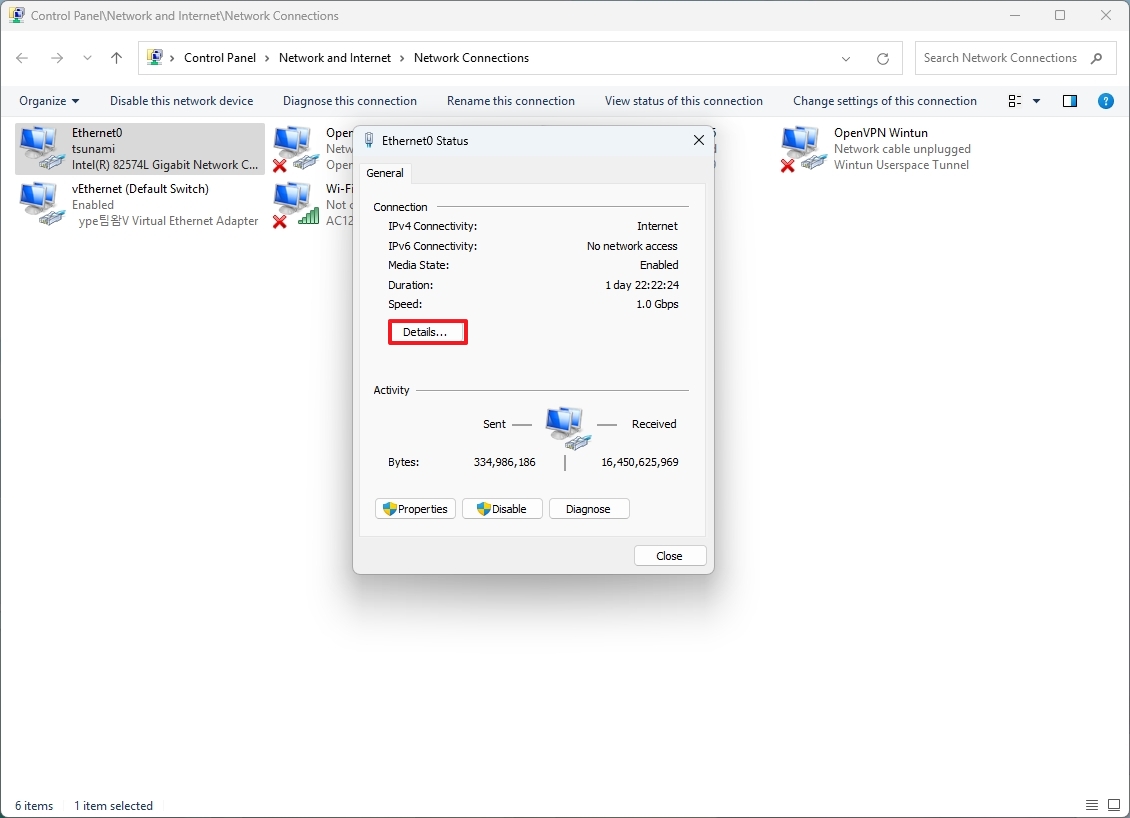
- Confirm the network connection details on Windows 11
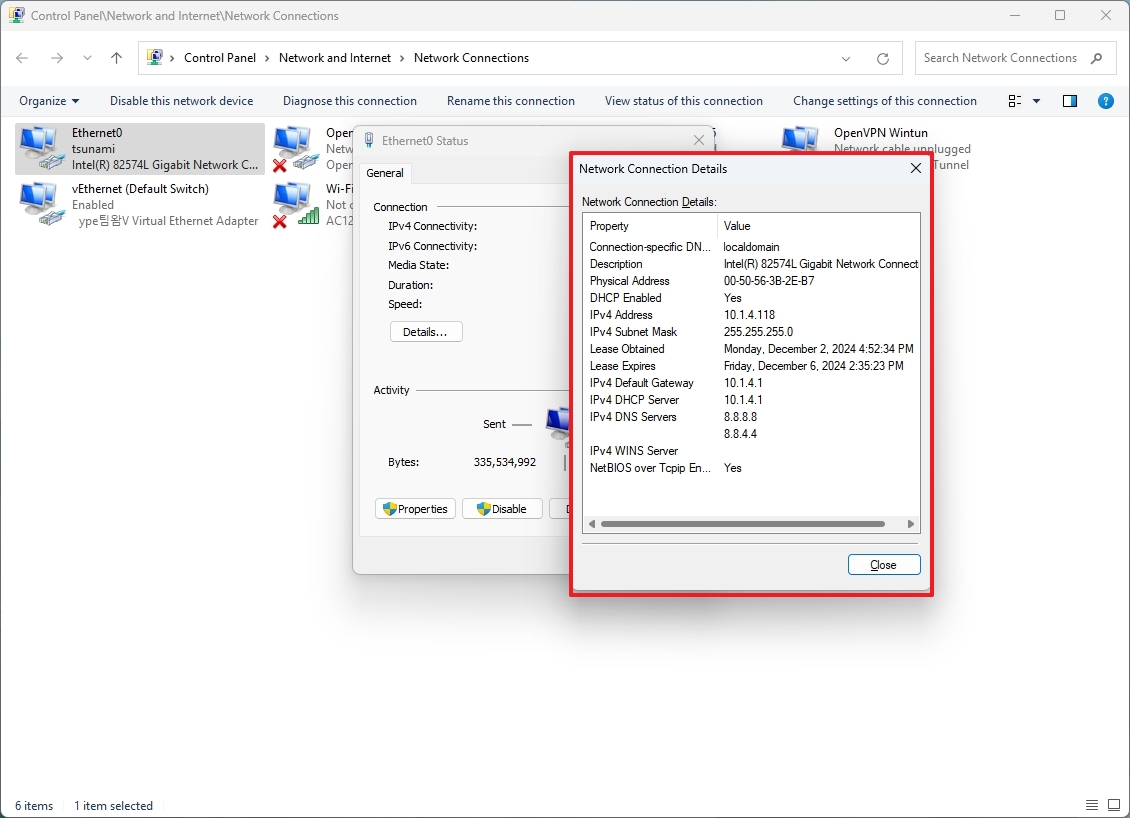
On this page, you will find the current configuration settings of the connection, some of which include:
- Connection-specific DNS suffix.
- Physical address.
- DHCP enabled.
- IPv4 address.
- IPv4 subnet mask.
- Lease obtained.
- Lease expires.
- IPv4 default gateway.
- IPv4 DHCP server.
- IPv4 DNS servers.
How to check network configuration from Command Prompt
To determine the IP, DNS servers, default gateway, and other network settings with Command Prompt use these steps:
- Open Start.
- Search for Command Prompt and click the top result to open the app.
- Type the following command to check the basic network configuration and press Enter: ipconfig

- Confirm the basic connection details, such as IPv4 address, DNS server addresses and suffix, and default gateway (router) for all connections.
- Type the following command to check all network configurations and press Enter: ipconfig /all

- Confirm more advanced network details like the TCP/IPv4 and IPv6 information, DNS servers and suffix, DHCP and lease information, and more.
After you complete the steps, the network configuration for all interfaces will be listed in the command output result.
How to check network configuration from PowerShell
To find out the network connection configuration for one or all interfaces with PowerShell, use these steps:
- Open Start.
- Search for PowerShell and click the top result to open the app.
- Type the following command to check the basic network configuration for the physical adapters and press Enter: Get-NetIPConfiguration
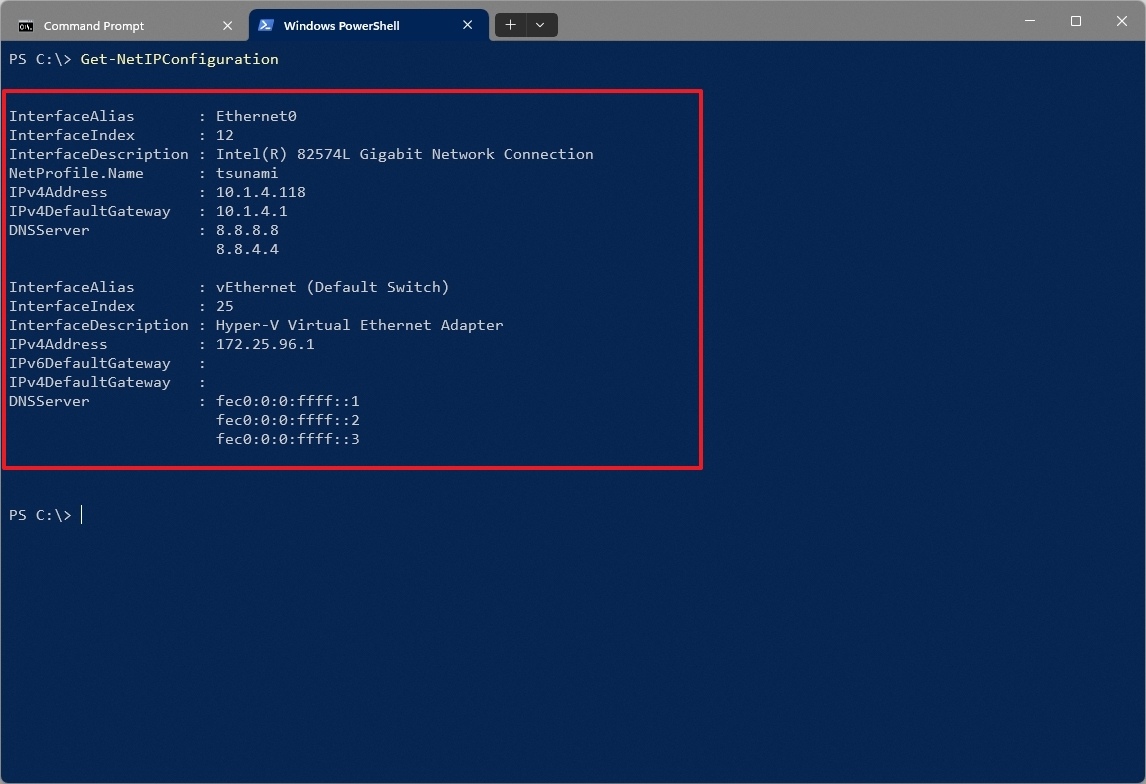
- Confirm the connection details like TCP/IPv4 and IPv6 addresses, DNS servers and default gateway addresses, interface name and index number, and more.
- (Optional) Type the following command to check the network configuration for all adapters (such as lookback, virtual, active, and disconnected) and press Enter: Get-NetIPConfiguration -All
- Type the following command to show network configuration details of a specific interface and press Enter: Get-NetIPConfiguration -InterfaceIndex 12
In the command, change «10» for the index number that represents your network adapter.
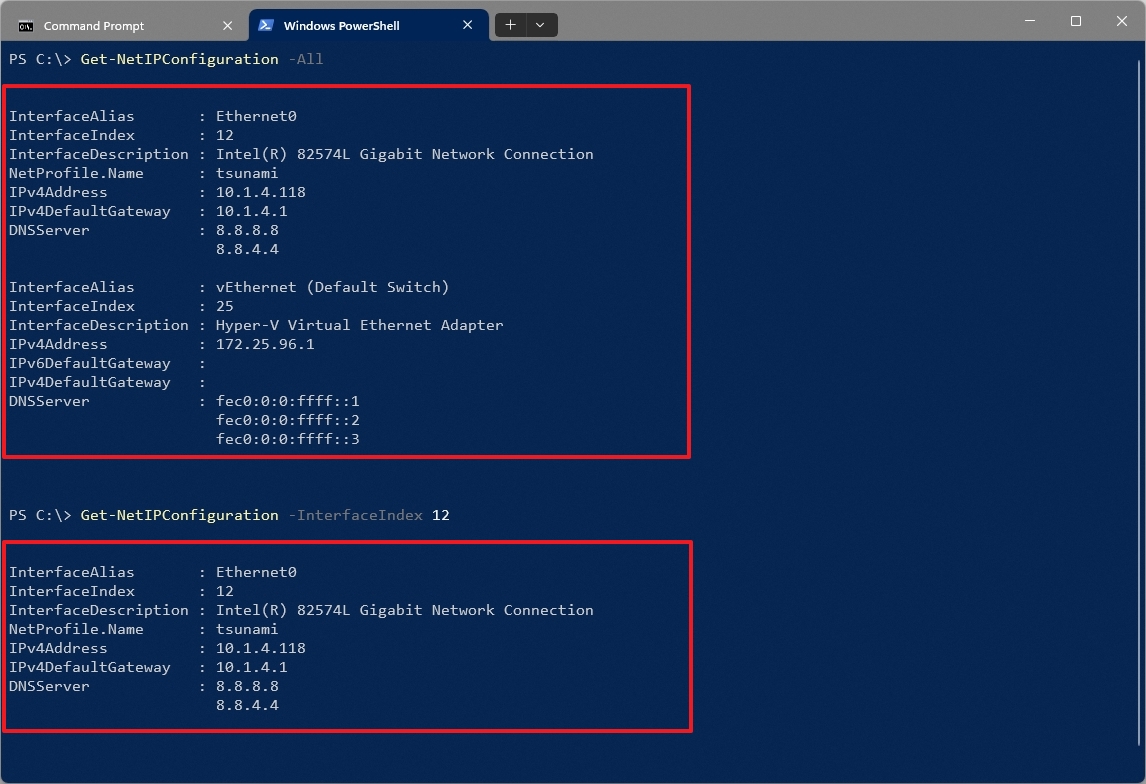
Once you complete the steps, PowerShell will display the network configuration for one or all interfaces (Ethernet, Wi-Fi, virtual, or lookback), depending on your command.
This guide focuses on the most common tools and commands for determining the network connection configuration on Windows 11. Although you may find different tools and commands, these instructions should provide more than enough information for most cases.
More resources
For more in-depth insights, troubleshooting tips, and the latest updates on Windows 11 and 10, be sure to explore these resources:
- Windows 11 on Windows Central — All you need to know
- Windows 10 on Windows Central — All you need to know
Mauro Huculak has been a Windows How-To Expert contributor for WindowsCentral.com for nearly a decade and has over 15 years of experience writing comprehensive guides. He also has an IT background and has achieved different professional certifications from Microsoft, Cisco, VMware, and CompTIA. He has been recognized as a Microsoft MVP for many years.