
Applies ToWindows 11 Windows 10
Средство проверки системных файлов — это служебная программа в Windows, которая проверяет наличие проблем с файлами на компьютере. Чтобы запустить ее, выполните следующие действия.
-
Убедитесь, что установлены последние обновления для Windows, а затем перезапустите компьютер. Дополнительные сведения см. в статье Обновление Windows.
-
В поле поиска на панели задач введите командную строку и щелкните правой кнопкой мыши или нажмите и удерживайте командную строку (классическое приложение) в списке результатов. Выберите Запуск от имени администратора, а затем —Да.
-
Введите DISM.exe /Online /Cleanup-image /Restorehealth (обратите внимание на пробел перед каждой косой чертой «/»), а затем нажмите ВВОД. (Примечание. Запуск и завершение этого шага может занять несколько минут.)
-
После того как появится сообщение «Операция успешно завершена», введите sfc /scannow (обратите внимание на пробел между «sfc» и «/») и нажмите клавишу ВВОД.
-
Когда появится сообщение «Проверка 100 % завершена», введите exit и нажмите клавишу ВВОД.
Дополнительные сведения о системной проверке файлов
Нужна дополнительная помощь?
Нужны дополнительные параметры?
Изучите преимущества подписки, просмотрите учебные курсы, узнайте, как защитить свое устройство и т. д.
Доброго дня!
Оказывается не все знают, что в Windows есть достаточно эффективная система самодиагностики и «лечения» (исправления ошибок). При возникновении самых разных проблем (например, со звуком, с сетью, Bluetooth, питанием и т.д.) — можно тремя кликами мышки запустить мастер устранения неполадок — и через 2-3 мин. получить работающую систему! 👀
Заранее предупрежу, что если проблема носит аппаратный характер (например, сломался Wi-Fi адаптер) — то никакой мастер в Windows вам не поможет (если только подскажет, что «такое-то устройство не отзывается»… Хотя не спорю, даже это может оказать неоценимую помощь диагностике).
Собственно, ниже в заметке приведу парочку способов, как можно запустить мастера самодиагностики в Windows (актуально для ОС Windows 10/11).
Итак…
*
Средство устранения неполадок: способы запуска
📌 Вариант 1
Универсальный способ. Причем, найти нужного мастера гораздо легче, чем во вкладке с параметрами, которую пытаются сделать разработчики из Microsoft взамен контрольной панели…
Действия по порядку:
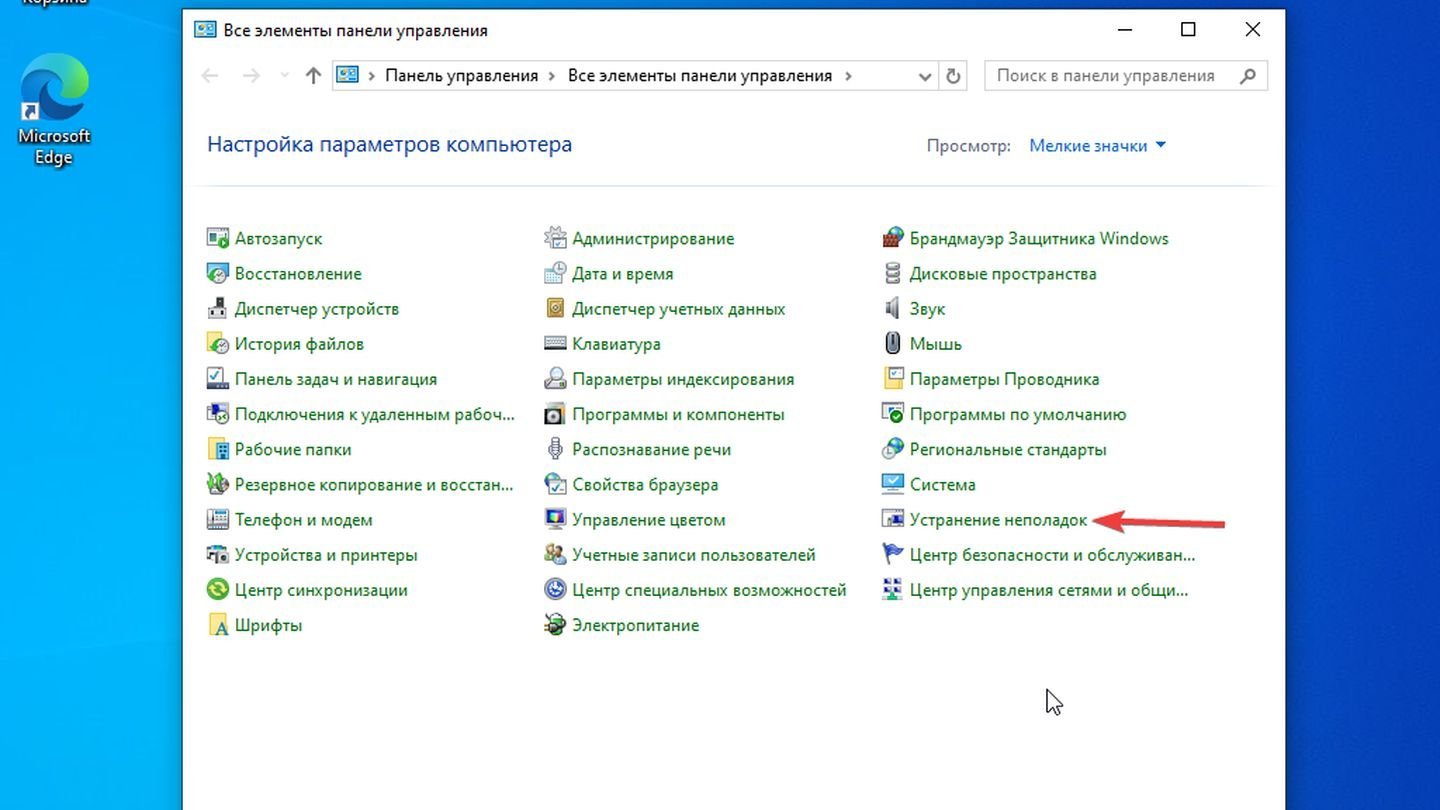
- сначала необходимо открыть панель управления/контрольную панель (сочетание Win+R, команда control);
- перевести режим отображения в «Мелкие значки»;
- в меню должна появиться ссылка «Устранение неполадок» — необходимо открыть ее;
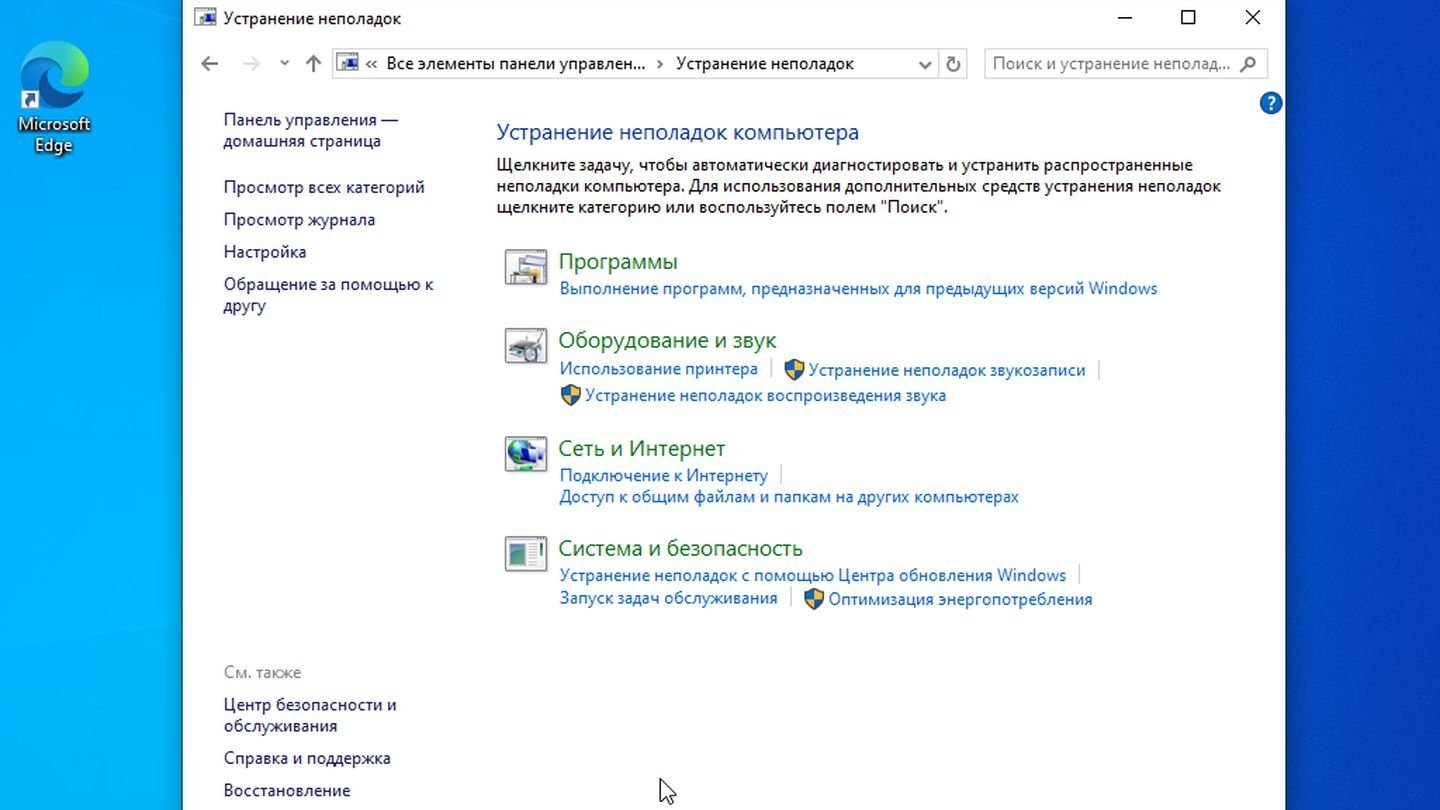
- далее нажмите ссылку «Просмотр всех категорий», и укажите свою проблему;
- должен запуститься мастер самодиагностики: он проверит основные настройки, работу служб, и пр. См. пару скринов ниже с примерами. 👇
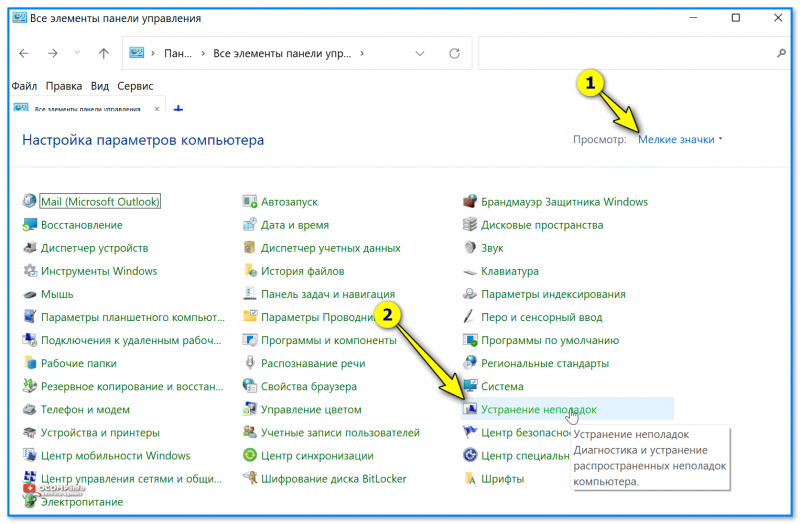
Панель управления — устранение неполадок
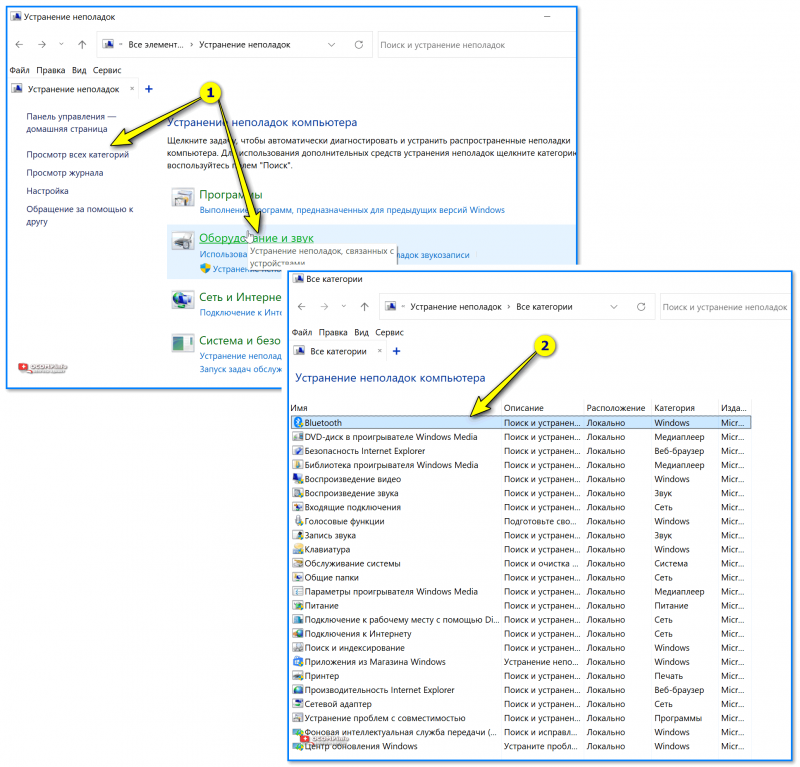
Все категории — выбор мастера (в чем проблема)
*
Обратите внимание, что перечень проблем, по которым можно запустить самодиагностику достаточно широк:
- Bluetooth;
- воспроизведение звука;
- голосовые функции;
- питание;
- принтер;
- клавиатура;
- обслуживание системы;
- подключение к сети Интернет;
- центр обновления и пр.
*
📌 Вариант 2
В Windows 10:
- нажать Win+i чтобы открылись параметры системы (либо воспользоваться меню ПУСК);
- перейти в раздел «Обновление и безопасность» и открыть ссылку «доп. средства устранения неполадок»;
- затем из предложенного списка выбрать свою проблему и подождать 2-3 мин., пока не появится результат сканирования…
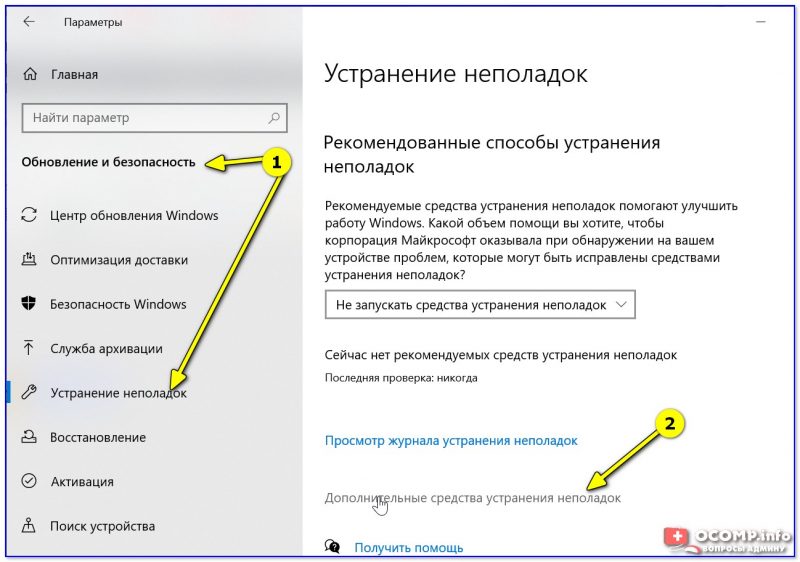
Устранение неполадок — обновление и безопасность — Windows 10
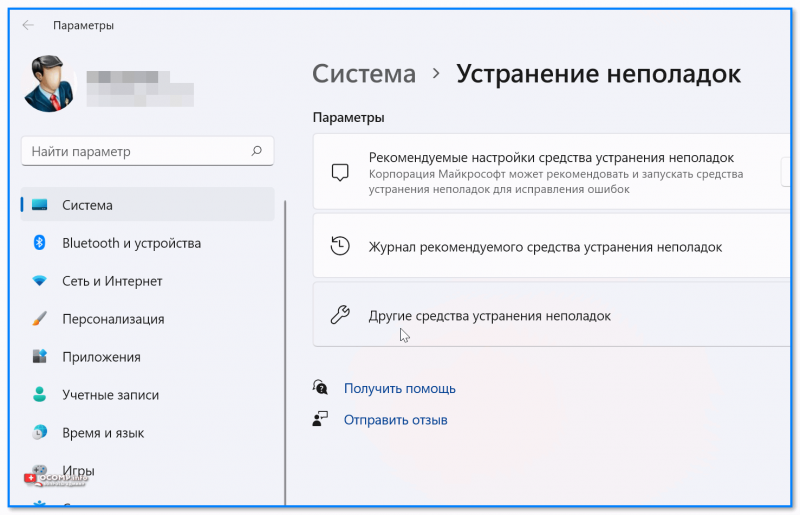
В Windows 11:
- нажать Win+i чтобы открыть параметры системы;
- далее перейти в раздел «Центр обновления / Восстановление / Устранение проблем, не возвращая ПК в исходное состояние / Другие средства устранения неполадок»;
- затем появится список мастеров самодиагностики — останется выбрать нужный… 👌
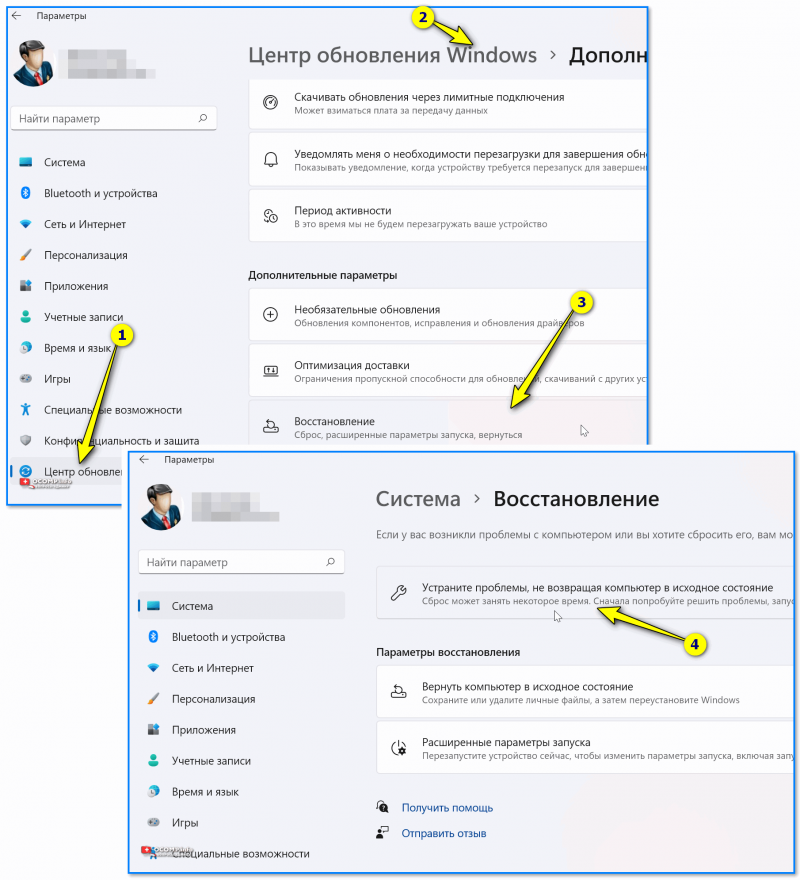
Центр обновления — восстановление — Windows 11

Другие средства устранения неполадок — Windows 11
*
📌 Вариант 3
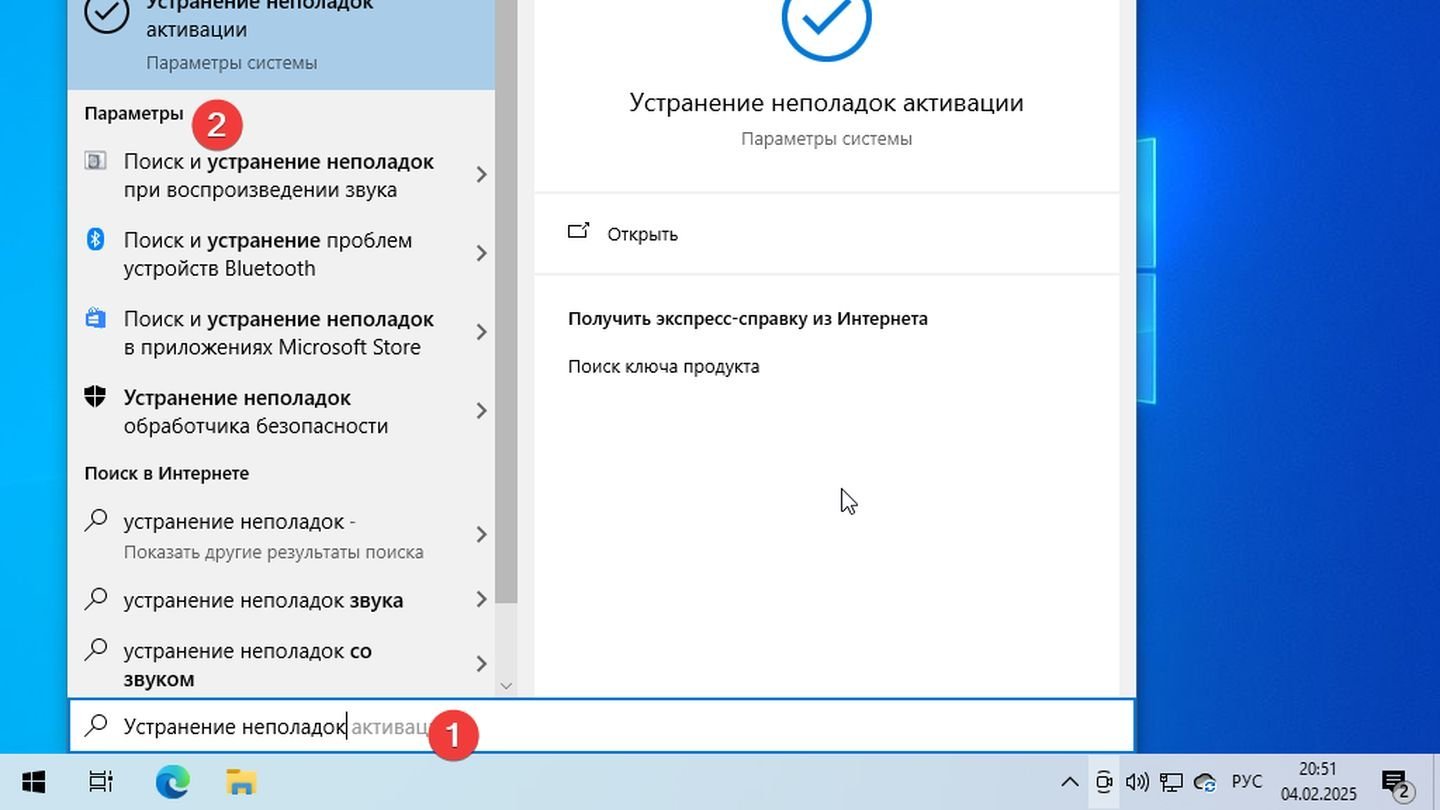
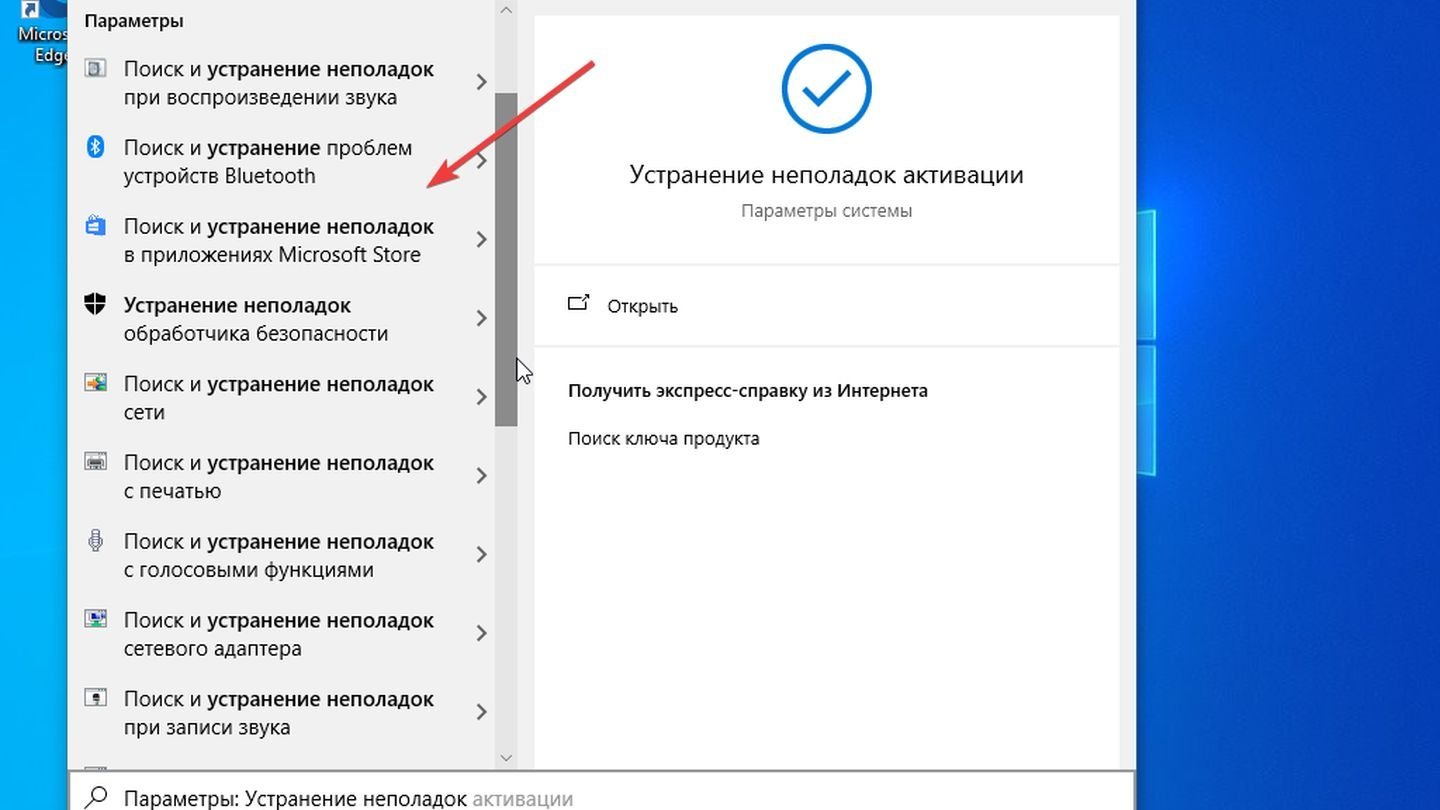
Попробуйте кликнуть по строке поиска (значку с лупой), расположенной рядом с кнопкой ПУСК — далее нужно ввести «troubleshooting» и нажать кнопку «Открыть» (вместо «troubleshooting» можно указать «параметры устранения неполадок»).
См. пример ниже. 👇
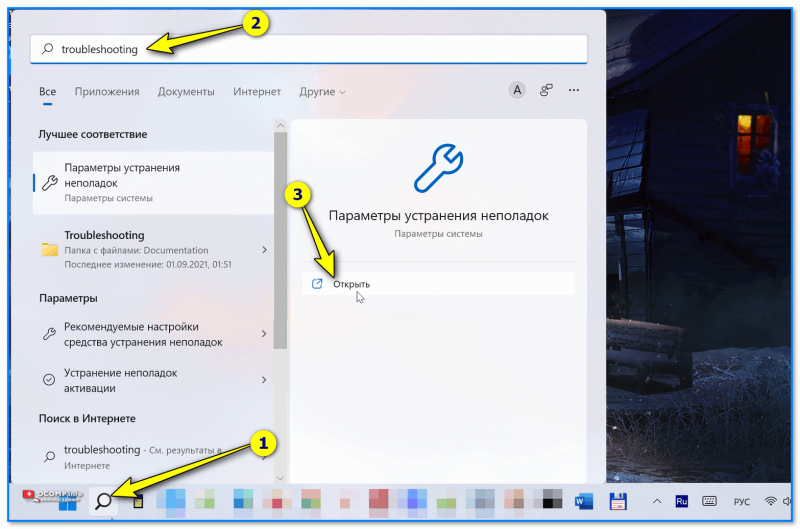
troubleshooting — поиск с помощью лупы (Windows 11)
Другие средства — Windows 11
*
📌 Вариант 4
Универсальный способ! Для начала нужно:
- запустить командную строку от имени администратора;
- ввести команду вида msdt.exe/id DeviceDiagnostic и нажать Enter (обратите внимание, что вместо DeviceDiagnostic можно указать ИД того мастера, который вам нужен. Полный их список у меня приведен чуть ниже скриншота 👇);
- должен появиться мастер диагностики…
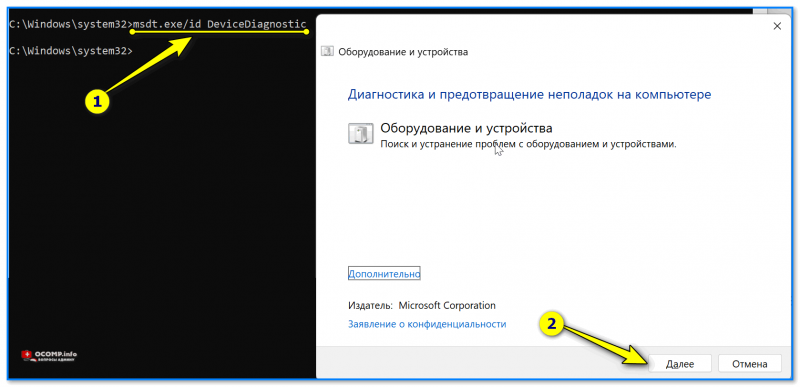
Запуск мастера устранения неполадок через командную строку
*
Список ИД аббревиатур мастеров (вводить в командную строку только то, что выделено зеленым):
- AeroDiagnostic — устраняет проблемы с эффектами Aero;
- AudioRecordingDiagnostic — устраняет проблемы с микрофоном;
- AudioPlaybackDiagnostic — устраняет проблемы со звуком при воспроизв. и медиа-файлов;
- DeviceDiagnostic — устраняет проблемы с оборудованием, подкл. к ПК;
- HomeGroupDiagnostic — устраняет проблемы с лок. сетью: просмотром компьютеров или общих файлов в домашней группе;
- NetworkDiagnosticsInbound — устраняет проблемы с брандмауэром Windows;
- NetworkDiagnosticsWeb — устраняет проблемы с подключением к Интернету (веб-узлу);
- NetworkDiagnosticsNetworkAdapter — устраняет проблемы сетевыми адаптерами;
- NetworkDiagnosticsDA — устраняет проблемы с подключением к Интернет, лок. сетью;
- NetworkDiagnosticsFileShare — устраняет проблемы с общими файлами и папками;
- PerformanceDiagnostic — помогает пользователю повысить производительность ОС;
- PowerDiagnostic — диагностика параметров питания (аккумулятор, режимы сна и пр.);
- PrinterDiagnostic — диагностика принтера, устранение проблем при печати;
- PCWDiagnostic — настройка старых программ для их корректной работы в современной Windows;
- SearchDiagnostic — устраняет проблемы поиска и индексации;
- WindowsMediaPlayerDVDDiagnostic — устраняет проблемы, возникающие при воспроизв. DVD;
- WindowsMediaPlayerConfigurationDiagnostic — сбрасывает настройки проигрывателя Windows Media;
- WindowsUpdateDiagnostic — устраняет проблемы с центром обновления Windows.
*
📌 Вариант 5
Если все предыдущие способы не помогли — попробуйте стороннее решение: утилиту FixWin (ссылка на офиц. сайт // кнопка загрузки там в самом низу страницы).
После ее запуска нужно перейти в раздел «troubleshooters» и указать нужный раздел (утилита на англ., но многое понятно из контекста. Также можете воспользоваться спец. переводчиками).
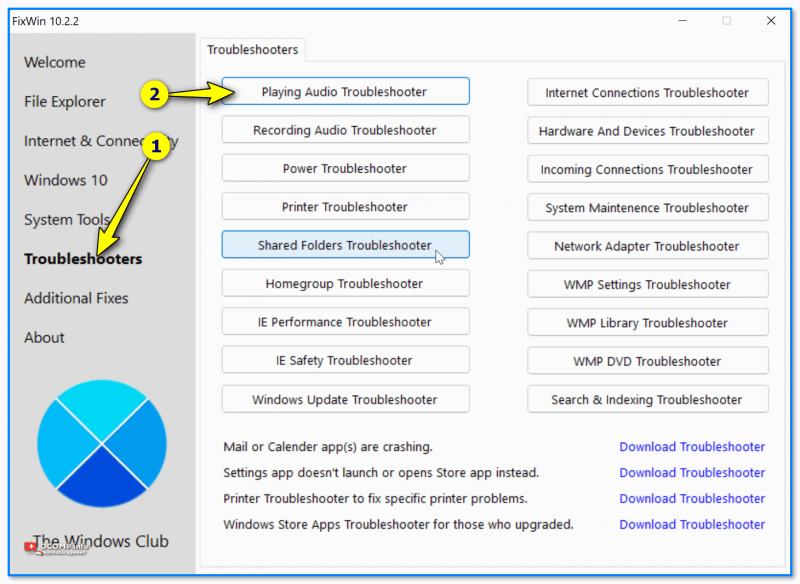
FixWin — утилита для исправления ошибок в Windows
*
За сим откланяюсь, всем успехов!
👋
Published On
November 2nd, 2018
Reading Time 8 Minutes Reading
Do you want to run diagnostics on Windows 10 operating system? Let’s read the give below solution to know how to perform diagnostics on Windows 10 step by step with sceenshots.
How to Run Diagnostics on Windows 10 Step by Step
- Type “Control Panel” on Windows search bar. Click on “Control panel”.
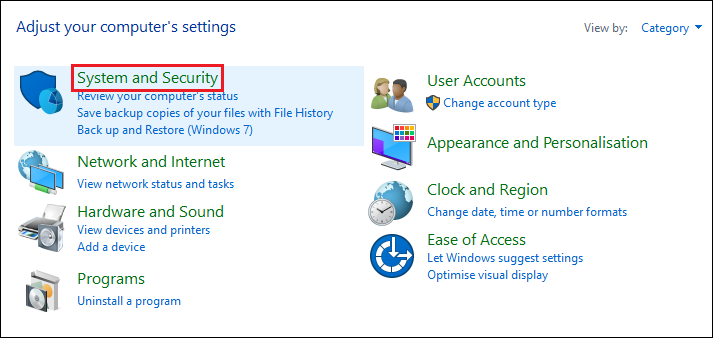
- Search and Hit on “System and Security”.
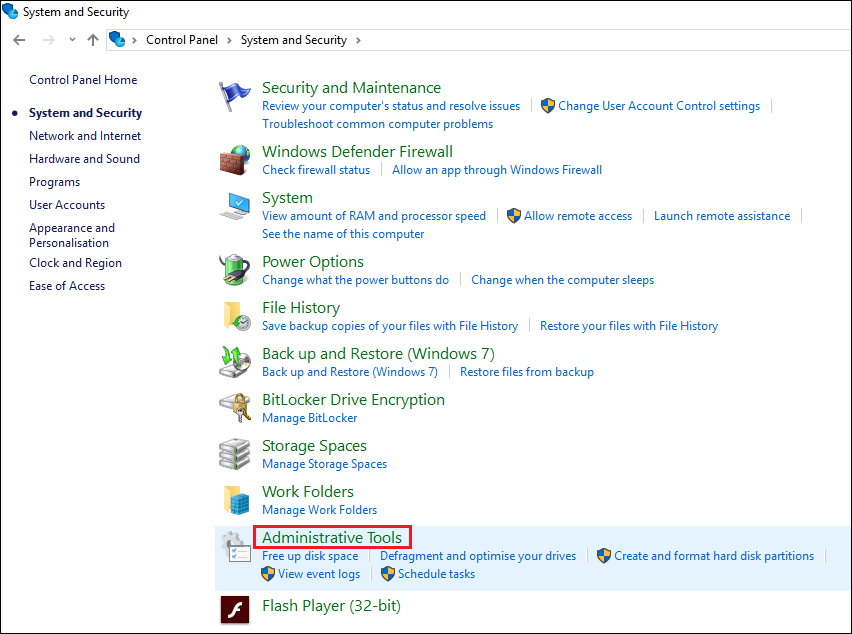
- Hit on “Administrative Tools”.
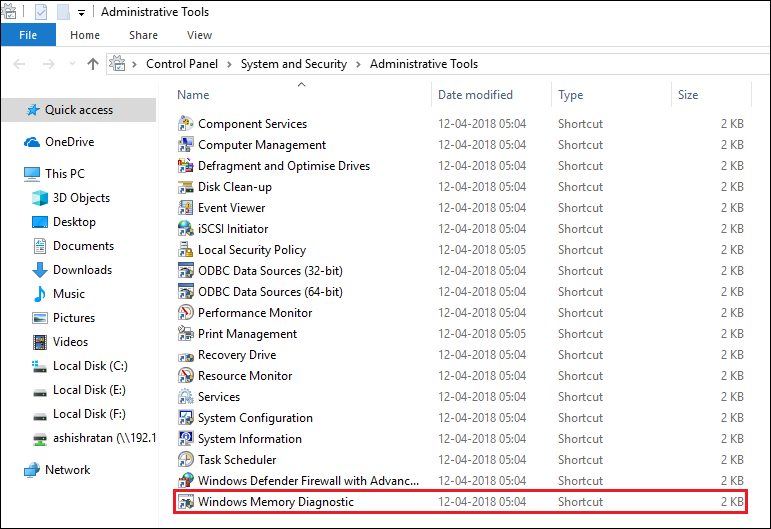
- Click on “Windows Memory Diagnostic”.
- Select “Restart now and check problems” option.
Short Trick: Press Windows Key + R and type mdsched.exe

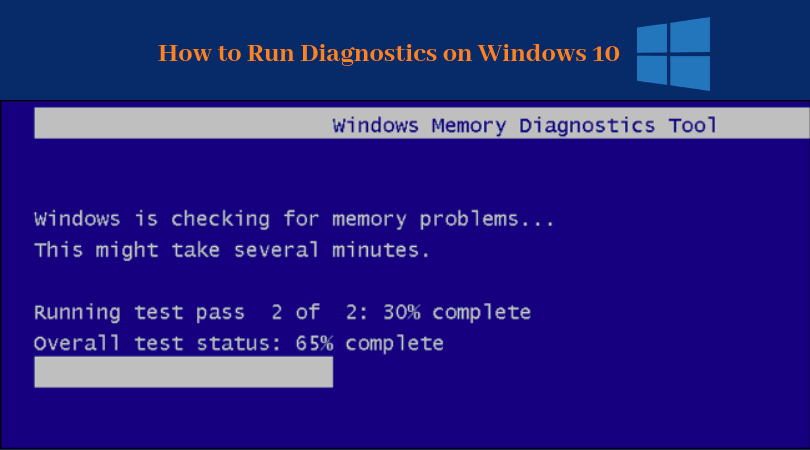
Once your machine restarts, it will open in Windows Memory Diagnostics environment. In this mode, the application will run all the scans available in the Basic mode.
What if Diagnostic Troubleshooting Tool Does Not Work on Windows 10, 8.1, and 7
The Troubleshooting Assistant has been part of the Windows operating system for years. With Windows 10 Diagnostic tool, you can quickly verify that certain components of your operating system are working properly. Unfortunately, some users have reported that the Diagnostic Troubleshooter no longer works error message on their Windows 10 PC. Since this can be a big problem, today we’ll show you how to fix it.
The Diagnostic Troubleshooting Wizard no longer works on Windows 10
Solutions
- Reinstall the Microsoft .NET Framework
- Scan your PC for malware
- Check if the required services are running
- Use registry editor
- Temporary deactivation of the .NET Framework
- Create and run a batch file
- Run the sfc scan
- Fix – Diagnostics Troubleshooting Wizard no longer works on Windows 10
Solution 1 – Repair Microsoft.NET Framework installation
.NET Framework is used for all types of applications on Windows platforms, from system applications to video games. Almost every Windows operating system has .NET Framework installed, but sometimes this framework can cause all sorts of problems. According to the user, this Framework for Diagnostic Troubleshooting Wizard may have been responsible for working error message. To resolve this issue, you must repair the .NET Framework installation. This is a simple process, and to do this you must follow these steps:
- Press Windows key + S and enter programs. Select programs and functions from the result list.
- When Windows opens programs and functions, search for and select Microsoft.NET Framework.
- From the menu above, choose Change or Repair.
- Follow the instructions to repair your .NET Framework installation.
- After completing the repair process, verify that the problem is resolved.
If the problem persists, we recommend that you download this tool (100% safe and tested by us) to fix various PC issues such as corrupted files, malware and hardware errors.
Solution 2 – Reinstall Microsoft.NET Framework
As mentioned earlier, the .NET Framework installation may be the cause of this problem, and if repairing the .NET Framework installation does not resolve the issue, you will need to reinstall it. To do this, follow these steps:
- Open the application settings by Windows key + I press.
- When Settings app opens, go to System >> Apps & Features.
- The list of installed applications will now be displayed.
- Locate Microsoft.NET Framework , select it and choose Uninstall from the menu.
- Follow the uninstallation process to remove the .NET Framework.
- After the .NET Framework has been removed, download and install the following version of the Microsoft Web site.
If you do not want to use settings to remove the .NET Framework, you can also use the Programs and Features section . Just open it as in the previous solution, select the .NET Framework and choose Uninstall. After removing and reinstalling the .NET Framework, verify that the problem is resolved.
Solution 3 – Scan your PC for malware
Sometimes malicious applications interfere with the core components of Windows 10, and they can also cause the Diagnostics Troubleshooter to stop working . If you see this message, perform a detailed scan of your system with your antivirus program. In addition to your antivirus, you can use BitDefender or a similar tool to search for malware. After removing the malware, verify that the problem persists.
You can try BitDefender here.
Solution 4 – Check if the required services are running
Like any other Windows component, the Diagnostic Troubleshooting Wizard relies on certain services to run properly. However, if these services are not started or configured incorrectly, you may experience problems with the Diagnostic Troubleshooter. To check the status of your services, you must do the following:
- Press Windows key + R and enter services.msc . Press Enter or click OK
- When Windows Services opens, locate the Diagnostic Policy Service and double-click it.
- Make sure that Service Status is set to Automatic on Running and Startup. If not, make the necessary changes. Click Apply and OK to save the changes.
- Now look for Diagnostic Service Host and Diagnostic System Host Services. Open their properties and make sure they are both running and that their startup type is set to Manual.
- After making the necessary changes, close the Windows Services and see if the problem is resolved.
By default, all these services should be running, but sometimes the status and startup type may change because of installed applications or because of some other computer problem, so check that all these services are running properly.
Solution 5 – Use registry editor
Before we begin, we must mention that using Registry Editor can potentially be dangerous and cause problems with your Windows 10 installation. It is recommended that you be careful when using Registry Editor. It is also a good practice to export your registry and use it as a backup in case something goes wrong. To edit your registration, you must do the following:
- Press Windows key + R and type regedit.
- When Registry Editor opens, in the left pane , navigate to HKEY_LOCAL_MACHINESOFTWAREPoliciesMicrosoftWindowsScriptedDiagnostics.
- Right-click the ScriptedDiagnostics button and select Delete from the menu.
- Then find the key ScriptedDiagnosticsProvider and delete it as well. This button should be located just below the ScriptedDiagnostics button.
- When finished, close the registry editor and see if the problem is resolved.
If you can not find these keys in your registry, it’s probably best to simply skip this solution.
Solution 6 – Temporarily disable the .NET Framework
As we have already mentioned, so Metimes.NET Framework may cause the Diagnostic Troubleshooting Assistant to stop working error message will appear on your Windows 10 PC. To resolve this issue, you must disable the .NET Framework. To do this, follow these steps:
- Open the Programs and Features section.
- When the Programs and Features section opens, click Turn Windows features on or off.
- The Windows Windows features will now be displayed. Locate the .NET Framework in the list and disable it. If you have multiple instances of the .NET Framework, make sure you disable them all.
- Click OK to save the changes.
- Restart your PC.
- When Windows 10 restarts, repeat these steps, enable the .NET Framework, and save the changes.
- Restart your PC and see if the problem is resolved.
Solution 7 – Create and run a batch file
Batch files can be very useful as they allow you to execute multiple commands almost immediately. Before you can run a batch file, you must create it, and you can do so by following these steps:
1. Open Notepad.
2. When Notepad opens, add the following lines:
- @echo off
- net stop wuauerv
- cd% system root%
- SoftwareSales SoftwareSales.old
- net start wuauserv
- Net stop bits
- Net start bits
- net stop cryptsvc
- cd% systemroot% system32
- ren catroot2.old
- net start cryptsvc
- regsvr32 Softpub.dll
- regsvr32 Wintrust.dll
- regsvr32 Mssip32.dll
- regsvr32 Initpki.dll / s
- echo reboot the computer
- Shutdown.exe -r -t 00
3. Click File >> Save As.
4. Now set Save as type to All Files and set the file name to update.bat . Click Save to save the file.
5. Find the update.bat file that you just created, right-click it and select Run as administrator . After all commands have been executed, your PC restarts.
After restarting your PC, check if the problem is resolved.
Solution 8 – Start the sfc scan
If your Windows 10 installation is damaged, you may experience such problems on your PC. One way to fix these problems is to run sfc scan and have your PC scanned. This scan will fix any damaged Windows 10 components and hopefully fix the Diagnostics Troubleshooter that no longer works . To run sfc scan, do the following:
- Open Command Prompt as administrator. To do this, press Windows key + X to open the Win + X menu and select Command Prompt (Admin).
- When the prompt opens, type sfc/ scannow and press Enter.
- Wait while your computer is being scanned. If there are problems with your Windows 10 installation, they should be fixed automatically.
The Troubleshooting Wizard is an important part of Windows 10, and if you ‘ve got the Troubleshooting Assistant that stops working , be sure to try repairing the .NET Framework installation. If that does not work, you can try any other solution from this article.
Related Article: Learn how to resolve Blue Screen Of Death Error in Windows 10 quickly.
Readers help support Windows Report. We may get a commission if you buy through our links.
Read our disclosure page to find out how can you help Windows Report sustain the editorial team. Read more
XINSTALL BY CLICKING THE DOWNLOAD
FILE
To prevent and troubleshoot issues, important to know how to run hardware diagnostics on Windows 10. You can use tools like Performance Monitor, Windows Memory Diagnostic, or specialized commands.
Wee cover these methods and other solutions to help you troubleshoot your system. Just follow the steps below.
How do I run hardware diagnostics on Windows 10?
1. Use the Performance Monitor tool
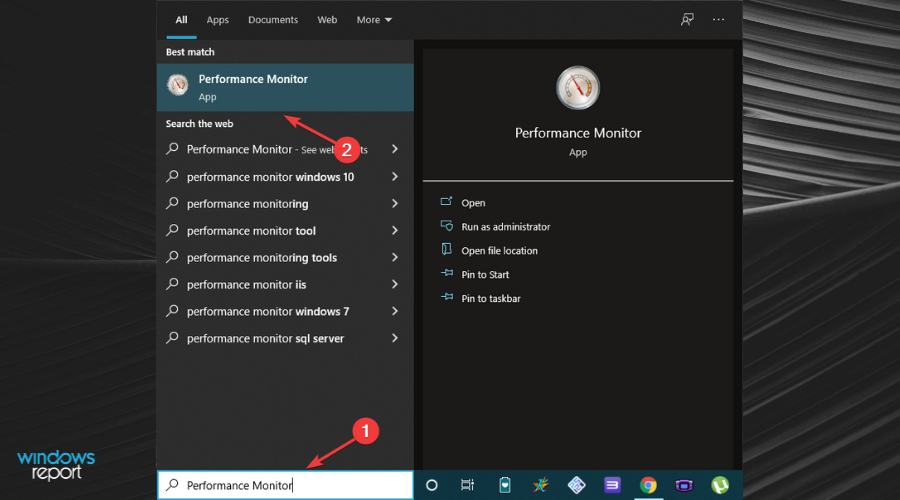
- Press the Windows key and search for Performance Monitor. Open the top result.

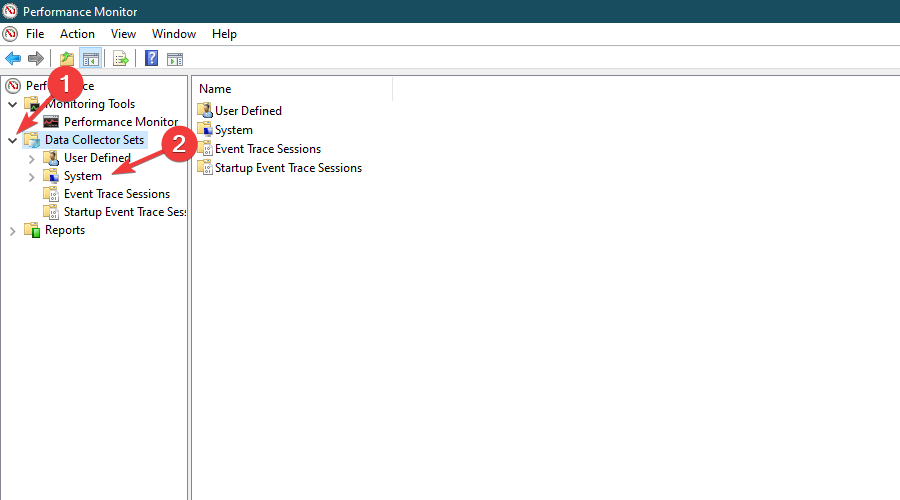
- From the left pane menu, expand the Data Collector Sets section. Click on the System option.
- Right-click System Diagnostics and select Start to begin system diagnostics tests.
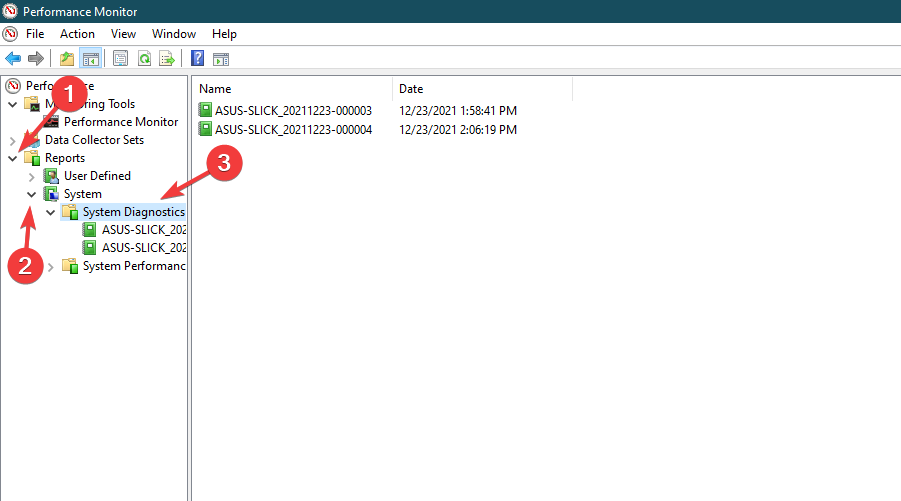
- Now, from the left pane menu, expand the Reports section, expand the System section, and open the System Diagnostics section.

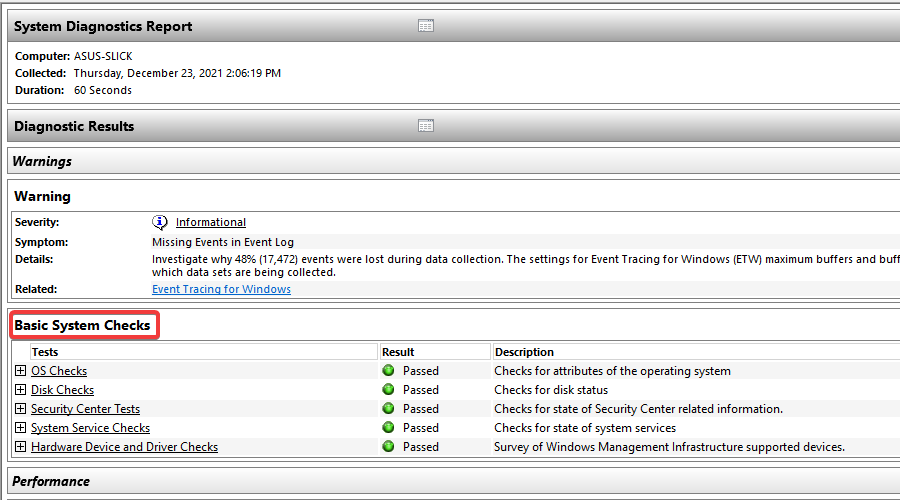
- You will find the generated system diagnostics test report here. Simply double-click the report to view it. Check out your PC’s Diagnostic Results.

2. Use the Windows Memory Diagnostic app
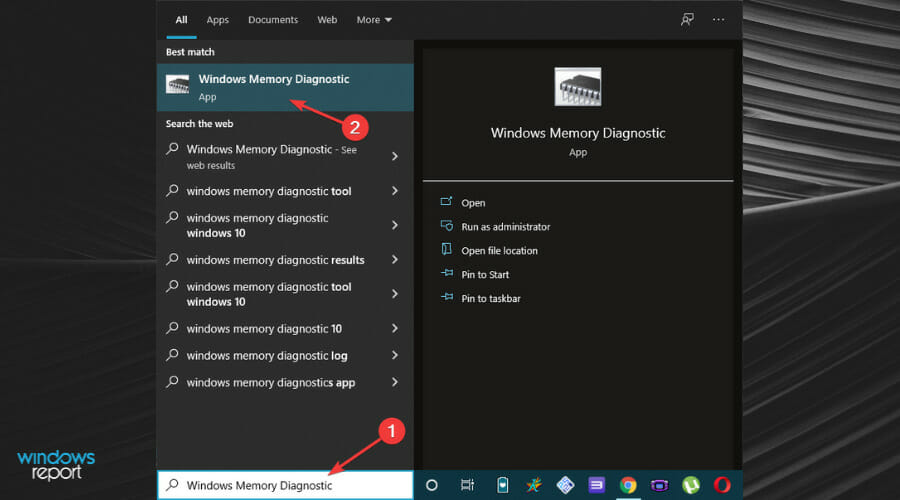
- Press Windows and search for Windows Memory Diagnostic. Click the first result to open it.
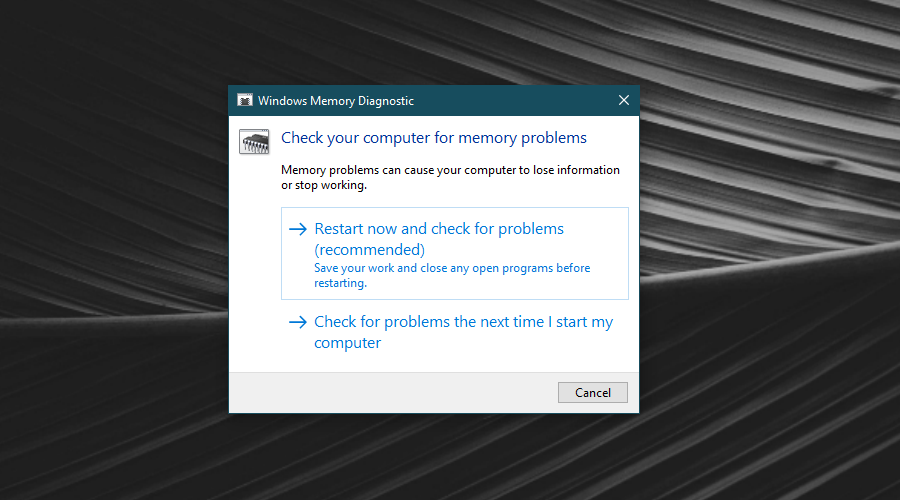
- Select the option Restart now and check for problems (recommended).
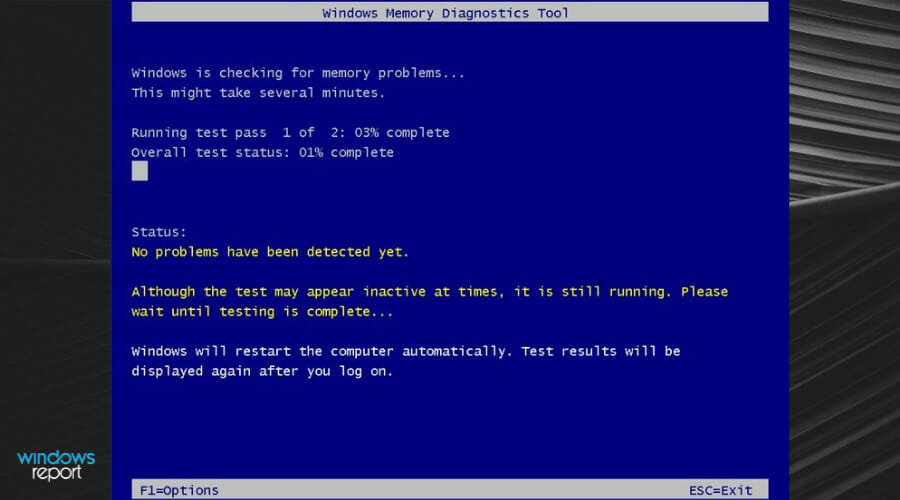
- Let the PC restart. Once the PC is restarted, the memory diagnostic scan will automatically begin. Wait for the process to finish. Your PC will reboot automatically afterward.
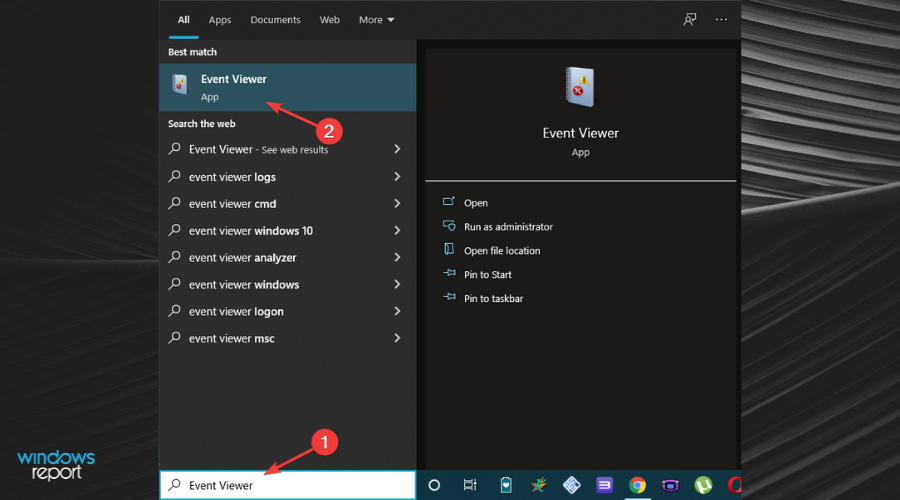
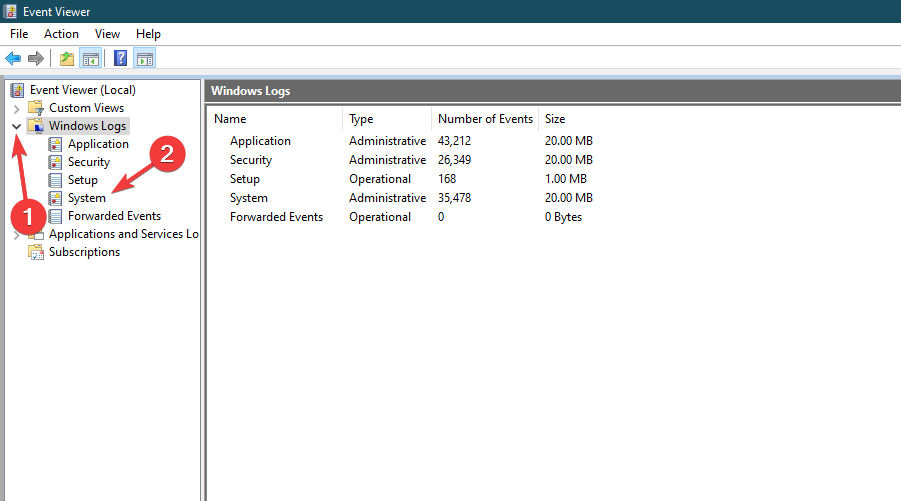
- After logging in, the results will be displayed on the desktop. In case the test results fail to show on the screen automatically, use the Event Viewer app to check the scan results. Thus, press Windows and search for Event Viewer in the Search bar. Open the first app.
- From the left pane menu, expand the Windows Logs section and click on the System option.
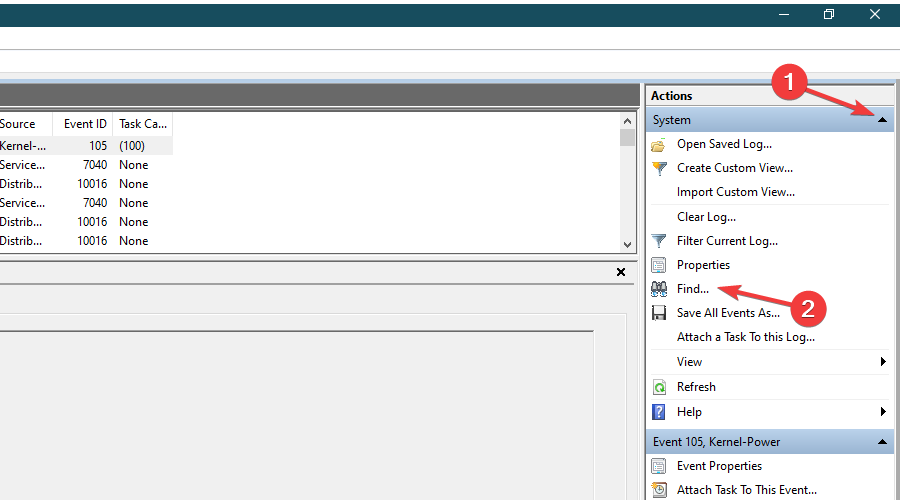
- In the right pane Actions menu, expand the System section. Click on the Find… option.
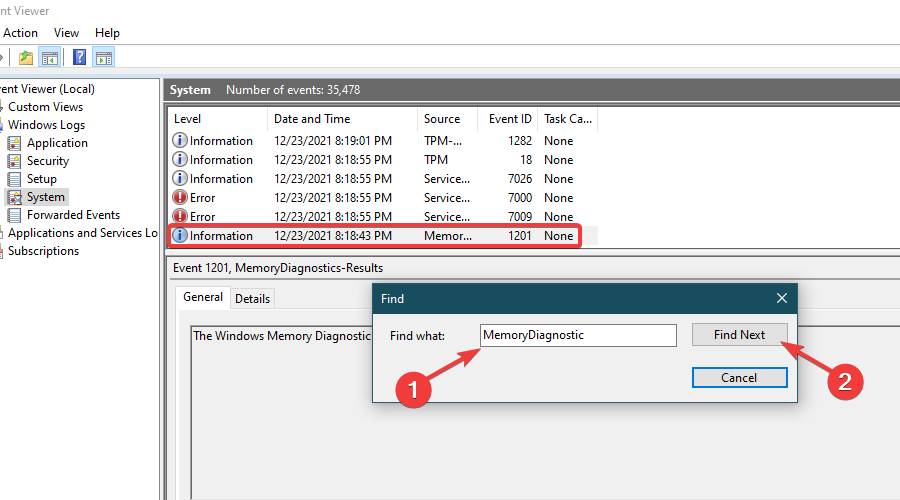
- In the text field, type MemoryDiagnostic and click on Find Next to look for the memory diagnostic scan log.
- View the results of the memory diagnostic scan in the General tab.

Unless you find any errors, your PC’s RAM is not a cause for concern. Check out more details on the Windows Memory Diagnostic Tool and how it can help keep your PC’s memory in check.
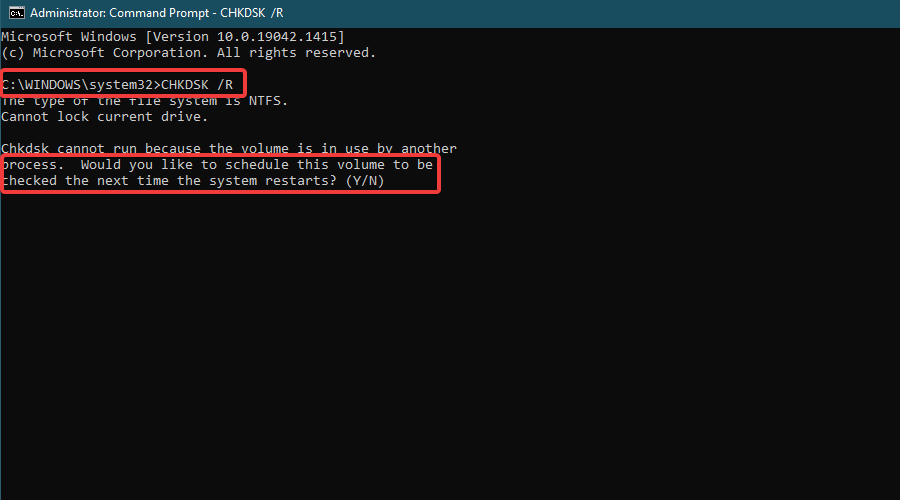
3. Run a CHKDSK scan to check for bad sectors
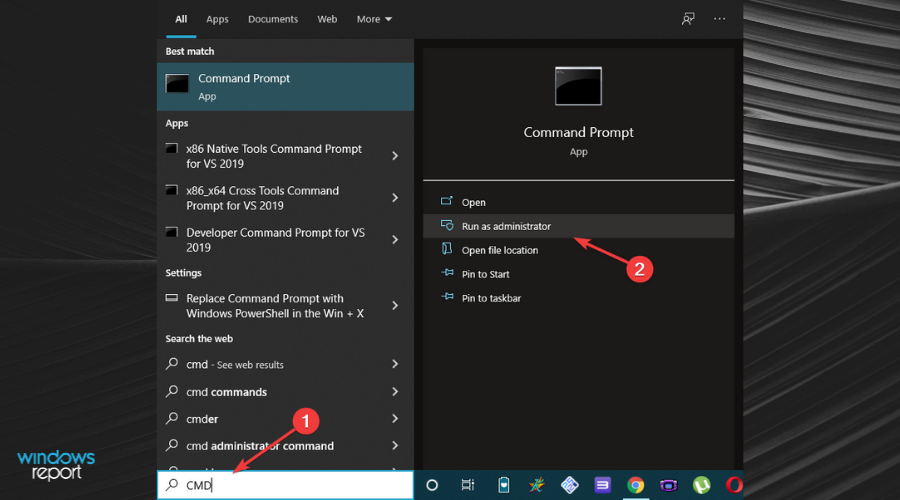
- Press the Windows key and search for CMD in the Search bar. Choose the Run as administrator option under the result.
- Type the following command and run it by pressing Enter. A prompt will appear asking you to schedule the scan on the next restart. Type Y and then press Enter:
CHKDSK /R
- Restart your PC. Once the PC restarts, the CHKDSK scan will begin automatically. Wait while hardware diagnostics is ran in Command Prompt.
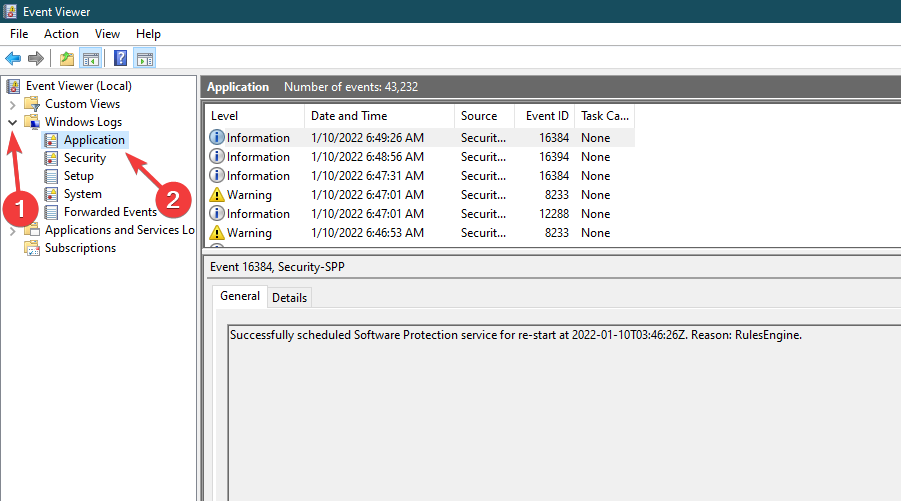
- Once the scan is complete and you log in, press Windows and search for Event Viewer in the Search bar. Open the app.
- From the left pane menu, expand the Windows Logs section and click on the Application option.
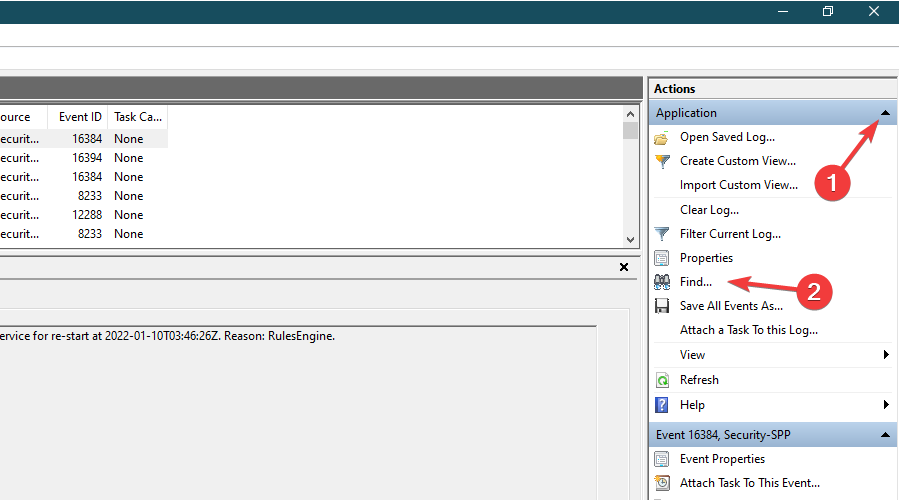
- In the right pane Actions menu, expand the Application section. Click on the Find… option.
- In the text field, type Wininit and click on Find Next to look for the CHKDSK scan log.
- View the results of the CHKDSK scan in the General tab.

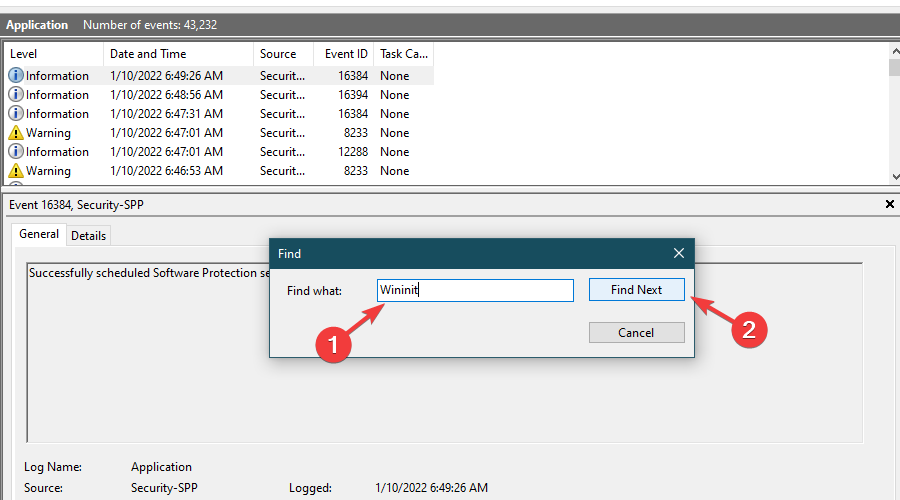
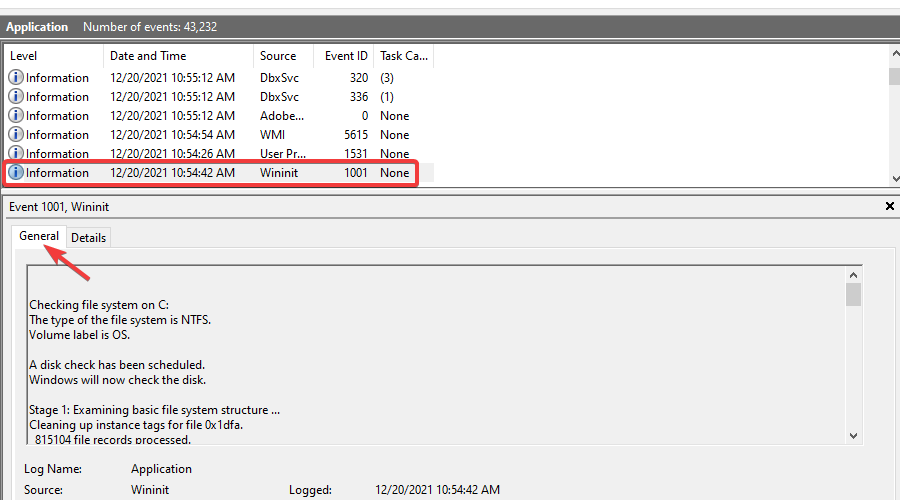
Click inside the text box in the General tab. Press Ctrl+A to select all of the text, copy, and paste it onto a new text file. This will make viewing the results quite convenient.
To learn more, we have a great guide on how to run chkdsk on Windows 11, so you might want to check it out.
NOTE
The CHKDSK scan can end up taking a lot of time. A good estimate is probably around 2-3 hours.
- How to fix Windows Memory Diagnostic no results
- Windows memory diagnostic tool stuck / frozen [Fixed]
- 13 Ways to Fix Memory Management Blue Screen Error for Good
- 6 Easy Ways to Fix Memory Management BSOD in Windows 11
4. Run the Battery diagnostics command
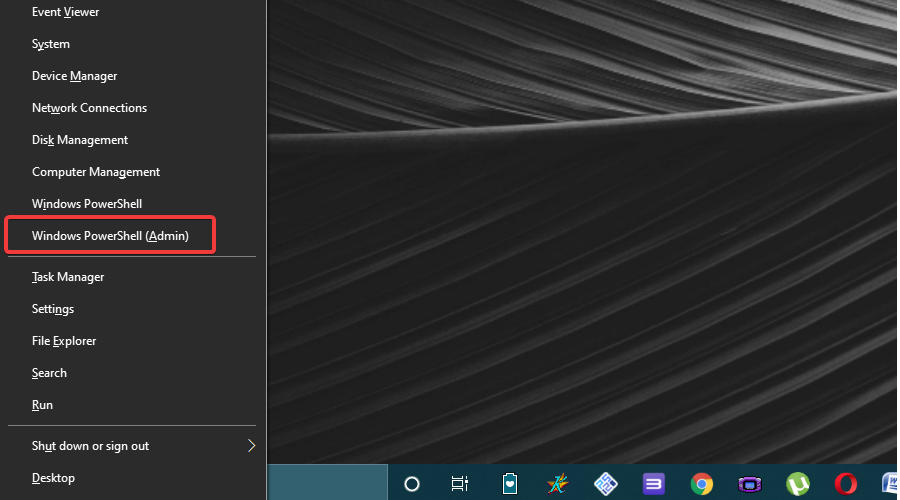
- Right-click the Start icon then select the Command Prompt or Windows PowerShell (Admin) option from the menu.
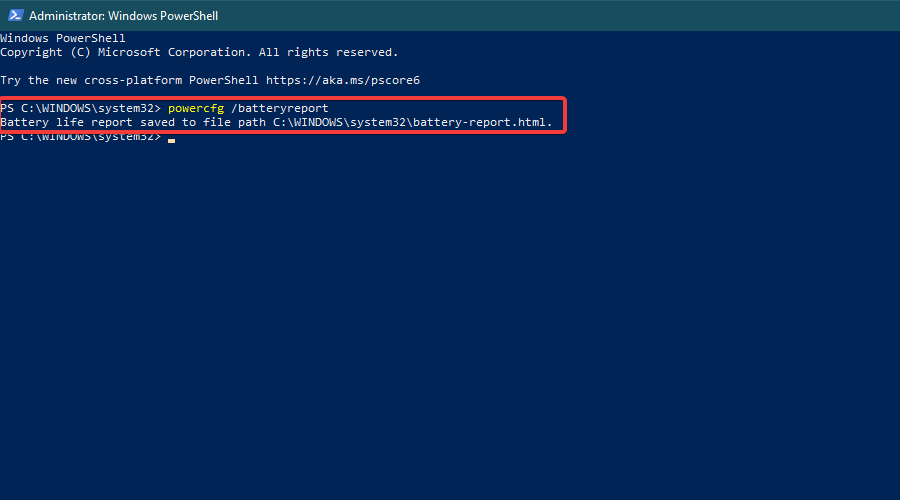
- Once the Command Prompt/ Windows PowerShell loads, type in the following command and run it by pressing Enter:
powercfg /batteryreport
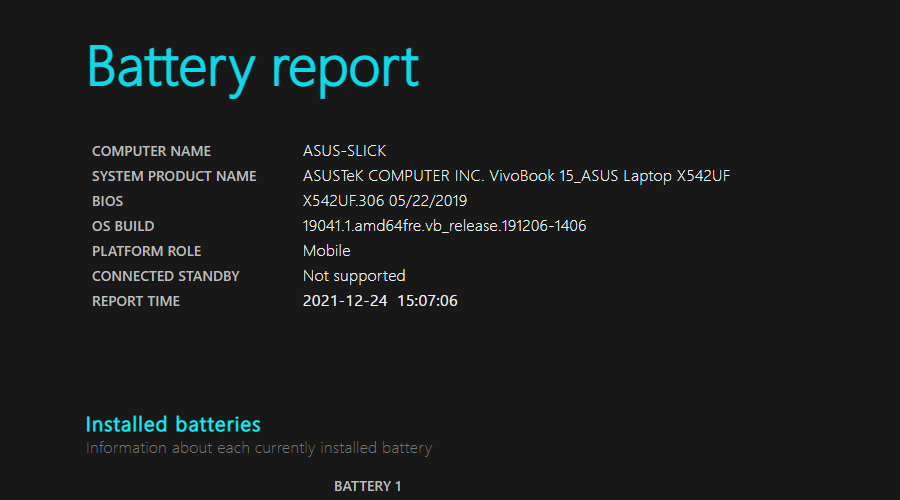
- An HTML file will be generated in a specified location. Open the file (in a browser) and view the results.
For an even deeper analysis, check out the 10 best tools for checking battery health on Windows 10.
5. Use a third-party diagnostics tool
If you’re looking for a more detailed look at your system, a third-party tool like AIDA64 Extreme can give you all the info you need.
It checks everything from temperature and voltage to performance, and even lets you stress test your PC to uncover hidden issues.
AIDA64 Extreme
Troubleshoot your device with tests for temperature, performance, and hardware stability using AIDA64 Extreme.
If you have a diagnostic tool from your manufacturer, then you can use it as well.
Moreover, you might want to use PC maintenance software in order to help your computer perform optimally all the time.
Feel free to ask us questions in the comments section below. Let us know which method you used to run a hardware diagnostic test.
Vladimir Popescu
Being an artist his entire life while also playing handball at a professional level, Vladimir has also developed a passion for all things computer-related.
With an innate fascination for research and analysis, and realizing many other people share his passion for this subject, he delved into writing Windows-related articles, so other people can also benefit from the acquired information.
When not writing kick-ass articles, Vladimir likes to spend his time doing Crossfit and creating art.
Windows 10 — довольно стабильная операционная система, но даже она не застрахована от различных сбоев и ошибок. С их устранением нередко помогает встроенный инструмент под названием о «Средство устранения неполадок». Подробнее о нем вы узнаете из нашего материала.
«Средство устранения неполадок» — это встроенная служебная программа Windows 10, которая автоматически сканирует компьютер на наличие распространенных ошибок и пытается их исправить. Она ориентирована в первую очередь на типичные проблемы, связанные с сетевыми подключениями, воспроизведением аудио, работой принтера и другими базовыми компонентами системы.
Преимущество этого инструмента в том, что он не требует технических навыков и экономит время: пользователю достаточно лишь выбрать категорию неполадок и дождаться завершения анализа.
Как работает «Средство устранения неполадок»
В основе работы утилиты лежит проверка настроек и служб, которые чаще всего выходят из строя или конфликтуют друг с другом. По сути, «Средство устранения неполадок» делает следующее:
- Сканирует системные файлы и параметры, определяя некорректные настройки;
- Сравнивает результаты с базой типовых сбоев, выявленных специалистами Microsoft;
- Применяет рекомендуемые исправления автоматически либо предлагает пользователю подтвердить внесение изменений;
- После выполнения проверки и корректировок выдает отчет о проделанной работе и итогах устранения неполадки.
Благодаря такому алгоритму многие проблемы решаются в пару кликов. Если же ошибка уникальна или связана с аппаратными сбоями, то штатных возможностей может оказаться недостаточно.
Как запустить «Средство устранения неполадок» в Windows 10
Доступ к средству устранения неполадок можно получить несколькими способами. Рассмотрим все.
Через настройки Windows

Источник: CQ / Windows 10
- Откройте «Параметры» (можно нажать кнопку «Пуск» и выбрать значок шестеренки или нажать сочетание клавиш Win + I);

Источник: CQ / Windows 10
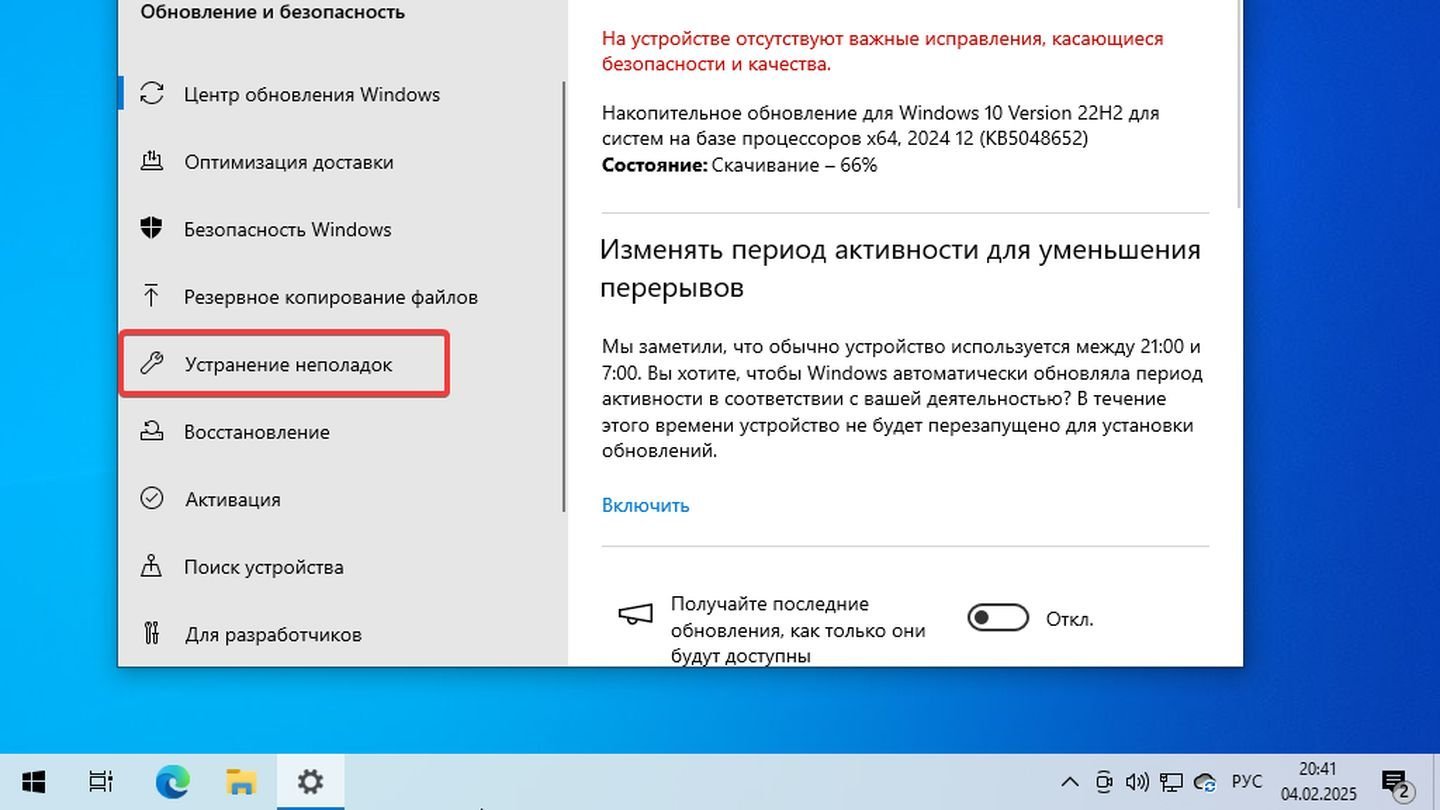
- Перейдите в раздел «Обновление и безопасность»;
Источник: CQ / Windows 10
- Выберите вкладку «Устранение неполадок»;
Источник: CQ / Windows 10
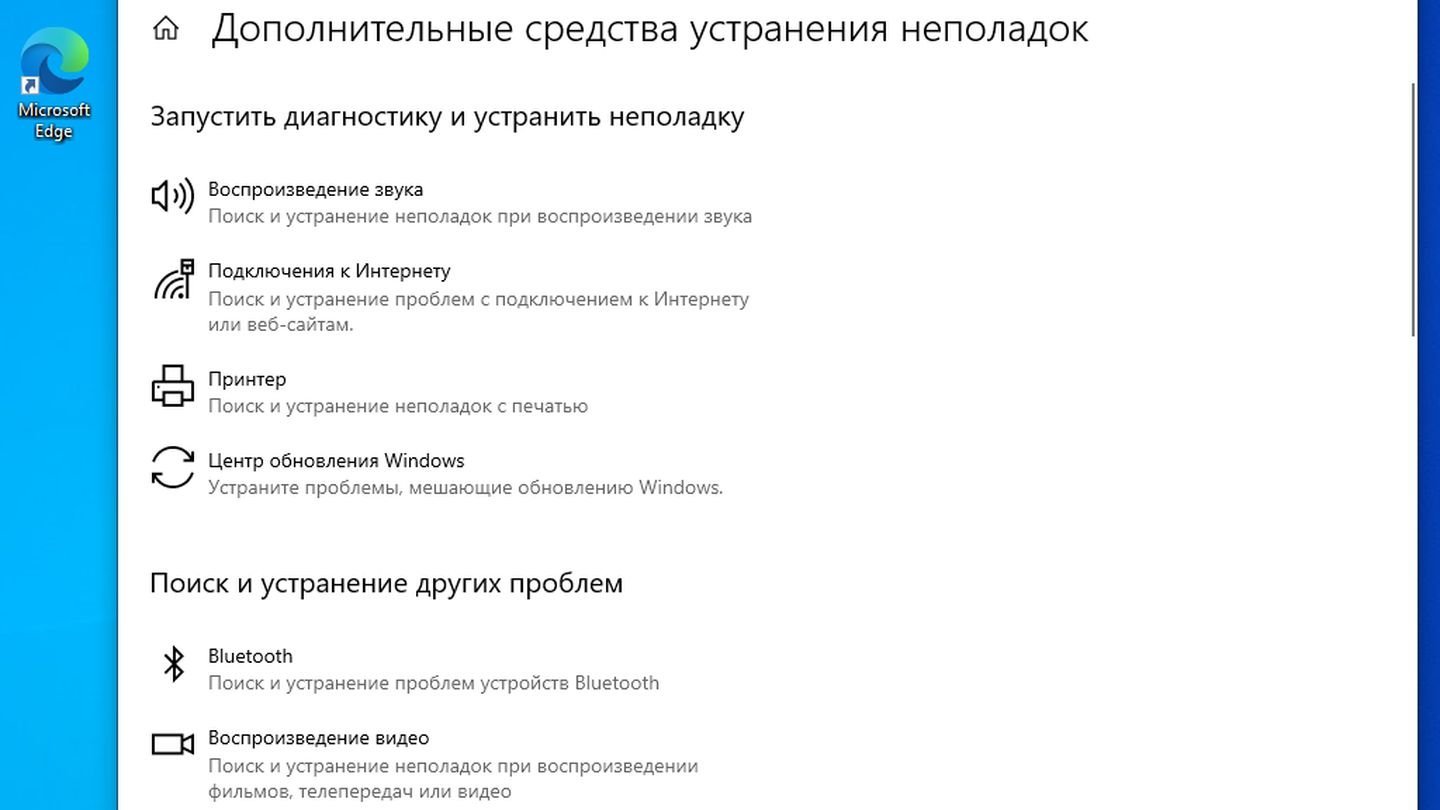
- Выберите «Дополнительные средства устранения неполадок». В списке доступных категорий нажмите на ту, которая соответствует вашей проблеме (например, «Проигрывание аудио» или «Подключения к интернету»);
Источник: CQ / Windows 10
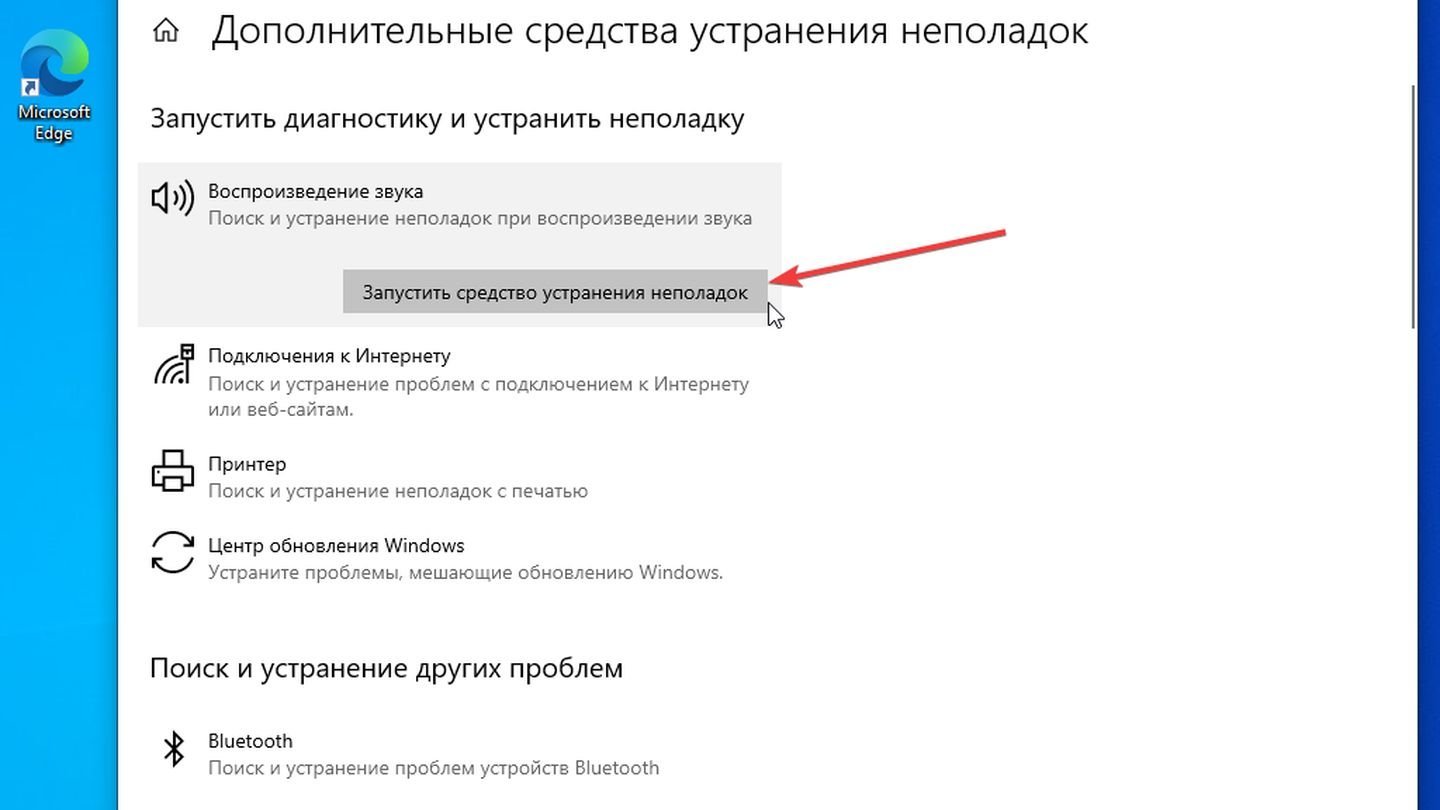
- Кликните «Запустить средство устранения неполадок» и следуйте инструкциям на экране.
Через «Панель управления»
Источник: CQ / Windows 10
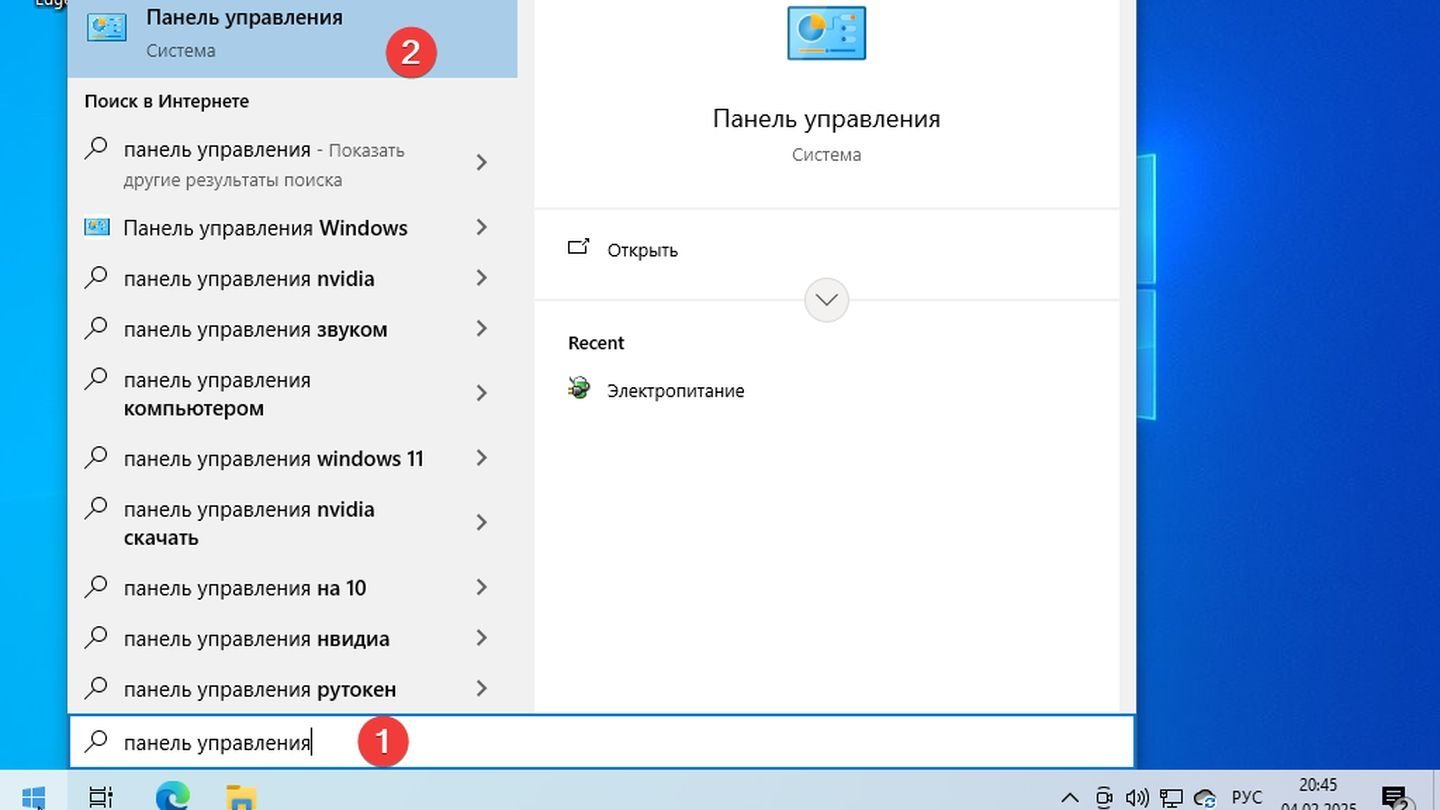
- Нажмите кнопку «Пуск» и введите «Панель управления» в поиске;
Источник: CQ / Windows 10
- Перейдите в раздел «Система и безопасность» либо сразу найдите пункт «Устранение неполадок»;
Источник: CQ / Windows 10
- В открывшемся окне вы увидите список категорий. Выберите необходимую, кликните «Запуск средства…» и дождитесь окончания процесса.
Поиск в меню «Пуск»
Источник: CQ / Windows 10
- Нажмите кнопку «Пуск» и введите фразу «Устранение неполадок». Нажмите на слово «Параметры»;
Источник: CQ / Windows 10
- Выберите устранение неполадок в категории, которая вам необходима.
С помощью командной строки (для опытных пользователей)
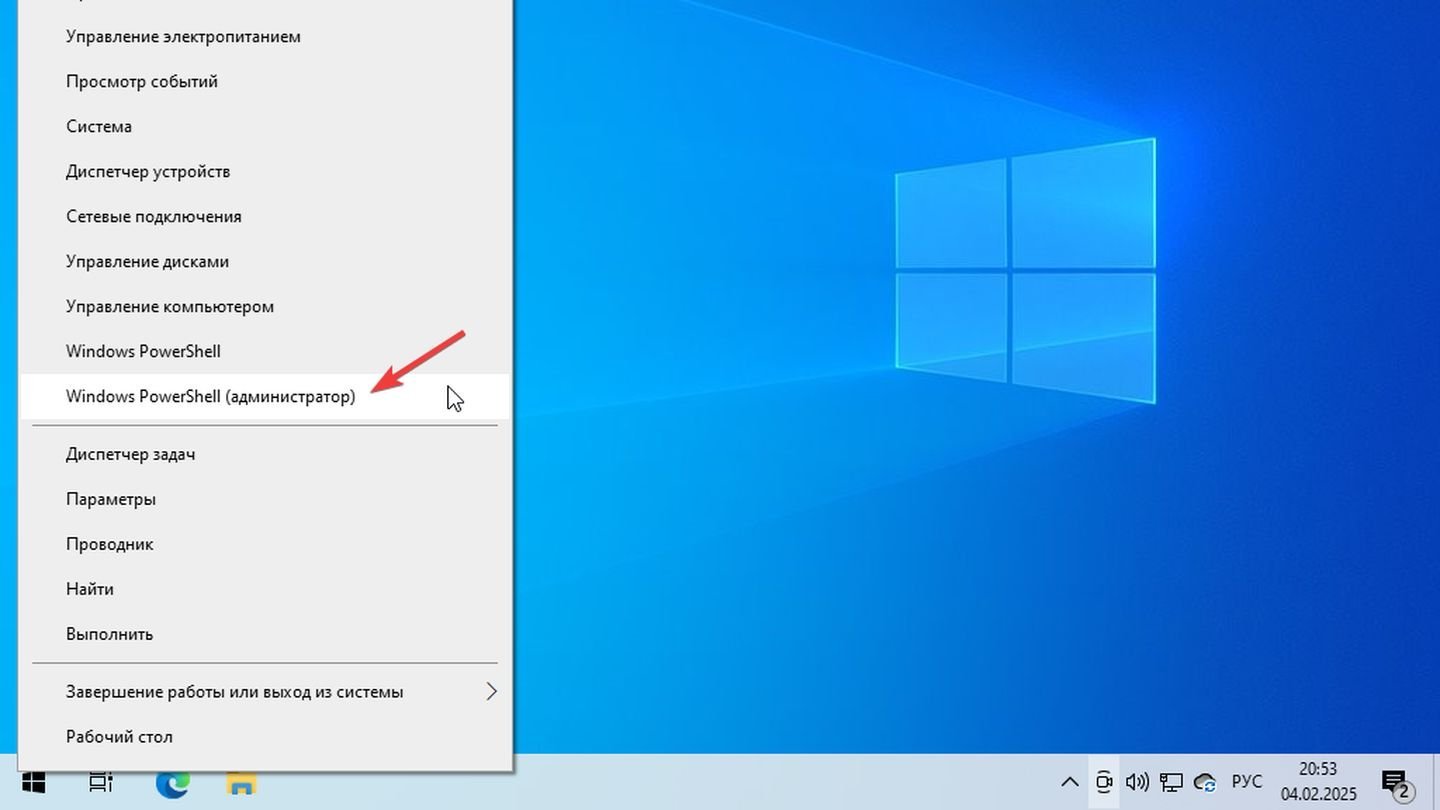
- Запустите Командную строку от имени администратора. Нажмите правой кнопкой на «Пуск», выберите «Windows PowerShell (Администратор)»;

Источник: CQ / Windows 10
- Введите команду: msdt.exe. Нажмите Enter. Откроется окно «Устранение неполадок», где можно выбрать необходимый модуль проверки.
Что делать, если «Средство устранения неполадок» не помогло
Иногда встроенный инструмент не может обнаружить или исправить ошибку. В таких случаях стоит предпринять следующие шаги:
Обновить систему
Убедитесь, что в Windows 10 установлены все последние обновления.

Источник: CQ / Windows 10
- Перейдите в «Параметры» → «Обновление и безопасность» и нажмите «Проверить наличие обновлений». Иногда проблемы решаются установкой свежих патчей от Microsoft.
Проверить работу антивируса
- Некорректная работа антивирусного ПО или брандмауэра способна вызывать конфликты в системе. Попробуйте временно отключить сторонний антивирус и повторно запустить проблемное приложение или действие, вызывающее ошибку.
Запустить проверку системных файлов
Если проблема связана с поврежденными или отсутствующими системными файлами, воспользуйтесь утилитой SFC (System File Checker). Для этого:
- Запустите Windows PowerShell от имени администратора;
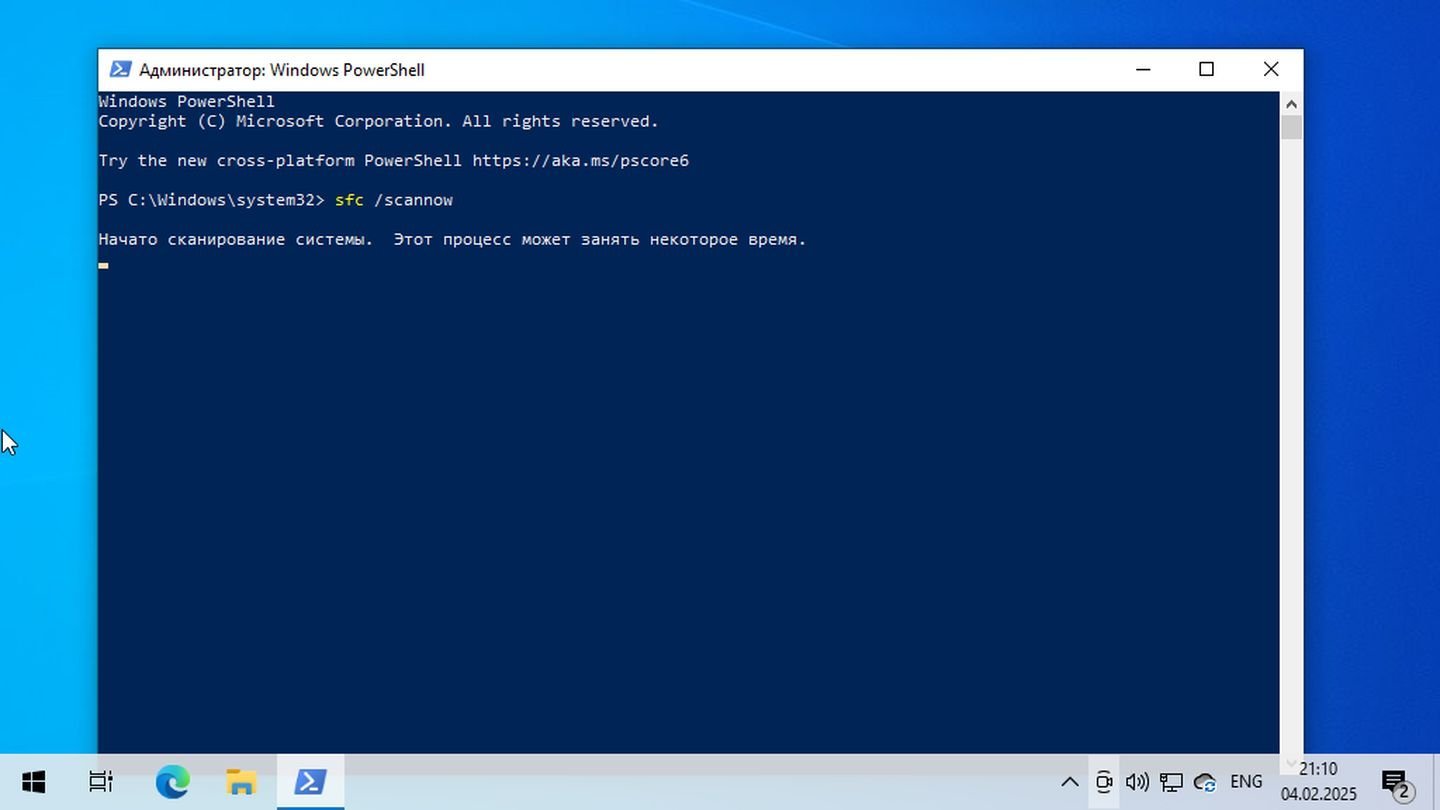
Источник: CQ / Windows 10
- Введите sfc /scannow и нажмите Enter;
Дождитесь окончания проверки и следуйте рекомендациям, если они будут выданы.
Использовать восстановление системы
Windows 10 позволяет вернуться к одной из сохраненных точек восстановления.
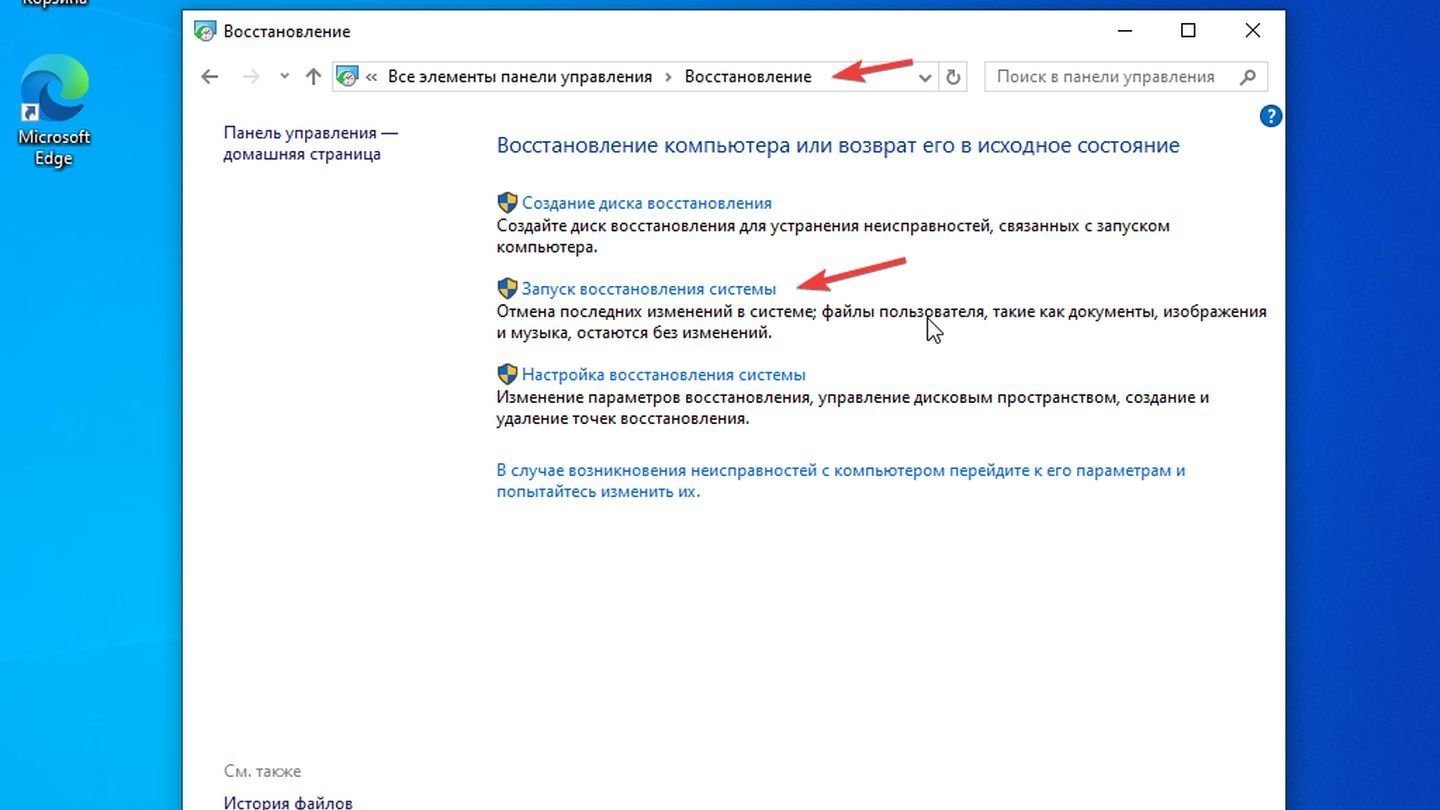
Источник: CQ / Windows 10
- Откройте «Панель управления» → «Восстановление» → «Запуск восстановления системы». Выберите точку, когда система работала штатно.
Обратиться к специалисту
Если ни одно из перечисленных решений не дало результата, возможно, проблемы связаны с аппаратными сбоями, несовместимостью драйверов или затрагивают более глубокие уровни системы. В таком случае лучше всего обратиться к профессионалам или в службу поддержки Microsoft, предоставив им максимально подробное описание неисправности и предпринятых шагов.
Заглавное фото: GroovyPost
Читайте также:
- Ошибка BAD SYSTEM CONFIG INFO в Windows — причины и решения
- Как устранить ошибку «Сервер RPC недоступен» в Windows
- Как исправить ошибку 0xc0000225 при загрузке Windows
- Как исправить ошибку «Среда восстановления Windows недоступна»
- Ошибка ntoskrnl.exe — как убрать синий экран смерти на Windows 10