
It’s common for desktop applications to use dialog boxes when prompting information from the user. You can create input dialog boxes in a Windows Forms application, by displaying a new window.
You can also add UI elements to the new dialog window. These include messages, text boxes, and «Ok» and «Cancel» buttons. When the user enters information in the input box, you can store the result and use it in other parts of the app.
How to Create an On-Click Function to Trigger the Input Dialog Box
The dialog box should not always be visible. You can trigger the dialog box to show when the user completes an action, such as a button click. You can also learn more about other Windows Forms events that you can use in a Windows Forms app.
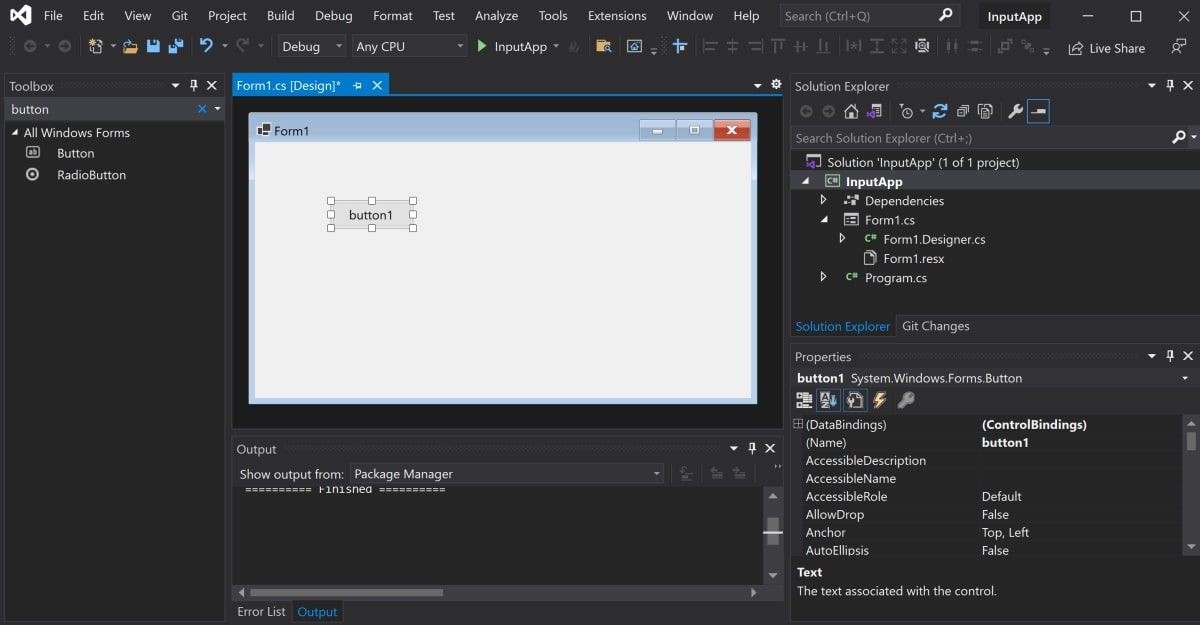
Add a button to the canvas and create a function that will run when the user clicks on the button.
- Create a new Windows Forms application in Visual Studio.
- In the Toolbox, search for a button UI control.
-
Click and drag a button onto the canvas.

-
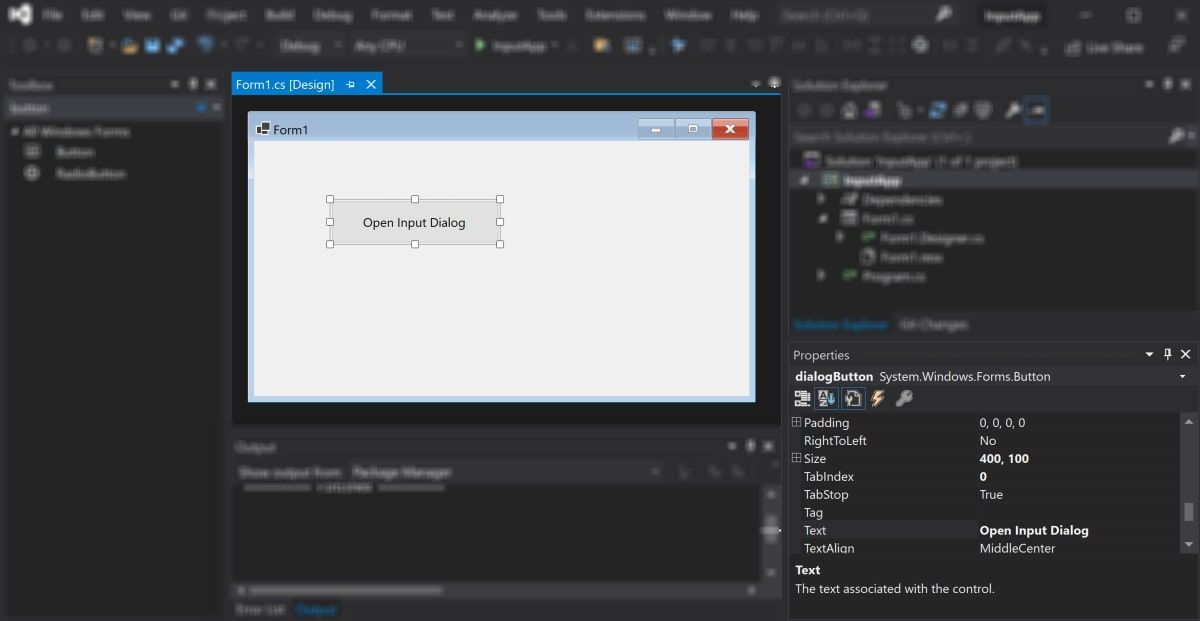
In the properties window, change the properties of the button to the following new values:
Property Name
New Value
Name
dialogButton
Size
400, 100
Text
Open Input Dialog

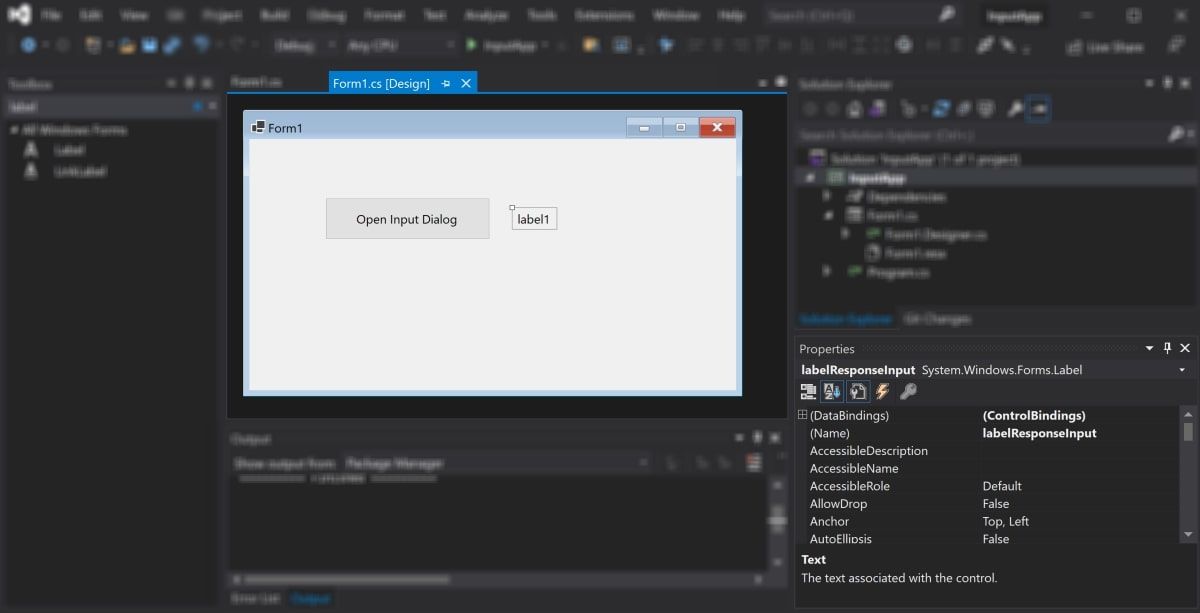
- In the Toolbox, click and drag a label onto the canvas. Place the label to the right side of the button.
-
In the properties window, change the properties of the label to the following values:
Property Name
New Value
Name
labelResponseInput
Visible
False

-
Double-click on the new Input Dialog button. This will generate an on-click function in the code-behind CS file for the form.
        private void dialogButton_Click(object sender, EventArgs e)
{
    // The code here will trigger when the user clicks on the button
    // It will display the input dialog box
}
How to Create the Input Dialog Box
Create the dialog box inside a new function. The function will programmatically create a new form, and add UI elements to it, including a text box with «Ok» and «Cancel» buttons.
-
Under the dialogButton_Click() function, create a new function that will create the Input Dialog box. The «title» parameter will show in the top-left corner of the window. The value for the «promptText» will display to the user. The «value» parameter is an out parameter and will return the value that the user entered inside the input box.
        public static DialogResult InputBox(string title, string promptText, ref string value)
{}
-
Inside the InputBox() function, create the UI elements that will display on the form.
        Form form = new Form();
Label label = new Label();
TextBox textBox = new TextBox();
Button buttonOk = new Button();
Button buttonCancel = new Button(); -
Add the title of the form, which will display in the top-left corner. Also add the main message that will display to the user, above the input box.
        form.Text = title;
label.Text = promptText; -
Add values for the «Ok» and «Cancel» buttons. The text property contains the text that shows on top of each button. The DialogResult property contains the type of result the button will represent. You can read more about DialogResult in Microsoft’s official documentation.
        buttonOk.Text = "OK";
buttonCancel.Text = "Cancel";
buttonOk.DialogResult = DialogResult.OK;
buttonCancel.DialogResult = DialogResult.Cancel; -
Use the SetBounds() method to set the x and y positions of the label, text box, and buttons on the form. You can also specify each element’s width and height.
        label.SetBounds(36, 36, 372, 13);
textBox.SetBounds(36, 86, 700, 20);
buttonOk.SetBounds(228, 160, 160, 60);
buttonCancel.SetBounds(400, 160, 160, 60); -
Configure some properties for the dialog window itself. These properties set the form size, borders, and start position. It also controls the ability to minimize or maximize the window, or resize the label if necessary.
        label.AutoSize = true;
form.ClientSize = new Size(796, 307);
form.FormBorderStyle = FormBorderStyle.FixedDialog;
form.StartPosition = FormStartPosition.CenterScreen;
form.MinimizeBox = false;
form.MaximizeBox = false; -
Add the UI elements onto the new form, and set the form’s accept and cancel buttons to the button objects created earlier.
        form.Controls.AddRange(new Control[] { label, textBox, buttonOk, buttonCancel });
form.AcceptButton = buttonOk;
form.CancelButton = buttonCancel; -
Show the newly created dialog window to the user.
DialogResult dialogResult = form.ShowDialog(); -
Store the value that the user entered into the textbox. Return the result of the form, which would either be «Ok», or «Cancel», based on the button the user clicks on.
        value = textBox.Text;
return dialogResult;
How to Use the Input Dialog Box
To use the input dialog box, call the InputBox() function inside the dialogButton_Click() function. When the user clicks on the «Open Input Dialog» button, it will show the dialog box.
-
Inside the dialogButton_Click() function, create a variable to store the value that the user enters inside the text box. This value will come from the «value» out parameter.
string value = ""; -
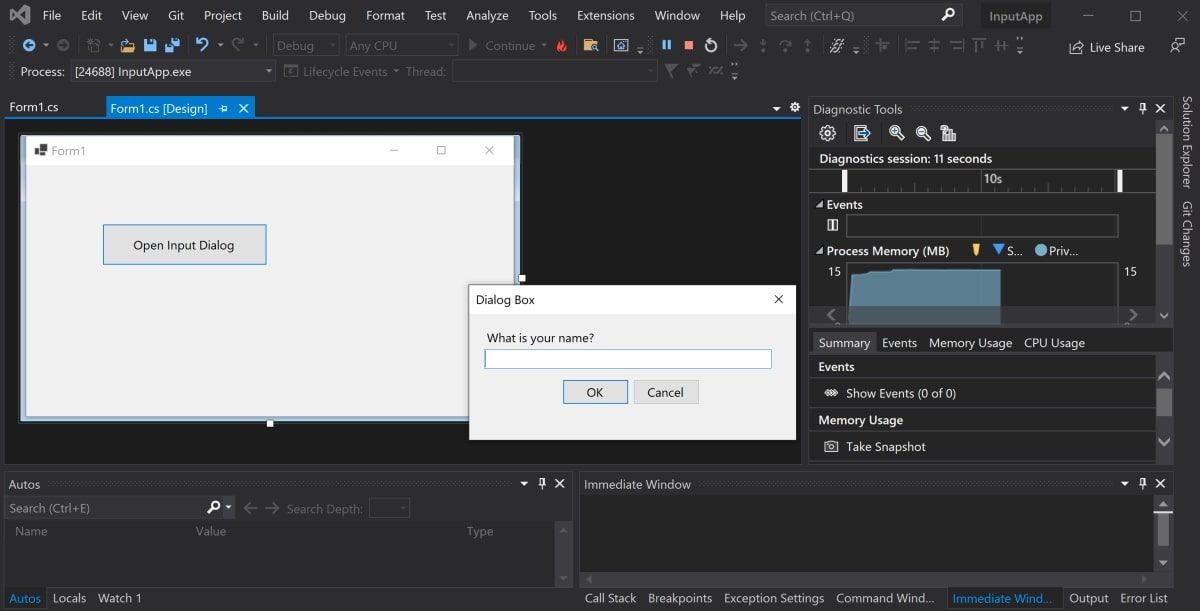
Display the dialog box by calling the InputBox() function. Check if the user clicks on the «Ok» button, and if so, add some text onto the screen to display the response back to the user.
        if (InputBox("Dialog Box", "What is your name?", ref value) == DialogResult.OK)
{
    labelResponseInput.Visible = true;
    labelResponseInput.Text = "Your name: " + value;
}
How to View the Input Dialog Pop Up
Run the application and trigger the dialog box.
-
Click on the green play button at the top of the Visual Studio window.

-
Click on the Open Input Dialog button to show the dialog box.

-
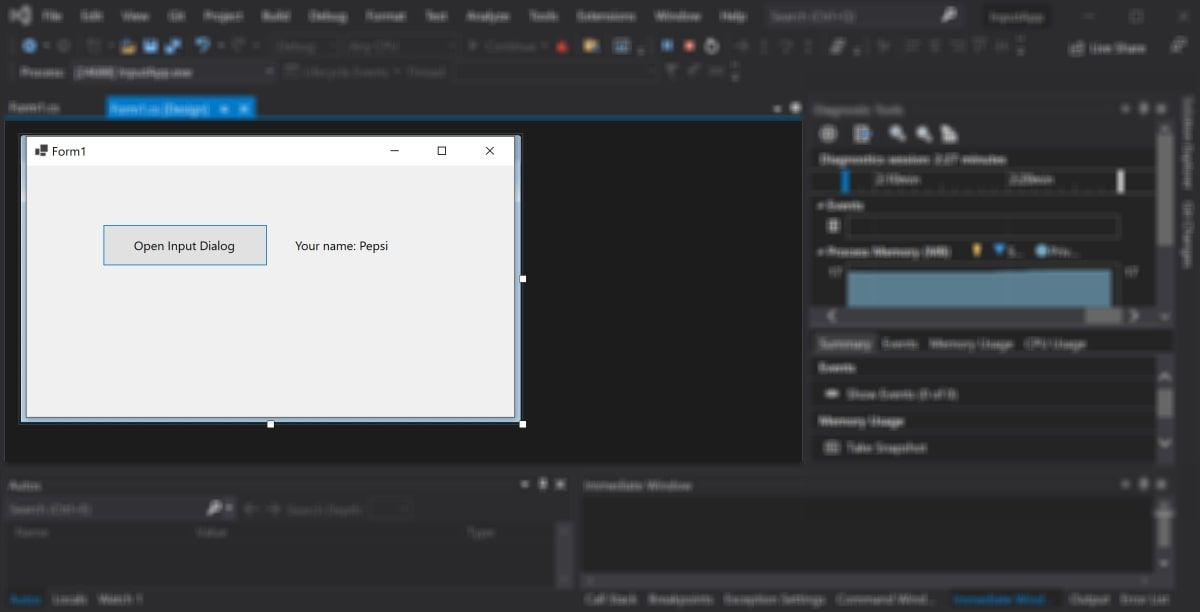
Enter a name into the text box and click on the OK button. The dialog box will close and display the results entered into the text box.

- Click on the Open Input Dialog button again to re-open the dialog box.
- Click on the Cancel button to close the dialog box. This cancels the dialog box without completing any actions or updating the UI.
Adding Content and UI Elements to Your Windows Forms Application
You can create input dialog boxes in a Windows Forms application, and display them to the user when certain events happen. You can create a new dialog window by creating a new form. You can then add new UI elements to it, such as labels, text boxes, or buttons.
Once the user has entered the required information, you can close the input box and store the information that they entered.
If you want to add more content to your UI or dialog box, you can explore how to add other UI elements. This includes elements such as shapes or images.
Классическая задача — получение ввода от пользователя — чаще всего решается через диалоговые окна. Например, у вас есть форма для отображения списка людей, и вы хотите иметь возможность добавления людей в список и редактирования их. Где расположить поля ввода для параметров добавляемого или редактируемого объекта? Можно в том же окне, где находится список, но лучше это делать в отдельном окне редактирования. Давайте рассмотрим это на примере.
Для примера нам понадобится новое WinForms-приложение, на главной форме которого мы поместим компонент ListView для хранения списка и две кнопки для добавления новой записи и редактирования выделенной. В списке ListView нужно:
- в свойстве Columns добавить три колонки с заголовками: Имя, Фамилия и Возраст;
- в свойстве View выбрать Details.
Такую главную форму можно увидеть на рис. 11.2.
Теперь нам понадобится дочерняя форма или диалоговое окно для редактирования элементов. Щелкните правой кнопкой мыши по имени проекта в панели Solution Explorer и в контекстном меню выберите Add | New Item. В открывшемся окне найдите и выделите Windows Form и в поле Name введите имя для диалогового окна — например, EditPersonForm.
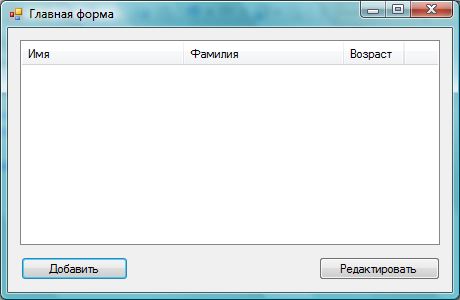
Рис. 11.2. Форма будущей программы
Сразу же поместите на форму две кнопки для сохранения и отмены изменений, а также три поля ввода: для изменения имени, фамилии и возраста. Для изменения возраста можно использовать компонент NumericUpDown, который хорошо подходит для редактирования чисел. Мой вариант формы можно увидеть на рис. 11.3, но ваш может и отличаться.
Рис. 11.3. Форма диалогового окна
Теперь несколько рекомендаций по оформлению диалоговых окон, которым не обязательно следовать, но которые чаще всего положительно сказываются на удобстве использования программ:
- в свойстве AcceptButton нужно указать кнопку, которая будет являться кнопкой по умолчанию, и именно она станет срабатывать (будет вызываться ее обработчик события Click), если пользователь нажмет клавишу в тот момент, когда отображается окно. Здесь чаще выбирают кнопки типа OK или Да;
- в свойстве CancelButton укажите кнопку отмены, которая будет срабатывать при нажатии клавиши ;
- свойство FormBorderStyle лучше установить в FixedDialog, потому что диалоговым окнам желательно устанавливать фиксированный размер окна, их просто незачем растягивать;
- свойство MaximizeBox рекомендуется установить в false, чтобы в заголовке окна не отображалась кнопка максимизации формы. Мы уже определились, что размер окна не должен изменяться, и возможность максимизации тем более не нужна;
- свойство ShowInTaskBar лучше тоже установить в false, потому что только главное окно должно отображаться в панели задач. Дочерние окна отображайте
в панели задач только при необходимости, а для диалоговых окон я не могу себе представить эту необходимость, — особенно, если окно модальное.
Еще пару манипуляций нужно сделать над кнопками. Для кнопки Сохранить установите свойство DialogResult в OK, а для кнопки Отмена установите это же свойство в Cancel. Теперь, если окно отображается в модальном режиме, то по нажатию любой из этих кнопок окно будет закрыто, а форма вернет в качестве результата то, что мы указали для кнопок в свойстве DialogResult.
Теперь посмотрим, как может использоваться эта форма. Для начала в коде формы добавим три свойства, через которые будет происходить обращение к полям ввода:
   public string FirstName
   {
     get { return firstNameTextBox.Text; }
     set { firstNameTextBox.Text = value; }
   }

   public string LastName
   {
     get { return lastNameTextBox.Text; }
     set { lastNameTextBox.Text = value; }
   }

   public int Age
   {
     get { return (int)ageNumericUpDown.Value; }
     set { ageNumericUpDown.Value = value; }
   }
Добавленные здесь свойства являются посредниками между диалоговым окном редактирования и главным окном, из которого будет вызываться это диалоговое окно.
Теперь все готово, чтобы написать код, который будет создавать новые элементы
в списке и редактировать их. Для начала создайте обработчик события Click для кнопки Добавить главной формы и напишите в нем содержимое листинга 11.1.
Листинг 11.1. Код добавления нового элемента в список
private void addPersonButton_Click(object sender, EventArgs e)
{
  // создаем форму
  EditPersonForm editForm = new EditPersonForm();

  // отображаем форму
  if (editForm.ShowDialog() != DialogResult.OK)
    return;

  ListViewItem newItem =
           personsListView.Items.Add(editForm.FirstName);
  newItem.SubItems.Add(editForm.LastName);
  newItem.SubItems.Add(editForm.Age.ToString());
}
В самом начале создается экземпляр класса EditPersonForm, а этим классом является форма. Следующим этапом идет отображение формы editForm.ShowDialog(), и тут же проверяется результат, который возвращает метод ShowDialog(). Если результат не равен DialogResult.OK (а этот результат возвращает кнопка Сохранить в диалоговом окне), то выполнение метода прерывается.
После этого создается новый элемент для списка ListView и заполняются два подэлемента, которые будут отображаться в колонках. Для чтения данных из объекта диалогового окна editForm используются свойства, которые мы написали.
Теперь посмотрим на метод, который выполняет редактирование выделенного в списке элемента. Этот код вы можете увидеть в листинге 11.2.
Листинг 11.2. Редактирование с помощью диалогового окна
private void editPersonButton_Click(object sender, EventArgs e)
{
  if (personsListView.SelectedItems.Count == 0)
    return;

  // для удобства сохраняем выделенный элемент в локальной переменной
  ListViewItem item = personsListView.SelectedItems[0];
  // создаем форму
  EditPersonForm editForm = new EditPersonForm();

  // заполняем поля формы значениями
  editForm.FirstName = item.Text;
  editForm.LastName = item.SubItems[1].Text;
  editForm.Age = Convert.ToInt32(item.SubItems[2].Text);
  if (editForm.ShowDialog() != DialogResult.OK)
    return;

  item.Text = editForm.FirstName;
  item.SubItems[1].Text = editForm.LastName;
  item.SubItems[2].Text = editForm.Age.ToString();
}
-
Input Dialog Box Using Microsoft Visual Basic
-
Custom Input Dialog Box Using Windows Forms in
C#
This tutorial will demonstrate to create an input dialog box in C# using two different methods similar to that in VB.Net.
An Input Dialog Box is a pop-up window that displays a message prompt and requests input from a user. The input can then be used in the code.
There is no version of VB.NET’s Input Dialog box in C# so that you can use one of two methods. The first and simplest is using the InputBox provided in Microsoft.VisualBasic.Interaction. The other method is by creating your own custom dialog box using System.Windows.Forms and System.Drawing.
Input Dialog Box Using Microsoft Visual Basic
As C# does not have its own version of an input dialog box like the one in VB.NET, you can add a reference to Microsoft.VisualBasic and use its InputBox.
To utilize Microsoft.VisualBasic, you must first add it to the project’s references by following the steps below.
-
Navigate to the Solution Explorer
-
Right-click on References
-
Click
Add Reference -
Click the
Assembliestab on the left -
Find the
Microsoft.VisualBasic.dllfile and clickOK
After successfully adding the reference, you can then use its using statement in your code.
using Microsoft.VisualBasic;
The Input Box itself is created by supplying the following parameters.
Prompt: The message to be displayed within the window. This is the only mandatory parameter that needs to be passed.Title: The window title to be displayedDefault: The default value of the input text box- X Coordinate: The X Coordinate of the Input Box’s startup position
- Y Coordinate: The Y Coordinate of the Input Box’s startup position
string input = Interaction.InputBox("Prompt", "Title", "Default", 10, 10);
Once this input box has been called, the program will wait for a response before continuing on with the rest of the code.
Example:
using System;
using Microsoft.VisualBasic;

namespace VisualBasic_Example {
  class Program {
    static void Main(string[] args) {
      // Create the input dialog box with the parameters below
      string input =
          Interaction.InputBox("What is at the end of the rainbow?", "Riddle", "...", 10, 10);

      // After the user has provided input, print to the console
      Console.WriteLine(input);
      Console.ReadLine();
    }
  }
}
In the example above, we create an input box with a riddle prompt that appears in the top left corner of the screen. After input is submitted, the value is printed to the console.
Output:
Custom Input Dialog Box Using Windows Forms in C#
Another option for creating an input dialog box is creating your own custom input dialog box. One benefit of creating an input dialog box is that it allows you to customize the window more than the first method. To utilize the code in the example below, you must first add a reference to System.Windows.Forms.dll and System.Drawing.dll by using the steps below.
-
Navigate to the Solution Explorer
-
Right-click on References
-
Click
Add Reference -
Click the
Assembliestab on the left -
Find the
Microsoft.VisualBasic.dllandSystem.Drawing.dllfiles and clickOK
After successfully adding the reference, you can use their using statements in your code.
Example:
using System;
using System.Windows.Forms;
using System.Drawing;

namespace CustomDialog_Example {
  class Program {
    static void Main(string[] args) {
      // Initialize the input variable which will be referenced by the custom input dialog box
      string input = "...";
      // Display the custom input dialog box with the following prompt, window title, and dimensions
      ShowInputDialogBox(ref input, "What is at the end of the rainbow?", "Riddle", 300, 200);

      // Print the input provided by the user
      Console.WriteLine(input);

      Console.ReadLine();
    }

    private static DialogResult ShowInputDialogBox(ref string input, string prompt,
                                                   string title = "Title", int width = 300,
                                                   int height = 200) {
      // This function creates the custom input dialog box by individually creating the different
      // window elements and adding them to the dialog box

      // Specify the size of the window using the parameters passed
      Size size = new Size(width, height);
      // Create a new form using a System.Windows Form
      Form inputBox = new Form();

      inputBox.FormBorderStyle = FormBorderStyle.FixedDialog;
      inputBox.ClientSize = size;
      // Set the window title using the parameter passed
      inputBox.Text = title;

      // Create a new label to hold the prompt
      Label label = new Label();
      label.Text = prompt;
      label.Location = new Point(5, 5);
      label.Width = size.Width - 10;
      inputBox.Controls.Add(label);

      // Create a textbox to accept the user's input
      TextBox textBox = new TextBox();
      textBox.Size = new Size(size.Width - 10, 23);
      textBox.Location = new Point(5, label.Location.Y + 20);
      textBox.Text = input;
      inputBox.Controls.Add(textBox);

      // Create an OK Button
      Button okButton = new Button();
      okButton.DialogResult = DialogResult.OK;
      okButton.Name = "okButton";
      okButton.Size = new Size(75, 23);
      okButton.Text = "&OK";
      okButton.Location = new Point(size.Width - 80 - 80, size.Height - 30);
      inputBox.Controls.Add(okButton);

      // Create a Cancel Button
      Button cancelButton = new Button();
      cancelButton.DialogResult = DialogResult.Cancel;
      cancelButton.Name = "cancelButton";
      cancelButton.Size = new Size(75, 23);
      cancelButton.Text = "&Cancel";
      cancelButton.Location = new Point(size.Width - 80, size.Height - 30);
      inputBox.Controls.Add(cancelButton);

      // Set the input box's buttons to the created OK and Cancel Buttons respectively so the window
      // appropriately behaves with the button clicks
      inputBox.AcceptButton = okButton;
      inputBox.CancelButton = cancelButton;

      // Show the window dialog box
      DialogResult result = inputBox.ShowDialog();
      input = textBox.Text;

      // After input has been submitted, return the input value
      return result;
    }
  }
}
In the example above, we created a custom function that uses elements from System.Windows.Forms and individually adds them to the Dialog Box. While you could hard code the different elements, you could also add parameters and reference them within the function to have as much customization as you’d like. After building and showing the dialog box, the program waits for the user to provide input to print it within the console.
Output:
Enjoying our tutorials? Subscribe to DelftStack on YouTube to support us in creating more high-quality video guides. Subscribe
A message box or dialog box is used to interact with the users of your application.
- The purpose of using a message box may include notifying about a particular action e.g. success message after entering a record.
- Similarly, an error message if an operation is unsuccessful. In both cases, you may display the “OK” button in the message box with the message.
- In other cases, you may display a message box for the user confirmation before performing a critical action e.g. deleting a record permanently. In that case, a Yes/No button in the dialog box makes sense.
In this tutorial, I will show you how to create various types of C# message boxes with code.
How to make message box work in Visual Studio?
If you are working in Visual Studio then you have to include the System.Windows.Forms by following this:
- In your project name under “Solution Explorer” right-click and select “Add Reference”.
- There you can see a few tabs. Select “.Net” tab.
- Now locate the System.Windows.Forms and press OK
The example of creating a simple message box
After taking the above steps, you need to include the System.Windows.Forms namespace as used in the code below.
You may provide a message to be displayed and the title of the dialog box by using the MessageBox class’s show method.
The following example simply displays a box with the OK button:
using System;

using System.Windows.Forms;

class msgbox_example

{
    static void Main()
    {
        string box_msg = "A Message Box with OK Button";
        string box_title = "Message Box Demo";

        MessageBox.Show(box_msg, box_title);
    }
}
The result:
An example of a Yes/No message box
The Yes/No dialog box can be useful for asking users to choose an option between the two.
For example, “Are you sure you want to delete this record?” Similarly, “Do you want to quit?” and so on.
The example below shows a Yes/No message box:
using System;

using System.Windows.Forms;

class msgbox_example

{
    static void Main()
    {
        string box_msg = "Message Box with Yes / No Options";
        string box_title = "Yes No Dialog";

       MessageBox.Show(box_msg, box_title, MessageBoxButtons.YesNo);
    }
}
The result:
Adding the Cancel button in the above dialog
You may use the YesNoCancel Enum value for creating a dialog with the third button i.e. Cancel in addition to the above two buttons.
The code below shows how with the output:
using System;

using System.Windows.Forms;
class msgbox_example

{
    static void Main()
    {
        string box_msg_y_n_c = "Yes/No/Cancel Options";
        string box_title_y_n_c = "Yes No Cancel Dialog box";

        MessageBox.Show(box_msg_y_n_c, box_title_y_n_c, MessageBoxButtons.YesNoCancel);
    }
}
Adding an icon example
By using the MessageBoxIcon Enum, you may specify an icon to be displayed with the message in the dialog box.
Different icons can be used by specifying respective value. For example:
- Exclamation
- Information
- Question
- Warning
- Asterisk
- Error
- Hand
- Stop
- None
The following example shows a few message boxes with different icons:
using System;

using System.Windows.Forms;

class msgbox_example
{
    static void Main()
    {

        MessageBox.Show("Exclamation Icon message box", "Dialog with Icon", MessageBoxButtons.YesNo, MessageBoxIcon.Exclamation);
        MessageBox.Show("Warning Icon message box", "Dialog with Icon", MessageBoxButtons.OKCancel, MessageBoxIcon.Warning);

        MessageBox.Show("There was an error processing your request!", "Dialog with Icon", MessageBoxButtons.OK, MessageBoxIcon.Error);
        MessageBox.Show("Operation cannot be successful, Do you want to retry?", "Dialog with Icon", MessageBoxButtons.RetryCancel, MessageBoxIcon.Stop);
    }
}
As you execute this code, four dialog boxes should display with respective icons and messages.
Performing actions on different buttons
The message box with the OK button only may be used for information purposes to the user, without performing any action.
However, in the case of boxes with OK, Cancel, Yes and No, and Retry buttons, you may require performing some action based on the user’s selection.
So, how to catch which button is pressed by the user?
For that, you may use a variable that catches the returned value. Then it can be used in an if statement and you may perform the desired action.
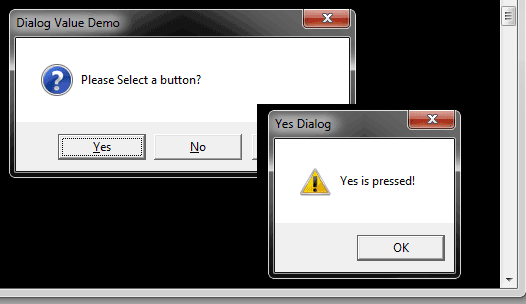
To demonstrate that, the following program displays a message box with Yes/No/Cancel buttons.
As you click any button, another message box with an “OK” button is displayed with its message for each button:
using System;

using System.Windows.Forms;

class msgbox_example_value
{
    static void Main()
    {

       var selectedOption = MessageBox.Show("Please Select a button?", "Dialog Value Demo", MessageBoxButtons.YesNoCancel, MessageBoxIcon.Question);

        // If the no button was pressed ...
       if (selectedOption == DialogResult.Yes)
        {
            MessageBox.Show("Yes is pressed!", "Yes Dialog", MessageBoxButtons.OK, MessageBoxIcon.Warning);
        }

       else if (selectedOption == DialogResult.No)
       {
           MessageBox.Show("No is pressed!", "No Dialog", MessageBoxButtons.OK, MessageBoxIcon.Exclamation);
       }

       else
       {
           MessageBox.Show("Cancel is pressed", "Cancel Dialog", MessageBoxButtons.OK, MessageBoxIcon.Error);
       }
    }
}
Отображать диалоговое окно таким же образом, как отобразить любые другие формы в приложении. Начальная форма загружается автоматически при запуске приложения. Чтобы сделать вторую форму или диалоговое окно отображаться в приложении, напишите код для загрузки и отображения. Аналогичным образом чтобы форма или диалоговое окно поле исчезают, напишите код для выгрузки его или скрывать.
Чтобы отобразить диалоговое окно
-
Перейдите к обработчику событий, с которым вы хотите открыть диалоговое окно. Это может произойти при выборе команды меню, при нажатии кнопки или при возникновении любого другого события.
-
В обработчике событий добавьте код, чтобы открыть диалоговое окно. В этом примере событие нажатия кнопки используется для отображения диалогового окна:
Private Sub Button1_Click(ByVal sender As System.Object, ByVal e As System.EventArgs) Handles Button1.Click
   Dim dlg1 as new Form()
   dlg1.ShowDialog()
End Sub
private void button1_Click(object sender, System.EventArgs e) { Form dlg1 = new Form(); dlg1.ShowDialog(); }private: void button1_Click(System::Object ^ sender, System::EventArgs ^ e) { Form ^ dlg1 = gcnew Form(); dlg1->ShowDialog(); }