
Switching to HDMI on a laptop running Windows 10 is a common task for many users. HDMI, short for High Definition Multimedia Interface, allows for the transfer of audio and video data from your laptop to an external display or television. This is particularly useful when you want to connect your laptop to a larger screen for presentations, gaming, or watching movies.
In this blog post, we will explore various methods you can use to switch to HDMI on your Windows 10 laptop. Whether you are using a dedicated HDMI port or an adapter, we will provide step-by-step instructions and tips to ensure a smooth and hassle-free experience. So, let’s dive in and explore the different ways to switch to HDMI on your laptop!
Video Tutorial:
What’s Needed
Before we begin, let’s take a look at what you’ll need to switch to HDMI on your Windows 10 laptop:
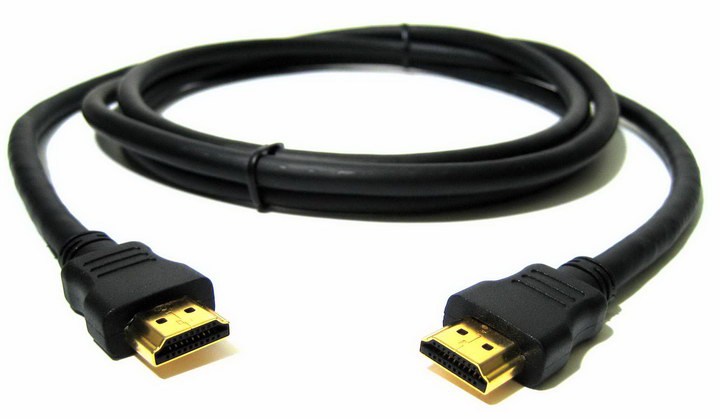
- A Windows 10 laptop with an HDMI port or an HDMI adapter
- An HDMI cable
- An external display or television with an HDMI input
- Optional: An additional audio cable if you want to connect separate speakers
Make sure you have all the necessary equipment ready before proceeding with any of the methods we will discuss.
What Requires Your Focus?
Switching to HDMI on your laptop requires your focus and attention to detail. You will need to follow the steps carefully and ensure that all the connections are made correctly for a successful switch to HDMI. Pay close attention to the specific instructions for your laptop model as some manufacturers may have slightly different processes.
Additionally, you should also ensure that your HDMI cable is in good condition and not damaged. A faulty cable can result in a poor connection or no connection at all, so it’s important to use a reliable HDMI cable for the best results.
Method 1. How to Switch to HDMI via Dedicated HDMI Port
If your laptop has a dedicated HDMI port, follow these steps to switch to HDMI:
- Ensure that your laptop and the external display or television are powered on.
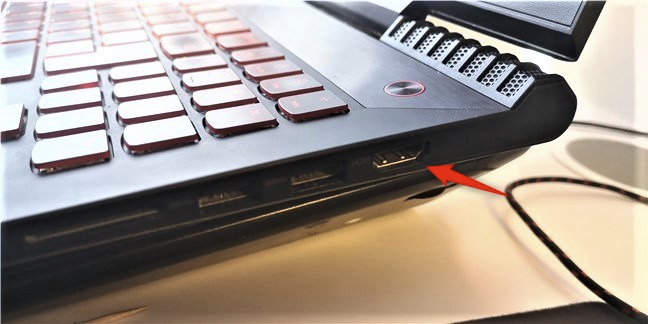
- Locate the HDMI port on your laptop. It is usually labeled «HDMI» and may be located on the side or back of your laptop.
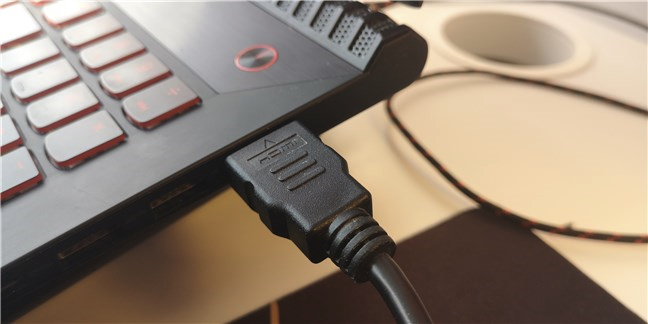
- Connect one end of the HDMI cable to the HDMI port on your laptop.
- Connect the other end of the HDMI cable to the HDMI input on your external display or television.
- On your laptop, press the Windows key + P on your keyboard to open the «Project» menu.
- In the «Project» menu, select «Duplicate» or «Second screen only» to switch to HDMI.
- Your laptop’s display should now appear on the external display or television via HDMI.
- To switch back to your laptop’s display, use the Windows key + P shortcut again and select «PC screen only.«
| Pros | Cons |
|---|---|
| 1. Easy and straightforward process to connect via a dedicated HDMI port. | 1. Limited availability of dedicated HDMI ports on some laptop models. |
| 2. No additional adapters or cables required. | 2. May require adjusting display settings for optimal resolution and screen size. |
| 3. Allows seamless mirroring or extending of your laptop’s display to an external screen. | 3. The length of the HDMI cable may limit the distance between your laptop and the external display. |
Method 2. How to Switch to HDMI via HDMI Adapter
If your laptop does not have a dedicated HDMI port, you can use an HDMI adapter to switch to HDMI:
- Ensure that your laptop and the external display or television are powered on.
- Check the available ports on your laptop and determine the type of adapter you need (e.g., USB-C to HDMI adapter, DisplayPort to HDMI adapter).
- Purchase the appropriate HDMI adapter based on your laptop’s available ports.
- Connect the HDMI cable to the HDMI input on the adapter.
- Connect the other end of the HDMI cable to the HDMI input on your external display or television.
- Connect the adapter to your laptop’s available port.
- On your laptop, press the Windows key + P on your keyboard to open the «Project» menu.
- In the «Project» menu, select «Duplicate» or «Second screen only» to switch to HDMI.
- Your laptop’s display should now appear on the external display or television via HDMI.
- To switch back to your laptop’s display, use the Windows key + P shortcut again and select «PC screen only.«
| Pros | Cons |
|---|---|
| 1. Allows switching to HDMI even if your laptop does not have a dedicated HDMI port. | 1. The need for an additional adapter adds complexity and cost. |
| 2. Provides flexibility to connect to different types of external displays or televisions. | 2. Some adapters may require driver installation or software configuration. |
| 3. Supports display mirroring or extending of your laptop’s display to an external screen. | 3. The length of the HDMI cable may limit the distance between your laptop and the external display. |
Method 3. How to Switch to HDMI via USB to HDMI Adapter
If your laptop has a USB port but no dedicated HDMI or DisplayPort, you can use a USB to HDMI adapter:
- Ensure that your laptop and the external display or television are powered on.
- Purchase a USB to HDMI adapter from a reputable manufacturer.
- Install any necessary drivers or software that come with the USB to HDMI adapter.
- Connect the USB end of the adapter to an available USB port on your laptop.
- Connect one end of the HDMI cable to the HDMI input on the adapter.
- Connect the other end of the HDMI cable to the HDMI input on your external display or television.
- On your laptop, press the Windows key + P on your keyboard to open the «Project» menu.
- In the «Project» menu, select «Duplicate» or «Second screen only» to switch to HDMI.
- Your laptop’s display should now appear on the external display or television via HDMI.
- To switch back to your laptop’s display, use the Windows key + P shortcut again and select «PC screen only.«
| Pros | Cons |
|---|---|
| 1. Enables HDMI connectivity on laptops with only USB ports. | 1. The need for an additional adapter adds complexity and cost. |
| 2. Can provide high-quality audio and video output. | 2. Some USB to HDMI adapters may have limited compatibility with certain laptop models. |
| 3. Supports display mirroring or extending of your laptop’s display to an external screen. | 3. The length of the HDMI cable may limit the distance between your laptop and the external display. |
Method 4. How to Switch to HDMI via Wireless Display Adapter
If you prefer a wireless solution, you can use a wireless display adapter to switch to HDMI:
- Ensure that your laptop and the external display or television are powered on.
- Purchase a wireless display adapter compatible with Windows 10, such as the Microsoft Wireless Display Adapter.
- Follow the manufacturer’s instructions to set up the wireless display adapter.
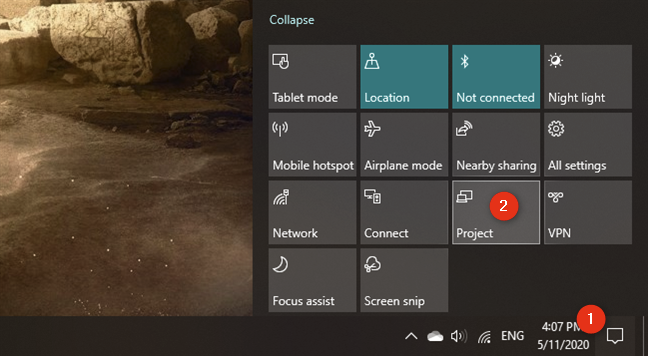
- On your laptop, click on the «Action Center» icon in the taskbar (usually located in the lower-right corner).
- In the «Action Center,» click on «Connect» to search for available wireless display adapters.
- Select the wireless display adapter from the list of available devices.
- Your laptop’s display should now appear on the external display or television via HDMI wirelessly.
- To switch back to your laptop’s display, simply disconnect from the wireless display adapter.
| Pros | Cons |
|---|---|
| 1. Provides a wireless solution for switching to HDMI. | 1. Wireless display adapters may have limited range and can be affected by signal interference. |
| 2. Easy setup and connection process. | 2. Wireless display adapters may have a higher cost compared to traditional HDMI cables or adapters. |
| 3. Supports display mirroring or extending of your laptop’s display to an external screen. | 3. Some wireless display adapters may have compatibility issues with certain laptop models. |
Why Can’t I Switch to HDMI?
There can be multiple reasons why you might not be able to switch to HDMI on your laptop. Here are some common reasons and their fixes:
- The HDMI cable is not properly connected. Check the connections and ensure they are secure.
- The external display or television is not set to the correct HDMI input. Use the display settings on the external device to select the HDMI input.
- The HDMI port on your laptop is not working. Try using a different HDMI port if available or use one of the alternative methods discussed above.
Q1: Why is there no sound after switching to HDMI?
A: If you are not getting any sound after switching to HDMI, it could be due to the audio settings on your laptop. Follow these steps to fix it:
- Right-click on the volume icon in the taskbar and select «Sounds.«
- In the «Playback» tab, select the HDMI output as the default audio device.
- Click «Apply» and then «OK» to save the changes.
- If you still don’t hear any sound, try adjusting the volume settings on the external display or television as well.
Q2: Why is my laptop screen flickering after switching to HDMI?
A: If your laptop screen is flickering after switching to HDMI, it could be a compatibility issue between your laptop and the external display or television. Try the following steps to resolve the issue:
- Disconnect the HDMI cable from your laptop.
- Restart your laptop.
- Reconnect the HDMI cable and switch to HDMI again.
- If the issue persists, try using a different HDMI cable or consult the manufacturer’s support for further assistance.
Q3: Why is the image on the external display or television blurry?
A: Blurry image on an external display or television can be caused by incorrect display settings. Adjust the display settings on your laptop to achieve the optimal resolution and screen size for the external screen. You can do this by following these steps:
- Right-click on the desktop and select «Display settings.«
- In the «Display settings» menu, adjust the resolution and scaling options to match the capabilities of your external display or television.
- Click «Apply» and then «OK» to save the changes.
- If the image is still blurry, check the display settings on the external device and make any necessary adjustments.
Implications and Recommendations
Switching to HDMI on your Windows 10 laptop opens up a world of possibilities for enhanced multimedia experiences and productivity. Here are some implications and recommendations to consider:
- Take advantage of the extended screen real estate: With HDMI, you can connect your laptop to a larger monitor or TV, giving you more screen space for multitasking or viewing content in high-definition.
- Improve your gaming experience: If you’re a gamer, connecting your laptop to a larger screen via HDMI can provide a more immersive and visually stunning gaming experience.
- Enhance your presentations: HDMI allows you to effortlessly share your laptop screen during presentations, making it easier to showcase your work to a larger audience.
5 FAQs about Switching to HDMI
Q1: Can I switch to HDMI on a laptop without Windows 10?
A: Yes, you can switch to HDMI on a laptop without Windows 10. The steps may vary depending on the operating system you are using, but the concept remains the same. Consult the documentation or support resources for your specific operating system for more information.
Q2: Can I extend my laptop’s display to multiple external screens using HDMI?
A: Yes, you can extend your laptop’s display to multiple external screens using HDMI. However, the capability to do so may depend on your laptop’s graphics card and the specific settings available in your operating system. Consult the documentation or support resources for your laptop and operating system for more information on multi-monitor support.
Q3: Can I switch to HDMI on a laptop with a VGA port?
A: Yes, you can switch to HDMI on a laptop with a VGA port by using a VGA to HDMI adapter. This adapter converts the VGA signal to HDMI, allowing you to connect to an HDMI display or television. Follow the instructions provided with the adapter to make the connection and switch to HDMI.
Q4: Are there any performance differences between the different methods to switch to HDMI?
A: In general, the performance differences between the different methods to
-
Что нужно для подключения?
-
Как подключить компьютер к телевизору
В случае, когда Wi-Fi Direct не настроен, Miracast не поддерживается, флешки с большим объемом нет, а кино в хорошем качестве посмотреть очень хочется, мы вспоминаем про разъем HDMI – прекрасный способ продублировать изображение на другое устройство без потери качества. Поэтому появляется вопрос: как подключить телевизор к компьютеру через HDMI в Windows 10 и что для этого потребуется? Ответ располагается ниже.
Что нужно для подключения?
Для подключения нам потребуется:
- ноутбук или настольный ПК с HDMI выходом;
- телевизор с HDMI входом;
- двусторонний кабель HDMI.
Внимание! Для получения качественной картинки с аудиодорожкой не пользуйтесь переходниками с HDMI на DVI и VGA, иначе просмотр фильмов и фотографий оставит только негативные эмоции.
Как подключить компьютер к телевизору
Итак, для передачи изображения на ТВ нам нужно соединить два устройства с помощью кабеля:
- Выключите телевизор и ноутбук. Сделать это нужно обязательно, дабы не повредить контакты в результате возможного возникновения искры.
- Подключите концы HDMI кабеля в разъемы входа и выхода (телевизора и ноутбука соответственно).

- Включите оба устройства.
Скорее всего, вы не увидите проекцию экрана ноутбука на телевизоре.
Для этого ТВ и ПК нужно настроить:
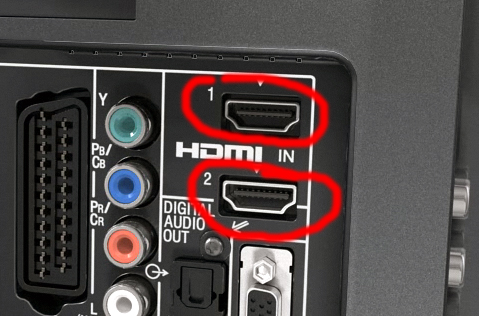
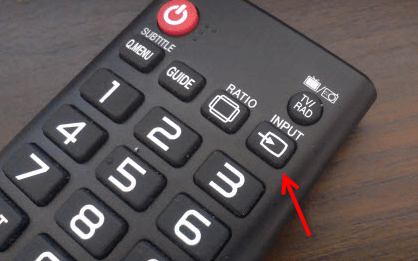
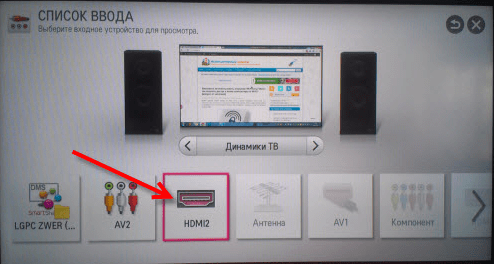
- Войдите в «Меню» телевизора и найдите пункт «Список ввода». Также его можно вызвать нажатием клавиши «Input» на пульте дистанционного управления.

- В появившемся перечне нажмите на источник входного сигнала: HDMI.

- После этого изображение с компьютера должно появится на телевизоре.
Но если этого не случилось, на ноутбуке или ПК отключена передача внешнего сигнала.
Для его включения нужно:
- Нажать одновременно клавиши Win+P.
- В появившемся окне выбрать тип проецирования.
Оптимальным способом является вариант «Только второй экран», при котором изображение с вашей машины будет с точностью копироваться на экран телевизора, при чем сам дисплей компьютера останется выключенным. Выбор другого подключения приведет к одновременной работе двух мониторов, что оказывает отвлекающий эффект.
В случае, если ваша панель имеет высокое разрешение дисплея, передаваемое изображение может быть размытым или зернистым.
Для полноценного использования ресурсов экрана телевизора вам нужно:
- Нажать ПКМ на рабочем столе.
- Выбрать пункт «Параметры экрана».
- В появившемся окне нажмите «Дополнительные параметры экрана».

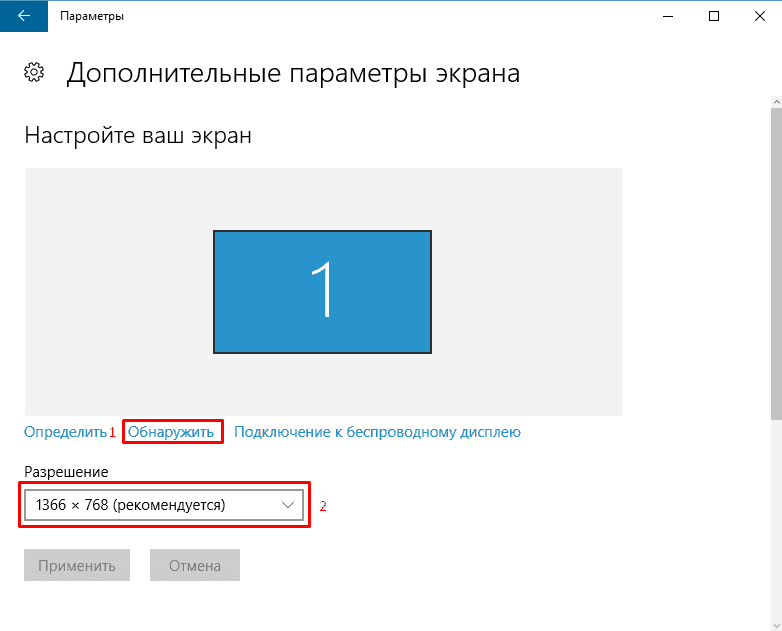
- Далее кликните на «Обнаружить» и после отображения параметров внешнего экрана выберите максимальное разрешение из выпадающего списка.

Совет! Если у вас отсутствует кабельное телевидение, а IPTV сильно бьет по кошельку, можете смотреть телевизор через компьютер: включить онлайн трансляцию или сопкаст на ПК и транслировать изображение на ТВ.
553559
Если вы решили подключит свой телевизор к компьютеру, или ноутбуку на Windows 10, то сейчас я покажу, и расскажу как это сделать. Подключать мы будем двумя способами: по беспроводной Wi-Fi сети, и с помощью кабеля HDMI. Под подключением по Wi-Fi я имею введу соединение через Wi-Fi роутер, и настройку технологии DLNA. Когда с компьютера, на телевизоре можно смотреть фильмы, фото, и слушать музыку. Ну а подключение с помощью HDMI кабеля, это обычное подключение по HDMI 🙂 При таком подключении, телевизор у нас будет как монитор в Windows 10.
Честно говоря, нет особой разницы, Windows 7 у вас, или Windows 10. Как подключение к телевизору по HDMI, так и по Wi-Fi, практически ничем не отличается. Но, рассмотрим все же на примере ноутбука с установленной Windows 10. Думаю, эта статья еще долго будет актуальной и полезной.
Подключаем телевизор к ноутбуку (Windows 10) по Wi-Fi. Настройка DLNA
Мы не будет рассматривать настройку технологии Wi-Fi Direct (когда можно без роутера соединить телевизор с ноутбуком, без проводов) и Miracast (не все устройства поддерживают эту технологию). Это темы для отдельных статей.
Если вы хотите свой телевизор соединить со своим компьютером по беспроводной сети, то это можно сделать следующим образом:
- Подключить ноутбук (Windows 10) к роутеру по Wi-Fi.
- Подключить к этой же сети свой телевизор. Вот инструкция по подключению телевизоров LG, и инструкция по настройке Wi-Fi на телевизорах Philips (Android TV).
Главное, что бы ноутбук и телевизор были подключены к одному роутеру. Кстати, не обязательно по Wi-Fi. Одно из устройств (или даже оба), можно подключить к маршрутизатору по кабелю.
После того, как вы все подключите, на компьютере можно переходить к настройке DLNA сервера. Запустив сервер на компьютере, на телевизоре можно будет смотреть фильмы. Обратите внимание, что на телевизоре, при использовании этого способа не будет отображаться рабочий стол. Вы сможете только просматривать определенные файлы. По настройке DLNA сервера, у нас есть три статьи:
- DLNA сервер в Windows 10. Настройка, вывод на телевизор – в этой статье мы запускали сервер без сторонних программ, с помощью стандартных средств в Windows 10.
- Настройка DLNA сервера для телевизора Philips. Смотрим фильмы с компьютера на телевизоре
- Как на телевизоре LG смотреть фильмы с компьютера (по wi-fi, или сети)? Настройка DLNA через Smart Share
Несмотря на то, что они написаны на примере Windows 7, на Windows 10 настройка DLNA сервера будет проходить точно так же. Я проверял, запущенный на ноутбуке с установленной Windows 10 DLNA сервер без проблем отображается на телевизоре.
Инструкции по ссылкам выше у меня для телевизоров LG, и Philips. Но, запущенный выше описанными способами сервер, будет без проблем работать на других телевизорах: Samsung, Sony, Toshiba и т. д. Настраивайте DLNA с помощью программы «Домашний медиа-сервер (UPnP, DLNA, HTTP)» (как я это делал в статье для телевизора Philips). Ее можно назвать универсальной.
С беспроводным соединением я думаю разобрались. Переходим к проводам.
Подключение по HDMI в Winodows 10
Если у вас Windows 7, то смотрите эту инструкцию по подключению телевизора LG к компьютеру по HDMI.
Берем обычный HDMI кабель. Один конец кабеля подключаем к телевизору в HDMI разъем. Их может быть несколько, подключайте в любой.
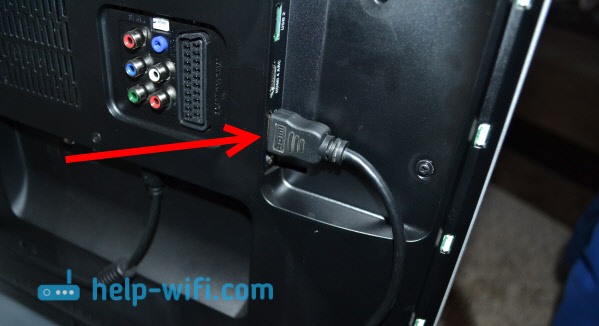
Второй конец кабеля подключаем к ноутбуку, или стационарному компьютеру.

Если картинка с компьютера не появилась на телевизоре, то скорее всего, на телевизоре нужно выбрать источник сигнала. На пульте дистанционного управления должна быть специальная кнопка. Обычно, она подписана INPUT, или SOURCES. Нажимаем на нее, и в качестве источника выбираем HDMI разъем, к которому мы подключили кабель.

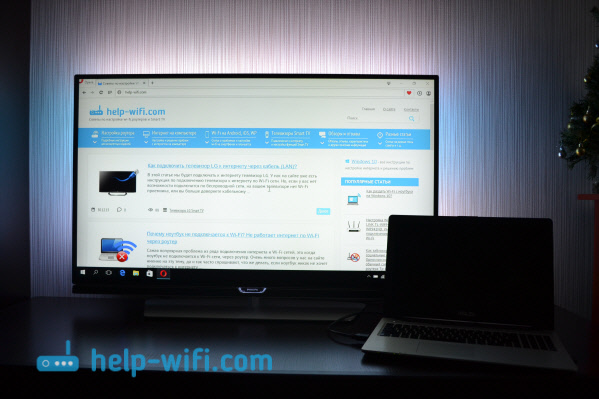
На телевизоре должно появится изображение.

В Windows 10 можно управлять вторым экраном. В нашем случае, это телевизор. В десятке это называется «Проецирование». Что бы вызвать это меню, достаточно нажать сочетание клавиш Win+P. Справа появится меню, в котором можно выбрать один из 4 вариантов.

Можно например вывести изображение только на телевизор.
Вот собственно и все настройки.
Если не работает звук на телевизоре при подключении к Windows 10 по HDMI
Возможно, после подключения телевизора к компьютеру, звук будет играть не с динамиков телевизора, а с динамиков ноутбука, или подключенных колонок. Это можно легко исправить.
Нажмите правой кнопкой мыши на значок регулировки звука, на панели уведомлений, и выберите Устройств воспроизведения.
Там в списке должен быть ваш телевизор. Нажмите на него правой кнопкой мышки, и выберите Использовать по умолчанию.

Теперь звук будет звучать с динамиков вашего телевизора.
Очень много решений связанных с проблемой вывода звука через HDMI кабель я собрал в этой статье: почему нет звука через HDMI на телевизоре, при подключении ноутбука (ПК) (на примере Windows 10 и Windows 7).
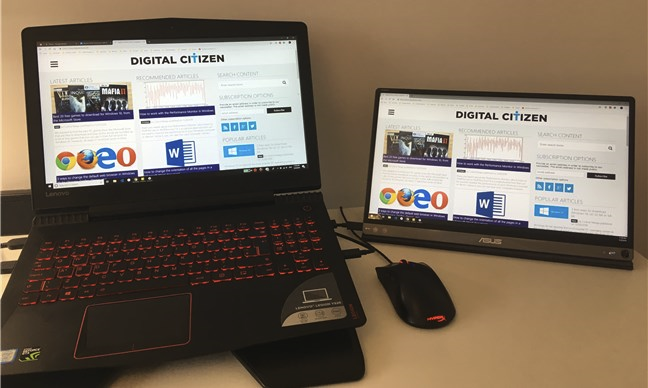
If you’re working from home and you brought your laptop from your office, you might want to connect a second monitor to it. A larger screen with more space on it can definitely improve your productivity, not to mention that it’s better to have two screens on which you can work at the same time. Did you ask yourself: «How do you connect a monitor to a laptop and use both screens?» Regardless of your reasons, if you want to learn how to connect a second monitor to a laptop or tablet with Windows 10, here’s how to do it:
1. How to connect a second monitor to a laptop using HDMI
HDMI, which comes from High-Definition Multimedia Interface, is a technology that allows electronic devices to transport both video and audio streams to compatible computer monitors, TVs, video projectors, and other similar devices, using dedicated cables.
If you have a laptop with an HDMI port, you can use it to connect an external monitor and even TVs or video projectors. It’s one of the best ways to do it, as HDMI provides an excellent balance between performance, video quality, and ease of use. Many modern laptops have at least one HDMI port available on them, so there’s a good chance yours has one too.
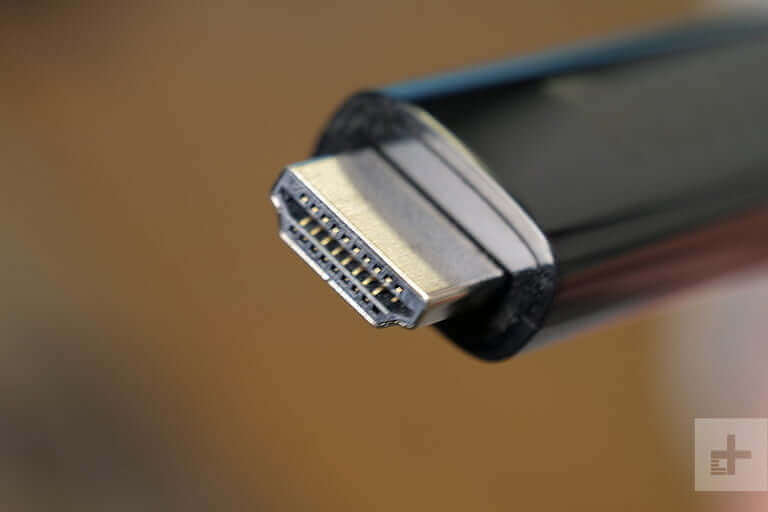
Look at your laptop to see if you do have an HDMI port on it. HDMI ports are rectangular, with two right angles and two corners that are cut away. Here’s what an HDMI port looks like:
Secondly, check whether your external computer monitor has an HDMI port on it. It’s usually found on its back, but some can also have HDMI ports on their sides.
If both your laptop and your external monitor have HDMI ports, use an HDMI cable to connect them.
Depending on how your Windows 10 laptop and your external monitor are configured, now you might see that the monitor already displays some images. However, in most cases, you still need to configure a few settings to make the external monitor work properly.
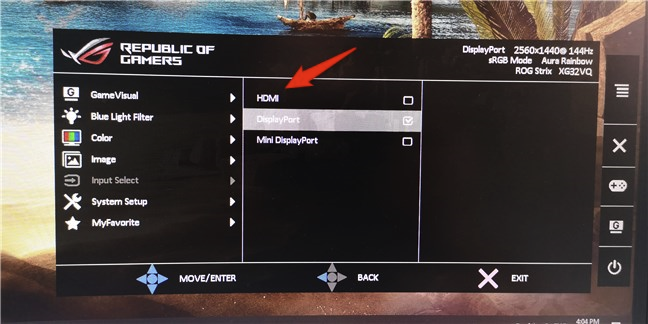
On your external monitor, look for a physical button that’s labeled Source. If you find one, push it repeatedly until the monitor shows HDMI as the source of input. If there is no such button, open the monitor’s OSD (On-Screen Display) and navigate through the menus to find the input source. When you find it, select HDMI.
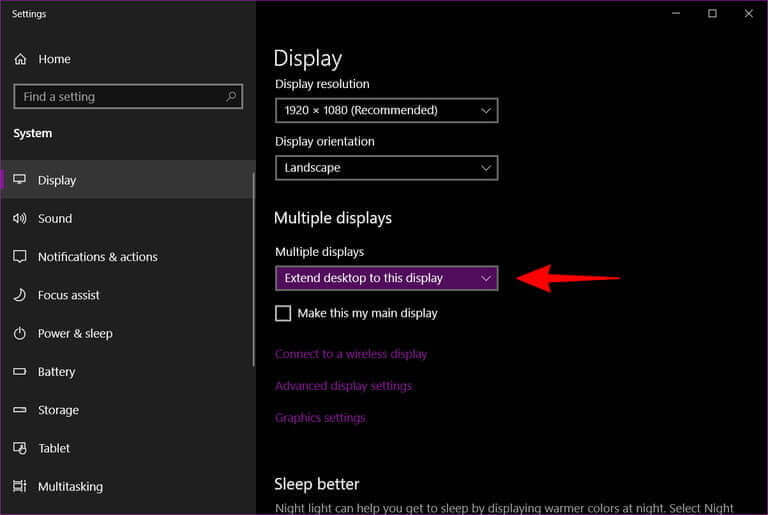
Next, you have to configure Windows 10 to let you use both displays according to your preferences. The easiest way to adjust the settings is to use Windows 10’s Project feature. Simultaneously press the Windows + P keys on your keyboard, or open the action center, Expand the quick actions, and click or tap the Project button.

Then, Windows 10 should give you several options for how to use your displays: PC screen only, Duplicate, Extend, and Second screen only. Select the one you prefer by clicking or tapping on it. If you want to use both screens, you should choose either Extend or Duplicate.

Extend increases the size of your Windows 10 desktop to cover both displays, so that’s likely what you want if you need more screen estate to work on. This is the option that lets you drag and drop windows and apps from your laptop screen to your external monitor and the other way around.

Duplicate, on the other hand, only mirrors your laptop’s screen on the external monitor, which can be useful if you want to show others what you’re doing on your laptop.
If you want to further customize the way your external monitor works together with your laptop, like adjust the resolution of the external monitor or set the order of the screens if you extend your desktop, read: Change the screen resolution and make text and icons bigger in Windows 10.
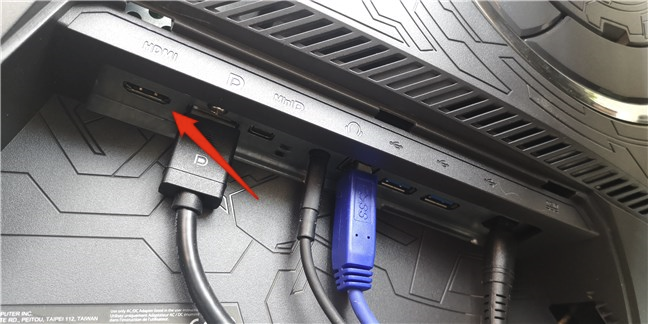
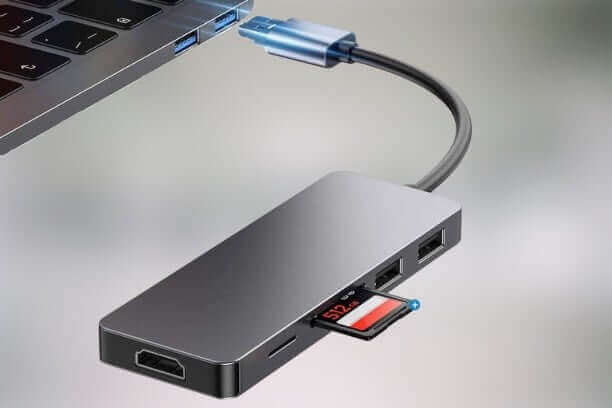
2. How to connect an external monitor using other types of ports and cables (USB-C, DisplayPort, DVI, VGA, S-Video)
If you don’t have HDMI on your laptop, you might have another type of video port on it. The reasons for laptop manufacturers to include other types of video ports differ. Some choose to use smaller video ports such as USB-C or faster and more capable DisplayPort ports. If you own an old laptop, it might not have any of the video ports we’ve mentioned, instead coming with older types of ports such as DVI, VGA, or even S-Video.
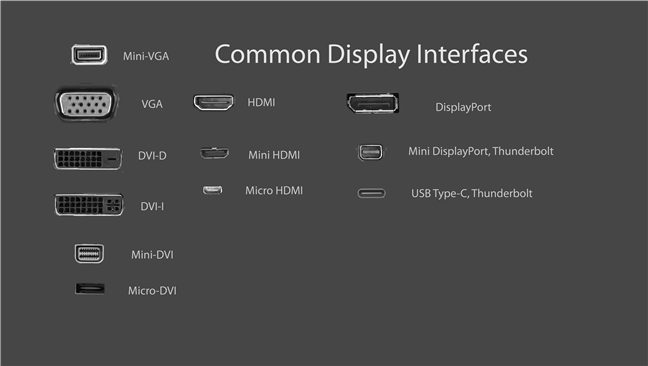
Look on the back and the sides of your laptop and check for the following details to correctly identify the type of ports available on your laptop:
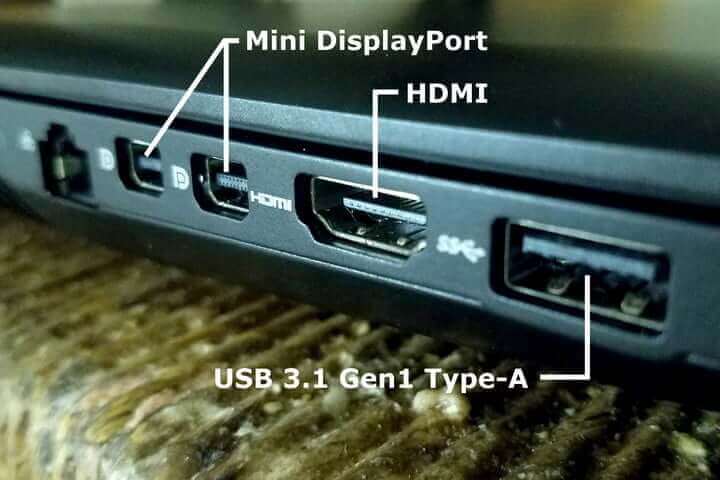
- DisplayPort: looks similar to HDMI but only one of its corners is cut diagonally, while the other three corners all have right angles
- Mini DisplayPort: a DisplayPort that’s much smaller in size, but otherwise looks the same as a regular DisplayPort
- USB-C: Is a tiny port with a rectangular shape and rounded corners
- DVI: larger than DisplayPort or HDMI, with a rectangular shape and usually colored white
- VGA: looks like a trapezoid and it’s usually colored in blue
- S-Video: has a circular shape and usually a black color
Repeat the same process to see what types of video ports are available on your external monitor. After you’ve identified what video ports are available on both your laptop and external monitor, there are two situations in which you can find yourself:
You have the same video ports available on the laptop and external monitor. In this case, you need to find a cable that matches the ports. For example, if both your monitor and your laptop have DisplayPorts, you can use a DisplayPort cable to connect them. This is the best situation, as all you need to do is get a cable that matches your video ports and use it to connect the external monitor to your laptop.
The laptop and the external monitor don’t share a common video port. In this case, connecting the external monitor to your laptop is a bit trickier, but not impossible. What you need is an adapter to convert the video signal from your laptop to the external monitor.
Depending on what video ports you have on your laptop and monitor, you might need a DisplayPort to VGA, HDMI to DisplayPort, USB-C to HDMI, VGA to HDMI, DVI to HDMI, or Mini DisplayPort to DisplayPort adapter. You can find adapters in electronics shops for almost any type of video connection, and they’re fairly cheap. Once you’ve got the adapter, plug it into the corresponding port on your laptop. Then plug an appropriate cable between the adapter and the external monitor.
For example, if your laptop has an old VGA port and your monitor an HDMI port, you can plug a VGA to HDMI adapter in your laptop’s VGA port, and then an HDMI cable between the adapter and your external monitor.
Once you’ve managed to connect your laptop to your external monitor, you might see that the monitor already displays the same things as your laptop’s screen. However, more often than not, you still have to select the monitor’s input source. On your external monitor, use its Source button (if it has one) or its OSD (On-Screen Display) to find the input Source setting and select the one that matches the port on the monitor that you’re using. For example, if you’re using a DisplayPort cable, select the Input that bears the same name.

If you’re using a VGA cable, select VGA or PC. The name of the video connection can differ depending on the manufacturer of your external monitor, so if you don’t get it right the first time, try the other Source option available. In the end, when you get the right one, video from your laptop should appear on your external screen.
Next, you can select the way in which Windows 10 uses your screens. First, open the Project tool. You can do that in the notifications panel*: Expand* the quick actions and press the Project button. Alternatively, you can also use the Windows + P keyboard shortcut.

Windows 10’s Project feature shows you a few ways in which you can use your external monitor together with your laptop’s screen: PC screen only, Duplicate, Extend, and Second screen only. Select what you prefer: if you want to use both your laptop’s screen and your external monitor, choose Extend or Duplicate.
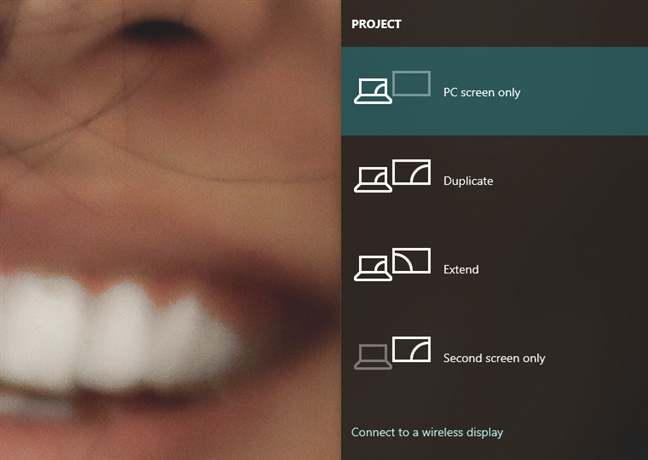
Extend expands your desktop so that it spans across both screens. If what you want is more space on your desktop and to be able to drag windows and apps from one screen to the other, select this option. Duplicate mirrors the laptop’s screen on the external monitor. In some situations, this can prove useful, like when you want others to be able to watch on the external monitor what you’re doing on your laptop.
TIP: Did you know that you can also snap Windows apps side by side and split the screen, when you’re using a dual-monitor setup?
3. How to connect an external monitor (or TV) to a laptop using a wireless connection
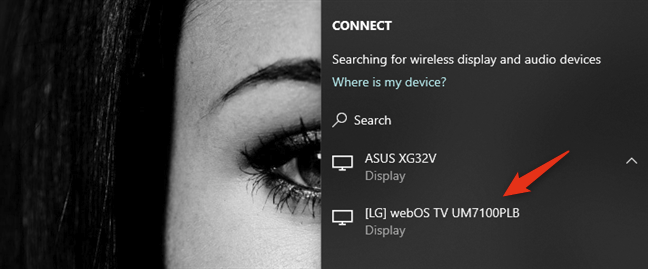
Some higher-end external monitors also support wireless connections, using a technology called Miracast. We’ve already published articles on what Miracast is and how to use Miracast to project from Windows 10 to a TV or monitor. You can read those if you want in-depth explanations. However, if you don’t have time to read additional material, here’s what you have to do to establish a wireless connection between your laptop and an external monitor (or TV) that supports Miracast:
Turn on your Miracast-enabled external monitor or smart TV. Keep in mind that, on some monitors (and smart TVs), you might also have to check their settings to make sure that wireless connections are enabled on it. Those settings might bear different names, and they might also be found in different places in your external monitor (or smart TV) menus, depending on its manufacturer.
NOTE: If your external monitor or TV doesn’t have built-in support for Miracast, you can also buy and use a Miracast dongle such as a Microsoft Wireless Display Adapter, Belkin Miracast Video Adapter or an ASUS Miracast Wireless Display Dongle. In this case, your external monitor (or TV) must have an HDMI port available. The Miracast adapter must also be charged using a USB port on your display or via a regular USB charger like those you use for your smartphones.
Once you’ve made sure that the external monitor (or TV) is on and that the Miracast features are enabled on it, go to your Windows 10 laptop. On it, open the Project panel: in the notifications panel, Expand the quick actions, and then press the Project button. A faster way is to use the Windows + P keyboard shortcut.
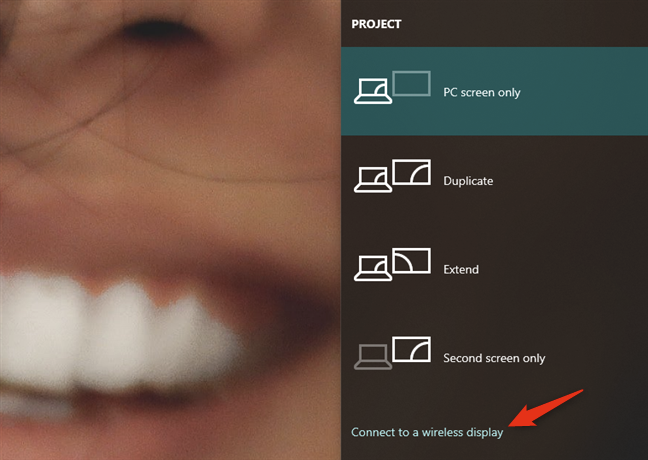
Windows 10’s Project should show up as a panel on your desktop’s right side. In some cases, it might automatically start «Searching for wireless displays and audio devices.» If it doesn’t, click or tap the «Connect to a wireless display» link.
When your laptop finds the external monitor (or TV), it shows it on a list in the Project panel. Click or tap on it, and then wait for the wireless connection to be established. Note that. On some TVs, you might also have to confirm that you want to connect them to your Windows 10 laptop using Miracast.
Once the wireless connection has been established, the external monitor (or TV) should display images from your laptop. To choose how the external monitor (or TV) works, either click/tap on «Change projection mode» or go back to the Project panel, and select what you prefer between the available display modes: PC screen only, Duplicate, Extend, and Second screen only.
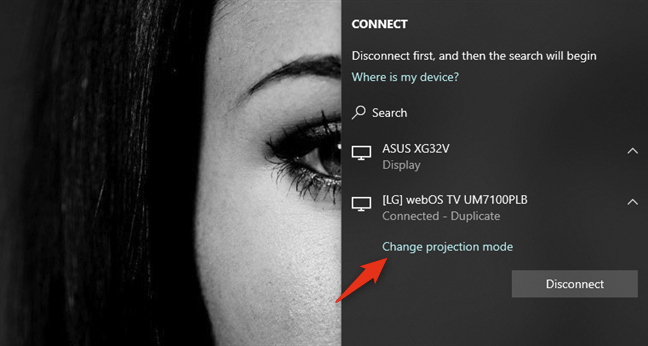
If you want to use both your laptop’s screen and the external monitor (TV), select either Extend or Duplicate. Extend your laptop’s screen if you want your desktop to span across both displays so that you can drag and drop windows and apps from one to the other. Choose Duplicate if you want to mirror your laptop screen on the external monitor (or TV).
Are you using an external monitor on your Windows 10 laptop?
Now you know how to add a second monitor, or even a TV, to your laptop. Do you find it easier to work on two screens at the same time? Did you encounter any problems when trying to connect your external monitor? We’d love to hear from you and, if you need our help, reach us using the comments below.
Вы можете подумать, что подключить компьютер к телевизору достаточно просто: нужно просто взять кабель HDMI и подсоединить его к телевизору, верно? Но что делать, если у компьютера нет порта HDMI? Из этой инструкции вы узнаете, как подключить компьютер с ОС Windows 10 к телевизору.
Windows 10
HDMI
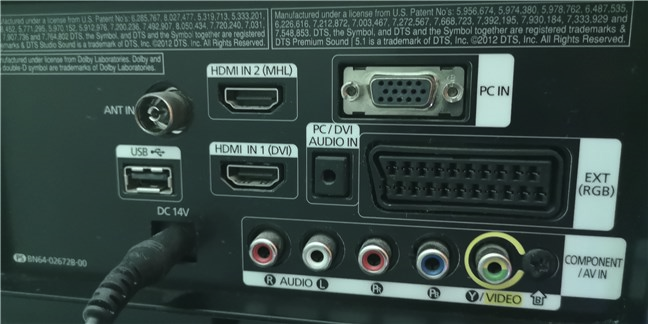
Все современные настольные мониторы и телевизоры оснащены HDMI портами. Часто на задней или боковой панели можно найти сразу несколько портов. Большинство настольных компьютеров и многие ноутбуки также предлагают этот вариант подключения, что делает его одним из самых простых способов подключения компьютера к телевизору, особенно учитывая, что и видео, и аудио сигналы передаются с помощью всего одного кабеля.
Сегодня также используются две меньшие версии этого интерфейса – Mini HDMI и Micro HDMI.
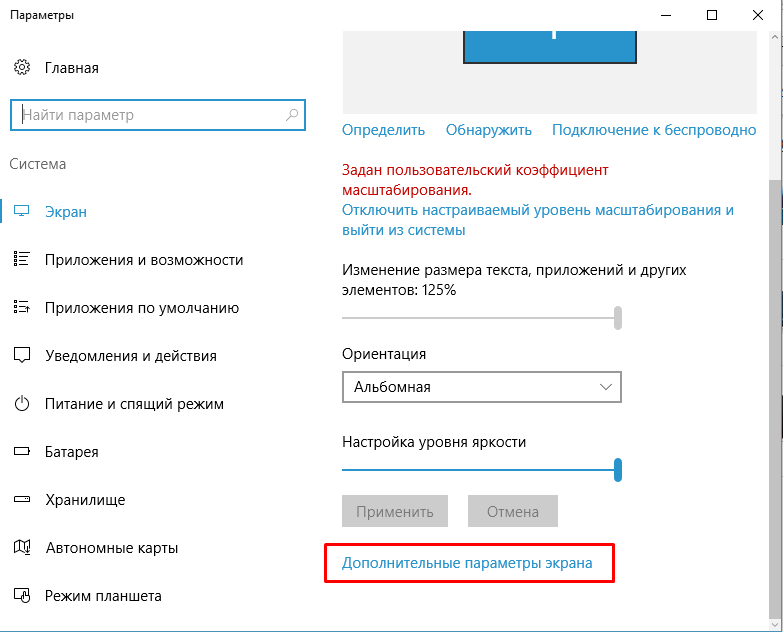
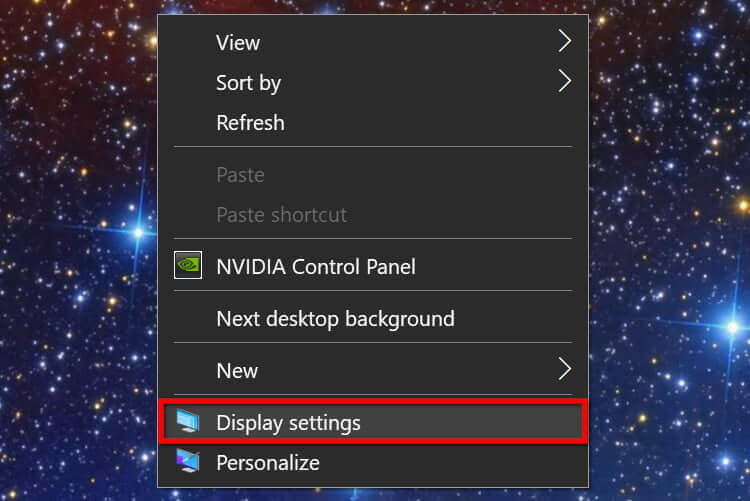
Чтобы соединить два устройства, подсоедините один конец кабеля HDMI вилка – вилка к порту на телевизоре, а другой конец к компьютеру. Windows 10 распознает телевизор как внешний экран, что можно проверить, щелкнув правой кнопкой мыши на рабочем столе и выбрав во всплывающем меню «Параметры экрана».
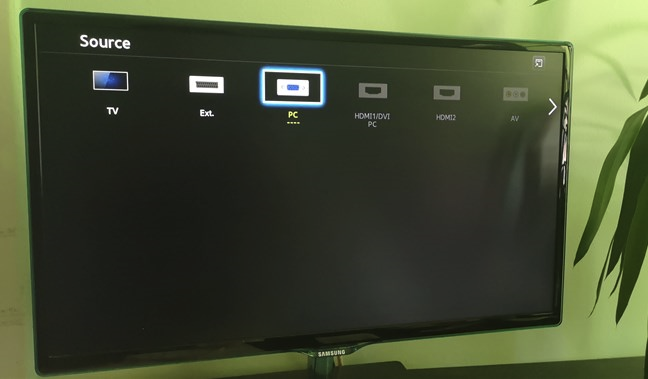
Чтобы отобразить рабочий стол Windows 10 на телевизоре, возьмите пульт и циклически переключайте соединения, пока не появится рабочий стол вашего ПК.
Если изображение искажено, сделайте следующее:
Шаг 1: Щелкните правой кнопкой мыши на рабочем столе и выберите во всплывающем меню «Параметры экрана».
Шаг 2: Выберите телевизор на схеме. На основном экране должно отображаться «1», а на телевизоре «2» или больше, если подключено более двух дисплеев.
Здесь можно изменить разрешение экрана, ориентацию и масштабирование. При необходимости вы можете изменить частоту обновления. Вот как это сделать:
Шаг 1: На панели «Дисплей» с выбранным телевизором, прокрутите вниз и щелкните «Дополнительные параметры дисплея».
Шаг 2: В следующем окне нажмите «Свойства видеоадаптера для дисплея №» – измените символ на назначенный номер телевизора.
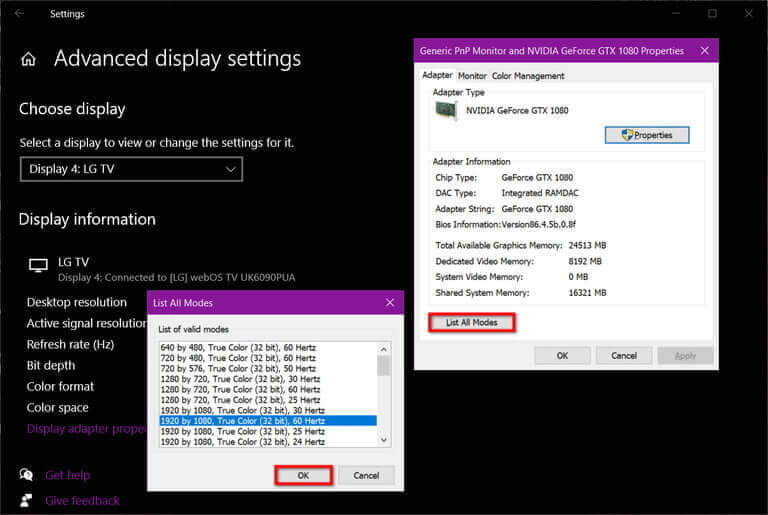
Шаг 3: Во всплывающем окне нажмите кнопку «Список всех режимов».
Шаг 4: Выберите частоту обновления и нажмите кнопку ОК.
DisplayPort
Большинство настольных ПК с выделенными графическими картами оснащены как минимум одним разъемом DisplayPort, в то время как на ноутбуках он встречается реже. Некоторые ноутбуки оснащены измененным адаптером mini-DisplayPort. К сожалению, телевизоры обычно не имеют разъемов DisplayPort – они в основном предназначены для настольных мониторов.
В этом случае требуется кабель DisplayPort вилка –HDMI вилка, или вам понадобится адаптер с вилкой DisplayPort и гнездом HDMI. В обоих случаях компьютер подключается к телевизору так же, как через HDMI.
Windows 10 должна определить телевизор как внешний экран и предлагать его в качестве расширенного или дублированного в зависимости от ваших предпочтений.
USB-C

Современные компьютеры, не имеющие разъема HDMI или DisplayPort часто имеют альтернативный вариант подключения в виде USB-C. Имейте в виду, что не все порты USB-C поддерживают вывод видео – это просто интерфейс, который не обещает никаких других технологий, кроме подключения USB 3.2. Прежде чем предположить, что порт USB-C поддерживает выход HDMI и DisplayPort, проверьте технические характеристики вашего компьютера.

В этом случае требуется кабель типа вилка – вилка с USB-C на одном конце и HDMI на другом. Адаптер USB-C с вилкой USB-C и гнездом HDMI также подойдет.
Как и при стандартном соединении HDMI, Windows 10 должна определить телевизор как внешний экран.
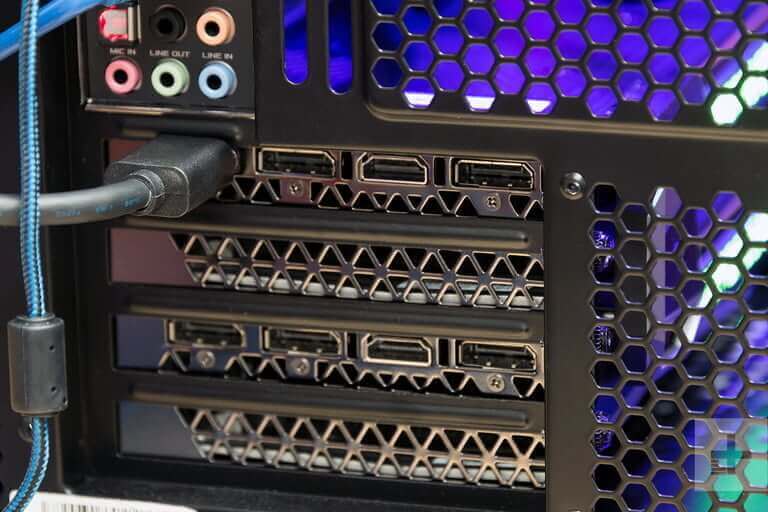
USB-A
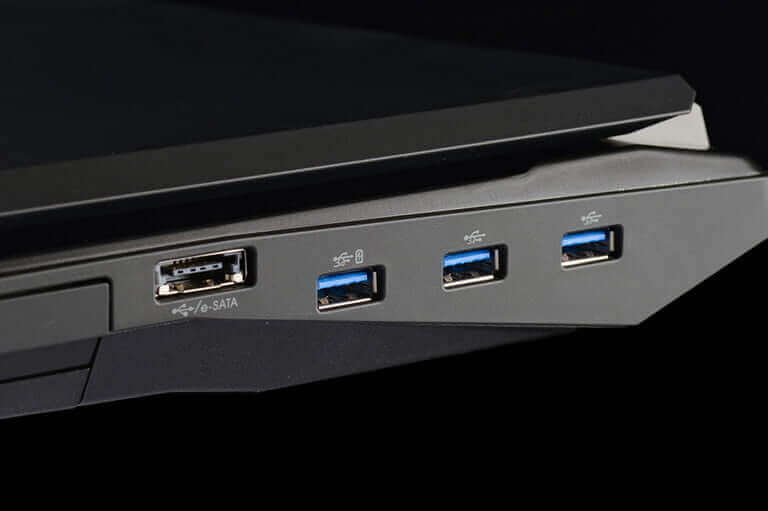
Этот порт на самом деле никогда не предназначался для передачи видео. В отличие от DisplayPort и HDMI, для него требуются сторонние драйверы DisplayLink. Этот метод лучше всего работает с синими портами USB (USB 3.0, USB 3.1), показанными на изображении выше, из-за их скорости. Однако в системных требованиях DisplayLink также указаны более старые соединения USB 2.0 не синего цвета, которые работают медленнее.
Для этого метода требуется адаптер или док-станция с портом HDMI, как показано на изображении выше на Mokai Start. Большинство из них автоматически устанавливают драйверы DisplayLink при их подключении к порту компьютера USB-A. Однако эти драйверы могут быть устаревшими, поэтому необходимо загрузить и установить последнюю версию непосредственно с DisplayLink.
После того как вы подключите адаптер или док-станцию и установите драйвер, Windows 10 должна обнаружить телевизор. Имейте в виду, что качество видео может отличаться, так как ПК зависит от стороннего программного обеспечения.
VGA and DVI
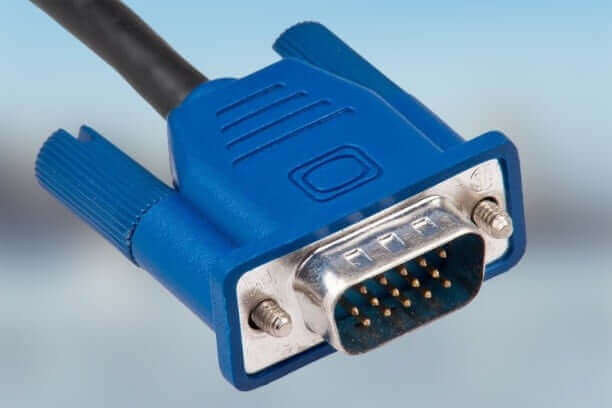
VGA, сокращенно от Video Graphics Adapter (видеоадаптер), впервые появился в 1987 году и поддерживает только аналоговые видеосигналы. Он не может похвастаться универсальностью, но в некоторых он будет полезен. Используйте кабель типа вилка – вилка с VGA на одном конце и HDMI на другом, или используйте адаптер с вилкой VGA и розеткой HDMI. Mini-VGA – это меньший вариант.
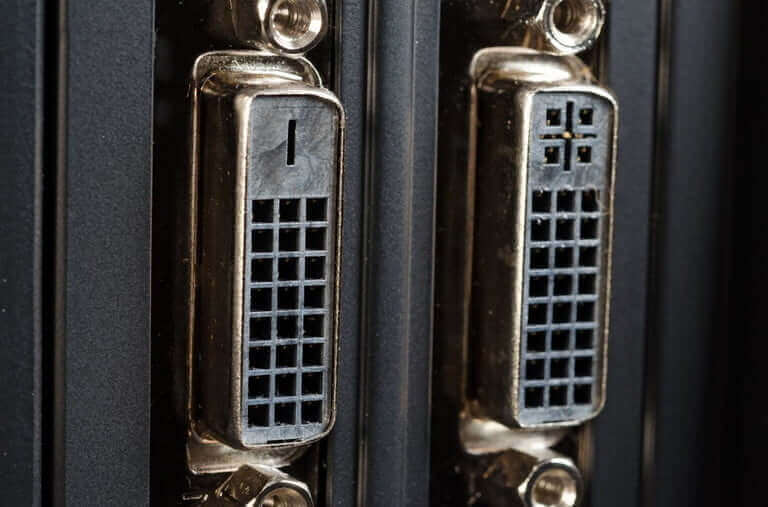
Digital Visual Interface, сокр. DVI — (цифровой видеоинтерфейс) – более поздняя разработка, и он все еще используется в некоторых исключительных случаях. Существует семь вариантов этого интерфейса: DVI-I Single Link, DVI-I Dual Link, DVI-A, DVI-D Single Link, DVI-D Dual Link, Mini-DVI и Micro-DVI. Такое разнообразие затрудняет поиск подходящего адаптера, поэтому перед покупкой проверьте характеристики вашего ПК, чтобы определить подходящий кабель или адаптер.
Miracast
Убедитесь, что ваш телевизор включен, совместим, и настроен на прием трансляции с ПК. Например, на LG Smart TV с webOS владельцы сначала должны загрузить приложение Device Connector и выбрать опцию ПК, а затем Screen Share и Miracast.
Этот метод не сработает, если какое-либо устройство подключено к проводной сети.
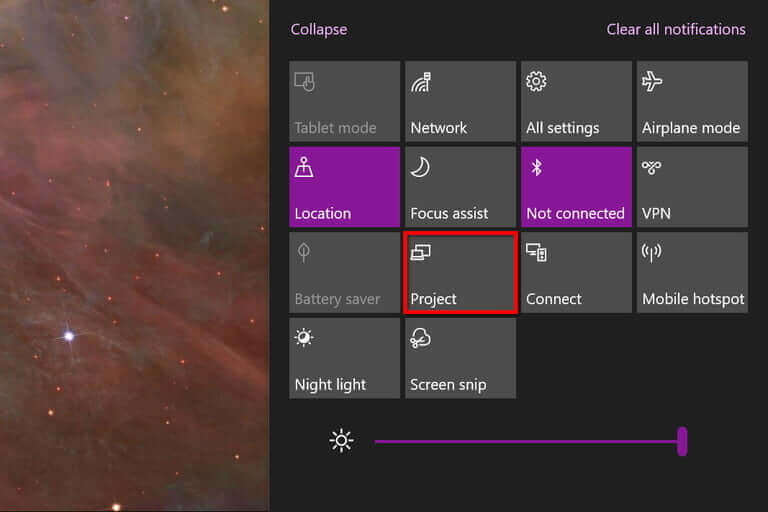
Шаг 1: Щелкните значок «Уведомления» рядом с системными часами. Вы увидите «Центр действий».
Шаг 2: Если видны только четыре плитки, нажмите «Развернуть» внизу.
Шаг 3: Щелкните плитку «Проект».
Шаг 4. В раскрывающемся меню, которое появляется справа, выберите «Подключиться к беспроводному дисплею».
Шаг 5: Выберите совместимый телевизор из списка.
Шаг 6: Следуйте инструкциям на экране телевизора, если таковые имеются.
Шаг 7: Чтобы завершить трансляцию, нажмите «Отключить» на панели инструментов в верхней части основного экрана ПК.

Обратите внимание, что на этой панели инструментов есть значок настройки. Щелкните его, чтобы открыть настройку трех вариантов оптимизации: для игр, для работы и для просмотра видео. Первый режим уменьшает задержку для достижения оптимальной частоты кадров. Режим просмотра видео увеличивает задержку для уменьшения буферизации. Рабочий режим – это среднее между двумя другими режимами.
Чтобы изменить режим трансляции, сделайте следующее:
Шаг 1: Щелкните рабочий стол правой кнопкой мыши и выберите во всплывающем меню «Параметры экрана».
Шаг 2: На экране появится приложение «Настройки». Выберите телевизор на схеме.
Шаг 3: Прокрутите вниз до «Несколько дисплеев» и щелкните стрелку вниз, чтобы расширить выбор.
Шаг 4: Выберите режим: «Расширить», «Дублировать», «Отобразить только на телевизоре» или «Отключить».
Разрешение, масштаб и т. д. можно настроить, как и на любом другом дисплее.