
Все способы:
- Способ 1: Редактор локальных политик
- Способ 2: Редактор реестра
- Способ 3: Сторонние программы
- Вопросы и ответы: 2
Способ 1: Редактор локальных политик
В приложении «Параметры» Windows 10 нет опции отключения инструмента рукописного ввода, тем не менее его можно отключить. Одним из способов является настройка соответствующей политики.
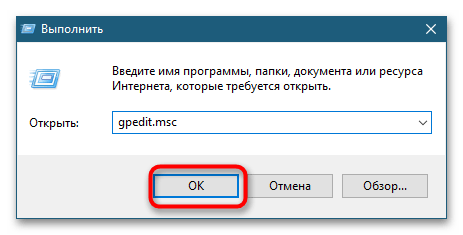
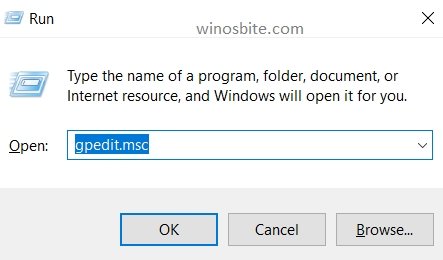
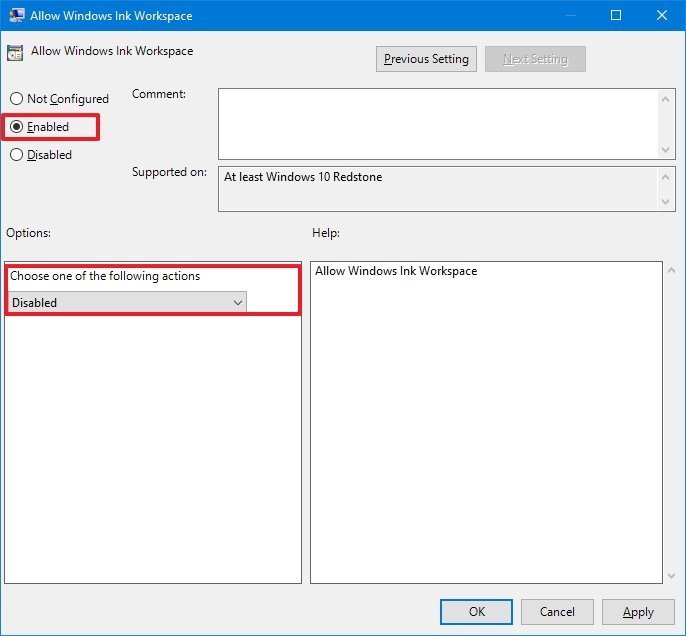
- Откройте «Редактор локальных групповых политик», для чего вызовите нажатием клавиш Win + R диалоговое окошко быстрого запуска и введите в него команду
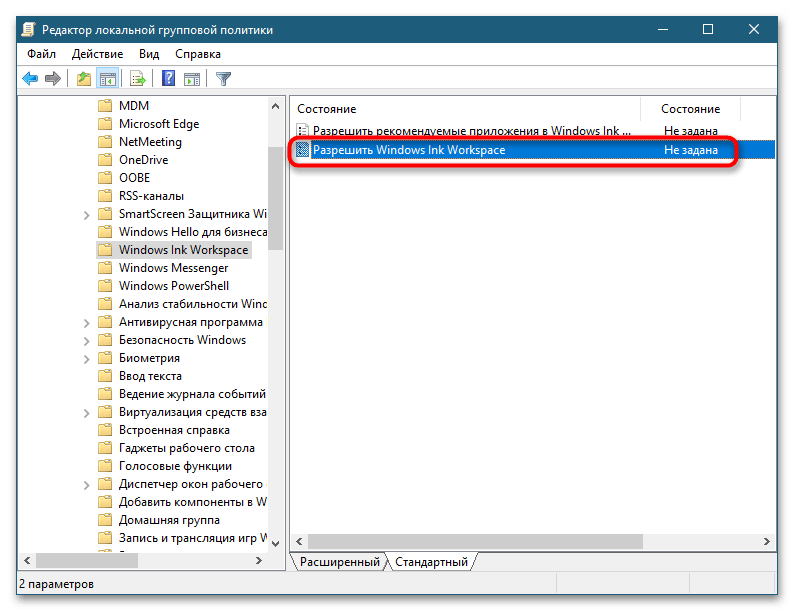
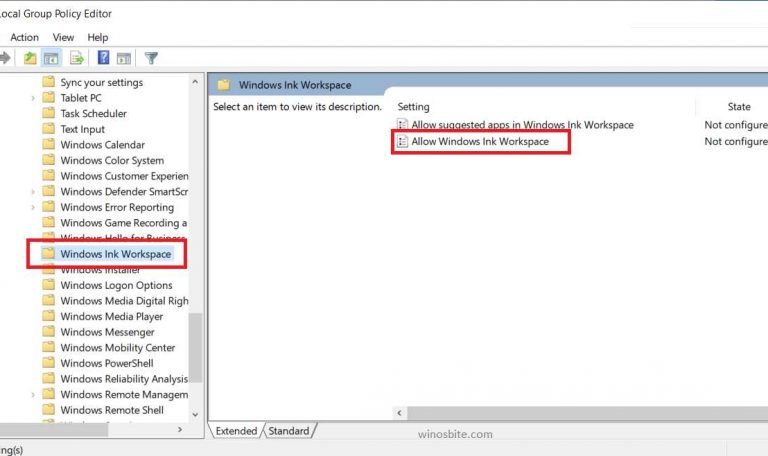
gpedit.msc. - В левой колонке окна редактора перейдите к настройке «Конфигурация компьютера» → «Административные шаблоны» → «Компоненты Windows» → «Windows Ink Workspace». В правой колонке дважды кликните по политике «Разрешить Windows Ink Workspace».
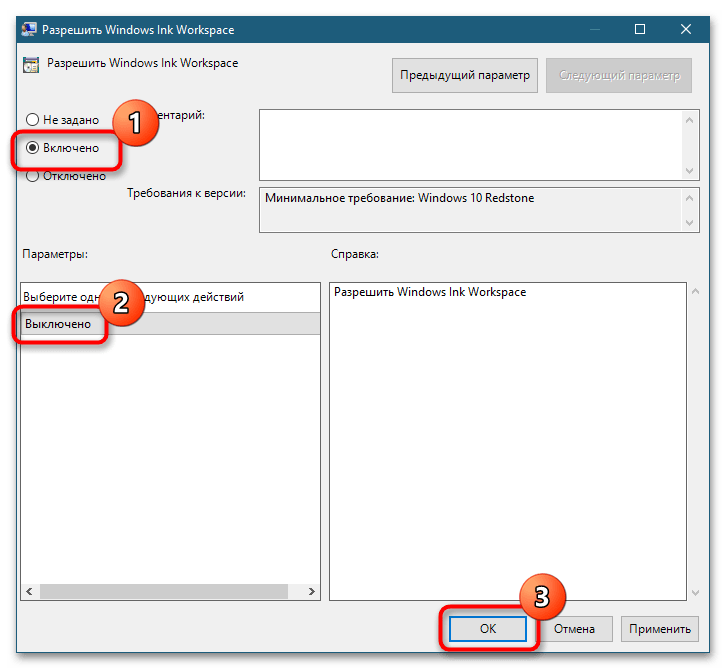
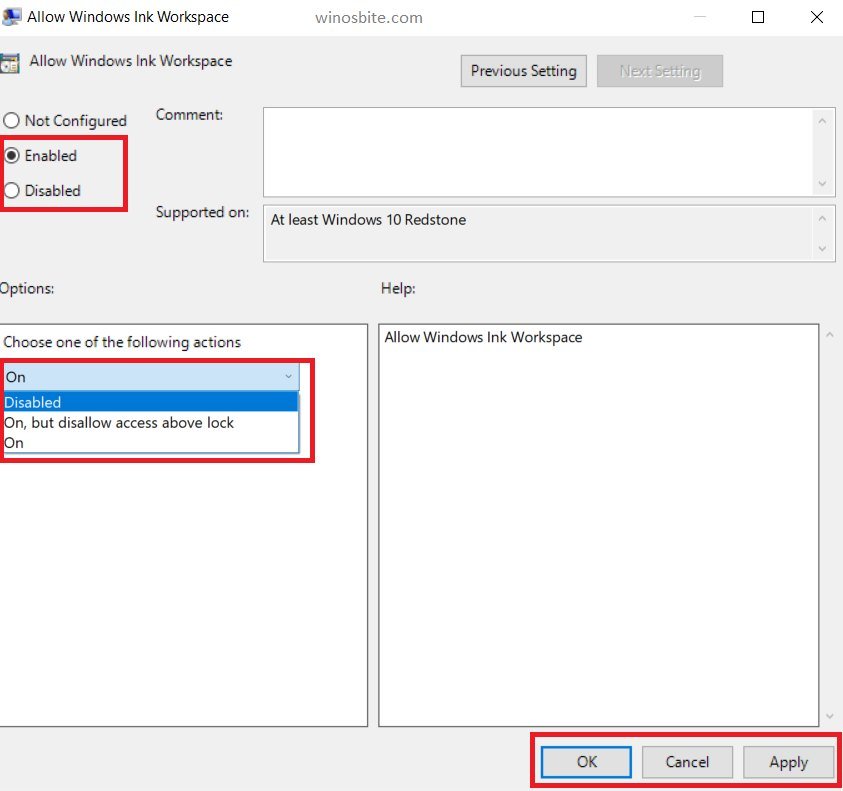
- Включите политику активацией радиокнопки «Включено», а в блоке «Параметры» из выпадающего списка действий выберите «Выключено». Сохраните настройки.
Настройки должны вступить в силу сразу, но если этого не произойдет, перезагрузите компьютер.
Способ 2: Редактор реестра
Для отключения «Пера» подойдет и «Редактор реестра». Этот способ могут взять на вооружение пользователи Windows 10 Home (Домашняя), в которой «Редактор локальных групповых политик» по умолчанию отключен.
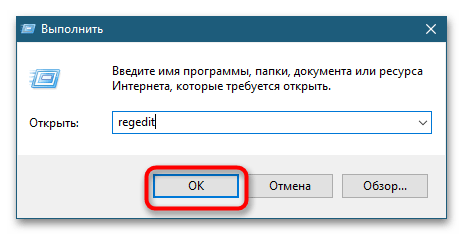
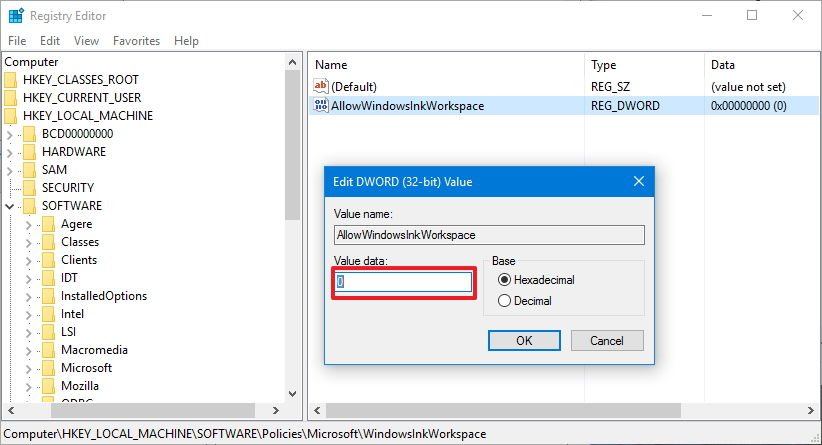
- Запустите «Редактор реестра» командой
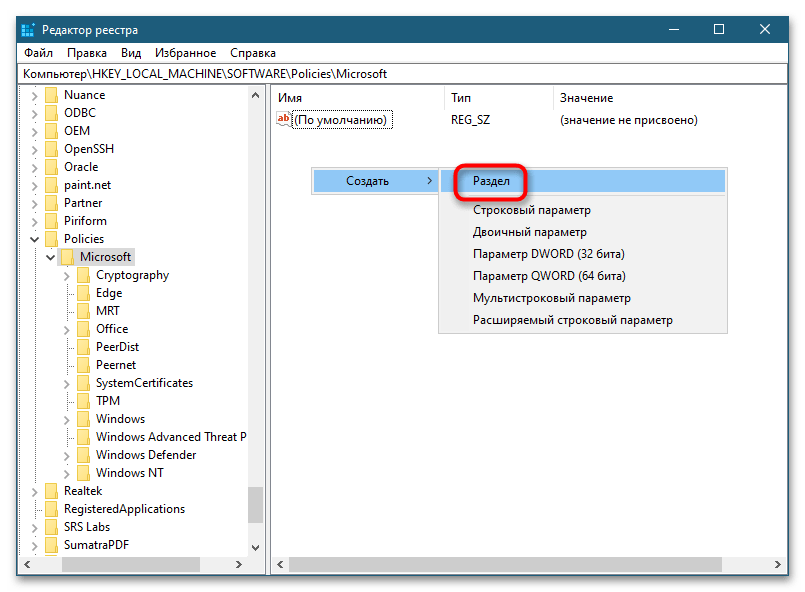
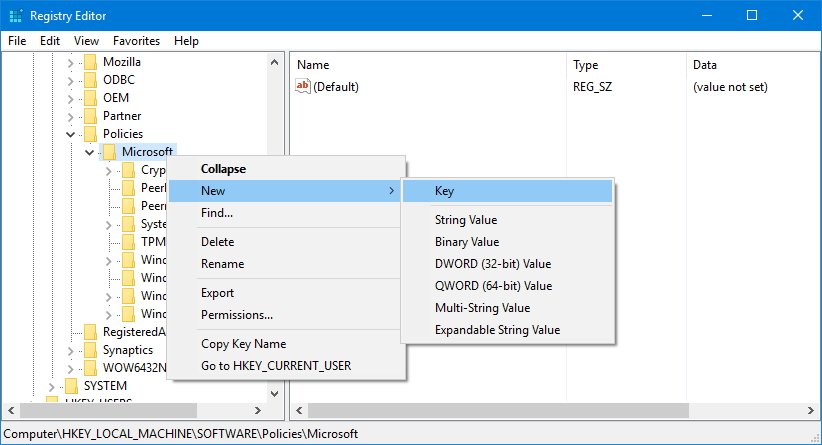
regedit, выполненной в диалоговом окошке «Выполнить» (вызывается клавишами Win + R). - Разверните ветку
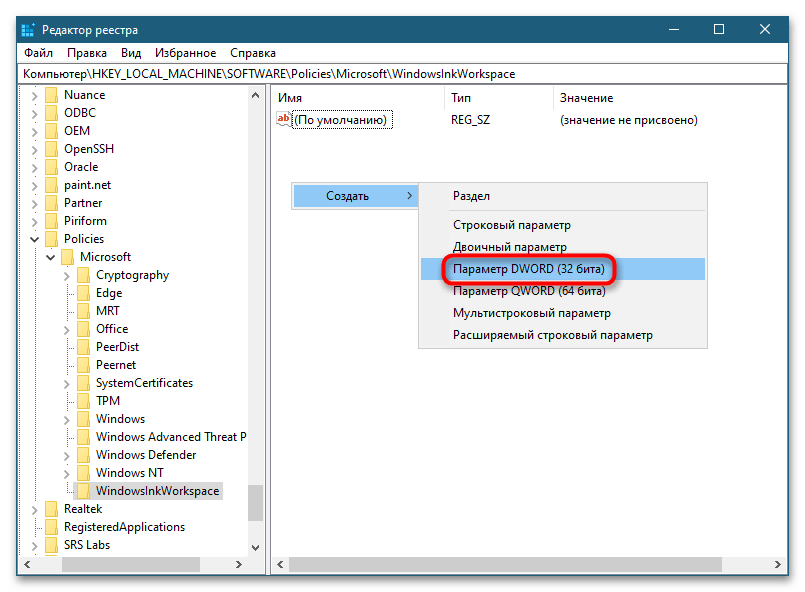
HKEY_LOCAL_MACHINE\SOFTWARE\Policies\Microsoft\WindowsInkWorkspace. Если последний подраздел отсутствует, создайте его вручную. Кликните правой кнопкой мыши по пустой области в подразделе «Microsoft» и выберите «Создать» → «Раздел». Назовите его «WindowsInkWorkspace». - В новом подразделе с помощью того же контекстного меню создайте DWORD-параметр и назовите его «AllowWindowsInkWorkspace».
- Значение параметра оставьте по умолчанию, то есть «0».
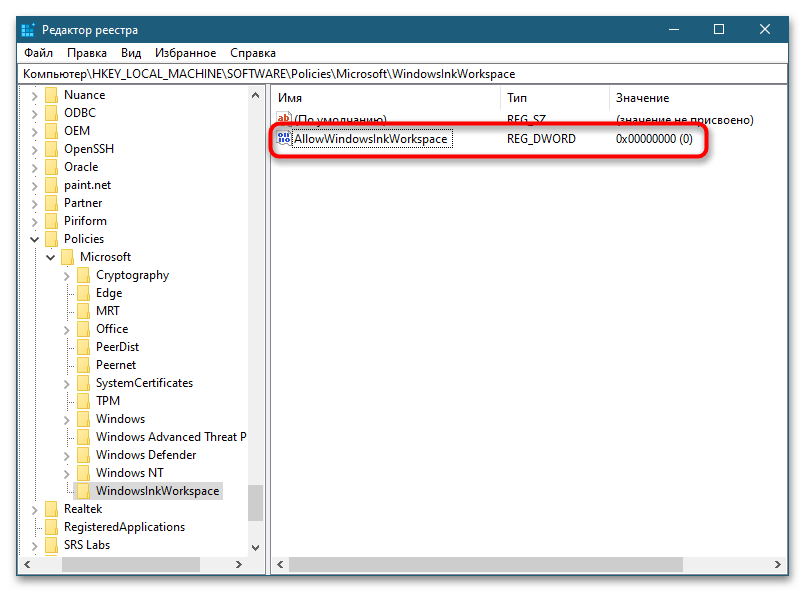
Новые настройки вступят в силу после перезагрузки компьютера.
Способ 3: Сторонние программы
Для отключения «Пера» в Windows 10 также можно использовать специализированные утилиты — твикеры, например Winaero Tweaker.
Скачать Winaero Tweaker с официального сайта
- Скачайте твикер с сайта разработчика и установите.
- Запустите утилиту, отыщите в левой колонке опцию «Disable Windows Ink Workspace» (раздел «Windows Apps») и установите флажок в одноименном чекбоксе в правой колонке окна.
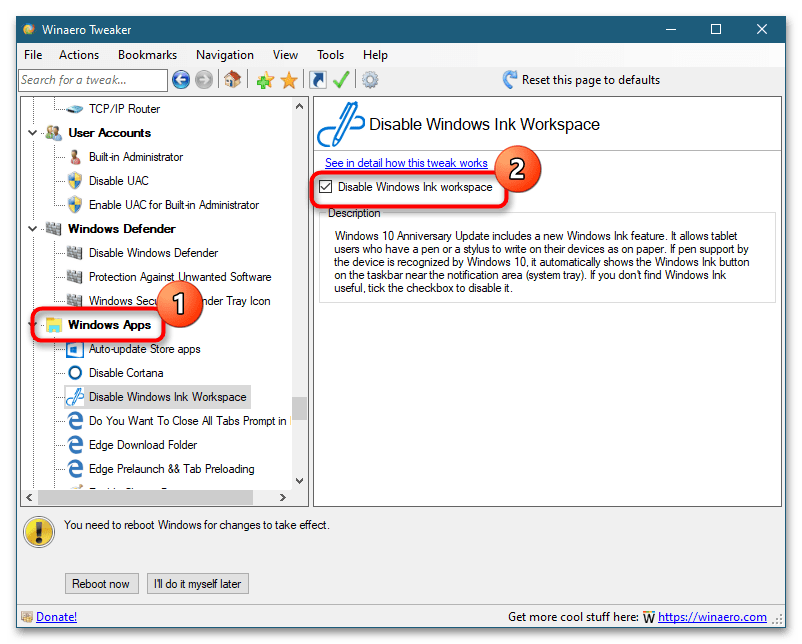
Чтобы перезагрузить компьютер немедленно, нажмите кнопку «Reboot now». Перезагрузку можно выполнить и позже, главное помнить, что новые настройки применятся только после перезапуска системы.
Наша группа в TelegramПолезные советы и помощь
Windows ink is a feature of Microsoft Windows 10 that lets you use a digital pen or your finger to draw or write on your PC. Obviously, this feature is only available on devices with touch-sensitive screens like a convertible laptop. This is quite a useful feature that is easy to use and handy especially for an art professional or a student.
Do you want to enable or disable Windows ink? Follow the below steps to learn some simple methods to do it.

Quick Overivew
Yes, it is perfectly safe to disable or enable Windows ink. Windows ink is a feature introduced by Microsoft in Windows 10 anniversary update in 2016. As it is an additional feature, it doesn’t matter whether you keep it on or turn it off. Also, enabling or disabling this feature will not affect your PC’s performance or functionality in any way.
Below are the methods to enable or disable it on your PC.
Methods to enable or disable Windows ink in Windows 10
Using local group policy editor (If you are using Windows 10 pro version)
If you are using Windows 10 pro, you should have the group policy editor application. This is the easiest method to disable windows ink in Windows 10.
1) Press Windows + R to open the Run Command
2) Type gpedit.msc in the text field and press ENTER
3) Navigate to the following directory in the left pane
- Computer Configuration ->Administrative Templates ->Windows Components ->Windows Ink Workspace
4) Now, in the right panel, open Allow Windows Ink Workspace
5) Select
- Enabled and ON if you want to enable it
- Disabled if you want to disable it
6) Apply the changes and exit the application.
If gpedit.msc is not present on your system, you might be using Windows 10 home instead of Windows 10 pro. Don’t worry, follow the method below to disable permanently or enable Windows ink on Windows 10 home.
Check how to disable gamebarpresencewriter on Windows 10 pc.
Using the Registry Editor
1) Press Windows + R to open the Run application
2) Type regedit in the text field and press ENTER to open the Registry editor

3) Go to the following location by entering the following directory in the text field at the top (or manually locate it)
- HKEY_LOCAL_MACHINE\SOFTWARE\Policies\Microsoft\WindowsInkWorkspace
If the WindowsInkWorkspace folder doesn’t exist, then right-click on Microsoft folder in the registry and create a new key by clicking on New->Key. Name the key as WindowsInkWorkspace.

4) Open the WindowsInkWorkspace key and right-click in the main panel -> New -> DWORD (32-bit) file and name it as AllowWindowsInkWorkspace (IGNORE THIS STEP IF AllowWindowsInkWorkspace WAS ALREADY PRESENT)

5) Double-click AllowWindowsInkWorkspace to open it and set its value data to 0 (for disabled) or 1 (for enabled), then click OK

6) Close the registry editor, then restart your PC.
Conclusion
That was it for the methods to enable or disable Windows ink feature on Microsoft Windows 10. In case of any queries or suggestions, don’t mind leaving a comment down below or contacting us.

Windows Ink is a new pen experience that Microsoft is introducing with the Windows 10 Anniversary Update. At the core of Windows Ink, there is the same pen support that the operating system has included for years, but there are a number of new improvements.
It all starts with the Windows Ink Workspace that acts as the central hub to access the new Sticky Notes to create notes and reminders using Cortana, and you can also draw on a whiteboard or on a screenshot using Sketchpad or Screen sketch. In addition, Microsoft has promised to keep improving the experience to make it easier for developers to implement Windows Ink support on their apps.
If you own a Surface Book, Surface Pro 4, or similar device that includes support for an active pen, the Windows Ink experience will be enabled by default. However, as with any feature, the new improvements may not be for everyone, and this Windows 10 guide, we’ll walk you through the steps to disable Windows Ink Workspace completely from your device.
How to disable Windows Ink Workspace using Group Policy
There are multiple ways to disable Windows Ink Workspace, but the quickest way to completely turn off the experience is by using the Local Group Policy Editor — that’s of course if you’re using Windows 10 Pro, Enterprise, or Education.
- Use the Windows key + R keyboard shortcut to open the Run command.
- Type gpedit.msc and click OK.
- Select Computer Configuration.
- Expand the following path: Administrative Templates\Windows Components\Windows Ink Workspace.Note: It’s worth pointing out that if you see two «Windows Ink Workspace» entries, you must choose to configure the second one. Otherwise, the instructions will not work.
- On the right side, double-click the Allow Windows Ink Workspace setting.
- Check the Enabled option.
- Under Options, select Disabled from the drop-down menu.
- Click Apply.
- Click OK.
- Restart your computer to see the new changes.
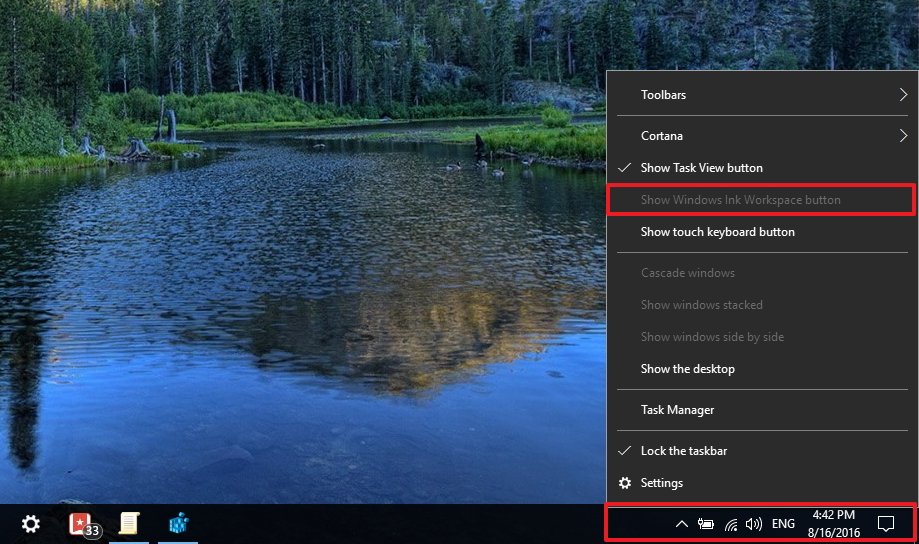
Once you restart your device, the Windows Ink Workspace icon will no longer be available in the taskbar. And you’ll notice that the «Show Windows Ink Workspace button» option on the taskbar context menu will become unavailable.
To revert the changes follow the steps mentioned above, but this time on step 8 select the Not Configured option instead.
How to disable Windows Ink Workspace using the registry
The Local Group Policy Editor is not a feature available on Windows 10 Home, but you can achieve the same results using the registry (if you’re up to the challenge).
All the latest news, reviews, and guides for Windows and Xbox diehards.
Important: Before you make any changes to the registry, make sure to understand that these changes may cause irreversible damage to your installation if they’re not done properly. It’s recommended that you do a full backup of your computer before proceeding. You’ve been warned!
- Use the Windows key + R keyboard shortcut to open the Run command.
- Type regedit, and click OK to open the Windows registry.
- Browse the following path:
HKEY_LOCAL_MACHINE\SOFTWARE\Policies\Microsoft\WindowsInkWorkspace - If you don’t see the WindowsInkWorkspace key (folder), then do the following:
- Right-click the Microsoft key, select New, and click Key.
- Name the new key WindowsInkWorkspace.
- Click OK.
- Right-click on the right side, select New, and click DWORD (32-bit) Value.
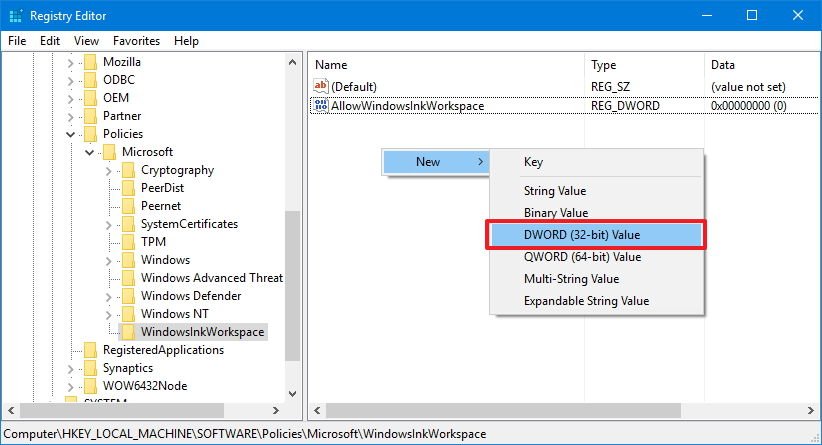
- Name the key AllowWindowsInkWorkspace.
- Click OK.
- Double-click the key and make sure its value is set to 0, which means disabled.
- Restart your computer to apply the changes.
Once you restart your device, identically as the process done with the Local Group Policy Editor, the Windows Ink Workspace icon will no longer be available in the taskbar. And you’ll notice that the «Show Windows Ink Workspace button» option on the taskbar context menu will become unavailable.
To enable Windows Ink Workspace again, simply follow the steps mentioned above and on step 9 make sure to change the value from 0 to 1, and restart your computer.
Wrapping things up
It’s important to note that after you’ve disabled Windows Ink Workspace, you won’t be able to launch Sketchpad or Screen sketch, but you’ll still be able to use Sticky Notes, as it’s a regular Windows Store app.
In addition, disabling the experience doesn’t remove the Pen & Windows Ink settings page from the Settings app. If you had the pen shortcuts configured to open Windows Ink Workspace, the pen button functions will fall back to open the OneNote app for all the options.
Do you use Windows Ink Workspace on the regular basis? Would you consider disabling the feature? Tell us in the comments below.
More Windows 10 resources
For more help articles, coverage, and answers on Windows 10, you can visit the following resources:
- Windows 10 on Windows Central – All you need to know
- Windows 10 Anniversary Update
- Windows 10 help, tips, and tricks
- Windows 10 forums on Windows Central
Mauro Huculak has been a Windows How-To Expert contributor for WindowsCentral.com for nearly a decade and has over 15 years of experience writing comprehensive guides. He also has an IT background and has achieved different professional certifications from Microsoft, Cisco, VMware, and CompTIA. He has been recognized as a Microsoft MVP for many years.
Disabling Windows Ink in Windows 11 is a straightforward process that involves a few changes in the system settings. This guide will walk you through the necessary steps to turn off Windows Ink’s features, which are primarily used by stylus or pen input users. Whether you’re looking to disable it to improve system performance or simply because you don’t use a stylus, this tutorial will have you covered.
This section will guide you through the steps to disable Windows Ink on your Windows 11 device. By following these steps, you can easily turn off Windows Ink and prevent it from running in the background.
Step 1: Open Windows Settings
Navigate to the Start Menu and click on the gear icon to open Windows Settings.
The Windows Settings menu is your control center for changing your computer’s configurations. Here, you can manage everything from system updates to personal preferences.
Step 2: Select Devices
In the settings window, find and click on ‘Devices.’
The Devices section is where you can adjust settings related to Bluetooth, printers, and other connected devices. This includes stylus or pen settings.
Step 3: Choose Pen & Windows Ink
Within Devices, click on ‘Pen & Windows Ink’ on the left sidebar.
This area is specifically designed for managing pen and stylus inputs, providing options tailored for users with touch or pen-enabled devices.
Step 4: Turn Off Windows Ink Workspace
Find the option to disable the Windows Ink Workspace and toggle it off.
Turning off Windows Ink Workspace prevents the pop-up workspace from appearing, which can help streamline your desktop experience if you don’t use stylus features.
Step 5: Adjust Additional Settings (Optional)
Look through additional pen settings to ensure no other Windows Ink features are enabled.
This might include disabling features like handwriting input or flicks, which are oriented towards pen users.
Once you’ve disabled Windows Ink, you’ll notice a cleaner interface with fewer distractions related to pen input. Your computer won’t run unnecessary processes associated with stylus support, potentially improving performance.
Tips for Disabling Windows Ink in Windows 11
- Disabling Windows Ink can help speed up your computer if you don’t use a stylus.
- Before disabling, ensure you won’t need stylus functions for apps like OneNote.
- Consider checking for any software updates that could improve Windows Ink management.
- Disable related features like handwriting recognition for a more streamlined experience.
- If you change your mind, you can easily re-enable Windows Ink by reversing these steps.
Frequently Asked Questions
Why would I want to disable Windows Ink?
Disabling Windows Ink can free up resources and improve performance for users who don’t use a stylus or pen.
Can I re-enable Windows Ink if needed?
Yes, simply follow the steps in reverse to turn Windows Ink back on.
Does disabling Windows Ink affect other input methods?
No, it only affects stylus inputs and related features, not mouse or keyboard functions.
What if I don’t see the ‘Pen & Windows Ink’ option?
This could mean your device doesn’t support pen inputs, so Windows Ink might not be available.
Will disabling Windows Ink save battery life?
It might slightly improve battery life by reducing background processes related to pen inputs.
Summary
- Open Windows Settings.
- Select Devices.
- Choose Pen & Windows Ink.
- Turn off Windows Ink Workspace.
- Adjust additional settings if needed.
Conclusion
Disabling Windows Ink in Windows 11 can be beneficial for those who don’t use pen inputs. While it’s a feature-packed tool for artists and note-takers, not everyone needs it running in the background. By turning it off, you’re streamlining your device’s operations, potentially boosting performance and reducing clutter.
This guide makes it easy to disable Windows Ink without diving into complex settings or system tweaks. It’s a simple action that can make a big difference, especially on devices where every bit of performance counts. If you ever find yourself needing those pen features again, you can turn them back on with just a few clicks.
For more tips on optimizing your Windows 11 experience or other tech topics, feel free to explore our other articles. Disabling unnecessary features like Windows Ink is just one of many ways to make your system work better for you. What other settings could you tweak to enhance your computer’s performance? Dive into the world of tech tweaks and discover more ways to customize your digital environment!
Matthew Burleigh has been writing tech tutorials since 2008. His writing has appeared on dozens of different websites and been read over 50 million times.
After receiving his Bachelor’s and Master’s degrees in Computer Science he spent several years working in IT management for small businesses. However, he now works full time writing content online and creating websites.
His main writing topics include iPhones, Microsoft Office, Google Apps, Android, and Photoshop, but he has also written about many other tech topics as well.
Read his full bio here.
Rick Akura
Learn how to turn off or disable Windows Ink Workspace in Windows 10 using the Registry Editor or Group Policy Editor in simple steps.
Windows Ink, or Microsoft Ink or Pen & Windows Ink, is a suite of software that allows you to use a digital pen or finger to write and draw on your computer screen. You can edit text, write notes, and, draw, capture a screenshot of your desktop, mark up, crop, and share your creations. There’s even an option to use Windows Ink from the Lock screen so you can use the feature even if you aren’t logged in to your device.
This is a really cool feature that gives users the ability to handwrite on their computers or draw on their computers. For some users, though, it isn’t a feature they will ever use. Can you disable Windows Ink, and if so, how do you disable Windows Ink?
How to Use Window Ink
To access the built-in apps that come with Windows Ink, tap or click the Windows Ink Workspace icon on the right end of the Taskbar. It looks like a digital pen. This will open a sidebar. There are three options: Sketch Pad (to free draw and doodle), Screen Sketch (to draw on the screen), and Sticky Notes (to create a digital note). Click the Windows Ink Workspace icon on the Taskbar and from the sidebar to choose:
- Click Sketch Pad or Screen Sketch.
- Click the Trash icon to begin a new sketch.
- Click or tap a tool from the toolbar like a pen or highlighter.
- Click the arrow under the tool, if available, to choose a color.
- Use your finger or compatible pen to draw on the page.
- Click the Save icon to save your drawing, if desired.
- To create a Sticky Note, click Sticky Notes and type your notes with a keyboard or a compatible Windows pen.
Windows Ink is compatible with many popular Microsoft Office apps and lets you perform tasks like deleting or highlighting words in Microsoft Word, writing a math problem, writing in OneNote, or marking up slides in PowerPoint.
What if, as mentioned above, you want to know how to disable windows ink workspace?
How to Disable Windows Pen Ink
Follow the steps below to disable Windows Ink in Windows 10. These steps are easy and will allow you to disable the Windows Ink workspace in just a few seconds.
If you don’t have a digital pen or you want to remove the Windows Ink Workspace icon from your taskbar, there are two very simple ways to disable Windows Ink Workspace in Windows 10. Here they are:
Solution 1: Disable Windows Ink Workspace in Windows 10 Using Group Policy
- Open the Local Group Policy Editor. Navigate to: Computer Configuration ->Administrative Templates ->Windows Components ->Windows Ink Workspace.
- In the right pane, double-click Allow Windows Ink Workspace to open its properties.
- Check the Enabled option. Next, select Disabled from the drop-down menu under the Options section.
-
Click on Apply and then OK. Restart your PC to make the changes to take effect.
Solution 2: Disable Windows Ink Workspace in Windows 10 Using Registry Tweak
- Press Windows Key + R to open the Run command
- From the run utility window, type Regedit and click Ok to open the registry.
- Next, navigate to the following path: HKEY_LOCAL_MACHINE\SOFTWARE\Policies\Microsoft
- If you can’t locate the WindowsInkWorkspace folder, then do the following:
—Right-click the Microsoft key in the left pane, and then select New -> Key.
-Name the Key as WindowsInkWorkspace and click OK. - Right-click empty space in the right pane, select New -> DWORD (32-bit) Value.
- Name the DWORD value as AllowWindowsInkWorkspace. Leave its value data as 0.
- Restart your computer. Once signed back in, you should see Windows Ink Workspace disabled.

To enable Windows Ink Workspace again, just follow the steps above and change the DWORD AllowWindowsInkWorkspace value from 0 to 1, and restart your computer.
The Windows Ink workspace feature is a cool feature to use, but if you want to disable it, use one of the methods above and you will have no problem getting it done.
If you are using Wacom tablets and want to know how to disable Windows Ink Wacom features, simply uninstall the Wacom software. That is a program and hardware that is separate from Windows 10. It is an ink and art program that comes in many different styles. You can read the manual for uninstalling these devices individually or visit the Wacom website to learn more about their various programs and devices.