
Download Article
Step-by-step administrator login guide for Windows 10
Download Article
- Making an Account an Administrator (Control Panel)
- Making an Account an Administrator (Settings)
- Enabling Administrator Account in CMD
- Enabling Administrator Account in PowerShell
- Logging In as an Administrator
- Video
- Expert Q&A
- Tips
|
|
|
|
|
|
|
An administrator (admin) account can change security settings, install and uninstall software, access every file, and change settings for other users. When you first start up Windows 10 or 11, you’re walked through the setup of the first user account, which is set to administrator. This wikiHow will show you how to log in as an administrator in Windows 10.
Administrator Login: Quick Steps
- Open the Control Panel.
- Go to User Accounts > User Accounts.
- Click Change account type on your account.
- Select Administrator and click Change account type.
-

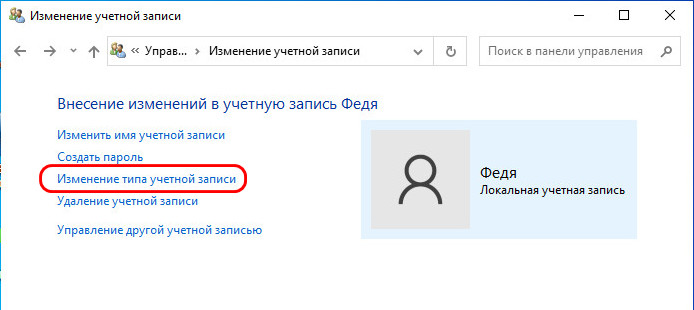
If you want to make your own account an administrator on this PC or give admin rights to another account, you can do so in the Control Panel. You will need the current administrator password to do this. To get started, type control panel into the Windows search bar, then click Control Panel.[1]
- Alternatively, you can use the command line to open the control panel.
- You can also use this method to give administrator rights to another user account on this PC.
-
It’s the green text next to an icon that resembles a person. It’s on the right side.
Advertisement
-
It’s next to an icon that resembles two people. This will show you a page with information about the Windows user account you are currently logged in to.
-
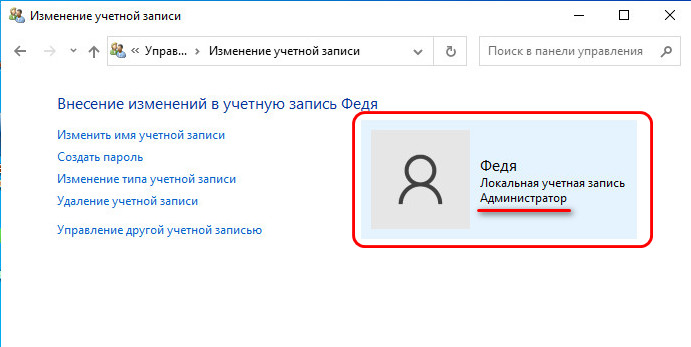
In the profile box on the right side of the User Accounts page, you’ll see “Administrator” under the username if the account is an administrator. If you’re already an administrator, you don’t need to proceed—you have full admin access to the system.
- You can check the status of other accounts by click Manage another account in this menu.
- If you are not using a Microsoft account, you will see «Local Account» above «Administrator.»
-
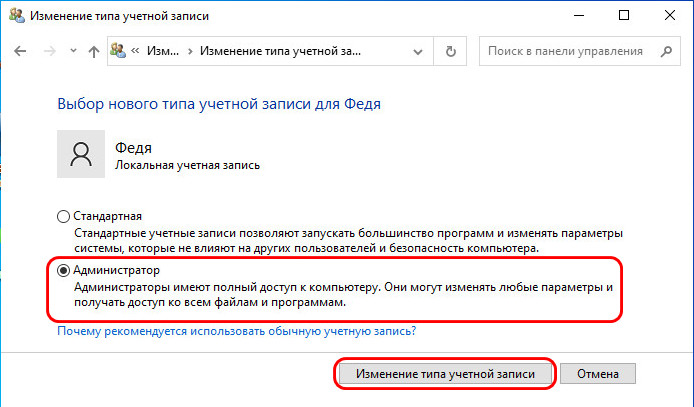
If your account isn’t an administrator, you can change it to one (if you know the administrator login information). To do so:[2]
- Click Change your account type.
- Click the Administrator option.
- Click Change account type.
- Type the admin password when prompted.
- You’re done! Your user account can now perform all tasks as an administrator.


Advertisement
-
If you want to make your own account an administrator on this PC, or give admin rights to another account, it’s easy to do in Settings. You will need to be using an administrator account to do this, or have the password for an administrator-level account. Start by opening the Start menu and selecting Settings.
-
This opens the Accounts settings.
-
You’ll see this in the left panel on Windows 10. If you’re using Windows 11, select Other users in the right panel instead.[3]
-
You may need to click the name of the user first.
-
When prompted, enter the administrator password or click Yes to confirm. This makes the selected account an administrator.
- The «Administrator» account type gives the selected account full admin permissions. Whenever this account logs in to this particular computer, it will be an administrator and can perform all tasks that the administrator account can.


Advertisement
-
If you want to be able to log in with the «Administrator» username and password, you will need to enable the Administrator account, which is disabled by default. To get started, press the Windows key and type cmd.[4]
- You will need to be logged in to an account that has administrative permissions to enable the Administrator account in Windows 10.
-
Click Yes in the box that pops up to continue.
-
You’ll see text confirming your entry. If you see an error, you may have mistyped the command. The default Windows 10 administrative account is active but not password protected.
-
To log in as an administrator, the account will need a password. To set the admin password, type net user administrator * and press Enter. When prompted, enter and confirm a new password for the administrator account.[5]
-
You can access the option to Sign out from your profile picture in the Start Menu. Or, to keep your account logged in, select Switch User instead to return to the login screen.
-
If you don’t see it, click Other Accounts and enter .\Administrator as the username.
-
Click the submit arrow button. This will log you into Windows as an administrator.


Advertisement
-
To enable the administrator account in PowerShell, you’ll need to run PowerShell as an administrator. To do this:
- Press the Windows key on your keyboard.
- Type powershell into the Search bar.
- Right-click Windows PowerShell and select Run as administrator.
- Click Yes to continue.
-
At the prompt, type net user administrator /active:yes and press Enter. This enables the «Administrator» user, but it will not work until you create a password.
-
To do this, you’ll need to enter the following command, but replace «NewPassword» with the password you would like to assign to the Administrator account:
- Set-LocalUser -Name "Administrator" -Password (ConvertTo-SecureString -AsPlainText "NewPassword" -Force).
- Once the password is assigned, you can now log in with the Administrator account.


Advertisement
-
If you’re logged in to Windows already and want to switch to an Administrator account, you can click the Start menu, select your profile photo, and click Sign Out to return to the login screen.
- Alternatively, click your profile photo and select Switch user if you don’t want to log your current account out of the system.
- If you’re at the login screen, skip to step 3 instead.
-
If you are not prompted to enter a username, choose this option to bring up the username and password fields.[6]
-
If you’re signing in as the local «Administrator» account, type .\Administrator as the username, then type the password of the local admin account. Once your password is accepted, you’ll be logged in to the computer as an administrator.
- If you need to log in as the domain administrator, use domain_name\Adminstrator instead.
-
After entering your password, click the arrow to log in as an administrator.


Advertisement
Add New Question
-
Question
I typed in the command on CMD and it said «Access is denied». So what do I do now?
Kyle Smith is a wikiHow Technology Writer, learning and sharing information about the latest technology. He has presented his research at multiple engineering conferences and is the writer and editor of hundreds of online electronics repair guides. Kyle received a BS in Industrial Engineering from Cal Poly, San Luis Obispo.
wikiHow Technology Writer
Expert Answer
Try checking the administrator status of your account by going to Control Panel > User Accounts > User Accounts. If you’re not an administrator but you know who is, ask them for the admin password. Or, ask them to make your account an administrator.
Ask a Question
200 characters left
Include your email address to get a message when this question is answered.
Submit
Advertisement
Video
Thanks for submitting a tip for review!
Advertisement
About This Article
Article SummaryX
1. Run Command Prompt as an administrator.
2. Type net user administrator /active:yes and press Enter.
3. Close Command Prompt.
4. Log out.
5. Click the Administrator account from the login page.
Did this summary help you?
Thanks to all authors for creating a page that has been read 305,099 times.
Is this article up to date?
In Windows 10, knowing how to run programs as administrator is very important. By default, apps and games in Windows 10 run without administrator permissions, to prevent unauthorized changes to your system. However, there are times when some programs require administrator permissions to work properly or to run specific commands. Windows 10 offers you the ability to run programs as admin without having to disable anything. Here are all the methods to use «Run as administrator» on any desktop app in Windows 10:
First things first: About UAC and Run as administrator
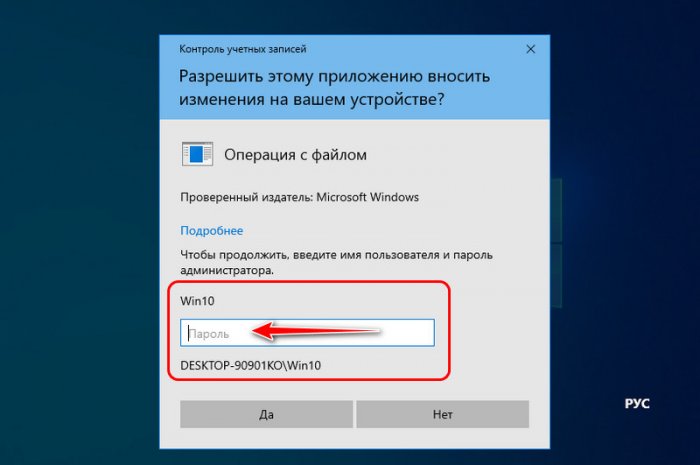
In early versions of Windows, applications had system-wide privileges, which was a security risk. All of Microsoft’s operating systems from Windows Vista onward, including Windows 10, include UAC or User Account Control, a security feature that prevents unauthorized changes to the operating system. Trying to run an application as administrator is one of the changes that require administrative privileges. Before the selected program is launched, a UAC prompt is triggered, asking for permission. If you run the application from an account without administrator permissions, the UAC prompt asks you to enter an administrator password. Without the admin password, the program does not launch.
In Windows 10, you can only run a program with administrator permissions if it is a desktop app. Some of these applications, like security software, cannot run correctly without having administrative permissions. Windows apps that are installed from the Microsoft Store cannot be run with administrative privileges in Windows 10. Furthermore, they have the same level of permissions as a normal user account, so they are not allowed to make changes to advanced system settings or the Windows Registry.
You can learn more about the difference between desktop apps and UWP apps and figure out which ones you can «Run as administrator» by reading What is a Windows app? How is it different from a desktop app or a program?.
1. Run a program as admin from the contextual menu of its Start Menu shortcut or tile
In Windows 10, you can launch a program with administrative permissions by using the contextual menu of its Start Menu shortcut. First, open the Start Menu. Then, find the shortcut of the program you want to launch in the All apps list, and right-click or press-and-hold on it to open a contextual menu. Click, tap, or hover over the More option, and then click or tap on «Run as administrator.«
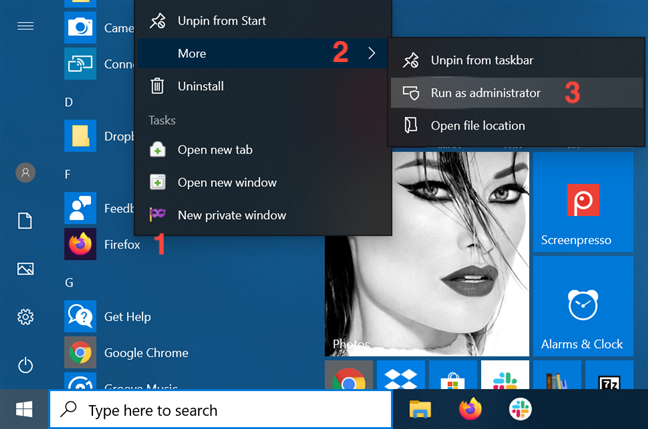
If you have a tile for your desktop app available in the Start Menu, right-click or press-and-hold on it to open a contextual menu. Access More and then click or tap on «Run as administrator.«
2. Run as administrator using «Ctrl + Shift + Click» on its Start Menu shortcut or tile
Open the Start Menu and locate the shortcut of the program you want to launch as administrator. Hold down both the Ctrl and the Shift keys on your keyboard and then click or tap on that program’s shortcut.
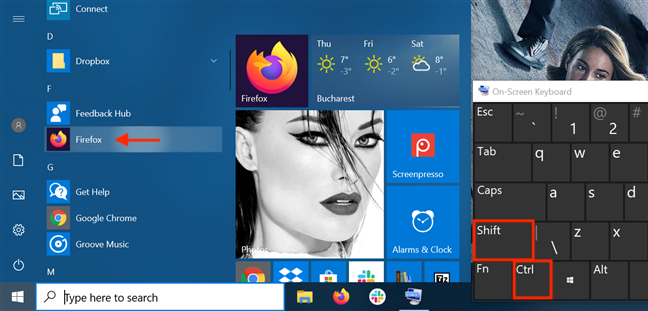
You can also use the «Ctrl + Shift + Click/Tap» shortcut on an app’s Start Menu tile to run it with administrator permissions in Windows 10.
During our tests, this method did not work every time, so if that is the case for you, either try again or consider running the app as administrator another way.
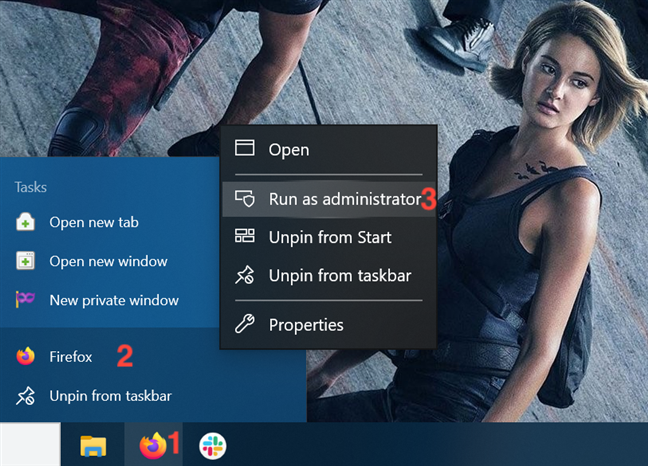
3. Run a program as administrator from its desktop shortcut
Find the desktop shortcut for the program you want to run as admin or create one yourself. Then, right-click or press-and-hold on it to open a contextual menu. Click or tap on the «Run as administrator» option.

4. Run a desktop app as administrator from its taskbar shortcut
In Windows 10, you can also run a desktop app with administrator permissions from its taskbar shortcut. Right-click or press-and-hold on the shortcut, and then right-click or press-and-hold again on the program’s name. Then, from the menu that opens, choose «Run as administrator.»
You can also use the «Ctrl + Shift + Click/Tap» shortcut on an app’s taskbar shortcut to run it with administrator permissions in Windows 10.
5. Run a program as administrator from its right-click menu
Although easier to find, shortcuts are not the only way to run a program as administrator in Windows 10. You can perform the same action from the main executable file’s contextual menu.
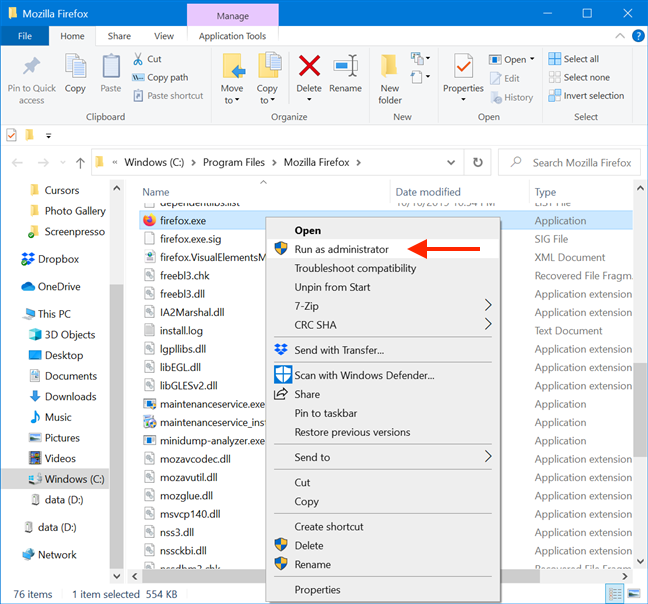
Open File Explorer and find the desktop app’s executable. Right-click or press-and-hold on it to open the contextual menu, and then click or tap on «Run as administrator.«
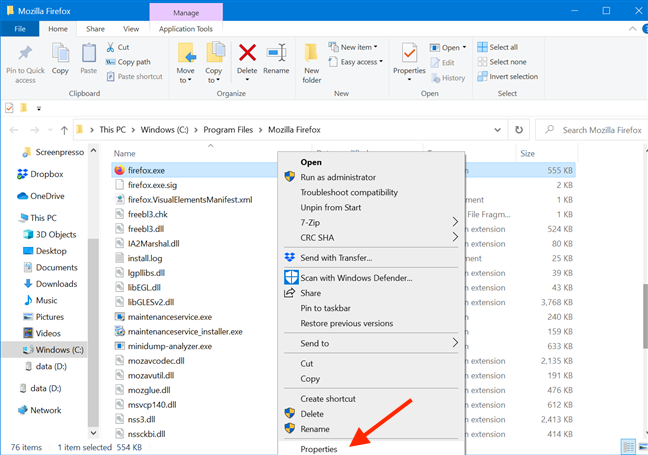
6. Use «Run as administrator» from File Explorer’s ribbon
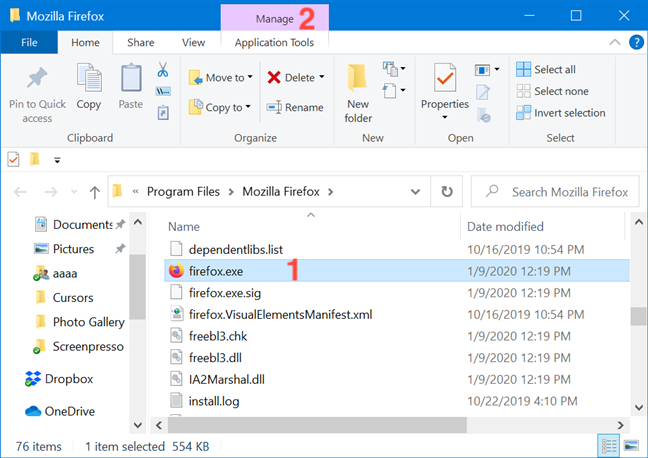
Find the program’s main executable in File Explorer. Select it, and then click or tap on the Manage tab from the ribbon.
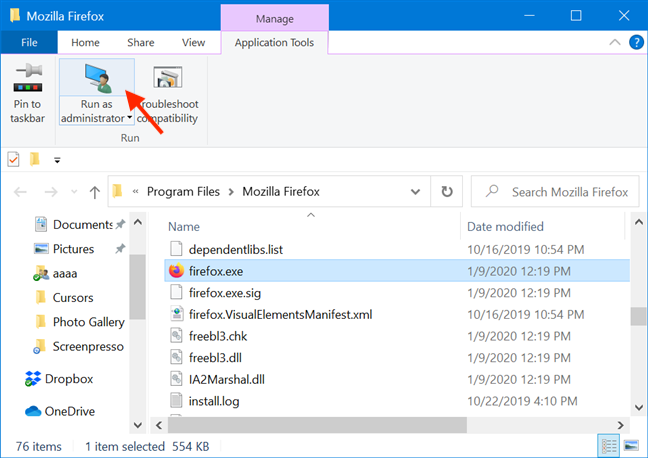
The option you need is displayed in the Run section of Application Tools. Click or tap on the upper half of the «Run as administrator» button to give the selected app admin permissions.
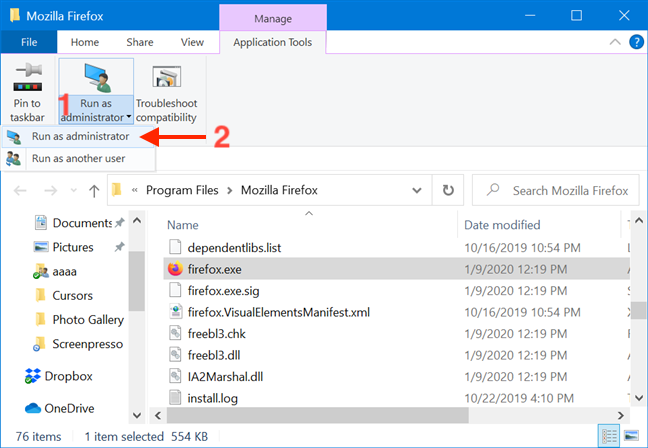
As an alternative, you can also press the lower half of the «Run as administrator» button and then click or tap on the «Run as administrator» option from the drop-down menu.
7. Run a desktop app as admin from the Search window
In the taskbar search field, type in the name of the program that needs to run with administrator permissions. Then, click or tap on the «Run as administrator» option displayed on the right side of the Search window.
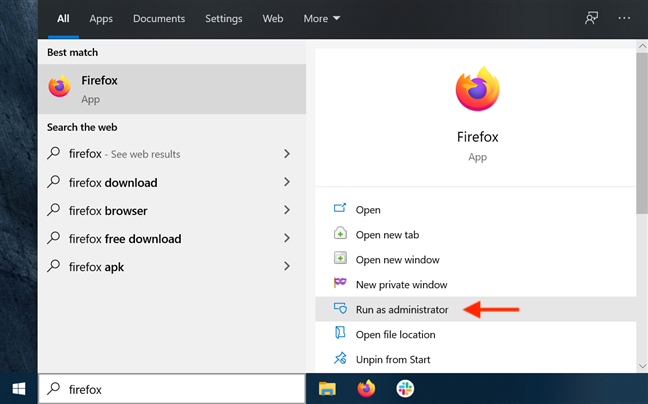
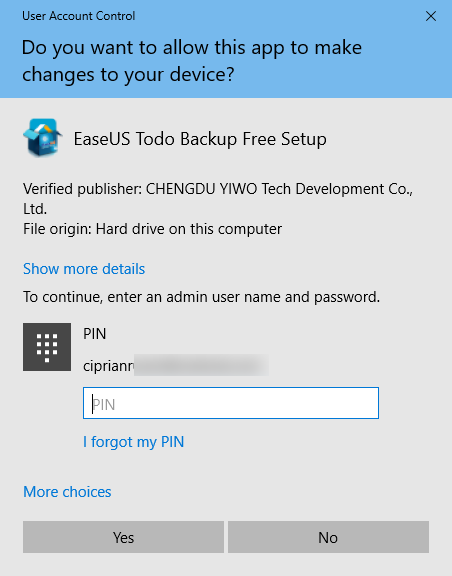
Obviously, when you see the UAC prompt asking for permission to run the app as admin, click or tap Yes.
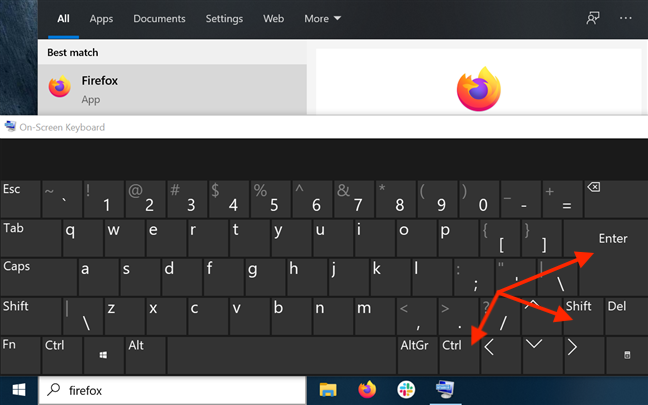
8. Run a program as administrator using «Ctrl + Shift + Enter» on its taskbar search result
Type the name of the program in your taskbar’s search field. If there are multiple results, use the arrow keys on your keyboard to highlight the program you want to run as administrator. Then, simultaneously press the Ctrl + Shift + Enter keys on your keyboard.
9. Run a program as administrator from the Run window
Open the Run window and type in the name of the executable for the program you want to run as administrator. Then hold down the Ctrl and Shift keys on your keyboard and click or tap on OK.
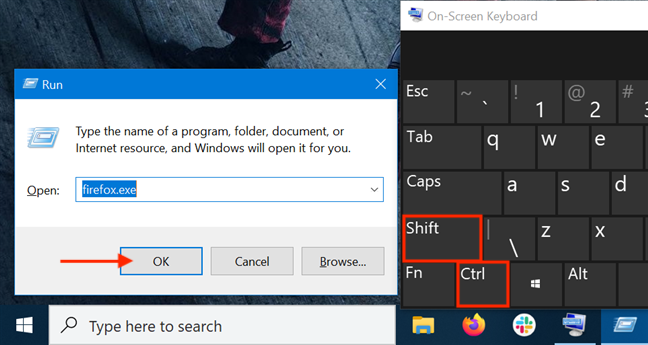
Alternatively, after typing in the name of the program’s main executable, press the Ctrl + Shift + Enter keys on your keyboard at the same time.

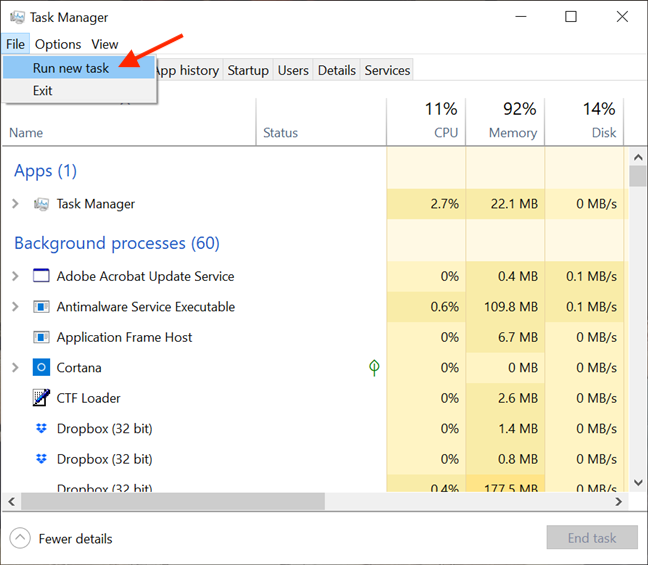
10. Run as admin from the Task Manager
Another way to launch a program as administrator in Windows 10 is to start it using the Task Manager. To begin, open the Task Manager. Then, if it opens up in its compact view, click or tap on the More details button.
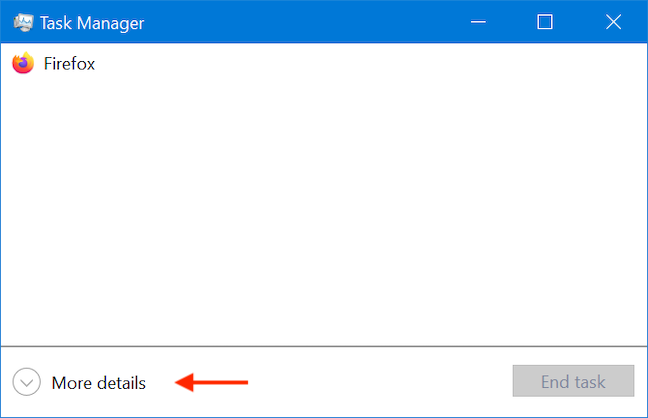
In the expanded Task Manager, open the File menu and click or tap on «Run new task.«
This opens the «Create new task» window. You can use its Open field to enter the path to the program you want to launch as administrator, or you can click or tap on Browse to navigate to it. Then, make sure to check the «Create this task with administrative privileges.» option and click or tap on OK.
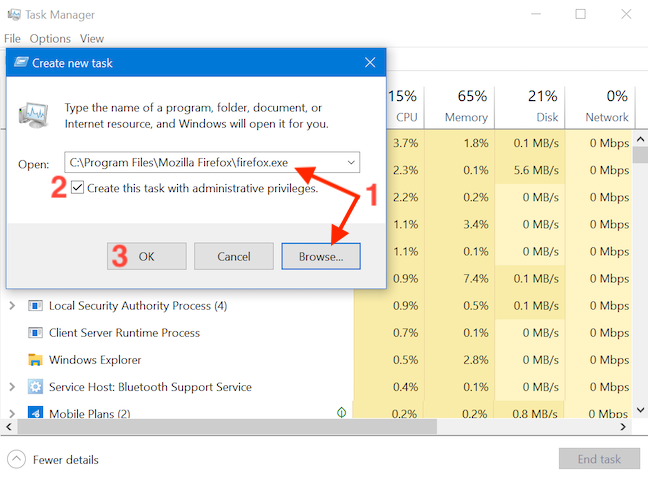
TIP: An advantage of using this method to launch programs as administrator is that you skip the UAC part of the process. That is because the app automatically inherits the permissions of the Task Manager — in our case, administrator permissions — so all you have to do is check the box to enable the option, as seen above. The option is missing if you only have standard user permissions on the device.
11. Run a desktop app as admin using the RunAs command in Command Prompt (CMD) or PowerShell
If the command line is your favorite way of asking your computer to do what you want, you can also access Command Prompt or PowerShell to run a program as administrator. Enter the following command in the CMD or PowerShell window, adjusting it to fit your needs:
runas /user:»your_computer_name\administrator_name» «C:\path\program.exe«
Replace your_computer_name with your computer’s name, administrator_name with the name of a user account that is an administrator on your system, and C:\path\program.exe with the complete path to the program that you want to run as administrator.
As seen in the image below, if you enter the command correctly, you are also asked to enter the administrator’s password. Then, press Enter on your keyboard once again.
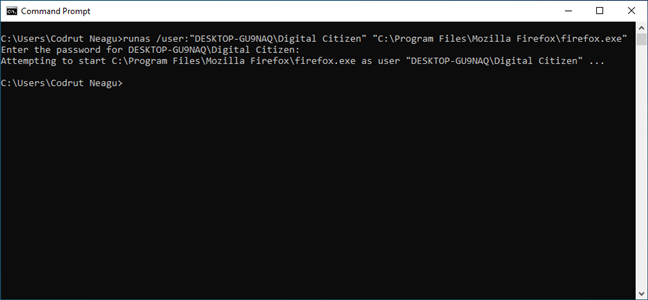
TIP: Using this method to launch programs as administrators, you skip the UAC part of the process.
12. Always run a program with administrator permissions
To avoid constantly having to use the methods illustrated above on desktop apps accessed on a regular basis, you can set a program to always run with administrator permissions.
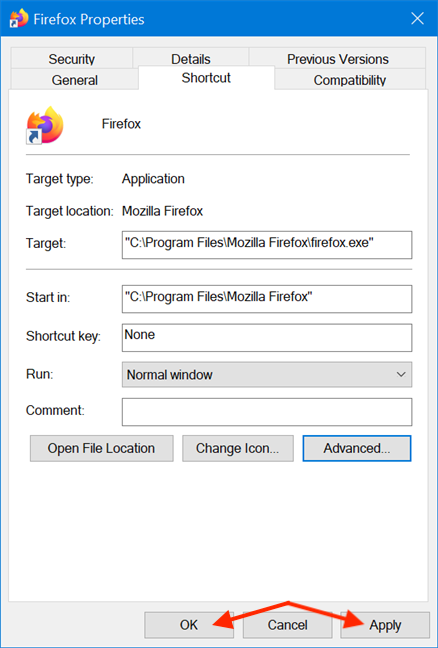
First, open File Explorer and find the main executable of the program you want to run. Right-click or press and hold on it to open the contextual menu. Then, click or tap on Properties.
In the Properties window, go to the Compatibility tab. At the bottom of the window, check the box next to the «Run this program as an administrator» option, and then click or tap on Apply or OK.
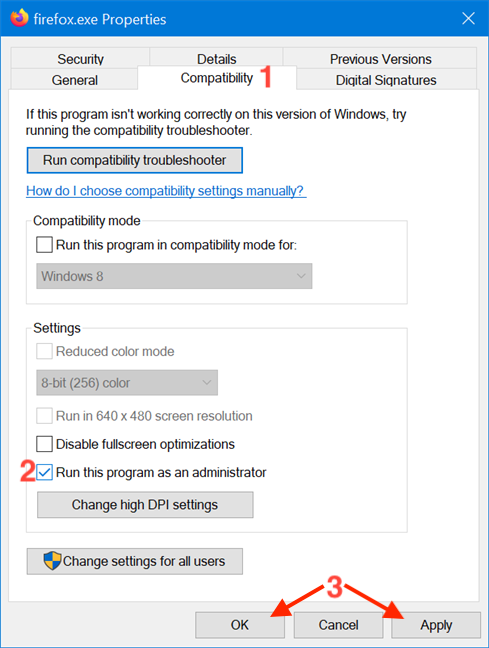
This setting is applied, and, from now on, the program always runs with administrator permissions. Follow the same steps if you want to disable the option. You can also edit the Properties of a program’s shortcut to avoid tampering with its main executable. To begin, right-click or press-and-hold on a program’s shortcut to access its contextual menu, and click or tap on Properties.
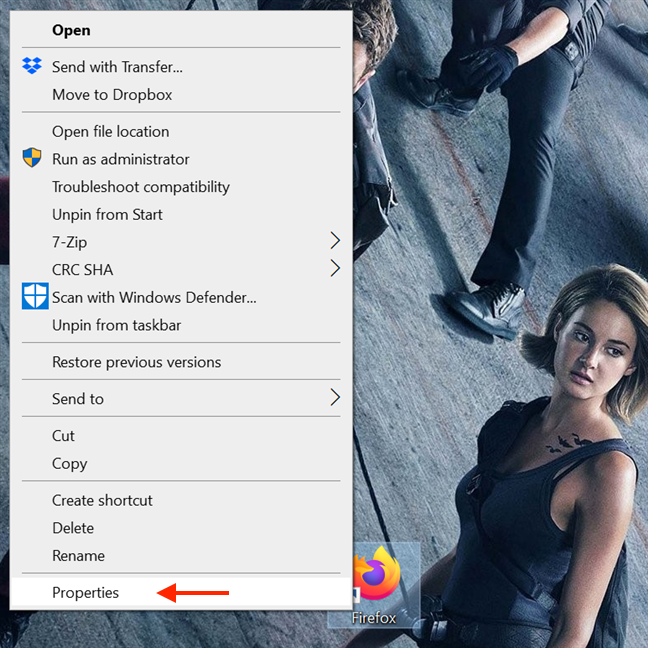
Then, in the shortcut’s Properties window, select the Shortcut tab. Click or tap on the Advanced button to open Advanced Properties.
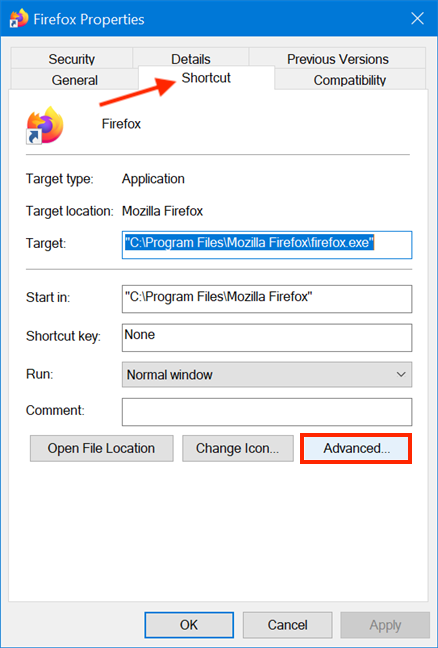
In the Advanced Properties window, check the box next to «Run as administrator» and then click or tap OK.
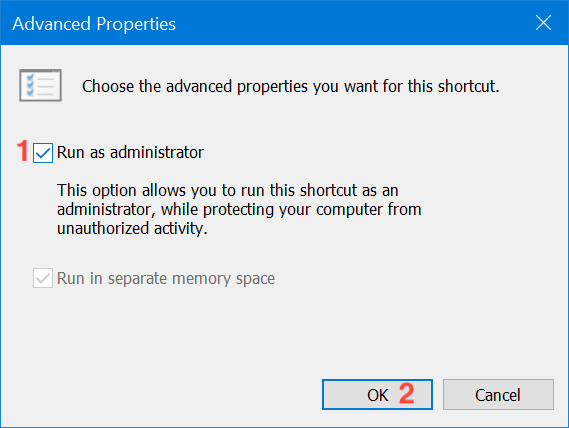
Finally, you are returned to the Properties window, where you have to click or tap on OK or Apply, and you are done.
The settings are applied, and your program works with administrative permissions as long as you open it using the same shortcut. When you use the methods in this section, the UAC prompts you as soon as you try to launch the app.
13. Run a program with administrator permissions and without a UAC prompt
Using the Task Scheduler, you can run a program as administrator without being prompted by the UAC (User Account Control) every time. It is simple, and you don’t have to disable UAC, thus compromising Windows 10’s security. We put together a detailed step by step guide to help you: Use the Windows Task Scheduler to run apps without UAC prompts and admin rights.
Which method(s) do you plan to use?
In Windows 10, there are fewer apps that need to run with administrator permissions than in older versions of Windows. However, a few legitimate programs still require elevated privileges. The main thing to remember is that even if you are logged in with an administrator account, you regularly run apps as a standard user. This means that if you need to run a program that requires administrator permissions, you can just use one of the methods described above and then approve it in the UAC prompt. Which of the method(s) illustrated do you plan to use? Did you already use some of them? Let us know in a comment.
Привет, друзья. В этой публикации рассмотрим, как получить права администратора в Windows 10. Эта версия унаследовала существовавший в Windows порядок разграничения учётных записей на таковые с правами администратора и обычных пользователей без прав администратора. Работая в учётной записи администратора, мы можем выполнять в системе любые действия, в частности, те, которые недоступны в учётных записях обычных пользователей – вносить важные системные настройки, управлять важными системными файлами, управлять другими учётными записями. И вот как быть, если у нас ограниченная учётная запись обычного пользователя, а мы хотим производить в Windows 10 действия, для которых нужны права администратора?
Итак, друзья, учётная запись Windows 10 обычного пользователя. Она ограничена возможностью выполнения определённых действий, которые доступны только в учётной записи администратора. При попытке проведения этих действий в учётной записи обычного пользователя системная функция контроля учётных записей (UAC) не даст нам это сделать. Не даст без введения пароля от учётной записи администратора.
Каждый раз для выполнения действий, для которых требуется разрешение UAC, нужно вводить пароль администратора. И если пользователь-администратор нам свой пароль не скажет, нам придётся каждый раз его дёргать, чтобы он ввёл этот пароль. Возможно, это ему самому надоест, и тогда мы можем его попросить дать нам такие же права администратора. Друзья, получить права администратора мы можем только с согласия пользователя-администратора. Если он согласен, тогда дело за малым – нужно изменить тип нашей учётной записи обычного пользователя на администратора. И мы рассмотрим 3 способа, как это сделать. Но мы выйдем за рамки привычных возможностей Windows 10 и в конце статьи погорим о том, как получить права администратора, не спрашивая согласия пользователя-администратора на такое действо.
Изменить тип нашей учётной записи обычного пользователя на администратора можно в разделе учётных записей в системном приложении «Параметры». Только войти в этот раздел необходимо с учётной записи администратора. В разделе «Учётные записи» идём далее в подраздел «Семья и другие пользователи». Кликаем свою учётную запись обычного пользователя и жмём «Изменить тип учётной записи».
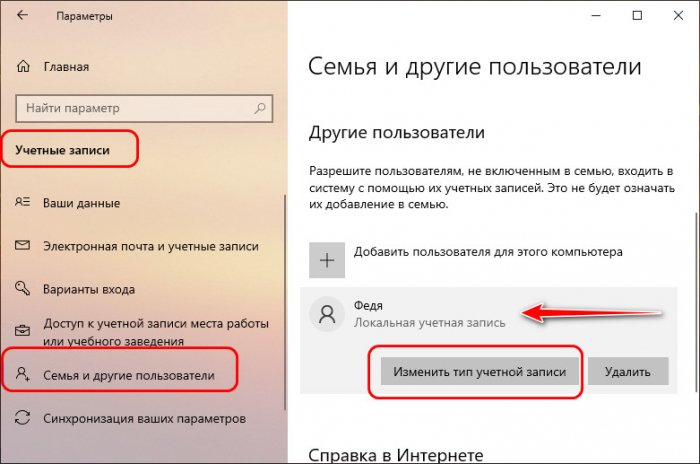
Меняем тип на администратора.
Тип нашей учётной записи изменён.

Но чтобы изменения вступили в силу, необходимо перезагрузить Windows 10.
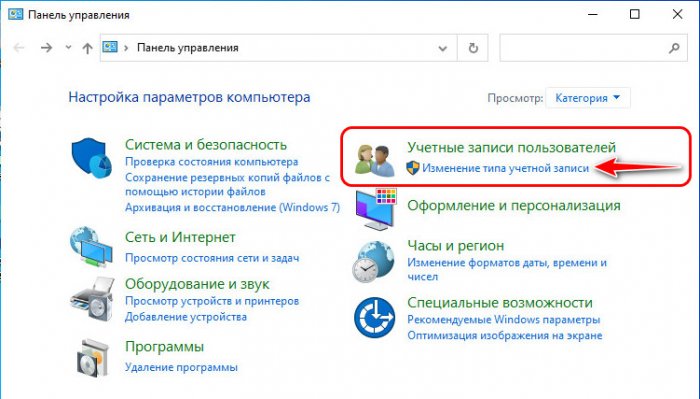
Изменить тип нашей учётной записи обычного пользователя мы можем и из своей учётной записи. Идём в панель управления, в категории «Учётные записи пользователей» жмём «Изменение типа учётной записи».
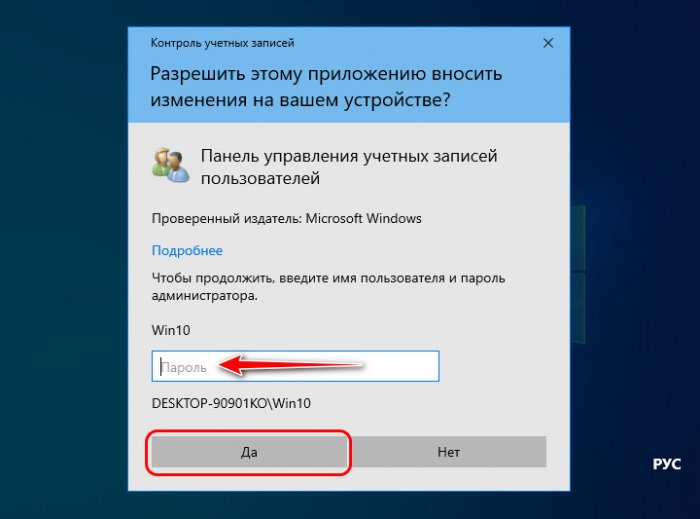
Вводим пароль администратора в окне UAC.
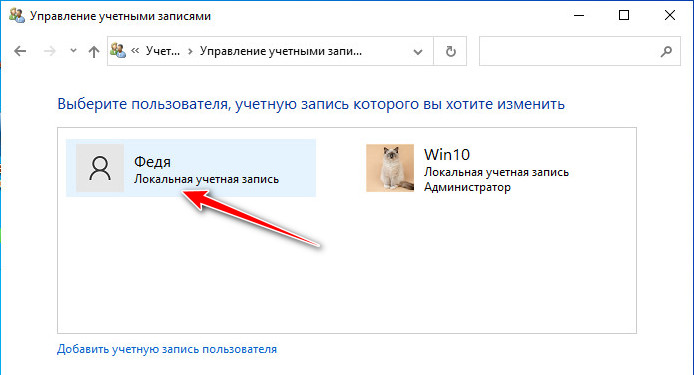
Кликаем свою учётную запись обычного пользователя.
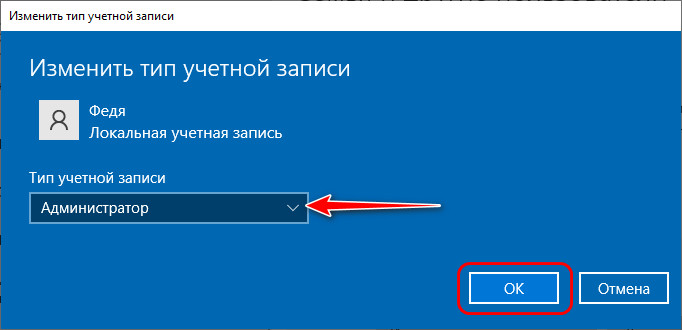
Жмём «Изменение типа учётной записи».
Отмечаем пункт «Администратор». Кликаем «Изменение типа учётной записи».
Всё – теперь мы являемся администратором.
И чтобы изменения вступили в силу, нужно перезайти в операционную систему, т.е. выйти на экран блокировки и зайти по новой.
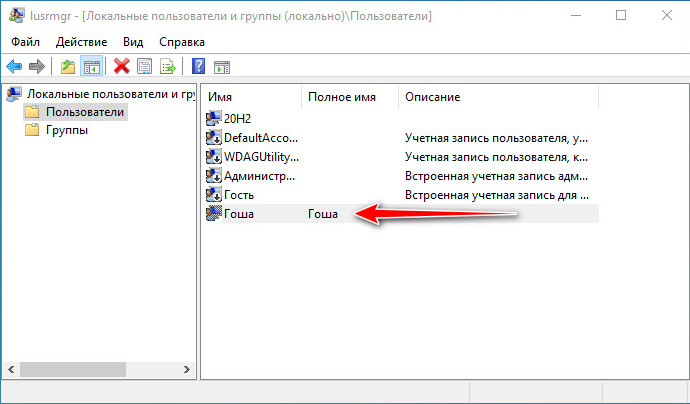
И третий способ, как мы можем изменить тип нашей учётной записи обычного пользователя на администратора – выполнить настройки в оснастке «Локальные пользователи и группы». Здесь мы также можем работать из своей учётной записи, но только эта оснастка доступна в редакциях Windows 10 начиная с Pro. Запускаем оснастку, вводим в системный поиск:
Запускаем обязательно от имени администратора.
Вводим пароль администратора в окне UAC.
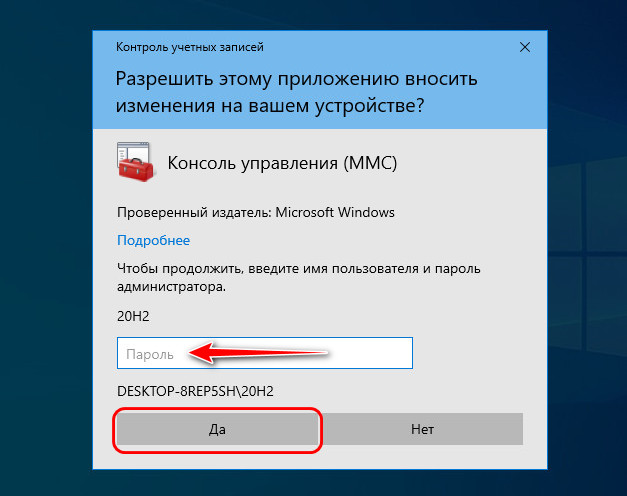
Делаем двойной клик на своей учётной записи.
В открывшемся окошке свойств идём во вкладку «Членство в группах». Жмём внизу «Добавить».
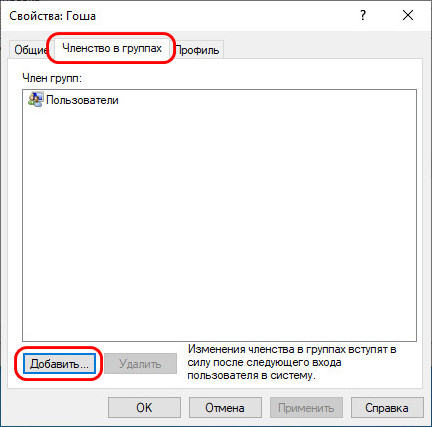
Далее – «Дополнительно».
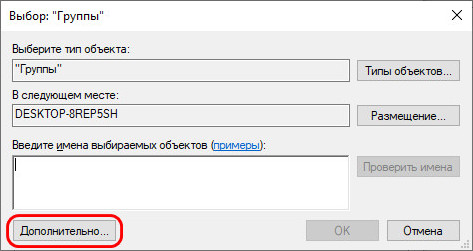
Далее жмём «Поиск», внизу в результатах поиска кликаем «Администраторы», жмём «Ок».
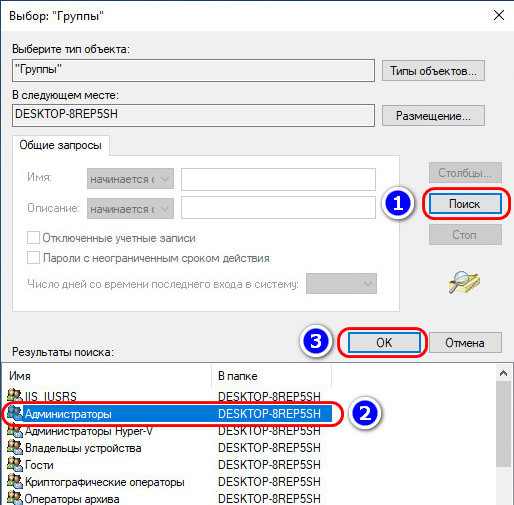
И жмём «Применить».
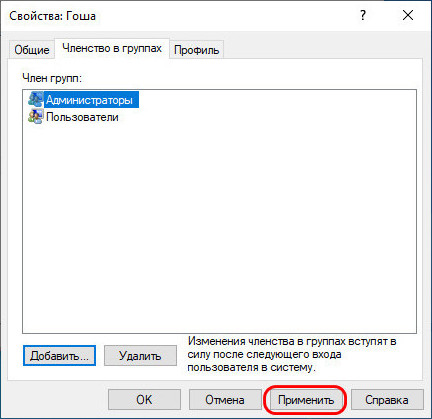
На этом всё, далее нужно только перезайти в операционную систему.
Ну и, друзья, самый пикантный момент публикации – как можно получить права администратора без ведома пользователя-администратора. Т.е. если он нам отказал в смене типа нашей учётной записи. Либо же его нет на месте, а нам нужно срочно предпринять какие-то важные действия, и здесь не до этики спроса разрешения. В таком случае мы можем сами, никого ни о чём не спрашивая, изменить тип своей учётной записи обычного пользователя на администратора. Нам для этого понадобится записать на флешку WinPE 10-8 Sergei Strelec, загрузится с неё, запустить присутствующую на этом LiveDisk’е программку OO UserManager и сменить тип своей учётной записи по типу того, как это делается в оснастке «Локальные пользователи и группы». Детали, друзья, смотрите в статье сайта «Нет прав администратора у учётной записи Windows: что делать?».
Для настройки некоторых системных параметров Windows требуются права администратора. Однако учетная запись «администратор» еще не означает «администратор компьютера».
В Windows 10, например, можно присвоить права администратора любому пользователю, однако при этом постоянно появляются предупреждающие сообщения и требования ввода пароля администратора. Причина: существует встроенная учетная запись администратора, обладающая большими правами, чем у пользователя, самостоятельно назначившего себя администратором. При включении встроенной учетной записи администратора для внесения изменений в систему подобные предупреждения и указания не будут появляться.
Суперадминистратор в Windows 7
В этой версии учетная запись администратора по умолчанию отключена. Для ее включения откройте меню «Пуск» и щелкните пункт «Все программы». Затем прокрутите список до пункта «Стандартные» и откройте его.
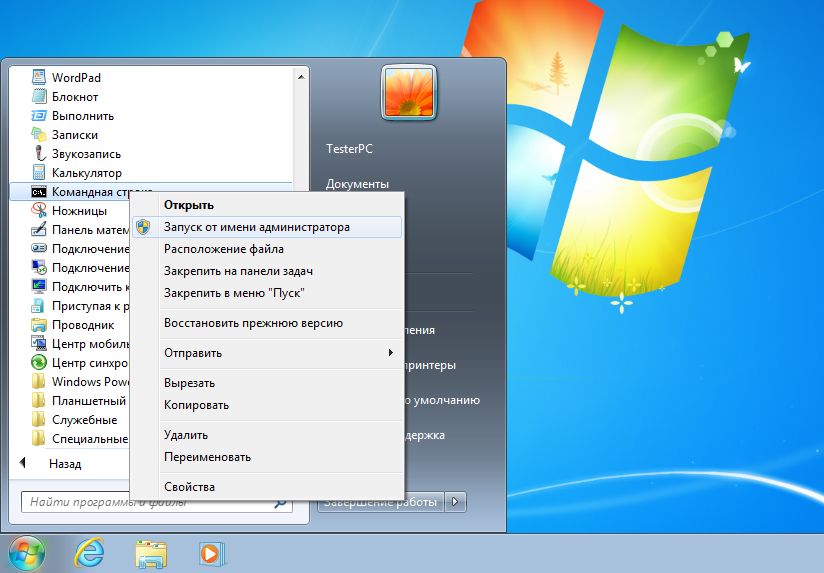
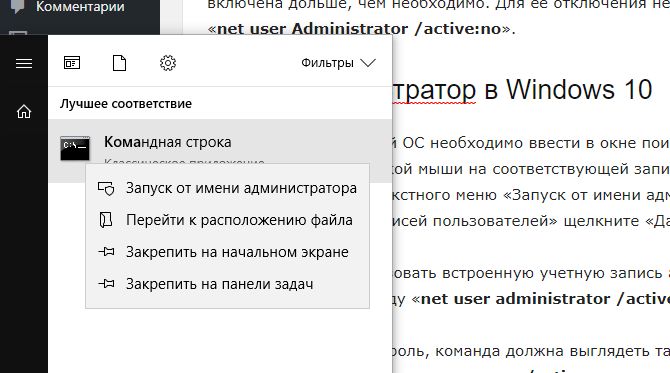
Щелкнув правой кнопкой мыши на пункте «Командная строка», выберите команду «Запуск от имени администратора» и щелкните «Да» в появившемся окне «Контроль учетных записей пользователей».
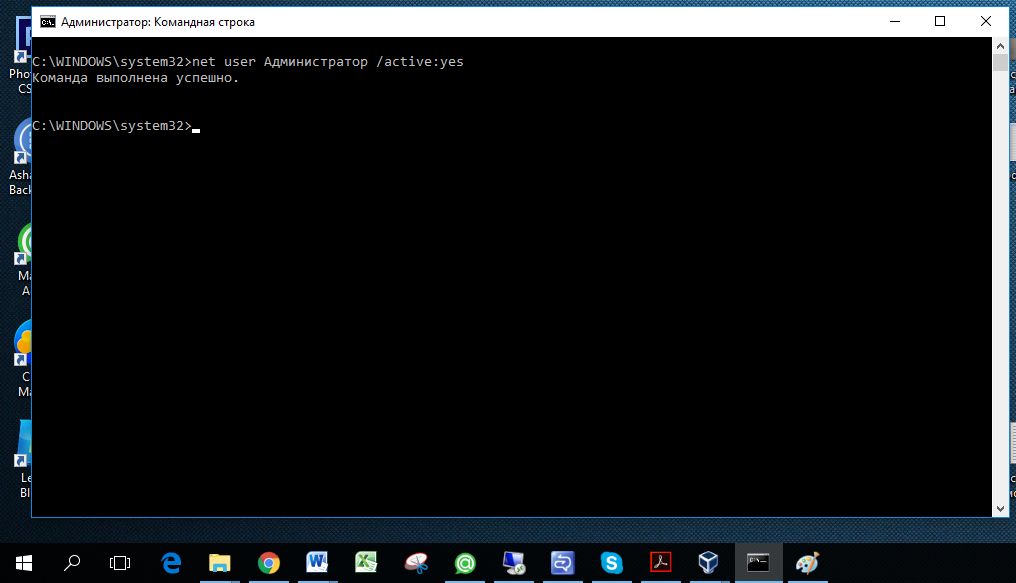
В окне «Администратор: командная строка» введите команду «net user Администратор / active:yes» без кавычек (для русскоязычной версии).
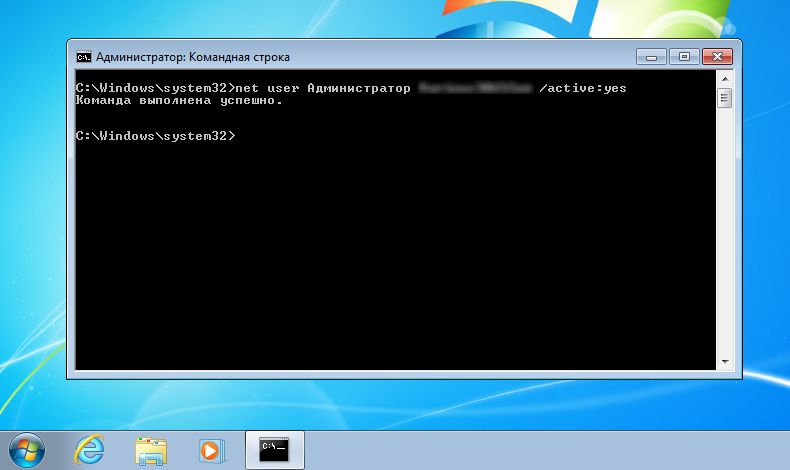
Из соображений безопасности учетная запись администратора не должна быть включена дольше, чем необходимо. Для ее отключения необходимо ввести команду «net user Администратор /active:no».
Суперадминистратор в Windows 10
Для пользователей этой ОС необходимо ввести в окне поиска «Командная строка», щелкнуть правой кнопкой мыши на соответствующей записи в перечне результатов и выбрать команду контекстного меню «Запуск от имени администратора». В окне «Контроль учетных записей пользователей» щелкните «Да».
Если вы хотите использовать встроенную учетную запись администратора без указания пароля, введите команду «net user Администратор /active:yes» (для русскоязычной версии).
Если вы установили пароль, команда должна выглядеть так:
«net user Администратор ваш_пароль /active: yes» (для русскоязычной версии). Вместо фрагмента «ваш_пароль» необходимо ввести ваш настоящий пароль.
Учетная запись администратора отключается командой «net user Администратор /active: no» (для русскоязычной версии).
Читайте также:
- Настройка энергопотребления Windows 10 в зависимости от режима работы
- Изменяем настройка прокси-сервера в Windows 7
- Windows 10 шпионит за вами: пошаговое руководство, как это отключить
Фото: компании-производители

Опубликовано 03.03.2023
Содержание:
- 1 Какие возможности дают права администратора
- 2 Как дать права администратора в Windows
- 2.1 В параметрах
- 2.2 Через панель управления
- 2.3 Посредством программы «Локальные пользователи и группы»
- 2.4 В командной строке
- 2.5 Через локальные групповые политики
- 3 Как получить права администратора в «Виндовс»
- 4 Отключить права администратора в Windows
- 4.1 Как отключить аккаунт администратора через «Управление компьютером»
- 4.2 Другие способы отключения прав администратора
- 4.3 Как удалить Администратора
- 5 Как действовать в некоторых «нештатных» ситуациях
- 6 Заключение
Какие возможности дают права администратора
При инсталляции «Виндовс» 10 предлагает пользователю выбрать тип создаваемого профиля — обычный либо с правами администратора. Без создания учетной записи (УЗ) в ОС войти невозможно. В более ранних версиях Windows допускается создать только пользовательский аккаунт, без дополнительных привилегий. Это необходимо для безопасности, чтобы неопытные юзеры не внесли необратимые изменения в систему, грозящие неблагоприятными последствиями, вплоть до выхода Windows из строя. Аккаунт администратора при этом создается в скрытом режиме, и по умолчанию он недоступен.
Но расширенная УЗ — это не только возможные неблагоприятные последствия, но и отличный инструмент для решения различных проблем управления ОС. Администратор обладает правами на:
- изменение и удаление всех файлов (в т. ч. скрытых и принадлежащих другим юзерам);
- создание и корректировку профилей;
- инсталляцию и удаление приложений и драйверов;
- изменение настроек «Виндовс» и файервола;
- запуск отдельных утилит, имеющих определенные ограничения.
Главная особенность профиля с правами администратора — он единственный в конкретной ОС. Только владелец расширенного аккаунта может вносить коррективы в неограниченном количестве. Тип УЗ указан в пользовательском профиле в «Пуске».
Как дать права администратора в Windows
Чтобы дать другому юзеру расширенные возможности, администратор выполняет на выбор один из следующих шагов (или применяет эти методы поочередно, если какой-либо из них не срабатывает).
В параметрах
«Виндовс» 10 подарила юзерам новую возможность для редактирования аккаунтов в «Параметрах» (все манипуляции выполняются из УЗ администратора):
- Используйте win+i и пройдите путь «Учетные записи» → «Семья и…».

- В блоке «Другие пользователи» укажите нужный аккаунт и примените действие «Изменить тип УЗ». Если здесь нет другого юзера, добавьте его, следуя инструкции Windows, после чего совершите описываемые действия.
- Далее в окошке «Тип УЗ» укажите «Администратор» и подтвердите OK.
Следующий вход в «Виндовс» предоставит назначенному пользователю расширенные права.
Через панель управления
Этого же результата возможно добиться и посредством панели управления. Откройте ее через поиск «Виндовс» и войдите в «Учетные записи…».

Активируйте «Управление другой УЗ».

Далее укажите нужного юзера и кликните «Изменение типа УЗ». Затем отметьте «Администратор» и подтвердите действие.
Посредством программы «Локальные пользователи и группы»
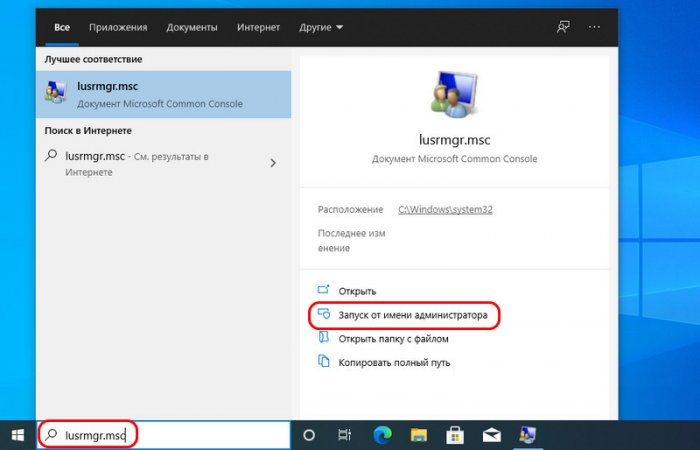
Еще один вариант для присвоения расширенных прав — системный инструмент «Локальные пользователи и группы»:
- Примените в строке, открытой win+r, комбинацию lusrmgr.msc. Откроется утилита.
- В директории «Пользователи» 2 раза кликните ЛКМ по нужному юзеру.

- Откройте вкладку «Членство в…» и кликните «Добавить», после чего наберите «Администраторы» и подтвердите OK.

- Теперь удалите данного пользователя из группы «Гости» (либо другой указанной для него) — выделите наименование и выберите нужное действие.

Подтвердите все действия кнопками «Применить» и OK.
В командной строке
Чтобы дать расширенные права другому юзеру, активируйте командную строку (тоже с админскими правами). Ввод команд подтверждается «Энтер».
- net users.
Команда предоставит перечень аккаунтов, зарегистрированных в ОС. Нужно в точности запомнить или записать имя выбранного юзера.
- net localgroup Администраторы название_аккаунта /add.
Комбинация добавит юзера в перечень администраторов ОС.
- net localgroup Пользователи название_аккаунта /delete.
Команда удалит аккаунт из перечня пользователей.
Важно! Если «Виндовс» выпущена на английском языке, то в командах нужно применять Administrators и Users. Наименования аккаунтов, состоящие из 2 и более слов, берутся в кавычки.
Через локальные групповые политики
В поле, открытом через win+r, наберите gpedit.msc. В редакторе ЛГП проходим «Конфигурация компьютера»→«Конфигурация Windows» и раскрываем параметры безопасности. Теперь нам нужны еще одни параметры безопасности — в «Локальных политиках». Справа ищем «Учетные записи: Состояние УЗ «Администратор».

Нажимаем на параметр, включаем его, применяем и подтверждаем OK.

Как получить права администратора в «Виндовс»
Кроме выдачи расширенных прав другим юзерам, их можно получить и самостоятельно. Нужен дополнительный инструмент — установочный носитель «Виндовс» 10, версия и разрядность которой идентична ОС, действующей на компьютере. Далее необходимо зайти в «БИОС» и в разделе BOOT выставить приоритет загрузки со съемного носителя. Когда появится экран установки, нажимаем Shift+F10. В открывшейся командной строке (с админскими правами) производим те же манипуляции, что описывались немного выше. Используем имя своего аккаунта. Чтобы окончить процедуру, закрываем командную строку и перезагружаем устройство.
Отключить права администратора в Windows
Иногда аккаунт администратора создает юзерам некоторые сложности в управлении ПК. Многие боятся допустить некорректные действия и нанести вред ОС. Поэтому нужно знать, как правильно отключить расширенные возможности в Windows.
Как отключить аккаунт администратора через «Управление компьютером»
Деактивировать УЗ в «Виндовс» 10 возможно посредством утилиты «Управление компьютером». Также здесь корректируются аккаунты других юзеров (кроме УЗ Microsoft).
- Кликаем ПКМ по «Пуск» и открываем «Управление ПК».
- Заходим в «Локальные пользователи и …».
- Справа в директории «Пользователи» указываем нужный аккаунт и кликаем по нему 2 раза ЛКМ.
- В общей вкладке отключаем УЗ.

- Применяем изменения и подтверждаем OK.
«Виндовс» начнет работать с измененными параметрами после следующего запуска. Обратно УЗ включается аналогично.
Другие способы отключения прав администратора
Для деактивации расширенных прав применяем в командной строке комбинацию net user имя_администратора /active:no. Заменив no на yes, мы заново активируем аккаунт администратора. Так же возможно отключать и включать любую локальную учетную запись.
Можно использовать и редактор ЛГП. Выше рассматривалось, как дать расширенные права этим способом. Заходим в ту же локацию и отмечаем «Отключен».

Применяем изменения и подтверждаем OK.
Как удалить Администратора
Чтобы полность удалить аккаунт администратора, нужно внести изменения в реестр «Виндовс». Просто удалить папку система не разрешит даже через командную консоль. В реестре нужен раздел HKEY_LOCAL_MACHINE.
- Откройте папку SAM. Внутри есть директория с тем же названием. Кликните по ней ПКМ и выберите «Разрешения».

- Отметьте группу «Администраторы» и в разрешениях дайте полный доступ. Для обновления реестра нажмите F5.
- Затем проделайте путь SAM→Domains→Account→Users→Names.
- Остановитесь на папке «Администраторы» и кликните по ней ПКМ.

- Выберите из меню действие «Удалить».
Перед манипуляциями по удалению аккаунта администратора сделайте резервную копию реестра. В случае ошибки можно будет восстановить работу Windows.
Как действовать в некоторых «нештатных» ситуациях
Иногда возникают некоторые «нештатные» ситуации. Они не страшны, но действовать нужно спокойно, соблюдая предложенные алгоритмы.
Если отключенный или удаленный аккаунт администратора был единственным, то спасти ситуацию возможно, только запустившись в безопасном режиме. ОС при этом предоставляет пользователю максимальные права. Нажмите win+r и наберите msconfig. Во вкладке «Загрузка» укажите «Безопасный режим», подтвердите OK сохранение изменений и отправьте ПК на перезагрузку.

Когда система запустится, необходимо создать новый аккаунт с правами администратора.
Кроме этого, вам могут понадобиться расширенные возможности для совершения каких-либо действий, но доступа к аккаунту администратора при этом нет. Сделайте следующее:
- Нажмите win+I и укажите «Обновление и…»
- В разделе «Восстановление» (в отдельных вариантах) выберите немедленный перезапуск системы.
- В дополнительных действиях пройдите «Поиск и устранение»→«Доппараметры»→«Командная строка».
Теперь добавьте свой аккаунт в перечень администраторов, как описано в начале статьи.
Заключение
С помощью этих нехитрых методов вы сможете как самостоятельно получить права администратора, так и дать их другому пользователю. Если вы испытываете затруднения, специалисты «АйТи Спектр» помогут вам разрешить их, а также предоставят услуги системного администратора.