

Диагностика сети: что это такое и для чего она нужна
23 июня 2023
Есть целый спектр проблем, которые в быту обозначают фразой «плохо работает интернет». Так говорят, когда не загружается сайт, не передаются данные, сложно подключиться к удаленному компьютеру, системе управления, какому-либо сервису. Диагностика сети нужна именно для того, чтобы понять, в чем заключается проблема и как ее исправить.
Эта процедура помогает установить скорость интернет-соединения, количество подключенных к сети IP-адресов и многое другое. В ходе диагностики поэтапно отбрасываются менее вероятные причины неполадок, чтобы в итоге найти реальный корень проблем.
В целом причинами плохого соединения могут быть:
- механические повреждения кабеля;
- неисправности компьютерного оборудования;
- слишком большая нагрузка на сетевые ресурсы;
- проблемы на стороне провайдера;
- сбои в работе маршрутизатора и сетевой платы;
- блокировка сигналов вирусным ПО и т.д.
Как проводится диагностика сети
Процесс устранения неполадок может быть как очень быстрым, так и длительным, многоэтапным. Занимаясь обслуживанием компьютерных сетей, мы часто сталкиваемся с жалобами на «плохой интернет» и для начала всегда рекомендуем пользователям перезагрузить оборудование — нередко этого достаточно.
Если проблема не решилась, можно провести диагностику сети инструментами Windows и приступить к полномасштабному сетевому анализу. Он включает проверку исправности оборудования, всех разъемов и точек входа, оптоволоконного кабеля и электропроводки, сетевого трафика, антивирусной защиты. Это довольно сложный и длительный процесс, который требует специальных знаний, в то время как провести быструю диагностику с помощью Windows могут и сами пользователи.
Проверка сети инструментами Windows
Для Windows 10:
- Зайдите в «Пуск» и выберите «Параметры».
- В открывшемся окне зайдите в «Сеть и интернет».
- Появится окно «Состояние сети», в котором вы увидите, есть ли проблемы в подключении компьютера к Wi-Fi или дело в отсутствии выхода в интернет.
- Нажмите на вкладку «Средство устранения сетевых неполадок» и следуйте инструкциям.
Для Windows 7:
- Нажмите «Пуск» и выберите «Панель управления».
- Зайдите в «Сеть и интернет», а после — в «Центр управления сетями».
- Выберите вкладку «Устранение неполадок», а внутри нее — пункт «Подключения к интернету».
- Система сама проведет диагностику, выполняйте инструкции на экране.
Для macOS:
- В строке меню найдите знак Wi-Fi и нажмите на него.
- Если появился пункт «Рекомендации по улучшению связи», выберите его и выполните все рекомендуемые действия.
- Если это не удалось или не помогло, нажмите знак Wi-Fi, одновременно удерживая кнопку Option на клавиатуре.
- В появившемся окне запустите «Беспроводную диагностику» и следуйте инструкциям.
Как проверить маршрутизатор и сетевую плату
Корректность работы этих устройств тоже можно проверить самостоятельно за несколько минут. Если на компьютере установлена операционная система Windows 10, нужно зайти в «Мой компьютер» и выбрать в верхнем меню «Свойства системы», а затем — «Диспетчер устройств».
Появится список устройств, в котором необходимо найти «Сетевые адаптеры». Раскрыв список адаптеров, можно увидеть, какие из них работают некорректно — на значке такого устройства будет изображен восклицательный знак.
В других версиях Windows процесс будет сходным, но могут меняться названия вкладок. Например, в Windows XP вместо «Диспетчер устройств» можно увидеть вкладку «Оборудование». Кстати, если сетевые адаптеры вовсе отсутствуют в списке, это значит, что они вышли из строя.
Нестабильное подключение к сети через роутер может быть связано и с другими проблемами — например, перебоями в электропитании или недостаточной мощностью устройства. Стоит понаблюдать, с чем связаны «провисания» и обрывы. Если они начинаются после запуска «тяжелых» программ, которые требуют много ресурсов (например, для обработки видеофайлов), или после подключения дополнительного оборудования — скорее всего, дело в мощности роутера и нужно выбрать другую модель.
Диагностика сети с помощью утилит
Если самостоятельная проверка и устранение неисправностей с помощью Windows не помогает, можно провести анализ сетевого трафика, используя специальные утилиты. Это задача для профессионалов — ею занимаются, как правило, штатные сисадмины или ИТ-компании, которые проводят обслуживание сетей на аутсорсинге.
Для Windows чаще всего используются утилиты:
- Ping — регистрирует, сколько времени проходит между отправкой сигнала на сервер и получением ответа от него. Таким образом можно выяснить, правильно ли поступают пакеты данных.
- PathPing — помогает диагностировать промежуточные узлы сети и определить, на каком из них происходит задержка или потеря сигнала.
- Telnet — дает информацию, может ли в принципе данное устройство подключиться к серверу, есть ли у него на это права.
- Ipconfig — информирует о сетевых настройках и служит для управления сетевыми интерфейсами.
- Getmac — дает просмотреть MAC-адреса сетевых адаптеров и узнать, какие протоколы связаны с каждым из них.
- Tracert — отслеживает маршрут, по которому передается пакет данных до того или иного узла в локальной или глобальной сети.
Запустить каждую из утилит путем введения соответствующих команд может любой пользователь — по инструкциям от специалиста. Но для анализа собранных данных нужны специальные знания. Поэтому при самостоятельной диагностике пользователи копируют полученные с помощью утилит данные и отправляют их профессионалам.
В рамках ИТ-обслуживания организаций наша компания проводит профессиональную диагностику сетей и предоставляет другие услуги системного администрирования, позволяя сэкономить на штатном ИТ-отделе. Мы обеспечиваем своим клиентам техподдержку 24/7, устраняя проблемы как в удаленном режиме, так и с выездом на место.
(Image credit: Future)
Windows 10 makes it easy to connect to a network and the internet using a wired or wireless connection. However, sometimes, you may still need to manually manage settings or troubleshoot connectivity problems, which is when the built-in command-line tools can come in handy.
Regardless of the issue, Windows 10 will likely have a Command Prompt tool to help you resolve the most common problems. For instance, ipconfig and ping are among the most important tools for viewing network settings and troubleshooting connectivity issues. If you are dealing with a routing problem, the route command can display the current routing table to examine and determine related problems, and with the nslookup tool, you can diagnose DNS problems.
You also have tools like arp to troubleshoot switching problems and determine the MAC address from an IP address. The netstat command-line tool allows you to view statistics for all the connections. And you can use the netsh tool to display and change many aspects of the network configuration, such as checking the current configuration, resetting settings, managing Wi-Fi and Ethernet settings, enabling or disabling the firewall, and a lot more.
This guide highlights eight Command Prompt tools that should help you manage and troubleshoot networking problems on your device and across the network.
1. IPConfig
On Windows 10, ipconfig (Internet Protocol configuration) is among the most common networking tools that allow you to query and show current TCP/IP (Transmission Control Protocol/Internet Protocol) network configuration. The command also includes options to perform different actions, such as refreshing Dynamic Host Configuration Protocol (DHCP) and Domain Name System (DNS) settings.
Display network configuration
To get started with ipconfig on Windows 10, use these steps:
All the latest news, reviews, and guides for Windows and Xbox diehards.
- Open Start.
- Search for Command Prompt, right-click the top result, and select the Run as administrator option.
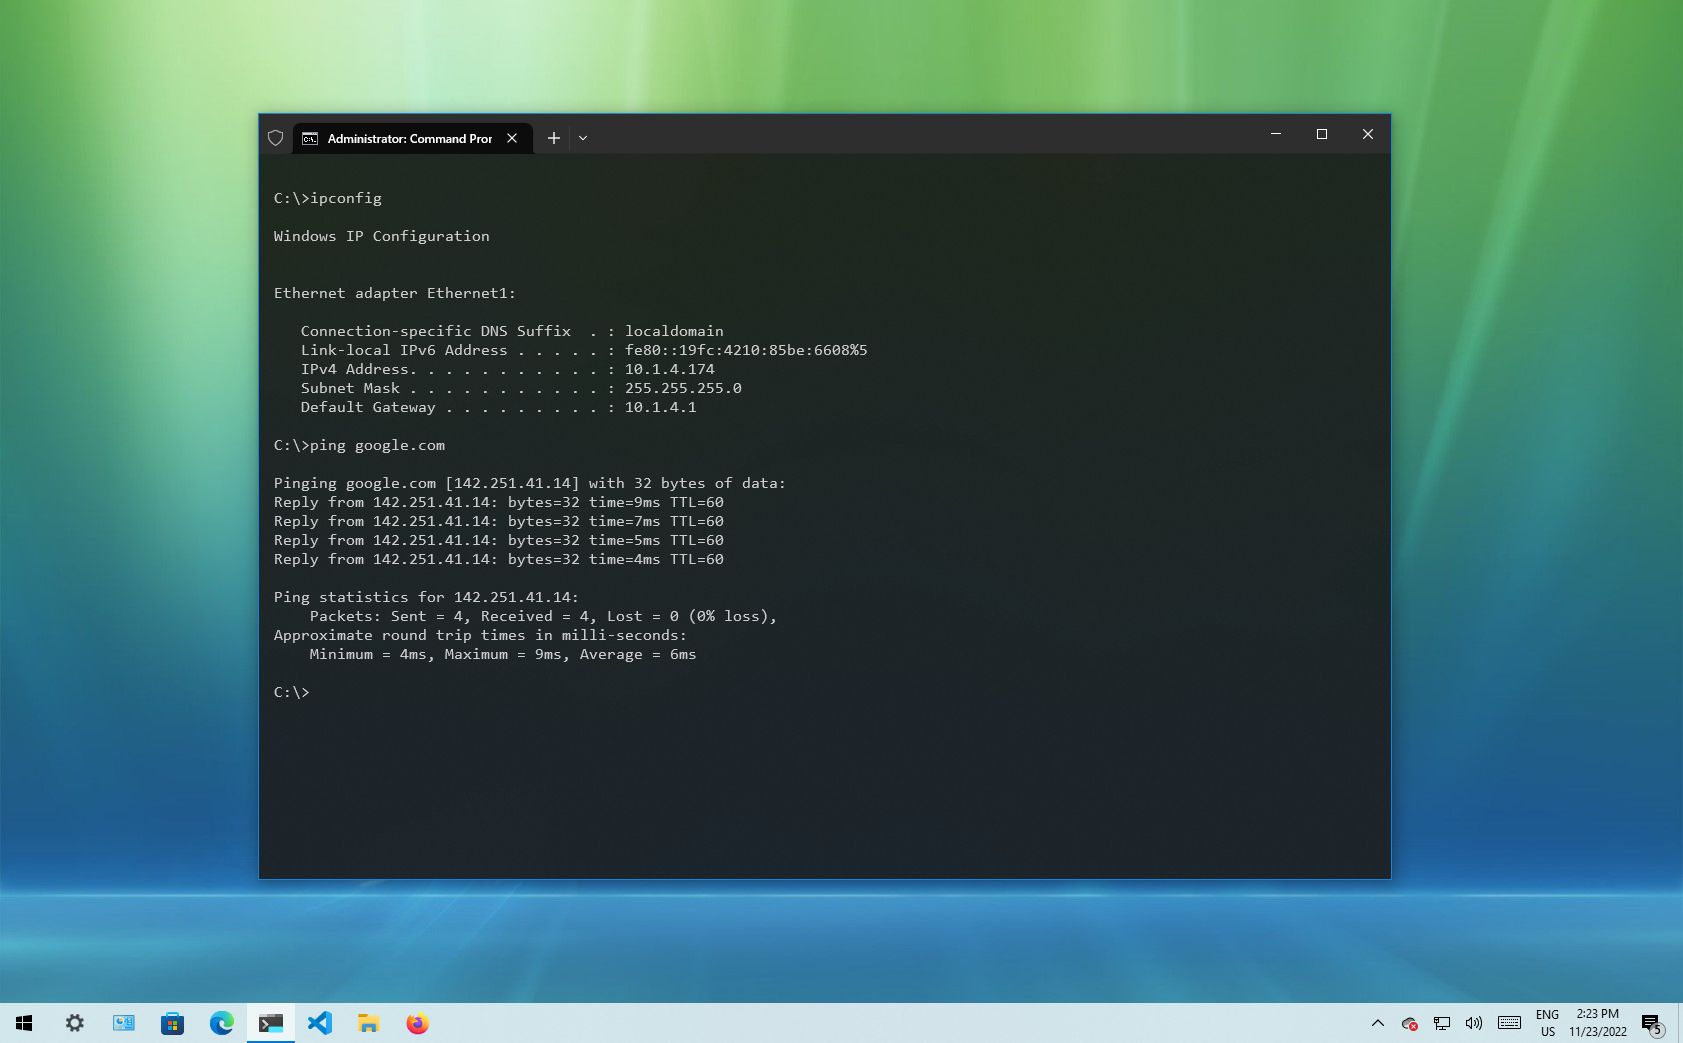
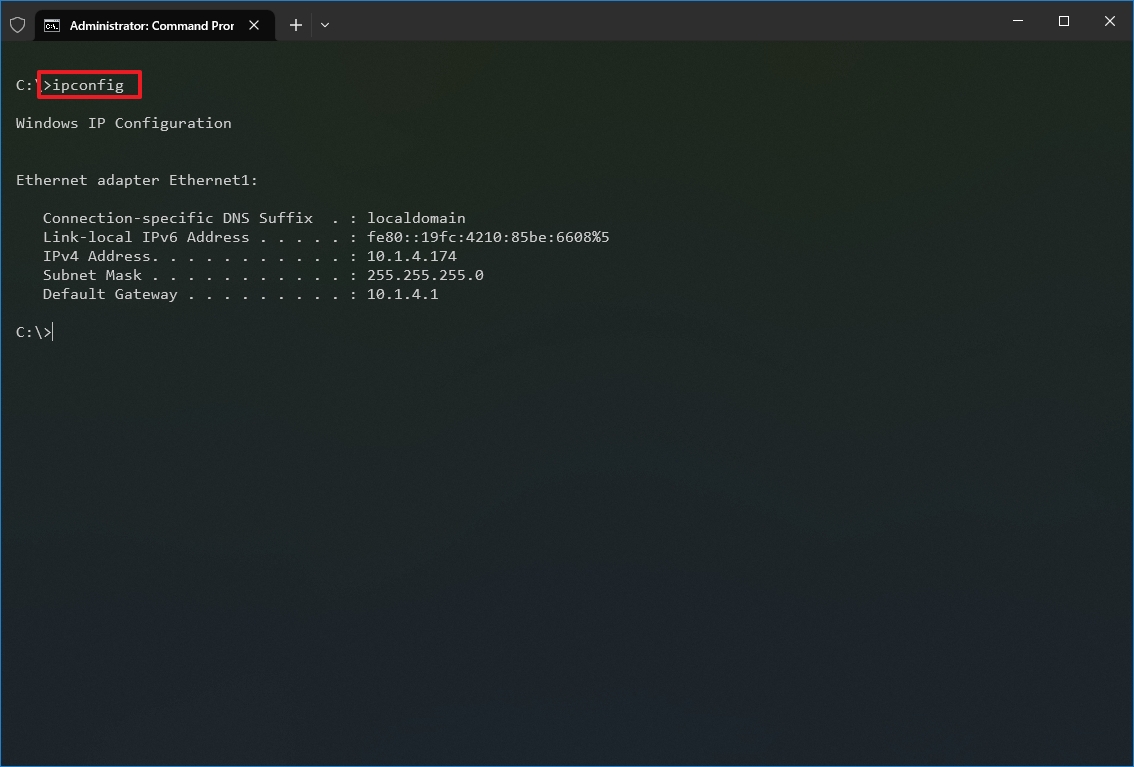
- Type the following command to view a summary of the TCP/IP network configuration and press Enter: ipconfig
- Quick tip: In Command Prompt, you can use the CLS command to clear the screen after you no longer need the information to continue running commands without clutter.
- Type the following command to view the complete TCP/IP network configuration and press Enter: ipconfig /all
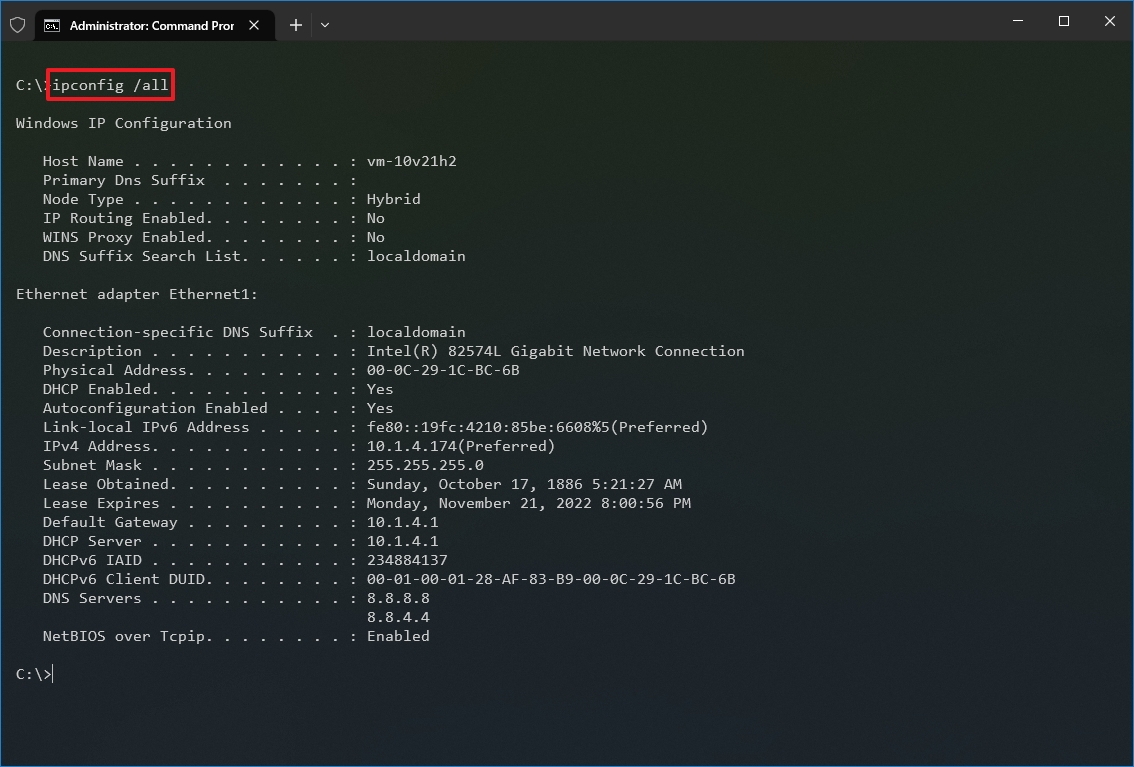
Once you complete the steps, you will have an overview of the PC’s entire TCP/IP configuration.
Refresh network settings
To release and renew the network configuration with Command Prompt, use these steps:
- Open Start.
- Search for Command Prompt, right-click the top result, and select the Run as administrator option.
- Type the following command to remove the current network configuration and press Enter: ipconfig /release
- Type the following command to reconfigure the network configuration and press Enter: ipconfig /renew
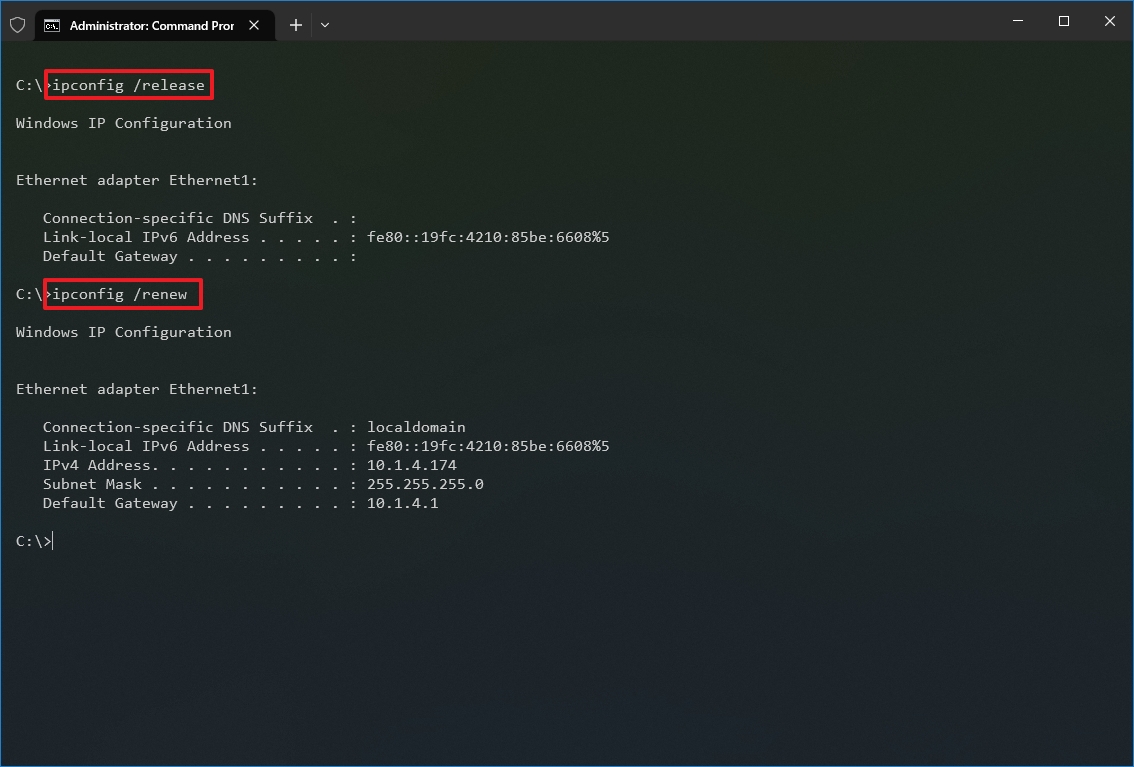
After you complete the steps, the first command will clear the current configuration, and the second command will fetch new settings from the DHCP server to resolve connectivity issues. If the dynamically assigned settings have not expired in the server, it is common to see the same IP address reconfigured on the device.
Refresh DNS settings
To flush and rebuild the current DNS cache entries on Windows 10, use these steps:
- Open Start.
- Search for Command Prompt, right-click the top result, and select the Run as administrator option.
- Type the following command to clear the DNS system cache on the device and press Enter: ipconfig /flushdns
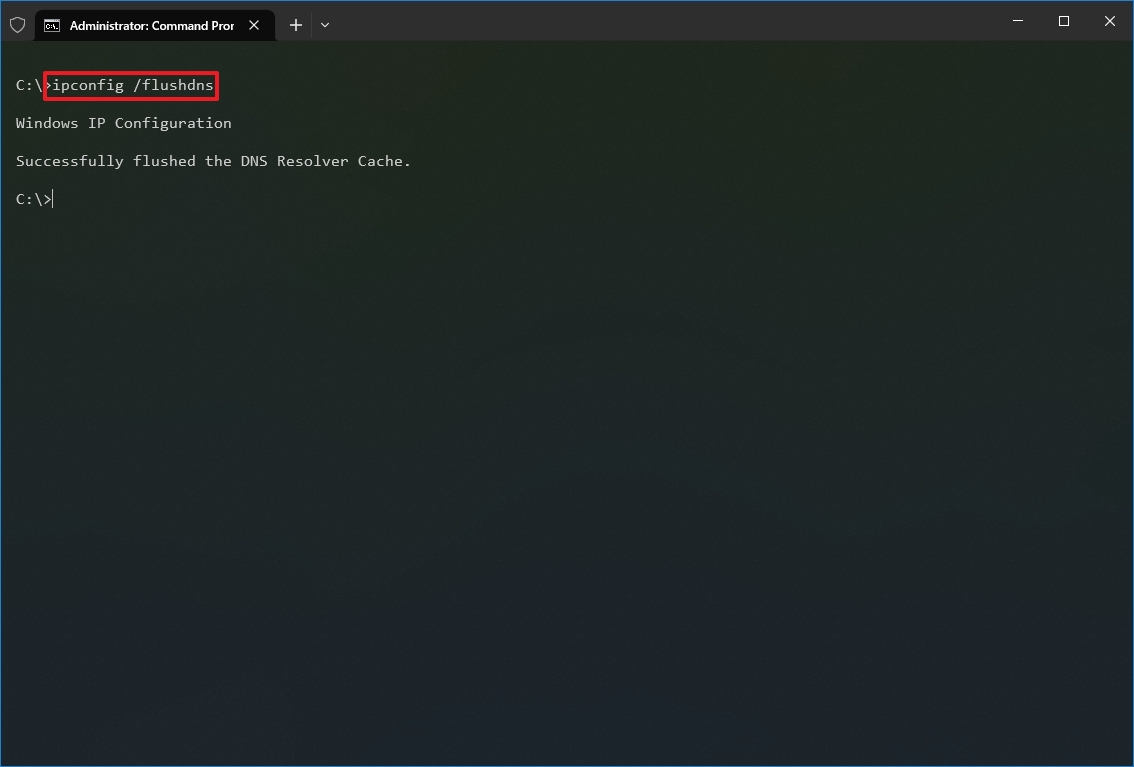
Once you complete the steps, the entries stored in the DNS cache of Windows 10 will be deleted and refreshed. Usually, this command will come in handy when you cannot connect to another computer or website using the host or domain name due to outdated information in the local cache.
2. Ping
Ping is another essential networking tool because it allows you to send ICMP (Internet Control Message Protocol) echo request messages to test the IP connectivity with other devices, whether it is another computer in the network or internet service.
Test device connectivity
To test the network connectivity with the ping command on Windows 10, use these steps:
- Open Start.
- Search for Command Prompt, right-click the top result, and select the Run as administrator option.
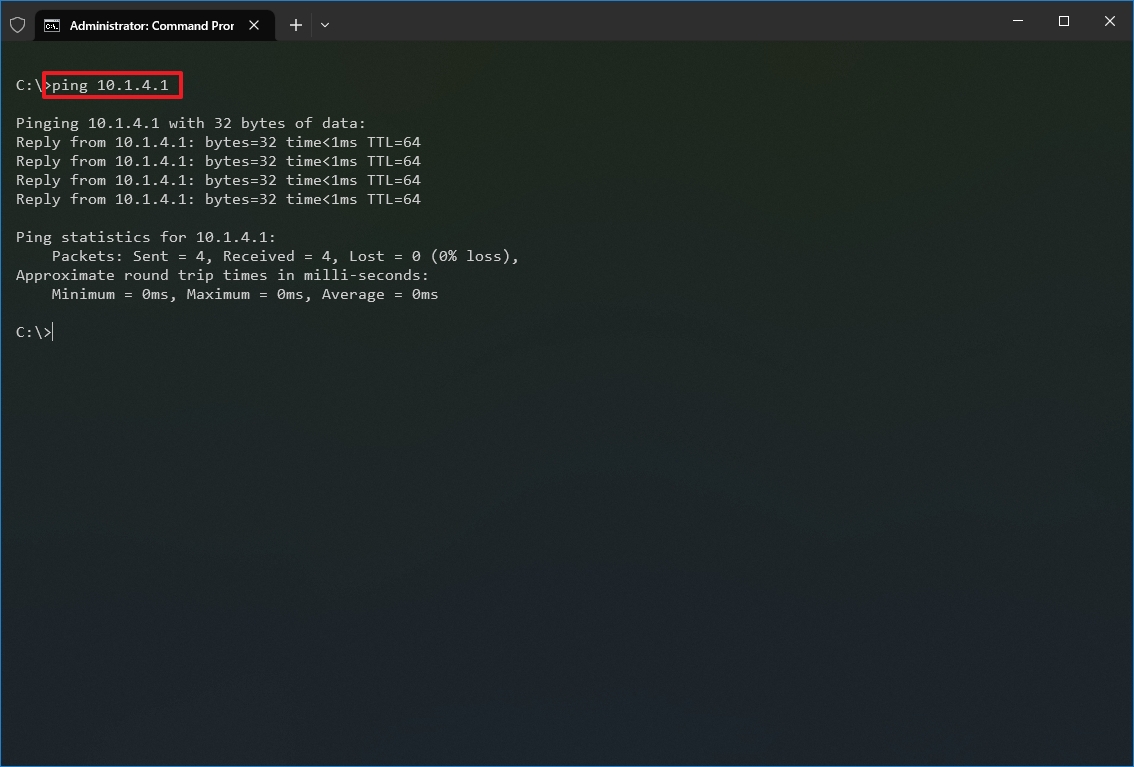
- Type the following command to send ICMP echo requests to test connectivity and press Enter: ping IP-OR-DOMAIN
In the command, replace IP-OR-DOMAIN with the actual IP address or domain name of the computer or service you want to test. For example, this command tests the communication between the local device and router: ping 10.1.4.1
- Quick tip: If you use the -a option (for example, ping -a 10.1.4.1), the command will also resolve the address to a hostname.
- (Optional) Type the following command to test the local computer networking stack and press Enter: ping 127.0.0.1 or ping loopback
- Quick note: The 127.0.0.1 is a well-known address, and it is referred to as the loopback address. When you run the command, if you get a reply, it means that the networking stack on Windows 10 is up and running. This is the same as pinging the device using its own network address.
Once you complete the steps, receiving four successful echo replies from the destination means the device can talk with the remote host. If the request times out, there is a problem between the host and the remote device.
If you are dealing with connectivity problems, start pinning the local computer to ensure the network stack is working. Then test the router’s connection to ensure the issue is not in the local network. Then try to ping a website to find out whether there is a problem with the internet connection or the remote host.
You should also know that the ping command will always time out if the remote device or service blocks the ICMP protocol.
Diagnose packet loss activity
The ping command includes many options that you can access with the «ping /?» command, and one of these options is the ability to set the time you want to run the tool, which can come in handy to examine packets lost when you are troubleshooting connectivity problems.
To run the ping command for a specific period, use these steps:
- Open Start.
- Search for Command Prompt, right-click the top result, and select the Run as administrator option.
- Type the following command to continue pinging until stopped and press Enter: ping IP-OR-DOMAIN -t
In the command, replace IP-OR-DOMAIN with the actual IP address or domain name of the computer or service you want to test. For example, this command tests the communication between the local device and router: ping 10.1.4.1 -t
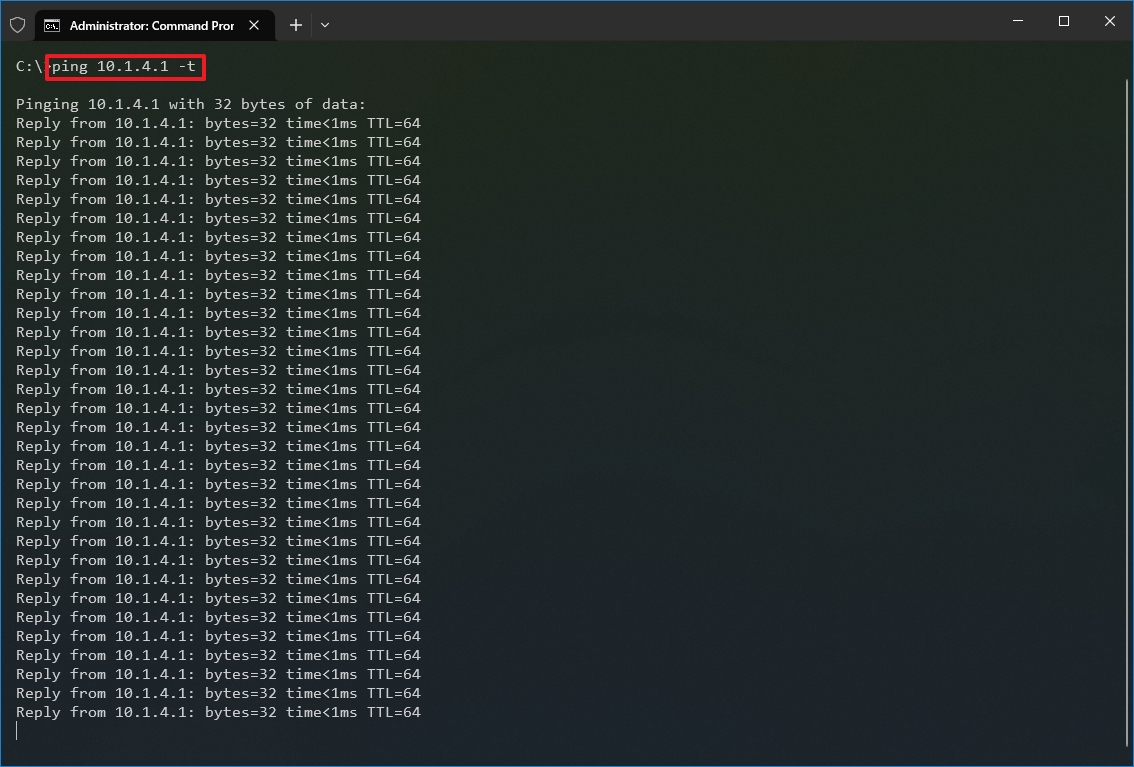
- Use the «Control + C» keyboard shortcut to stop the ping.
After you complete the steps, you will be able to see the successful and lost requests that can give you a clue on how to continue troubleshooting and resolving the connectivity problem. Administrators usually use the ping command in a local network to find out when a service goes down quickly. Also, the tool can be used as a quick way to know when the server is up and running again when restarting a server remotely.
3. Tracert
Windows 10 also includes tracert (Trace Route), a diagnostic tool to determine the network path to a destination using a series of ICMP echo requests. However, unlike the ping command, each request includes a TTL (Time to Live) value that increases by one each time, allowing to display of a list of the route the requests have taken and their duration.
To trace the route to a destination with Command Prompt on Windows 10, use these steps:
- Open Start.
- Search for Command Prompt, right-click the top result, and select the Run as administrator option.
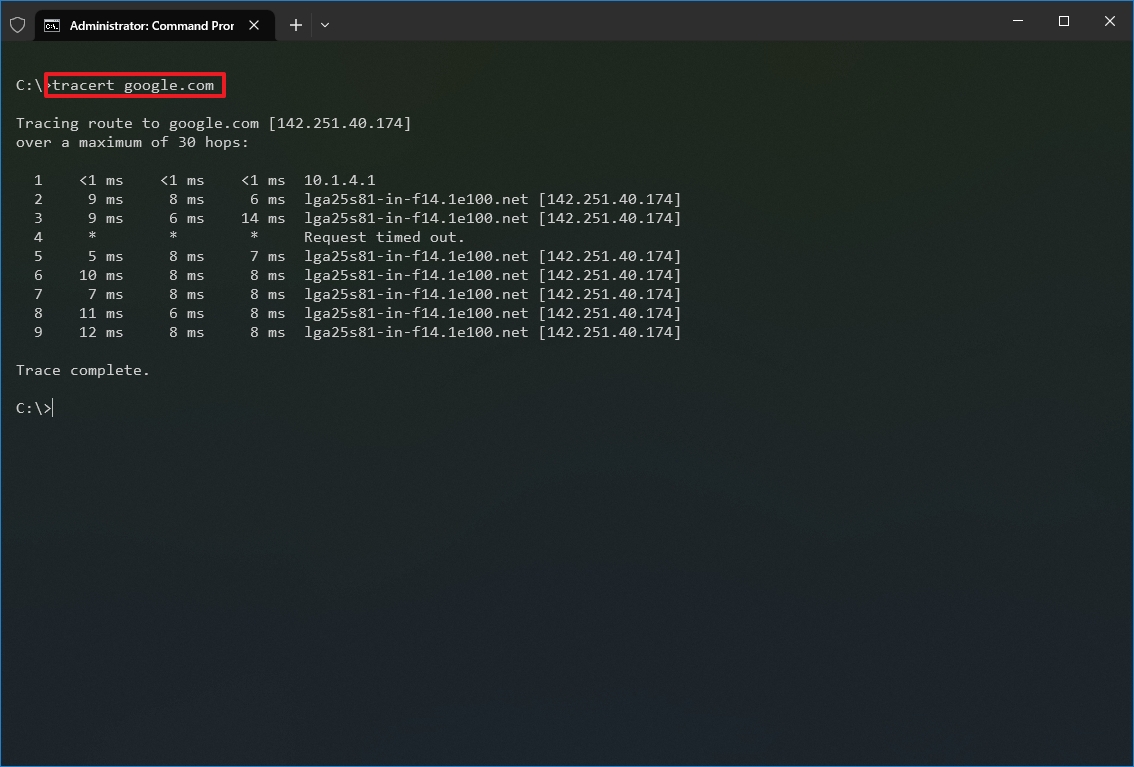
- Type the following command to understand the path taken to the destination and press Enter: tracert IP-OR-DOMAIN
In the command, replace IP-OR-DOMAIN with the actual IP address or domain name for the destination you want to troubleshoot. For example, this command allows you to view the path the packets are taking to reach Google.com: tracert google.com
- (Optional) Type the following command to adjust the hop counts to the destination and press Enter: tracert -h HOP-COUNT IP-OR-DOMAIN
In the command, replace IP-OR-DOMAIN with the actual IP address or domain name for the destination you want to troubleshoot and HOP-COUNT for the number of hops you want to trace. For example, this command puts the limit of 5 hops (nodes) to the destination: tracert -h 5 google.com
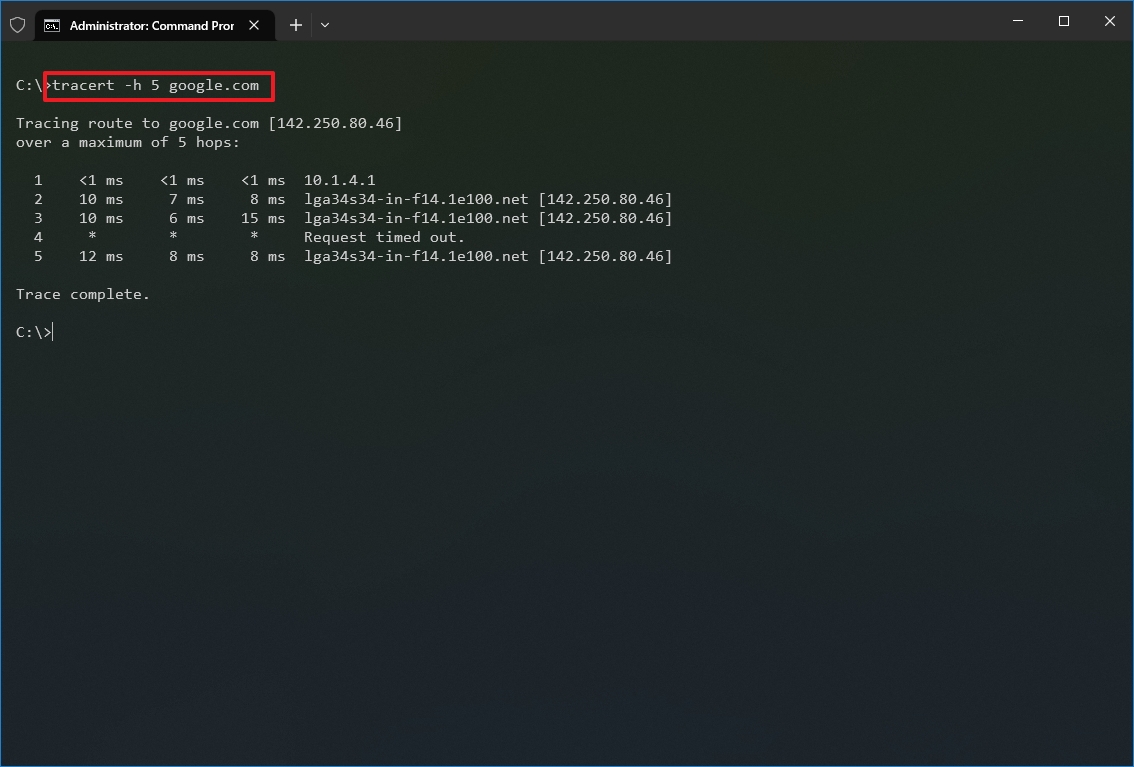
Once you complete the steps, you will know if the destination is reachable or if there is a networking problem along the way.
Similar to the ping tool, tracert includes several options, which you can view with the «tracert /?» command.
4. NSLookup
The nslookup (Name Server Lookup) tool can show valuable details to troubleshoot and resolve DNS-related issues. The tool includes an interactive and non-interactive modes. However, you will be using the non-interactive mode more often than not, which means you will type the full command to obtain the necessary information.
You can use this command to display the default DNS name and address of the local device and determine the domain name of an IP address or the name servers for a specific node.
To get started with nslookup on Windows 10, use these steps:
- Open Start.
- Search for Command Prompt, right-click the top result, and select the Run as administrator option.
- Type the following command to look up the local DNS name and address and press Enter: nslookup
- Quick note: This command also happens to open the nslookup interactive mode.
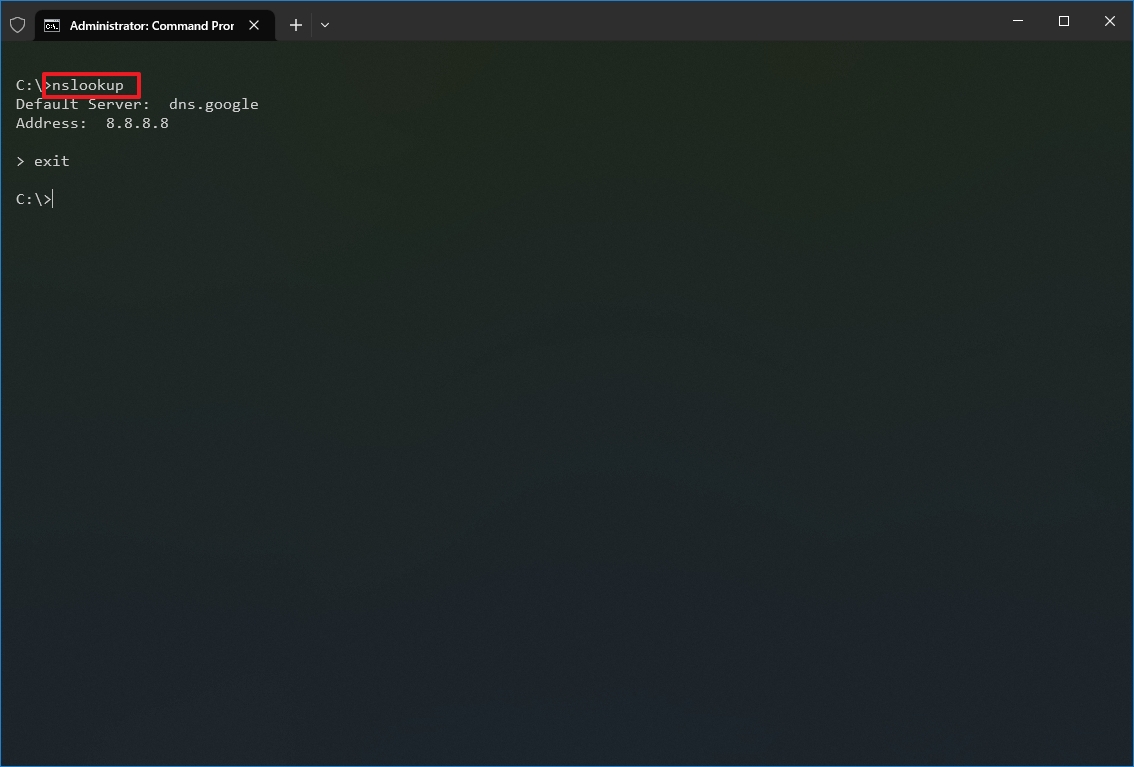
- Confirm the current DNS information.
- Type the following command to exit the interactive mode and press Enter: exit
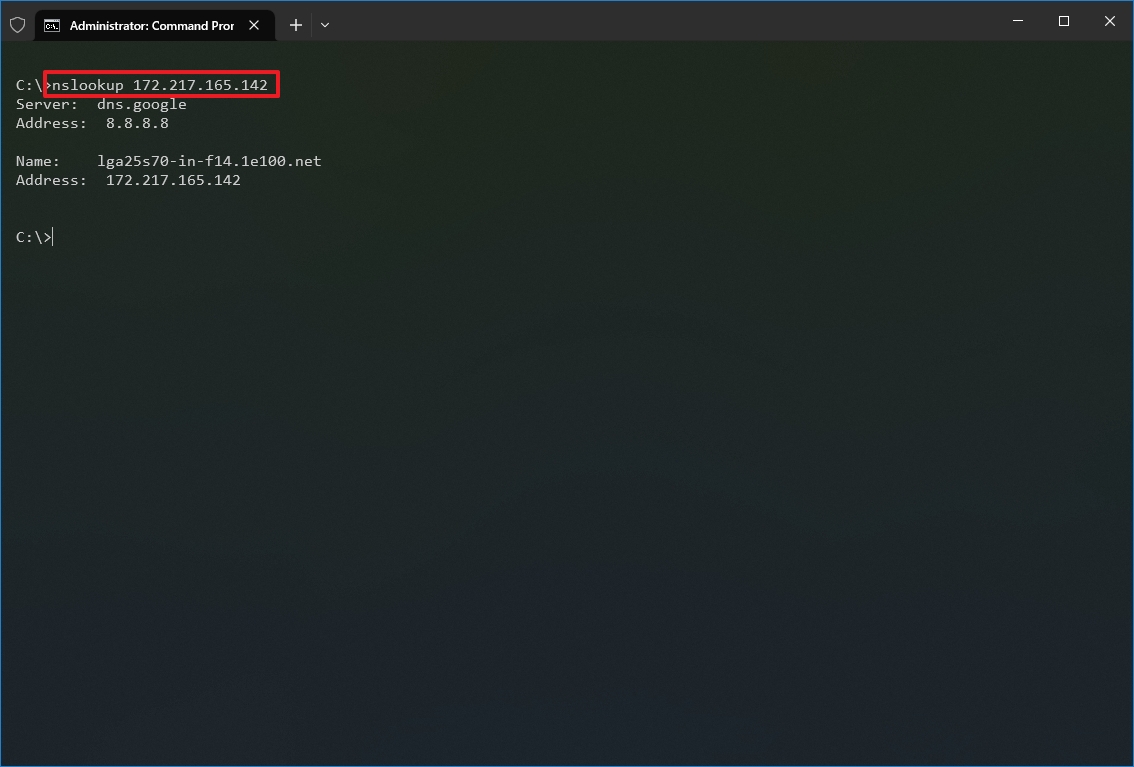
- Type the following command to determine the name and address of a specific server and press Enter: nslookup IP-ADDRESS
In the command, replace the IP-ADDRESS with the address of the remote device. For example, this command looks up the IP address 172.217.165.142 address: nslookup 172.217.165.142
- Type the following command to determine the address of a specific server and press Enter: nslookup DOMAIN-NAME
In the command, replace the DOMAIN-NAME with the address of the remote device. For example, this command looks up the IP address Google.com address: nslookup google.com
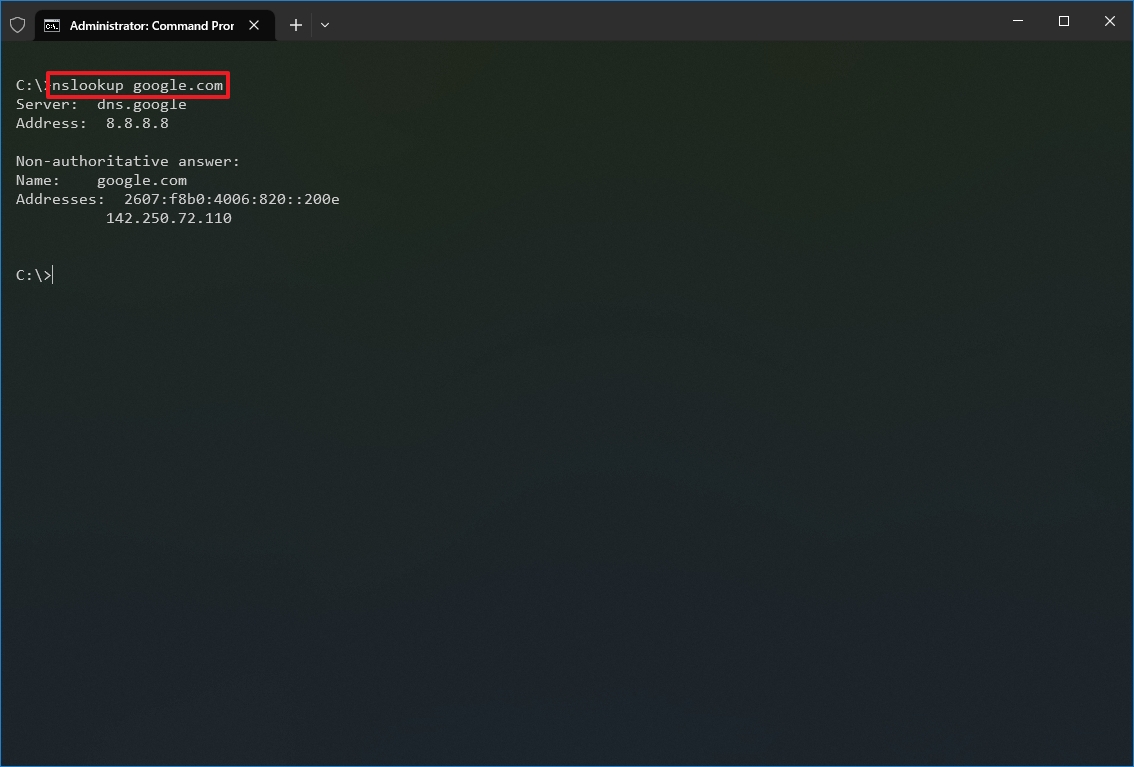
After you complete the steps, depending on the command, you will know whether the device has a DNS resolver and the IP address or domain and vice versa of the remote host.
5. NetStat
The netstat (Network Statistics) tool displays statistics for all network connections. It allows you to understand open and connected ports to monitor and troubleshoot networking problems for Windows 10 and apps.
When using the netstat tool, you can list active network connections and listening ports. You can view network adapter and protocol statistics. You can even display the current routing table and much more.
To get started with netstat, use these steps:
- Open Start.
- Search for Command Prompt, right-click the top result, and select the Run as administrator option.
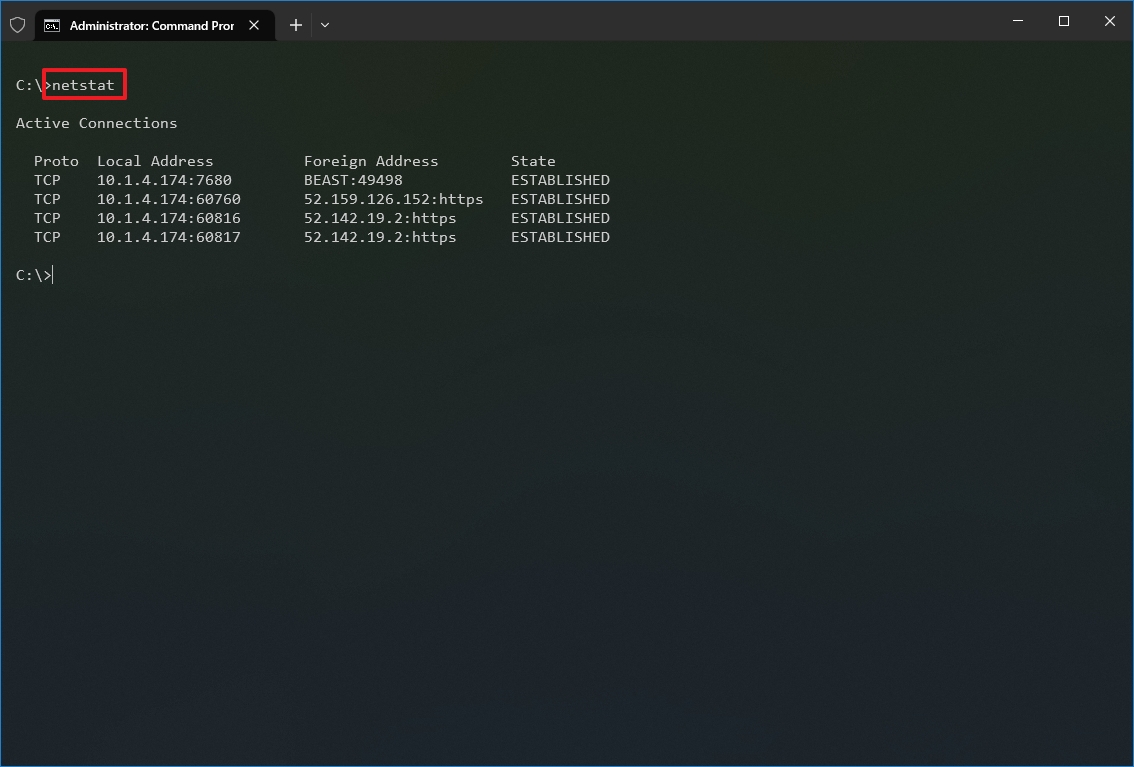
- Type the following command to show all active TCP connections and press Enter: netstat
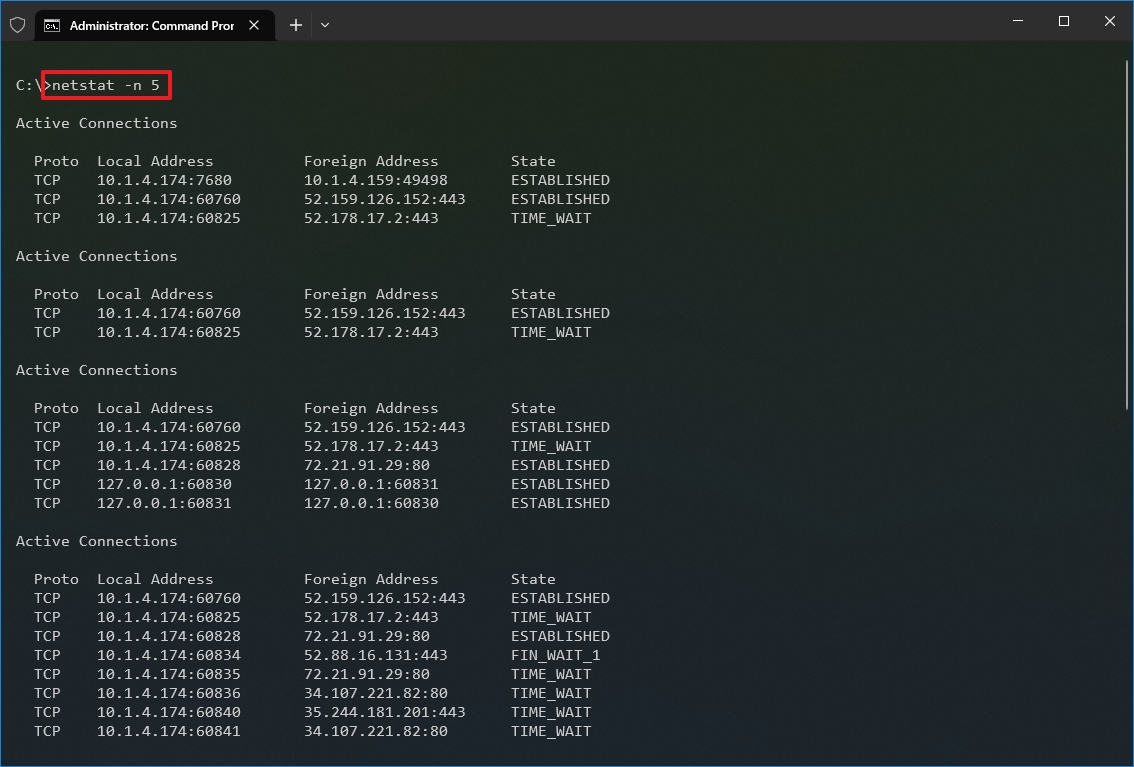
- (Optional) Type the following command to display active connections showing numeric IP address and port number instead of trying to determine the names and press Enter: netstat -n

- (Optional) Type the following command to refresh the information at a specific interval and press Enter: netstat -n INTERVAL
In the command, make sure to replace INTERVAL for the number (in seconds) you want to redisplay the information. This example refreshes the command in question every five seconds: netstat -n 5
- Quick note: When using the interval parameter, you can terminate the command using the «Ctrl + C» keyboard shortcut in the console.
Once you run the command, it will return a list of all active connections in four columns, including:
- Proto: Displays the connection protocol, including TCP or UDP.
- Local Address: Displays the device’s IP address followed by a semicolon with a port number of the connection. The double-semicolon inside brackets indicates the local IPv6 address. The «0.0.0.0» address also refers to the local address.
- Foreign Address: Shows the remote computer’s IP (or FQDN) address with the port number after the semicolon port name (for instance, https, http, microsoft-ds, wsd).
- State: Shows whether the connection is active (established), if the port has been closed (time_wait) and if the program has not closed the port (close_wait). Other statuses available include closed, fin_wait_1, fin_wait_2, last_ack, listen, syn_received, syn_send, and timed_wait.
6. ARP
Windows 10 maintains an arp (Address Resolution Protocol) table, which stores IP to Media Access Control (MAC) entries that the system has resolved. The arp tool lets you view the entire table, modify the entries, and use it to determine a remote computer’s MAC address.
Usually, you do not need to worry about MAC addresses, but there are scenarios when this information may come in handy. For example, when troubleshooting network problems at the data link layer (switching) or when restricting access or filtering content through the network for specific devices.
To get started with arp on Windows 10, use these steps:
- Open Start.
- Search for Command Prompt, right-click the top result, and select the Run as administrator option.
- Type the following command to view the current arp table cache on Windows 10 and press Enter: arp -a

- Type the following command to determine the MAC address of a remote device and press Enter: arp -a IP
In the command, make sure to replace IP with the address of the destination. For example, this command reveals the physical address of the 10.1.4.120 destination: arp -a 10.1.4.120

- Confirm the MAC (physical) address for the remote device.
After you complete the steps, you will be able to view the entire arp table and MAC address of a specific IP address.
If you want to know all the available options, use the «arp /?» command to list the available options with their corresponding descriptions.
7. Route
The route tool displays the routing table that allows Windows 10 to understand the network and communicate with other devices and services. The tool also offers some options to modify and clear the table as needed.
Like the arp tool, you typically do not have to worry about the routing table, but the command-line tool will come in handy when troubleshooting related problems.
To view or flush the routing table available on Windows 10, use these steps:
- Open Start.
- Search for Command Prompt, right-click the top result, and select the Run as administrator option.
- Type the following command to view the routing table known to Windows 10 and press Enter: route print

- Confirm the routing table information.
- (Optional) Type the following command to clear the routing table and press Enter: route -f
- Quick note: When running this command, the device will lose network connectivity since the system no longer understands the network topology. After running the command, restart the machine to allow the networking stack to rebuild the routing table. Usually, you should not have to clear the table unless you modify some of the entries and you need to reset the table.
Once you complete the steps, you will understand the routing table and how to clear the information.
You can also use the «route /?» command to view a list of available options, including options to change networking metrics, specify a gateway, add a new route, and much more. However, modifying these settings is usually not recommended unless you understand how the network works.
8. Netsh
On Windows 10, netsh (Network Shell) is a legacy command-line tool that allows you to display and change virtually any network configuration. For instance, you can use the tool to view the current network configurations, manage wireless connections, reset the network stack to fix most common problems, enable or disable the firewall, and a lot more.
To get started with the netsh command-line tool, use these steps:
- Open Start.
- Search for Command Prompt, right-click the top result, and select the Run as administrator option.
- Type the following command to view a list of the available commands (contexts) and press Enter: netsh /?
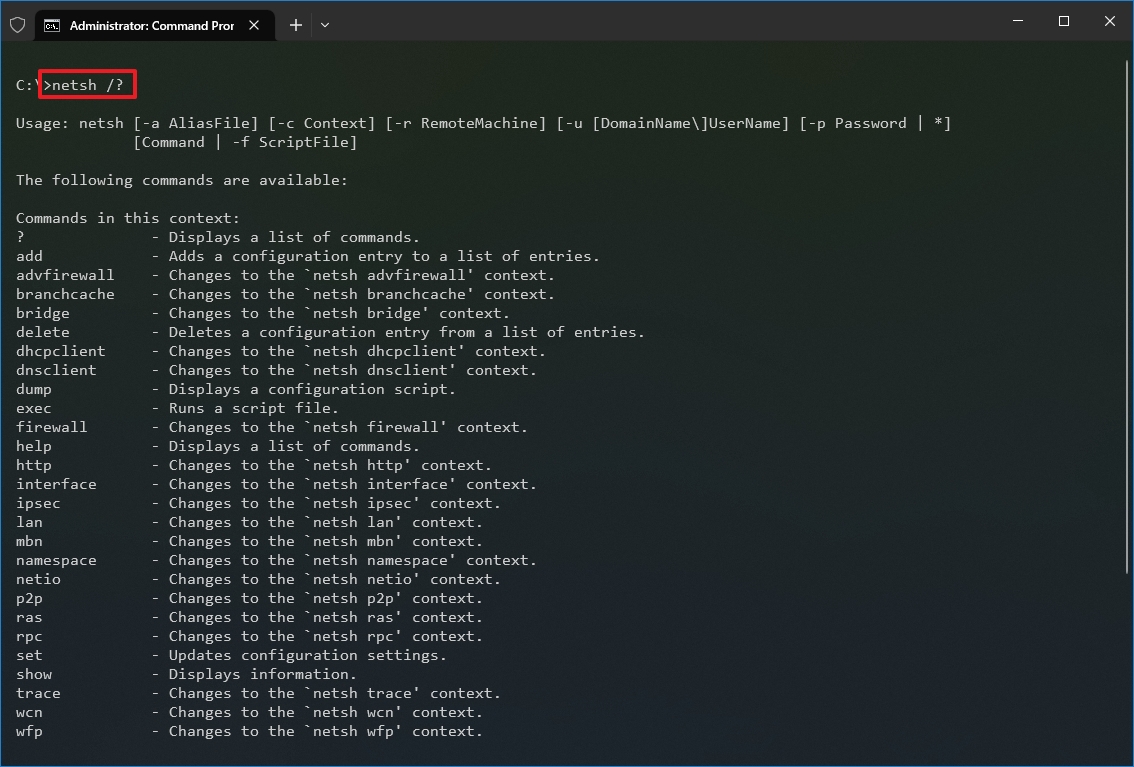
- Type the following command to view the list of available subcommands (subcontexts) for a specific option and press Enter: netsh CONTEXT-COMMAND
In the command, change the CONTEXT-COMMAND for the command that includes additional options. For example, this command shows the commands available to manage the firewall with netsh: netsh advfirewall /?
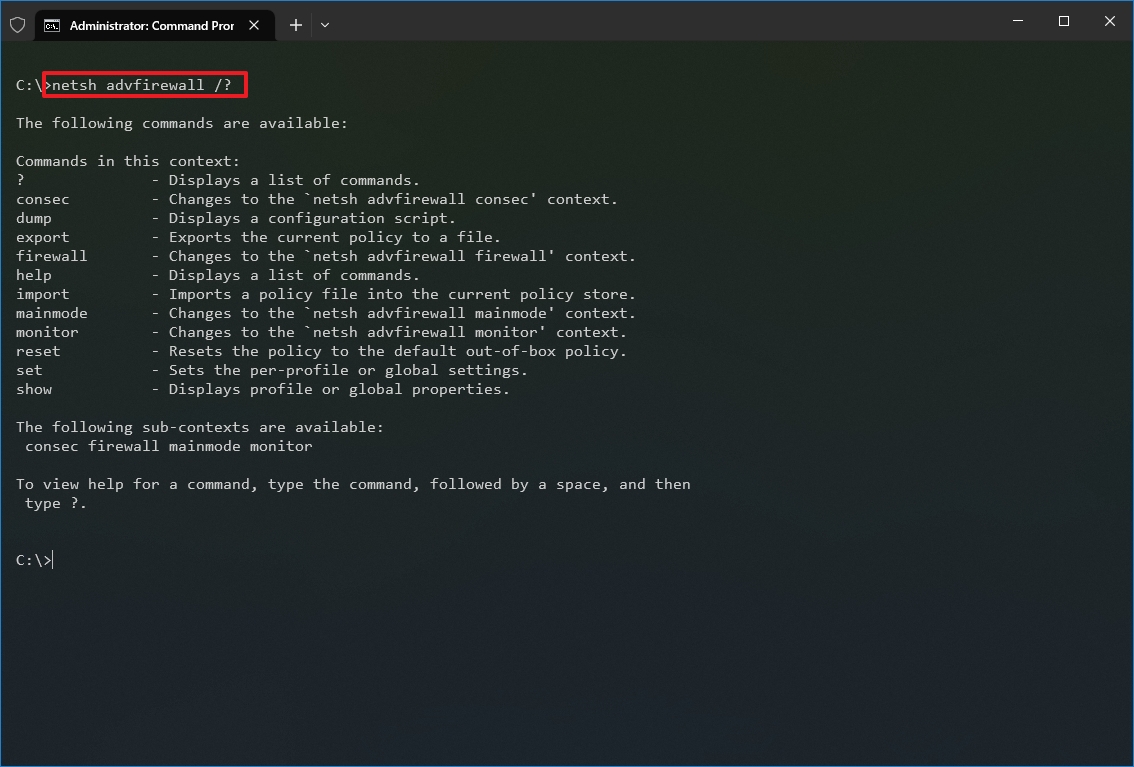
Once you complete the steps, you will know how to navigate the netsh contexts and subcontexts command to manage networking settings.
Reset system network stack
To reset the network stack to resolve common connectivity problems, use these steps:
- Open Start.
- Search for Command Prompt, right-click the top result, and select the Run as administrator option.
- Type the following command to reset the winsock stack and press Enter: netsh winsock reset
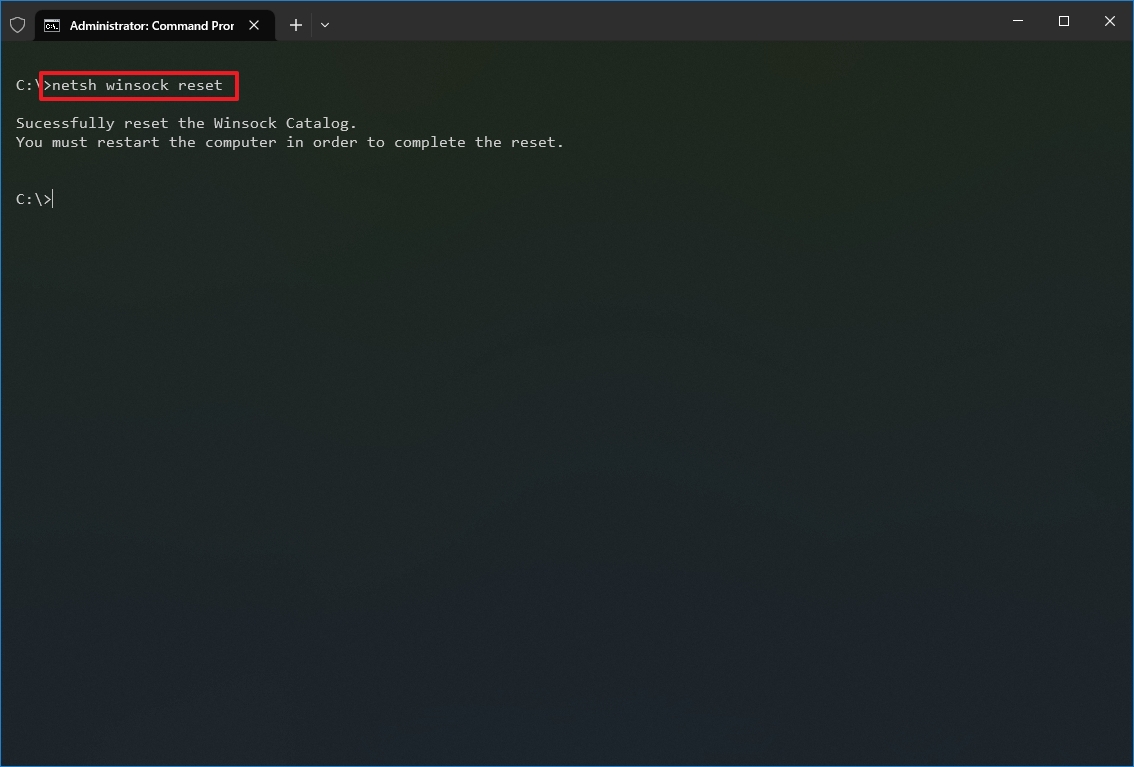
- Restart your computer.
After you complete the steps, the winsock configuration will reset, hopefully fixing the problems connecting to a network and the internet.
Export and import network configuration
To export the network configuration with netsh on Windows 10, use these steps:
- Open Start.
- Search for Command Prompt, right-click the top result, and select the Run as administrator option.
- Type the following command to export the current configuration for all the network adapters and press Enter: netsh -c interface dump>PATH\TO\EXPORTED.txt
In the command, replace the PATH\TO\EXPORTED.txt with the path and name of the file to store the configuration. For example, the following command exports the settings to the netshconfig.txt file: netsh -c interface dump>c:\netshconfig.txt
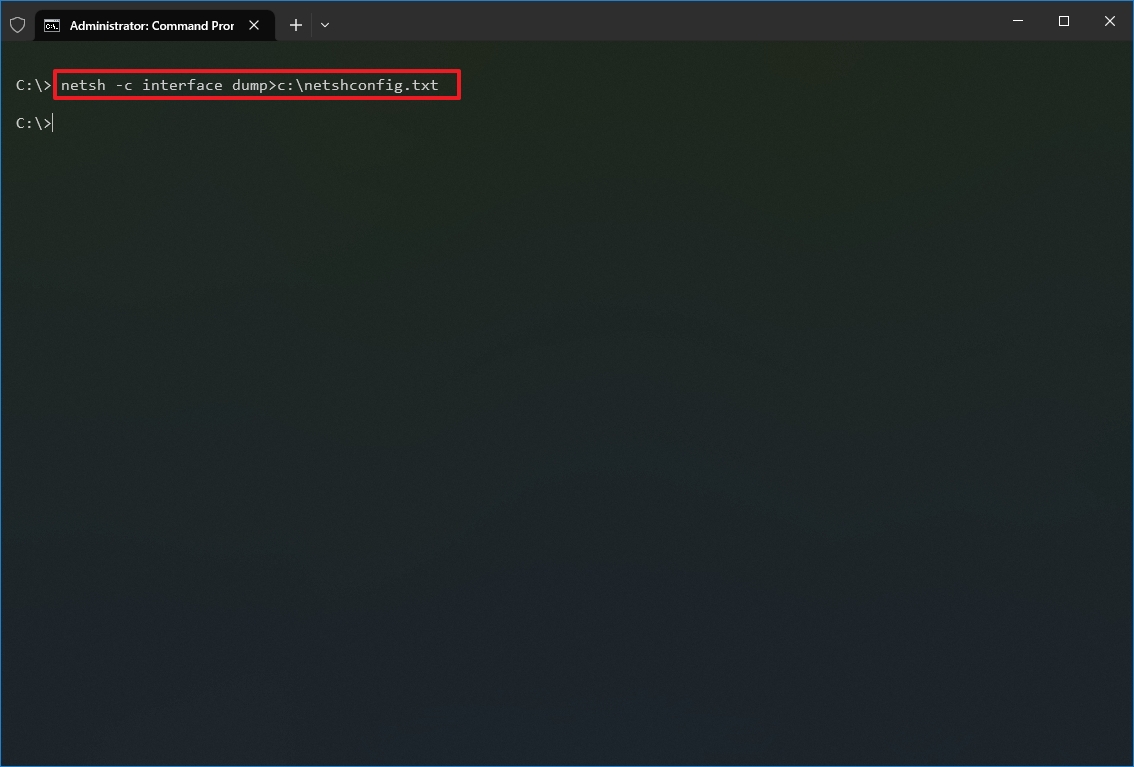
Once you complete the steps, you can open the file with any text editor to view the exported configuration.
Import network configuration
To import the network configuration settings with netsh, use these steps:
- Open Start.
- Search for Command Prompt, right-click the top result, and select the Run as administrator option.
- Type the following command to import the network configuration and press Enter: netsh -c interface dump>PATH\TO\IMPORTED.txt
In the command, replace the PATH\TO\EXPORTED.txt with the path and name of the file you want with the exported configuration. For example, the following command imports the settings from the netshconfig.txt file: netsh -f c:\netshconfig.txt
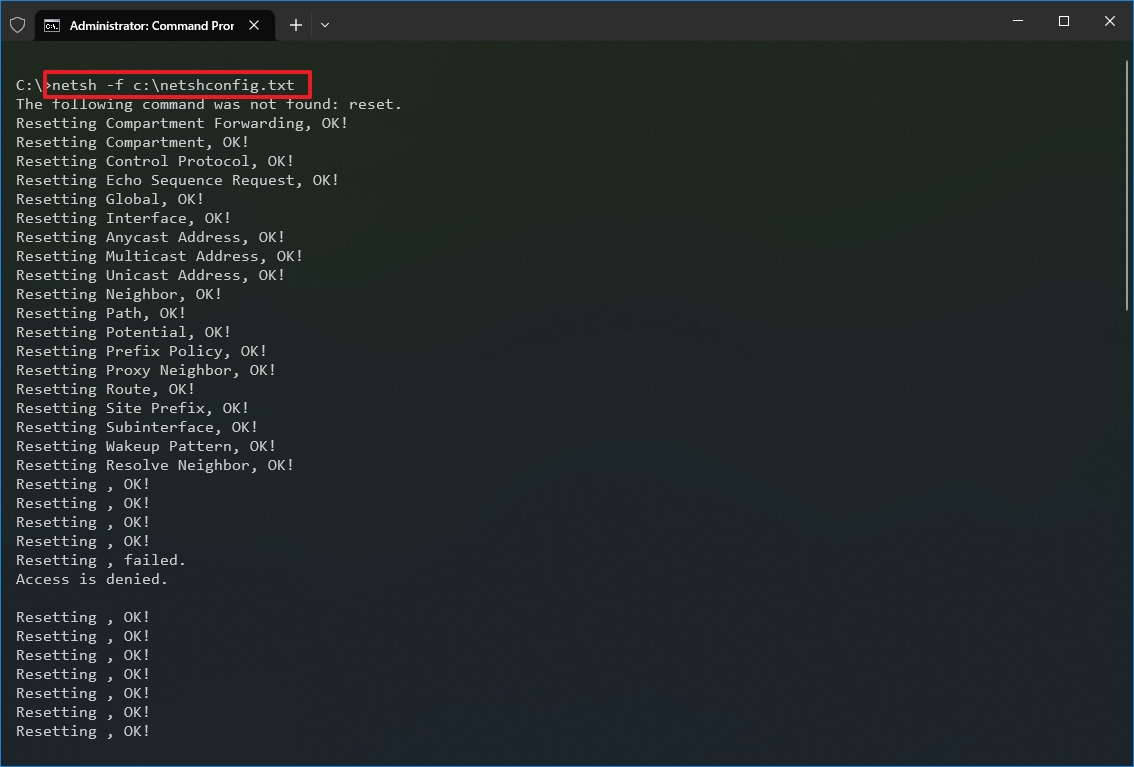
After you complete the steps, the new networking configuration will be imported and applied to Windows 10.
Enable and disable firewall
To enable the Windows 10 firewall with netsh, use these steps:
- Open Start.
- Search for Command Prompt, right-click the top result, and select the Run as administrator option.
- Type the following command to enable the default firewall and press Enter: netsh advfirewall set currentprofile state on
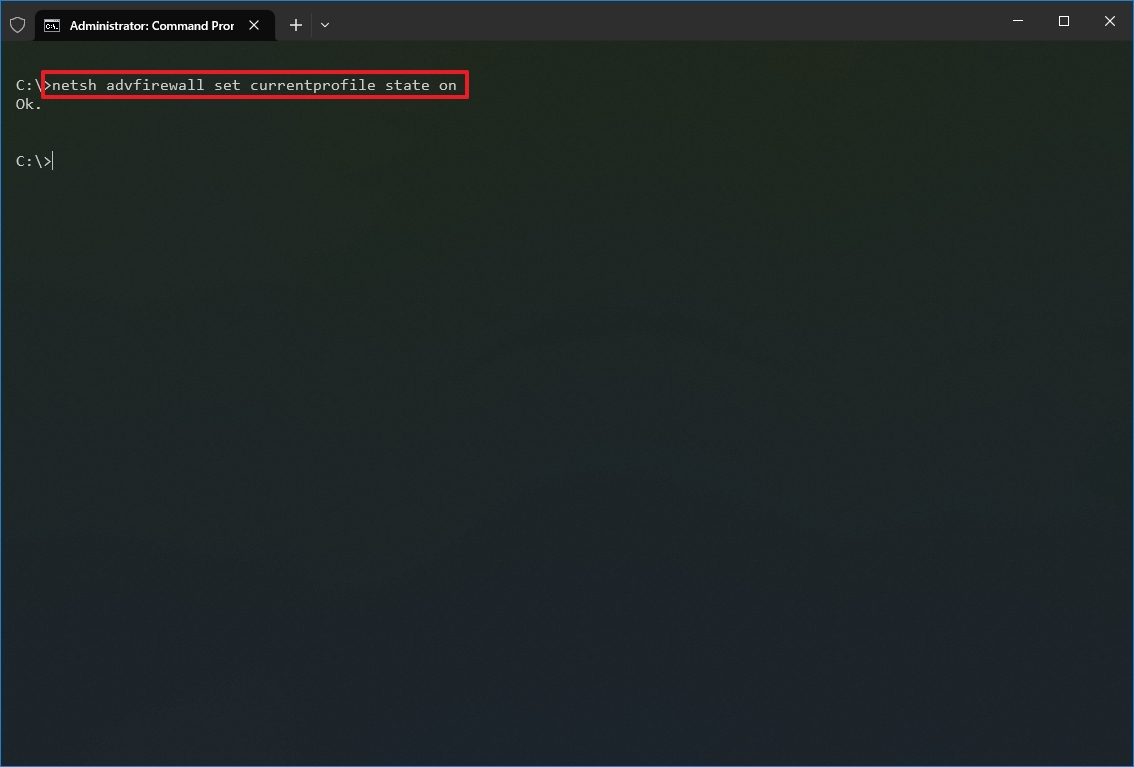
Once you complete the steps, the Windows Defender Firewall will enable on the device.
Disable firewall
To disable the Windows 10 firewall with netsh, use these steps:
- Open Start.
- Search for Command Prompt, right-click the top result, and select the Run as administrator option.
- Type the following command to disable the default firewall and press Enter: netsh advfirewall set currentprofile state off

Once you complete the steps, the Windows Defender Firewall will be disabled on the device.
On Windows 10, there are many tools you can use to change settings and troubleshoot networking issues using Command Prompt, PowerShell, and graphical applications. However, in this guide, we only focus on getting you started with some of the most common tools available in Command Prompt.
More resources
For more helpful articles, coverage, and answers to common questions about Windows 10 and Windows 11, visit the following resources:
- Windows 11 on Windows Central — All you need to know
- Windows 10 on Windows Central — All you need to know
Mauro Huculak has been a Windows How-To Expert contributor for WindowsCentral.com for nearly a decade and has over 15 years of experience writing comprehensive guides. He also has an IT background and has achieved different professional certifications from Microsoft, Cisco, VMware, and CompTIA. He has been recognized as a Microsoft MVP for many years.
Applies ToWindows 10 Windows 11
Проводное подключение Ethernet позволяет быстро получить доступ к Интернету: подключите один конец кабеля Ethernet к домашнему маршрутизатору, а другой — к порту Ethernet на компьютере с Windows. Если на вашем компьютере нет порта Ethernet, но вы хотите попробовать этот вариант, вы можете воспользоваться адаптером USB-ethernet.
Если вы используете подключение Ethernet и не можете подключиться к Интернету, вы можете попытаться устранить проблему и подключиться.
Запуск средства устранения неполадок с сетью
Если вы используете устройство Windows 11, начните с запуска автоматического средства устранения неполадок с сетью и Интернетом в приложении «Получить справку». Он автоматически запустится диагностика и попытается устранить большинство проблем. Если вы используете более раннюю версию Windows или мобильное устройство, перейдите к инструкциям по устранению неполадок.
Запустите средство устранения неполадок в разделе «Справка»
На домашнем маршрутизаторе
Чтобы решить проблему или сузить область поиска решения, в первую очередь выполните следующие действия:
Убедитесь, что кабель Ethernet надежно подключен к порту Ethernet на маршрутизаторе и компьютере с Windows. Убедитесь, что кабель Ethernet подключен к правильному порту Ethernet маршрутизатора, а не к порту Интернета, который используется для подключения модема и маршрутизатора.
Если один кабель Ethernet не работает и поблизости есть другой, попробуйте другой кабель Ethernet, чтобы узнать, работает ли это. Если он работает, вероятно, проблема заключается в первом кабеле.
Это поможет установить новое соединение с поставщиком услуг Интернета. При этом все подключения к вашей сети Wi‑Fi будут временно разорваны. Инструкции по перезагрузке модема и маршрутизатора могут отличаться, но основные действия таковы:
Примечание: Если у вас есть комбинированное устройство с кабельным модемом/маршрутизатором Wi-Fi, вам просто нужно выполнить предлагаемые действия на одном устройстве.
-
Отсоедините кабель питания маршрутизатора от источника питания.
-
Отсоедините кабель питания модема от источника питания. В некоторых модемах есть резервный аккумулятор. Если после отключения модема его индикаторы не гаснут, извлеките аккумулятор.
-
Подождите не менее 30 секунд.
Если вы вынимали из модема аккумулятор, верните его на место. -
Подключите модем к источнику питания. Индикаторы модема замигают. Подождите, пока они перестанут мигать.
-
Подключите маршрутизатор к источнику питания. Подождите несколько минут, пока модем и маршрутизатор полностью включатся. Как правило, готовность этих устройств можно проверить по индикаторам состояния.
-
На компьютере попробуйте снова зайти в Интернет с помощью Ethernet-подключения.
На компьютере
Откройте Параметры > Сеть и Интернет. Проверьте состояние подключения Ethernet в верхней части экрана.
-
На Windows 11 должно отображаться подключено под именем сетевого подключения.
-
На Windows 10 должно отображаться значение Вы подключены к Интернету под сетевым подключением.
Если возникает ошибка, например выдается сообщение Требуется действие, выберите Ethernet, чтобы просмотреть параметры подключения Ethernet.
Если один кабель Ethernet не работает и поблизости есть другой, попробуйте другой кабель Ethernet, чтобы узнать, работает ли это. Если он работает, вероятно, проблема заключается в первом кабеле.
Если ваш маршрутизатор поддерживает сеть Wi-Fi, попробуйте подключиться к Wi-Fi и посмотрите, удастся ли вам это. Эта рекомендация преследует две цели: помочь вам подключиться к Интернету и ограничить число возможных причин проблемы. Подробнее см. в разделе Подключение к сети Wi-Fi в Windows.
Попробуйте запустить эти сетевые команды, чтобы вручную сбросить стек TCP/IP, освободить и обновить IP-адрес, а также очистить и сбросить кэш сопоставителя DNS-клиента.
-
Выберите Поиск на панели задач и введите Командная строка. Появится кнопка Командная строка. Справа от нее выберите Запуск от имени администратора > Да.
-
В командной строке выполните в указанном порядке следующие команды, а затем проверьте, помогло ли это решить проблему с подключением:
-
Введите netsh winsock reset и нажмите клавишу ВВОД.
-
Введите netsh int ip reset и нажмите клавишу ВВОД.
-
Введите ipconfig /release и нажмите клавишу ВВОД.
-
Введите ipconfig /renew и нажмите клавишу ВВОД.
-
Введите ipconfig /flushdns и нажмите клавишу ВВОД.
-
Если предыдущие шаги не помогли устранить проблему, попробуйте удалить драйвер сетевого адаптера и перезагрузить компьютер. Windows установит последнюю версию драйвера автоматически. Воспользуйтесь этим способом, если сетевое подключение стало работать неправильно после недавнего обновления.
Сначала убедитесь, что у вас есть резервные копии драйверов. Перейдите на веб-сайт изготовителя компьютера и скачайте последнюю версию драйвера для сетевого адаптера. Если компьютер не подключается к Интернету, скачайте драйвер на другом компьютере, сохраните его на USB-устройстве флэш-памяти, а затем установите на своем компьютере. Вам нужно знать изготовителя компьютера и название или номер модели.
-
Выберите поиск на панели задач, введите диспетчер устройств, а затем выберите Диспетчер устройств в списке результатов.
-
Разверните раздел Сетевые адаптеры и найдите сетевой адаптер Ethernet для своего устройства.
-
Выберите сетевой адаптер, нажмите и удерживайте его (или щелкните правой кнопкой мыши), затем выберите Удалить устройство > Попытка удалить драйвер для этого устройства > Удалить.
-
После удаления драйвера нажмите кнопку Пуск > Выключение > Перезагрузка.
После перезапуска компьютера операционная система Windows автоматически выполнит поиск драйверов и установит драйвер сетевого адаптера. Проверьте, помогло ли это решить проблему с подключением. Если Windows не устанавливает драйвер автоматически, попробуйте установить резервную копию драйвера, сохраненную перед удалением.
Сброс сетевых параметров является крайним шагом. Используйте его, только если вышеперечисленные действия не помогли установить подключение.
Возможно, это поможет устранить проблемы с подключением после перехода с Windows 10 на Windows 11, а также проблему, из-за которой вы можете подключиться к Интернету, но не к общим сетевым дискам. Сброс сети позволяет удалить все установленные сетевые адаптеры и их параметры. После перезапуска компьютера все сетевые адаптеры будут переустановлены, а параметрам будут заданы значения по умолчанию.
-
Нажмите кнопку Пуск и введите слово параметры. Выберите Параметры > Сеть & Интернет
-
На Windows 11 выберите Дополнительные параметры сети > Сброс сети.
-
На Windows 10 выберите Состояние > Сброс сети.
-
-
В окне Сброс сетевых параметров выберите пункты Сбросить > Да.
-
Подождите, пока компьютер перезагрузится, и проверьте, устранена ли проблема.
Примечания:
-
После выполнения сброса сетевых параметров может потребоваться переустановить и настроить другое сетевое программное обеспечение, которое вы можете использовать, например клиент VPN или виртуальные коммутаторы от Hyper‑V (если вы используете то или иное программное обеспечение для виртуализации сети).
-
При выполнении сброса сетевых параметров все ваши известные сетевые подключения могут быть переведены на профиль общедоступной сети. При использовании профиля общедоступной сети обнаружение вашего компьютера другими компьютерами и устройствами, находящимися в сети, будет недоступно, за счет чего повышается степень безопасности вашего компьютера. Сведения об использовании профиля частной сети см. в разделе Основные параметры и задачи сети.
На другом компьютере
Если у вас дома есть другой компьютер с Windows и адаптер USB-Ethernet, попробуйте подключиться с помощью этого компьютера. Если вам это удастся, проблема, скорее всего, возникла из-за вашего первого компьютера. Если вы не можете подключиться к сети Ethernet с любого компьютера, причиной проблемы может быть маршрутизатор, поставщик услуг Интернета или адаптер USB-Ethernet.
Нужна дополнительная помощь?
Нужны дополнительные параметры?
Изучите преимущества подписки, просмотрите учебные курсы, узнайте, как защитить свое устройство и т. д.
While using the computer at any time, you might experience troubles with the internet connection on your PC. It is indeed a frustrating experience when you cannot access the wired or wireless available networks around you when needed. That is why Windows provide the users with a tool that can be used to troubleshoot those connection problems. Let us learn more about how to troubleshoot network connectivity problems with network troubleshooter Windows 10, reset TCP/IP, and other methods.

Table of Contents
Following are some of the uses of network troubleshooting to fix the network-related problems on Windows systems:
- Troubleshooting the network helps you diagnose and resolve problems within the computer network.
- All the problems related to network operations will be analyzed by the troubleshooter, and the issues will be displayed on the screen.
- This method eliminates the potential symptoms of the network connection error and prevents it from occurring again.
Let us move on to discussing the different methods explaining how to troubleshoot network connectivity problems you may be facing right now.
Method 1: Run Network Troubleshooter
Follow the below methods to run a network troubleshooter from the settings application to troubleshoot network connectivity problems on your Windows 10 PC:
1. Hit the Windows key and type Troubleshoot settings in the search bar. Click Open as shown.

2. Click on Additional troubleshooters.

3. Select Network Adapter and click on Run the troubleshooter to run this network troubleshooter on Windows 10.

4. Select the network adapter to diagnose from given options and click on Next.
- Wi-Fi
- Ethernet
- All network adapters

5. Wait for the troubleshooter to detect the problems.
6A. If the result is Troubleshooting couldn’t identify the problem, click on Close the troubleshooter.

6B. If the troubleshooter has identified a problem, then follow the on-screen instructions to fix the possible network problems.
Also Read: Fix Network Connection Error 0x00028002
Method 2: Change Network Adapter Settings
The most typical reasons for network adapter not working Windows 10 issue include a failing TCP/IP stack, IP address, or DNS client resolver cache. Thus, change network adapter settings Windows 10 to solve the issue, as follows:
1. Launch Control Panel through the Windows Search Bar, as shown.

2. Set View by > Large icons and click on Network and Sharing Center.

3. Click on Change adapter settings, as shown.

4. Select Properties from the Wi-Fi wireless adapter context menu by right-clicking on it.

5. Look for Internet Protocol Version 4 (TCP/IPv4) in the list of options that appears and uncheck it to disable it.

6. To make the changes stay, click OK and restart your PC.
Also Read: How to Enable DNS over HTTPS in Chrome
Method 3: Reset TCP/IP
Few users have reported that you could fix the network connectivity problems by resetting the TCP/IP configuration. Implement the below-mentioned steps to reset TCP/IP for smooth network connectivity in the future:
1. Hit the Windows key, type Command Prompt, and click on Run as administrator.

2. Now, type the following commands one by one and hit Enter after each command:
ipconfig /release
ipconfig /all
ipconfig /flushdns
ipconfig /renew

3. Finally, wait for the commands to be executed and reboot your PC. You will have completed the reset TCP/IP process.
Also Read: How to Change DNS Server on Windows 11
Method 4: Restart or Reset Router and Modem
By restarting or resetting the router and modem, you can resolve the network connectivity problems and refresh your internet connection.
Method 4A: Restart Router/Modem
Restarting the router/modem will re-initiate the network connectivity. Few users have reported that all the changes marked in the configuration settings will be effective when you restart the router/modem. Therefore, follow the below-mentioned steps to do so:
1. Find the Power button at the back of your router/modem.
2. Press the button once to turn it off.

3. Now, disconnect the Router/Modem power cable and wait until the power is entirely drained from the capacitors.
4. Then, reconnect the power cable and switch it on after a minute.
5. Wait until the network connection is re-established and try signing in again.
Also Read: What is the Difference Between a Router and a Modem?
Method 4B: Reset Router
Before you try the below instructions, you must be aware of a few points:
Note 1: All the settings and setups like forwarded ports, black-listed connections, credentials, etc., will be erased. So, make sure to keep an account of these before proceeding to the instructions discussed below.
Note 2: After Reset, the router will switch back to its default settings and authentication password. So, use its default credentials to log-in after the reset.
1. Open the router settings using the default gateway IP address. Then, use your credentials to Login as shown.

2. Note down all the configuration settings. You will require them after resetting the router as you may lose your ISP credentials if you use a P2P protocol (Point-to-Point Protocol over the Internet)
3. Now, hold the Reset button on your router for 10-30 seconds.
Note: You may have to use pointing devices like a pin, or toothpick to press the RESET button in some Routers.

4. The router will automatically turn off and turn back on. You can release the button when the lights begin to blink.
5. Re-enter configuration details for the router on the webpage.
Also Read: How to Find My Router’s IP Address
Method 4C: Reset Modem
If the issue is not resolved even after restart/reset of the router, try resetting the modem. It is one of the effective methods to solve how to troubleshoot network connectivity problems.
Note: Please keep in mind that resetting the modem will also reset all of your device settings. Modem resetting can be done in the following ways:
Option 1: Using Reset Button
By pushing the reset button available on the backside of the modem, you can reset the modem settings.

Option 2: Using Web Browser
1. Type 192.168.1.1 or 192.168.1.2 into the address bar of the web browser.
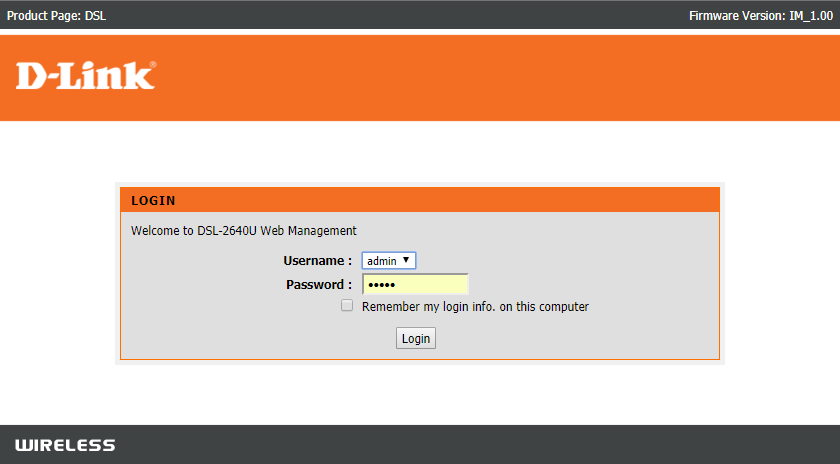
2. Type your credentials and hit Enter key to log in.
Note: Different routers have different default login credentials.
3. Select Settings > System > Maintenance.
4. Choose Restore Default Settings and wait for the process to be completed.

5. After the reset is finished, the modem will restart itself.
Frequently Asked Questions (FAQs)
Q1. What does a network troubleshooter do on Windows 10?
Ans. When you run network troubleshooter on your system, it identifies the network and connection problems by analyzing the network components and operations. Further, the troubleshooter fixes the problems within a few steps. It is the safest and most reliable way to know what network problems your device is facing and fix the issues instantly.
Q2. Can any device face network problems?
Ans. Yes, any device may face network issues once or more times as a computer system may fail to configure with the available network to form a proper connection. However, it is solvable as to how to troubleshoot network connectivity problems methods are mentioned to troubleshoot this problem in this article.
Q3. Is it hard to troubleshoot network issues on Windows 10?
Ans. No, it is easy. Windows has provided the easiest ways for users to identify and solve network issues. Follow the above methods carefully to know how to troubleshoot network connectivity problems.
Recommended:
- How to Update Network Adapter Drivers on Windows 10
- Xfinity Router Login How to Login to a Comcast Xfinity Router
- How to Hide WiFi Network Name in Windows 11
- Fix Amazon KFAUWI Device Showing up on Network
So these were the methods about how to troubleshoot network connectivity problems on Windows 10. Please let us know if this method worked the best for you. And leave any questions or comments in the space below for us.
Диагностика сети в Windows с помощью командной строки позволяет проанализировать и устранить множество проблем с сетевыми соединениями и Интернетом. Следует заметить, что у многих команд нет эквивалентов в графической среде!
Инструкция
Итак, запускаем командную строку. Быстро вызвать ее можно через поиск в Windows7/8/8.1/10 по фразе cmd или сочетанием клавиш Win+R->cmd в Windows XP.
За запуск диагностики отвечает команда ipconfig. Набираем ipconfig /all и нажимаем Enter.
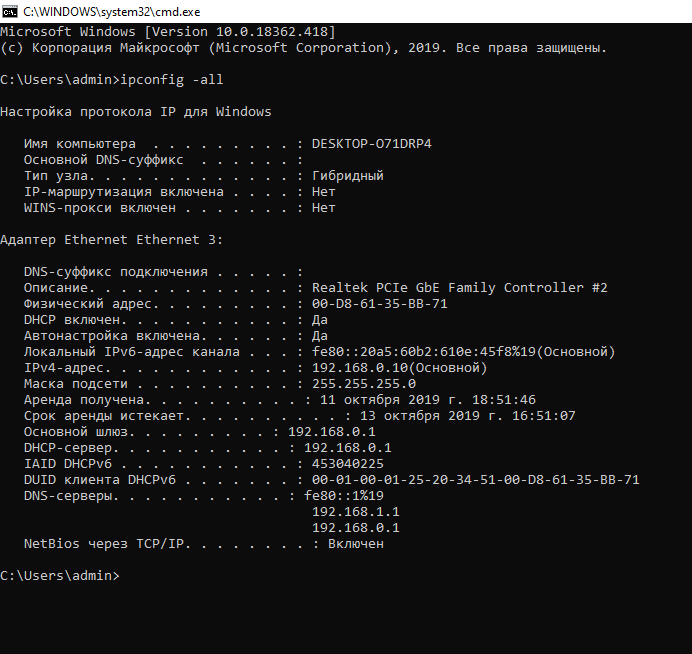
Pдесь можем увидеть, что компьютер подключен к сети интернет через локальный кабель
- IP ПК – 192.168.0.10
- IP Шлюза (роутера) – 192.168.0.1
- DHCP Сервер – именно он дает ip-адрес ПК в сети.
- DNS сервер — адреса серверов, которые преобразуют имена хостов в IP-адреса.
Обратите внимание на шлюз и маску подсети. Если ваш шлюз имеет вид 192.168.0.1, а маска подсети 255.255.255.0, то ip-адрес должен быть в виде 192.168.0.*, где * любое число от 0 до 255 (сейчас во всех роутерах отсчет выдаваемых ip-адресов начинается с 100).
Если ваш ip адрес имеет нестандартный вид (типа 168.98.45.10), это значит, что ваш компьютер принимает неправильные данные от dhcp сервера.
Для этого надо сбросить параметры ip-адресов следующими командами (следующие команды надо вводить через командную строку от имени администратора):

Командная строка от имени администратора

Обычная командная строка (от имени пользователя)
- ipconfig /release – для сброса всех автоматических настроек.
- ipconfig /renew – чтобы получить автоматические настройки.
- netsh winsock reset – сброс параметров ip адресов (всех).
- netsh int ipv4 reset – сброс параметров ipv4.
После выполнения данных команд, командная строка будет выглядеть так.
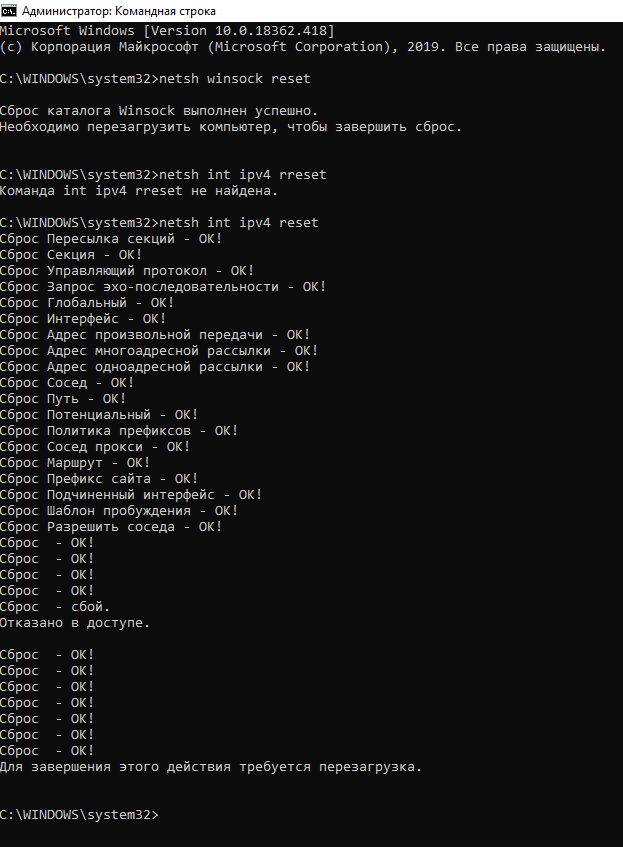
CMD после выполнения команд
Чтобы проверить работоспособность сети, потребуется ввести следующие команды:
- ping 192.168.0.1 – отправка пакетов на роутер (вид может отличаться в зависимости от ip-адреса роутера).
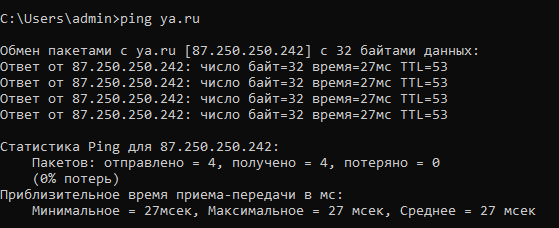
- ping ya.ru – отправка пакетов на адрес ya.ru
Отправка пакетов
Если четырех стандартных пакетов вам мало, то после ping ya.ru допишите –t. В таком случае пакеты будут отправляться, пока вы не закроете командную строку. Вместо t можно указать и определенное количество пакетов (например, -45)
ping ya.ru
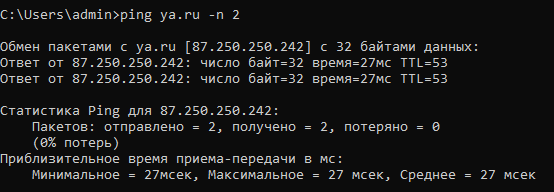
ping ya.ru -n 2 (отправка 2 пакетов)
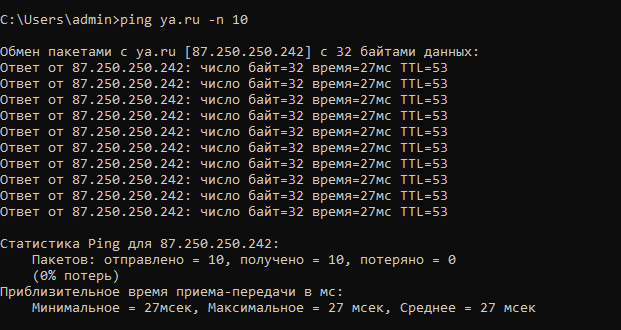
ping ya.ru -n 10 (отправка 10 пакетов). Потерь нет…
С помощью такой диагностики можно определить виновника неполадок с сетью.
Всем пока!
Post Views: 1 395