
-
Выключение функции Xbox DVR
-
Удаление программы
Microsoft постоянно совершенствует свое детище, раз за разом внедряя в него новые функции. Относительно недавно, разработчики предоставили возможность пользователям Windows 10, автоматически записывать игры с помощью функции Xbox DVR, через подключенный аккаунт Xbox. В целом, задумка неплохая, но отнюдь не для тех, у кого слабые характеристики ПК.
В рамках этой статьи вы узнаете, как удалить Xbox в Windows 10 полностью и отключить Xbox DVR.
Отключение функции записи игр поможет повысить FPS в играх. Выключить его можно в самом приложении:
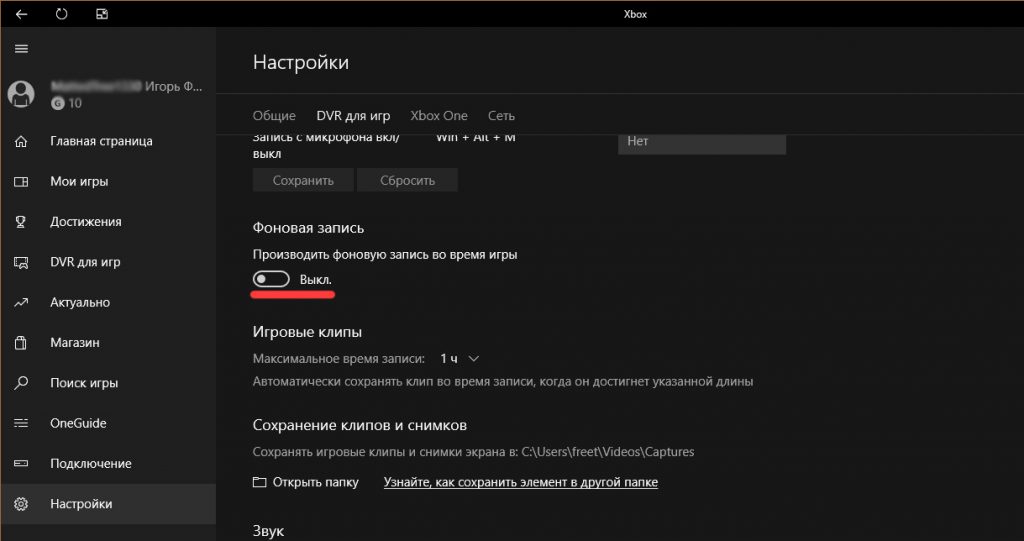
- В поиске Windows введите запрос “Xbox”.

- В открывшейся программе выберите “Настройки”.

- Переместите ползунок “Фоновая запись” в состояние “Выключить”.
- Если вы совсем не пользуетесь данной программой, можете выключить Xbox DVR полностью.
Совет! Программа Overwolf – помощник для любителей компьютерных игр. Она поможет провести мониторинг FPS до и после отключения DVR.
Удаление программы
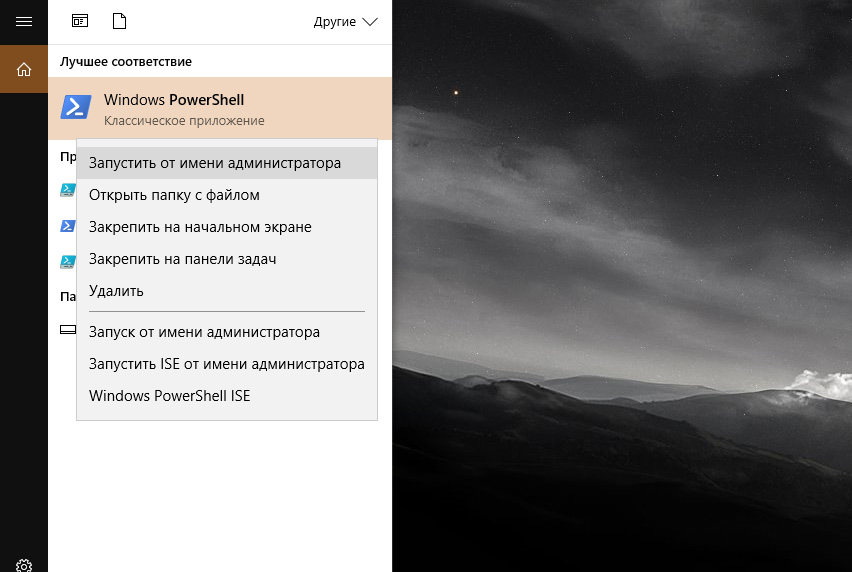
Xbox входит в состав стандартных приложений Windows 10, которые стандартным способом удалить не получится. Для удаления вам понадобятся права администратора:
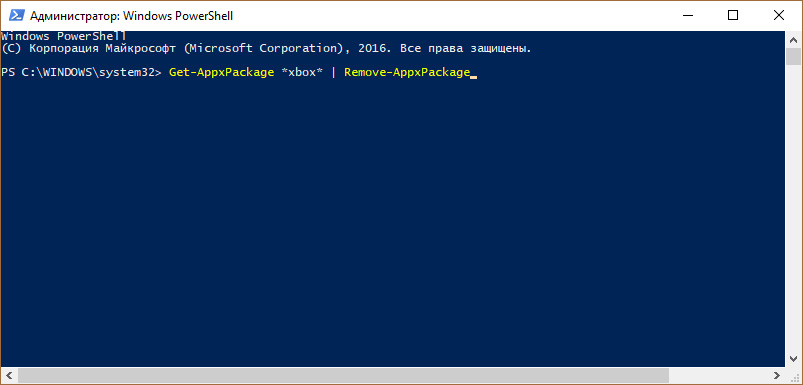
- В поиске Windows введите PowerShell и запустите консоль от имени администратора.

- Введите команду удаления
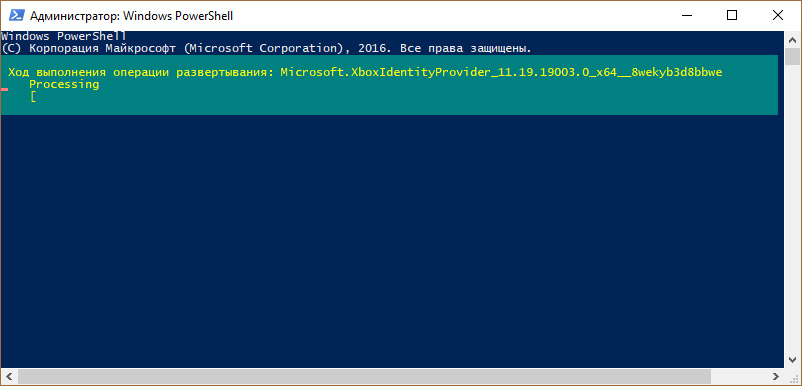
Get-AppxPackage *xbox* | Remove-AppxPackage

- Дождитесь окончание процедуры и перезагрузите ПК.

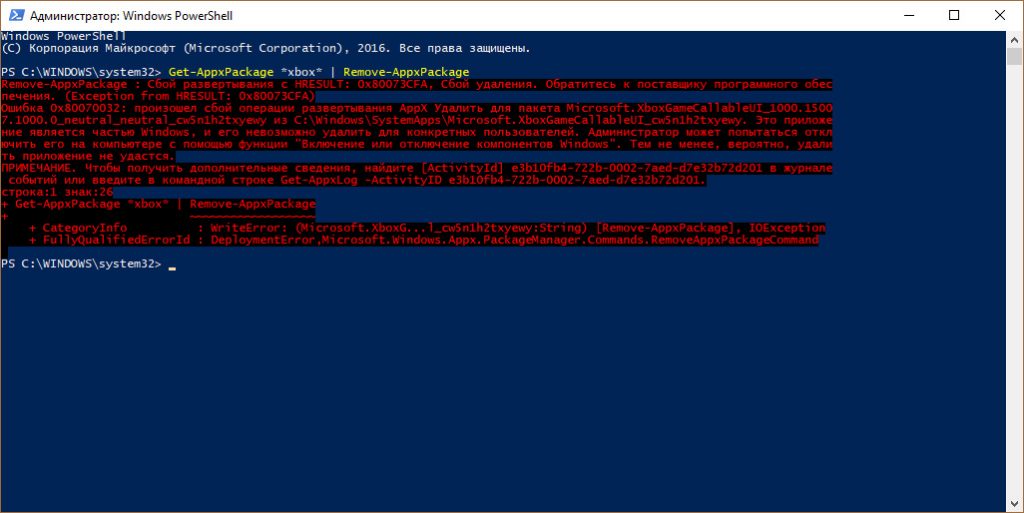
Важно! Вы можете получить уведомление в PowerShell, что произошел сбой удаления и его невозможно удалить для конкретных пользователей. Перезагрузите ПК и проверьте наличие программы в Windows 10. Она должна удалится, несмотря на подобное сообщение.
В операционной системе Windows 10 появилась возможность записывать видео благодаря встроенному приложению Xbox DVR. Функция записи по умолчанию доступна всегда и активируется комбинацией клавиш Win+Alt+R.
Когда функция записи видео активирована, может снижаться значение FPS и могут возникать «фризы» как на низкопроизводительных конфигурациях, так и на достаточно мощных компьютерах.
Чтобы отключить запись видео:
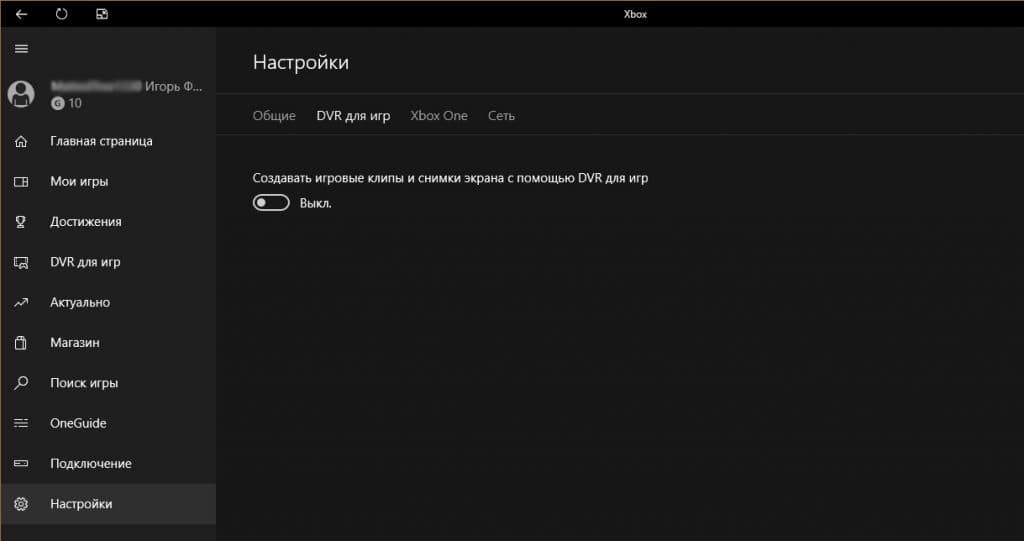
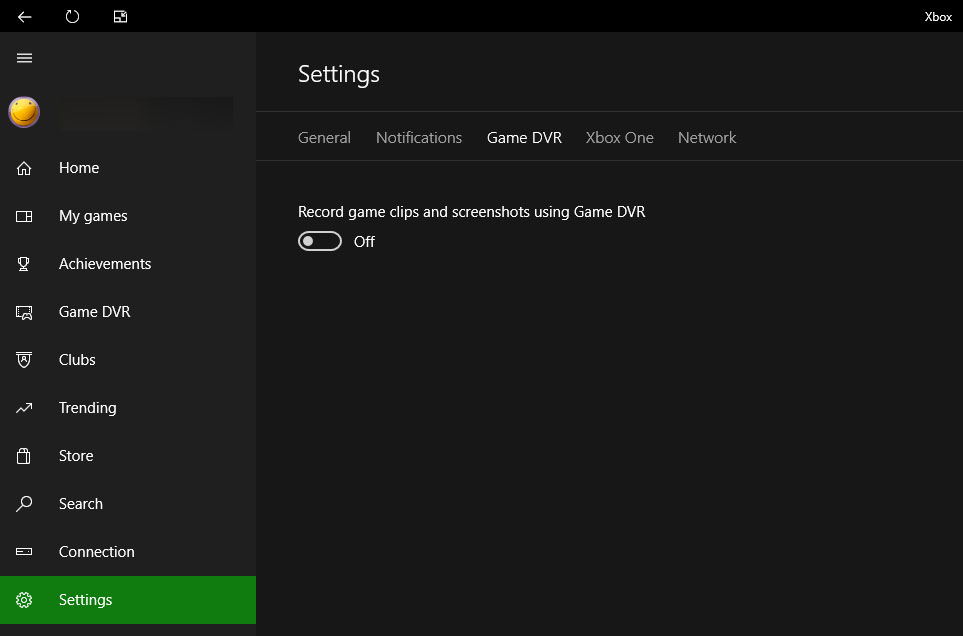
- Нажмите Пуск, в строке поиска введите xbox (без кавычек). Когда в результатах появится приложение Xbox, запустите его.
- Запустив приложение, слева в меню выберите Settings, затем перейдите на закладку Game DVR и передвиньте ползунок параметра Record game clips and screenshots using Game DVR в положение Off.

(Image credit: Windows Central)
The Game Bar in Windows 10 is a tool designed to help gamers capture video, broadcast their gameplay online, take screenshots, and quickly access the Xbox app. It’s an efficient tool, but not everyone needs to use it nor wants it on their PC. That’s especially true if something happens to go wrong with a Windows 10 update, rendering the Game Bar obsolete until an update from Microsoft comes down the pipe. Here are a few ways you can disable or remove the Game Bar and some of the features associated with it that might be affecting your PCs performance.
How to disable Game DVR
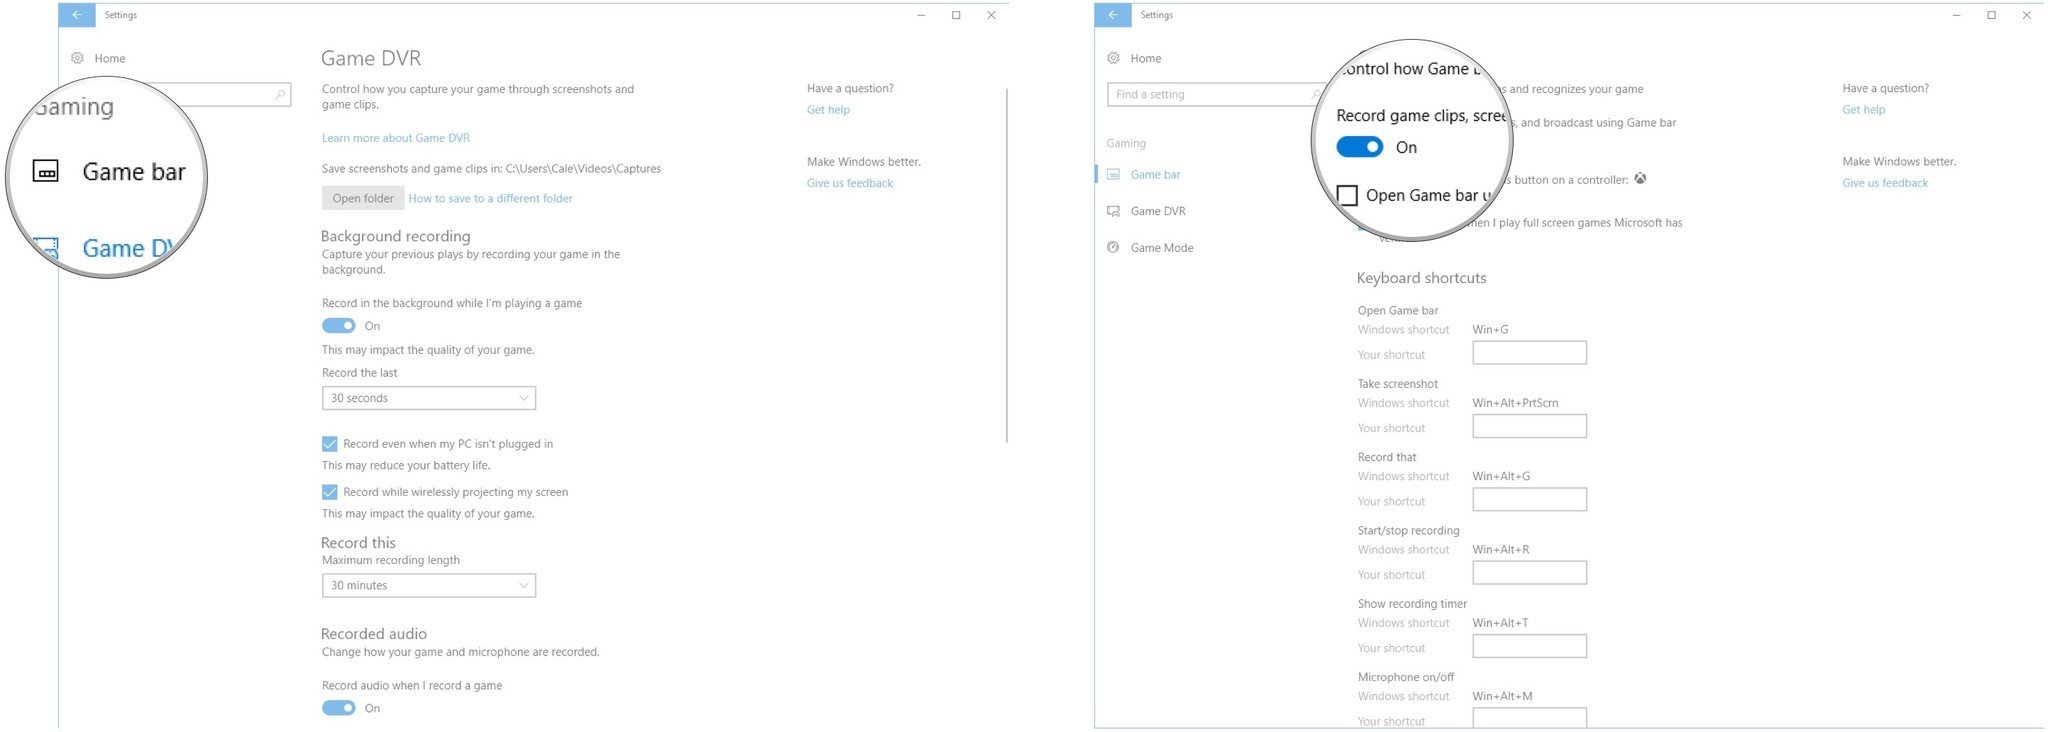
Game DVR, part of the Xbox Game Bar, records video in the background while you game so that you can grab a clip of an epic moment that happened out of the blue. This recording also takes up system resources, so if your rig is already chugging along trying to run an intensive game, you can disable Game DVR without fully disabling the Game Bar.
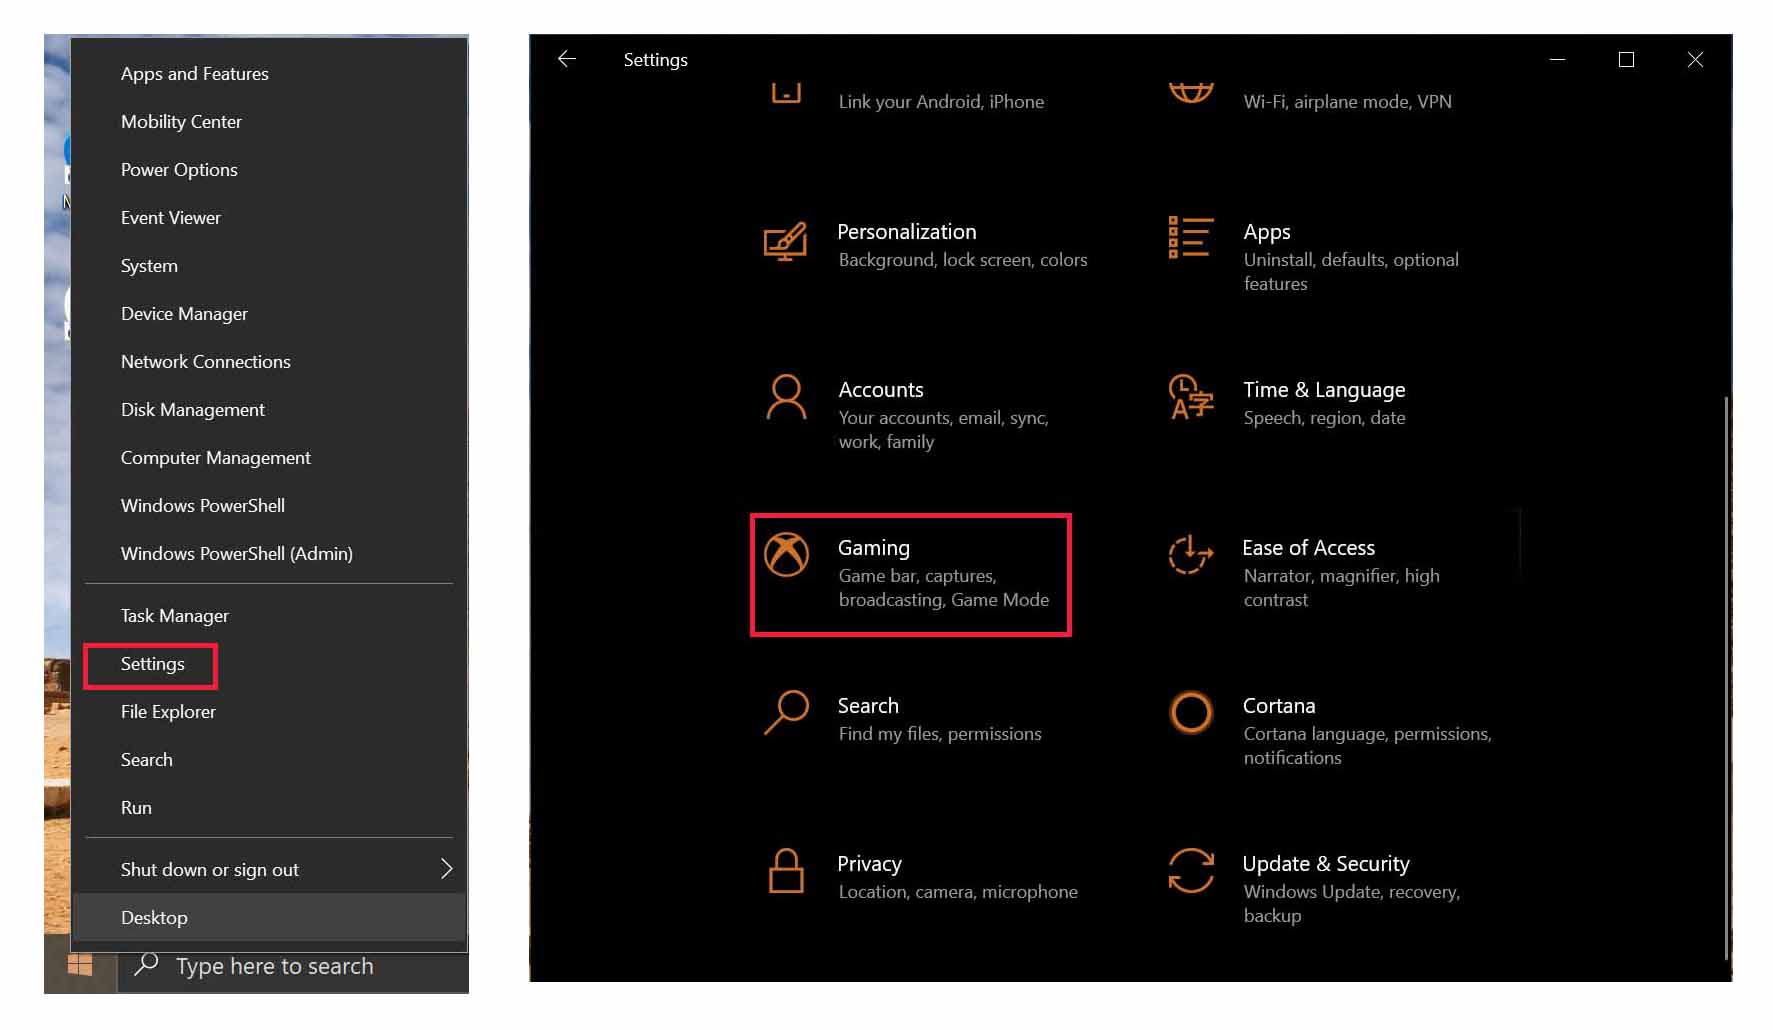
- Right-click the Start button.
- Click Settings.
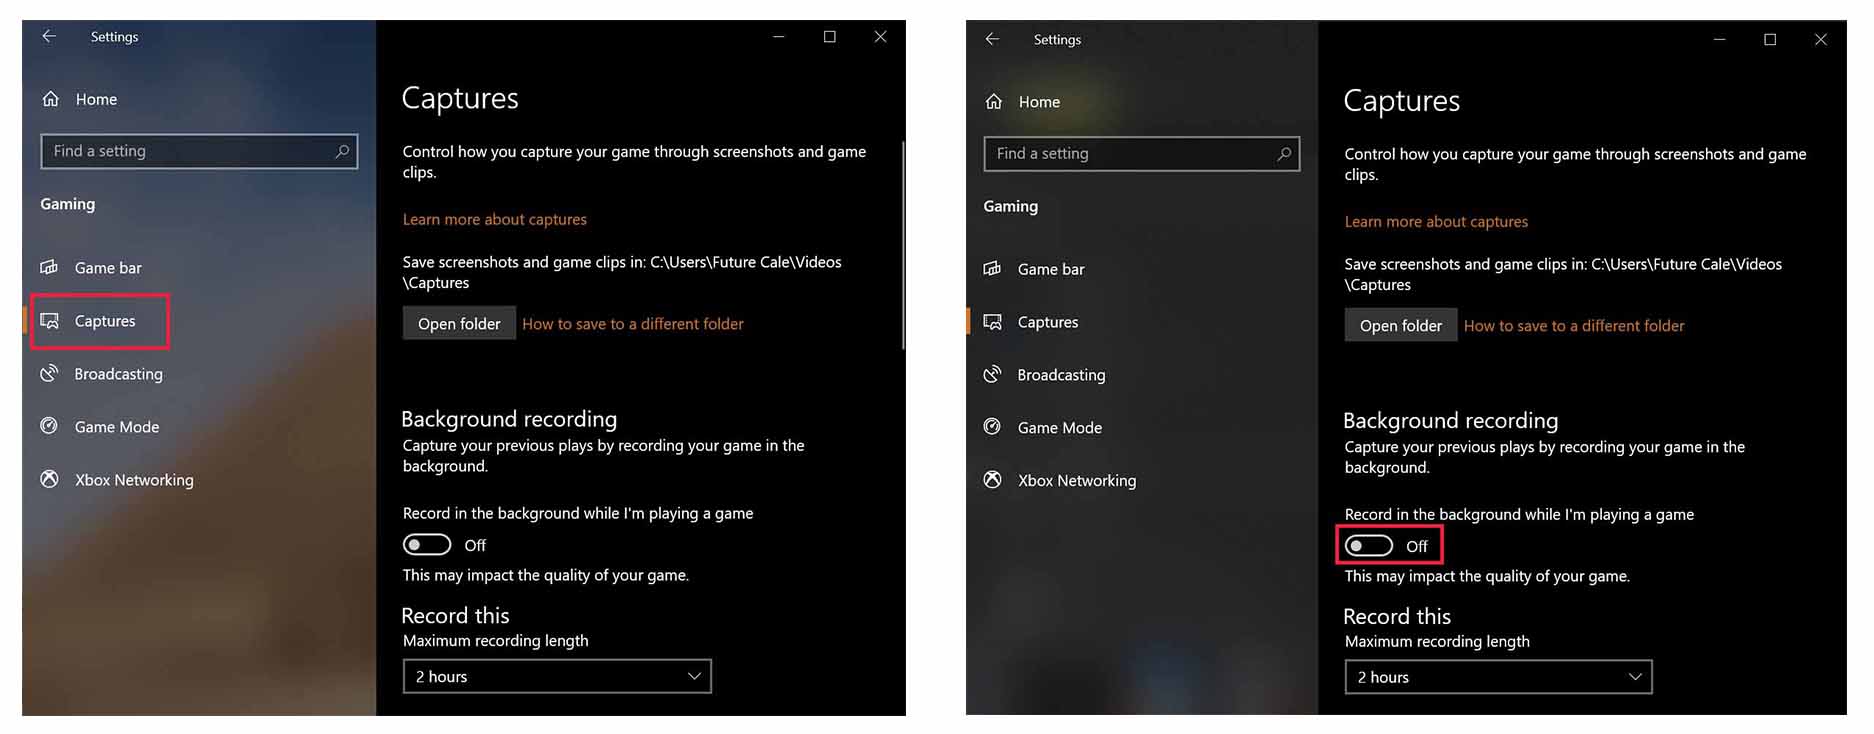
- Click Gaming.
- Click Captures.
- Click the switch below Record in the background while I’m playing a game so that it turns Off.
If you’d like to re-enable the Game DVR, simply repeat the steps and toggle the switch to On.
How to disable Xbox Game Bar in Windows 10
If you have a Windows 10 PC and don’t plan on doing any sort of gaming at all (or you just don’t want to use Game Bar), you can disable the Game Bar completely. This means that nothing will happen when you hit the Windows key + G shortcut on your keyboard or hit the Xbox button on your gamepad.
- Right-click the Start button.
- Click Settings.
- Click Gaming.
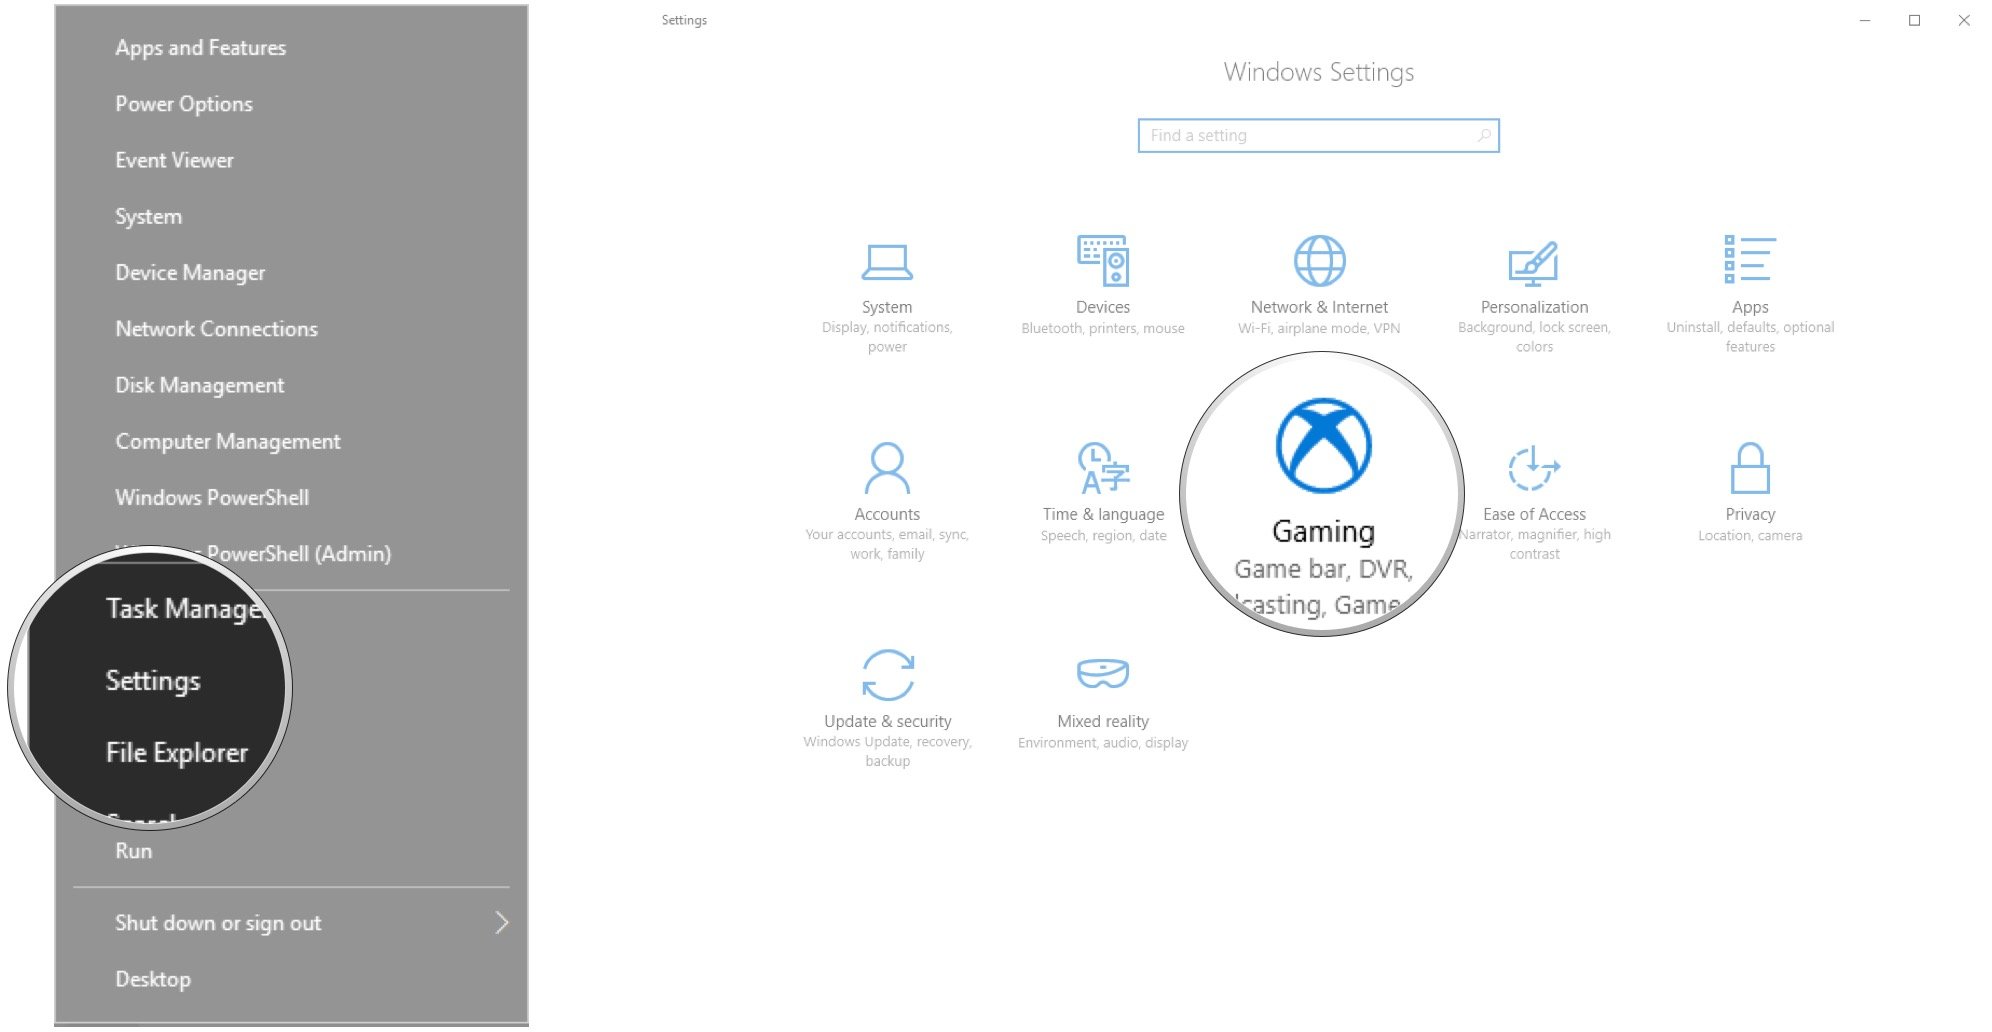
- Click Game Bar.
- Click the switch below Record game clips. Screenshots, and broadcast using Game Bar so that it turns Off.
How to remove the Xbox Game Bar from Windows 10
If you’d like to completely remove the Xbox Game Bar, whether to avoid bugs or simply because you’d rather use other overlay systems, it can be done through Windows 10’s PowerShell. Here’s how it’s done, and how you can reverse the operation if you ever change your mind.
- Right-click the Start button.
- Click Windows PowerShell (Admin).
- Type Get-AppxPackage Microsoft.XboxGamingOverlay | Remove-AppxPackage and hit Enter on your keyboard.
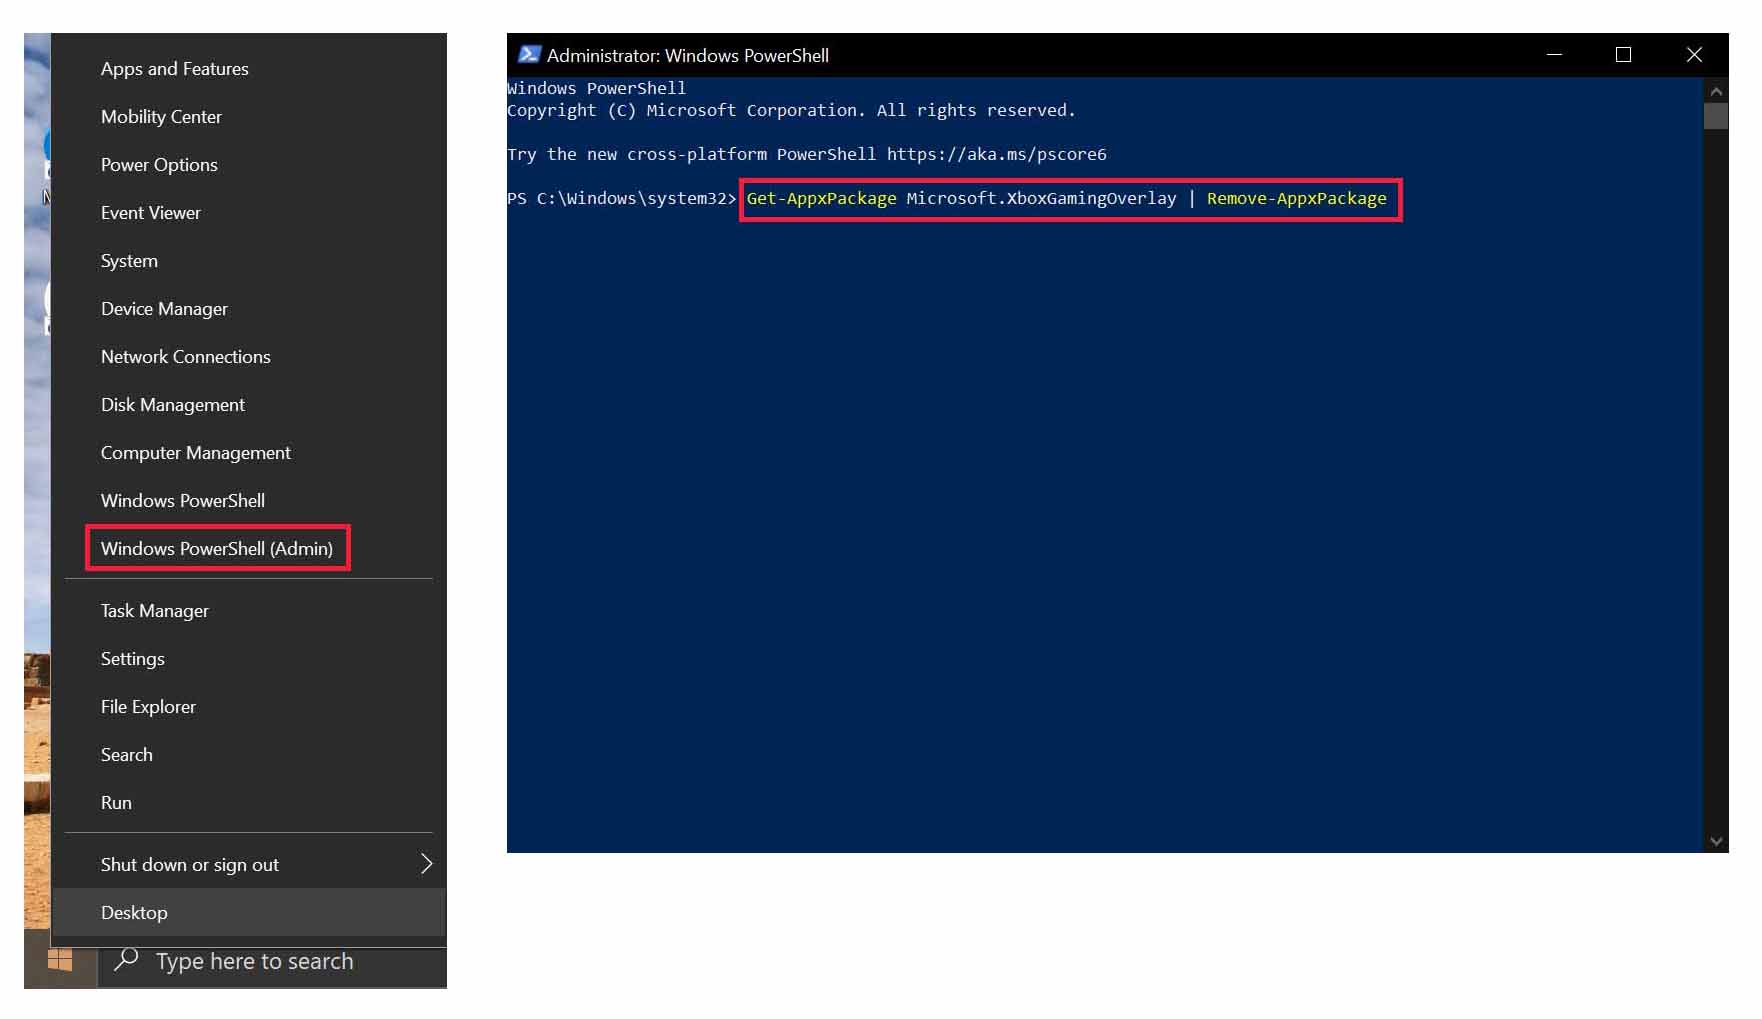
PowerShell will do its thing, and the next time you try to open the Xbox Game Bar you should be prompted to look for an app.
Want to get the Xbox Game Bar back on your Windows 10 PC? Just visit the Game Bar page in the Microsoft Store to download it again.
All the latest news, reviews, and guides for Windows and Xbox diehards.
Looking for more information on how to master the Game Bar? Our complete guide to how to use the Windows 10 Xbox Game Bar.
Cale Hunt brings to Windows Central more than eight years of experience writing about laptops, PCs, accessories, games, and beyond. If it runs Windows or in some way complements the hardware, there’s a good chance he knows about it, has written about it, or is already busy testing it.
Have you ever experienced slow gaming performance in Windows 10? If yes, then this article is for you? Here you will learn how to disable Game DVR and Game Bar on Windows 10 PC to optimize the gaming performance.
Well, Windows 10 offers plenty of the latest features and is a great operating system for gamers as well. But some of the Windows 10 features may cause lagging and slow performance issues.
Windows 10 “Game DVR” feature allows recording the video in the background and the “Game Bar” feature allows you to take screenshots or record gameplay.
But many gamers reported they are experiencing the lagging and slow gaming performance issue when using these features in Windows 10.
As we know that the Game DVR and Game Bar is designed to run in the background while playing the game, hence it affects the system performance and generates lag issue sometimes.
So, it is recommended to disable the Windows game bar and Game DVR in order to make your PC/Laptop normal and maximize Windows 10 performance.
What is the Game Bar and Game DVR?
The Game Bar and Game DVR are the latest features of the Windows 10 system. These advanced features allow gamers to record gameplay in the background with the “background recording”.
And when you choose, it saves the video to a file, so that you can watch your memorable moments in the future or share them with your friends.
Game DVR can automatically record all of your gaming moments in the background so when any amazing moment happens, you can save it without any problem.
But if you don’t choose to save it, then the Game DVR removes that video and carries on recording in the background. So that you can play games usually and if you want you can save the last gameplay to a file.
Whereas the Game Bar is the graphical interface and allows recording gameplay, take screenshots, save clips as well. And you can access the “Game Bar” feature with a simple shortcut (Win+G), via this you can quickly access gaming features.
Well, this won’t lower the system performance but it popup as you run any game. And is also by default enabled on Windows 10.
But unluckily the Game DVR eats up the system resources and if your computer is old then this feature can slower your computer noticeably. Hence, it needs to be disabled on your PC.
If you don’t know how to do it, then follow the various methods mentioned in this article to turn off the Game DVR and Game Bar on WIndows 10.
How to Disable Windows Game DVR and Game Bar using Settings App?
We know that the Game DVR is a part of the Game Bar and used to record video in the background while gaming. But, this feature also takes lots of up system resources and slow down the performance of your system.
So, let’s disable the Game DVR and Game Bar on Windows 10 PC with the help of the below-given steps.
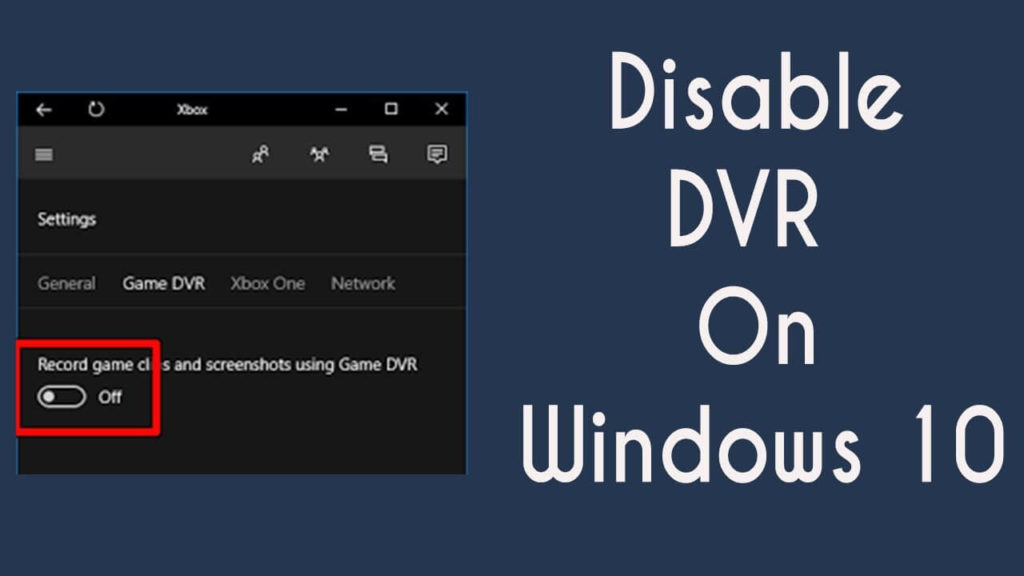
Disable Windows 10 Game DVR
Moreover, you are still able to start manual recording from the Game Bar, however, Windows 10 doesn’t automatically record in the background.
Disable Windows 10 Game Bar
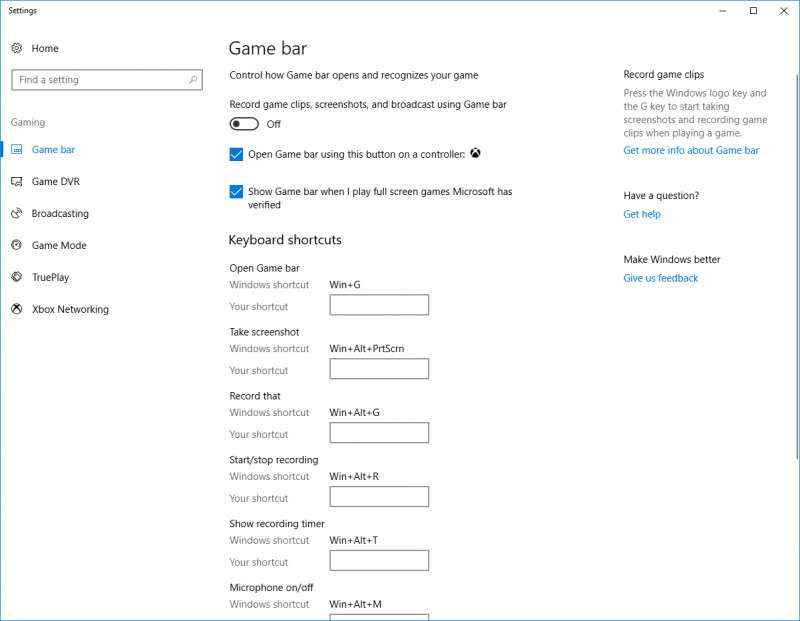
- Right-click on the Start button and then navigate through the Settings-> Gaming-> Game Bar.

- Now, click on the switch present under the Record game clips. Screenshots, and broadcast using Game Bar to turn it off.
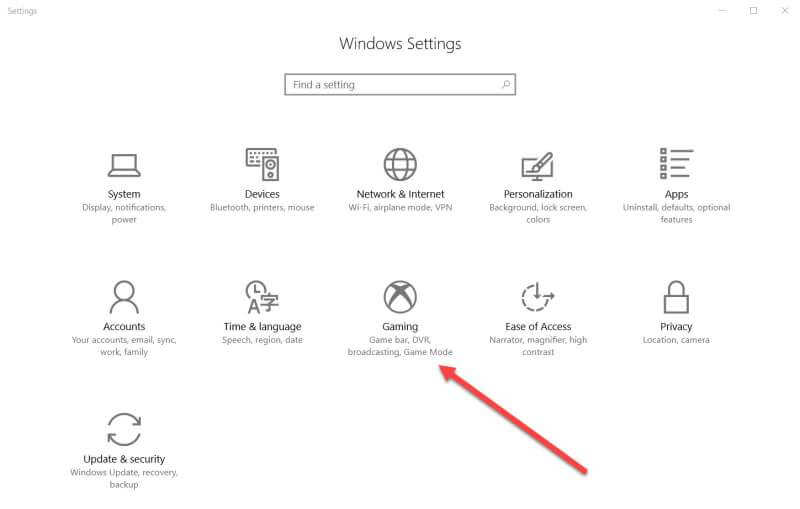
You can’t see the Game Bar feature again if you return to the screen and turn it back ON.
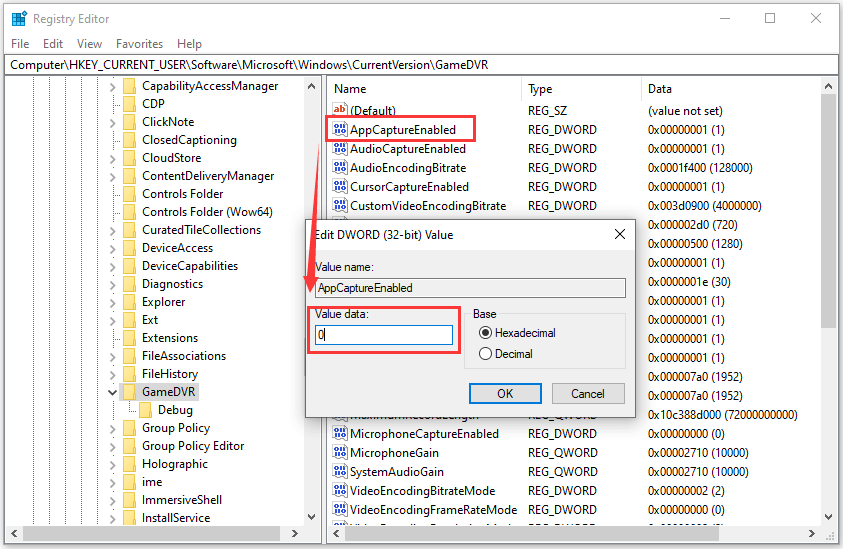
- Press Windows + R keys > type regedit on Run box > click on the OK button.
- On the Registry Editor window, navigate to the following path:
HKEY_CURRENT_USER\Software\Microsoft\Windows\CurrentVersion\GameDVR
- On the right panel of the window, right-click on the AppCaptureEnabled and select the Modify option from the context menu.
- Now, change the Value Data from 1 to 0.
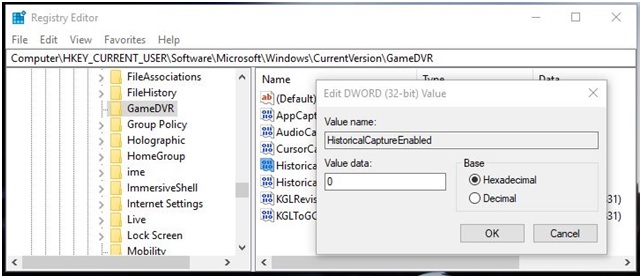
- Next, double click on the HistoricalCaptureEnabled key and change the Value Data from 1 to 0 to turn off the Game DVR.
Disable Game DVR and Game Bar on Windows 10 via Group Policy
- Launch the Run dialog box, then type gpedit.msc and press the Enter key to open the Local Group Policy Editor.
- In the Local Group Policy Editor window, go to the below-given path:
Computer Configuration > Administrative Templates > Windows Components > Windows Game Recording and Broadcasting
- Double click on the Enables or disables Windows Game Recording and Broadcasting from the right panel.
- Select the Disabled option and click on the OK button.
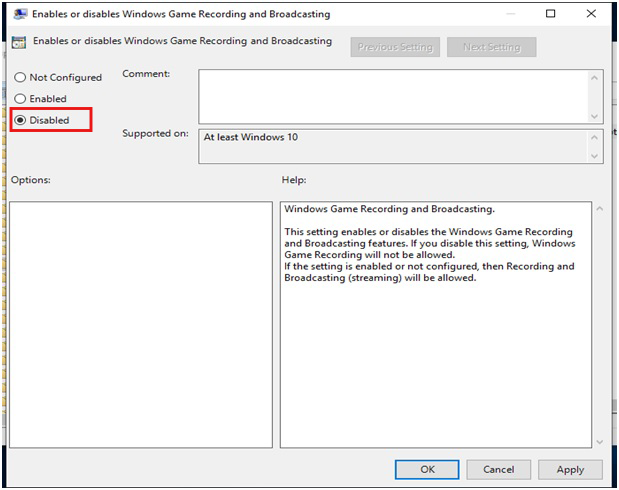
- Restart the GPO settings.
How to Disable Xbox DVR in Windows 10 without Login into Microsoft Account?
In case you don’t have an Xbox account or not signed into the Xbox App then don’t worry as you can still disable Xbox DVR via the Registry Editor. But, this method is for those who are familiar with the registry database operations and not recommended for beginner users.
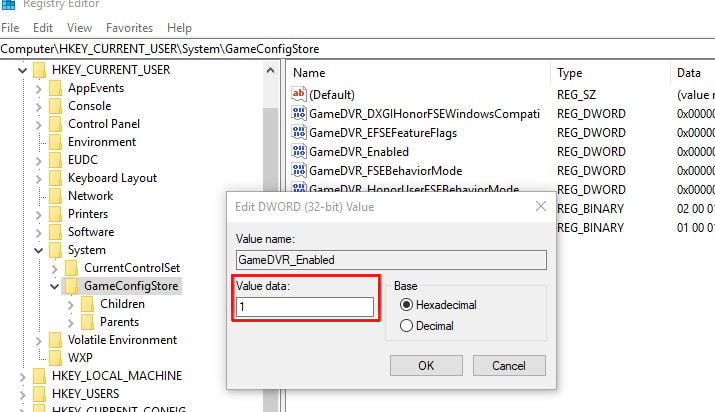
- First of all, you have to open the Registry Editor, to do this press Windows + R and in the appeared run dialogue box type ‘regedit’ then press the Enter key.
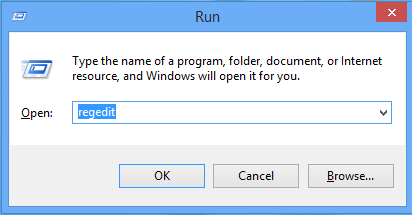
- After opening the Registry Editor Window, you have to go to this path:
HKEY_CURRENT_USER\System\GameConfigStore
- Now, you have to set the value of DWORD “GameDVR_Enabled” to 0.
- Navigate to the HKEY_LOCAL_MACHINE\SOFTWARE\Policies\Microsoft\Windows\
- Create the key “GameDVR“, Create a DWORD 32bit called “AllowGameDVR” and set it to 0
- At last, reboot your computer.
How to Turn Off the Xbox Game Monitoring?
Xbox Game Monitoring is a Windows 10 service that works with the Xbox app. The function of this feature is to keeps an eye on what game is currently being played on your Computer/Laptop.
Sometimes, this feature clashes with the game performance while playing games from other services, like Steam.
This feature is active even after disabling the Game Bar, and in order to disable this service, you need to go via registry operations.
Note: It is suggested to only operate over the registry editor if you have professional knowledge, this operation is not for beginners. Keep a complete backup of your registry database, PC, and other data of your computer.
- Right-click on the Start button and go to the Search option and search for the regedit
- After opening the registry editor, you have to find HKEY_LOCAL_MACHINE and double-click on it. Then double-click on the SYSTEM and then double-click on the CurrentControlSet.
- Double-click on the Services to expand it, and then click on the xbgm. In order to find this key, you have to scroll down.
- Again, right-click on the Start REG_DWORD key, which is present at the right-side pane of the window, and click Modify. Now you have to type 4 (the default is 3).
- At last click on the OK.
So, you have disabled the Xbox Game Monitoring service, if you want to enable this feature again then you have to repeat the steps, and change the value from 4 to 3 again.
FAQ: Some More Information Related to Game DVR
1: How Do I Record my Screen with Game DVR?
You can record your screen on Windows 10 with the Game DVR. And follow the steps to do so:
- Go to Settings> the Gaming> and Game DVR.
- Then set up the audio and video quality settings.
- And as you are ready to record > open the Game Bar by pressing Win+G.
- Next click “yes, this a game”
- Then record the screen capture video.
- Now locate your video in Videos>Captures.
And in this way, you can use your Game DVR in Windows 10 to record screen
2: Did Game Bar Affect Performance?
Yes, many gamers confirmed the Game Bar affects the performance of the Windows. Also, Microsoft claims the feature is only allowed for games that are verified to work with it. But if the Game Bar interferes with the full-screen mode can cause performance issues, lagging, and other glitches with the games.
Conclusion
All the above-given steps are completely tested, so don’t worry about its working. But registry editor related operations should be executed very carefully.
If you want to boost your gaming experience on your old Windows system then try running the Game Booster tool. This is the software specially designed to deal with game-related issues, like lagging, display issues, errors, and more.
I hope the article works for you, and you are able to disable the Game DVR as well as the Game Bar in Windows 10 and optimize the gaming performance in Windows 10.
Good Luck..!
Hardeep has always been a Windows lover ever since she got her hands on her first Windows XP PC. She has always been enthusiastic about technological stuff, especially Artificial Intelligence (AI) computing. Before joining PC Error Fix, she worked as a freelancer and worked on numerous technical projects.