
Все способы:
- Способ 1: Редактор локальных политик
- Способ 2: Редактор реестра
- Способ 3: Сторонние программы
- Вопросы и ответы: 2
Способ 1: Редактор локальных политик
В приложении «Параметры» Windows 10 нет опции отключения инструмента рукописного ввода, тем не менее его можно отключить. Одним из способов является настройка соответствующей политики.
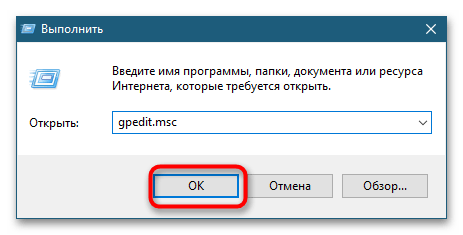
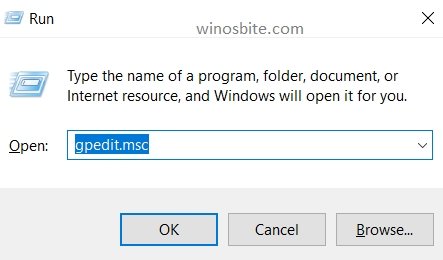
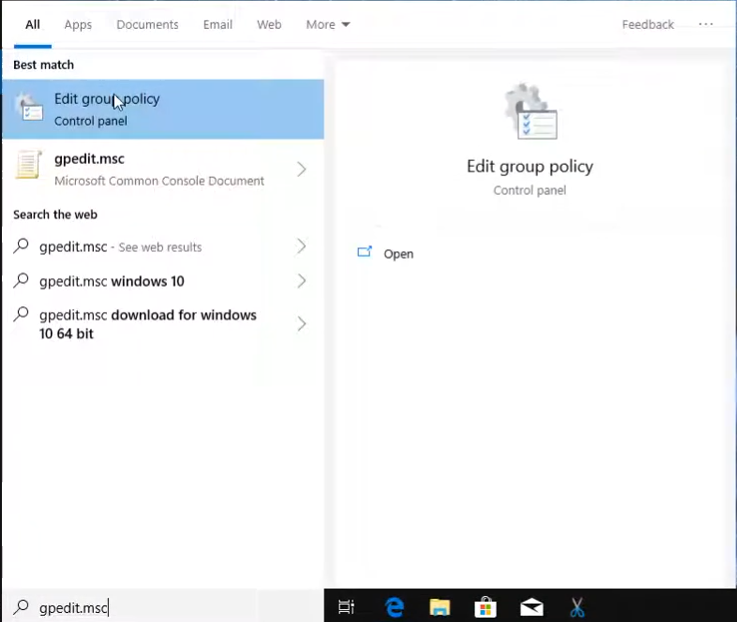
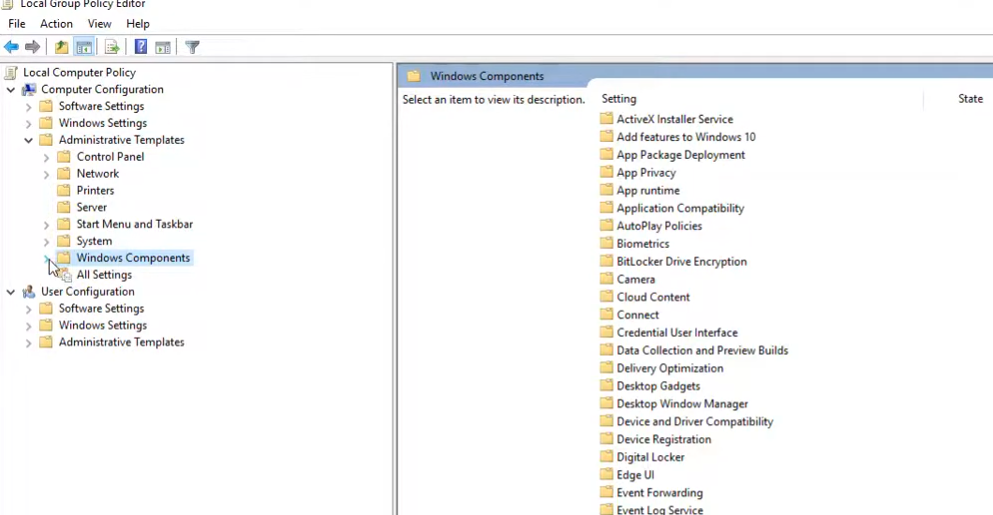
- Откройте «Редактор локальных групповых политик», для чего вызовите нажатием клавиш Win + R диалоговое окошко быстрого запуска и введите в него команду
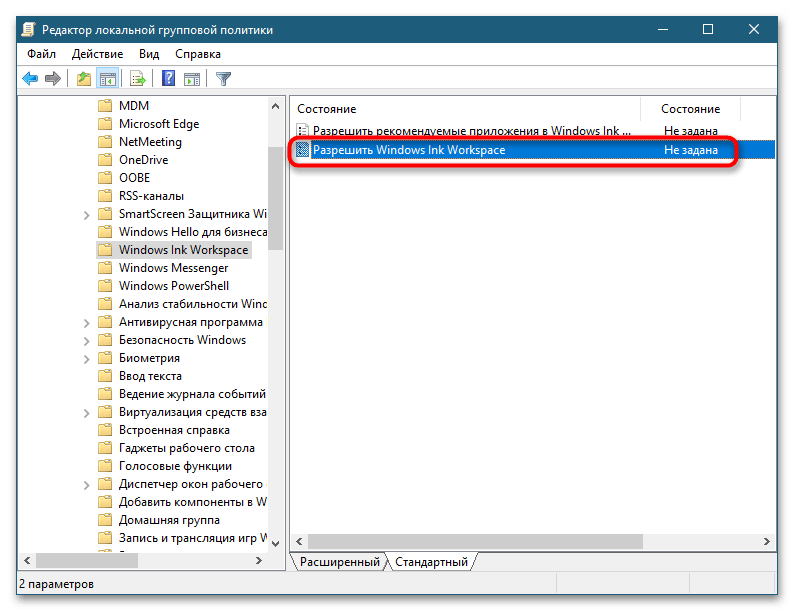
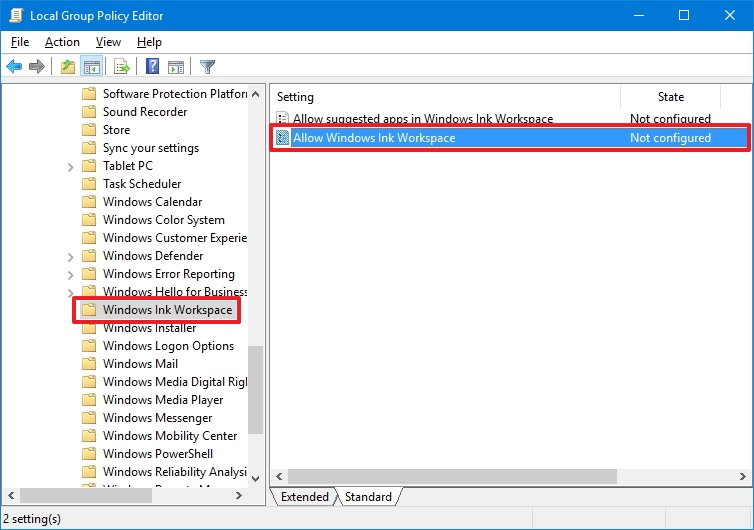
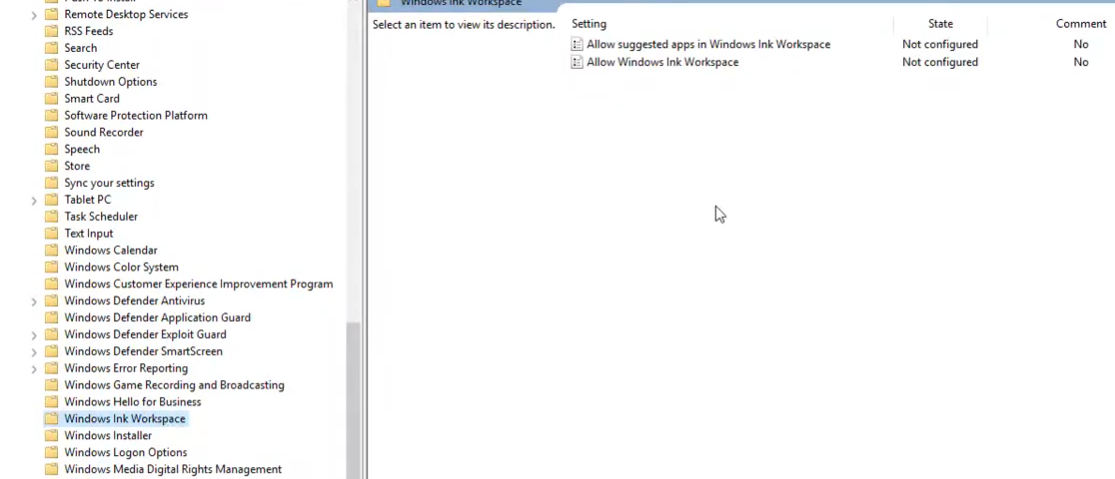
gpedit.msc. - В левой колонке окна редактора перейдите к настройке «Конфигурация компьютера» → «Административные шаблоны» → «Компоненты Windows» → «Windows Ink Workspace». В правой колонке дважды кликните по политике «Разрешить Windows Ink Workspace».
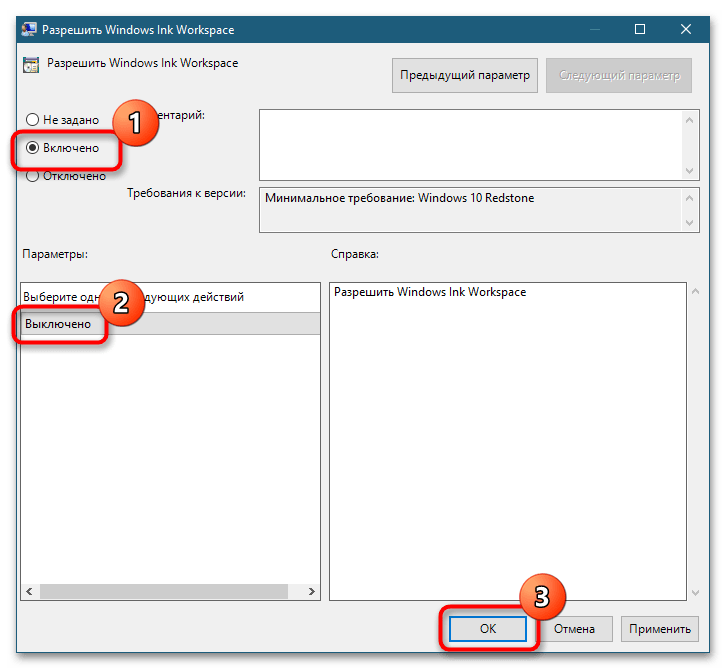
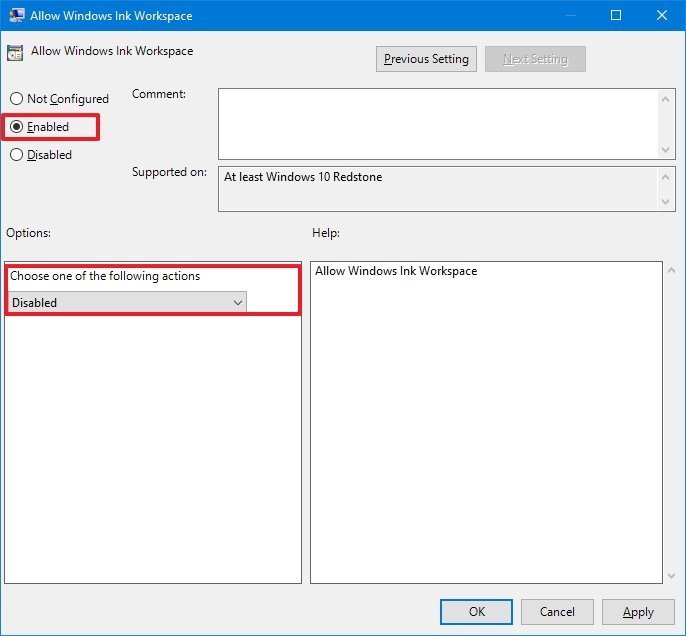
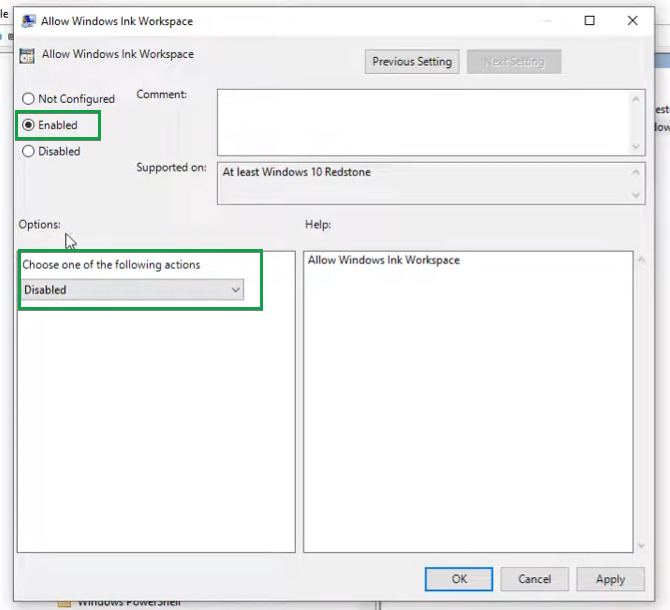
- Включите политику активацией радиокнопки «Включено», а в блоке «Параметры» из выпадающего списка действий выберите «Выключено». Сохраните настройки.
Настройки должны вступить в силу сразу, но если этого не произойдет, перезагрузите компьютер.
Способ 2: Редактор реестра
Для отключения «Пера» подойдет и «Редактор реестра». Этот способ могут взять на вооружение пользователи Windows 10 Home (Домашняя), в которой «Редактор локальных групповых политик» по умолчанию отключен.
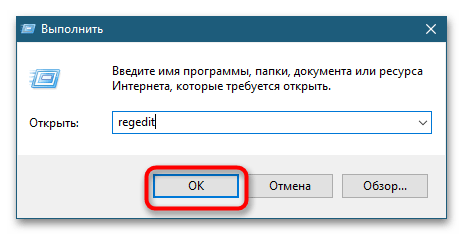
- Запустите «Редактор реестра» командой
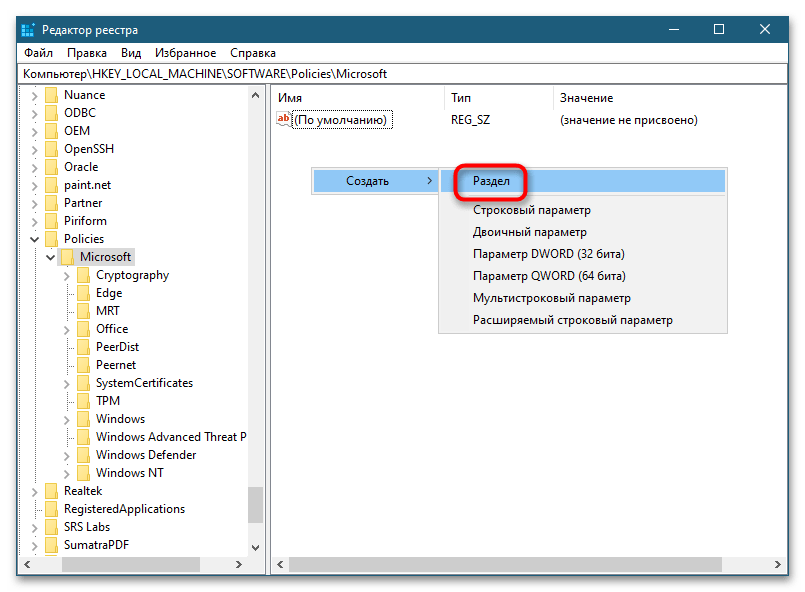
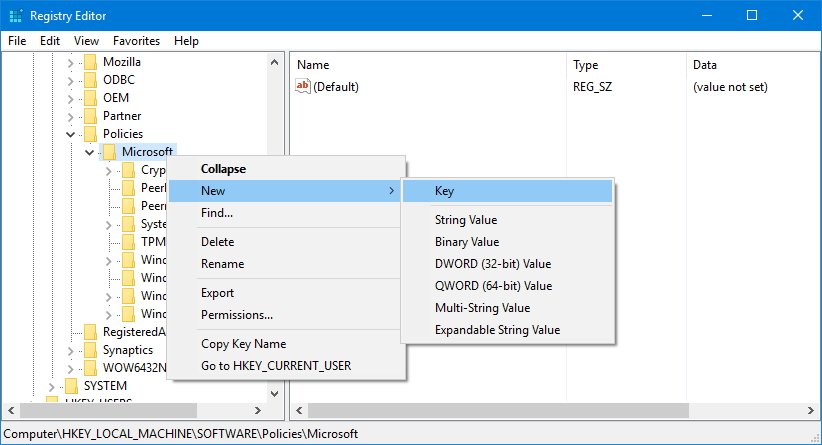
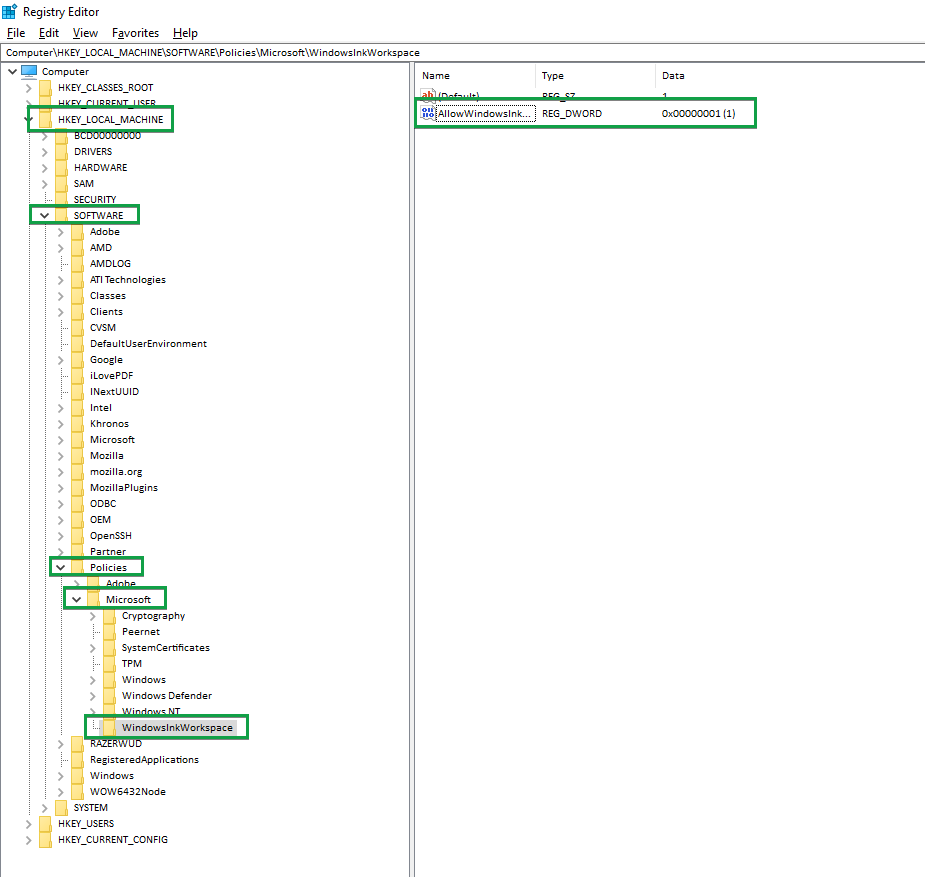
regedit, выполненной в диалоговом окошке «Выполнить» (вызывается клавишами Win + R). - Разверните ветку
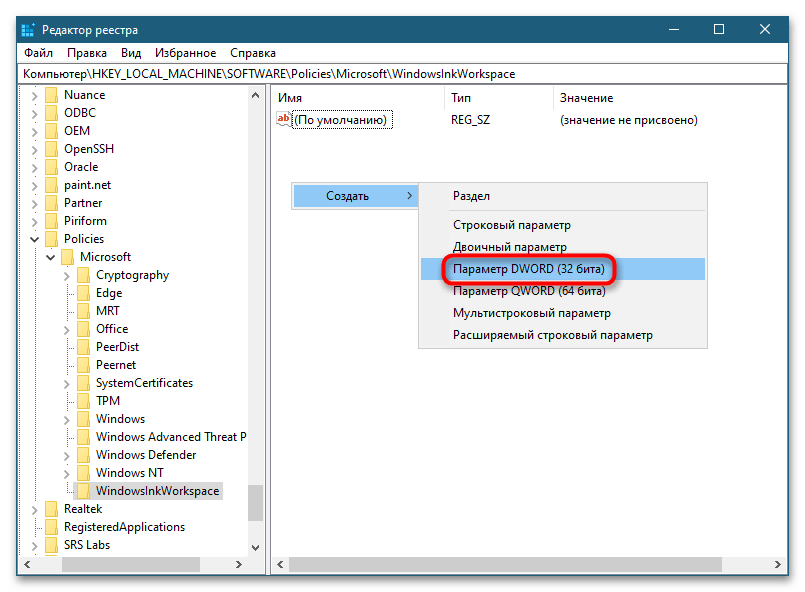
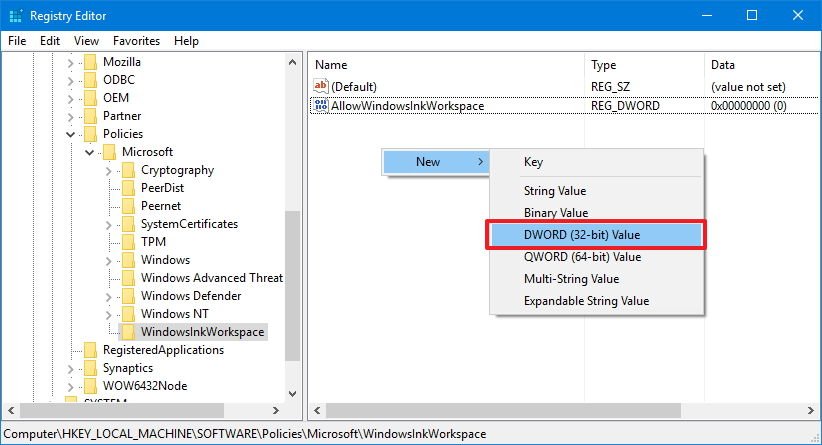
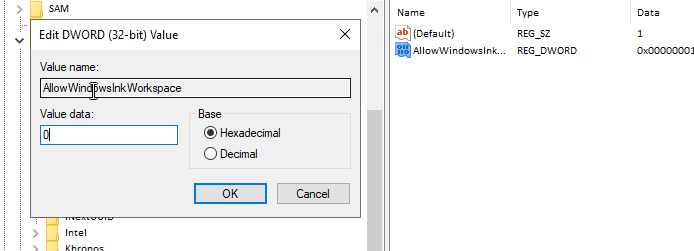
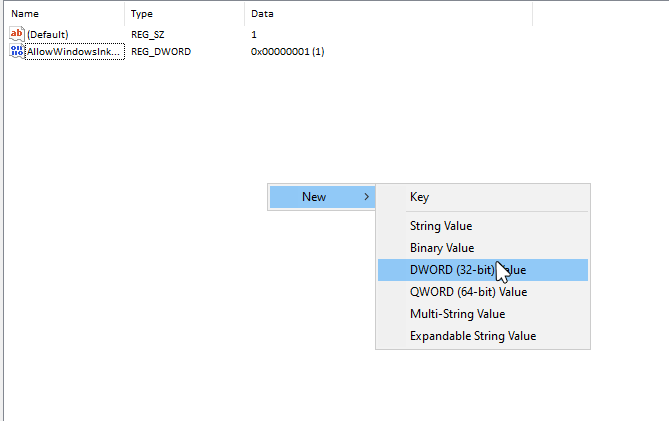
HKEY_LOCAL_MACHINE\SOFTWARE\Policies\Microsoft\WindowsInkWorkspace. Если последний подраздел отсутствует, создайте его вручную. Кликните правой кнопкой мыши по пустой области в подразделе «Microsoft» и выберите «Создать» → «Раздел». Назовите его «WindowsInkWorkspace». - В новом подразделе с помощью того же контекстного меню создайте DWORD-параметр и назовите его «AllowWindowsInkWorkspace».
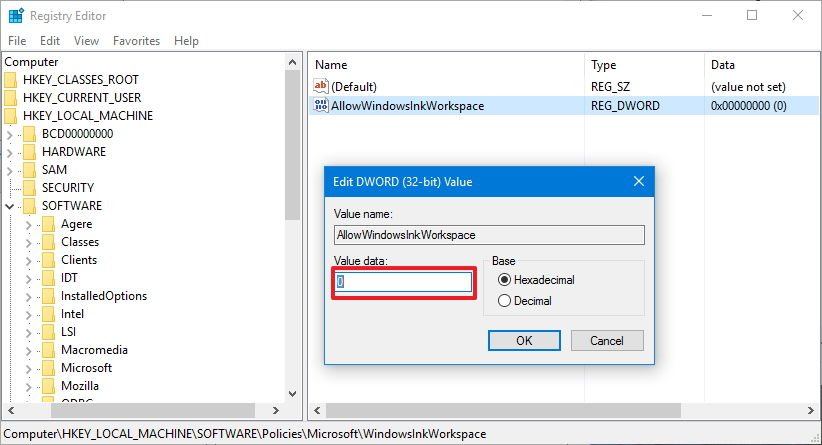
- Значение параметра оставьте по умолчанию, то есть «0».
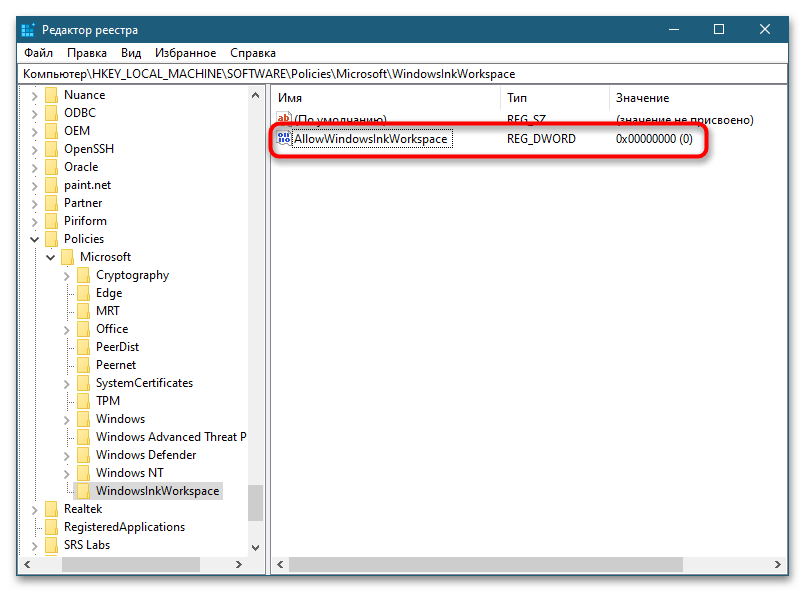
Новые настройки вступят в силу после перезагрузки компьютера.
Способ 3: Сторонние программы
Для отключения «Пера» в Windows 10 также можно использовать специализированные утилиты — твикеры, например Winaero Tweaker.
Скачать Winaero Tweaker с официального сайта
- Скачайте твикер с сайта разработчика и установите.
- Запустите утилиту, отыщите в левой колонке опцию «Disable Windows Ink Workspace» (раздел «Windows Apps») и установите флажок в одноименном чекбоксе в правой колонке окна.
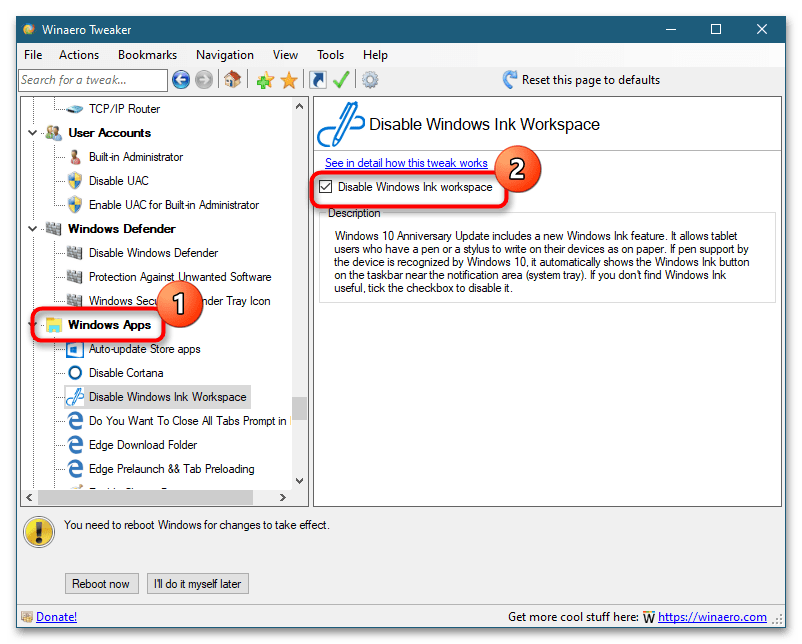
Чтобы перезагрузить компьютер немедленно, нажмите кнопку «Reboot now». Перезагрузку можно выполнить и позже, главное помнить, что новые настройки применятся только после перезапуска системы.
Наша группа в TelegramПолезные советы и помощь
Windows Ink is a new pen experience that Microsoft is introducing with the Windows 10 Anniversary Update. At the core of Windows Ink, there is the same pen support that the operating system has included for years, but there are a number of new improvements.
It all starts with the Windows Ink Workspace that acts as the central hub to access the new Sticky Notes to create notes and reminders using Cortana, and you can also draw on a whiteboard or on a screenshot using Sketchpad or Screen sketch. In addition, Microsoft has promised to keep improving the experience to make it easier for developers to implement Windows Ink support on their apps.
If you own a Surface Book, Surface Pro 4, or similar device that includes support for an active pen, the Windows Ink experience will be enabled by default. However, as with any feature, the new improvements may not be for everyone, and this Windows 10 guide, we’ll walk you through the steps to disable Windows Ink Workspace completely from your device.
How to disable Windows Ink Workspace using Group Policy
There are multiple ways to disable Windows Ink Workspace, but the quickest way to completely turn off the experience is by using the Local Group Policy Editor — that’s of course if you’re using Windows 10 Pro, Enterprise, or Education.
- Use the Windows key + R keyboard shortcut to open the Run command.
- Type gpedit.msc and click OK.
- Select Computer Configuration.
- Expand the following path: Administrative Templates\Windows Components\Windows Ink Workspace.Note: It’s worth pointing out that if you see two «Windows Ink Workspace» entries, you must choose to configure the second one. Otherwise, the instructions will not work.
- On the right side, double-click the Allow Windows Ink Workspace setting.
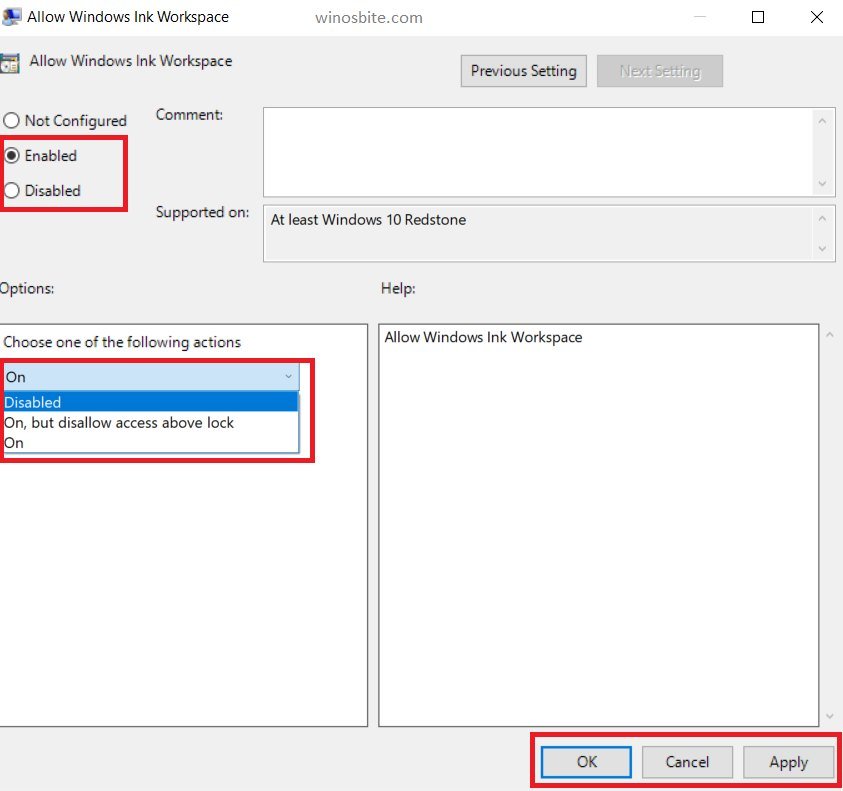
- Check the Enabled option.
- Under Options, select Disabled from the drop-down menu.
- Click Apply.
- Click OK.
- Restart your computer to see the new changes.
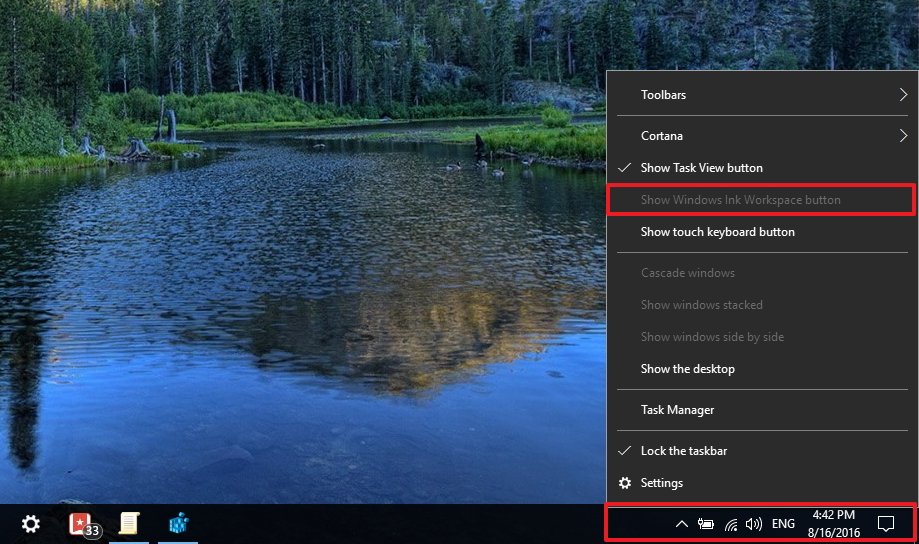
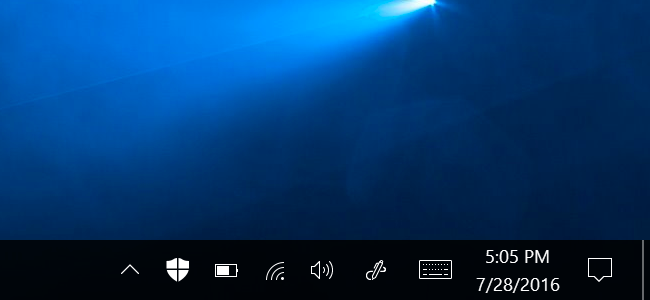
Once you restart your device, the Windows Ink Workspace icon will no longer be available in the taskbar. And you’ll notice that the «Show Windows Ink Workspace button» option on the taskbar context menu will become unavailable.
To revert the changes follow the steps mentioned above, but this time on step 8 select the Not Configured option instead.
How to disable Windows Ink Workspace using the registry
The Local Group Policy Editor is not a feature available on Windows 10 Home, but you can achieve the same results using the registry (if you’re up to the challenge).
All the latest news, reviews, and guides for Windows and Xbox diehards.
Important: Before you make any changes to the registry, make sure to understand that these changes may cause irreversible damage to your installation if they’re not done properly. It’s recommended that you do a full backup of your computer before proceeding. You’ve been warned!
- Use the Windows key + R keyboard shortcut to open the Run command.
- Type regedit, and click OK to open the Windows registry.
- Browse the following path:
HKEY_LOCAL_MACHINE\SOFTWARE\Policies\Microsoft\WindowsInkWorkspace - If you don’t see the WindowsInkWorkspace key (folder), then do the following:
- Right-click the Microsoft key, select New, and click Key.
- Name the new key WindowsInkWorkspace.
- Click OK.
- Right-click on the right side, select New, and click DWORD (32-bit) Value.
- Name the key AllowWindowsInkWorkspace.
- Click OK.
- Double-click the key and make sure its value is set to 0, which means disabled.
- Restart your computer to apply the changes.
Once you restart your device, identically as the process done with the Local Group Policy Editor, the Windows Ink Workspace icon will no longer be available in the taskbar. And you’ll notice that the «Show Windows Ink Workspace button» option on the taskbar context menu will become unavailable.
To enable Windows Ink Workspace again, simply follow the steps mentioned above and on step 9 make sure to change the value from 0 to 1, and restart your computer.
Wrapping things up
It’s important to note that after you’ve disabled Windows Ink Workspace, you won’t be able to launch Sketchpad or Screen sketch, but you’ll still be able to use Sticky Notes, as it’s a regular Windows Store app.
In addition, disabling the experience doesn’t remove the Pen & Windows Ink settings page from the Settings app. If you had the pen shortcuts configured to open Windows Ink Workspace, the pen button functions will fall back to open the OneNote app for all the options.
Do you use Windows Ink Workspace on the regular basis? Would you consider disabling the feature? Tell us in the comments below.
More Windows 10 resources
For more help articles, coverage, and answers on Windows 10, you can visit the following resources:
- Windows 10 on Windows Central – All you need to know
- Windows 10 Anniversary Update
- Windows 10 help, tips, and tricks
- Windows 10 forums on Windows Central
Mauro Huculak has been a Windows How-To Expert contributor for WindowsCentral.com for nearly a decade and has over 15 years of experience writing comprehensive guides. He also has an IT background and has achieved different professional certifications from Microsoft, Cisco, VMware, and CompTIA. He has been recognized as a Microsoft MVP for many years.
Quick Links
-
How to Open the Windows Ink Workspace
-
How to Launch and Find Pen-Enabled Apps
-
How to Use Sticky Notes, Sketchpad, and Screen Sketch
-
How to Configure Your Pen and Customize the Workspace
-
How to Disable the Windows Ink Workspace Icon
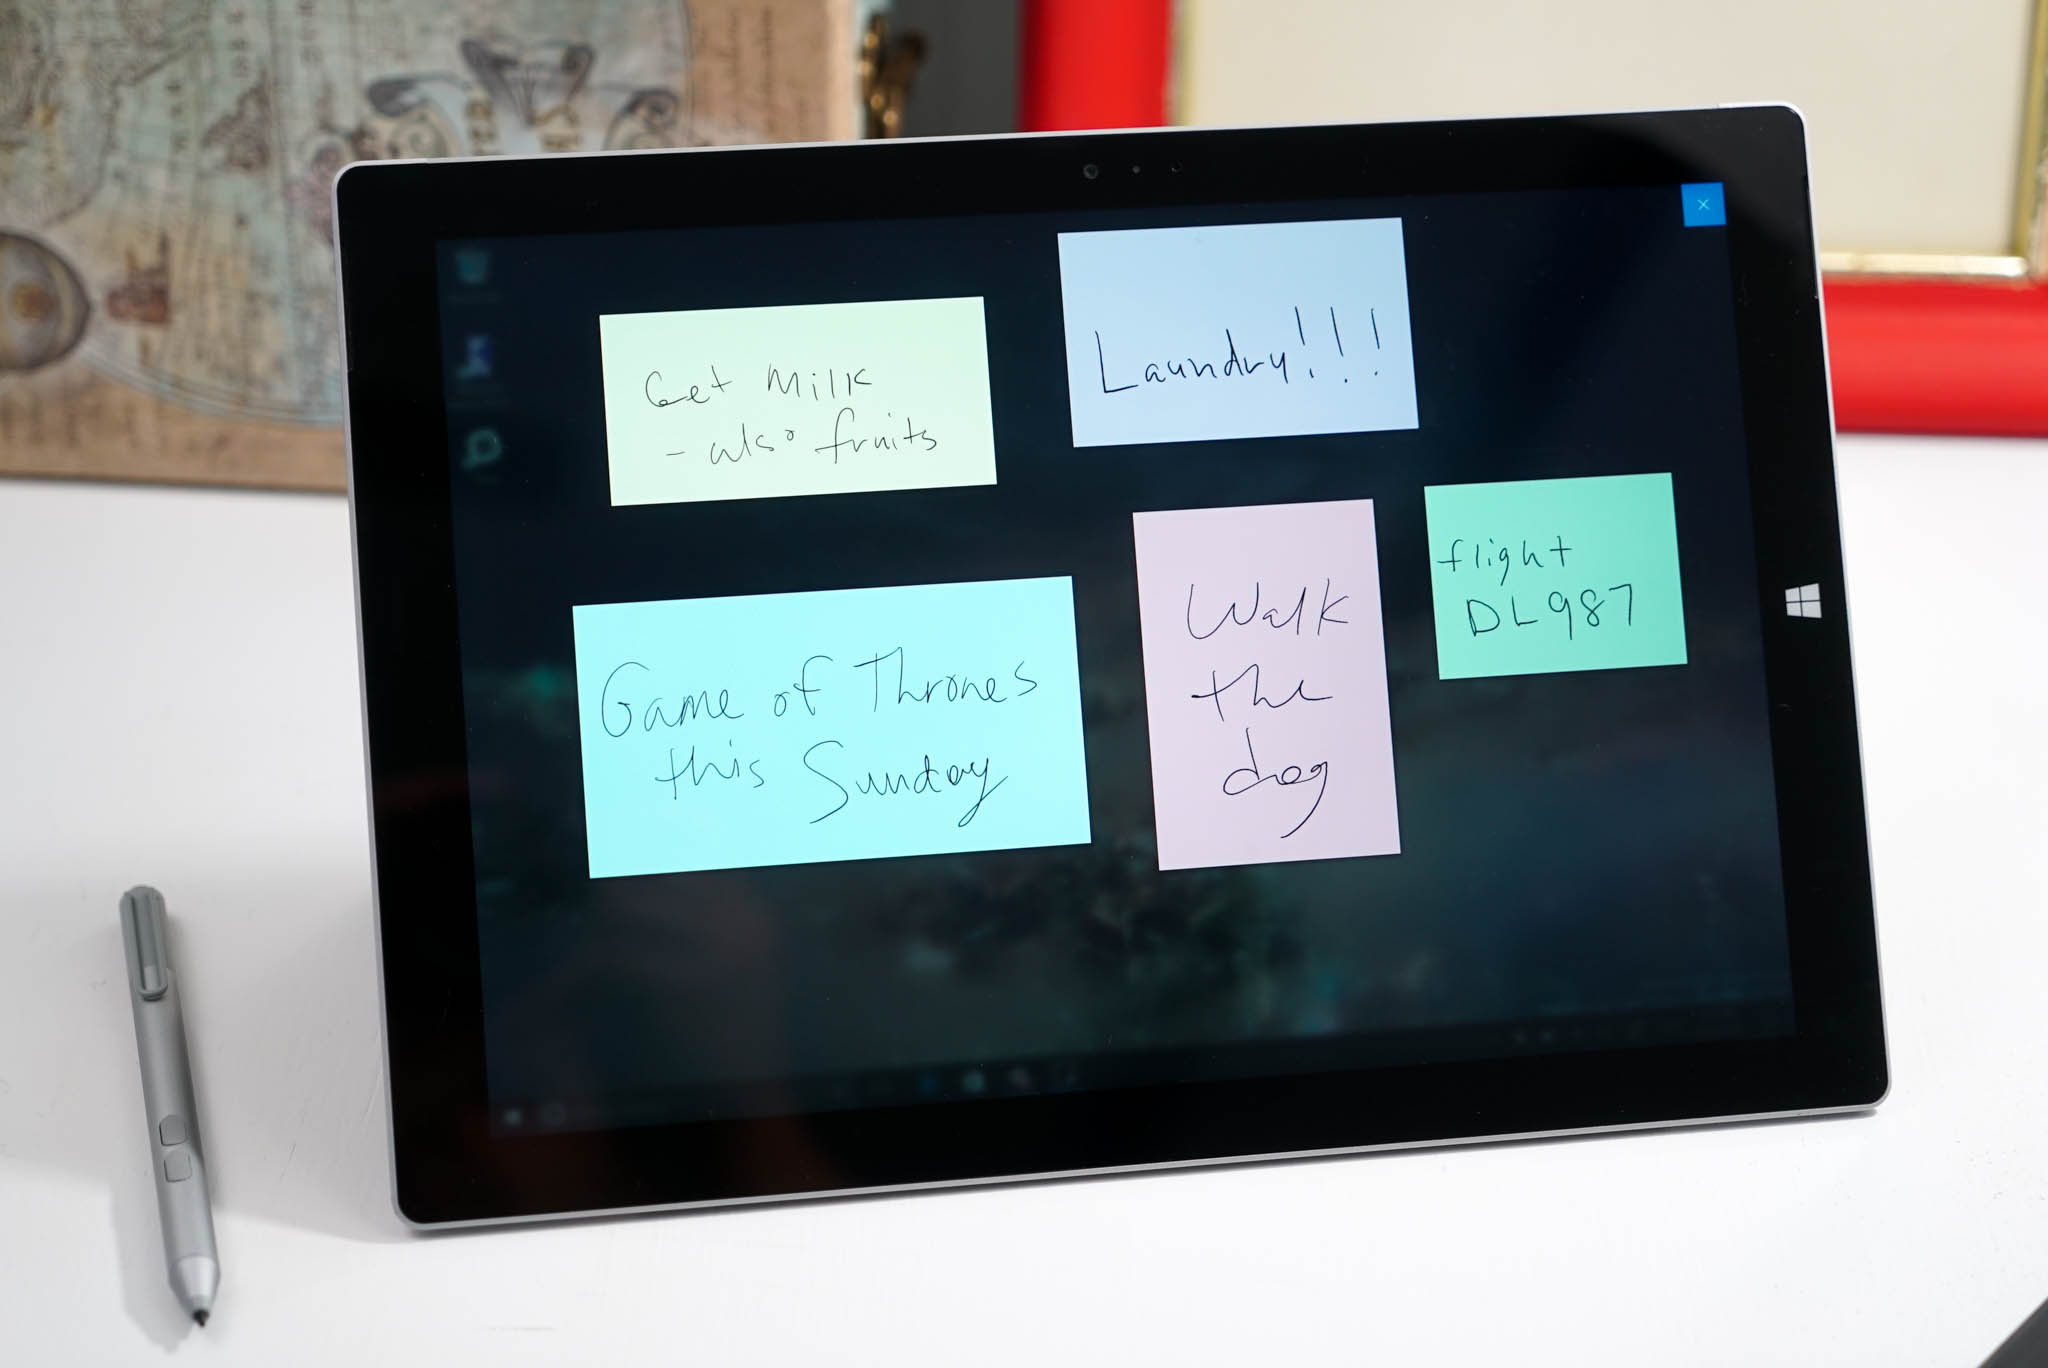
Windows 10’s Anniversary Update improves on Windows 10’s stylus support with a new «Windows Ink Workspace» feature. It’s designed to make using a digital pen faster and easier with a Windows 10 tablet or convertible device.
Aside from being a dedicated launcher for pen-enabled apps, the Windows Ink Workspace includes new Sticky Notes, Sketchpad, and Screen Sketch applications. You’ll also find more options for controlling how your pen functions in the Settings app.
How to Open the Windows Ink Workspace
To launch the workspace, click or tap the pen-shaped Windows Ink Workspace icon that appears in your notification area.
If you have a stylus or digital pen with a shortcut button, you can also quickly launch the Windows Ink Workspace by pressing the button on the pen. For example, if you have a Surface Pen, you can press the button on the pen to launch the workspace. That’s the default setting, at least—you can customize what the button does from the Settings app.
How to Launch and Find Pen-Enabled Apps
The Windows Ink Workspace is like a Start menu for getting stuff done with a pen. Rather than hunting down individual apps, you just grab your pen, press the button, and then tap the app you want to use with the pen.
It opens as a sidebar on the right side of your screen and provides quick access to apps like the new Sticky Notes, Sketchpad, and Screen Sketch tools, along with quick shortcut tiles to launch pen-enabled apps you recently used. These shortcut tiles are just another way to find and launch pen-enabled apps without your other installed applications getting in the way.
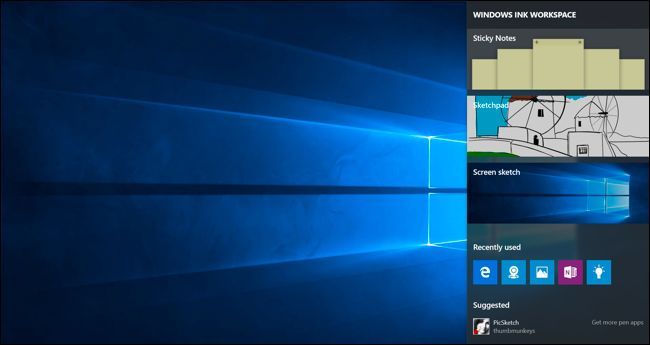
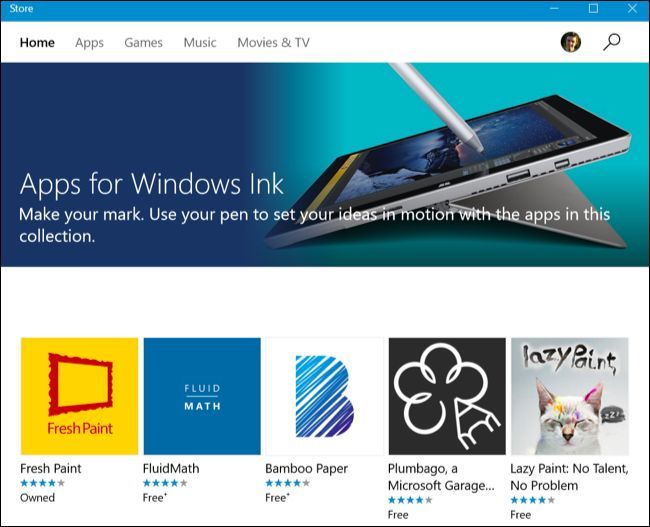
You’ll also see «Suggested» apps from the Windows Store here, and you can click or tap «Get more pen apps» to view a special page on the Windows Store that lists only pen-enabled apps. This gives you a faster way to find pen-enabled apps, like Microsoft’s own Fresh Paint application for digital art.
How to Use Sticky Notes, Sketchpad, and Screen Sketch
The three main Windows Ink Workspace apps are provided by Windows and designed to make using your pen easier and faster.
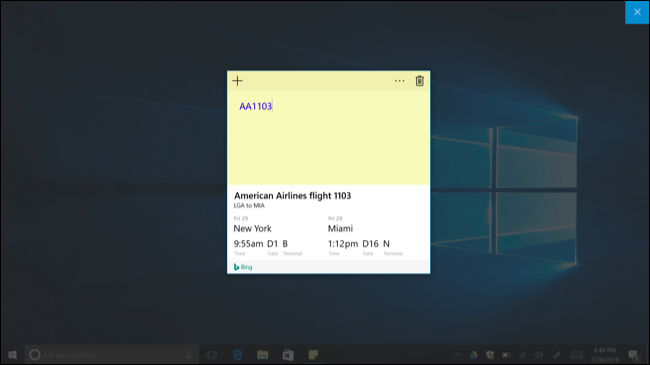
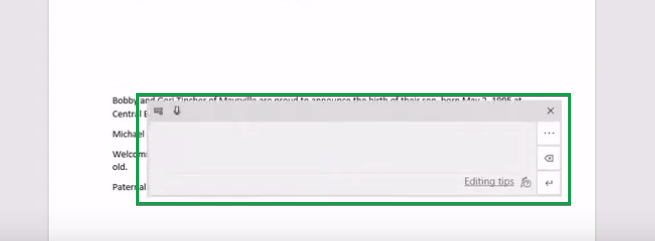
Use Sticky Notes to jot down notes with a pen (or just type them out with your keyboard) and refer to them later. Sticky Notes is a more lightweight app that’s ideal for quick notes. For more detailed, extensive note-taking, you’re probably better off with Microsoft’s OneNote.
When you open Sticky Notes, you’ll be asked if you want to «Enable insights», which will make Windows use character recognition read your sticky notes and use Bing and Cortana to provide more detailed information. For example, if you jot down a flight number, Sticky Notes will perform character recognition, recognize the flight number, and turn it into a link. Click or tap the link to view up-to-date details about that flight number. This is entirely optional, and the main purpose of the Sticky Notes app is just for writing notes with a pen or your keyboard.
Sketchpad is basically just a digital whiteboard. You’ll find options for choosing different styles of writing, from thin pencil to colored pens and thicker highlighters of different colors. There’s also a virtual ruler you can enable that will allow you to draw a completely straight line. Place the ruler, draw, and your line will stay snapped to the edge of the ruler. You can save an image of your whiteboard to an image file or use the share button to send it to someone through another app.

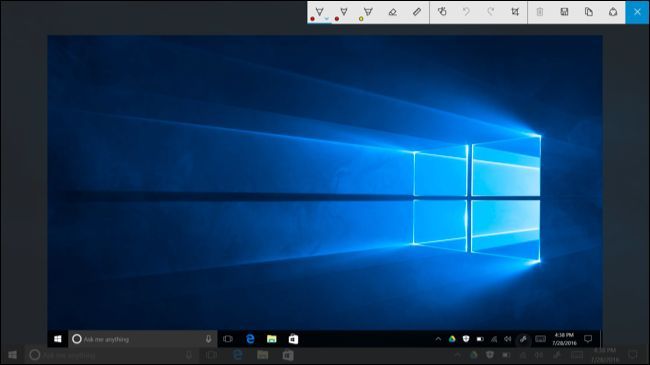
Screen Sketch is a fairly simple tool that allows you to mark up your screen. When you launch Screen Sketch, it will take a screenshot and give you drawing tools you can use to annotate it. Draw or write whatever you want over your screen, and then you can save the sketch to an image file and send it to someone or use the share button to share it with another app.
If you just want to save a screenshot without annotating it, use the Windows+PrintScreen keyboard shortcut instead.
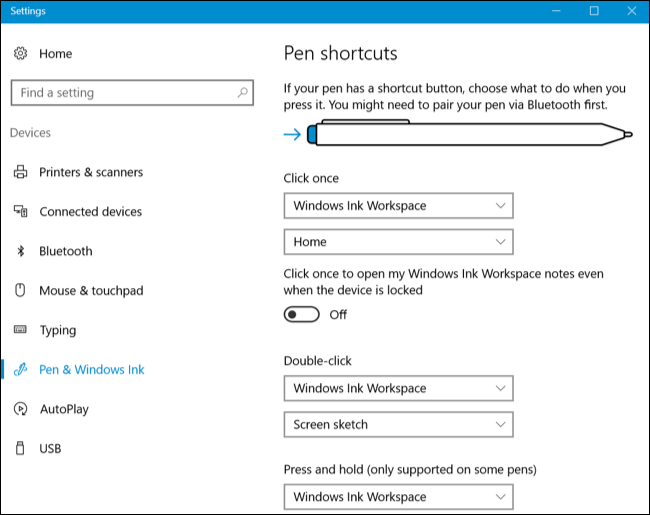
How to Configure Your Pen and Customize the Workspace
To customize the Windows Ink Workspace, head to Settings > Devices > Pen & Windows Ink. You’ll find a variety of options for controlling your pen and the Windows Ink Workspace here. For example, you can tell Windows whether you write with your right or left hand and choose what the button on the pen does when you click, double-click, or long-press it.
How to Disable the Windows Ink Workspace Icon
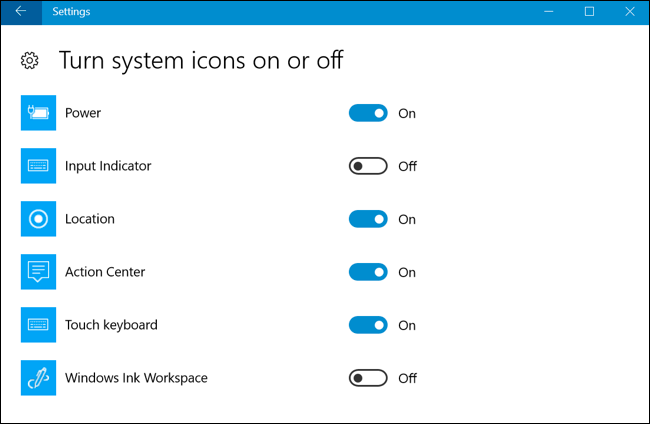
If you don’t plan on using a pen with Windows 10 and you want to get the Windows Ink Workspace off your taskbar, you can turn it off just like you’d turn off other system icons.
To do this, head to Settings > Personalization > Taskbar > Turn System Icons On or Off. Locate the Windows Ink Workspace icon here and set it to «Off».
Windows ink is a feature of Microsoft Windows 10 that lets you use a digital pen or your finger to draw or write on your PC. Obviously, this feature is only available on devices with touch-sensitive screens like a convertible laptop. This is quite a useful feature that is easy to use and handy especially for an art professional or a student.
Do you want to enable or disable Windows ink? Follow the below steps to learn some simple methods to do it.

Quick Overivew
Yes, it is perfectly safe to disable or enable Windows ink. Windows ink is a feature introduced by Microsoft in Windows 10 anniversary update in 2016. As it is an additional feature, it doesn’t matter whether you keep it on or turn it off. Also, enabling or disabling this feature will not affect your PC’s performance or functionality in any way.
Below are the methods to enable or disable it on your PC.
Methods to enable or disable Windows ink in Windows 10
Using local group policy editor (If you are using Windows 10 pro version)
If you are using Windows 10 pro, you should have the group policy editor application. This is the easiest method to disable windows ink in Windows 10.
1) Press Windows + R to open the Run Command
2) Type gpedit.msc in the text field and press ENTER
3) Navigate to the following directory in the left pane
- Computer Configuration ->Administrative Templates ->Windows Components ->Windows Ink Workspace
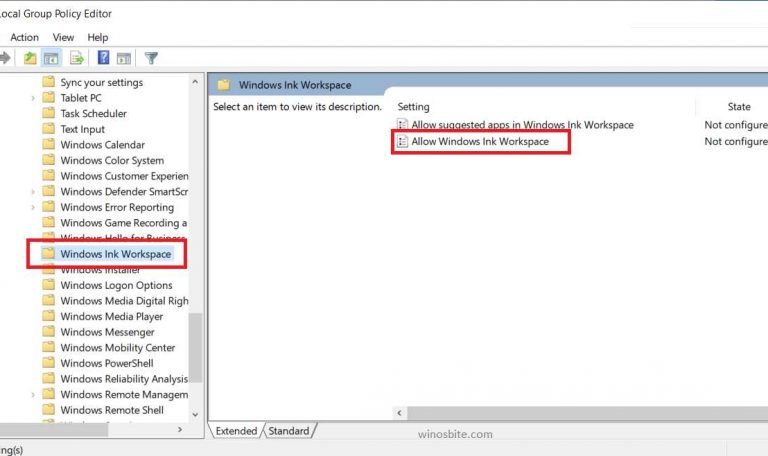
4) Now, in the right panel, open Allow Windows Ink Workspace
5) Select
- Enabled and ON if you want to enable it
- Disabled if you want to disable it
6) Apply the changes and exit the application.
If gpedit.msc is not present on your system, you might be using Windows 10 home instead of Windows 10 pro. Don’t worry, follow the method below to disable permanently or enable Windows ink on Windows 10 home.
Check how to disable gamebarpresencewriter on Windows 10 pc.
Using the Registry Editor
1) Press Windows + R to open the Run application
2) Type regedit in the text field and press ENTER to open the Registry editor

3) Go to the following location by entering the following directory in the text field at the top (or manually locate it)
- HKEY_LOCAL_MACHINE\SOFTWARE\Policies\Microsoft\WindowsInkWorkspace
If the WindowsInkWorkspace folder doesn’t exist, then right-click on Microsoft folder in the registry and create a new key by clicking on New->Key. Name the key as WindowsInkWorkspace.

4) Open the WindowsInkWorkspace key and right-click in the main panel -> New -> DWORD (32-bit) file and name it as AllowWindowsInkWorkspace (IGNORE THIS STEP IF AllowWindowsInkWorkspace WAS ALREADY PRESENT)

5) Double-click AllowWindowsInkWorkspace to open it and set its value data to 0 (for disabled) or 1 (for enabled), then click OK

6) Close the registry editor, then restart your PC.
Conclusion
That was it for the methods to enable or disable Windows ink feature on Microsoft Windows 10. In case of any queries or suggestions, don’t mind leaving a comment down below or contacting us.
Windows Ink, although an impressive feature, isn’t necessary for every user, and its random pop-ups can be frustrating for some. Users who regularly utilize it have reported issues such as brush lag, unresponsive or erratic movement, blank gray screens, and other interruptions in their workflow.
The random appearances of the workspace and other bugs are often due to a faulty or outdated digital touch device connected to the system. To use the workspace to its full potential, you should update or replace your device. However, if you choose to disable the Ink workspace, the following methods will guide you.
1. Disabling Ink Workspace via Regedit
You can disable the Ink Workspace by altering its policy’s value in the registry editor. Doing so will stop the ink service until you revert the value to its default setting.
Note: Exercise caution when working with the registry editor. Consider making a registry back before performing this method.
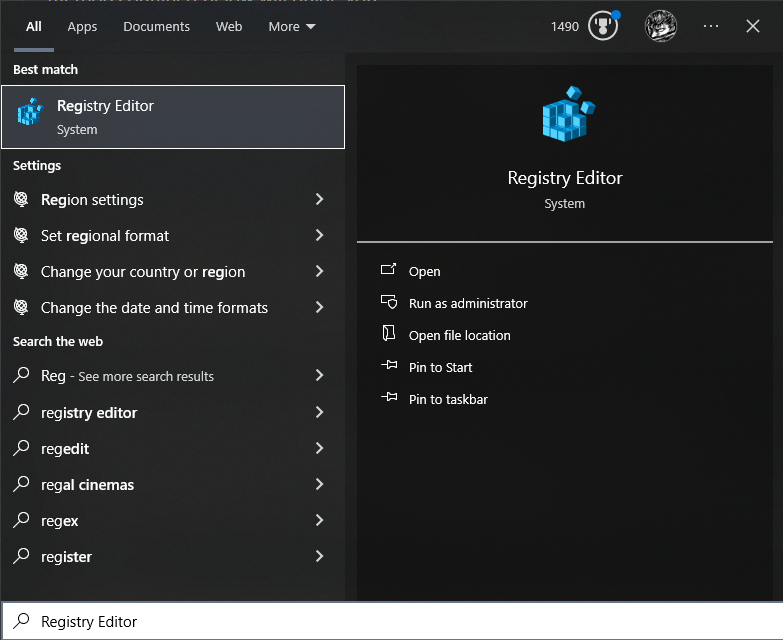
- Open the Windows search bar and type “Registry Editor”.

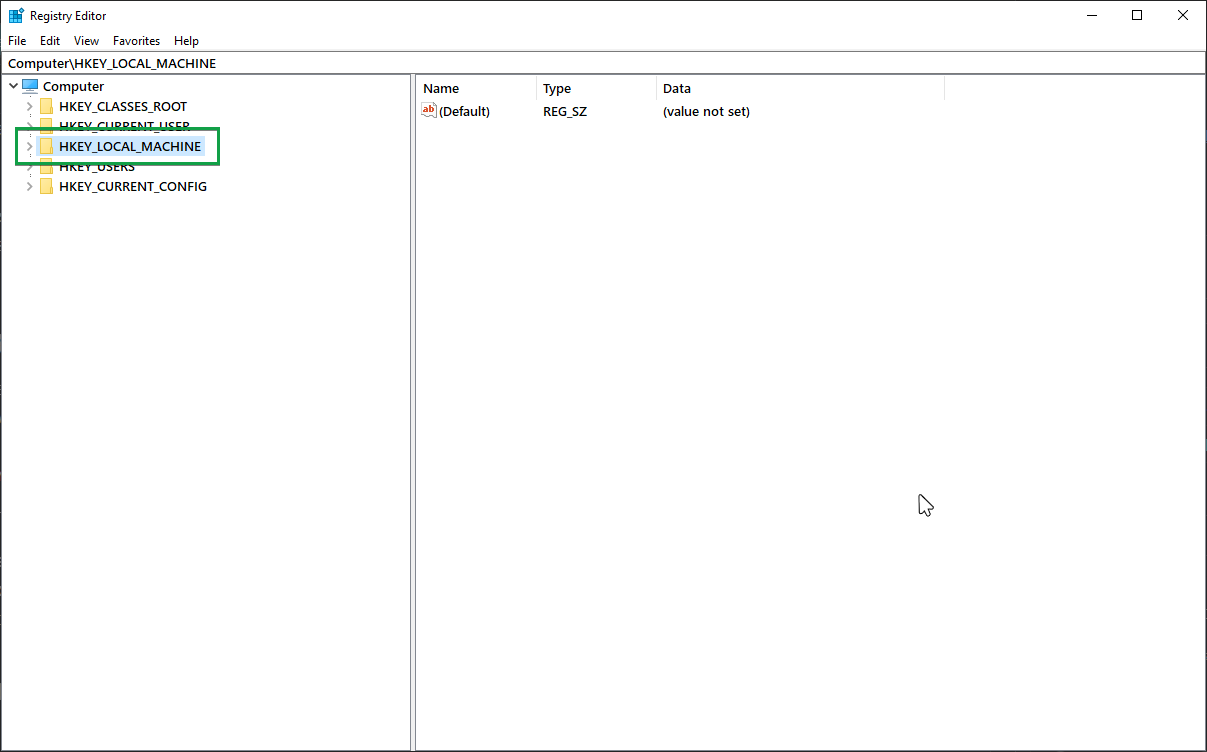
- Navigate to “HKEY_LOCAL_MACHINE”.

- Expand the dropdown and follow this path: HKEY_LOCAL_MACHINE > SOFTWARE > Policies > Microsoft > WindowsInkWorkspace.

- Locate the registry entry named “AllowWindowsInkWorkspace”, right-click on it, and then select Modify.
- In the prompt that appears, change the value to ‘0′.

If there is no existing registry for the Ink workspace:
- Right-click within the WindowsInkWorkspace key.
- Select New and then click DWORD (32-bit) Value to create a new registry entry.

- Name the new registry “AllowWindowsInkWorkspace” and set its value to ‘0’ as previously described.
2. Disabling Ink Workspace via Group Policy Editor
The Group Policy Editor allows you to modify the configuration of any running Windows service, such as the Ink Workspace, and to disable it on your computer.
Note: The Group Policy Editor is not typically needed by individual users, so it is disabled by default in the Windows 10 Home edition. If you want to install and use it, follow this guide.
- Type “gpedit.msc” into the search bar and open Edit Group Policy from the search results.

- Click to expand the Computer Configuration section, then navigate: Administrative Templates > Windows Components.

- Locate Windows Ink Workspace in the list.
- Access the setting named “Allow Windows Ink Workspace”.

- In the properties, select the Disabled option and then click OK.

3. Disabling Ink Workspace via the Services Tab
The Ink Workspace is a Microsoft service that can be enabled or disabled according to a user’s personal preference. The system configuration’s Services tab allows you to prevent the service from loading upon system startup.
- Type “msconfig” into the Windows search bar.
- Select “System Configuration” from the search results.

- Go to the “Services” tab from the menu bar.
- Uncheck “Touch Keyboard and Handwriting Panel Service” to disable it.
- Click “Apply” and then OK.


Kevin Arrows
Kevin Arrows is a highly experienced and knowledgeable technology specialist with over a decade of industry experience. He holds a Microsoft Certified Technology Specialist (MCTS) certification and has a deep passion for staying up-to-date on the latest tech developments. Kevin has written extensively on a wide range of tech-related topics, showcasing his expertise and knowledge in areas such as software development, cybersecurity, and cloud computing. His contributions to the tech field have been widely recognized and respected by his peers, and he is highly regarded for his ability to explain complex technical concepts in a clear and concise manner.