
Перейти к основному контенту
Поддержка
Поддержка
Войти
Войдите с помощью учетной записи Майкрософт
Войдите или создайте учетную запись.
Здравствуйте,
Выберите другую учетную запись.
У вас несколько учетных записей
Выберите учетную запись, с помощью которой нужно войти.
Applies ToWindows 11 Windows 10
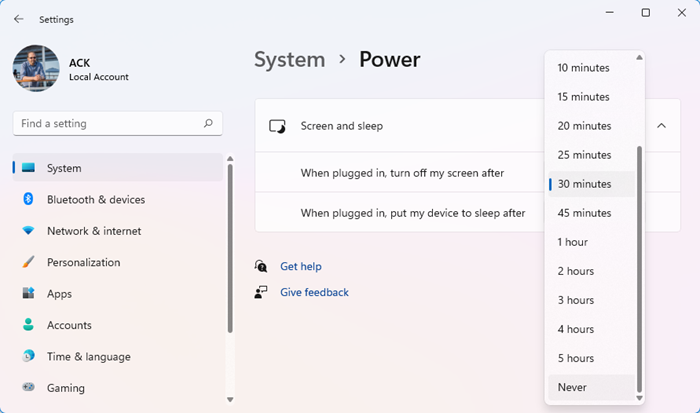
Чтобы настроить параметры питания и спящего режима в Windows 11, выберите Пуск > Параметры > система > питание & батареи > экран, спящий режим & время ожидания в режиме гибернации.
-
Выключите экран после: Выберите время ожидания устройства перед выключением экрана, когда вы не используете устройство, как при его подключении, так и при включении батареи.
-
Перенесите устройство в спящий режим после: Выберите время ожидания устройства перед переходом в спящий режим, когда вы не используете его, когда оно подключено к сети и когда оно подключено к аккумулятору.
См. дополнительные сведения о том, как завершить работу компьютера, включить его в спящий режим или гибернировать.
Открытие параметров спящего режима Power &
ПОДПИСКА НА RSS-КАНАЛЫ
Нужна дополнительная помощь?
Нужны дополнительные параметры?
Изучите преимущества подписки, просмотрите учебные курсы, узнайте, как защитить свое устройство и т. д.
Преимущества подписки на Microsoft 365

Обучение работе с Microsoft 365

Microsoft Security

Центр специальных возможностей
Были ли сведения полезными?
(Отправьте отзыв в корпорацию Майкрософт, чтобы мы могли помочь.)
Насколько вы удовлетворены качеством перевода?
Что повлияло на вашу оценку?
Моя проблема решена
Понятные инструкции
Понятные сведения
Без профессиональной лексики
Полезные изображения
Качество перевода
Не соответствует интерфейсу
Неверные инструкции
Слишком техническая информация
Недостаточно информации
Недостаточно изображений
Качество перевода
Добавите что-нибудь? Это необязательно
После нажатия кнопки «Отправить» ваш отзыв будет использован для улучшения продуктов и служб Майкрософт.
Эти данные будут доступны для сбора ИТ-администратору.
Заявление о конфиденциальности.
Спасибо за ваш отзыв!
×
Last Updated :
02 Apr, 2024
Are you wondering how to change the screen timeout in Windows 11? The screen will turn off after a specified period of inactivity on Windows 11 by the default settings. The device features an adjustable setting that turns off the screen whenever the gadget is idle, to conserve battery power, and adjust the screen timeout duration period. These involve anything from a minute up to over five hours.
To learn How to Change the display Timeout in Windows 11? keep reading! This article explains different ways to adjust the screen timeout to your preference, avoiding any inconvenience caused by the default setting.
Methods to Change the Screen Timeout in Windows 11
- Method 1: Change Windows Screen Timeout Using Settings
- Method 2: Change Windows Screen Timeout Using Control Panel
- Method 3: Change Windows Screen Timeout Using Advanced Power Options
- Method 4: Change Windows Screen Timeout Using Command Prompt
- Method 5: Change Windows Screen Timeout Using PowerShell Command
- Method 6: Change Windows Screen Timeout Using Registry Editor
How to Change the Windows 11 Lock Screen Timeout?
To change the screen timeout in Windows 11, you’ll need to edit the registry to enable the timeout settings. Here’s a step-by-step guide:
Method 1: Change Windows Screen Timeout Using Settings
This method allows you to customize and change the display timeout to suit your needs, helping to conserve power and optimize your PC’s performance.
Step 1: Press the Win + I keys to open the Settings app.
Step 2: Click on «System» and select «Power & sleep» from the left sidebar.
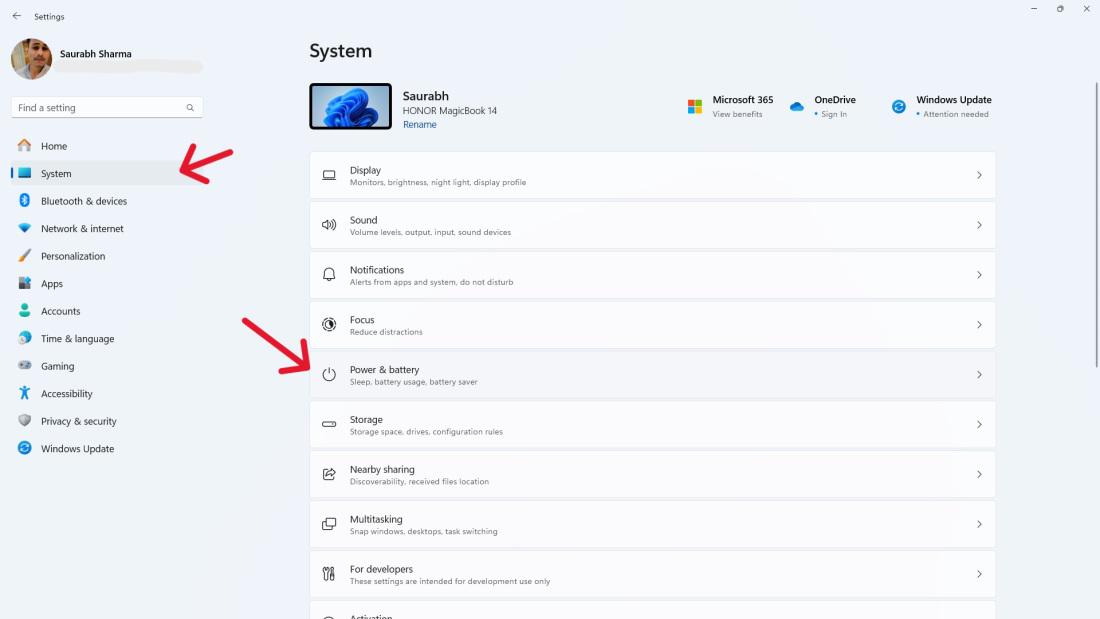
Step 3: In the “screen and sleep” section of settings, select the drop-down menu and set it to your preferred timeout period.
Method 2: Change Windows Screen Timeout Using Control Panel
If you want to adjust how long it takes for your screen to turn off automatically, you can do it through the Control Panel. This method allows you to easily change the display timeout according to your preferences.
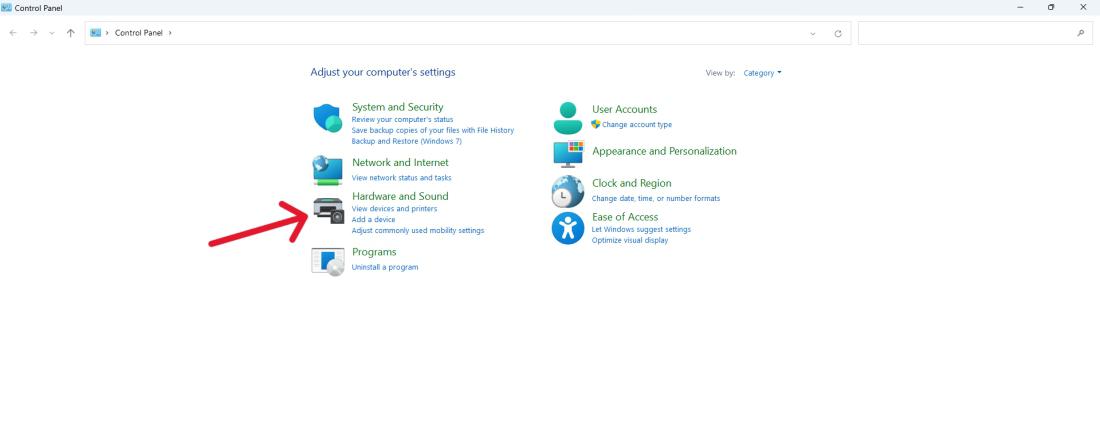
Step 1: Click the Start button and then select «Control Panel.»
Step 2: Select «Hardware and Sound» and then «Power Options.»
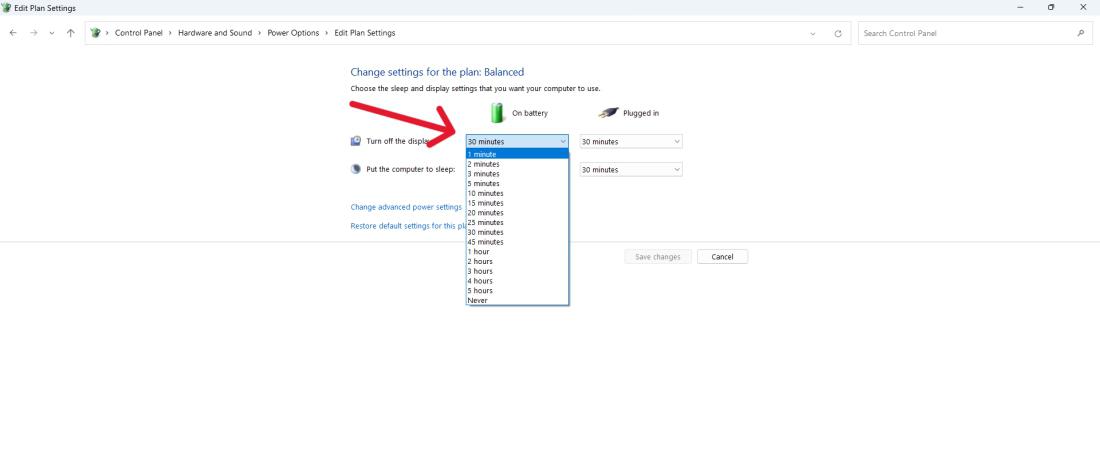
Step 3: Click on «Change plan settings» next to your selected power plan.
Step 4: Adjust the dropdown menu to your desired timeout duration.
Method 3: Change Windows Screen Timeout Using Advanced Power Options
This method allows you to adjust the timeout settings to your preference, allowing you to customize how long your screen remains active before turning off automatically.
Step 1: Open the run dialog by pressing Win + R
Step 2: Then, Type the following command
control.exe powercfg.cpl,,3
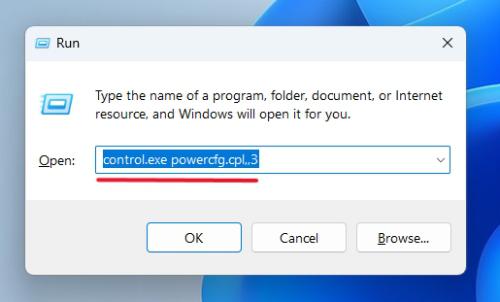
Step 3: Extend Sleep > Sleep after clicking the “On battery” OR “Plugged in” and define the required screen timeout length.

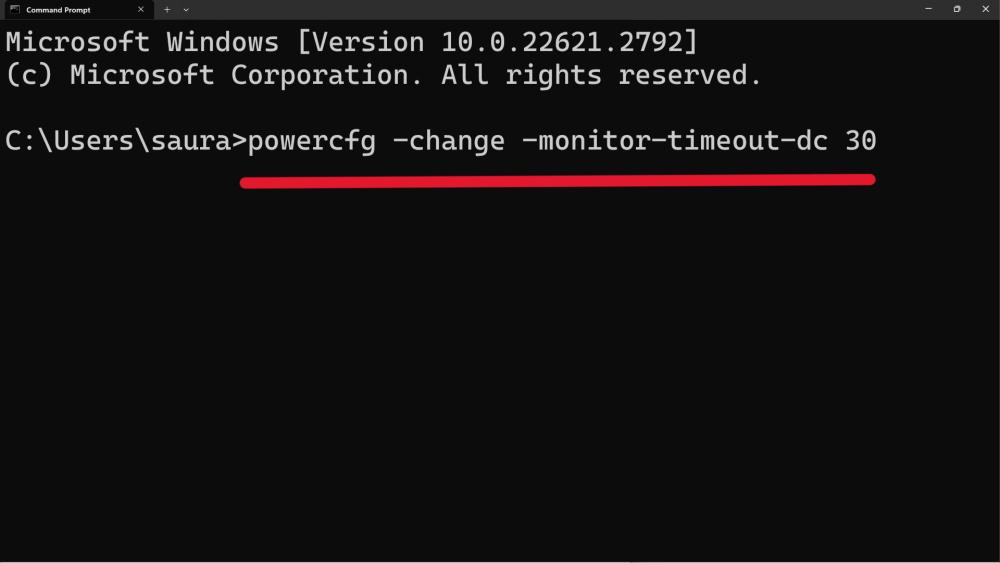
Method 4: Change Windows Screen Timeout Using Command Prompt
This method provides a straightforward way to customize your display timeout settings in Windows 11.
Step 1: Go to the start menu, click run, type CMD, then press Enter to launch the command prompt. The search bar can be opened by pressing Win + S.
Step 2: Type this command :
powercfg -change -monitor-timeout-dc xwhere X will be the time duration in seconds
Method 5: Change Windows Screen Timeout Using PowerShell Command
This method gives you more control over changing the display timeout to better suit your preferences.
Step 1: Open PowerShell as an administrator.
Step 2: Use the following command to set the screen timeout:
powercfg -change -monitor-timeout-ac 60
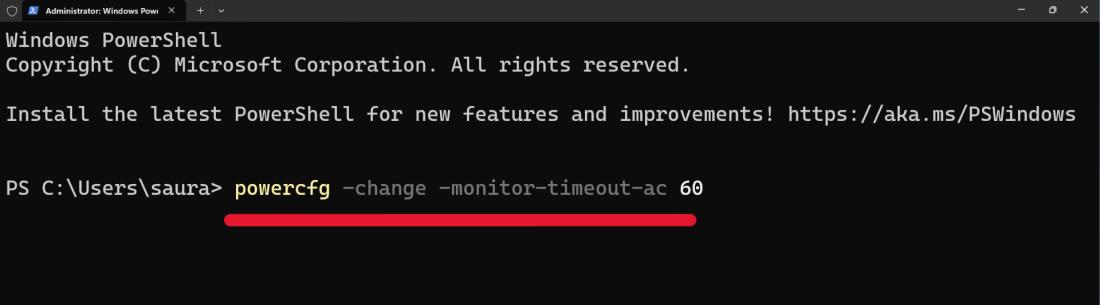
Step 3: Replace ‘X‘ with the desired timeout value in seconds.
Method 6: Change Windows Screen Timeout Using Registry Editor
This method allows you to change the display timeout according to your preference. Follow these steps carefully to ensure you make the adjustments correctly.
Step 1: Press Win + R to open the Run dialog, type regedit, and press Enter.
Step 2: Navigate to
HKEY_LOCAL_MACHINE\SYSTEM\CurrentControlSet\Control\Power\PowerSettings\7516b95f-f776-4464-8c53-06167f40cc99\8EC4B3A5-6868-48c2-BE75-4F3044BE88A7.Right-click on «Attributes» then click on «Modify» Now several on input change the value to «2«.
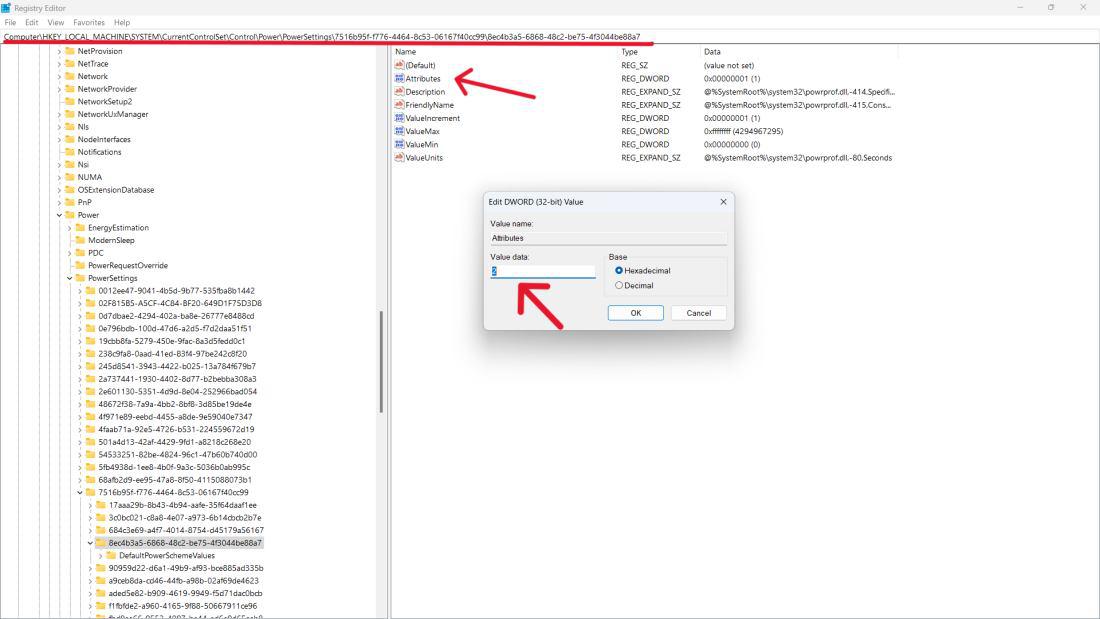
Step 4: Click on OK
Conclusion
In conclusion, changing the screen timeout in Windows 11 is rather simple and gives us several ways to personalize that important part of battery saving. However, the Windows 11 interface satisfies multiple types of users, as it provides the modern Settings app, the traditional Control Panel, and the command-line power of PowerShell and Command Prompt. More sophisticated users can also dig deeper into the registry editor and make more accurate adjustments with display timeout settings.
Are you tired of your screen going dark while you’re in the middle of something important? Learning how to stop your screen from turning off on Windows 11 is a simple task that can save you a lot of frustration. By adjusting your power settings, you can keep your screen active for as long as you need. Let’s dive into the steps to accomplish this.
Step-by-Step Tutorial on How to Stop Screen from Turning Off on Windows 11
In this guide, we’ll tweak the power settings on your Windows 11 computer so your screen stays on longer or doesn’t turn off at all. Follow these steps carefully, and you’ll have full control over your screen timeout settings.
Step 1: Open Settings
Click on the Start menu and select ‘Settings’.
You can also press ‘Windows + I’ to open the Settings directly. This is the place where you can customize almost every aspect of your Windows experience.
Step 2: Go to System
In the Settings menu, click on ‘System’.
The System section includes various sub-settings related to display, sound, notifications, and power.
Step 3: Select Power & Battery
Within System, click on ‘Power & battery’.
Here you’ll find options to adjust how your PC uses power, which directly affects when your screen turns off.
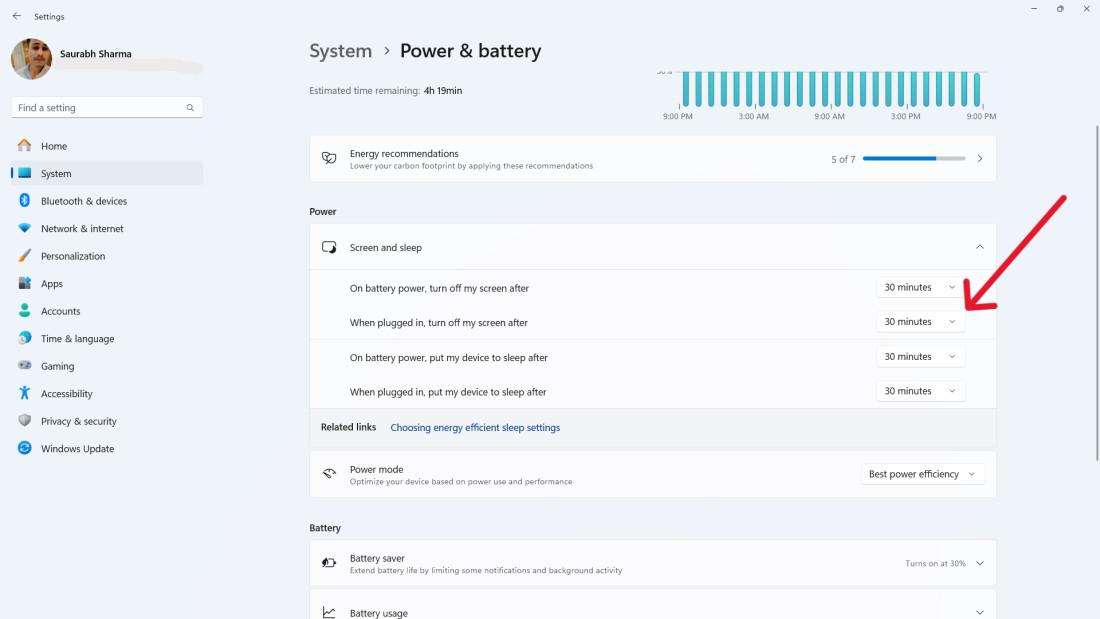
Step 4: Adjust Screen and Sleep Settings
Under Power & battery, you’ll see ‘Screen and sleep’. Change the settings for when plugged in and on battery.
You can set the screen to never turn off, or choose a longer duration that better fits your needs.
Step 5: Save Your Settings
After adjusting the settings, close the Settings window.
Your new settings will automatically save, ensuring your screen stays on as you specified.
After completing these steps, your screen will stay on based on the new settings you chose. This is particularly useful if you’re doing activities that require constant screen visibility, like reading or coding.
- Customize for Both Battery and Plugged In: Ensure you adjust the settings for both scenarios to cover all bases.
- Use Shortcuts: Remember the ‘Windows + I’ shortcut to access Settings quickly.
- Check Advanced Power Settings: For more control, delve into the advanced power settings to fine-tune your power usage.
- Update Your System: Keeping Windows updated can sometimes fix issues related to power settings.
- Restart After Changes: Sometimes a quick restart helps to apply the new settings effectively.
Frequently Asked Questions
Why does my screen keep turning off?
Your screen turns off based on the power settings configured in your system. Adjusting these settings can prevent it from turning off.
Can I set my screen to never turn off?
Yes, you can set your screen to never turn off by changing the settings in the Power & battery section within System.
Will this affect my battery life?
If you’re using a laptop, setting the screen to never turn off can drain your battery faster. Adjust settings based on your needs.
Can I use different settings for plugged-in and battery modes?
Absolutely, Windows 11 allows you to customize settings for both scenarios separately.
What if my settings don’t save?
Ensure you have administrative rights. If the issue persists, consider restarting your computer or checking for system updates.
Summary of Steps
- Open Settings.
- Go to System.
- Select Power & battery.
- Adjust Screen and Sleep settings.
- Save your settings.
Conclusion
Adjusting your screen timeout settings in Windows 11 is a quick and easy way to improve your productivity and ensure your screen stays on when you need it. By following the steps outlined in this guide, you can customize your power settings to fit your lifestyle, whether you’re using a desktop or a laptop.
If you want more control over your device, consider exploring other system settings like advanced power options. Remember, technology is here to serve you, so don’t hesitate to tweak settings to make your computer work just the way you like it.
Taking a few minutes to understand and adjust these settings can save you a lot of hassle in the long run. So go ahead, make the change today, and enjoy a screen that stays on as long as you need it to.
Matthew Burleigh has been writing tech tutorials since 2008. His writing has appeared on dozens of different websites and been read over 50 million times.
After receiving his Bachelor’s and Master’s degrees in Computer Science he spent several years working in IT management for small businesses. However, he now works full time writing content online and creating websites.
His main writing topics include iPhones, Microsoft Office, Google Apps, Android, and Photoshop, but he has also written about many other tech topics as well.
Read his full bio here.
Download Windows Speedup Tool to fix errors and make PC run faster
Your computer’s display will turn off automatically when the system goes into the idle state to save some of your precious battery life and power. But if you are not a fan of that feature, check this post to prevent Screen Display from turning off in Windows 11/10.

Prevent Windows screen display from turning off
To keep your screen from turning off on a Windows 11 or Windows 10 computer, you may use one of these options:
- Through Settings app
- By using Command Prompt
- Through the Control Panel
Let’s see all these methods in detail:
1] Through the Settings app
If you want to prevent the screen display from turning off, you need to perform some changes in the Settings app:
- Open the Windows Settings using Win+I keyboard shortcut and then head to the System > Power & sleep.
- Move to the right pane and locate the Screen section. Then click on the drop-down menu and set “On battery power, turn off after” as Never.
- Similarly, click on the drop-down menu and set “When plugged in, turn off after” as Never.
- After following the above steps, your computer screen display will not turn off automatically.

Tip: ScreenOff lets you turn off Windows laptop screen with a click.
2] By using Command Prompt

You can also keep your screen from turning off by running a simple command in Command Prompt. To do so, open the Run dialog box using the Win+R keyboard shortcut.
In the text field, type Ctrl+Shift+Enter keys to open Command Prompt with admin privileges. Click on the Yes button if UAC popup on your computer screen.
In the Command Prompt window, type the following command:
powercfg -change -monitor-timeout-ac 0
Press the Enter key to set the timeout setting to never
Furthermore, you can also set your screen timeout settings to never when your PC is running on battery. To do this, type the following command and hit enter to run it:
powercfg -change -monitor-timeout-dc 0
After running the above commands, it will set your screen timeout setting to never turn off.
Read: Windows computer goes to Sleep too early.
3] Through the Control Panel

The next option is the control panel using which you can prevent your Windows 11/10 screen display from turning off. So let’s see how to do this:
Open the Control Panel.
Go to the upper right corner of the screen and make sure the View by option is set to Category.
Now go to Hardware and Sound > Power Options.
From the left pane, click the link named Choose when to turn off the display.

In the Edit Plan Settings window, set the “Turn off the display” option to Never using the drop-down menu for both On battery and Plugged in.
Here please note that the “On Battery” option is only available for the laptop computer.
We hope you find the post useful.
Related: Computer Screen won’t turn off after the specified time.
How do I stop my display from turning off Windows 11?
To stop your display from turning off on a Windows 11 computer, you need to configure the Power & battery settings. You can also use Command Prompt or Control Panel to do the same.
Also Read: Prevent users from shutting down or restarting Windows computer.
How do I stop my Screen from going black Windows 11?
Your screen goes black when your computer goes into an idle state. So, if you want to configure your computer such that it never goes into the idle state, our best bet is to change the On battery power, turn off after to Never.
Also Read: Windows PC turns off randomly.
Anand Khanse is the Admin of TheWindowsClub.com, a 10-year Microsoft MVP (2006-16) & a Windows Insider MVP (2016-2022). Please read the entire post & the comments first, create a System Restore Point before making any changes to your system & be careful about any 3rd-party offers while installing freeware.
Спящий режим — одна из функций экономии электроэнергии, присутствующая на ПК и ноутбуках с Windows. В зависимости от настроек устройство может переходить в режим сна после определенного периода бездействия, а в дальнейшем — в режим гибернации или не переходить в него, существуют и дополнительные нюансы.
В этой инструкции подробно о том, как отключить спящий режим в Windows 11 или включить его, о решении возможных проблем при работе режима сна и дополнительная информация на тему, которая может быть полезной. На близкую тему: Гибернация Windows 11 — как отключить, включить, добавить в меню Пуск.
Включение, отключение и настройка спящего режима в Параметрах Windows 11
Основной способ настройки работы спящего режима для обычного пользователя — использование соответствующего раздела в «Параметры». Шаги будут следующими:
- Откройте «Параметры» через меню Пуск или нажав клавиши Win+I на клавиатуре.
- Перейдите в раздел Система — Питание и батарея. Ещё один способ быстро попасть в нужный раздел — нажать правой кнопкой мыши по кнопке Пуск и выбрать пункт «Управление электропитанием».

- В подразделе «Питание» будет присутствовать пункт «Экран и спящий режим», где для вы можете либо настроить время перехода в спящий режим, либо отключить его. Для ноутбука — отдельно при питании от батареи и при питании от сети. Здесь же можно настроить время отключения экрана.


В результате спящий режим должен будет исправно работать в соответствии с заданными настройками. Если соответствующий пункт не отображается в меню завершения работы, вам может помочь статья Как добавить спящий режим в меню Пуск Windows 11.
Обратите внимание, что по умолчанию при выходе из спящего режима вас будут запрашивать пароль для входа в систему. Эту настройку можно изменить:
- Перейдите в Параметры — Учетные записи.
- Откройте пункт «Варианты входа».
- Найдите пункт настроек «В случае вашего отсутствия через какое время Windows должна потребовать выполнить повторный вход». По умолчанию там будет указано «Время выхода компьютера из спящего режима», при желании опцию можно изменить на «Никогда».


Настройки спящего режима в Панели управления
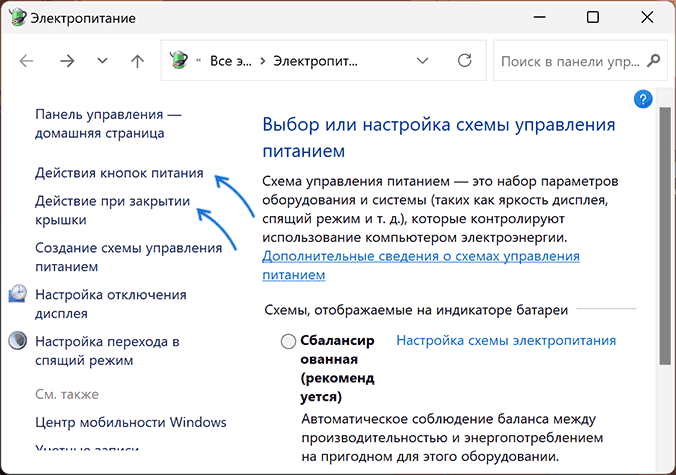
Второй способ изменить параметры спящего режима Windows 11 — использовать старый интерфейс панели управления, для этого:
- Откройте «Панель управления» (можно использовать поиск в панели задач), а в ней — пункт «Электропитание», либо нажмите клавиши Win+R на клавиатуре, введите powercfg.cpl и нажмите Enter.

- Нажмите «Настройка схемы электропитания» справа от активной схемы электропитания.

- На следующем экране вы сможете задать время перехода компьютера или ноутбука в спящий режим или выбрать «Никогда», если требуется отключить спящий режим. Здесь же можно настроить отключение монитора.

- Если нажать «Изменить дополнительные параметры питания», в дополнительных параметрах электропитания можно также настроить время перехода в спящий режим в разделе «Сон». Дополнительно, в этом же разделе можно изменить, через какое время компьютер будет переводиться в режим гибернации, разрешить или запретить таймеры пробуждения.

- В Дополнительных параметрах питания может присутствовать ещё один раздел, имеющий отношение к спящему режиму — «Кнопки питания и крышка». При необходимости настройте его нужным образом.

- Если раздел «Кнопки питания и крышка отсутствует» в дополнительных параметрах схемы, поведение при закрытии крышки ноутбука и нажатии кнопки питания можно настроить в главном окне параметров электропитания, нажав по соответствующим пунктам в левой панели.


Учитывайте, что так как настройки автоматического перехода в спящий режим выполняются отдельно для каждой из схем электропитания в случае, если вы их меняете в зависимости от сценария использования, настройки может потребоваться выполнить для каждой из них.
Решение возможных проблем с работой спящего режима
Нередки случаи, когда спящий режим Windows 11 работает не так, как ожидается. Ниже — список частых проблем пользователей и варианты их решения.
- Автоматический выход из спящего режима. Здесь может помочь инструкция Что делать, если компьютер или ноутбук сам просыпается.
- Что делать, если нет пункта спящий режим в меню Пуск
- Компьютер или ноутбук не переходит в спящий режим. Возможны два варианта: если переход в сон не происходит после заданного периода времени, но исправно работает при нажатии пункта «Спящий режим» в меню Пуск, скорее всего, причина — фоновые задачи, мешающие переходу в спящий режим (например, работающий торрент-клиент или другое ПО). Если переход в спящий режим не происходит даже при попытке включить его вручную, стоит озаботиться ручной установкой оригинальных драйверов чипсета и управления электропитанием с сайта производителя ноутбука или материнской платы, а для ноутбуков Intel отдельное внимание обратить на драйвер Intel Management Engine Interface. Официальные, даже старые драйверы (в том числе от предыдущих версий ОС), в некоторых случаях работают более правильно, чем те, что Windows устанавливает автоматически. Здесь также может помочь материал Что делать, если Windows 11 не выключается (причины и подходы к решению почти одинаковы).
- Компьютер не выходит из спящего режима. Проблема обычно вызвана либо драйверами чипсета и управления электропитанием, как в предыдущем случае, но иногда причиной оказываются драйверы видеокарты — вручную установите последние версии драйверов как для дискретной, так и для интегрированной видеокарт.
- Некоторые пользователи сообщают, что экран выключается, даже если спящий режим и отключение экрана настроены на «Никогда». Возможные причины: включенная заставка «Пустой экран» (как изменить заставку или скринсейвер в Windows 11), а в некоторых случаях — снижение яркости экрана: попробуйте в Параметры — Питание и батарея — Экономия заряда отключить опцию «Уменьшать яркость экрана в режиме экономии заряда». Также параметры яркости экрана можно задать в дополнительных параметрах схемы электропитания: замечено, что на некоторых устройствах снижение яркости до значений ниже 50-20% может приводить к полному отключению подсветки экрана.
- Спящий режим отключен, но ноутбук или ПК все равно переходи в него через 2 минуты. В этом случае откройте редактор реестра и перейдите к разделу
HKEY_LOCAL_MACHINE\SYSTEM\CurrentControlSet\Control\Power\PowerSettings\238C9FA8-0AAD-41ED-83F4-97BE242C8F20\7bc4a2f9-d8fc-4469-b07b-33eb785aaca0
в этом разделе дважды нажмите по параметру Attributes и задайте значение 2 для него, примените настройки и закройте редактор реестра. Перейдите в «Дополнительные параметры схемы электропитания» (шаги 1-4 из предыдущего раздела инструкции), в разделе «Сон» появится новый подраздел — «Время ожидания автоматического перехода системы в режим сна», установите новое значение времени.

- При проблемах с работой спящего режима может помочь устранение неполадок электропитания и восстановление схем электропитания по умолчанию. Для запуска каждой из опций нажмите клавиши Win+R, а затем используйте одну из следующих команд:
msdt.exe /id PowerDiagnostic
powercfg /restoredefaultschemes

Полезными могут оказаться дополнительные инструкции на тему работу спящего режима:
- Как отключить Modern Standby (S0 Low Power Idle) в Windows 11 и 10 (вариант спящего режима без отключения процессора и сетевых возможностей)
- Как перевести ПК или ноутбук в спящий режим с клавиатуры
- Как предотвратить переход компьютера в спящий режим, когда работает определённая программа
- Как отключить вывод из спящего режима с клавиатуры, мыши или тачпада
- Как отключить пароль после спящего режима Windows 11
Если возникают какие-то дополнительные проблемы, не приведённые в списке, опишите в комментариях ситуацию со всеми подробностями: думаю, решение найдётся.