
Безопасность на основе виртуализации, Virtualization based security или VBS — функция Windows 11 и Windows 10, предотвращающая выполнение потенциально опасного кода в памяти компьютера, изолируя его. Функция полезная, но по некоторым отзывам её отключение может повысить производительность в играх, а некоторые программы могут не запускаться, если она включена.
В этой инструкции описаны способы отключить безопасность на основе виртуализации. Далее рассмотрено отключение Virtualization Based Security в редакторе локальной и групповой политики, а также альтернативные методы, если отключение этими способами не помогло.
Как отключить безопасность на основе виртуализации в редакторе локальной групповой политики или редакторе реестра
Основной способ отключения Virtualization Based Security — настройка соответствующей политики в Windows. Если у вас установлена Pro или Enterprise версия системы, можно использовать редактор локальной групповой политики:
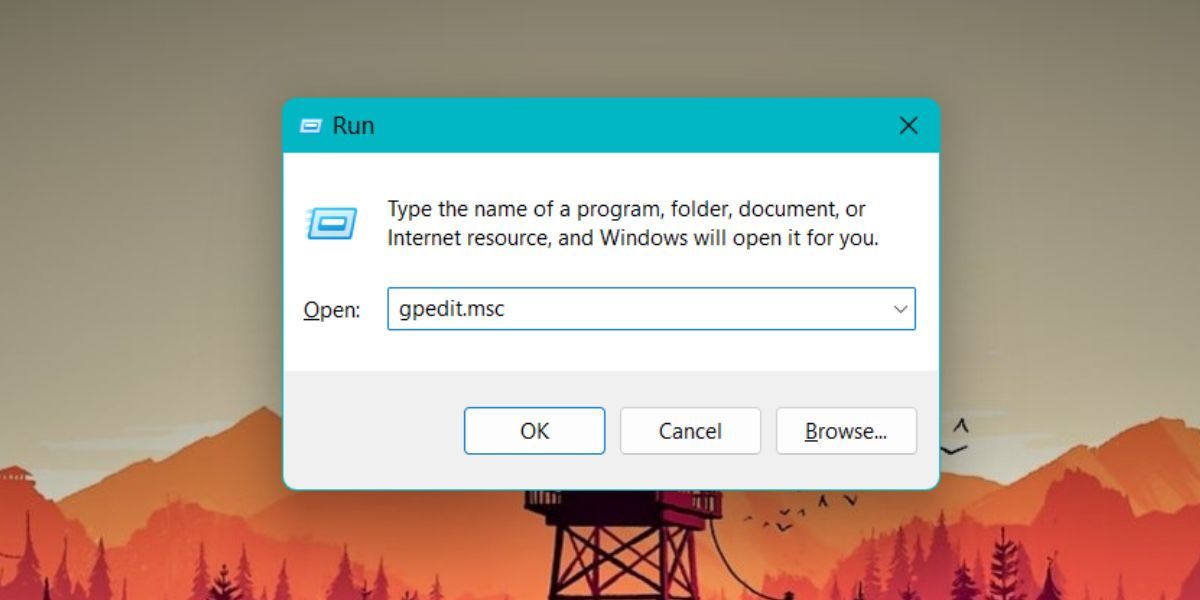
- Нажмите правой кнопкой мыши по кнопке «Пуск», выберите пункт «Выполнить», введите gpedit.msc и нажмите Enter.
- В редакторе локальной групповой политики перейдите к разделу «Конфигурация компьютера» — «Административные шаблоны» — «Система» — «Device Guard». Дважды кликните по пункту «Включить средство обеспечение безопасности на основе виртуализации» в правой панели.

- Установите значение «Отключено» и примените настройки.

- Перезагрузите компьютер.


В случае, если на вашем компьютере установлена домашняя редакция Windows, можно использовать редактор реестра:
- Нажмите клавиши Win+R на клавиатуре, введите regedit и нажмите Enter.
- Перейдите к разделу реестра
HKEY_LOCAL_MACHINE\System\CurrentControlSet\Control\DeviceGuard
- Нажмите правой кнопкой мыши в пустом месте правой панели редактора реестра и создайте новый параметр DWORD с именем EnableVirtualizationBasedSecurity и установите значение 0 для него.

- При наличии такого параметра, дважды нажмите по нему и измените значение на 0.
- Перезагрузите компьютер.

В результате функция VBS будет отключена. Если несмотря на это какая-то программа требует отключить Virtualization Based Security для своей работы, используйте далее описанные методы.
Дополнительные методы отключения Virtualization Based Security
Если предыдущий вариант не помог, и какая-то программа при запуске требует отключить VBS, можно использовать дополнительные подходы. Учитывайте, что при их использовании также будут отключены другие встроенные функции виртуализации Windows 11 и Windows 10 (на базе Hyper-V):
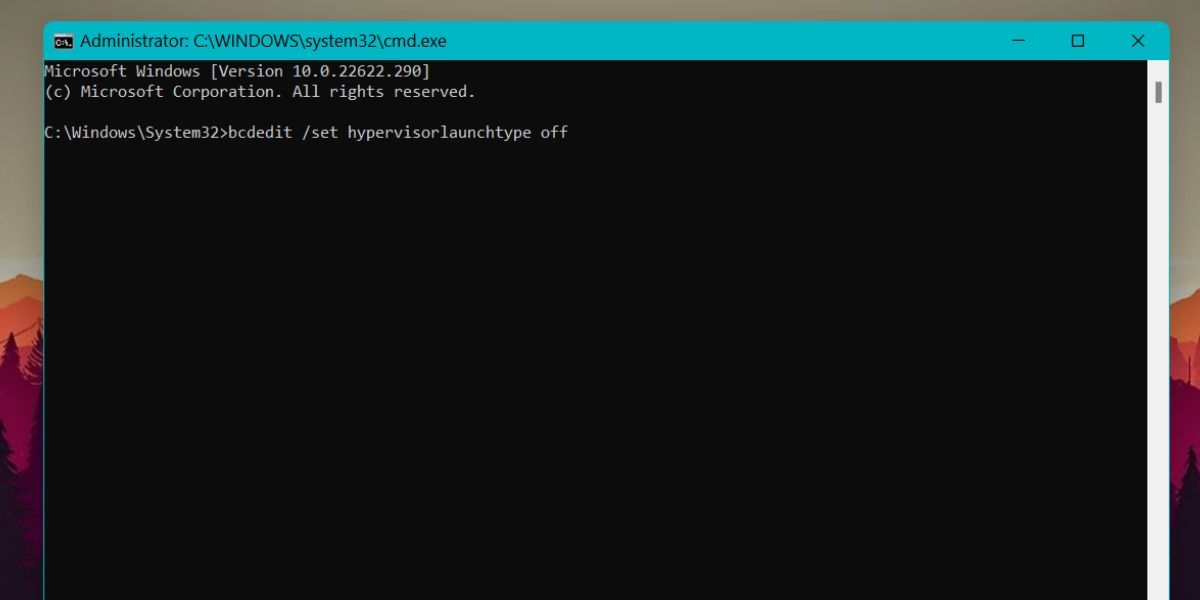
- Запустите командную строку от имени администратора, введите команду
bcdedit /set hypervisorlaunchtype off
и нажмите Enter. После этого перезагрузите компьютер.
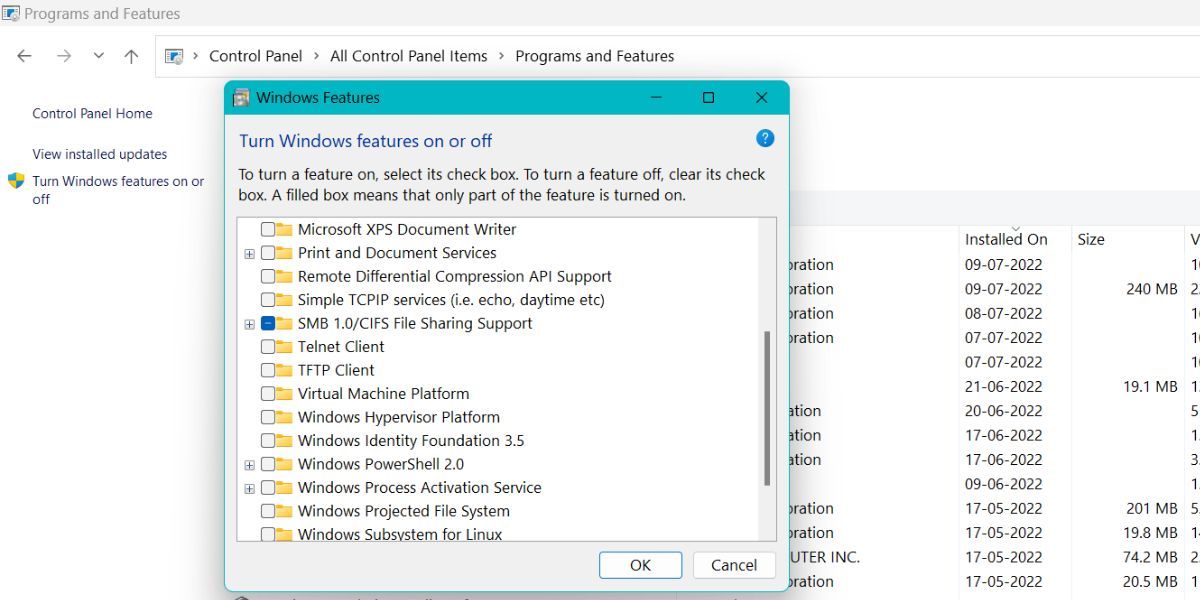
- Откройте окно «Программы и компоненты» в панели управления или с помощью Win+R — appwiz.cpl, нажмите «Включение или отключение компонентов Windows» слева, отключите компоненты «Application Guard в Microsoft Defender», «Hyper-V», «Платформа виртуальной машины», нажмите «Ок» и перезагрузите компьютер после удаления компонентов.


Обычно один из этих способов помогает решить проблемы, связанные с включенной функцией безопасности на основе виртуализации. Если вам требуется узнать текущий статус функции, вы можете нажать клавиши Win+R, ввести команду msinfo32 и нажать Enter.

В разделе «Сведения о системе» внизу списка вы найдете пункт «Безопасность на основе виртуализации» с нужной информацией.

Безопасность на основе виртуализации, также известная как VBS, позволяет Windows 11 создавать защищенный анклав памяти, изолированный от небезопасного кода. Другая встроенная функция, называемая целостностью кода с применением гипервизора (HVCI), использует возможности VBS для предотвращения попадания неподписанных или сомнительных драйверов и программного обеспечения в память. Вместе VBS и HVCI добавляют уровень защиты, который ограничивает ущерб, который вредоносное ПО может нанести, даже если оно пройдет мимо вашего антивирусного ПО.
К сожалению, VBS и HVCI требуют значительных затрат на производительность, особенно когда дело касается игр. В тестах обнаружили, что игры работали на 5 процентов медленнее с этими настройками, чем с выключенными. Другие тестировщики увидели еще большое снижение производительности; на сайте PC Gamer отметили падение производительности на 25 процентов, хотя они тестировали процессоры Intel 10-го поколения, когда Microsoft рекомендует не менее 11-го поколения.
Простое обновление до Windows 11 не включит VBS, если вы не включили его в Windows 10, где он не использовался по умолчанию в течение нескольких лет. Так что на данный момент это проблема, с которой сталкиваются немногие.
Однако, если вы выполняете чистую установку Windows 11 или покупаете новый ноутбук или настольный компьютер с Windows 11, по умолчанию у вас может быть включен VBS / HVCI. Microsoft рекомендует включить его в OEMS по умолчанию, но отмечает, что «некоторые устройства, которые особенно чувствительны к производительности (например, игровые ПК), могут поставляться с отключенным HVCI». И уже известно, по крайней мере, об одном OEM, который утверждает, что они будут поставлять свои системы с отключенным VBS.
Если вы используете Windows 11, и производительность, особенно в играх, имеет для вас наибольшее значение, ниже будет показано, как проверить, включен ли VBS / HVCI и как его отключить. Однако, если вы не играете, вы можете оставить защиту на месте.
Как проверить, включен ли VBS в Windows 11
Прежде чем вы начнете думать об отключении VBS, вам нужно выяснить, включен ли он вообще.
1. Откройте системную информацию. Самый простой способ сделать это — выполнить поиск «системной информации» в поиске Windows и щелкнуть верхний результат.

2. Прокрутите вниз и найдите строку «Безопасность на основе виртуализации». Если написано «работает», значит VBS включен. Но если написано «не включено», значит ничего больше делать не надо.

Как отключить VBS / HVCI в Windows 11
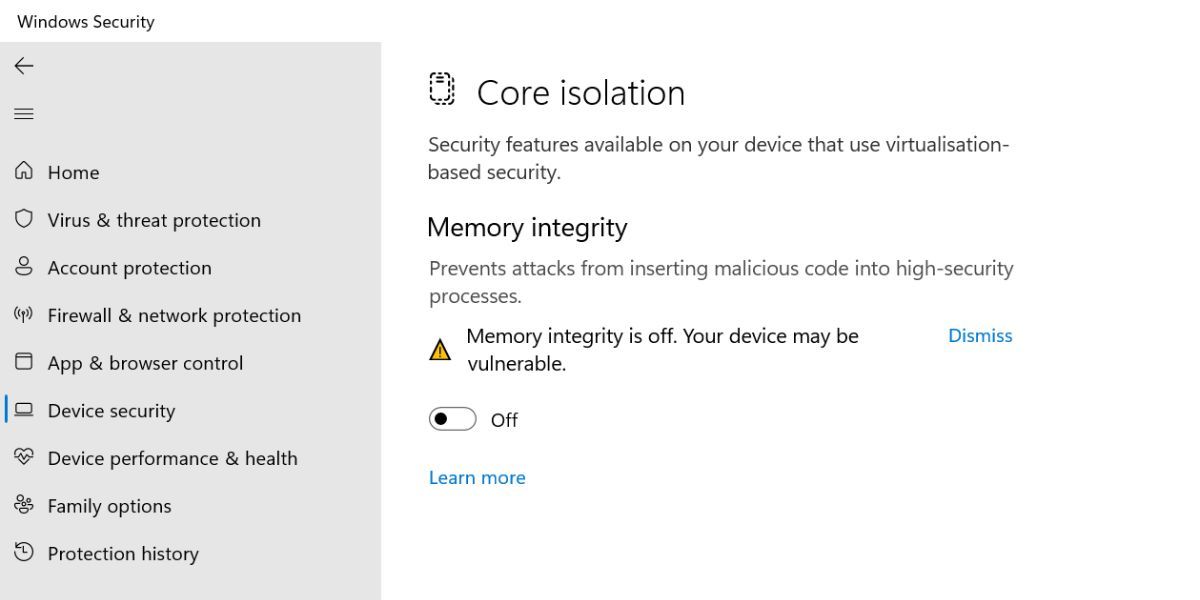
1. Найдите Core Isolation в поиске Windows и щелкните верхний результат .

2. Нажмите «Безопасность Windows» и «ОК», если вас спросят, какое приложение использовать. Откроется подменю.

3. Выключите целостность памяти, если она была включена. Если уже выключена, переходите к шагу 6.

4. Перезагрузите компьютер, как будет предложено.

5. Еще раз проверьте информацию о системе, чтобы убедиться, что безопасность на основе виртуализации выключена. Если да, то все готово. Если нет, перейдите к шагу 6, где вы отключите VBS в реестре.

6. Откройте regedit. Самый простой способ — нажать Windows + R, ввести regedit в текстовое поле и нажать ОК.

7. Перейдите к HKEY_LOCAL_MACHINE\System\CurrentControlSet\Control\DeviceGuard.

8. Откройте EnableVirtualizationBasedSecurity и установите для него значение 0.

9. Закройте regedit и перезагрузите компьютер .
На этом этапе вы должны увидеть, что VBS отключен в приложении с системной информацией.
Telegram-канал @overclockers_news — теперь в новом формате. Подписывайся, чтобы быть в курсе всех новостей!
Windows 11’s Virtualization Based Security features have been shown to have some impact on gaming performance — even if it isn’t drastic. While you will be putting your system more at risk, if you’re looking to min-max your gaming PC’s performance, you can always disable it. Just follow the steps below to disable VBS in Windows 11 with a few quick clicks.
Plus, later in this guide, we discuss if disabling VBS is really worth it, what you’d be losing if you choose to disable it, and other options for boosting your PCs gaming performance that don’t necessarily involve messing with VBS.
Note: Digital Trends does not recommend disabling any security features on your devices and takes no responsibility for any security issues that arise if you do.
How to disable VBS in Windows 11
Microsoft highlights several ways to disable VBS in Windows 11, but the quickest and easiest is using the Windows 11 Security center.
Step 1: Use the Windows search bar to look for «Windows Security» and select the security app.
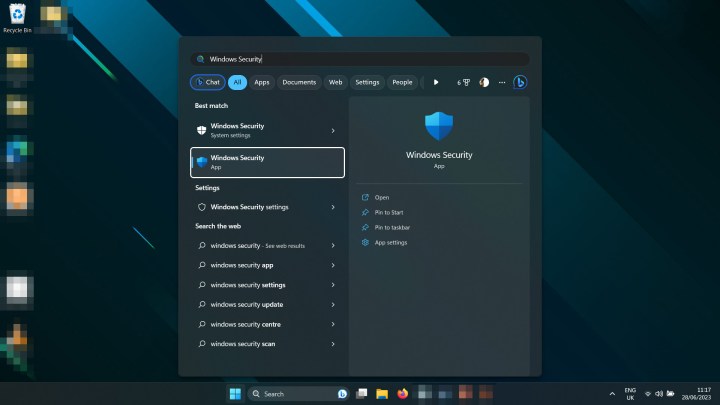
Image used with permission by copyright holder
Step 2: Select Device security from the left-hand menu.
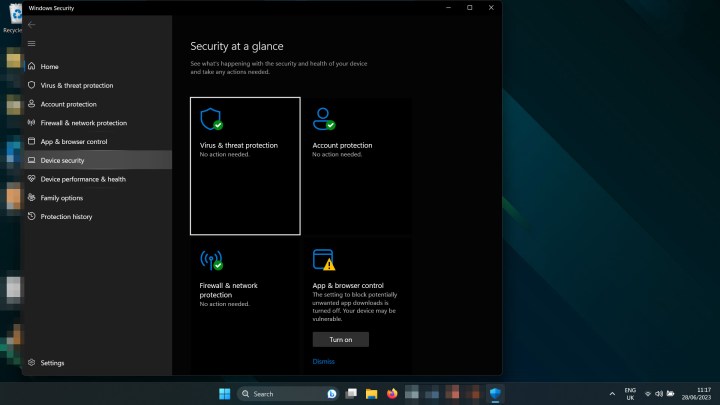
Image used with permission by copyright holder
Step 3: Select Core isolation details underneath the Core isolation heading.

Image used with permission by copyright holder
Step 4: Use the toggle to turn Memory integrity to Off.
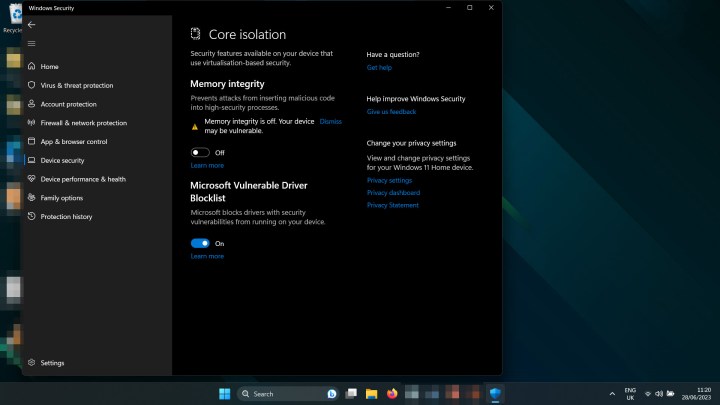
Image used with permission by copyright holder
Step 5: Restart your computer. When it boots up again, VBS should be disabled.
If you were looking to improve your game performance by disabling VBS, try playing one of them now to see what effect it had. Use these tips to track your frames per second.
How to check if VBS is disabled
You can check whether VBS is disabled on your system by looking in Windows 11’s System Information pane.
Step 1: Press the Windows key + R keyboard shortcut to launch the Run dialog box.
Step 2: Type in «msinfo32» and select OK or press Enter.

Image used with permission by copyright holder
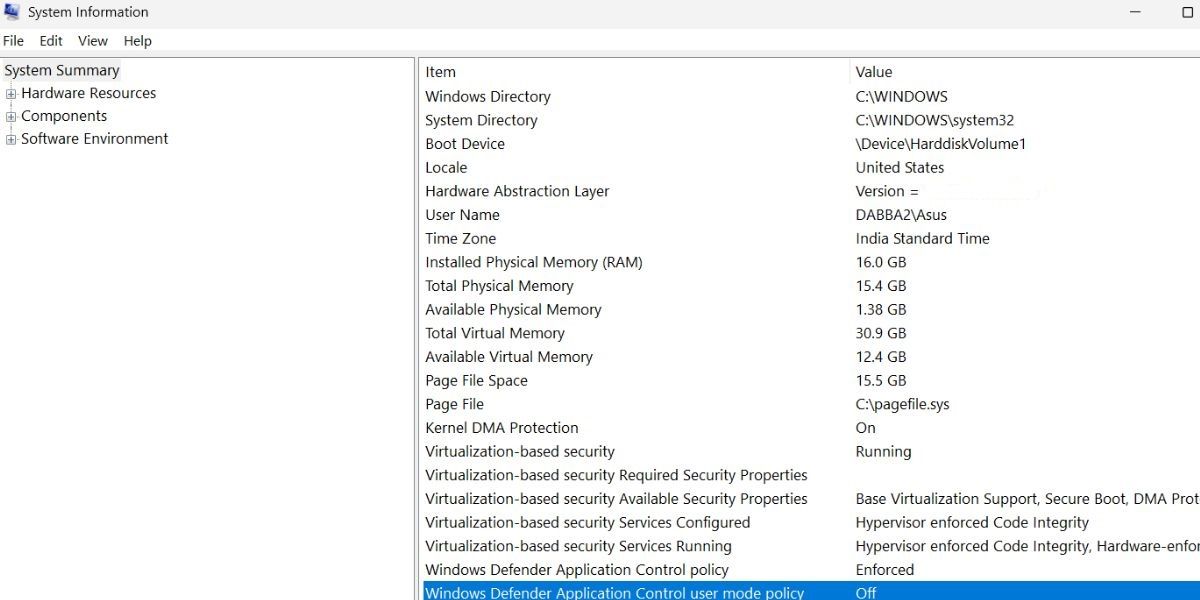
Step 3: In the System Information window that pops up, scroll down the right-hand pane until you find Virtualization-based security. If it’s disabled, it will say Not enabled.

Image used with permission by copyright holder
Should you disable VBS?
Unless you need absolutely every possible frame per second for your games, then no, you probably shouldn’t. We’ve shown in our analysis that the impact on gaming performance with VBS enabled is minimal at best — less than 1% fps in most cases. VBS also serves an important security function by protecting verification process like validating drivers, and helps prevent malware from inserting itself into your applications.
Yes, if you disable memory integrity you may get a couple of extra fps in your games, but you really aren’t going to notice that difference. You’d be better off optimizing Windows 11 for gaming, applying specific settings for your favorite games, or just saving up and buying a better graphics card.
Virtualization-based security (VBS) is a feature in Windows 11 that creates an isolated environment to enhance system security. By using hardware virtualization, it allows Windows to run security processes in a separate secure area of memory, protecting the operating system from various attacks. While VBS provides significant security advantages, there are certain scenarios where users might opt to disable it, especially in gaming or resource-intensive applications where performance might be impacted.
This article will provide a comprehensive guide on how to disable VBS in Windows 11. We will explore the reasons for disabling VBS, the effects it may have on your system, and the step-by-step process to turn off this feature effectively.
Understanding VBS and Its Implications
Before diving into the disabling process, it’s important to understand what VBS is and why it might need to be disabled.
-
What is VBS?
- Virtualization-based security (VBS) uses CPU virtualization extensions to create a secure location in memory. It runs in kernel mode, which is a privileged level that can execute the system’s most sensitive code and perform tasks that regular user-mode processes cannot.
-
Benefits of VBS
- Increased protection against malware attacks, particularly those that try to exploit vulnerabilities in the Windows kernel.
- Enhanced security for sensitive data and credential storage.
- Improved security for Windows applications that can take advantage of the isolated environment.
-
Reasons to Disable VBS
- Performance Concerns: In environments where resource-intensive applications, such as high-end gaming or software development tools, are used, VBS may lead to performance degradation.
- Compatibility Issues: Some older applications or hardware may not function correctly with VBS enabled.
- Customization: Advanced users or those looking to tweak system settings for optimal performance may find it beneficial to disable this feature.
Pre-requisites Before Disabling VBS
-
Backup Important Data: Before making significant changes to system settings, it’s always wise to back up any important files or data to ensure that you have recovery options if something goes wrong.
-
Update Windows: Ensure your Windows 11 is up to date by checking for software updates. This can prevent potential issues during the disabling process.
-
Admin Privileges Required: You will need administrative privileges to disable VBS, as it involves changes to system settings.
How to Check if VBS is Enabled
Before you disable VBS, it’s useful to check if it’s currently enabled. You can verify this through the System Information tool.
-
Open System Information:
- Press
Windows + Rto open the Run dialog. - Type
msinfo32and hit Enter.
- Press
-
Check VBS Status:
- In the System Information window, look for “Virtualization-based security” listed in the right pane.
- If it says «Running» or «Enabled», VBS is currently active.
Methods to Disable VBS in Windows 11
There are several methods to disable VBS, including using the Windows Security app, a Group Policy editor, or the Windows Registry. Below are detailed steps for each method.
Method 1: Disabling VBS via Windows Security
-
Open Windows Security:
- Click on the Start menu and start typing «Windows Security», then select it from the results.
-
Go to Device Security:
- In the Windows Security window, navigate to the “Device security” section.
-
Core Isolation Details:
- Click on “Core isolation details”. This will show you the settings related to VBS.
-
Turn Off Memory Integrity:
- Find the option labeled “Memory integrity”. If it is toggled on, switch it off. You may need to restart your computer for changes to take effect.
Method 2: Disabling VBS via Group Policy Editor
This method is applicable to Windows 11 Pro, Education, and Enterprise editions.
-
Open Group Policy Editor:
- Press
Windows + R, typegpedit.msc, and press Enter.
- Press
-
Navigate to Local Computer Policy:
- In the Group Policy Editor, expand the following:
Computer Configuration > Administrative Templates > System > Device Guard
- In the Group Policy Editor, expand the following:
-
Configure the Options:
- Look for “Turn on Virtualization Based Security” and double-click on it to edit.
- Select the “Disabled” option, then click «OK».
-
Target Specific VBS Features:
- Additionally, check the settings for “Require Virtualization Based Security” and ensure it is disabled as well.
-
Restart the System: After making changes, restarting your computer is crucial to apply them effectively.
Method 3: Disabling VBS via Windows Registry
Altering registry keys can be risky, and it is essential to proceed with caution. Always back up the registry before making changes.
-
Open Registry Editor:
- Press
Windows + R, typeregedit, and press Enter.
- Press
-
Navigate to the VBS Registry Key:
- Go to the following path:
HKEY_LOCAL_MACHINESOFTWAREMicrosoftWindowsCurrentVersionPoliciesSystem
- Go to the following path:
-
Edit or Create the DWORD Value:
- Look for a value named
EnableVirtualizationBasedSecurity. If it does not exist, create it by right-clicking in the right pane, selecting New, then selecting DWORD (32-bit) Value, and naming itEnableVirtualizationBasedSecurity. - Set its value to
0.
- Look for a value named
-
Remove Any Other VBS-related Keys:
- Look for other keys related to virtualization and security, such as
DataProtectionand remove or edit their values as necessary.
- Look for other keys related to virtualization and security, such as
-
Close the Registry Editor and Restart: After making these changes, close the Registry Editor and restart your system.
Post-Disabling Considerations
-
Rechecking VBS Status: After rebooting your system, follow the steps outlined earlier to check if VBS is now disabled.
-
Monitoring Performance: Observe the system’s performance in your applications. You may notice improvements in speed and responsiveness, especially in resource-intensive tasks.
-
Understand the Security Risks: With VBS disabled, your system may be more vulnerable to certain types of attacks. Ensure that you have other robust security measures in place, such as antivirus software and regular system updates.
Conclusion
Disabling Virtualization-Based Security in Windows 11 can provide performance benefits, particularly for users engaged in high-performance tasks. However, it is important to weigh the advantages against the potential security risks involved. By following the steps laid out in this guide, users can confidently disable VBS and tailor their system’s configuration to meet their specific needs. Always remember to back up data and monitor the system after making such changes to ensure everything functions properly.
The Virtualization-Based Security (VBS) feature came into the spotlight with Windows 11 and comes enabled by default on newer systems. This feature existed in Windows 10 too, but it hogged quite a lot of system resources.
If you experience a drop in gaming performance after upgrading to Windows 11, don’t fret. If you’ve tried everything already and nothing seems to work, VBS may be the culprit behind your low frame rates. As such, let’s explore how to disable VBS and squeeze the maximum amount of performance from your system.
Does VBS Really Reduce Performance?
PC Gamer and Tom’s Hardware dove in deep to learn about the drop in performance after enabling VBS. Both findings revealed performance drops ranging from 5-25 percent. Popular titles like Horizon: Zero Dawn and Shadow of the Tomb Raider suffered massive FPS drops.
Surprisingly, the CPU and GPU frequency remained unchanged. But these components were drawing less power. There haven’t been any detailed findings about what is actually causing it. But if you want to get maximum performance in games and applications, VBS is likely standing in your way.
What Are the Repercussions of Disabling VBS on Your System?
Virtualization-Based Security (VBS) works with Windows Hypervisor to create an isolated memory region. This isolated region securely stores login credentials, crucial Windows security code, and more. HVCI is a feature that uses VBS to conduct integrity checks on programs.
In simple words, attackers have a tough time when VBS is active. So, turning it off leaves you exposed to kernel-level attacks. If you are someone who uses their system for confidential official work, it is best to keep VBS enabled. If you are a gamer or use resource-intensive apps, disabling VBS will minimize the performance drop.
How to Check If VBS is Active on Your System
You can use the System Information app to check if VBS is active on your system. Here’s how to do it:
- Press Win + R to launch the Run dialog box. Type msinfo32 in the text box and press the Enter key.
- System Information utility will launch.
- Navigate to the right pane. Scroll down and locate the Virtualization-based security entry in the list. Alternatively, you can use the Find What box present at the bottom and search for the feature.
-
If you see «Running» mentioned next to it, it means that VBS is up and running on your system.

- Close the System Information utility.
How to Disable VBS to Increase Performance in Windows 11
If you want to disable VBS, here are a few tricks you can try.
1. How to Disable VBS From the Windows Settings
Perform the following steps to disable VBS from the Settings app.
- Press Win + I to launch the Settings app. Navigate to the left-hand side menu and click on the Privacy and Security option.
- Click on Windows Security and then click the Open Windows Security button.
- Windows Security app will launch. Go to the left-hand side menu and select Device Security.
- Find the Core isolation section and click on the Core isolation details option.
-
Now, check whether the Memory Integrity toggle is active or not. If it is active, click on it to disable the feature.
- Restart your system. Test some apps and games to check their performance.
2. How to Disable VBS With the Command Prompt
You can also disable VBS using the command prompt. Keep in mind that you must grant administrator access before executing the commands.
To turn off VBS using the command prompt, repeat the following steps:
- Press Win + R to launch the Run command box. Now type cmd and press Ctrl + Shift + Enter to launch the command prompt with elevated permissions.
-
Type bcdedit /set hypervisorlaunchtype off in the text area.
- Press the enter key to execute the command. Wait for the execution to complete.
- Restart your system. VBS won’t bother you anymore.
3. How to Turn Off Windows’ Virtualization Features
VBS can run on your system only if virtualization is active. If you shut off all the Virtualization features of Windows, VBS won’t work. So, you have to uninstall a few Windows features.
To turn off Virtualization features in Windows 11, do as follows:
- Press the Win key, type Control Panel and open the first result.
- Find the Program and Features option and then click on Uninstall a Program option.
- Navigate to the top left-hand side and click on the Turn Windows Features on or off option.
-
Windows Features will launch. Find Microsoft Defender Application Guard, Virtual Machine Platform, and Windows Hypervisor Platform in the list.
- Uncheck all these features and then click on the OK button. Wait for the setup to disable these features on your device. Click on the Restart Now button to apply changes.
- Revisit the Windows Features to check whether all Virtualization features are inactive or not.
4. How to Disable VBS From the Local Group Policy Editor
You can use the Group Policy Editor to turn off VBS permanently. Keep in mind that GPE is not available for Windows 11 Home users. You need to run a batch script to enable GPE. Check out our complete Group Policy Editor guide for more information on this.
To disable VBS using the Group Policy Editor, do as follows:
-
Press Win + R to launch the Run command box. Type gpedit.msc and hit the enter key to launch the Group Policy Editor.
- Navigate to Local Computer Policy > Computer Configuration > Administrative Templates > System > Device Guard.
- Under Device Guard, find the Turn On Virtualization Based Security policy and double-click on it.
- Click on the Disabled radio button in the policy window. Then, click on the Apply button.
- Click on the OK button and exit the Group Policy Editor. Restart your system to apply changes.
- To re-enable VBS, click on the Enabled radio button in the Turn On Virtualization Based Security policy.
5. How to Disable Virtualization via the BIOS
The last option is to disable virtualization technology from the system BIOS. As mentioned before, VBS won’t work if you disable virtualization features. So, by doing this, you can ensure that VBS doesn’t turn on ever again.
To turn off virtualization technology from BIOS, repeat the following steps:
- Restart your system. Press the corresponding F-key to access the BIOS setup (usually it is the F2 or F12 key).
- Once you are inside the BIOS, go to the advanced settings page. Remember that each OEM has a different BIOS appearance and settings layout.
-
Find the Virtualization Technology option under advanced settings. Click on it to disable the feature on your system.
- Now, press the F10 key to save the changes. Exit the BIOS setup and continue the OS boot process.
- Check the Memory Integrity option in Windows Security. It will appear grayed out.

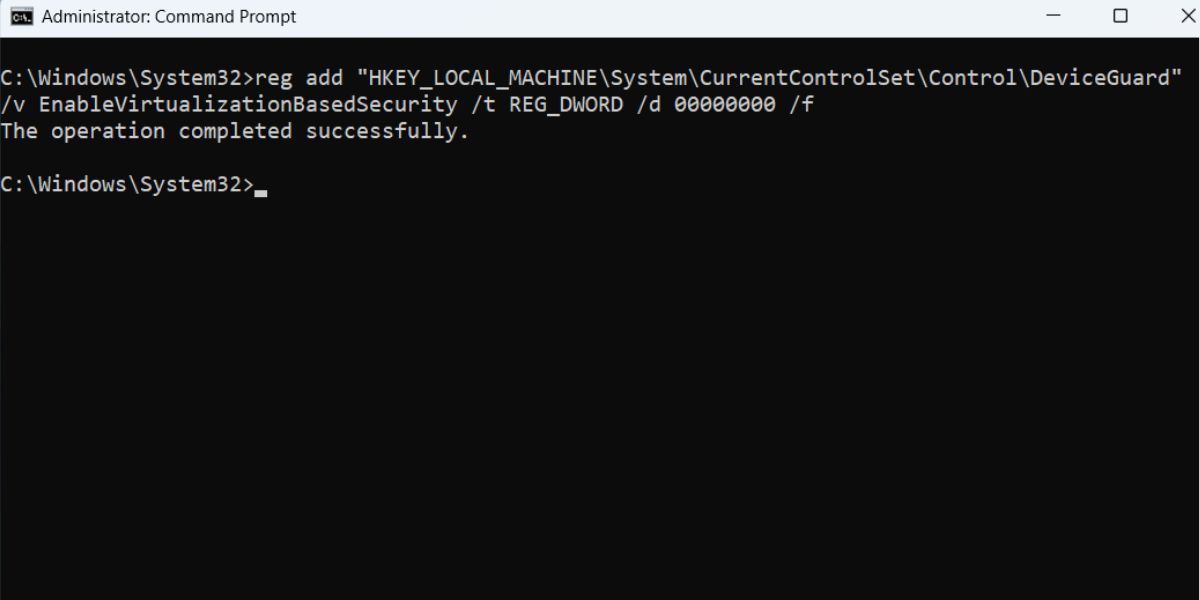
6. How to Disable VBS Using Registry Editor
If you don’t have Group Policy Editor on your Windows 11 Home version, you can use the Registry Editor to change the status of VBS on your PC. Instead of manually navigating to the registry key, you can use Command Prompt to modify the EnableVirtualizationBasedSecurity DWORD value.
But before doing that, create a manual backup of the Windows Registry and save it to an external USB drive as a backup option. After doing that, repeat the following steps to disable VBS by tweaking the registry:
- Press Win + R to launch the Run dialog box. Type cmd and press the Ctrl + Shift + Enter keys simultaneously to open the Command Prompt with administrator privileges.
-
Now, type the following command and press the Enter key to execute it:
reg add "HKEY_LOCAL_MACHINE\System\CurrentControlSet\Control\DeviceGuard" /v EnableVirtualizationBasedSecurity/t REG_DWORD /d 00000000 /f -
If everything went fine, you will see a «The operation completed successfully.» message.
- Type exit and press Enter to close the Command Prompt window.
- Restart your PC to apply the changes.
VBS Won’t Throttle Your System Performance Anymore
VBS is a pretty cool feature that is available in both Windows 10 and 11. However, the drastic performance drops surely make it less enticing for gamers. Firstly, start by disabling the Memory Integrity feature in Windows Security. Then turn off VBS using the Group Policy Editor.
After that, move to other steps to disable virtualization features such as MDAG, and Virtual Machine Platform. Lastly, disable the virtualization technology from the BIOS. Features like VBS won’t work without it.