
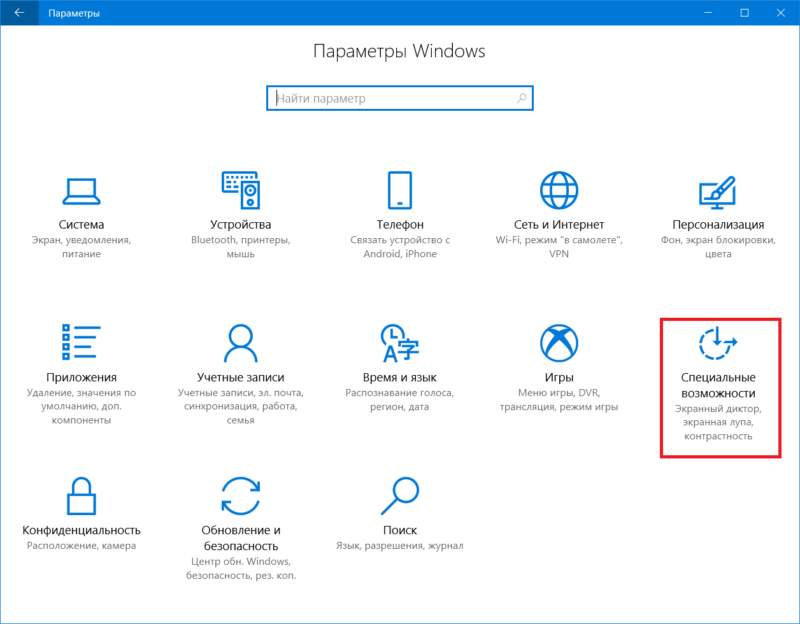
С каждым релизом Windows 10 Microsoft делает свою операционную систему все более дружелюбной для пользователей с определенными расстройствами или болезнями. Windows 10 Fall Creators Update получила набор изменений, которые улучшат взаимодействие с компьютером для тех, кому приходится мириться с проблемами со зрением. Функция называется «Цветовые фильтры» и активируется из настроек Специальных возможностей.
Что такое цветовые фильтры в Windows 10
Цветовые фильтры упрощают жизнь пользователям с определенными расстройствами зрения или чрезмерной светочувствительностью. Фильтры применяются ко всей системе целиком, поэтому изменяется не только внешний вид определенных системных элементов, но и всех остальных приложений, включая игры, фото и видео. Работа цветовых фильтров также не зависит от того, какой экран или видеокарту вы используете. Эта функция реализована таким образом, чтобы ею мог воспользоваться каждый, вне зависимости от мощности устройства, его форм-фактора или возраста.
Для справки: цветовые фильтры доступны только на компьютерах, которые обновлены до Windows 10 Fall Creators Update или Windows 10 1709 сборки 16299. Если ваш ПК еще не обновлен, почитайте статью, которая рассказывает о том, как установить Windows 10 Fall Creators Update.
Как включить цветовой фильтр в Windows 10
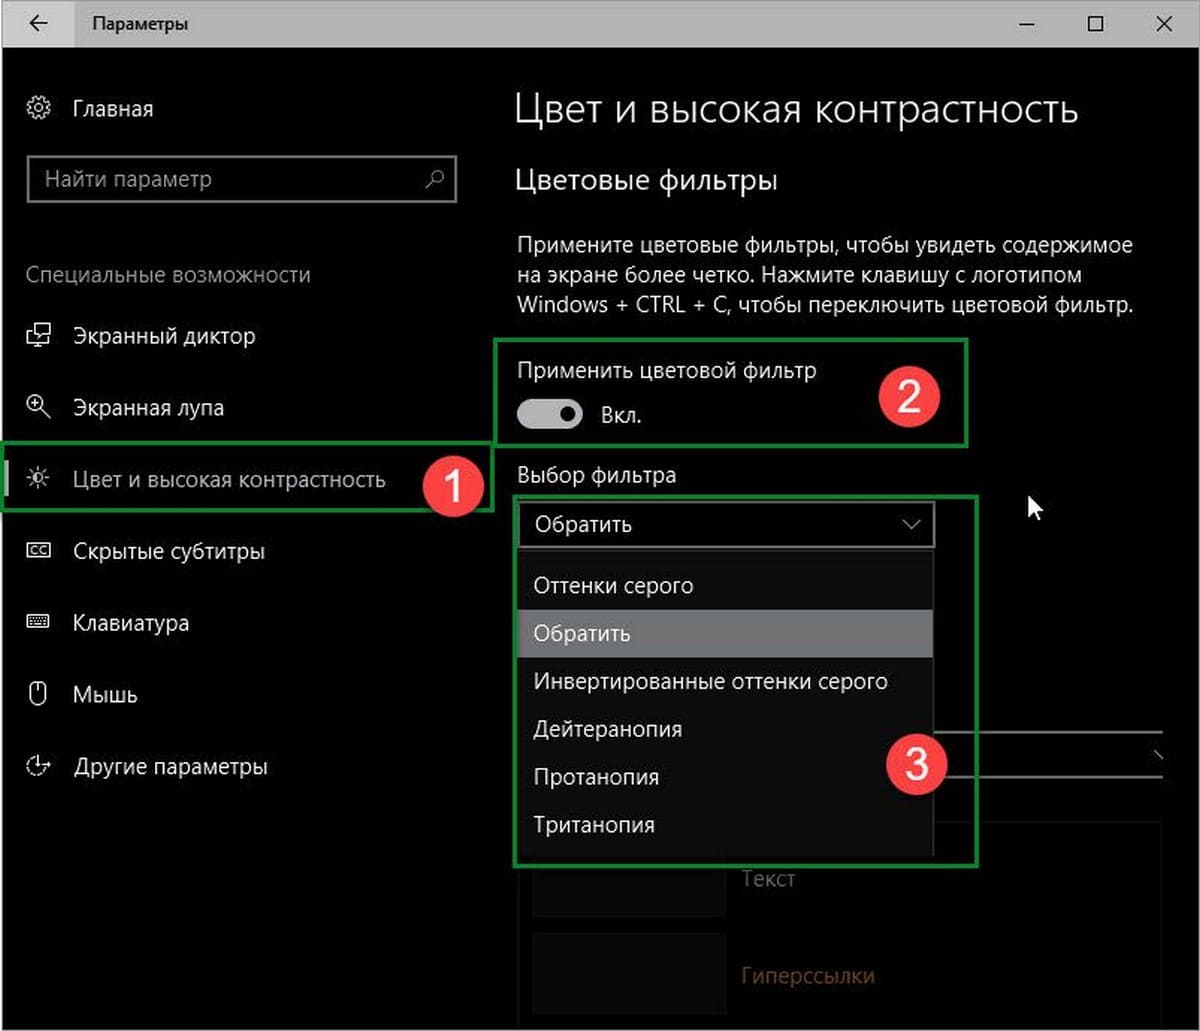
- Нажмите Win + I и перейдите в раздел Специальные возможности.

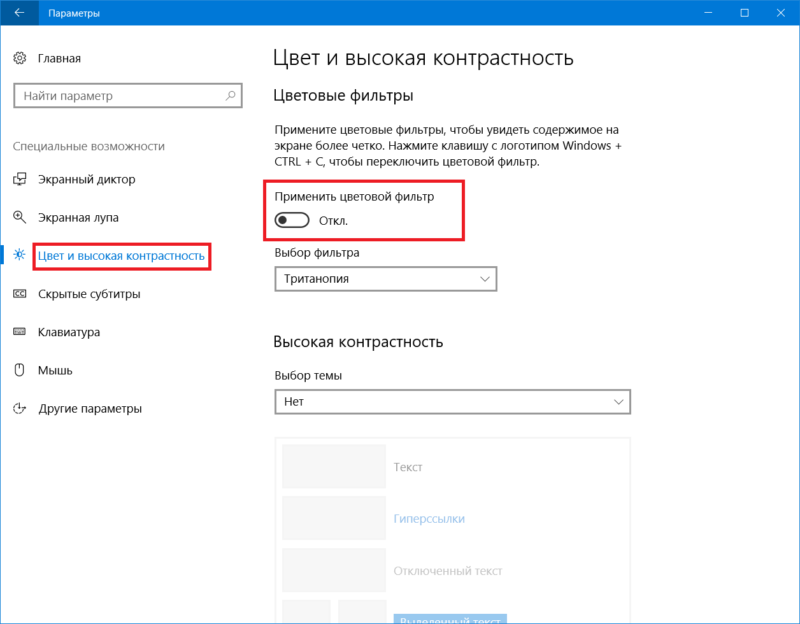
- В боковом меню выберите пункт Цвет и высокая контрастность.
- Активируйте переключатель Применить цветовой фильтр.
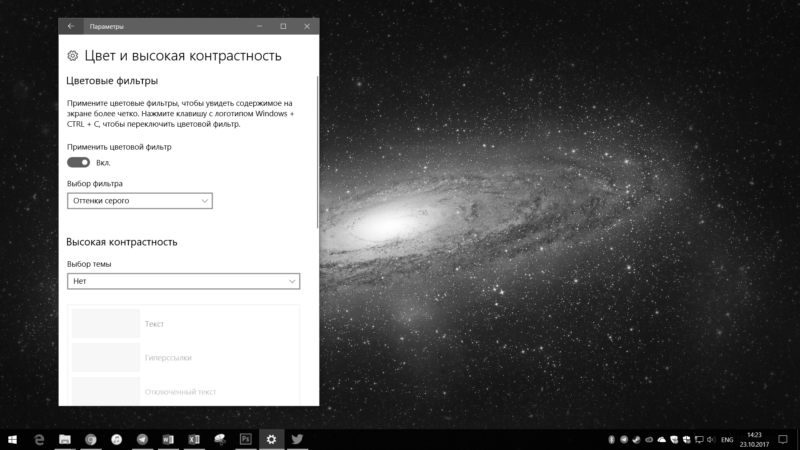
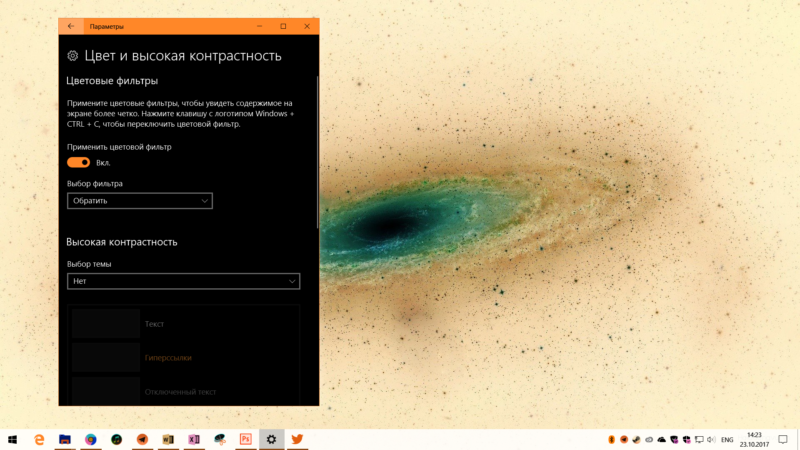
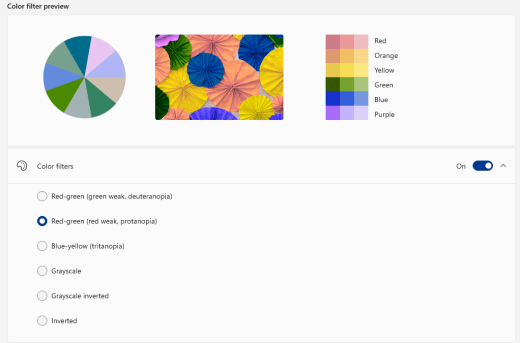
После этого система наложит «поверх» экрана определенный фильтр, чем существенно изменит картинку на экране. Вы можете выбрать один из нескольких фильтров, чтобы подстроить картинку под ваши личные предпочтения или физические особенности. Всего доступно шесть филтров.
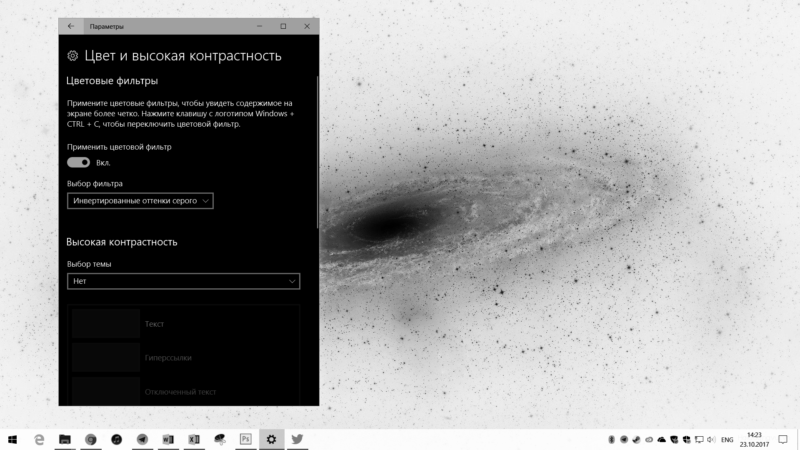
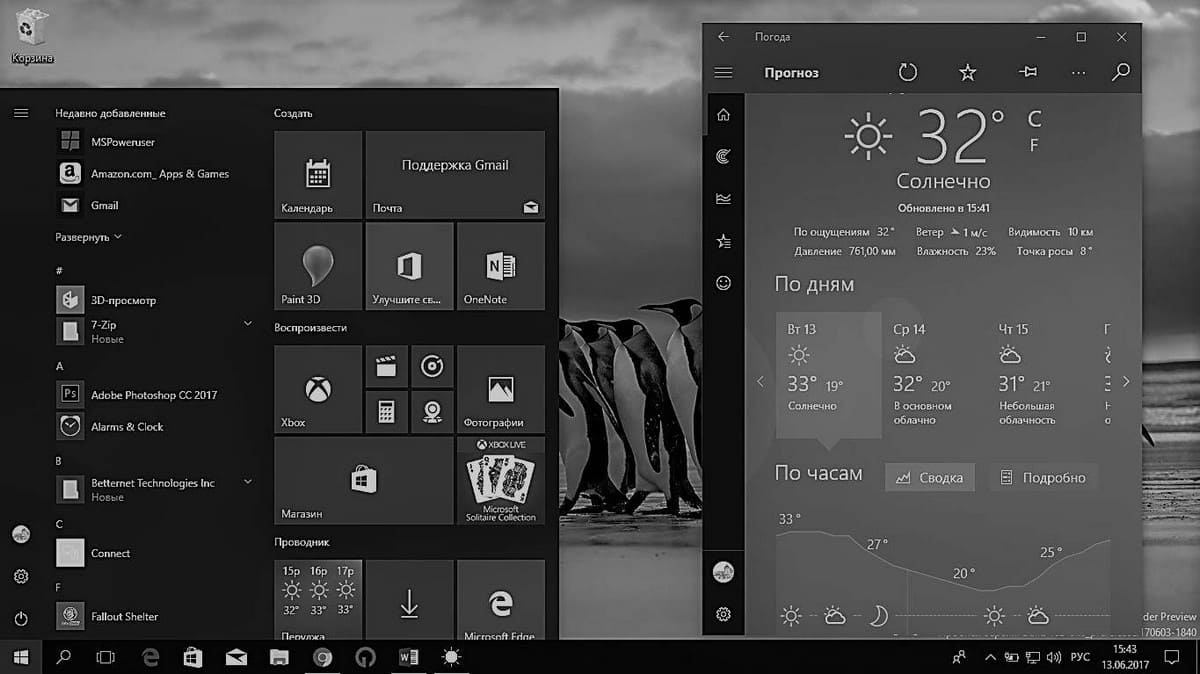
- Оттенки серого – система выключает любое отображение цвета, поэтому экран станет черно-белым.

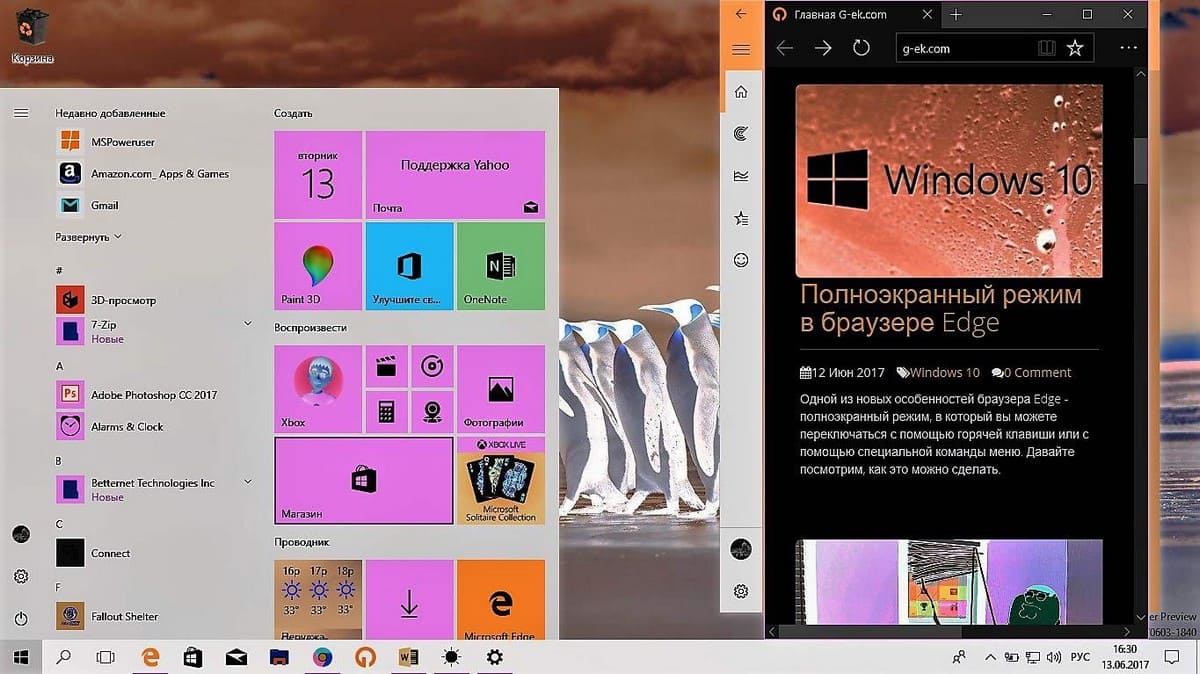
- Обратить – он же «негатив» или «инверсия». Цвета инвертируются, так что в результате получается весьма странная для обычного пользователя картинка. Тем не менее, определенно найдутся случаи, когда инвертированное изображение окажется полезным.
- Инвертированные оттенки серого – сочетание первого и второго фильтра. Экран становится черно-белым, но при этом инвертированным. Иными словами, черное стает белым, а белое черным (и в пределах диапазона серого цвета). Другие цвета не отображаются.
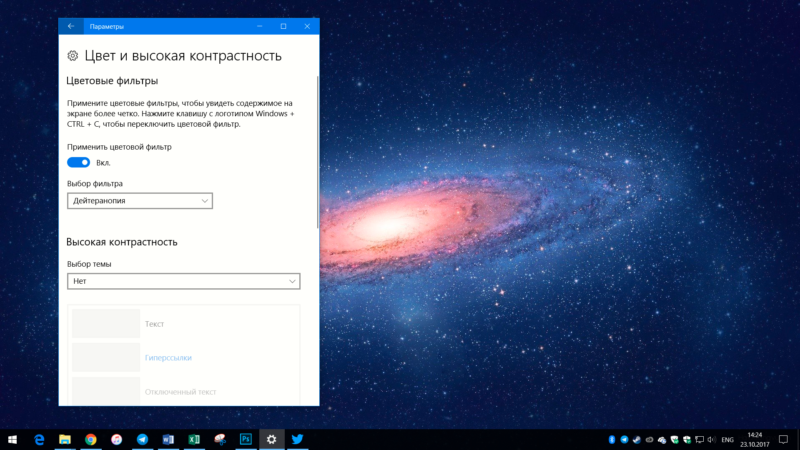
- Дейтеранопия – этот фильтр для тех, кто страдает от пониженной чувствительности в основном к зеленым цветам. При включенном фильтре «Дейтеранопия» Windows увеличит насыщенность отдельных цветов, при этом картинка в общем останется прежней.
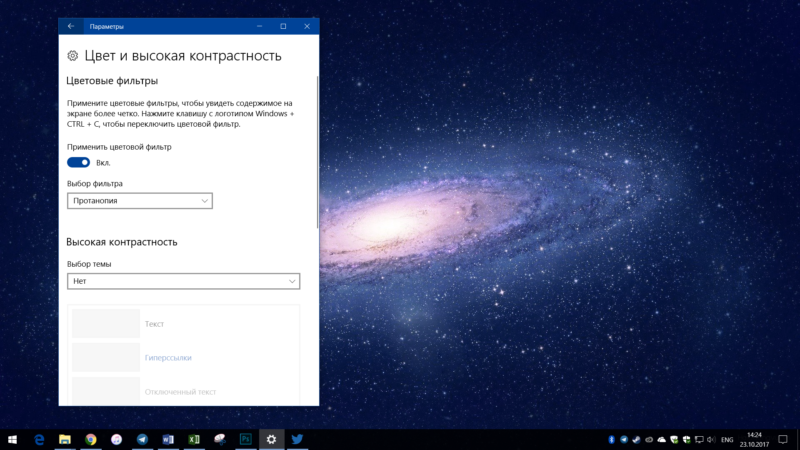
- Протанопия – облегчит работу за компьютером, если у пользователя расстройство восприятия красных цветов.
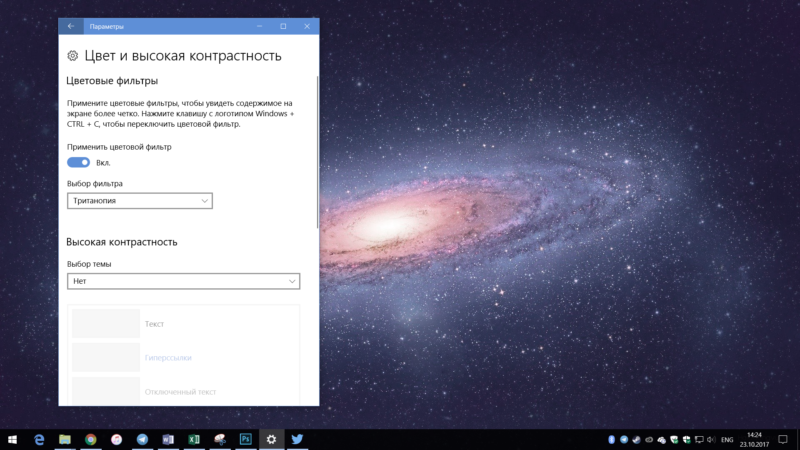
- Тританопия – в этом случае нарушается восприятие сине-фиолетовой области спектра. Весьма редкое расстройство, но и для него предусмотрен фильтр в Windows 10, что определенно порадует пользователей.
Активировать цветовой фильтр можно не только из Параметров Windows. Для этого в системе предусмотрена отдельная комбинация клавиш. Надо нажать Win + Ctrl + C, после чего Windows сразу же применит выбранный вами фильтр.
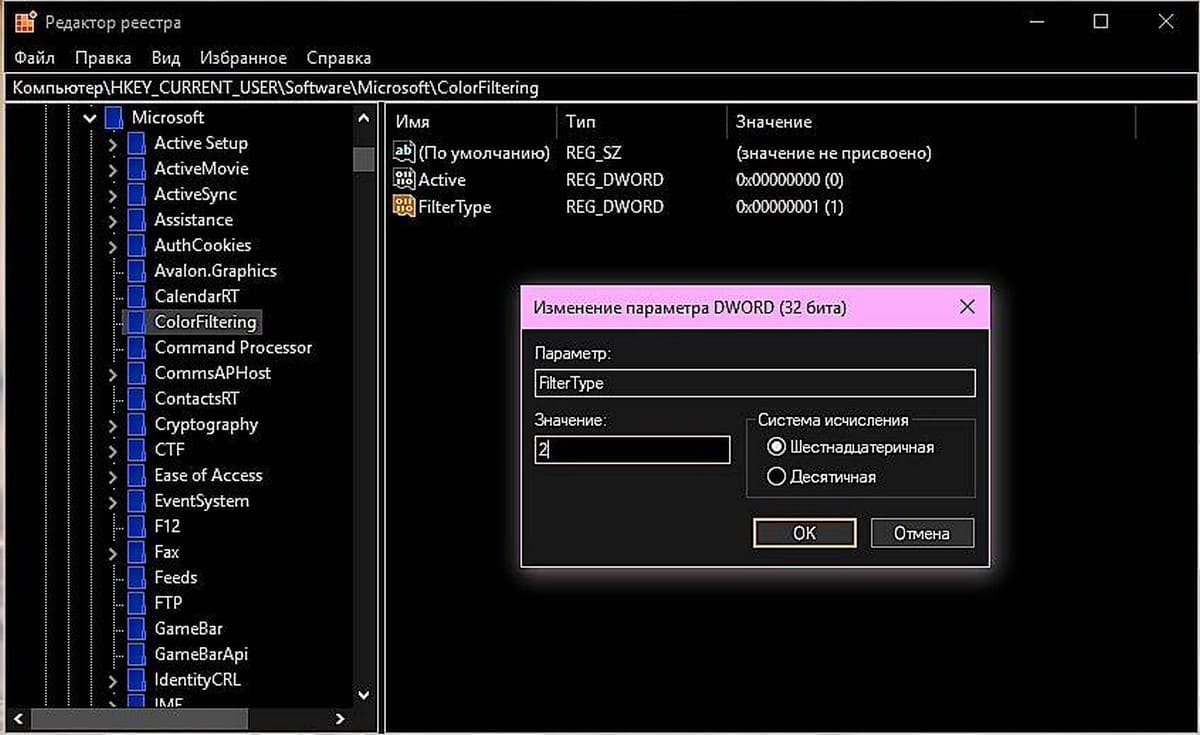
Как и в случае с любыми другими настройками Windows 10, вы можете включить цветовые фильтры с помощью Редактора реестра (смотрите «Что такое системный реестр Windows»). Не совсем понятно, кому такое надо, но все же, если вы захотите включить фильтры столь нестандартным способом, вот как это сделать:
- Нажмите Win + R и введите regedit (подробнее о всех доступных методах запустить редактор реестра читайте в статье «Как открыть Редактор реестра»).

- Перейдите по адресу Компьютер\HKEY_CURRENT_USER\Software\Microsoft\ColorFiltering. Можно просто скопировать путь и вставить в адресную строку редактора.

- В правой части экрана должно отображаться два ключа – Active и FilterType. Если их нет, создайте их. Тип ключа – DWORD 32-бита.
- Для включения цветового фильтра измените значения ключа Active с 0 на 1. Для отключения установите обратно 0.

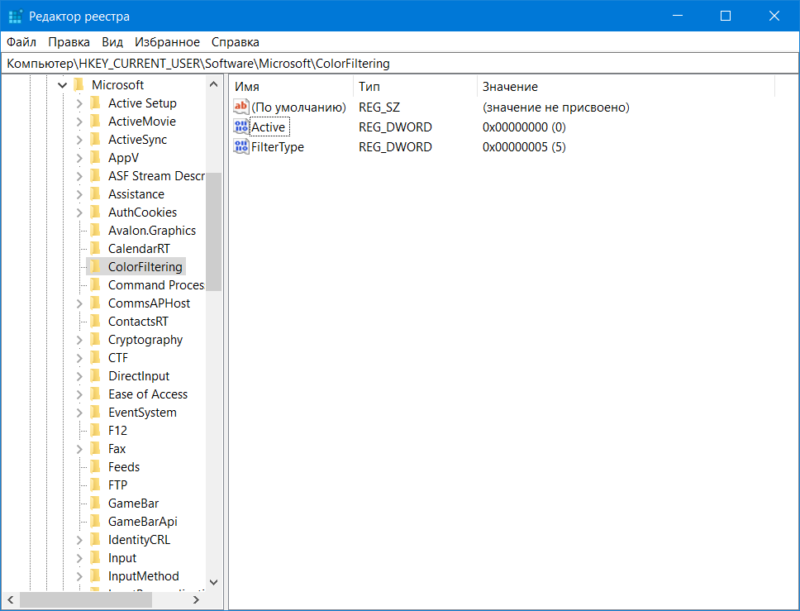
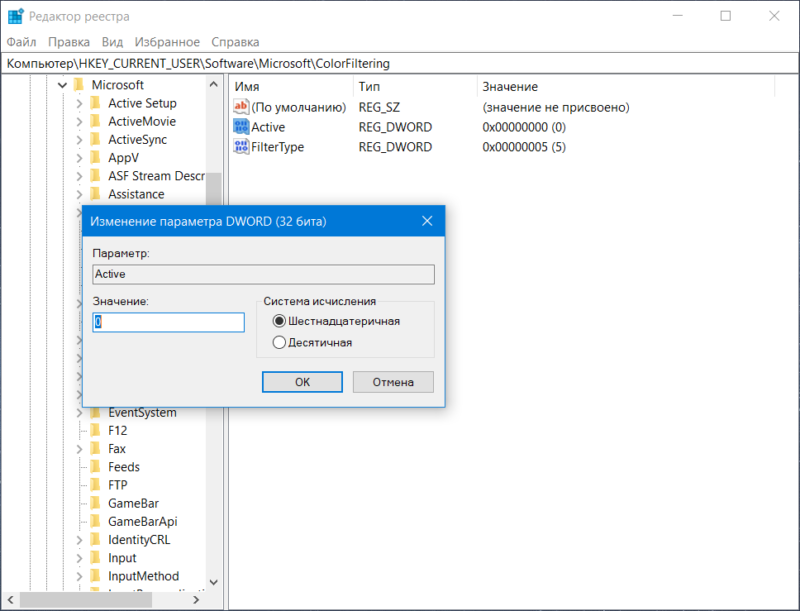
Чтобы задать какой-то конкретный фильтр, измените ключ FilterType и укажите одно из следующих значений:
- 0 – оттенки серого.
- 1 – обратить.
- 2 – инвертированные оттенки серого.
- 3 – дейтеранопия.
- 4 – протанопия.
- 5 – тританопия.
После редактирования выйдите из системы, либо перезагрузите компьютер для применения изменений.
Как отключить цветовой фильтр в Windows 10
Цветовые фильтры отключаются точно так же, как и включаются.
- Откройте Параметры – Специальные возможности – Цвет и высокая контрастность.
- Отключите параметр Применить цветовой фильтр.
Опционально воспользуйтесь той же комбинацией клавиш Win + Ctrl + C для более быстрого отключения фильтров.
Как вы видите, все довольно просто. Лишь несколько кликов мышью и вы сможете подстроить отображение цветов под свои нужды. Разумеется, для более точной калибровки или настройки вам может понадобится более сложное стороннее программное обеспечение. Также рекомендуем почитать статью о том, как откалибровать монитор в Windows 10.
Applies ToWindows 11 Windows 10
Если вам сложно видеть содержимое на экране, примените цветовой фильтр. Цветовые фильтры меняют цветовую палитру на экране и могут помочь отличить друг от друга элементы, различающиеся только цветом.
Использование цветового фильтра
-
Чтобы перейти к настройкам на компьютере, нажмите клавиши Windows+U или нажмите кнопку Пуск > Параметры > специальными > .

-
Выберите Цветовые фильтры .
-
Включит переключатель
Цветовые фильтры. -
Выберите цветной фильтр в списке. Попробуйте каждый фильтр, чтобы узнать, какой из них лучше вам подходит.
Перейти к цветным фильтрам
Нужна дополнительная помощь?
Нужны дополнительные параметры?
Изучите преимущества подписки, просмотрите учебные курсы, узнайте, как защитить свое устройство и т. д.
Начиная с ОС Windows 10 сборки 16215, Windows теперь включает в себя Цветовые фильтры на системном уровне, в том числе фильтры, предназначенные, для пользователей с проблемами цветового восприятия помогая им различать такие цвета, как красный, зеленый, тем самым облегчая пользователям взаимодействие с интерфейсом системы.
Этот учебник покажет вам, как включить, изменить или отключить Цветовые фильтры для вашей учетной записи в Windows 10.
Включение и отключение Цветовых фильтров с помощью клавиши быстрого доступа
Нажмите Win + Ctrl + C клавиши для включения или отключения Цветного фильтра.
Начиная с Windows 10 build 17083, вы можете включить или отключить сочетание клавиш для использования фильтра. В настройках есть специальный параметр, который был добавлен, чтобы избежать случайное нажатие горячей клавиши.
Включение и выключение Цветовых фильтров в Параметрах
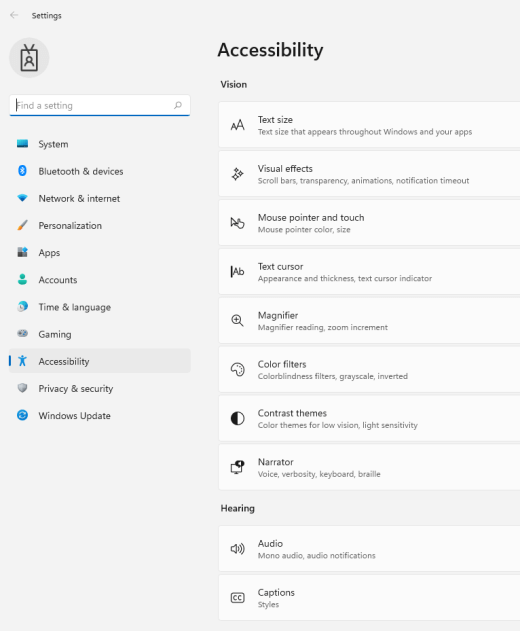
1. Откройте Параметры Windows10 с помощью сочетания клавиш Win + I и нажмите на значок «Специальные возможности».
2. В левой части окна кликните на раздел «Цветные фильтры»
3. В открывшимся разделе вы можете Включить, Отключить и выбрать нужный Цветовой фильтр из выпадающего списка.
3.1) Перетяните ползунок переключателя в положение Вкл чтобы задействовать Цветовой фильтр.
3.2) Выберите необходимый вам фильтр.
4. Теперь вы можете закрыть окно настроек.
Включение и выключение цветных Цветовые фильтры с помощью Regedit.
Откройте приложение редактор реестра и перейдите к разделу
HKEY_CURRENT_USER\Software\Microsoft\ColorFiltering
Справа, вам нужно создать или изменить два параметра DWORD (32-бита) с именем Active и FilterType.
Примечание: Даже если вы работаете в 64-разрядной версии Windows, вам по- прежнему необходимо использовать 32-битный параметр DWORD.
Active отвечает за состояние функции:
Active = 1 означает, что цветовые фильтры включены.
Active = 0 означает, что цветовые фильтры отключены.
Параметр FilterType может иметь одно из следующих значений.
0 = Greyscale
1 = Invert
2 = Greyscale Inverted
3 = Deuteranopia
4 = Protanopia
5 = Tritanopia
Выйдите из учетной записи Windows 10, чтобы применить изменения, сделанные в реестре Windows 10.
Все!
To provide maximum usability, Microsoft allows to Enable, Disable and Choose Color Filters in Windows 10. You can optimize the colors of the installed software, third-party applications as well as the Microsoft apps in order to have a clear vision on the screen. This setting is useful for visually impaired users, specifically during differentiation between things in 2 palettes.
Windows 10 has a built-in feature of showing all the installed software and apps on the screen as a thumbnail view. Some find difficulties in recognizing the apps from each other. As a result, Microsoft is now allowing you to Enable, Disable and Choose Color Filters on Windows 10 so that you can distinguish the each and every app easily. The home screen of Windows 10 shows all the installed applications and software altogether, but sometimes because of impairment, it becomes a heavy task for the users to identify the application they want. It becomes a serious issue when they run out of time.
So, in order to help out users who are blind or visually handicapped, Microsoft came up with this feature. Color filters not only perform at the system level, but also works on all the installed software, Microsoft Apps, and 3rd party applications. Till this moment, below given are the list of colors that are functioning on Windows 10 so far with this feature:
- Protanopia
- Tritanopia
- Grayscale
- Invert
- Deuteranopia
- Grayscale Inverted.
How to Enable, Disable and Choose Color Filters on Windows 10
1st Method – Through Settings
Step 1 – Launch the Settings application Enable, Disable and Choose Color Filters by using Win+I shortcut. When various tabs come into view, reach out to Ease of Access and select it.
Step 2 – Proceeding forward, click Color Filters in the left pane. On its corresponding right pane, toggle On the option for the setting Turn on color filters. Alternatively, you can also press the Windows key+ Ctrl + C together from the keyboard. This shortcut combination of keys will enable or disable the Grayscale on your computer as a default color filter.
Step 3 – Now, click the drop-down underneath the option Choose a filter. Choose any color you like from the list and the feature applies the selected filter instantly.
2nd Method – Registry Editor
You can configure the Color filters with the help of registry key too. The steps of this method are as follows:
Step 1 – First of all, open Registry Editor in order to Enable, Disable and Choose Color Filters. Next, go to the following key –
Computer\HKEY_CURRENT_USER\Software\Microsoft\ColorFiltering
Step 2 – On the right side of the screen, you see 2 DWORDs – Active and FilterType.
Step 3 – The first DWORD Active lets you Enable and Disable Color Filters by modifying its value. So, to enable Color Filters, execute a right-click on Active, choose Modify from the list of options. On its edit box, type 1 in the Value data field and click OK to implement the changes.
Step 4 – In contrast, to disable provide 0 in the same space and click OK.
Step 5 – The second DWORD FilterType ensures what filter you use in the Color Filter. Perform a right click on the FilterType, choose Modify and then select the one from following.
| Color Filters | Registry Values |
| Grayscale | 0 |
| Invert | 1 |
| Grayscale Inverted | 2 |
| Deuteranopia | 3 |
| Protanopia | 4 |
| Tritanopia | 5 |
Step 6 – Here also, on the edit dialog, insert any of the above Registry Value and click OK to make the changes effective.
Conclusion
Color filters make the apps look beautiful and as well as users can easily distinguish every different app. For this reason, Microsoft has allowed the users to enable, disable and choose Color Filters on Windows 10 to offer the flexibility in use. You can now customize your PC if you have eye problems as you prefer using either of the methods.
Colour Filters were introduced in Windows 10 build 16215 as a part of ease of access system. These colour filters work at the system level and include various colour filters which can turn your screen black and white, invert colours etc. These filters are designed to make it easier for people with colour blindness to distinguish colours on their screen. Also, people with light or colour sensitivity can easily use these filters to make the content easier to read, thus increasing the reach of Windows to far more users.

There are different types of colour filters available in Windows 10 such as Greyscale, Invert, Greyscale Inverted, Deuteranopia, Protanopia, and Tritanopia. So without wasting any time, let’s see How to Enable or Disable Color Filters in Windows 10 with the helo of the below-listed tutorial.
Table of Contents
Make sure to create a restore point just in case something goes wrong.
Method 1: Enable or Disable Color Filters Using Keyboard Shortcut
Press Windows Key + Ctrl + C keys on the keyboard together to enable the default greyscale filter. Again use the shortcut keys if you need to disable the greyscale filter. If the shortcut isn’t enabled, then you need to enable it using the below guide.
To change the default filter for Windows Key + Ctrl + C shortcut key combination, follow the below-listed steps:
1. Press Windows Key + I to open Settings then click on Ease of Access.

2. From the left-hand menu, click on Color filter.
3. Now in the right-hand window under “Use colour filter” checkmark “Allow the shortcut key to toggle the filter on or off“. Now you can use the shortcut Windows Key + Ctrl + C keys to enable Color filter any time you want.

4. Under the Color filters, select any colour filter from the list you want and then use the shortcut key combination to enable the colour filters.

5. This will change the default filter when you use the Windows Key + Ctrl + C Shortcut key to Enable or Disable Color Filters in Windows 10.
Method 2: Enable or Disable Color Filter in Windows 10 Settings
1. Press Windows Key + I to open Settings then click on Ease of Access.
2. From the left-hand menu, click on Color filters.
3. To enable the colour filters, toggle the button under “Use colour filters” to ON and then under it, select the desired filter you want to use.

4. If you wish to disable the colour filters, turn off the toggle under “Use colour filter”.
5. Reboot your PC to save changes.
Method 3: Enable or Disable Color Filter Using Registry Editor
1. Press Windows Key + R then type regedit and hit Enter.
2. Navigate to the following registry key:
HKEY_CURRENT_USER\Software\Microsoft\ColorFiltering
3. Right-click on the ColorFiltering key then selects New > DWORD (32-bit) Value.

Note: If the Active DWORD is already there, skip to the next step.

4. Name this newly created DWORD as Active then double-click on it to change its value according to:
Enable Color Filters in Windows 10: 1
Disable Color Filters in Windows 10: 0
5. Again right-click on the ColorFiltering key then select New > DWORD (32-bit) Value.
Note: If the FilterType DWORD is already there, skip to the next step.
6. Name this DWORD as FilterType then double-click on it to change its value according to:
0 = Greyscale
1 = Invert
2 = Greyscale Inverted
3 = Deuteranopia
4 = Protanopia
5 = Tritanopia
7. Click OK then close everything and reboot your PC to save changes.
Recommended:
- Enable or Disable ClearType in Windows 10
- Enable or Disable Mouse ClickLock in Windows 10
- How to Create a Shortcut to Clear the Clipboard in Windows 10
- Easily Access Color And Appearance In Windows 10
That’s it you have successfully learned How to Enable or Disable Color Filters in Windows 10 but if you still have any questions regarding this post then feel free to ask them in the comment’s section.