
В этой пошаговой инструкции подробно о трёх способах отключить проверку цифровой подписи драйверов в Windows 11, в случае если при установке драйвера какого-либо устройства (в том числе виртуального) система сообщает о том, что INF стороннего производителя не содержит информации о подписи или о других проблемах с цифровой подписью.
Первый из способов позволяет однократно отключить проверку цифровой подписи драйверов для установки драйвера, два других отключают её на постоянной основе. Также при желании вы можете самостоятельно подписать драйвер цифровой подписью.
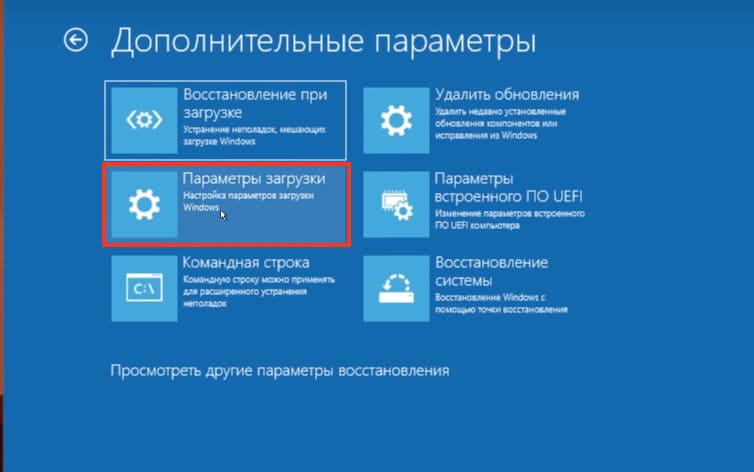
Расширенные параметры запуска
Первый способ позволяет однократно загрузить Windows 11 с отключенной проверки цифровой подписи драйверов. Шаги будут следующими:
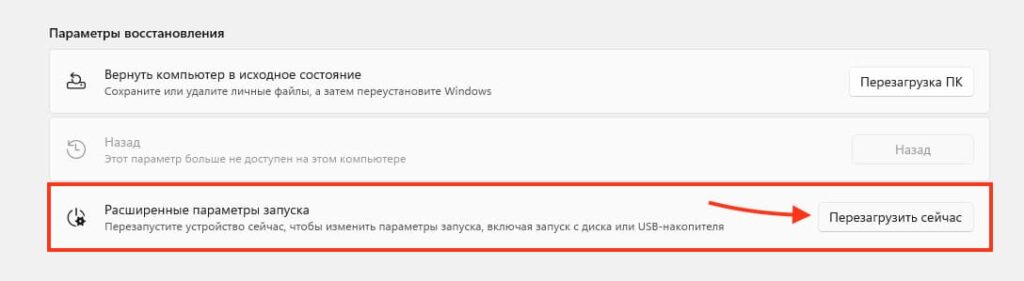
- Зайдите в Параметры — Система — Восстановление и нажмите кнопку «Перезагрузить сейчас» в разделе «Расширенные параметры запуска» для входа в среду восстановления. Есть и другие способы: Как открыть среду восстановления Windows 11.

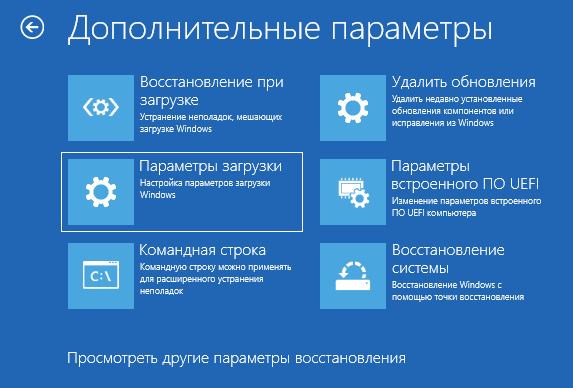
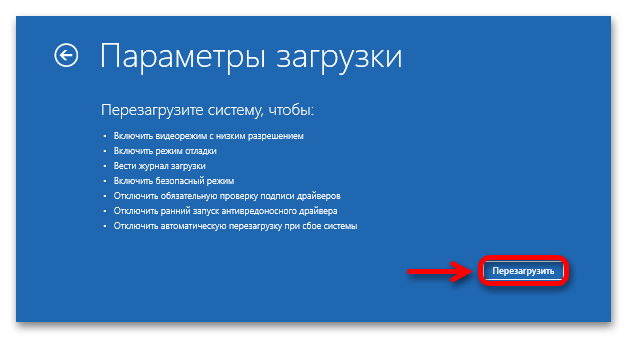
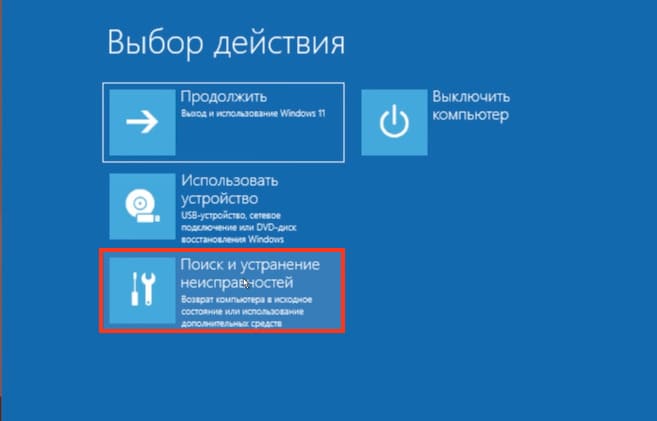
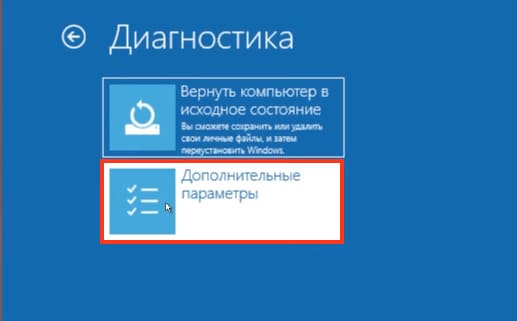
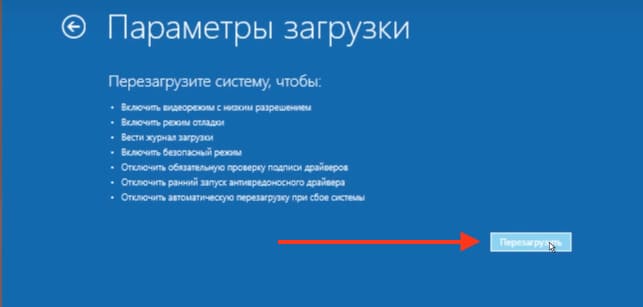
- После перезагрузки откроется среда восстановления, в ней перейдите по пути: Поиск и устранение неисправностей — Дополнительные параметры — Параметры загрузки — Перезагрузить.

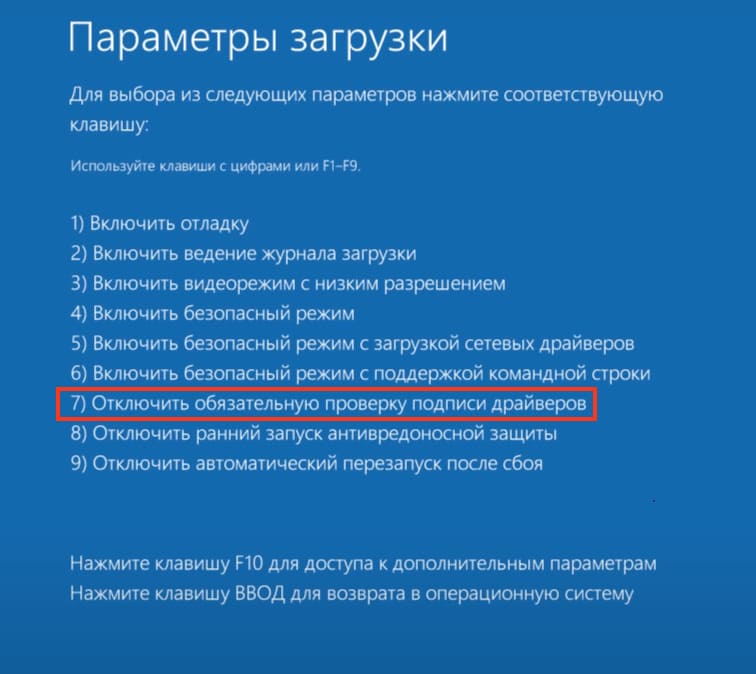
- Откроется окно с особыми вариантами загрузки. Нажмите клавишу для пункта «Отключить обязательную проверку цифровой подписи драйверов» — по умолчанию это 7 или F7 (на некоторых ноутбуках — Fn+F7).

- Windows 11 перезагрузится с отключенной проверкой цифровой подписи драйверов.


После перезагрузки вы можете установить драйвер, который ранее не устанавливался: сообщений об ошибках, связанных с цифровой подписью, появиться не должно.
Учитывайте, что при использовании этого способа, уже при следующей перезагрузки проверка цифровой подписи будет снова включена: при этом установленные ранее драйверы устройств обычно продолжают работать, но не всегда. В этом случае можно использовать один из далее описанных способов.
В командной строке (bcdedit)
Следующий метод — изменение конфигурации загрузки Windows 11 таким образом, чтобы проверка цифровой подписи драйверов не выполнялась. Необходимые шаги:
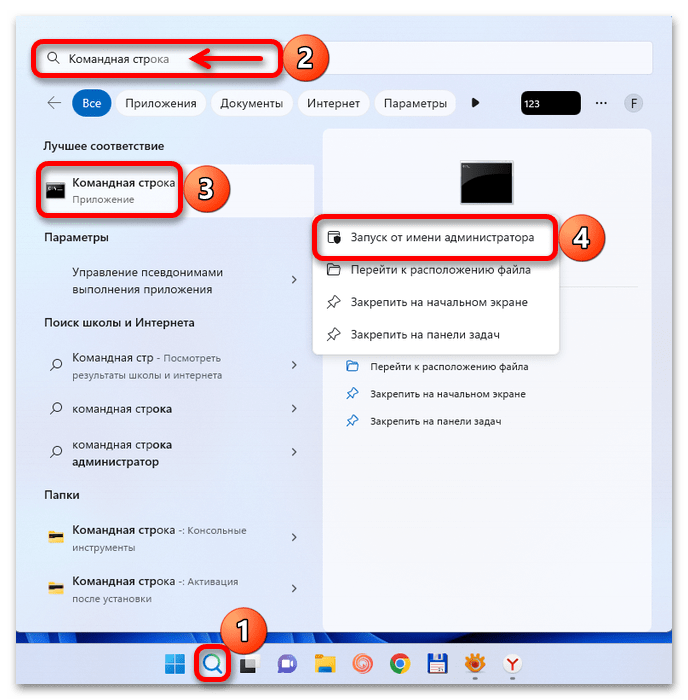
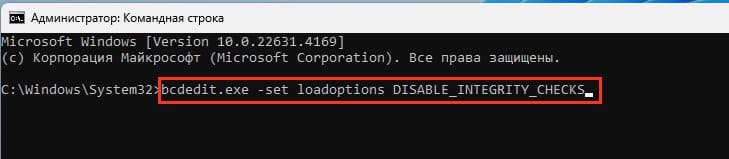
- Запустите Терминал Windows от имени Администратора (используйте меню по правому клику на кнопке «Пуск») или командную строку от имени администратора.
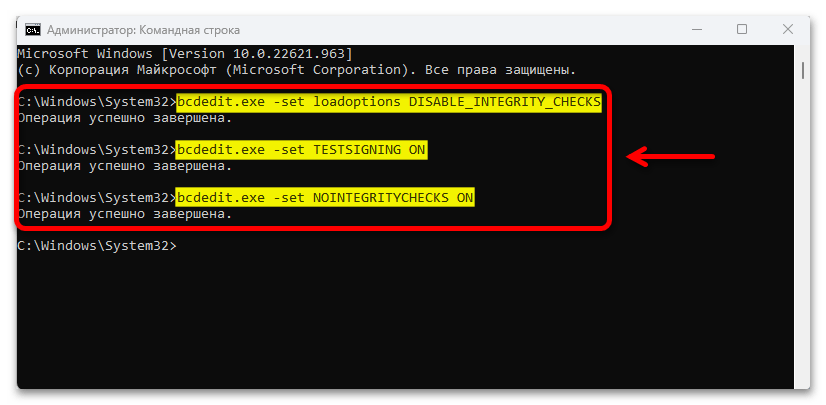
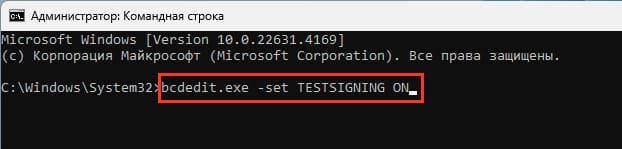
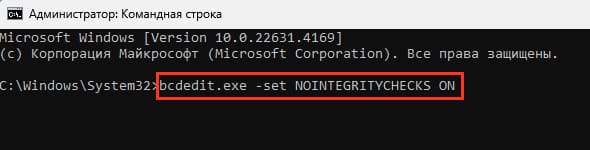
- По порядку введите команды (если при выполнении вы видите сообщения об ошибке, отключите Secure Boot в БИОС/UEFI вашего ПК или ноутбука):
bcdedit.exe -set loadoptions DISABLE_INTEGRITY_CHECKS
bcdedit.exe -set TESTSIGNING ON
bcdedit.exe -set NOINTEGRITYCHECKS ON

- Закройте командную строку, перезагрузите компьютер и установите нужный драйвер. Если это не сработало, попробуйте дополнить метод способом из следующего раздела инструкции.
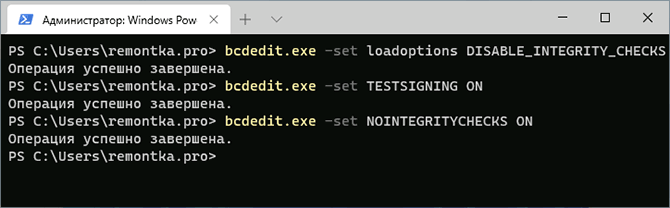
Обратите внимание: при использовании этого способа при вводе команд вы можете получить сообщение: «Не удается открыть данные конфигурации загрузки. Не удается найти указанный файл». Решение:
- С помощью DISKPART в командной строке назначаем букву скрытому FAT32 разделу с EFI загрузчиком, в примере далее — букву X.
- Используем те же команды, но непосредственно указывая путь к конфигурации загрузки, например, первая из команд будет иметь вид:
bcdedit /store X:\EFI\Boot\BCD -set {default} loadoptions DISABLE_INTEGRITY_CHECKS
Более подробно об этом в статье Как исправить Не удается открыть данные конфигурации загрузки Не удается найти указанный файл.
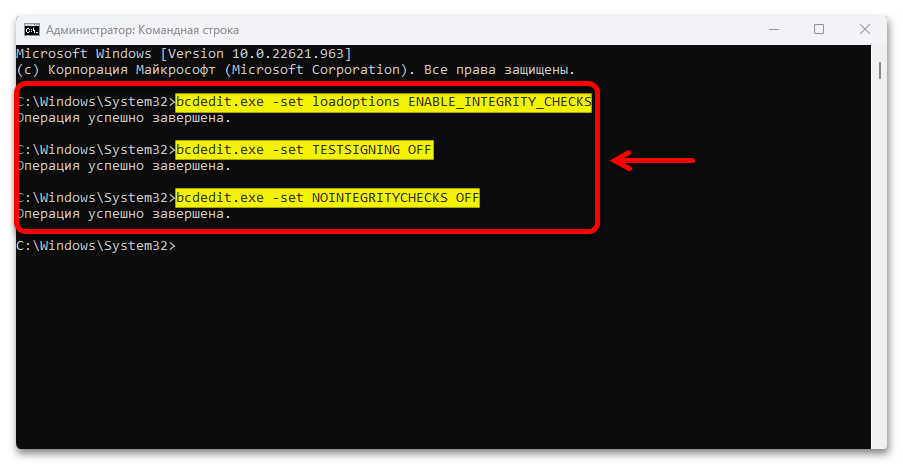
В дальнейшем, чтобы вернуть конфигурацию загрузки в исходное состояние (что также уберет надпись «Тестовый режим» в углу экрана), тем же образом используйте команды
bcdedit.exe -set loadoptions ENABLE_INTEGRITY_CHECKS
bcdedit.exe -set TESTSIGNING OFF
bcdedit.exe -set NOINTEGRITYCHECKS OFF
Редактор локальной групповой политики
Этот способ не подойдет для домашней редакции системы, но должен исправно работать в Windows 11 Pro или Корпоративная. Для того, чтобы отключить проверку цифровой подписи драйверов в редакторе локальной групповой политики:
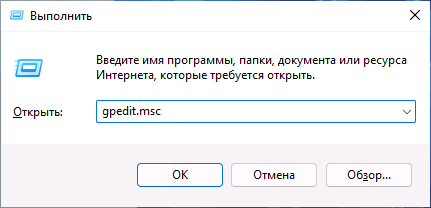
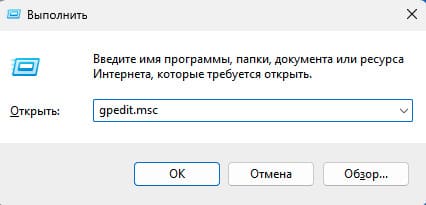
- Нажмите клавиши Win+R на клавиатуре (или нажмите правой кнопкой мыши по кнопке «Пуск» и выберите пункт «Выполнить»), введите gpedit.msc и нажмите Enter.

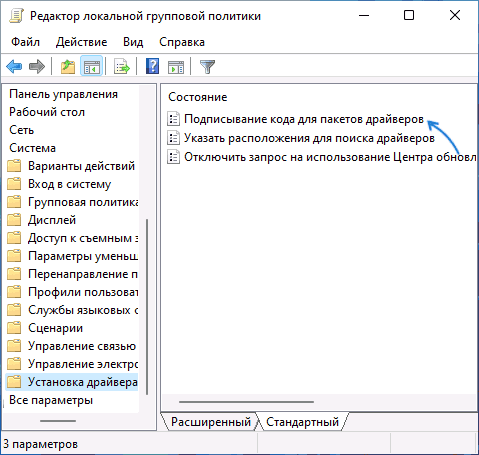
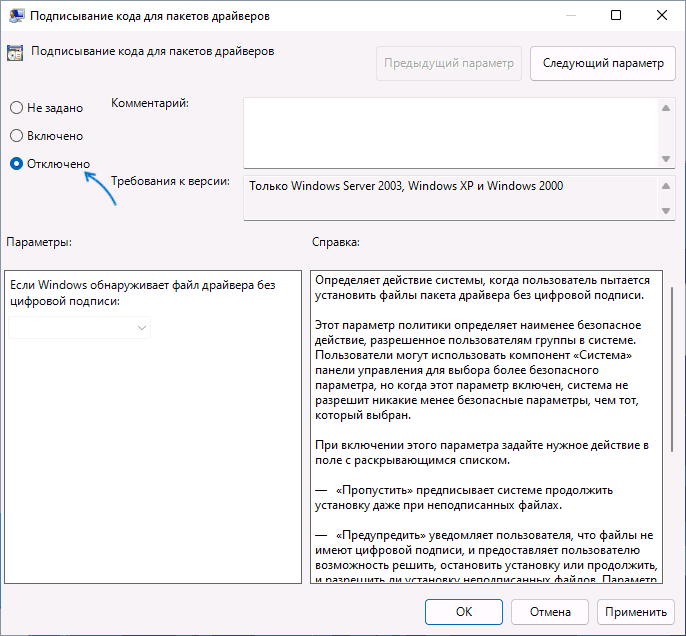
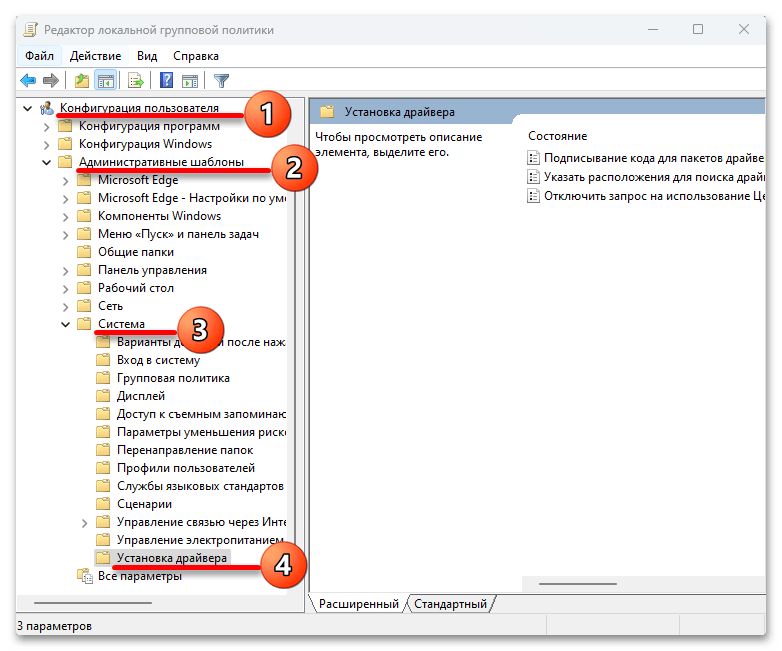
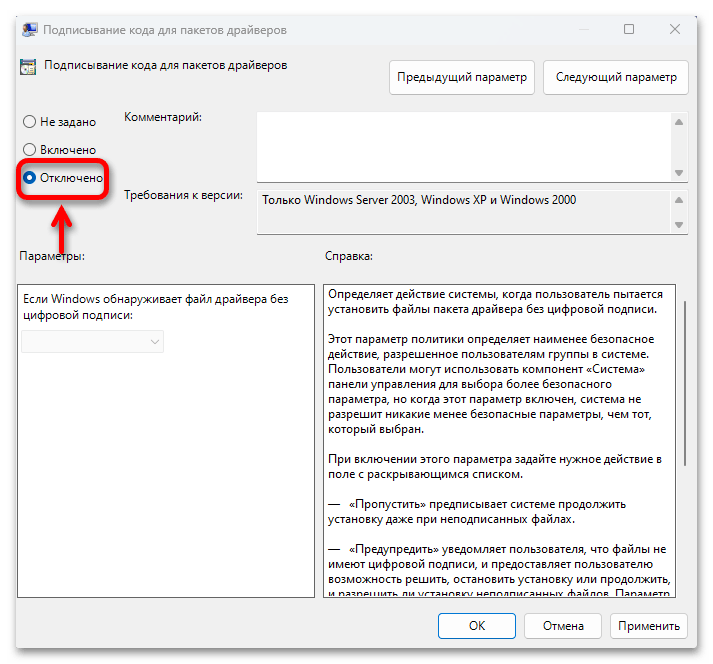
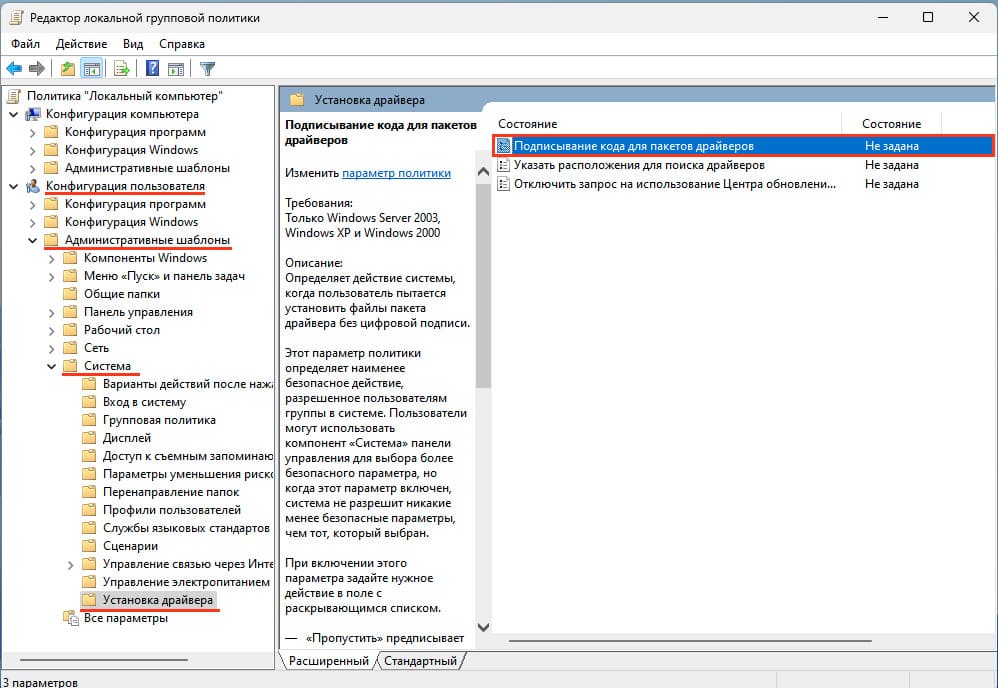
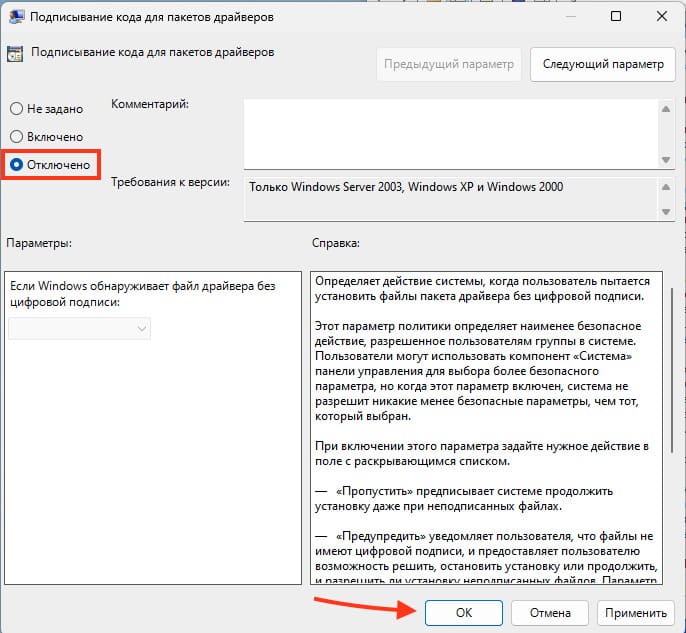
- В открывшемся редакторе локальной групповой политики перейдите к разделу Конфигурация пользователя — Административные шаблоны — Система — Установка драйвера.

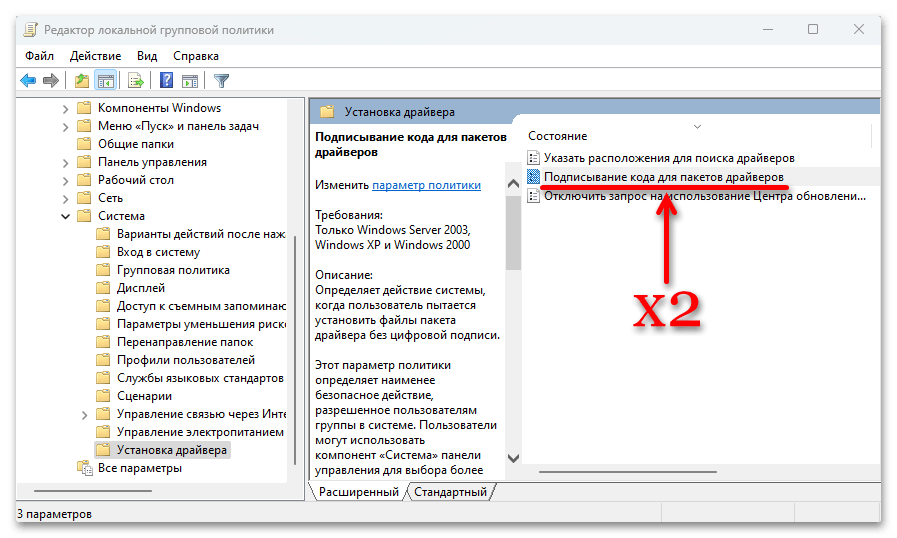
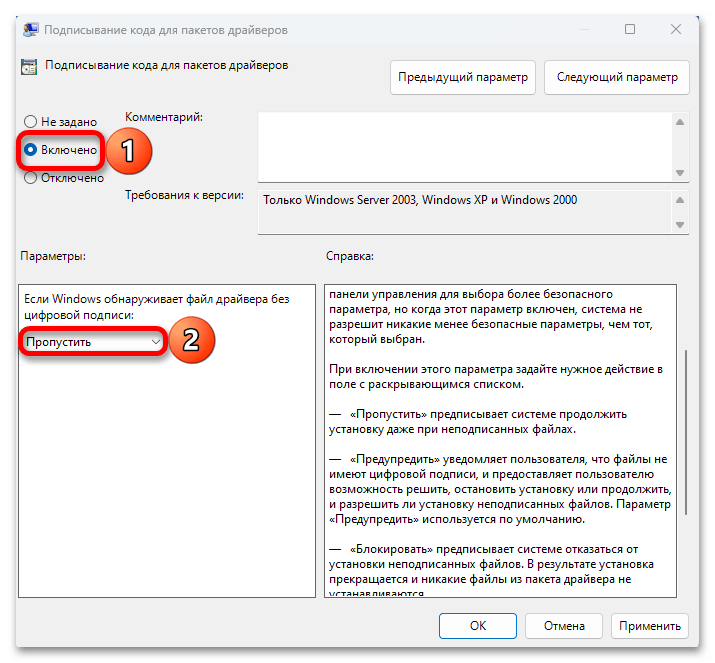
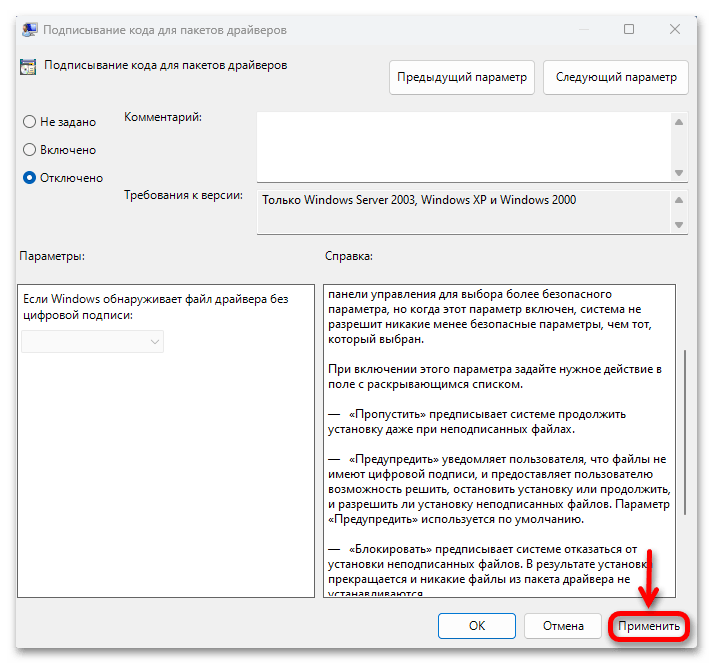
- Дважды нажмите по параметру «Подписывание кода для пакетов драйверов» и установите значение «Отключено» для него и примените настройки. Либо используйте «Включено», указав в поле «Если Windows обнаруживает файл драйвера без цифровой подписи» опцию «Пропустить».

После применения настроек и закрытия редактора локальной групповой политики драйверы без цифровой подписи должны устанавливаться. Если это не произошло — перезагрузите компьютер и попробуйте снова.
Все способы:
- Способ 1: WinRE
- Способ 2: Консоль
- Вариант 1: «Тестовый режим»
- Вариант 2: «Безопасный режим»
- Способ 3: LGPE
- Вопросы и ответы: 0
Способ 1: WinRE
Контроль подписей помогает операционной системе понять, что они прошли сертификацию и являются доверенными. Если же сертификата нет, он поврежден или его срок истек, установка такого программного обеспечения может быть заблокирована. Но отключить функцию возможность есть, оптимальный вариант – выполнить несколько действий в среде восстановления ОС (WinRE).
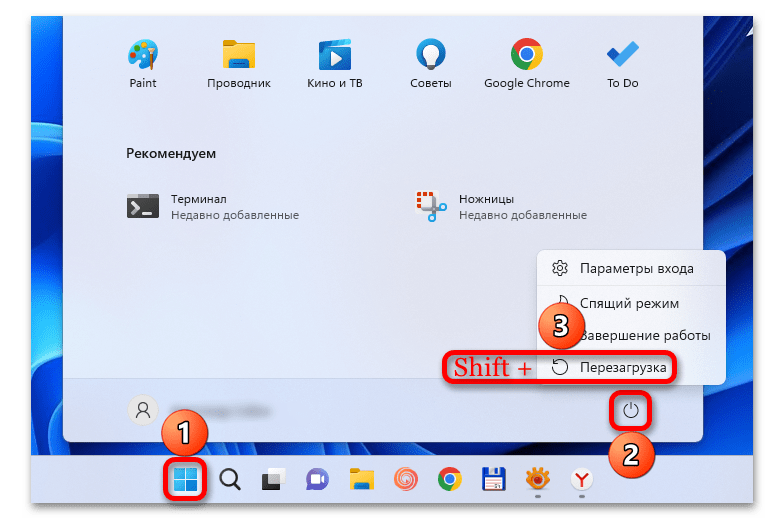
- Кликаем кнопку «Пуск», открываем системные настройки,

находим раздел с опциями восстановления,

и, чтобы активировать WinRE, жмем «Перезагрузить сейчас»,

а затем подтверждаем действие.

Либо открываем меню выключения компьютера, зажимаем кнопку «Shift» и запускаем перезагрузку.
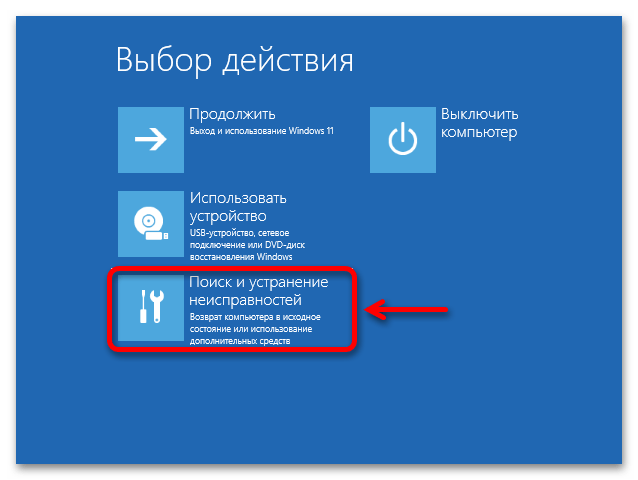
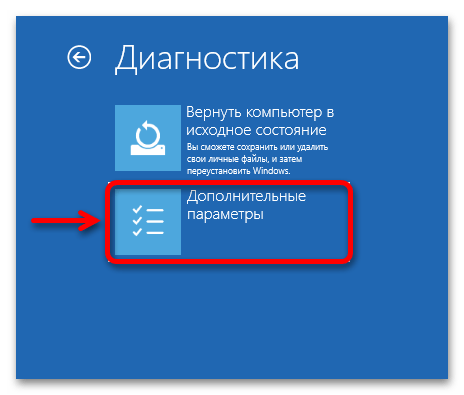
- Нас интересует раздел с инструментами «Поиска и устранения неполадок»,

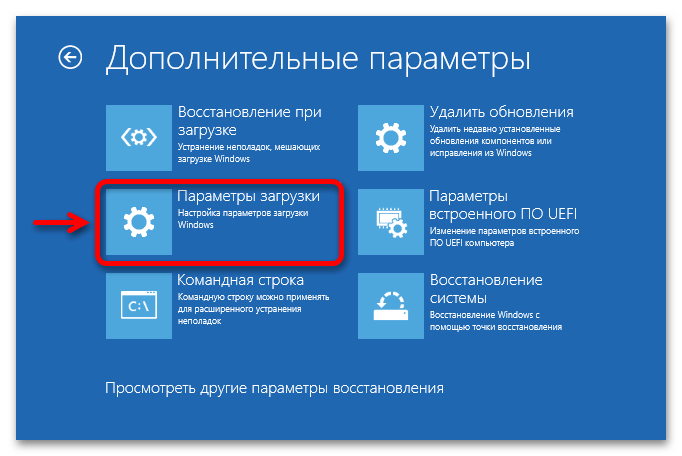
в нем открываем «Дополнительные параметры»,

следом «Параметры загрузки»,

и перезагружаемся.
- На следующем экране жмем клавишу «F7». Когда система загрузится в штатном режиме, пробуем снова установить драйверы.


Способ 2: Консоль
Первый способ считается наиболее рабочим, но отменить верификацию подписей можно и через «Командною строку». Правда, судя по комментариям некоторых пользователей в сети, не у всех таким образом получается это сделать.
Для успешного выполнения следующих команд необходимо отключить «Secure Boot» в UEFI. В принципе, можете сразу перейти к инструкциям ниже, вдруг функция уже не активна, а если в процессе получите ошибку, обратитесь к руководству для материнской платы/ноутбука или к нашей статье, в которой подробно описано, как отключить безопасную загрузку.
Подробнее: Как отключить Secure Boot в UEFI
Вариант 1: «Тестовый режим»
- С помощью поиска находим «Командную строку» и запускаем приложение с повышенными правами.
- По очереди вводим следующие команды и нажимаем «Enter» для их выполнения:
bcdedit.exe -set loadoptions DISABLE_INTEGRITY_CHECKSbcdedit.exe -set TESTSIGNING ONbcdedit.exe -set NOINTEGRITYCHECKS ON - Перезагружаем ПК, чтобы система загрузилась в «Тестовом режиме». Подтверждением этому будет надпись в углу рабочего стола. Теперь пробуем установить драйверы.
- Чтобы перезагрузиться в штатном режиме, снова открываем консоль, вводим и подтверждаем нажатием «Enter» следующие команды:
bcdedit.exe -set loadoptions ENABLE_INTEGRITY_CHECKSbcdedit.exe -set TESTSIGNING OFFbcdedit.exe -set NOINTEGRITYCHECKS OFF
Вариант 2: «Безопасный режим»
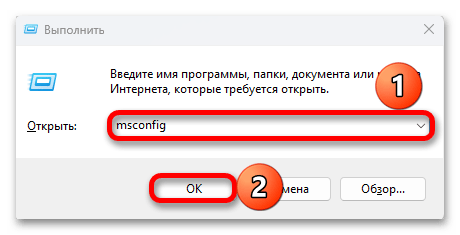
- Сочетанием клавиш «Windows+R» вызываем окно «Выполнить», вводим команду
msconfigи кликаем «OK».
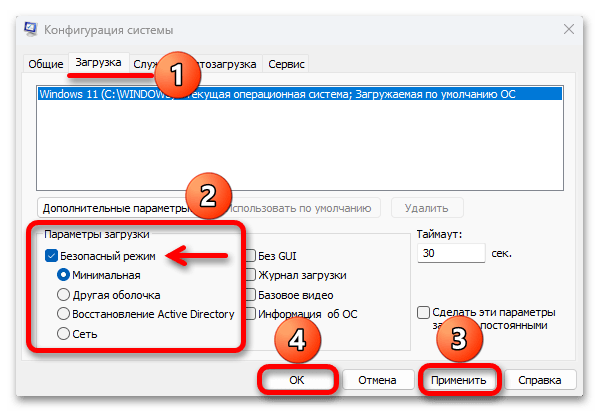
Переходим во вкладку «Загрузка», устанавливаем запуск в «Безопасном режиме», применяем изменения, закрываем окно

и подтверждаем перезагрузку.
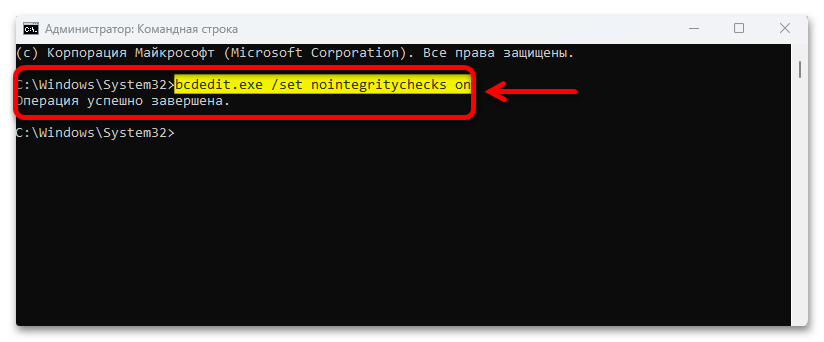
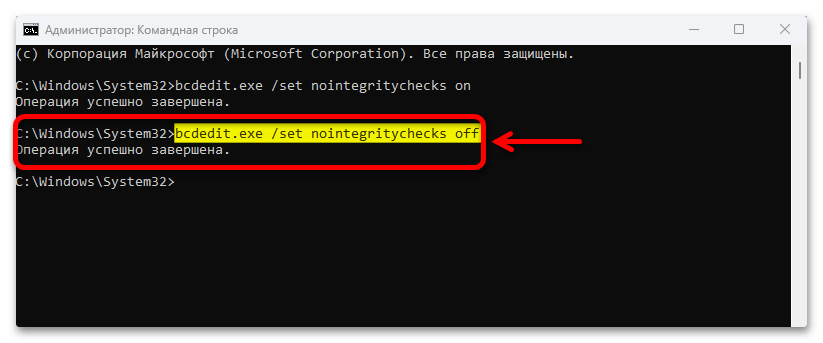
- Вызываем консоль с повышенными правами вводим команду:
bcdedit.exe /set nointegritychecks onи нажимаем «Enter».
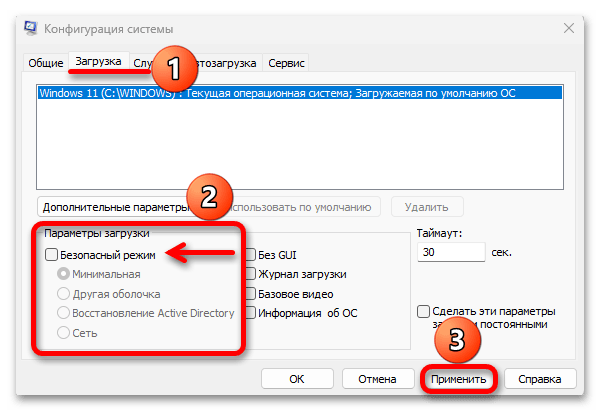
- Теперь отключаем БР, перезагружаем систему в обычном режиме и пробуем установить драйверы.

Читайте также: Как выйти из безопасного режима в Windows 11
- Чтобы потом вернуть настройки в исходное состояние, повторяем описанные выше действия, но в конце меняем значение «on» на «off».
Способ 3: LGPE
«Редактор локальной групповой политики» доступен на компьютерах с ОС Windows 11 версии выше «Home», т.е. «PRO», «Enterprise», «Education» и т.д.
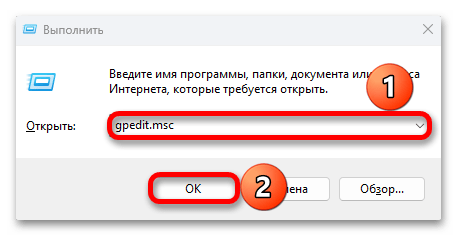
- В окне «Выполнить» («Win+R») вводим команду
gpedit.mscи подтверждаем ее.
Читайте также: Запуск «Редактора локальной групповой политики» в Windows 11
- Теперь в левой области перемещаемся к нужному каталогу так, как это показано на скриншоте ниже.
- В правой области находим параметр «Подписывание кода для пакетов драйверов» и кликаем по нему дважды.
- Здесь мы можем просто отключить опцию.

Либо оставить включенной, но установить дополнительный параметр – «Пропустить».
- Применяем изменения, закрываем «Редактор» и перезагружаем систему.
Наша группа в TelegramПолезные советы и помощь
В некоторых ситуациях пользователи сталкиваются с проблемой, когда драйвер без цифровой подписи не устанавливается в Windows 11. В этой статье мы расскажем, как отключить обязательную проверку цифровой подписи драйверов, используя несколько методов.
Приобрести оригинальные ключи активации Windows 11 можно у нас в магазине от 1690 ₽
Скачать дистрибутивы разных версий Windows 11 можно у нас в каталогe.
Метод 1: Отключение проверки подписи через параметры восстановления
Этот метод наиболее простой и не требует изменения системных настроек. Следуйте шагам ниже:
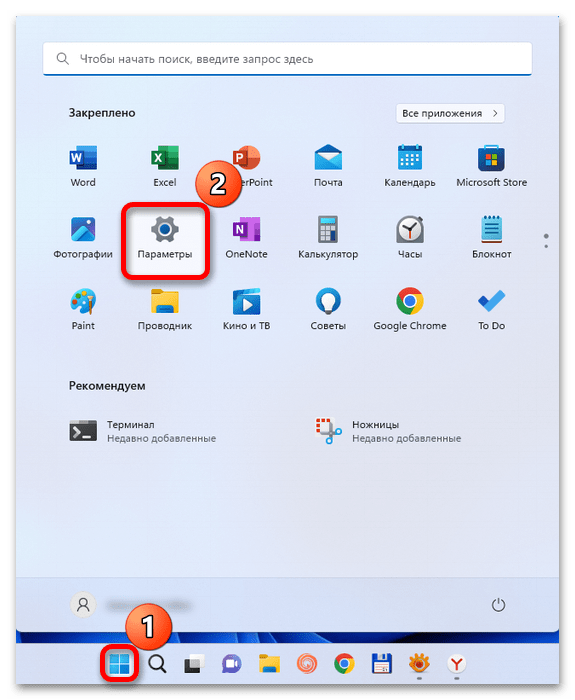
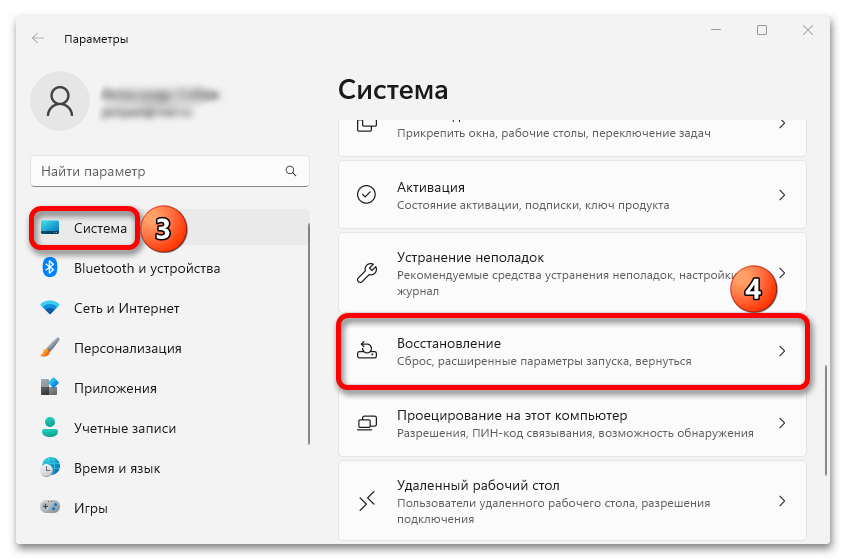
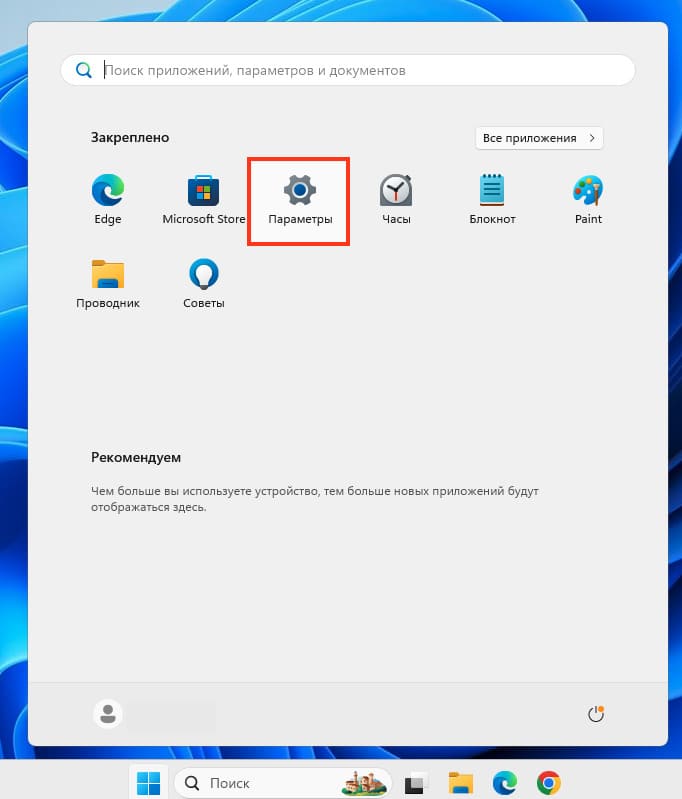
1. Откройте Параметры Windows.
2. В разделе Система выберите пункт Восстановление.
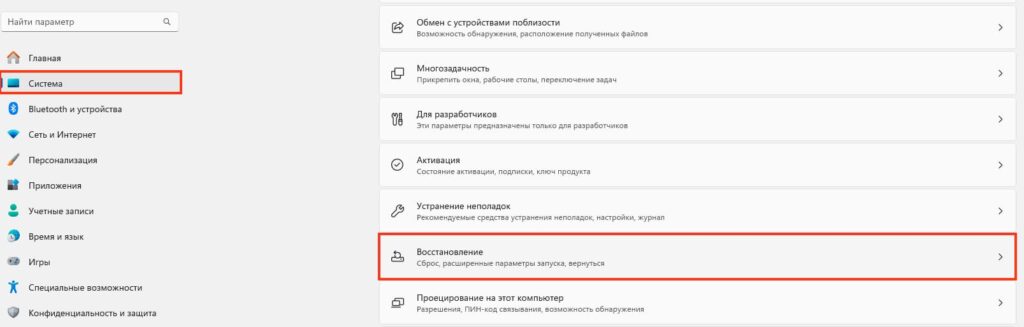
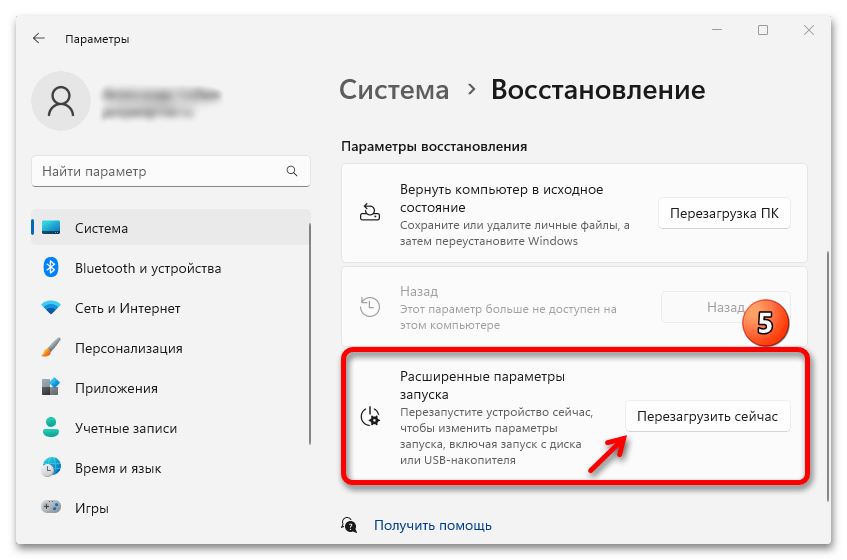
3. В разделе Восстановление найдите пункт Расширенные параметры запуска и нажмите Перезагрузить сейчас.

4. После перезагрузки система загрузится в среду восстановления. Перейдите в раздел Поиск и устранение неисправностей
5. Затем выберите Дополнительные параметры.
6. Откройте Параметры загрузки и нажмите Перезагрузить.
7. В появившемся меню обратите внимание на пункт номер 7 — Отключить обязательную проверку подписи драйверов. Нажмите клавишу 7 или F7 (в зависимости от устройства может потребоваться нажать Fn+F7).
8. Windows 11 загрузится с отключенной проверкой цифровой подписи драйверов, что позволит установить неподписанный драйвер.
После установки драйвера при следующей перезагрузке Windows 11 снова включит проверку подписи драйверов.
Метод 2: Отключение проверки через командную строку
1. Запустите Командную строку от имени администратора. Для этого кликните правой кнопкой по кнопке Пуск и выберите Терминал Windows (Администратор).

2. Введите следующие команды поочередно, нажимая Enter после каждой:
bcdedit /set loadoptions DDISABLE_INTEGRITY_CHECKS
bcdedit.exe -set TESTSIGNING ON
bcdedit.exe -set NOINTEGRITYCHECKS ON
3. Перезагрузите компьютер. После этого вы сможете установить неподписанный драйвер.
4. После установки драйвера, чтобы вернуть стандартные параметры, введите следующие команды:
bcdedit.exe -set loadoptions ENABLE_INTEGRITY_CHECKS
bcdedit.exe -set TESTSIGNING OFF
bcdedit.exe -set NOINTEGRITYCHECKS OFF
Перезагрузите систему.
Метод 3: Использование редактора локальной групповой политики
Этот метод подходит только для версий Windows 11 Pro и Enterprise, так как в Домашней версии редактор локальной групповой политики недоступен.
1. Нажмите Win + R на клавиатуре или кликните правой кнопкой мыши по кнопке Пуск и выберите Выполнить.
2. Введите команду gpedit.msc и нажмите OK.
3. В редакторе локальной групповой политики перейдите по пути:
Конфигурация пользователя > Административные шаблоны > Система > Установка драйвера.
4. Найдите пункт Подписывание кода для пакетов драйверов и дважды кликните на него.
5. Выберите опцию Отключено и примените настройки.
6. Либо выберите опцию Включено с параметром Пропустить, затем примените настройки и перезагрузите компьютер.
Эти методы помогут отключить проверку цифровой подписи драйверов в Windows 11, позволяя установить неподписанные драйверы на ваше устройство.
Лицензионный ключ активации Windows 11 от
In this article, we will demonstrate multiple ways to disable driver signature enforcement in Windows 11. Driver Signature Enforcement in Windows 11 is a feature that only allows drivers signed by Microsoft to be installed on the computer. If the drivers are unsigned but safe, you can install them by turning off the driver signature enforcement checks.
Drivers are required in order for a new piece of PC hardware to function properly after being installed. Drivers are pieces of software that facilitate communication between your Windows computer and peripherals like monitors, printers, mice, and keyboards. The hardware component will be an unrecognized device for Windows if no drivers are loaded for it.
Windows 11 has a built-in security feature that prevents the installation of drivers unless Microsoft has digitally certified them to show that they are secure. The presence of a digital signature on a driver indicates that it comes from a reliable source and is free of malware. Microsoft regularly certifies the drivers for newly released hardware components, signs them as secure, and allows their installation.

The signature enforcement feature checks the driver signatures on your PC and restricts users from installing unsigned drivers. By disabling this feature, you’ll allow unverified drivers to be installed on your PC, which puts your computer at risk. You need to understand the consequences of disabling this security feature, which are discussed in the next section.
Ways to disable Signature Enforcement Permanently
You can disable driver signature enforcement permanently in Windows 11 using a variety of methods, including:
- Group Policy / Local Group Policy Editor
- Disable Driver Signature Enforcement in Startup Settings
- Turn off driver signature enforcement on Windows 11 via Advanced Boot Options
- Using command prompt to disable driver signature enforcement
Any of the above methods can be used on Windows 11 to turn off driver signature checks permanently. If you intend to disable signature enforcement on enterprise machines, seek approval from the business. All the above methods will be covered in this article, and you can choose the option that best suits you.
See Also: Enable Experimental Features in GeForce Experience
What happens when you disable Driver Signature Enforcement?
Disabling driver signature enforcement allows unsigned drivers to be installed on the system. This is useful when you have drivers for hardware components that Microsoft doesn’t digitally sign or recognize as secure.
For example, in some cases, driver signature enforcement causes problems while installing the drivers for components on Windows 11. Most users face issues with Audio and Webcam drivers not being recognized, saying it couldn’t check the driver signature (when in fact they are). In these cases, you may want to disable drive signature enforcement in order to install those drivers.
The Pros and Cons of Turning Off Signature Enforcement for Drivers
Disabling driver signature enforcement allows you to install drivers that Microsoft doesn’t certify as secure. This comes with both pros and cons.
- Pros: If you have trouble installing genuine drivers that Microsoft doesn’t recognize, you can disable driver signature enforcement. Furthermore, if you’re a software developer developing a driver or using older drivers for some reason, you’ll need to disable this feature to install unsigned drivers.
- Cons: The biggest disadvantage of disabling driver signature enforcement is that it can increase the risk of installing malicious or unstable drivers. If the drivers are too old or aren’t certified as secure by Microsoft, you should not install them because they may compromise the security of your device. If this happens, you’ll need antivirus software to remove them.
Now that you know the pros and cons of turning off driver signature enforcement, let’s take a look at various solutions.
Method 1: Disable Driver Signature Enforcement in Startup Settings
The advanced startup settings in Windows 11 allow you to perform changes that you cannot do when you are logged in to the PC. From the Windows 11 startup settings, you can disable driver signature enforcement using the following steps:
1. Press the Windows key to launch the Start menu, click on the Power icon, press and hold the Shift key, and then select Restart to enter the recovery mode in Windows 11.

2. On the Recovery Mode screen, select Troubleshoot.

3. From the list of Troubleshoot options, select Advanced Options.

4. Windows 11 has multiple advanced options to choose from. The option to disable driver signature enforcement is included in the start-up settings. Select Start-up Settings.

5. In order to use any of the startup settings, your PC needs to restart. Click on the Restart button.

6. On the Startup Settings page, press 7 to select Disable Driver Signature Enforcement. This will restart your Windows 11 PC. You should now be able to install unsigned drivers on your Windows 11 PC.

Method 2: Use GPO to disable Driver Signature Enforcement
When you want to disable driver signature enforcement on multiple PCs, you can use the Group Policy method. A GPO can be configured with settings to turn off driver signature enforcement and applied to Active Directory domain joined PCs (Windows 10 and Windows 11).
You can also use the Local Group Policy Editor on your Windows 11 PC to turn off driver signature enforcement. The Local GP Editor doesn’t come with Windows 11 Home edition, so make sure you are either running Windows 11 Enterprise or Pro to make use of the Local Group Policy Editor tool to configure the driver signature enforcement settings.
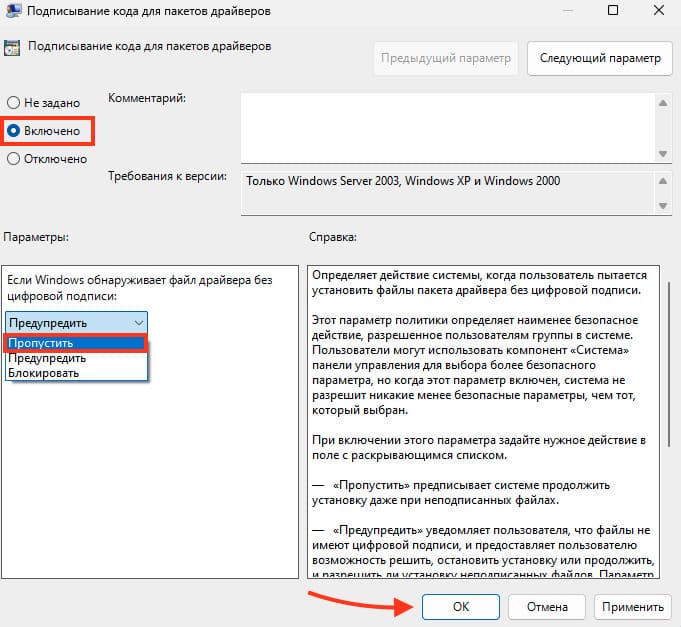
The group policy setting “Code Signing for Driver Packages” lets you configure how the system responds when a user tries to install driver package files that are not digitally signed. When Windows detects a driver file without a digital signature, you can configure the desired response, which includes Ignore, Warn, or Block.
- Ignore: Directs the system to proceed with the installation even if it includes unsigned files.
- Warn: Notifies the user that files are not digitally signed and lets the user decide whether to stop or proceed with the installation and whether to permit unsigned files to be installed. “Warn” is the default.
- Block: Directs the system to refuse to install unsigned files. As a result, the installation stops, and none of the files in the driver package are installed.
Using group policy, you can disable driver signature enforcement by performing these steps.
- Press Windows + R to open the Run window. Enter gpedit.msc and press Enter.
- In the Group Policy editor, navigate to User Configuration > Administrative Templates > System > Driver Installation.
- Double-click the Code Signing for Driver Packages policy setting and enable it.
- For the option “When Windows detects an unsigned driver“, click the drop-down and select Warn.
- Click Apply and OK. Restart your computer to apply the GPO changes.
After the restart, you can install unverified drivers on your PC. To revert the changes, open the GP editor and disable the setting “Code Signing for Driver Packages“.

Method 3: Disable Driver Signature Enforcement using CMD Prompt
Using the CMD prompt is the quickest and easiest way to disable driver signature enforcement on your Windows 11 PC.
- Launch the command prompt as an administrator on your Windows 11 PC.
- Enter the following command lines: bcdedit /set nointegritychecks on.
- This will turn off driver signature enforcement for your PC. The message “The operation is completed successfully” confirms that signature enforcement is disabled for all drivers.

To confirm that unsigned driver installation is permitted, run the command “bcdedit” in the same command prompt window, and the output will show that the nointegritychecks option under Windows Boot Loader is set to Yes. This means you can install unsigned drivers on your PC now.

Method 4: Turn off Driver Signature Enforcement from Advanced Boot Options
One of the ways to permanently disable driver signature enforcement on a Windows 11 PC is through advanced boot options. The Advanced Boot Options screen lets you start Windows in advanced troubleshooting modes. You can access the menu by turning on your computer and pressing the F8 key before Windows starts.
Turn off the computer and hit the F8 key repeatedly before Windows starts to boot to launch the Advanced Boot Options. Use the arrow keys to select the Disable Driver Signature Enforcement option, and then press the Enter key. Your Windows 11 PC will reboot now. The PC now allows drivers containing improper signatures to be installed.

Still Need Help?
If you need further assistance on the above article or want to discuss other technical issues, check out some of these options.
Readers help support Windows Report. We may get a commission if you buy through our links.
Read our disclosure page to find out how can you help Windows Report sustain the editorial team. Read more
Microsoft has embedded several security features in Windows to ensure that your PC remains safe and secure. One of these is Driver Signature Enforcement in Windows 11.
If you get Windows requires a digitally signed driver or a similar message. This feature is the problem, and today, we will show you how to disable the driver signature enforcement in Windows 11.
What happens when you disable Driver Signature Enforcement?
Disabling driver signature enforcement allows unsigned drivers to be installed on the system. This can be useful for installing older or custom drivers that Microsoft does not digitally sign, but it can also increase the risk of installing malicious or unstable drivers.
Disabling Driver Signature Enforcement allows you to install drivers that Microsoft doesn’t verify. This comes with a couple of benefits and flaws:
- Security concerns – By disabling this feature, you’ll allow unverified drivers to be installed on your PC. This can be a security risk and allow rootkits to be installed. If this happens, you’ll need USB antivirus software to remove them.
- Testing purposes – If you’re developing a driver or using older drivers for some reason, you’ll need to disable this feature to install unsigned drivers.
Now, let us explore how to disable Driver Signature Enforcement.
Should I disable the Driver Signature Enforcement feature in Windows 11?
This is the real question here. Though you may want to install a driver that performs better, it’s not always safe. So, if the current ones work just fine, there’s no need to experiment with new ones.
The Driver Signature Enforcement feature is there for a reason, and when you disable it, it negates the whole purpose. Microsoft signs drivers after they are thoroughly checked, their authenticity and reliability verified, and these are the ones that should be installed.
But if you want to download an unsigned driver, conduct thorough research on the source and the driver itself. Once satisfied, you can disable the feature and install the driver.
How can I disable Driver Signature Enforcement in Windows 11?
1. Via Windows Recovery Environment (RE)
- Press the Windows key to launch the Start menu, click on the Power icon, press and hold the Shift key, and then click on Restart to enter the recovery mode in Windows 11.

- Once the OS enters the recovery environment, click on Troubleshoot.

- Next, click Advanced options.

- Select Startup settings from the six options listed here.
- Now, click on the Restart button.
- If you are asked to enter the BitLocker recovery key, find out what to do. With the feature enabled, Windows may ask you to provide the key to ensure that no one else is accessing the data.
- Finally, press the F7 or 7 key to boot Windows with the Driver Signature Enforcement feature disabled.


Once the system restarts, Driver Signature Enforcement will be disabled in Windows 11. You can now install the desired unsigned driver on your PC. To enable Driver Signature Enforcement in Windows 11, restart the computer.
2. Use Command Prompt
NOTE
This solution will only work if Secure Boot is disabled. We have a guide on how to enable Secure Boot, but you can use the same methods to disable it.
- Click the Start button, type cmd, and select Run as administrator from the results.
- Now, type or paste the following command and press Enter to run it:
bcdedit /set nointegritychecks on
- To check if the command worked, type the following command and look if the nointegritychecks value is set to Yes:
bcdedit


This method ensures Windows 11 disables Driver Signature Enforcement permanently. However, make sure that you disable Secure Boot first. Otherwise, the command will not work.
- Mozilla Firefox 138.0.3 update rolls out with some known bug fixes
- Microsoft just killed these features with Edge 137 beta release
3. Through Advanced Boot Options
- Turn off the computer, and as soon as the display lights up, hit the F8 key repeatedly before Windows starts to boot to launch the Advanced Boot Options.
- Use the arrow keys to select the Disable Driver Signature Enforcement option, and then hit Enter.


These are all the ways you can disable Driver Signature Enforcement in Windows 11. We could earlier execute a bunch of commands in the previous iterations for the same, but with Secure Boot being mandatory in Windows 11, those wouldn’t work anymore.
For those wondering how to check if Driver Signature Enforcement is disabled, try installing an unsigned driver or check the Group Policy settings. Besides, if you remember disabling it via the Recovery Mode, another restart will enable Driver Signature Enforcement by default.
In most cases, updating the driver should help boost the device’s performance if you disable the feature for that.
For that, you can use Outbyte Driver Updater, a dedicated tool that will automatically install the latest updates for the drivers on your system and keep them all up-to-date.
Also, find out how to easily update drivers in Windows 11, and stay clear of most driver-related errors.
Do not hesitate to tell us which method you chose to disable the driver signature enforcement feature in Windows 11 and the driver you were trying to install in the comments section below.
Kazim Ali Alvi
Windows Hardware Expert
Kazim has always been fond of technology, be it scrolling through the settings on his iPhone, Android device, or Windows PC. He’s specialized in hardware devices, always ready to remove a screw or two to find out the real cause of a problem.
Long-time Windows user, Kazim is ready to provide a solution for your every software & hardware error on Windows 11, Windows 10 and any previous iteration. He’s also one of our experts in Networking & Security.