
Download Article
Download Article
- Using Run, Command Prompt, or PowerShell
- Using Power Options
- Video
|
|
Windows 10 has a feature that can automatically shutdown your computer according to a schedule you set. But you might be working or gaming late and don’t want your computer to automatically shut down. This wikiHow will teach you how to cancel auto-shutdown using the run command, the command prompt, or PowerShell. However, if you use power-saving settings to save your battery life when your laptop isn’t plugged into a power source, you may also need to change those settings in Power Options.
-

Pressing the Win + R key combination will open the Run window.
- You’ll find Command Prompt or PowerShell in your Start menu. Since PowerShell is replacing Command Prompt for many modern Windows 10 computers, you can also select PowerShell in the menu that pops up when you press Win + X.[1]
- You’ll find Command Prompt or PowerShell in your Start menu. Since PowerShell is replacing Command Prompt for many modern Windows 10 computers, you can also select PowerShell in the menu that pops up when you press Win + X.[1]
-
shutdown -a. This command will cancel the scheduled shutdown for one time. You’ll have to repeat this process if you want to cancel other scheduled shutdowns.
Advertisement
-
It’s below the place where you entered the code in the Run window and will prompt it to close.[2]


Advertisement
-
You can press Win + I to open Settings, or you can find it in your Start menu next to a gear icon.
-
It should be the first icon in the menu.[3]
-
You should see this in the menu on the left side of the window.[4]
-
This is towards the right side of the window.[5]
-
You’ll see this to the right of your current plan.
-
It’s under the general settings.
-
Double-clicking these will expand their menus.
-
If you want to change the setting for both of these options, repeat the process for the one you didn’t already change.[6]
-
You will not see this if you’re on a laptop.
- Changing the «Sleep» settings to «Never» will ensure that your computer never goes to sleep.
-
A menu will expand below the header.
-
If you want to change the setting for both of these options, repeat the process for the one you didn’t already change.
-
You will not see this if you’re on a laptop.[7]
- These settings will ensure your computer never hibernates, which might drain your battery if your laptop is not plugged into a power source.[8]
- These settings will ensure your computer never hibernates, which might drain your battery if your laptop is not plugged into a power source.[8]


Advertisement
Ask a Question
200 characters left
Include your email address to get a message when this question is answered.
Submit
Advertisement
Video
Thanks for submitting a tip for review!
About This Article
Article SummaryX
1. Press Win + R (to open Run) or open Command Prompt or PowerShell.
2. Enter the following command: «shutdown -a».
3. Click OK (in the Run window) or press Enter (in Command Prompt or PowerShell).
Did this summary help you?
Thanks to all authors for creating a page that has been read 204,998 times.
Is this article up to date?
Все способы:
- Способ 1: Системные средства
- Вариант 1: Команда
- Вариант 2: «Планировщик заданий»
- Способ 2: Сторонние решения
- Вариант 1: Wise Auto Shutdown
- Вариант 2: Lim Timer Off
- Вопросы и ответы: 4
Способ 1: Системные средства
Таймер выключения компьютера в «десятке» чаще всего устанавливается посредством ввода специальной команды в текстовых интерфейсах (инструменты «Выполнить», «Командная строка» и PowerShell), а также с помощью оснастки «Планировщик задач». Следовательно, методы отключения для каждого из вариантов отличаются.
Вариант 1: Команда
Самый простой способ задать таймер выключения компьютера – ввод специальной команды через соответствующие интерфейсы. Посредством этих же инструментов процедуру можно отменить, проще всего — с помощью окна «Выполнить».
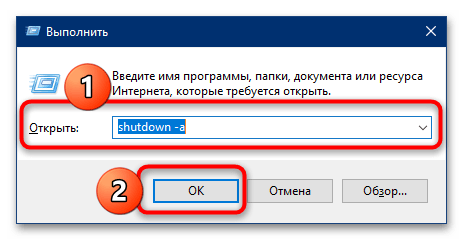
- Нажмите сочетание клавиш Win+R для вызова окна ввода, впишите в него следующую команду и кликните «ОК»:
shutdown -a - ОС должна уведомить вас о том, что операция автоматического отключения была отменена.
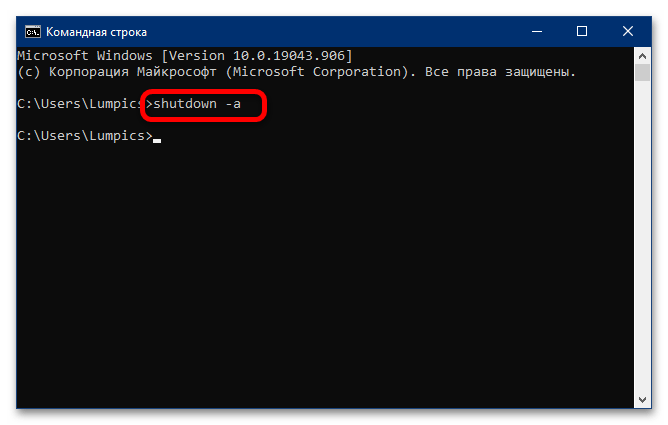
- Аналогичным образом работает ввод указанной команды в интерфейсах «Командной строки» и «PowerShell».

Вариант 2: «Планировщик заданий»
Если же таймер был установлен во встроенном средстве автоматизации Windows 10, то последовательность его отключения выглядит следующим образом:
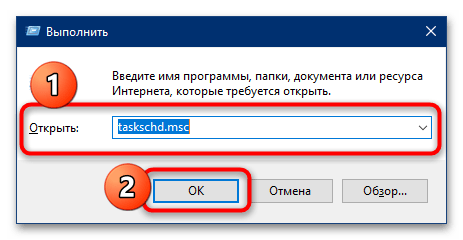
- Снова вызовите окно «Выполнить», но на этот раз введите в него команду
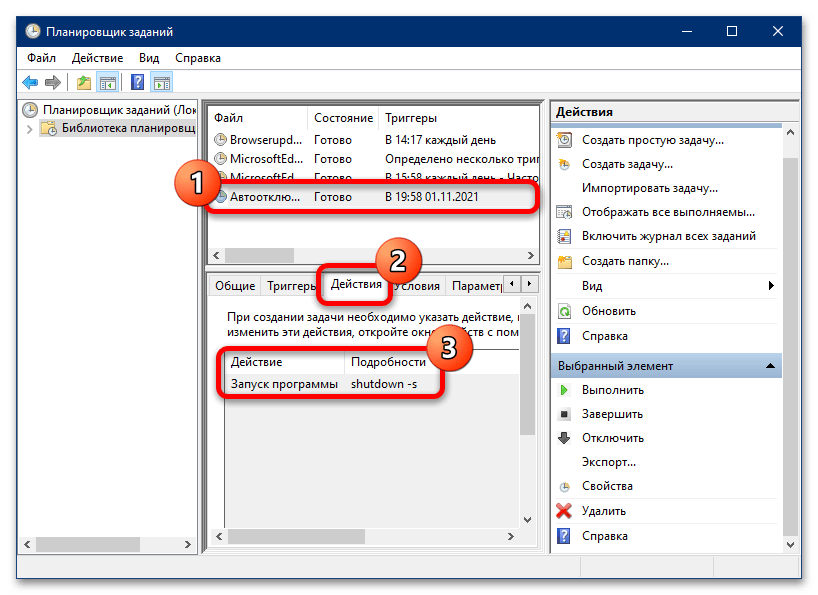
taskschd.msc. - После запуска оснастки кликните левой кнопкой мыши по категории «Библиотека планировщика заданий» в боковом меню.
- Пролистайте перечень заданных операций до позиции, которая соответствует задаче автоматического выключения – если вы задавали её самостоятельно, то должны помнить введённое описание. Если же работаете с чужим компьютером (например, родственника), ориентируйтесь на название либо действие (его можно посмотреть на одноимённой вкладке в нижнем блоке, предварительно выделив нужную строку нажатием на левую кнопку мыши), где должно быть указано «Запуск программ shutdown -s».

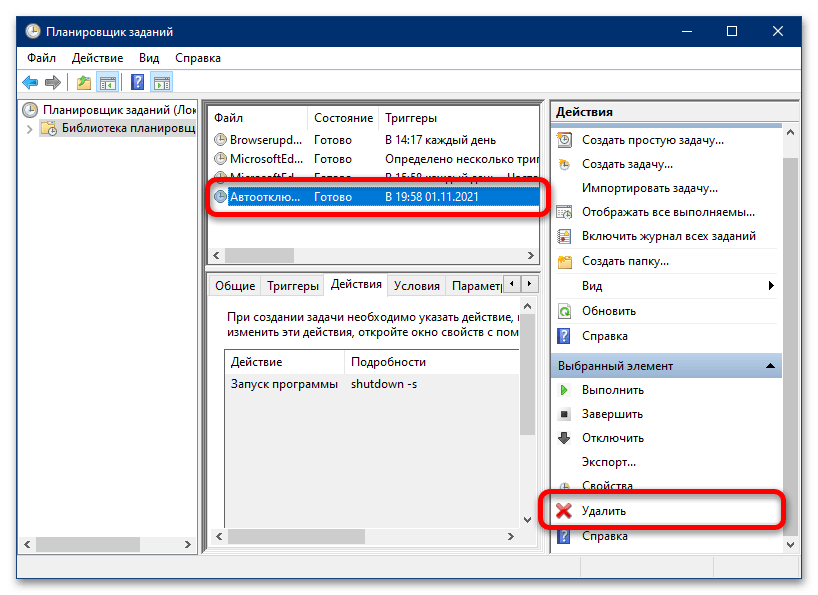
После обнаружения требуемой операции нажмите «Удалить» в контекстном меню справа.
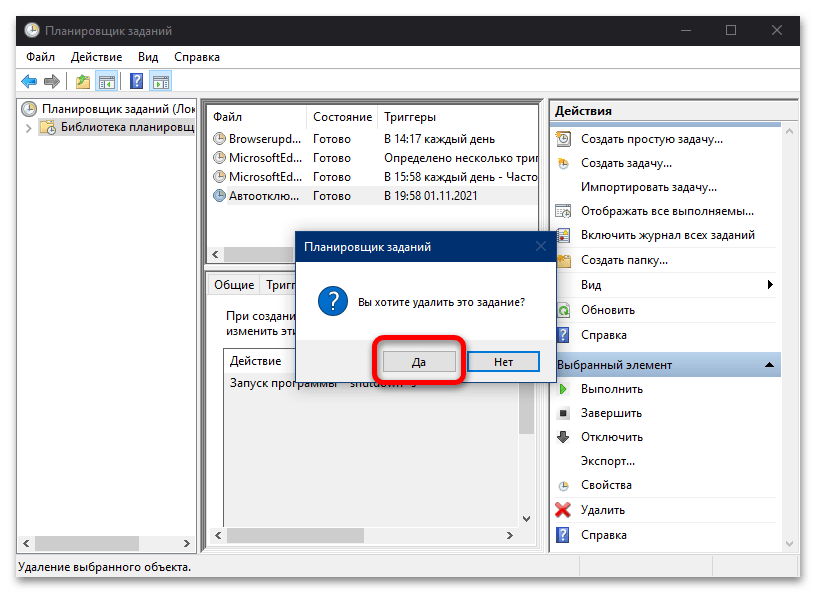
- Далее подтвердите желание удалить задачу, после чего закройте «Планировщик заданий».
Как видим, отмена автоматического выключения компьютера по таймеру, который задан системными средствам, выполняется элементарно.
Способ 2: Сторонние решения
Также существует большое количество сторонних программ, которые выполняют задачу автоотключения компьютера в определённое время. Практически все они работают по одному и тому же принципу, поэтому покажем процедуру отмены таймера на двух примерах.
Вариант 1: Wise Auto Shutdown
Для того чтобы отменить отключение компьютера посредством этого приложения, нужно выполнить следующие действия:
- Откройте системный трей (область со значками в правом нижнем углу «Рабочего стола») и найдите иконку программы. Если она отсутствует, нажмите на стрелочку рядом – нужный ярлык должен быть там. Кликните по нему для вызова основного окна.
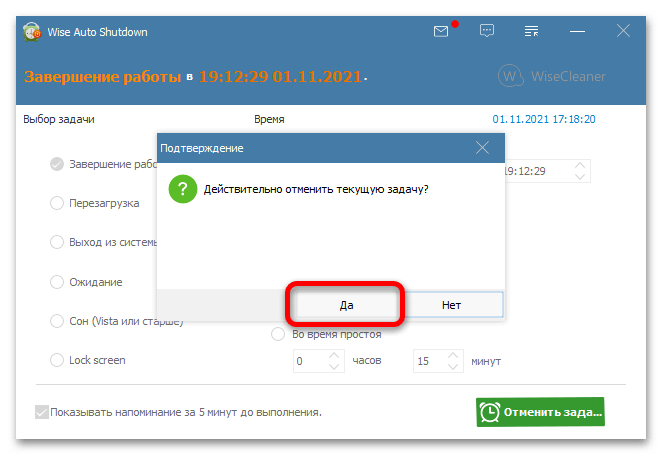
- Здесь найдите кнопку «Отменить задачу» и щёлкните по ней.
- Подтвердите действие нажатием на «Да».
- Альтернативный вариант – воспользоваться уведомлением. По умолчанию за 5 минут до отключения программа показывает информационное окно, в котором присутствует кнопка «Отменить». Нажмите на неё для отключения таймера.


Вариант 2: Lim Timer Off
Пользователи этой программы также могут отменять настроенный таймер отключения. Как и в предыдущем случае, откройте трей либо его дополнительное пространство, найдите там иконку приложения и кликните по ней правой кнопкой мыши. Затем воспользуйтесь пунктом контекстного меню «Остановить таймер».
Сторонние приложения для автоматического отключения компьютера с Windows 10 так же, как и системные средства, позволяют отменить выполнение запланированной операции.
Наша группа в TelegramПолезные советы и помощь
Introduction
Automatic shutdown in Windows 10 is one of the features of Windows 10 and if you want to use this automatic shutdown schedule on your laptop/PC then read this article on the topic of, How to Schedule Automatic Shutdown in Windows 10.
If you set down the Auto Shutdown Schedule in Windows 10 and suddenly you remember that you have urgent work and want to cancel this auto Shutdown Schedule, then you have to know the procedure to Cancel the Auto Shutdown Schedule in Windows 10.
This tutorial will show you various ways, how to Cancel the Auto Shutdown Schedule or Task in Windows 10.
Method 1. Via run
Step 1. From the Start menu, open the Run dialog box or you can Press the «Window + R» key to open the RUN window.
Step 2. Type «shutdown -a» and click on the «OK» button.
After clicking on the OK button or pressing the enter key, the auto-shutdown schedule or task will be canceled automatically.
Method 2. Via command prompt
Step 1. Open Command Prompt.
Step 2. Type «shutdown -a» and press enter key.
By pressing the enter key, the Auto Shutdown Schedule will be Canceled Automatically.
Method 3. Via windows powershell
Step 1. Open Windows PowerShell. (Alternatively, you can press the «Windows + X» key and click on «Windows PowerShell» to open it.)
Step 2. Type «shutdown -a» and press enter key.
After pressing the enter key, the Auto Shutdown schedule will be canceled automatically.
Method 4. Through the creation of a shortcut icon
Step 1. Right-click on the empty area of the desktop and select «New > Shortcut».
Step 2. Click on the browse button and choose «shutdown.exe» from C/Windows/System32 and add «-a» or you can type directly «shutdown.exe -a» and click on the Next Button.
Step 3. Choose any name for this shortcut that you want, and then click on Finish Button.
Step 4. After clicking on this Finish Button, the Shortcut Icon will be generated.
By clicking the «Cancel Auto Shutdown» Shortcut Icon, you can cancel the Auto Shutdown Schedule or Task and If you want, you can change the default icon of this shortcut, by choosing the properties option.
Conclusion
By following any of the above methods, you can Cancel the Automatic Shutdown in Windows 10.
I hope you enjoyed this article. Follow C# Corner to learn more new and amazing things about Windows 10.
Thanks for reading this article.
Turn your PC off completely
To shut down, select Start and then select Power > Shut down .
Sleep
Sleep uses very little power, your PC starts up faster, and you’re instantly back to where you left off. You don’t have to worry that you’ll lose your work because of your battery draining because Windows automatically saves all your work and turns off the PC if the battery is too low. Use Sleep when you’re going to be away from your PC for just a little while—like when you’re taking a coffee break.
For a lot of PCs (especially laptops and tablets), your PC goes to sleep when you close your lid or press the power button.
To set your PC so it goes to sleep when you close the lid or press the power button:
-
Select Search on the taskbar, type control panel, and select it from the results.
-
Select System and Security.
-
In the Power Options section, select Change what the power buttons do.
-
Select Change settings that are currently unavailable.
-
Select options based on how you want Sleep to work:
-
For a laptop, expand the list for When I close the lid in the On battery column and select Sleep. Repeat for the Plugged in column, if desired.
-
For a desktop, tablet, or laptop, expand the list for When I press the power button in the On battery column and select Sleep. Repeat for the Plugged in column, if desired.
-
-
Select Save changes.
When you’re ready to make your PC sleep, just press the power button on your desktop, tablet, or laptop, or close your laptop’s lid.
On most PCs, you can resume working by pressing your PC’s power button. However, not all PCs are the same. You might be able to wake it by pressing any key on the keyboard, clicking a mouse button, or opening the lid on a laptop. Check the documentation that came with your computer or go to the manufacturer’s website.
Hibernate
This option was designed for laptops and might not be available for all PCs. (For example, PCs with InstantGo don’t have the hibernate option.) Hibernate uses less power than sleep and when you start up the PC again, you’re back to where you left off (though not as fast as sleep).
Use hibernation when you know that you won’t use your laptop or tablet for an extended period and won’t have an opportunity to charge the battery during that time. First check to see if this option is available on your PC and if it is, turn it on.
To set your PC so it can hibernate:
-
Select Search on the taskbar, type control panel, and select it from the results.
-
Select System and Security.
-
In the Power Options section, select Change what the power buttons do.
-
Select Change settings that are currently unavailable.
-
In the Shutdown settings section, select Hibernate.
-
Select Save changes.
Now you’ll be able to hibernate your PC in a few different ways:
-
Select Start , and then select Power > Hibernate.
-
Press the Windows logo key + X on your keyboard, and then select Shut down or sign out > Hibernate.
-
You can also set closing the lid or pressing the power or sleep buttons to hibernate your PC, if you so desire, using the same directions in To set your PC so it goes to sleep when you close the lid or press the power button.
Note: If devices connected to your PC (like monitors, printers, or scanners) aren’t working properly after waking up from sleep or hibernate, you might need to disconnect and reconnect your device or restart your PC. You should also make sure that you have the most current drivers for all of your devices.