
Все способы:
- Способ 1: Временное отключение
- Способ 2: Изменение настроек
- Способ 3: Очистка автозапуска
- Способ 4: Полное удаление
- Вопросы и ответы: 0
Способ 1: Временное отключение
Наиболее простой метод деактивации основных модулей защиты антивируса Norton Security на компьютере с Windows 10 сводится к использованию специального меню с ограниченным количеством параметров. Данный вариант лучше всего подходит для временной деактивации программы, тогда как полное отключение следует выполнять через внутренние настройки или удаление.
- Чтобы выполнить поставленную задачу, в области уведомлений на панели задач найдите значок «Norton Security» и кликните правой кнопкой мыши. Данная иконка вполне может отсутствовать среди видимых значков, но будет присутствовать в общем списке софта, свернутого в трей.
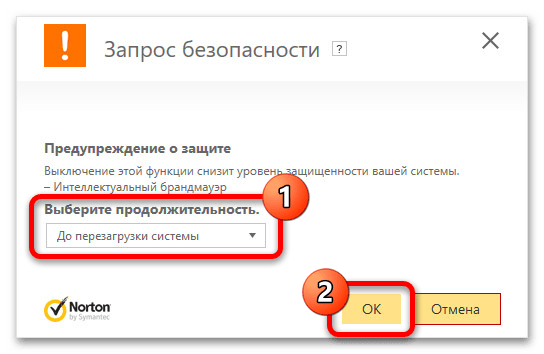
- В зависимости от требований к результату, в контекстном меню воспользуйтесь опцией «Выключить интеллектуальный брандмауэр», чтобы отключить защиту в интернете, или «Выключить автоматическую защиту» для деактивации защиты файловой системы. Помимо этого, можно «Включить режим без сообщений», позволяющий принудительно блокировать системные уведомления от программы.
- Последующие действия не отличаются во всех трех случаях — из выпадающего списка необходимо просто выбрать период деактивации выбранной службы и воспользоваться кнопкой «ОК» для сохранения обновленных параметров. Как правило, автоматическое восстановление работоспособности обеспечивается во всех вариантах, кроме «До перезагрузки системы» и «Постоянно».

Обновленные параметры будут применены сразу после нажатия указанной кнопки и отмечены в соответствующем оповещении. Задействовать каждый из модулей в будущем можно вручную через аналогичное меню, воспользовавшись параметрами в рамках основного окна антивируса или дождавшись выполнения условия, будь то таймер или перезагрузка компьютера.

Способ 2: Изменение настроек
Отключить Нортон на постоянной основе, в том числе выборочно избавившись от модулей, которые, например, создают дополнительную нагрузку или просто не используются, можно через встроенные параметры программы. Сразу стоит отметить, что мы не будем подробно рассматривать каждый отдельный элемент, а сделаем акцент лишь на ключевых параметрах. При желании можете внести дополнительные изменения самостоятельно.
- Как и в предыдущем варианте, найдите значок антивируса на панели задач Windows 10, кликните правой кнопкой мыши и во всплывающем окне выберите «Открыть Norton 360». В качестве альтернативы можете просто дважды кликнуть ЛКМ по иконке.
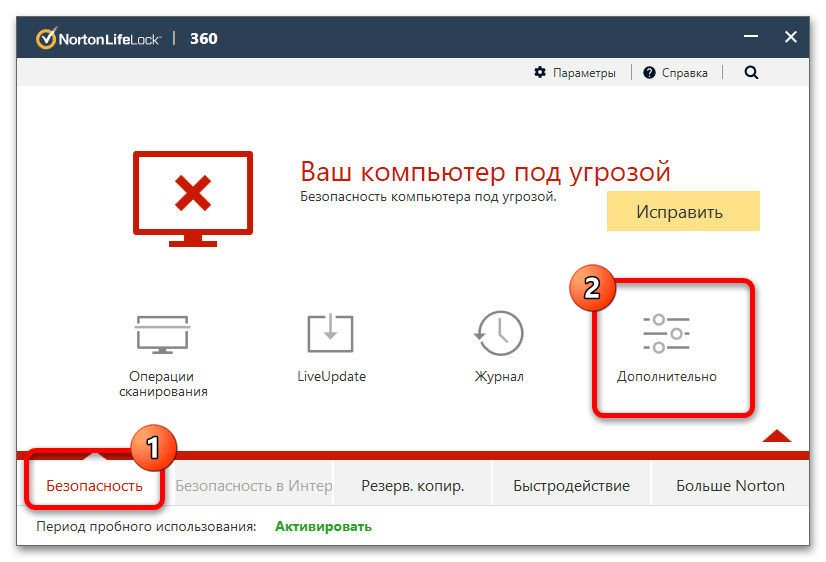
- Находясь в основном окне Norton Security, на нижней панели найдите и разверните вкладку «Безопасность». Здесь следует воспользоваться кнопкой «Дополнительно», как правило, расположенной в самом конце представленного списка.
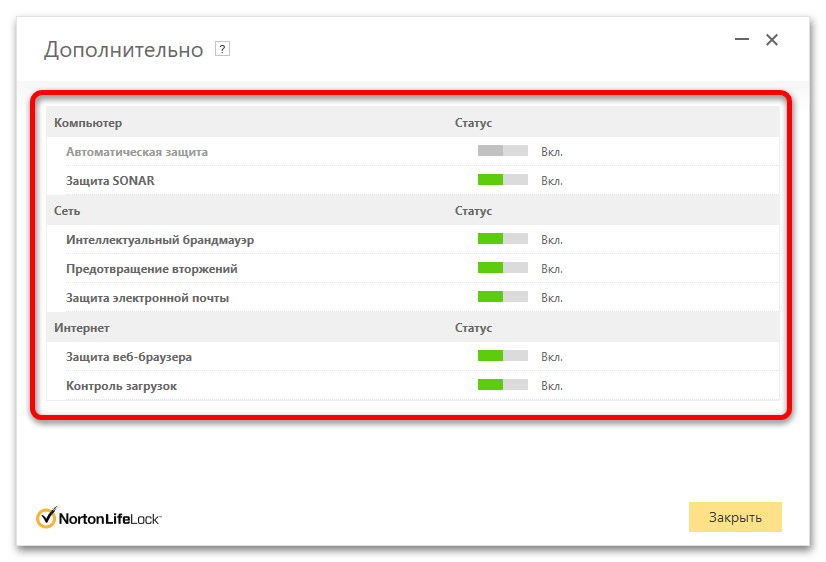
- Во всплывающем окне можно достаточно быстро отключить любой основной модуль программы, будь то «Автоматическая защита», «Интеллектуальный брандмауэр», «Защита веб-браузера» и «Контроль загрузок» или «Защита SONAR». Изменение практически каждого параметра будет сопровождаться обязательным подтверждением, по аналогии с предыдущим вариантом.
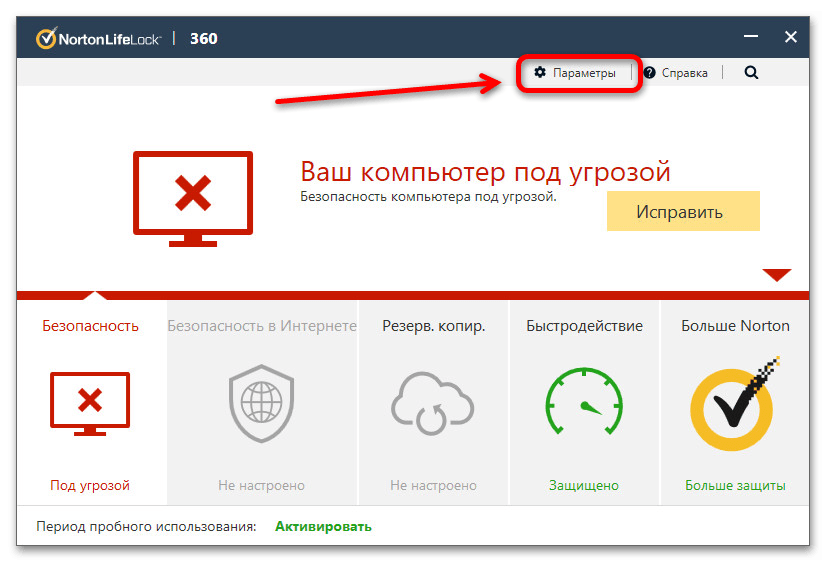
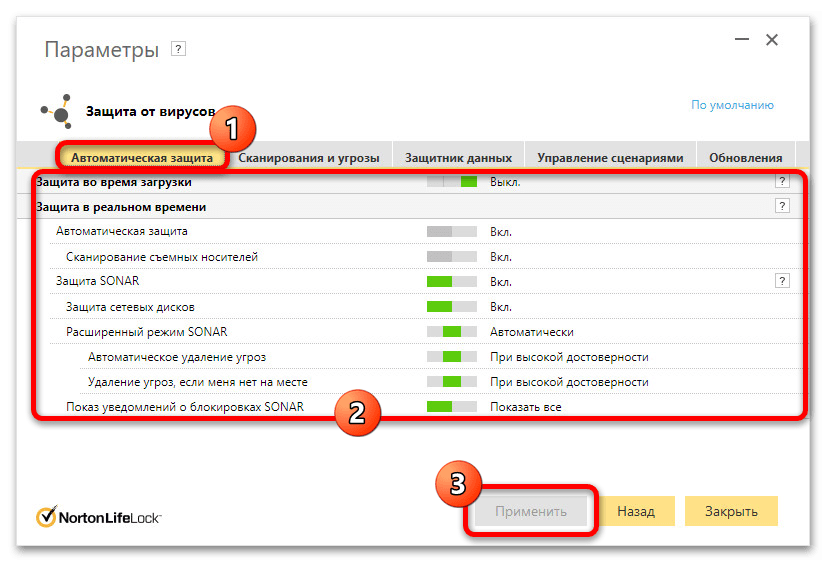
- Если вас не устраивает доступное в данном окне количество настроек, можете вернуться на главную страницу антивируса и на верхней панели воспользоваться кнопкой «Параметры». Именно здесь доступны все возможные настройки, в том числе не связанные с защитой.
- Первым делом обратите внимание на правую колонку, где можно просто установкой галочки задействовать «Режим без вывода сообщений» или, наоборот, снятием деактивировать «Интеллектуальный брандмауэр». Для перехода к более конкретным настройкам используйте основные пункты меню, отмеченные на скриншоте.

На странице «Защита от вирусов» можно управлять основным модулем защиты файловой системы, а также некоторыми вспомогательными службами. Для быстрого отключения используйте ползунок «Автоматическая защита» и «Защита во время загрузки».
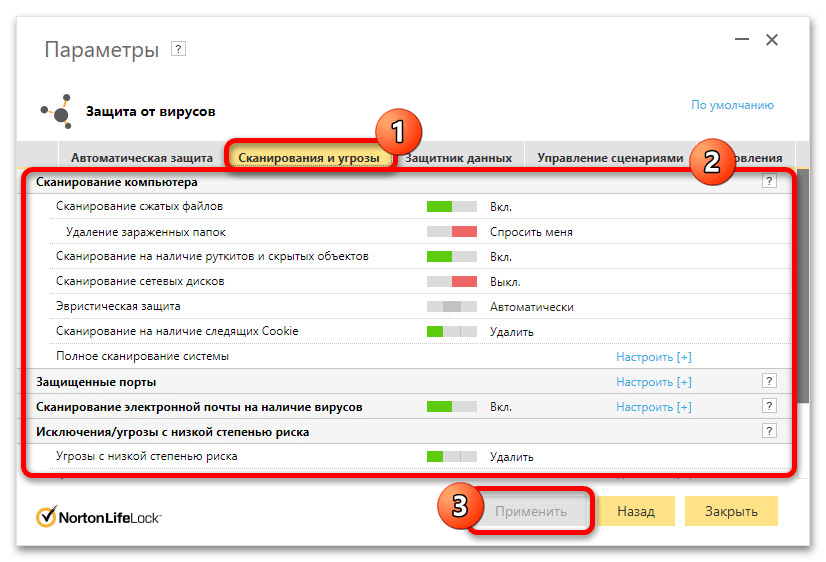
- Соседние вкладки практически не связаны с автоматической системой защиты, однако могут работать при определенных условиях. Так, например, рекомендуем уделить внимание «Сканированию и угрозам» и в частности «Эвристической защите».
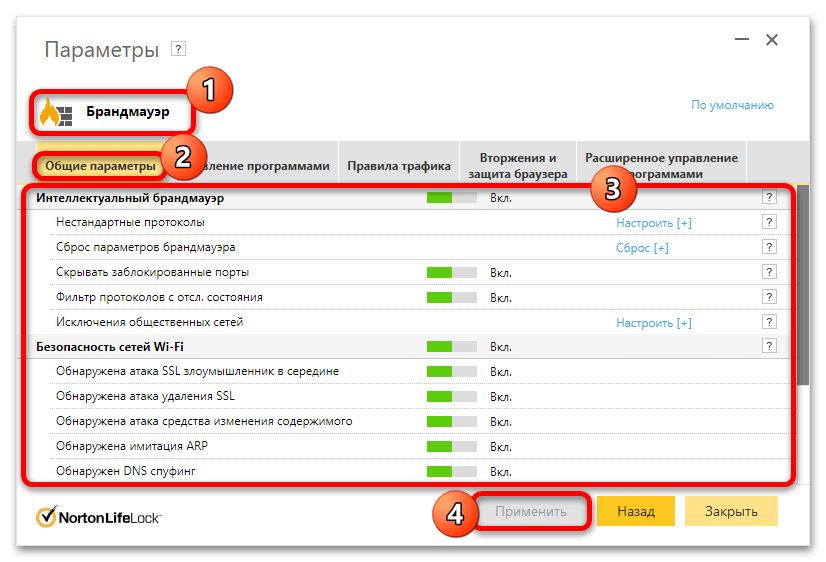
- Раздел «Брандмауэр», в свою очередь, содержит параметры, напрямую связанные с защитой интернета. Здесь внутри категории «Общие параметры» можно деактивировать связанные модули, будь то «Интеллектуальный брандмауэр» или «Безопасность сетей Wi-Fi», а также отключить отдельные службы вроде фильтра исключений для адресов.
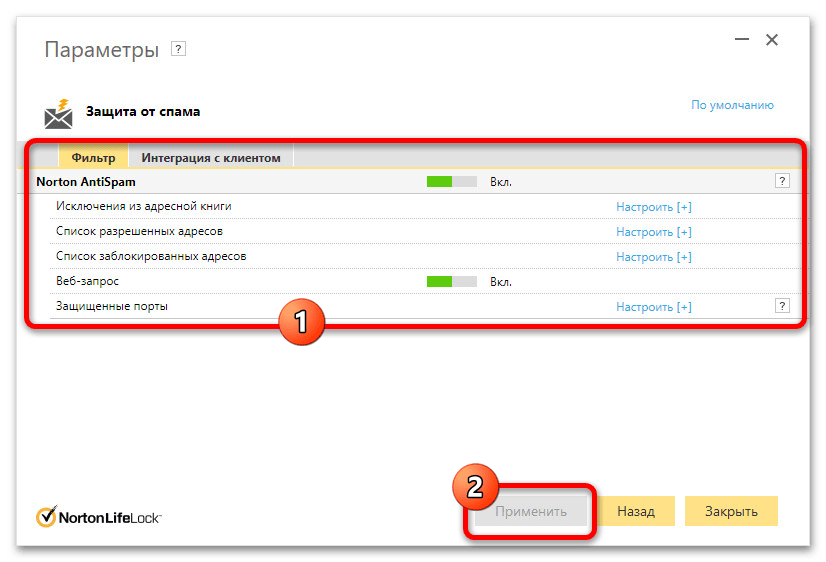
- Последний раздел внутренних настроек содержит меньше всего параметров, так как отвечает за фильтрацию электронной почты от спама. Как нетрудно догадаться, данный модуль в целом не будет работать, если на компьютере не настроен локальный почтовый клиент.
Чтобы завершить изменение настроек, используйте кнопку «Применить» на нижней панели в рамках рассматриваемого окна. Отключение любого модуля выполняется моментально и не требует перезагрузки системы.

Способ 3: Очистка автозапуска
Кроме деактивации рассматриваемого антивируса встроенными средствами, в качестве альтернативы можно воспользоваться настройками автозапуска, чтобы предотвратить автоматическое включение основных модулей при запуске Windows 10. При этом, в отличие от большинства аналогичных программ, Norton Security придется исключать из автозагрузки исключительно сторонними средствами.
Читайте также: Отключение автозапуска программ в Windows 10
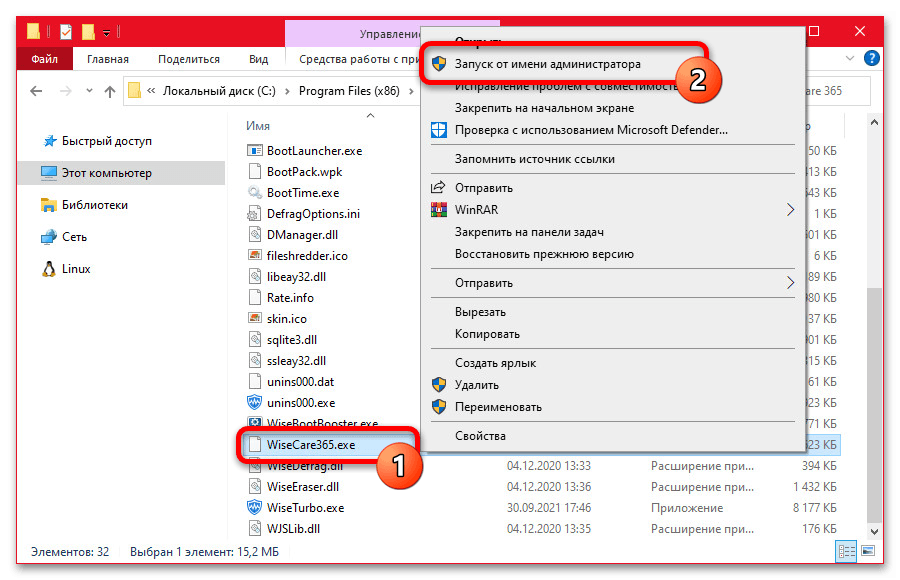
- В качестве программы для удаления антивируса из автозагрузки нами будет использоваться Wise Care 365, который можно скачать бесплатно с официального сайта разработчика. Подробно останавливаться на установке мы не будем, но отметим, что запускать данную программу лучше всего «От имени администратора» через контекстное меню.
Скачать Wise Care 365 с официального сайта
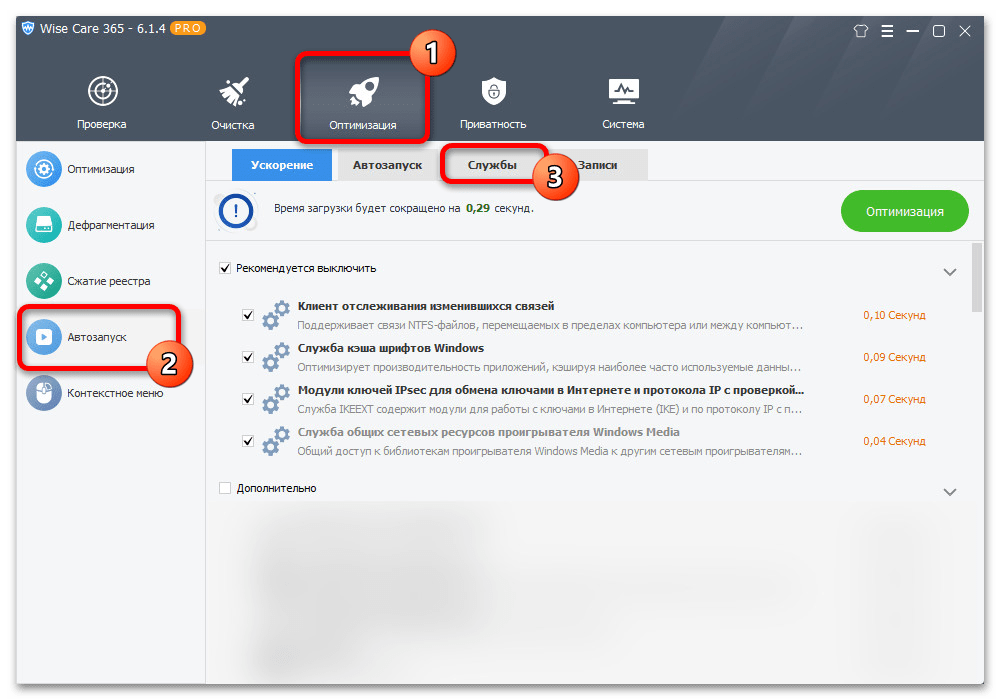
- Разобравшись с установкой и запуском, при помощи главного меню в верхней части рабочего окна программы перейдите на вкладку «Оптимизация». Здесь в первую очередь следует выбрать категорию «Автозапуск» и переключиться на список «Службы».
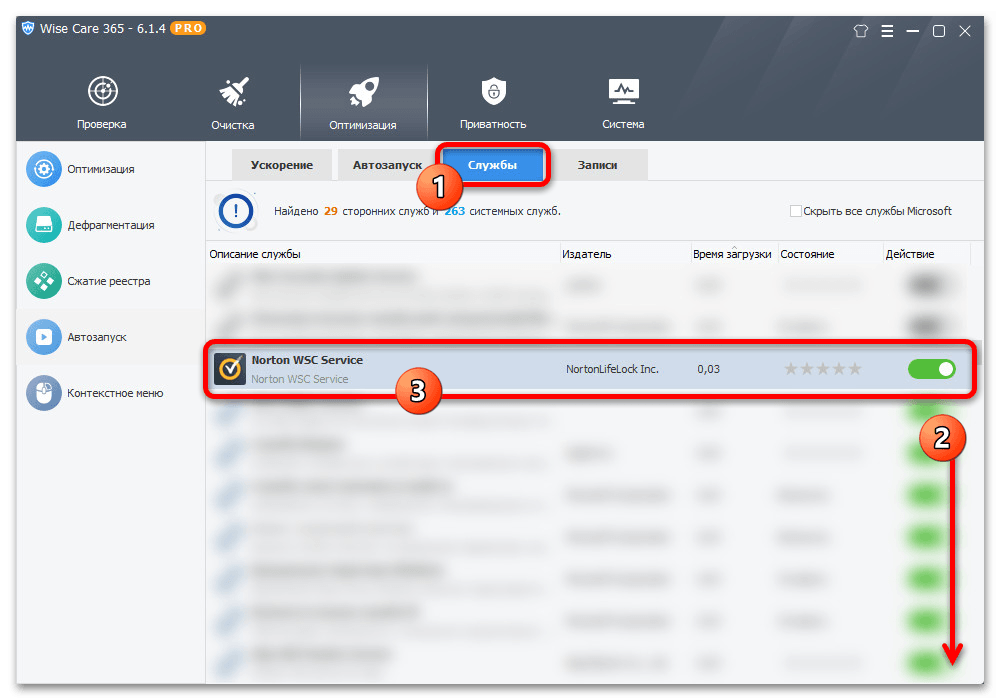
- Из общего списка служб найдите и деактивируйте с помощью ползунка «Norton WSC Service», как правило, представленный двумя разными службами. Если в процессе возникают ошибки, скорее всего программа была запущена без прав администратора.
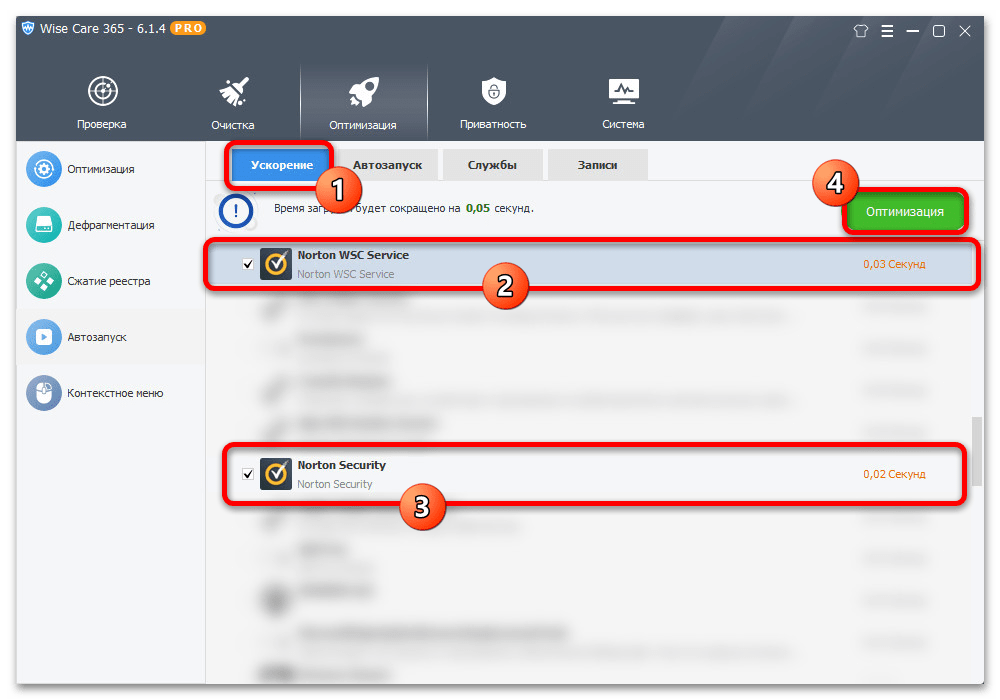
- В качестве альтернативы или дополнительного решения можете перейти на вкладку «Ускорение», найти «Norton WSC Service» и задействовать для быстрой деактивации. Перед нажатием кнопки «Оптимизация» обязательно убедитесь, что другие службы не были затронуты программой во избежание ошибок.
Оптимизация выполняется моментально, но изменения будут заметны только при повторном включении компьютера. Учитывайте, что даже с учетом сторонних и достаточно эффективных средств гарантировать стабильное исключение антивируса из автозагрузки невозможно из-за достаточно сильной интеграции в операционную систему.
Способ 4: Полное удаление
Последний и наиболее радикальный метод отключения Norton Security на компьютере под управлением Windows 10 заключается в полном удалении данной программы. Выполнить это можно несколькими способами: воспользовавшись официальной утилитой, которую придется скачать с веб-сайта разработчика, или штатными средствами операционной системы.
Подробнее: Полное удаление Norton Security из Windows 10
Какой бы из способов, рассмотренных в другой инструкции по ссылке выше, вы ни выбрали, по завершении необходимо перезагрузить компьютер для применения изменений. Не стоит также забывать про отключение всех модулей защиты, и, чтобы компьютер не оставался под угрозой, желательно задействовать другой антивирус или хотя бы стандартный «Защитник Windows».
Наша группа в TelegramПолезные советы и помощь
Любой современный ПК должен иметь антивирусную программу для защиты от вирусов, шпионских атак и прочих угроз. Если вы часто пользуетесь интернетом, загружаете документы, осуществляете онлайн платежи, то обязаны купить антивирус на компьютер. Сегодня доступно множество программных продуктов данной категории. Например, очень популярен Norton Internet Security. Он обладает всеми актуальными модулями защиты, позволяет сканировать жесткие диски, работать со всеми существующими цифровыми угрозами и пр. Иными словами, полезная программа. И если вы планируете ею пользоваться, то должны знать, как отключить Нортон Антивирус на Виндовс 10 на время. Или даже полностью удалить его.

Для чего нужно отключать Norton
У многих пользователей наверняка возникнет вопрос касательно целесообразности данного шага. Ведь важно, чтобы антивирусная защита работала на постоянной основе. Однако все же иногда возникает необходимость отключить. Вот несколько актуальных причин:
- Необходимость снизить нагрузку на ПК, чтобы запустить другие более требовательные программы;
- Отключение блокировки и внутренних модулей защиты для посещения сторонних сайтов;
- Отключение защиты для запуска программ, которые не имеют сертификаты безопасности. При этом они безвредны. К примеру, это могут быть самописные программы;
- Необходимость запустить антивирус другой фирмы, чтобы он не конфликтовал с Norton.
Как отключить антивирус Нортон
Чтобы временно деактивировать программу, вам нужно выполнить следующие шаги:
- Нажмите правой клавишей по иконке в трее;
- Выберите пункт «Отключить автоматическую защиту»;
- Выберите время отключения.
Если указать определенные минуты, то по истечении временного периода антивирус автоматически включится. Если выбрать вариант до перезагрузки, то программа активируется после перезагрузки ПК. Но это все опять же временное отключение. Даже если вы деактивируете Нортон Аккаунт, то все равно не обеспечить полную деактивацию.
Другой вариант – это отключение отдельных модулей. Для этого вам нужно перейти в настройки, которые доступны в основном меню антивируса. В новом окне перейдите в раздел «Защита в реальном времени» и переместите нужные ползунки в положение «Выкл». Затем примените внесенные изменения. Антивирус продолжит работать, но часть модулей будет деактивирована.
Удаление Нортон
Если вам не подходит такой вариант, то единственный способ полностью отключить программу – это деинсталляция. Поэтому нужно понять, как удалить Norton. Тут возможно несколько способов: через встроенное меню Windows, через сторонние программы или через утилиту от Norton.
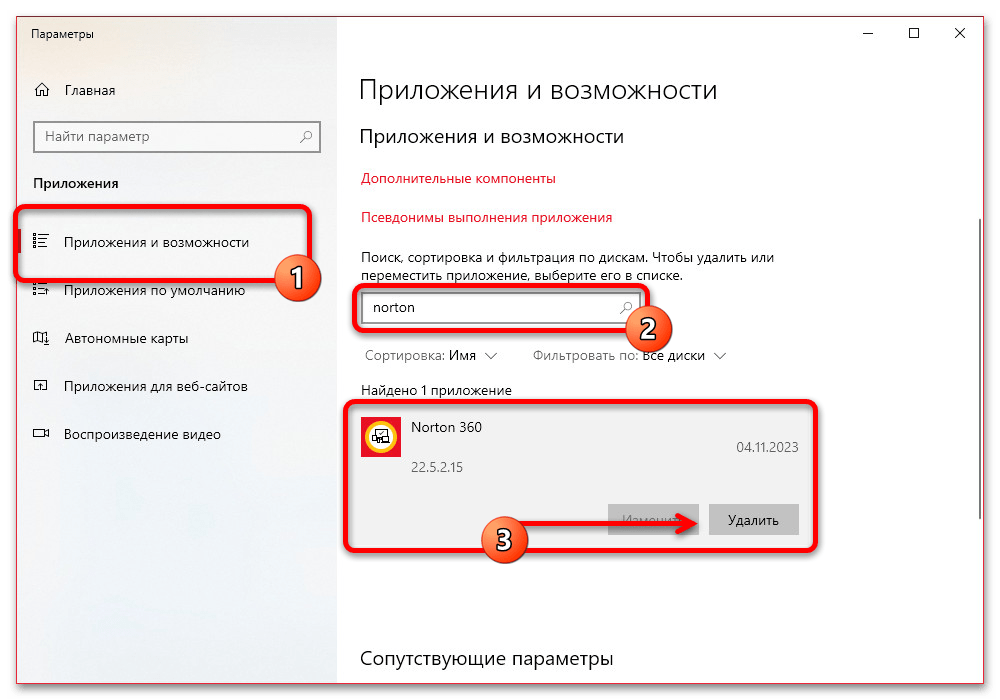
В первом случае вам нужно сделать следующее:
- Откройте меню «Пуск»;
- Перейдите в раздел «Параметры»;
- Откройте «Приложения»;
- Найдите в правом списке программу Norton Security;
- Выделите ее;
- Нажмите «Удалить»;
- В новом окне программы выберите способ деинсталляции (с сохранением или удалением параметров);
- Перезагрузите ПК.
Этот способ в ряде случаев может не сработать, так как в системе останутся файлы программы. Поэтому есть сторонние программы для решения проблемы, например, CCleaner. Она позволяет не только деинсталлировать антивирус, но и удалить остаточные файлы и записи в реестре.
Еще один вариант, как удалить Нортон Секьюрити с компьютера Виндовс 10 – это и использовать утилиту от самих разработчиков Norton Remove. Ее необходимо скачать с официального сайта, запустить и следовать инструкциям. Через утилиту можно как просто удалить программу, так и удалить, а затем загрузить и установить свежую версию.
Are you looking for a way to temporarily disable Norton Security on your Windows 10 PC? We’ve got you covered! Despite its effectiveness in protecting your computer from threats, there may be times when you need to turn off Norton Security temporarily, whether it’s for troubleshooting or to install certain software. In this article, we’ll guide you through the process of disabling Norton Security on your Windows 10 device. Let’s get started!
If you’re wondering how to turn off Norton Security on your Windows 10 PC, follow these simple steps. First, locate the Norton Security icon in your system tray, typically found in the bottom right corner of your screen. Right-click on the icon and select «Disable Auto-Protect» from the drop-down menu. This will temporarily disable Norton Security’s real-time protection feature, allowing you to perform tasks that may have otherwise been blocked. It’s important to remember to re-enable the auto-protect feature once you’re done, as leaving it disabled could leave your computer vulnerable to threats. By following these steps, you can easily turn off Norton Security on your Windows 10 PC when needed.
To turn off Norton Security on Windows 10, follow these steps:
- Open the Norton Security application on your Windows 10 computer.
- Click on the Settings option.
- In the Settings window, click on the «Real-time Protection» tab.
- Toggle the switch next to «Auto-Protect» to Off.
- Click on «Apply» to save the changes.
By following these steps, you can turn off Norton Security on your Windows 10 computer. Remember to turn it back on when you’re done to ensure continuous protection.

How to Temporarily Disable Norton Security on Windows 10
Norton Security is a popular antivirus program that provides comprehensive protection against various threats on Windows 10. However, there may be instances when you need to temporarily disable Norton Security, such as when installing certain software or troubleshooting connectivity issues. In this guide, we will walk you through the steps to turn off Norton Security on your Windows 10 computer so that you can proceed with your desired tasks.
Disabling Norton Security from the System Tray
The easiest way to disable Norton Security temporarily is through the system tray icon. Follow these steps:
- Locate the Norton Security icon on the system tray, which is usually found in the bottom-right corner of the screen.
- Right-click on the Norton Security icon.
- In the context menu, select the option «Disable Smart Firewall» to turn off the firewall temporarily.
- Similarly, you can select «Disable Auto-Protect» to disable real-time scanning temporarily.
Please note that disabling the firewall or real-time scanning temporarily leaves your computer vulnerable to potential threats. Make sure to re-enable these features once you have finished your intended tasks.
Disabling Norton Security from the Settings
If you prefer accessing the Norton Security settings to disable specific features, you can follow these steps:
- Open the Norton Security program on your Windows 10 computer.
- In the main Norton Security window, click on the «Settings» option.
- Within the settings menu, look for the «Firewall» or «Real-Time Protection» options.
- Toggle the switches to turn off the respective features.
Remember to enable the firewall and real-time scanning once you have completed your tasks.
Disabling Norton Security Using the Run Dialog Box
Another method to disable Norton Security temporarily involves using the Run dialog box. Here’s how:
- Press the Windows key and the R key simultaneously on your keyboard to open the Run dialog box.
- Type «msconfig» (without the quotes) into the text field and click «OK.»
- In the System Configuration window that appears, navigate to the «Services» tab.
- Scroll down and locate the Norton Security service.
- Uncheck the box next to the Norton Security service.
- Click «Apply» and then «OK» to save the changes.
- Restart your computer for the changes to take effect.
Turning off Norton Security’s Automatic Startup
If you want to prevent Norton Security from starting up every time you boot your Windows 10 computer, you can disable its automatic startup feature. Here’s how:
- Open the Norton Security program on your computer.
- In the main Norton Security window, click on the «Settings» option.
- Select the «Administrative Settings» tab.
- Under the «Startup and Processor Control» section, toggle the switch for «Turn on Auto-Protect» to the off position.
- Save the changes and exit the Norton Security settings.
By disabling the automatic startup feature, Norton Security will not start running in the background when you boot your computer. You can manually run the program when needed.
Re-enabling Norton Security
To turn on Norton Security after disabling it, simply follow these steps:
- Locate the Norton Security icon on the system tray.
- Right-click on the icon and select the option «Enable Smart Firewall» or «Enable Auto-Protect,» depending on what you had previously disabled.
- Alternatively, you can open the Norton Security program and navigate to the settings to enable the firewall and real-time scanning.
It is crucial to re-enable Norton Security features to ensure the ongoing protection of your computer against potential threats.
How to Completely Uninstall Norton Security on Windows 10
If you no longer wish to use Norton Security and want to uninstall it completely from your Windows 10 computer, follow the steps below:
Using the Control Panel
The most common method to uninstall programs on Windows is through the Control Panel. Here’s how to uninstall Norton Security using this method:
- Open the Control Panel on your Windows 10 computer.
- Navigate to the «Programs» or «Programs and Features» section.
- Locate Norton Security in the list of installed programs.
- Right-click on Norton Security and select «Uninstall» or «Remove.»
- Follow the on-screen instructions to complete the uninstallation process.
Using the Norton Removal Tool
If you encounter issues while uninstalling Norton Security through the Control Panel or if there are leftover files and registry entries, you can use the Norton Removal Tool for a more thorough removal. Here’s how:
- Download the Norton Removal Tool from the official Norton website.
- Double-click on the downloaded file to run the tool.
- Follow the on-screen instructions to proceed with the removal process.
- Once the removal tool has finished its job, restart your computer.
The Norton Removal Tool ensures a complete and clean uninstallation of Norton Security from your Windows 10 computer.
Additional Cleanup Steps
In rare cases, you may need to perform additional cleanup steps to remove any leftover files or registry entries from Norton Security. Here are some additional steps you can take:
- Open File Explorer and navigate to the following locations:
- Delete any remaining Norton Security folders or files.
- Press the Windows key and the R key simultaneously to open the Run dialog box.
- Type «regedit» (without the quotes) into the text field and click «OK» to open the Registry Editor.
- Backup your registry before making any changes.
- Navigate to the following registry keys:
- Delete any Norton Security-related entries in those registry keys.
Remember to exercise caution when making changes to the Windows Registry, as incorrect modifications can cause system instability. It’s always recommended to back up the registry or seek expert assistance if you’re unsure of the steps.
By following these steps, you should be able to completely uninstall Norton Security from your Windows 10 computer and ensure that no leftover files or registry entries are interfering with your system.
Turning off or uninstalling Norton Security on Windows 10 can be necessary in specific situations. However, it is important to remember that Norton Security provides essential protection against various threats, so it is recommended to have an antivirus program installed on your computer. If you decide to remove Norton Security, make sure to replace it with another reliable antivirus solution to keep your computer safe and secure.

Disabling Norton Security on Windows 10
If you need to temporarily disable Norton Security on your Windows 10 computer, follow these steps:
- Locate the Norton Security icon in the system tray and right-click on it.
- A context menu will appear. From there, select «Disable Auto-Protect.»
- A new dialog will pop up asking you to confirm the action. Click «Yes» to proceed.
To completely turn off Norton Security, you can follow these additional steps:
- Open the Norton Security application on your computer.
- In the main window, click on «Settings.»
- Under «Quick Controls,» toggle the switch to turn off «Real-time Protection.»
- Confirm the action when prompted, and Norton Security will be fully disabled.
Remember to enable Norton Security once you have completed the tasks that require it for your system’s protection.
Key Takeaways: How to Turn off Norton Security on Windows 10
- To turn off Norton Security on Windows 10, right-click on the Norton Security icon in the system tray and select «Disable Smart Firewall».
- If you want to temporarily turn off Norton Security on Windows 10, you can choose the «Disable Antivirus Auto-Protect» option from the right-click menu.
- If you plan to uninstall Norton Security completely from your Windows 10 computer, go to the Control Panel, select «Uninstall a program», and then click on Norton Security to initiate the uninstallation process.
- Another way to disable Norton Security on Windows 10 is to open the Norton Security application, go to the «Settings» menu, click on «Firewall», and toggle the switch to «Off» to disable the firewall.
- Remember
Frequently Asked Questions
Here are some commonly asked questions about turning off Norton Security on Windows 10:
1. Can I temporarily disable Norton Security on Windows 10?
Yes, you can temporarily disable Norton Security on Windows 10. To do this, right-click on the Norton Security icon in the system tray and select «Disable Auto-Protect.» This will disable real-time protection but still allow you to use other features of Norton Security. Remember to re-enable Auto-Protect when you are done.
Alternatively, you can also open the Norton Security application, go to the «Settings» menu, and toggle the switch next to «Real-Time Protection» to turn it off temporarily. Again, make sure to enable it later to ensure your computer is protected against threats.
2. How do I completely turn off Norton Security on Windows 10?
If you want to completely turn off Norton Security on Windows 10, open the Norton Security application and go to the «Settings» menu. From there, click on the «Firewall» tab and toggle the switch next to «Smart Firewall» to turn it off. This will disable the firewall feature of Norton Security.
To disable other features of Norton Security, such as Auto-Protect and Intrusion Prevention, go to the «Scans and Risks» tab in the settings menu. Toggle the switches next to each feature to turn them off. Keep in mind that by turning off these features, your computer will be more susceptible to threats.
3. Is it safe to turn off Norton Security on Windows 10?
While it is possible to turn off Norton Security on Windows 10, it is not recommended unless necessary. Norton Security provides valuable protection against malware, viruses, and other online threats. By turning it off, you are leaving your computer vulnerable to these threats.
If you need to turn off Norton Security temporarily, make sure to enable it as soon as possible to ensure your computer is protected. Only turn off Norton Security completely if you have another reliable antivirus program installed and active on your computer.
4. Can I schedule Norton Security to turn off at specific times on Windows 10?
Yes, you can schedule Norton Security to turn off at specific times on Windows 10. To do this, open the Norton Security application and go to the «Settings» menu. From there, click on the «Administrative Settings» tab and select «Idle Time Activity.» Here, you can set the duration of inactivity before Norton Security turns off.
Additionally, you can also schedule specific times for Norton Security to turn off and on. In the «Scheduling» section of the settings menu, you can specify the days and time range when you want Norton Security to be disabled. This can be useful if you have tasks that require Norton Security to be turned off temporarily.
5. How do I turn off Norton Security notifications on Windows 10?
If you find the Norton Security notifications on Windows 10 to be intrusive, you can customize them or turn them off completely. To do this, open the Norton Security application and go to the «Settings» menu. From there, click on the «Administrative Settings» tab and select «Notifications.»
In the «Notifications» section, you can choose to turn off all notifications or customize specific notification types. You can also adjust the level of detail for each notification. However, it is recommended to keep important notifications enabled to ensure you stay informed about potential threats and security issues.
In conclusion, turning off Norton Security on Windows 10 is a straightforward process that can be done in just a few steps. It is important to note that disabling your antivirus software should only be done temporarily and for specific reasons, such as troubleshooting compatibility issues or installing certain software.
To turn off Norton Security on Windows 10, you can either use the Norton Security application or disable it temporarily from the Windows Security Center. By following these steps, you can easily turn off Norton Security on Windows 10 and resume normal operations on your computer.
There are a few different ways to disable Norton Security on Windows 10. One way is to right-click on the Norton icon in the system tray and select «Disable.» Another way is to launch the Norton Security application and click on the «Settings» gear icon. From here, you can click on «General Settings» and then toggle the «Enable Norton Security» switch to «Off.«
Why can’t I turn off Norton?
How do I completely disable Norton 360?
If you want to disable Norton 360, you can do so by opening the Norton 360 window and clicking on the «Disable Norton 360» button. You can also disable Norton 360 by opening the Windows Control Panel and clicking on the «Add or Remove Programs» icon. Locate Norton 360 in the list of installed programs and click on the «Remove» button.
How do I stop Norton from blocking a program?
If you’re using Norton Internet Security, you can add the program to the Norton Internet Security exceptions list. To do this, follow these steps:
1. Open Norton Internet Security.
2. Click Settings.
3. In the Settings window, click Firewall.
4. In the Firewall settings window, click the Exceptions tab.
5. Click Add Program.
6. In the Add a Program window, browse to and select the program that you want to add to the exceptions list, and then click Open.
7. Click OK.
If you’re using Norton 360, you can add the program to the Norton 360 exceptions list. To do this, follow these steps:
1. Open Norton 360.
2. Click Settings.
3. In the Settings window, click Firewall.
4. In the Firewall settings window, click the Program Rules tab.
5. Click Add.
6. In the Add a Program window, browse to and select the program that you want to add to the exceptions list, and then click Open.
7. Click OK.
How do I turn off Norton firewall?
If you’re using Norton Internet Security, you can turn off the firewall by opening the Norton Internet Security window and clicking the «Turn Off» button next to the Firewall heading. If you’re using Norton 360, you can turn off the firewall by opening the Norton 360 window and clicking the «Settings» button. Then, click «Firewall» and select «Off» from the drop-down menu.
How do I turn on Windows Defender instead of Norton?
If you would like to use Windows Defender instead of Norton, you can follow the steps below:
1. Open Norton Security and click on «Settings«.
2. Go to «General» and click on «Product Settings«.
3. Click on «Turn Off«.
4. Restart your computer for the changes to take effect.
5. Once your computer has restarted, open Windows Defender by going to «Start» and then «All Programs«.
6. Click on «Turn Windows Defender on or off«.
7. Under «Real-time protection«, select the «Off» radio button and click «OK«.
8. Restart your computer for the changes to take effect.
How do I stop Norton from running in the background?
There are a few different ways to stop Norton from running in the background. One way is to go into the Norton settings and disable the «Start Norton automatically when I start my computer» setting. Another way is to add Norton to the list of programs that are allowed to run in the background in your computer’s Task Manager settings. Finally, you can also just uninstall Norton entirely.
How do I turn off Windows protection?
There are a few different ways to turn off Windows protection, depending on which version of Windows you are using.
If you are using Windows 10, you can go to the «Settings» app and click on «Update & Security«. From there, click on «Windows Security» and then click on «Virus & threat protection«. Under the «Virus & threat protection settings» section, click on the toggle switch next to «Real-time protection» to turn it off.
If you are using Windows 8, you can go to the «Control Panel» and click on «System and Security«. From there, click on «Security and Maintenance» and then click on «Change security and maintenance settings«. Under the «Security» section, there is a «Virus protection» section where you can click on the «Off» radio button to turn off Windows protection.
If you are using Windows 7, you can go to the «Control Panel» and click on «System and Security«. From there, click on «Security» and then click on «Turn off Windows Defender«.
How do I disable Norton on Chrome?
If you’re using Norton’s Chrome extension, you can disable it by following these steps:
1. Open Chrome and click the three dots in the top-right corner.
2. Click «More tools» and then «Extensions.«
3. Find the Norton extension and click the blue «Disable» button.
If you’re using Norton’s Safe Web extension, you can disable it by following these steps:
1. Open Chrome and click the three dots in the top-right corner.
2. Click «More tools» and then «Extensions.«
3. Find the Norton Safe Web extension and click the blue «Disable» button.
How do I unblock my Antivirus software?
There are a few different ways to unblock your antivirus software, depending on the program you are using. If you are using Windows Defender, you can unblock it by opening the Windows Defender Security Center and clicking on the «Allow an app or feature through Windows Defender Firewall» option in the left sidebar. If you are using a third-party antivirus program, you can usually unblock it by opening the program’s settings and looking for an option to allow or whitelist the program.
Does Norton have a Firewall?
Yes, Norton does have a firewall. You can find more information about it here: https://support.norton.com/sp/en/us/home/current/solutions/v60392881_EndUserProfile_en_us
How do I stop Norton from blocking my WIFI?
If Norton is blocking your WIFI, you can try the following steps:
1. Restart your computer and router. This can often resolve connectivity issues.
2. Check that the firewall is not blocking your WIFI. You can do this by going into the Norton settings and looking for the Firewall tab.
3. Add an exception for your WIFI in the Norton settings. This will allow Norton to recognize your WIFI and stop blocking it.
4. If you are still having trouble, you can contact Norton support for further assistance.
Do I need both Norton and Windows Defender?
If you have a Windows computer, you do not need to install Norton. Windows Defender comes pre-installed on all Windows computers and provides basic protection against viruses and malware. For more comprehensive protection, you can upgrade to Windows Defender Advanced Threat Protection.
Should I use Windows Defender or Norton?
There is no one-size-fits-all answer to this question, as the best security solution for your needs will depend on a number of factors. However, in general, Windows Defender is a good choice for basic protection, while Norton is a good choice for more advanced protection.
Why does Norton keep popping up?
There could be a few reasons why Norton keeps popping up. It could be that your Norton subscription has expired and you need to renew it. Or, it could be that Norton has detected a potential threat on your computer and is prompting you to take action. If you’re not sure why Norton is popping up, you can contact Norton support for help.
Temporarily turn off or permanently disable Norton to speed up your PC
Updated on April 17, 2020
Norton antivirus software protects your computer from various types of malware and other nefarious attacks intended to obtain your personal information or simply wreak havoc on your device. Occasionally it can be too protective and block programs that you actually do trust from performing their necessary duties. In those cases, you’ll want to turn off Norton at least temporarily.
Instructions in this article apply to Windows 10 and macOS 10.13 (High Sierra) and higher.
How to Disable Norton Antivirus in Windows
When you need to temporarily turn off Norton while you accomplish the tasks at hand, follow these steps.
Your PC is vulnerable while Auto-Protect is turned off, so be wary of what websites you visit or actions you take during this time period.
-
Right-click the Norton Security icon, located in the notification section of your Windows taskbar.
-
When the pop-up menu appears, select Disable Auto-Protect.
-
A Security Request dialog should now appear, overlaying your desktop and other active applications. Select the drop-down menu labeled Select the duration.
-
Choose the amount of time that you’d like Norton’s Auto-Protect functionality to remain off by selecting one of the following options: 15 minutes, 1 hour, 5 hours, Until system restart or Permanently.
If you’d like to completely disable Norton’s antivirus protection for an indeterminate period of time, select the Permanently option.
-
Select OK to turn off Norton protection for the specified duration.
-
If you’d like to re-enable Norton protection at any point prior to the time specified, repeat steps 1 and 2 above and select Enable Auto-Protect.
How to Disable Norton Firewall in Windows
In addition to turning off Norton’s antivirus protection, you may also want to disable its firewall as well. This could be useful if you’re using another firewall instead, such as the built-in Windows version, or if you have a need to allow all incoming and outgoing traffic to your PC for a specific amount of time.
Disabling your firewall could prove dangerous, so proceed with caution. To do so, simply follow the steps above, replacing Auto-Protect with Smart Firewall where applicable.
-
Start Norton.
-
Select Settings.
-
Select Firewall.
-
Under General Settings, in Smart Firewall, turn Off by toggling switch.
-
Select Apply.
-
You may get prompted for a duration, select the amount of time then select OK.
How to Disable Norton Antivirus in macOS
Disabling your antivirus protection could prove dangerous, so proceed with caution.
-
Select Norton Security, located in your macOS Dock. It appears as a yellow circle with a white interior and a black check mark in its foreground.
-
The Norton Security interface should now be displayed, overlaying your desktop.
-
Select Advanced.
-
Select Protect My Mac, located in the left menu, if it’s not already selected.
-
Ensure that Automatic Scans and Idle Scans options are disabled (gray).
Your Mac is vulnerable while these protection features are turned off, so be wary of what websites you visit or actions you take during this time period.
-
To re-enable Norton virus protection at any point, repeat these steps and turn both Automatic Scans and Idle Scans options back on by selecting their respective settings.
How to Disable Norton Firewall in macOS
Disabling your firewall could prove dangerous, so proceed with caution.
-
Select Norton Security, located in your macOS Dock. It appears as a yellow circle with a white interior and a black check mark in its foreground.
-
The Norton Security interface should now be displayed, overlaying your desktop.
-
Select Advanced.
-
Select Firewall, located in the left menu pane.
-
Toggle off (gray) the options for Connection Blocking and Vulnerability Protection.
-
To re-enable Norton’s firewall at any point, repeat these steps and turn both Automatic Scans and Idle Scans options back on by selecting their respective toggles.
Thanks for letting us know!
Get the Latest Tech News Delivered Every Day
Subscribe