
Способ 1: Настройки системы
В некоторых случаях может возникать необходимость отключения функции «Быстрого запуска» в Windows 10, например, с целью обхода многих ошибок. Наиболее простой способ выполнения данной задачи сводится к изменению отдельного системного параметра в глобальных настройках электропитания.
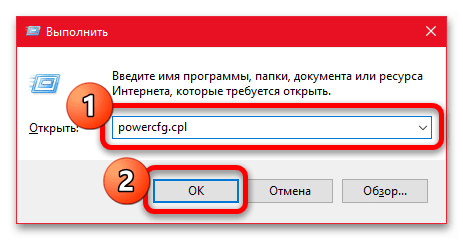
- Открыть раздел с параметрами электропитания можно многими способами, используя иконку батареи в трее на ноутбуках или соответствующие категории в «Параметрах» Windows 10. При этом мы рекомендуем воспользоваться более простым решением — нажать сочетание клавиш «WIN+R», ввести указанную ниже команду и подтвердить переход с помощью «Enter» или «ОК».
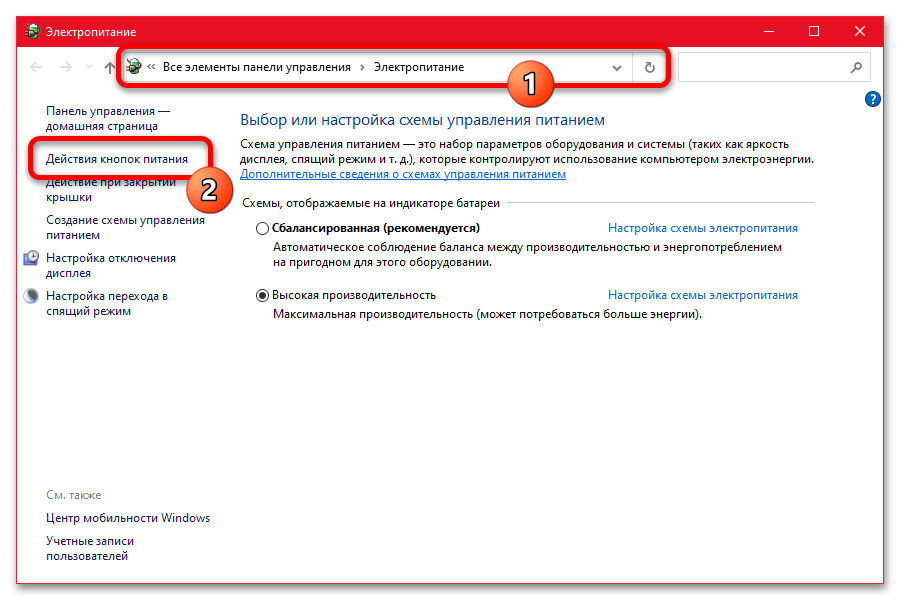
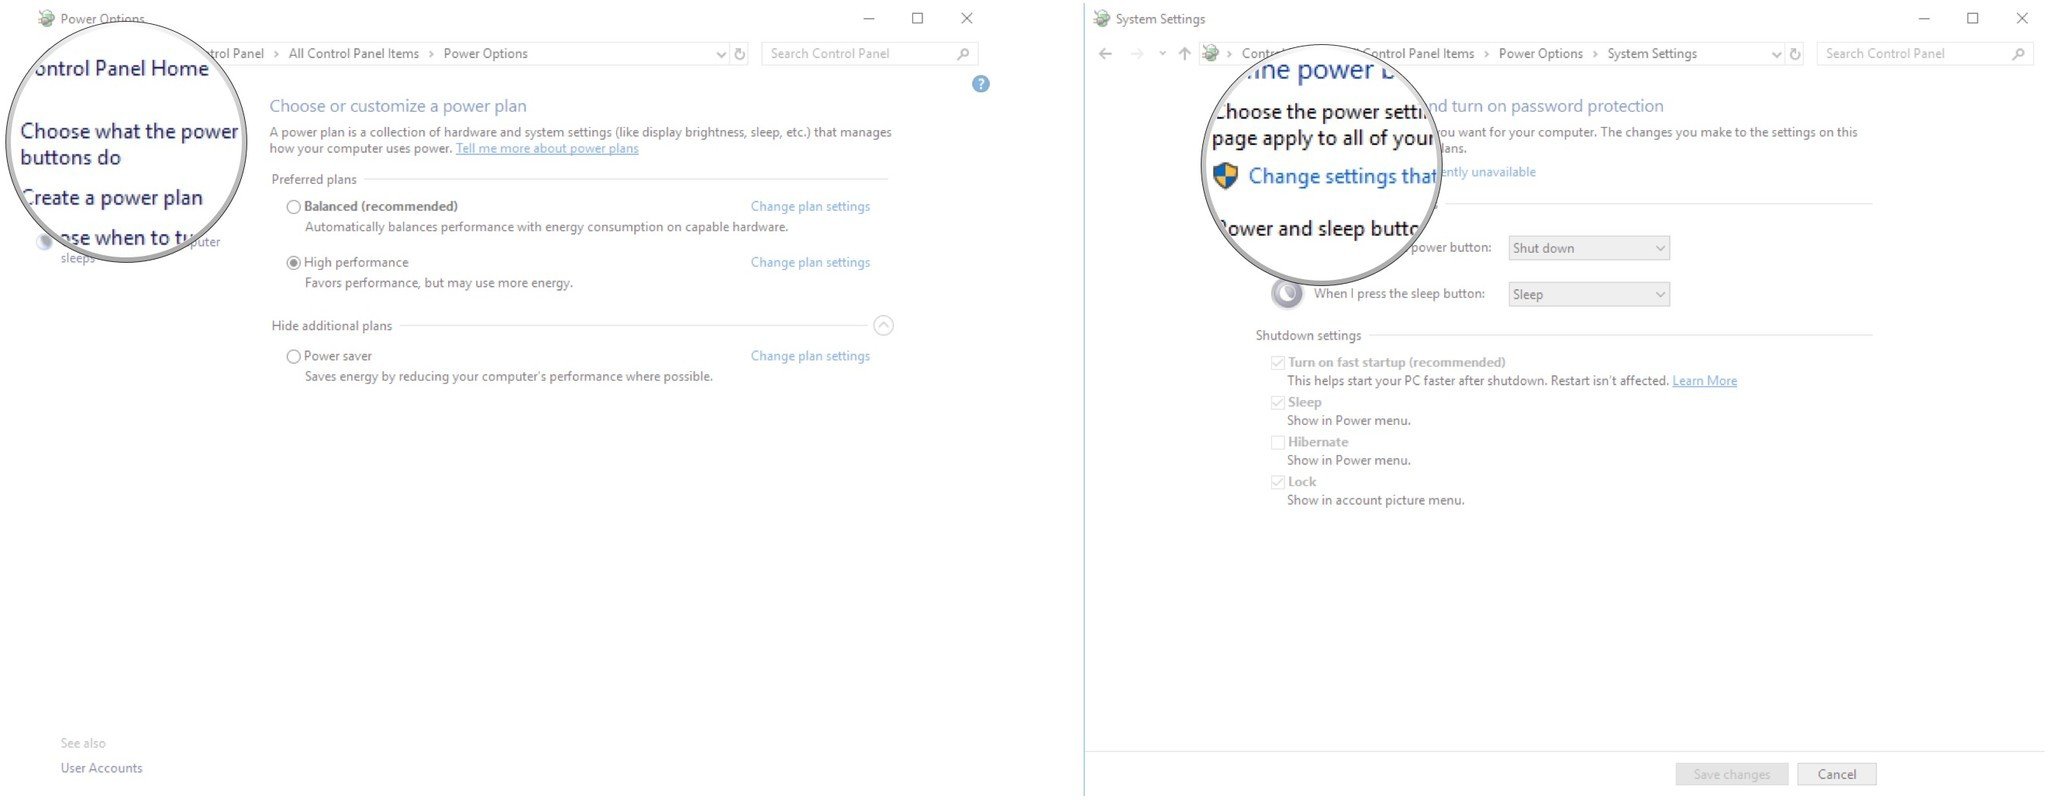
powercfg.cpl - При появлении окна «Электропитание» в левой колонке воспользуйтесь ссылкой «Действия кнопок питания». Здесь, в свою очередь, можно сразу найти нужный пункт настроек в категории «Параметры завершения работы».
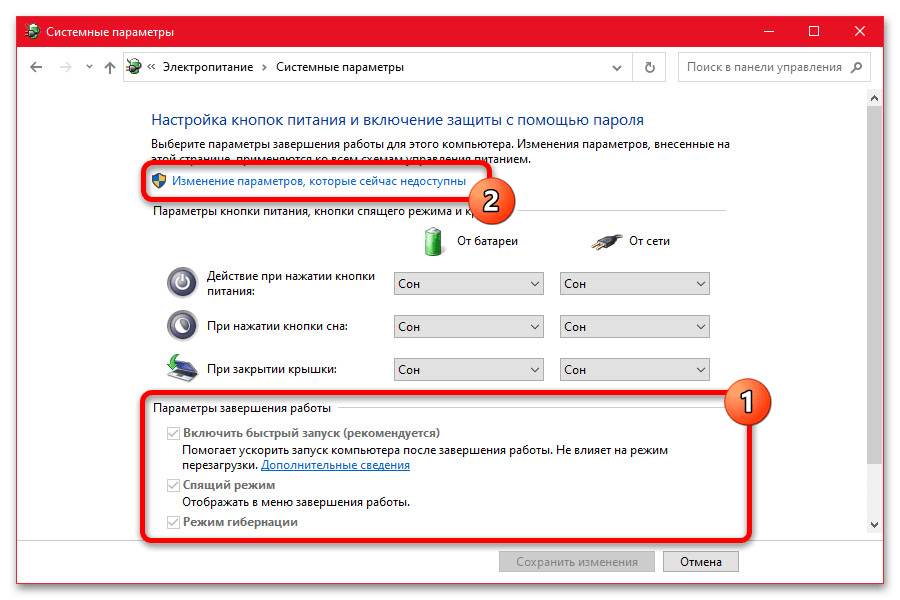
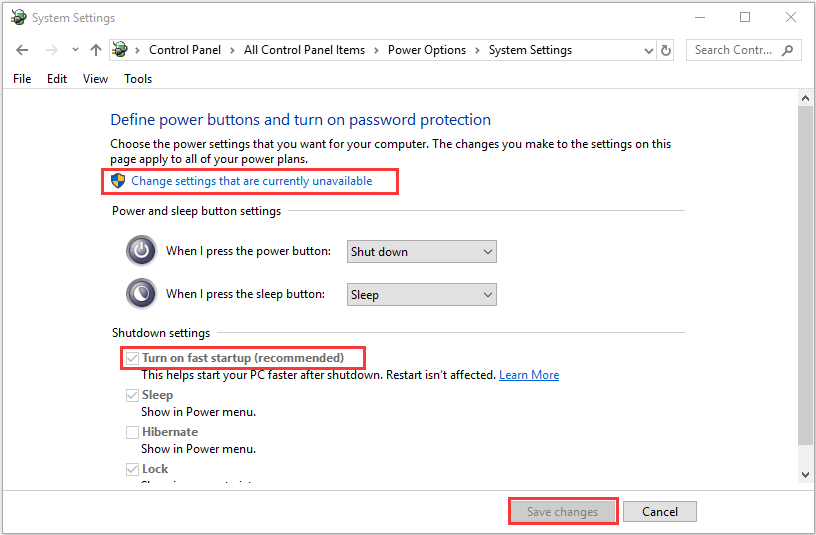
- Как правило, ни одна опция в отмеченном разделе по умолчанию недоступна для изменения из-за особенностей системы. Чтобы это исправить, достаточно будет воспользоваться ссылкой «Изменение параметров, которые сейчас недоступны» в блоке «Настройки кнопок питания и включение защиты с помощью пароля».
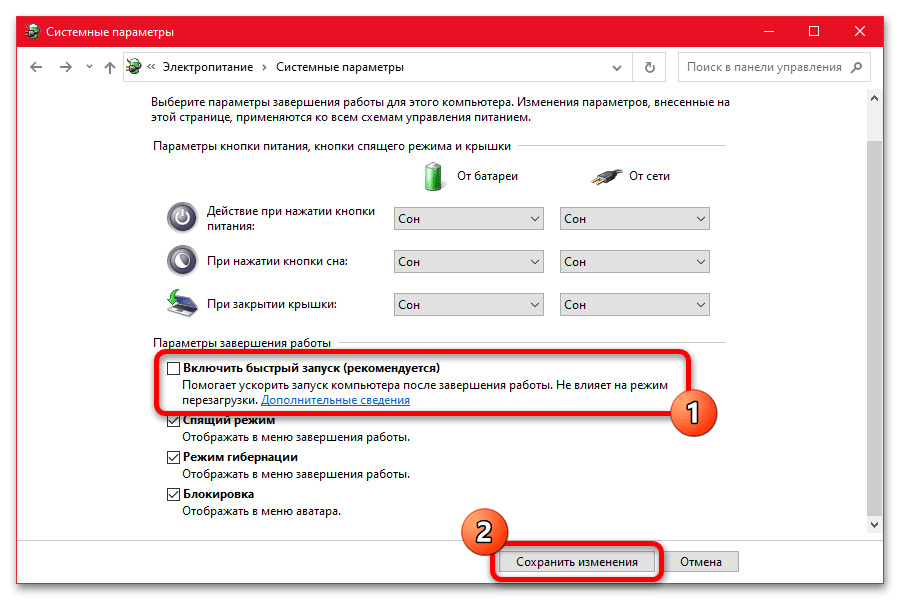
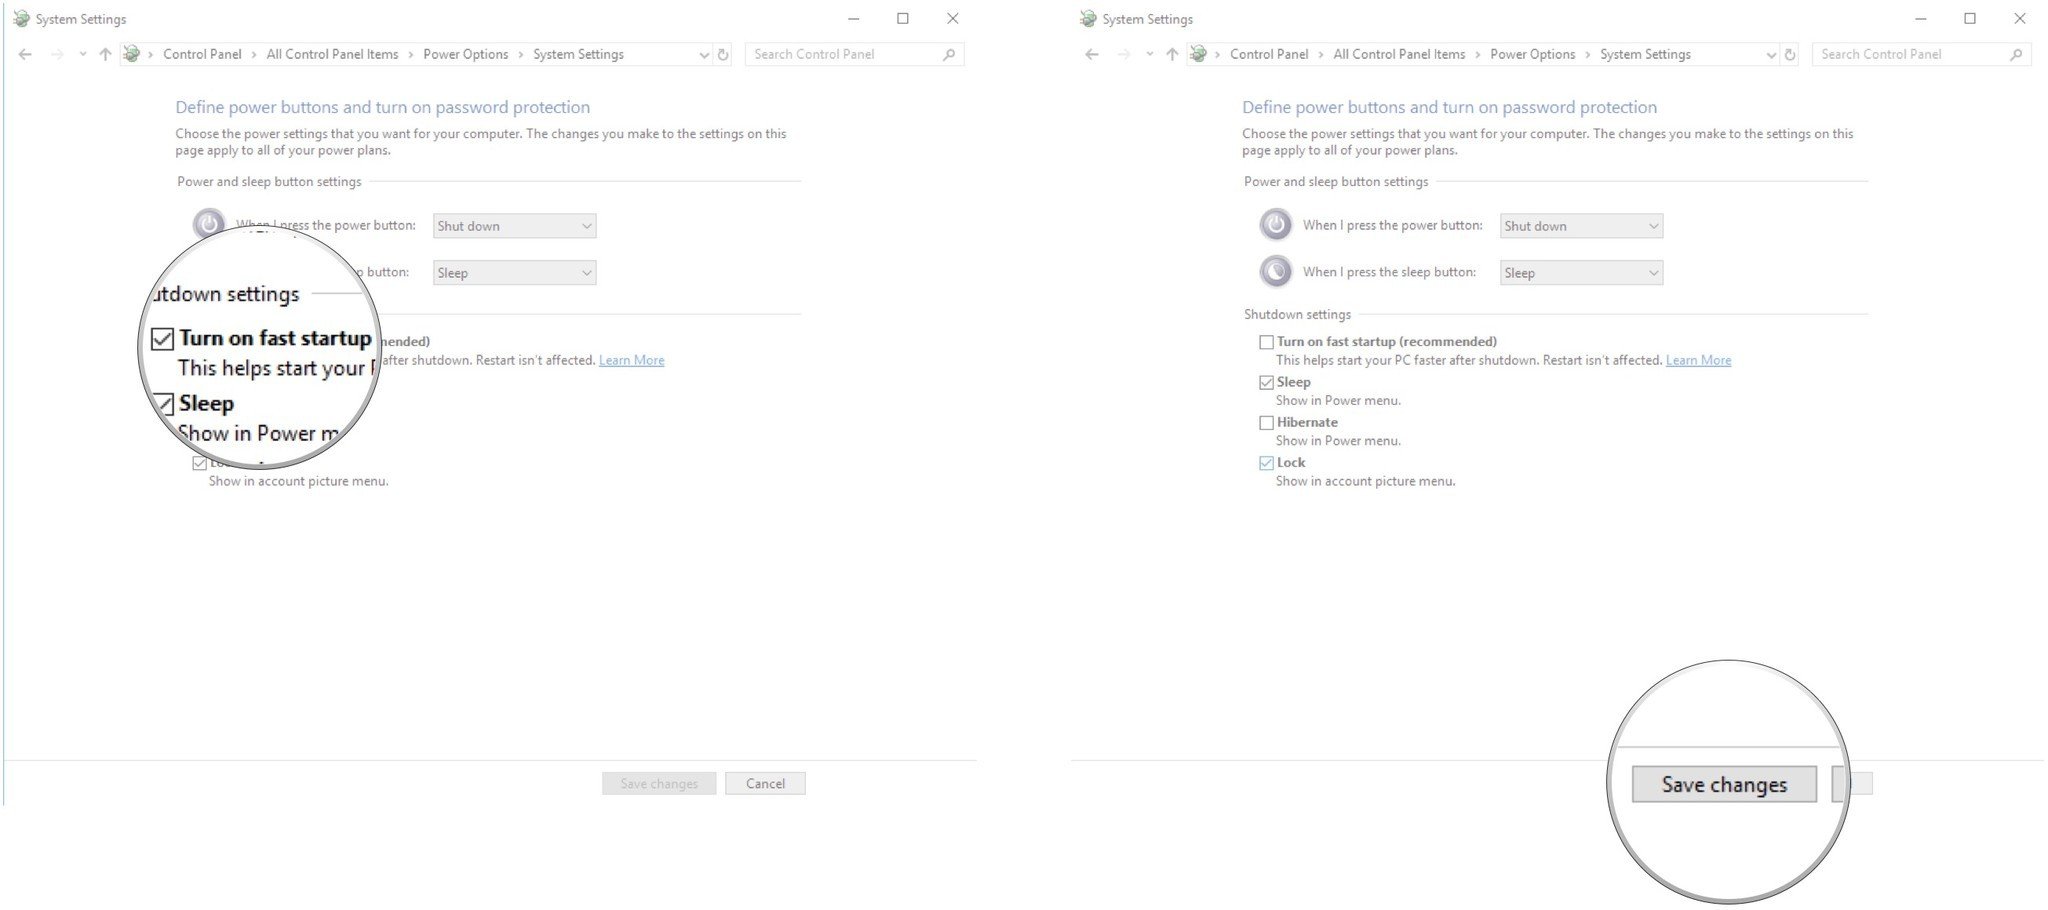
- Разобравшись с разблокировкой дополнительных возможностей, снимите галочку «Включить быстрый запуск», чтобы деактивировать функцию. После этого обязательно воспользуйтесь кнопкой «Сохранить изменения», чтобы новые параметры моментально вступили в силу.
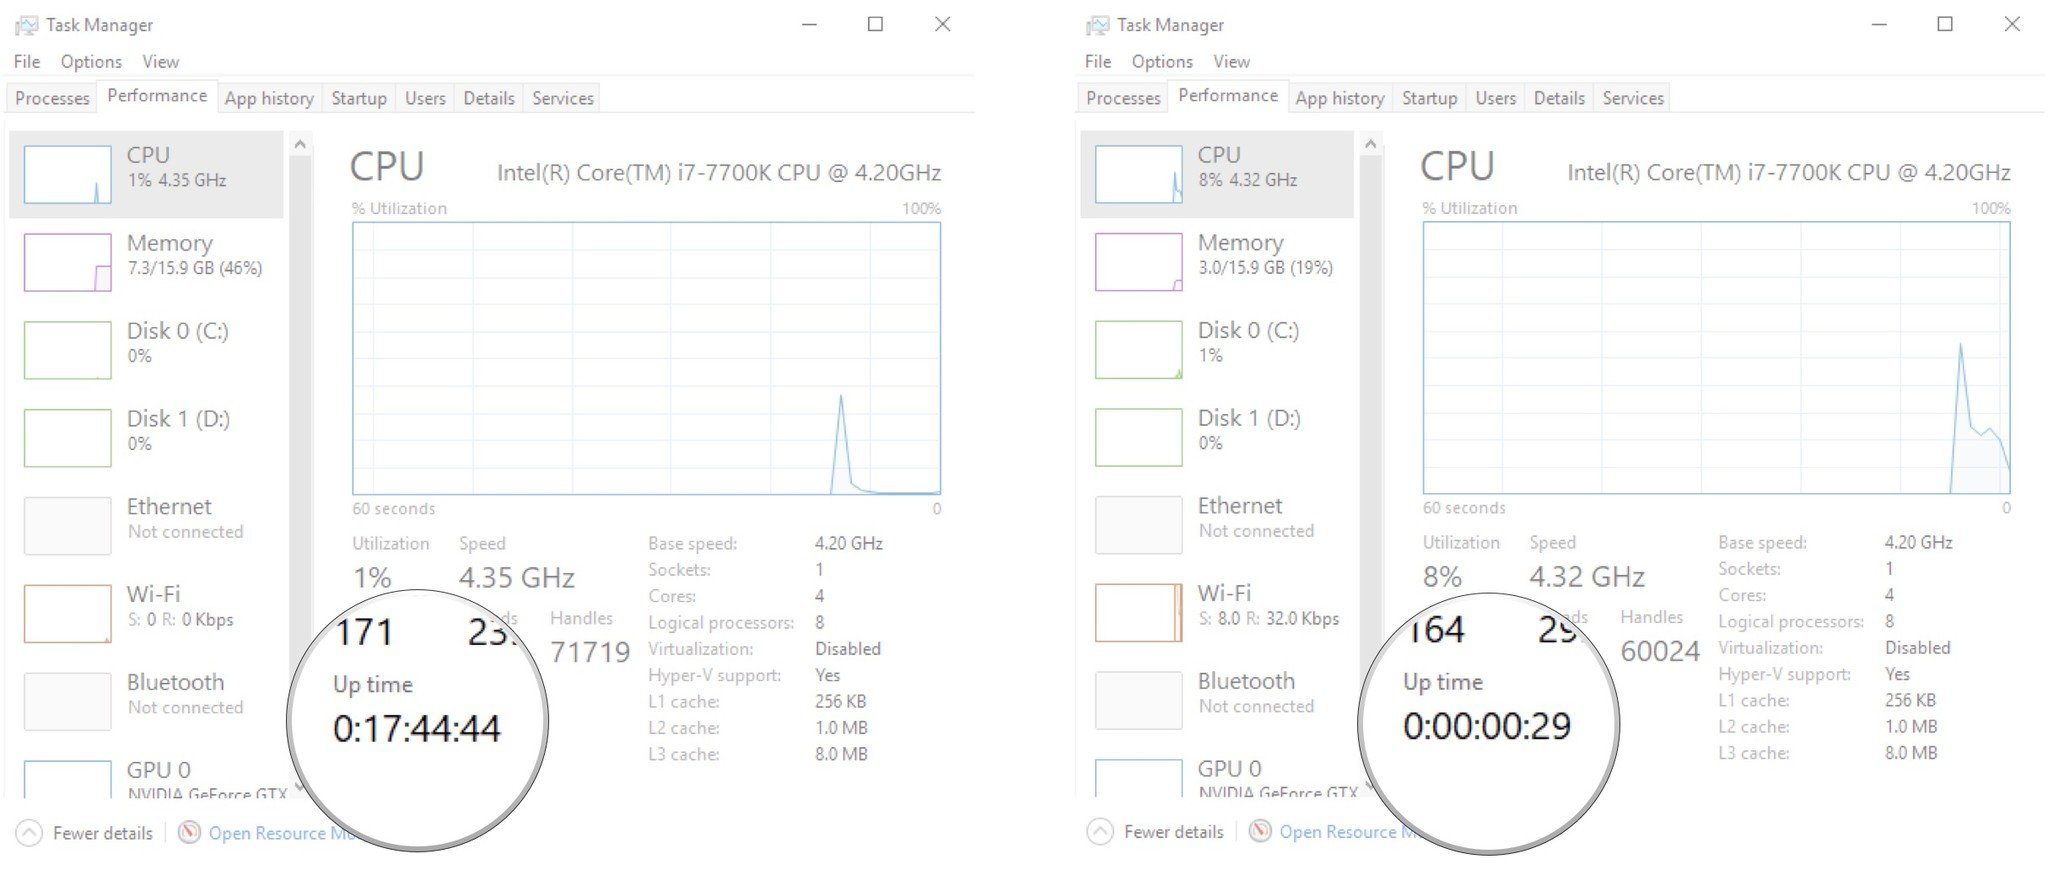
Если все было сделано четко по инструкции, быстрый запуск будет деактивирован. Для проверки можете перезапустить компьютер, открыть вкладку «Производительность» в «Диспетчере задач» и ознакомиться с данными «Времени работы», которые теперь обновляются при каждом выключении системы.
Способ 2: Изменение реестра
Единственным альтернативным решением, если у вас по каким-то причинам не получается отредактировать настройки через графический интерфейс Windows 10, является параметр в реестре. При этом изменения, как и ранее, применяются моментально сразу после сохранения нового значения.
Читайте также: Как открыть «Редактор реестра» в Windows 10
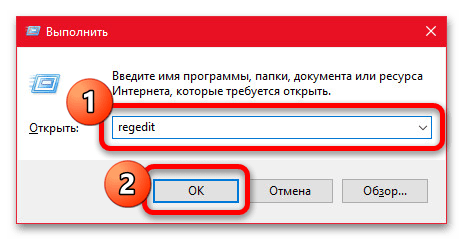
- Для открытия редактора реестра можно воспользоваться соответствующим значком в меню «Пуск» или нажать «WIN+R» и ввести указанную ниже команду. Какой бы из способов вы не выбрали, должно открыться новое окно с говорящим заголовком.
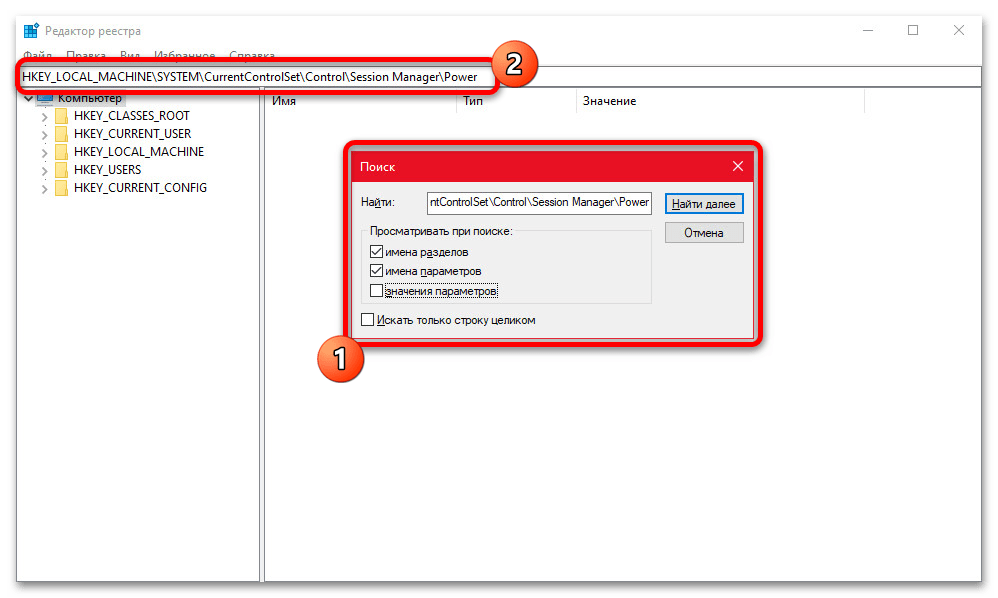
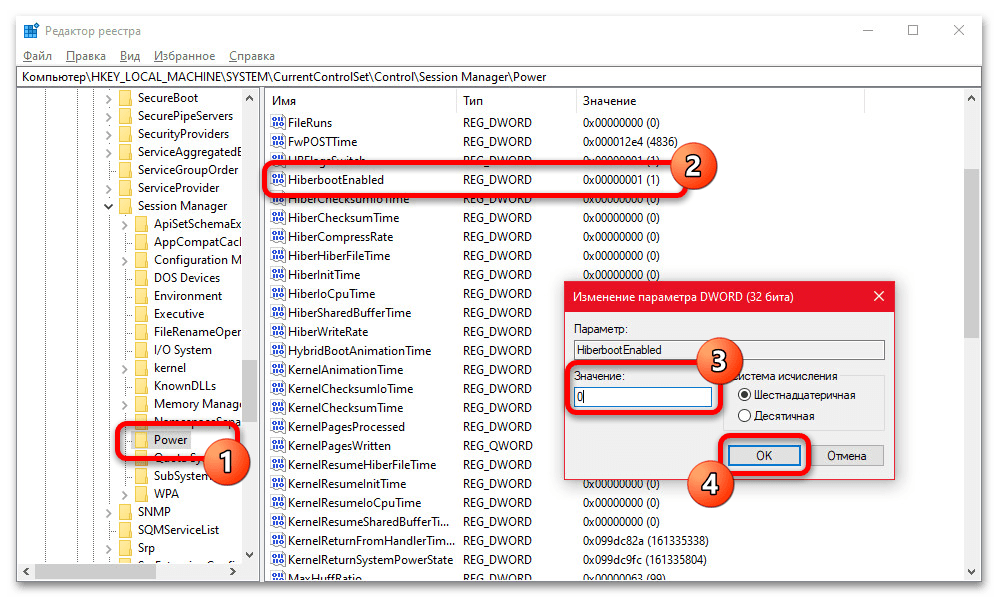
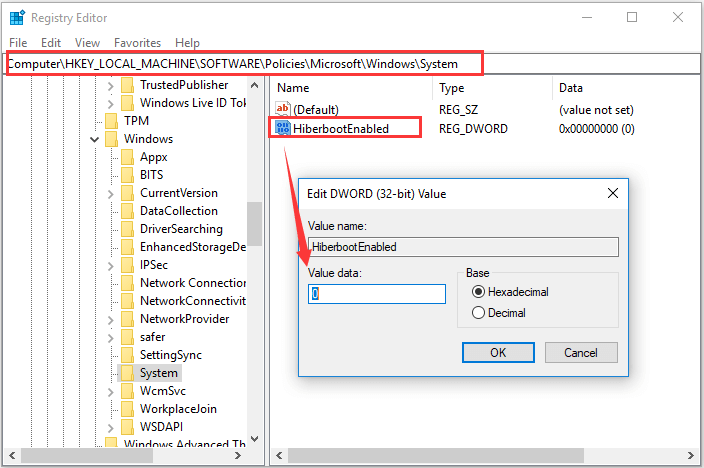
regedit - Из всех записей реестра необходимо изменить один единственный параметр, расположенный в категории «Power» по указанному ниже пути. Для удобства можете использовать встроенный поиск, доступный при нажатии «CTRL+F», или ввести полный адрес в отмеченное нами поле и нажать «ENTER».
HKEY_LOCAL_MACHINE\SYSTEM\CurrentControlSet\Control\Session Manager\Power - В правой части рабочего окна редактора реестра найдите параметр «HiberbootEnabled», дважды кликните левой кнопкой мыши для изменения и в качестве значения установите «0». После нажатия кнопки «ОК» новые настройки вступят в силу и отразятся на следующем запуске.
С целью проверки, как и ранее, можете произвести полный перезапуск системы с использованием пункта «Завершение работы». При этом на компьютерах с жестким диском частичным показателем может также стать время включения, которое без быстрого запуска значительно увеличивается.
Наша группа в TelegramПолезные советы и помощь
В этой инструкции подробно о том, как отключить быстрый запуск Windows 10 или включить его. Быстрый запуск, быстрая загрузка или гибридная загрузка — технология, включенная в Windows 10 по умолчанию и позволяет вашему компьютеру или ноутбуку быстрее загрузиться в операционную систему после выключения (но не после перезагрузки).
Технология быстрой загрузки опирается на гибернацию: при включенной функции быстрого запуска, система при выключении сохраняет ядро Windows 10 и загруженные драйверы в файл гибернации hiberfil.sys, а при включении снова загружает его в память, т.е. процесс похож на выход из состояния гибернации.
Как отключить быстрый запуск Windows 10
Чаще пользователи ищут, как выключить быстрый запуск (быструю загрузку). Связано это с тем, что в некоторых случаях (часто причиной являются драйвера, особенно на ноутбуках) при включенной функции, выключение или включение компьютера происходит неправильно.
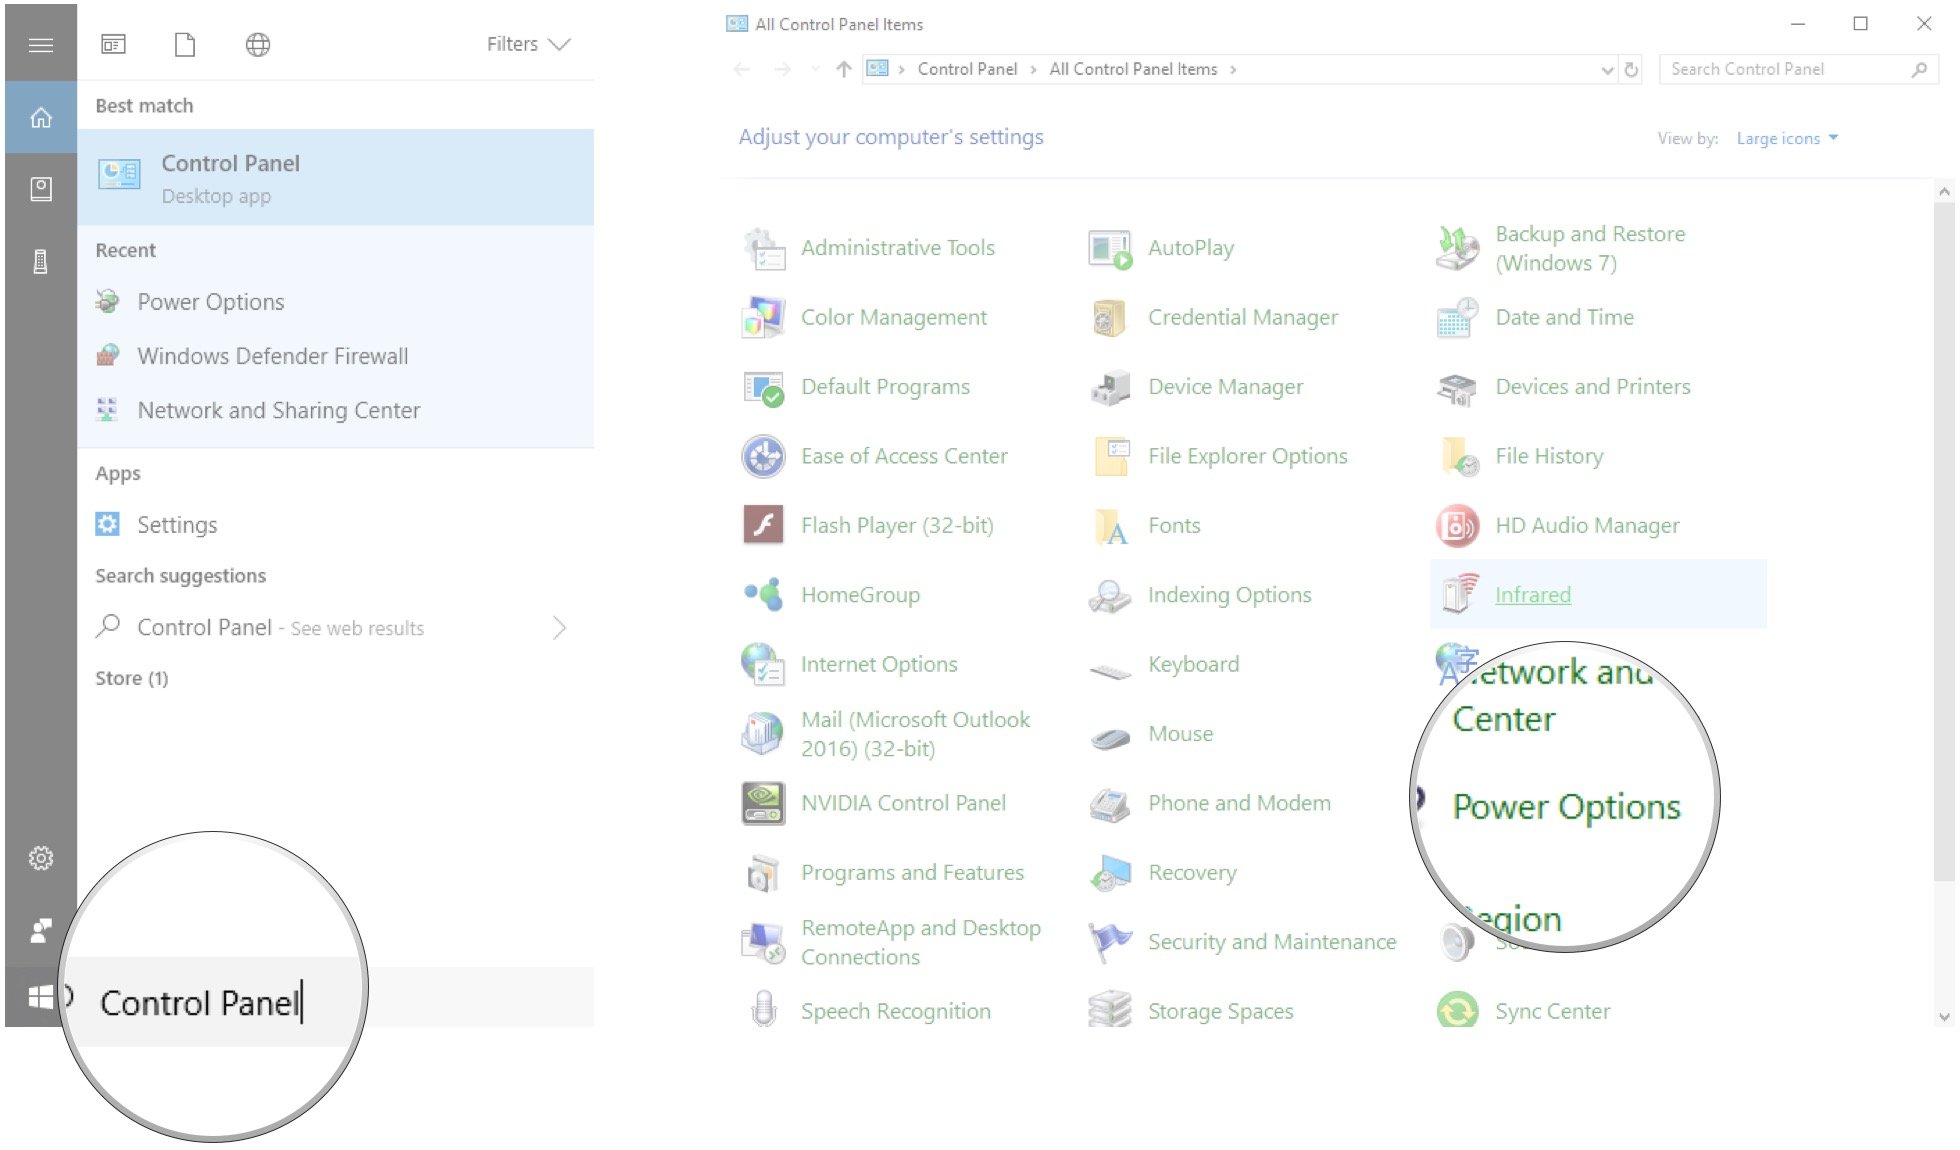
- Для отключения быстрой загрузки, зайдите в панель управления Windows 10 (через правый клик по пуску), после чего откройте пункт «Электропитание» (если его нет, в поле просмотр справа вверху поставьте «Значки» вместо «Категории».

- В окне параметров электропитания слева выберите пункт «Действия кнопок питания».

- В открывшемся окне нажмите по «Изменение параметров, которые сейчас недоступны» (вы должны быть администратором для того, чтобы их изменить).

- Затем, внизу этого же окна, снимите отметку с «Включить быстрый запуск».
- Сохраните изменения.


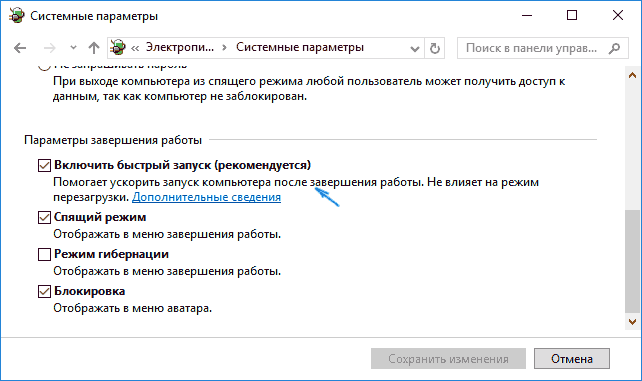
Готово, быстрый запуск отключен.
Если вы не пользуетесь ни быстрой загрузкой Windows 10 ни функциями гибернации, то вы также можете отключить гибернацию (это действие само по себе отключает и быстрый запуск). Тем самым, можно высвободить дополнительное место на жестком диске, подробнее об этом в инструкции Гибернация Windows 10.
Кроме описанного способа отключения быстрого запуска через панель управления, этот же параметр можно изменить через редактор реестра Windows 10. За него отвечает значение HiberbootEnabled в разделе реестра
HKEY_LOCAL_MACHINE\SYSTEM\CurrentControlSet\Control\Session Manager\Power
(если значение равно 0, быстрая загрузка отключена, если 1 — включена).
Как отключить быстрый запуск Windows 10 — видео инструкция
Как включить быстрый запуск
Если вам, наоборот, требуется включить быстрый запуск Windows 10, вы можете сделать это тем же образом, что и выключение (как описано выше, через панель управления или редактор реестра). Однако, в некоторых случаях может оказаться так, что опция отсутствует или недоступна для изменения.

Обычно это означает, что ранее была выключена гибернация Windows 10, а для работы быстрой загрузки, ее требуется включить. Сделать это можно в командной строке, запущенной от имени администратора с помощью команды: powercfg /hibernate on (или powercfg -h on) с последующим нажатием Enter.
После этого вновь зайдите в параметры электропитания, как это было описано ранее, чтобы включить быстрый запуск. Если вы не пользуетесь гибернацией как таковой, но вам требуется быстрая загрузка, в упоминавшейся выше статье про гибернацию Windows 10 описан способ уменьшить файл гибернации hiberfil.sys при таком сценарии использования.
Если что-то, имеющее отношение к быстрому запуску Windows 10 осталось непонятным, задавайте вопросы в комментариях, я постараюсь ответить.
Fast startup is a feature first implemented in Windows 8 as Fast Boot and carried over to Windows 10 that allows your PC to start up more quickly, hence its name. While this handy feature can shave valuable seconds from your PC’s boot time by saving the operating system’s state to a hibernation file, Fast startup may not always work perfectly, prompting many to disable it when they get their hands on a new PC.
Let’s take a look at exactly how fast startup works, why you might want to enable or disable it, and how to do so.
What is fast startup?
Windows PCs typically operate in a number of Advanced Configuration and Power Interface (ACPI) power states. An S0 power state, for example, is when your PC is running and ready to respond to your input. There are a number of sleep states, including S1, S2, and S3, and there’s also a hybrid sleep state where hibernation is used in tandem with a sleep state.
Hibernation is considered an S4 power state. While hibernating, your PC will seem like it’s completely off, but there will be a saved hibernation file ready to be used to boot back to where you were during your last user session. Some power is usually still routed to peripherals so that you can, say, tap your keyboard and have the PC boot.
An S5 power state (soft off) is when your PC is shut down and rebooted completely. There’s no hibernation file and no saved user session. There is also a G3 power state, which is when your PC consumes absolutely no power and is completely turned off.
With fast startup enabled, choosing to shut down your PC might look like you’re completely shutting things down, but in reality, your PC is entering a mix between a shutdown and hibernation. A hibernation file is indeed used, although it is smaller than usual. Why? You’re logged off before the file is created, meaning your session is not recorded. The speed boost comes from the Windows kernel being saved on your hard drive and loaded when booting.
Is your PC truly shutting down?
While fast startup is a pretty harmless tool that can deliver a considerable startup speed boost, especially to PCs using hard-disk drives (HDD), some people prefer to have their PC truly shut down when they click the «Shut down» button on their PC.
All the latest news, reviews, and guides for Windows and Xbox diehards.
In a post on the PC Master Race subreddit, a user pointed out that fast startup was re-enabled in a Windows 10 update following the release of the Fall Creators Update. Following the April 2018 Windows 10 update, Fast Startup was again re-enabled on my own PC, and it seems to have kicked in again following the May 2019 Update.
If you’re among the group of people who disable fast startup on their Windows 10 PC, you might want to recheck the settings to see if it’s still off.
Why disable fast startup?
Leaving fast startup enabled shouldn’t harm anything on your PC — it’s a feature built into Windows — but there are a few reasons why you might want to nevertheless disable it.
One of the major reasons is if you’re using Wake-on-LAN, which will likely have problems when your PC is shut down with fast startup enabled. Others would like to save the hard drive space that is usually taken up with the hibernation file, and Linux users will likely see complications with dual boot and virtualization. Furthermore, some users have even reported that power buttons on their keyboard will not work and fans in their PCs will continue spinning. These problems are by no means across the board, but they can prove to be frustrating. Finally, Windows 10 updates might not install properly if you have fast startup enabled.
And by not fully shutting down the system, fast startup can also interfere with some system updates that require a full shutdown. If you have fast startup enabled, a potential workaround would be to apply the updates by restarting, rather than shutting down, the system.
Your reason for disabling fast startup might simply have to do with wanting to see your PC truly shut down when you choose to shut down, especially when working with a speedy solid-state drive (SSD), or to have the processor (CPU) uptime reset after booting.
How to enable and disable fast startup on Windows 10
If you’d like to see how your PC performs without fast startup enabled, you can disable it in just a few steps:
- Right-click the Start button.
- Click Search.

- Type Control Panel and hit Enter on your keyboard.
- Click Power Options.
- Click Choose what the power buttons do.
- Click Change settings that are currently unavailable.
- Click Turn on fast startup (recommended) so that the checkmark disappears.
- Click Save changes.
If you want to re-enable fast startup at any point, simply repeat the steps so a checkmark appears next to Turn on fast startup.
Changing the size of your hiberation file
Alternatively, if you’re more concerned with device storage and not how fast startup may impact your laptop’s performance, you can also change the size of the stored hibernation file. Typically, these files can expand to several gigabytes, and you can reclaim this storage by typing in a simple command prompt by limiting how much space is allocated to the file.
By default, the hibernation file size will vary from system to system, but it is configured to take up to 75% of the installed RAM of your system.
To change the hibernation file’s storage size to about half of that, you’ll want to enter the Command Prompt menu as an Admin by hitting the Windows+X keys.
Once the Command Prompt dialogue appears, type: powercfg /h /type reduced
That will give you a reduced hibernation file size. If you want to reverse your action, you can type powercfg /h /type full
Cale Hunt brings to Windows Central more than eight years of experience writing about laptops, PCs, accessories, games, and beyond. If it runs Windows or in some way complements the hardware, there’s a good chance he knows about it, has written about it, or is already busy testing it.
-
Home
-
Partition Manager
- Can’t Disable Fast Startup Windows 10? Try These Solutions
By Amanda |
Last Updated
Recently, some Windows 10 users report that they have some problems with disabling fast startup. If you are one of them, don’t miss this post where MiniTool displays 4 methods to help you disable fast startup Windows 10.
Fast startup is a feature that helps start your computer faster after shutdown. Some users would like to enable this feature for faster boot, but some problems occur when they want to disable it.
According to the reports from users, this feature will be re-enabled automatically with a new Windows update, even if they have disabled it before. Even worse, the fast startup feature gets missing in the Shutdown settings and thus users cannot enable or disable the feature in Windows 10.
If you can’t disable fast startup windows 10 or the feature is missing, you can try the following methods. Let’s dive in.
Solution 1: Edit Local Group Policy
You can configure the Local Group Policy Editor to manage the fast startup feature. But note that this utility only available in Windows 10 Pro and Enterprise versions). To disable fast boot Windows 10, just follow the steps below:
Step 1: Press Windows + R to open Run window.
Step 2: Input gpedit.msc in the empty box and click OK to open Local Group Policy Editor.
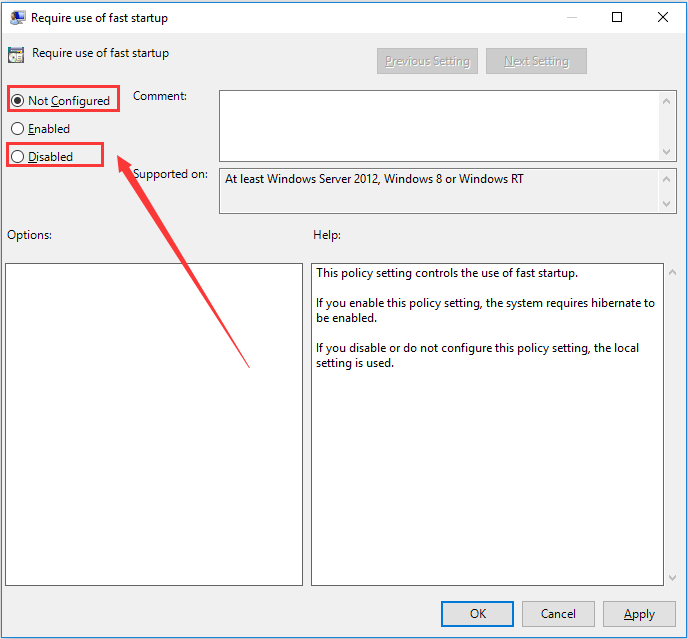
Step 3: Go to the following path: Computer Configuration > Administrative Templates > System > Shutdown.
Step 4: In the right pane, double-click Require use of fast startup to edit the setting.
Step 5: In the pop-up window, choose Not Configured or disabled to make the fast startup feature available in local settings. Click Apply and OK to save the change.
Once it’s done, you can open Control Panel and go to disable fast startup again. Just navigate to System and Security > Power Options > Choose what power buttons do. Click Change settings that are currently unavailable, uncheck Turn on fast startup option and hit Save changes.
Solution 2: Make Sure Hibernation Is Enabled
As you can see in last part, if the Require use of fast startup policy setting is enabled, the system will require hibernate to be enabled. In this case, you might need to check whether hibernation is enabled if you want to manage the fast startup feature in the local settings.
To make sure hibernation is enabled, you can simply run Command Prompt as administrator, input the command powercfg.exe /hibernate on and press Enter to execute it. After that, you can go to Shutdown settings to disable fast startup feature now with the steps mentioned in the previous contents.
Solution 3: Disable Fast Startup Using Registry Editor
In addition, you can also disable fast start by edit Windows Registry, but you are recommended to back up the current registry before making any changes. The detailed steps are provided below:
Step 1: Invoke Run dialog, input regedit and press Enter to open Registry Editor.
Step 2: Copy and paste the following path to the address bar and press Enter key: ComputerHKEY_LOCAL_MACHINESOFTWAREPoliciesMicrosoftWindowsSystem
Step 3: Right-click the System folder and choose New > DWORD (32-bit) Value and name it HiberbootEnabled.
Step 4: Double-click the DWORD and set its Value data to 0. Click OK button to save the change.
Solution 4: Run SFC Scan
If some system files get corrupted, some power settings like fast startup might also become unavailable. So, it is worthwhile to run SFC scan to repair your system files.
To do that, you need to open Command Prompt as administrator and execute sfc /scannow command. After the process is completed, restart your computer and try disabling fast startup feature again. If sfc scannow doesn’t work, you can try running DISM command and disabling the feature again:
- DISM /online /Cleanup-Image / ScanHealth
- DISM /Online /Cleanup-Image /RestoreHealth
About The Author
Position: Columnist
Amanda has been working as English editor for the MiniTool team since she was graduated from university. She enjoys sharing effective solutions and her own experience to help readers fix various issues with computers, dedicated to make their tech life easier and more enjoyable.
Amanda has published many articles, covering fields of data recovery, partition management, disk backup, and etc. In order to provide more useful tips and information, she is still committed to expand her technical knowledge.
FAQ
[Windows 11/10] Как отключить Fast Startup (Быстрый Запуск) в Windows
Применимые продукты: ноутбук, настольный компьютер, моноблок, игровой портативный компьютер, материнская плата, видеокарта, LCD монитор, мини-ПК.
Быстрый Запуск — это функция, предназначенная для ускорения процесса загрузки систем Windows после завершения работы. По умолчанию на устройствах Windows включен Быстрый Запуск. При выключении устройства Windows сохраняют некоторые системные данные на диске. После перезагрузки система использует эти сохраненные данные для возобновления работы устройства, а не для полной перезагрузки, тем самым увеличивая скорость загрузки системы. В каком-то смысле он работает аналогично спящему режиму.
Благодаря Быстрому Запуску (Fast Startup) устройства не отключаются полностью, что приводит к небольшому расходу заряда аккумулятора. Это считается нормальным. Если Вы хотите отключить Быстрый Запуск, выполните следующие действия.
Пожалуйста, перейдите к соответствующей инструкции в зависимости от текущей операционной системы Windows на Вашем устройстве:
Операционная система Windows 11
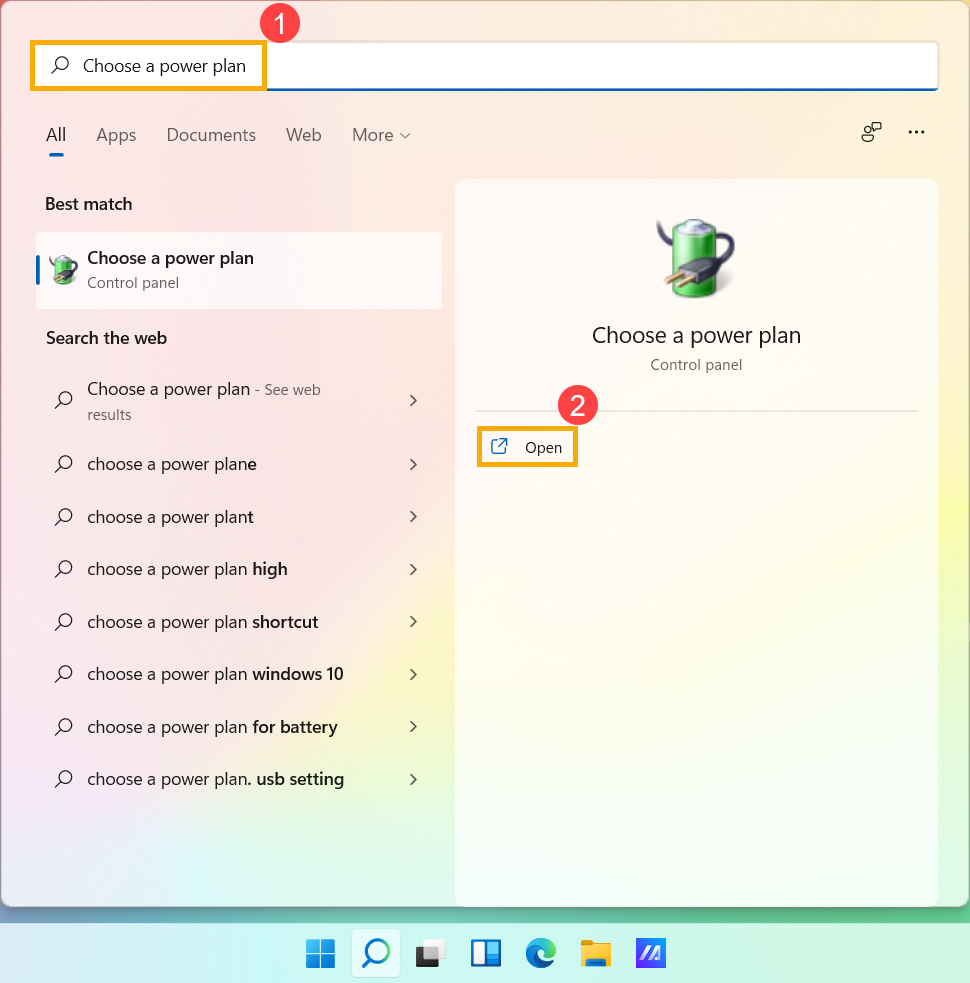
- Введите и найдите [Выбрать схему электропитания] в строке поиска Windows ① , а затем нажмите [Открыть] ②.

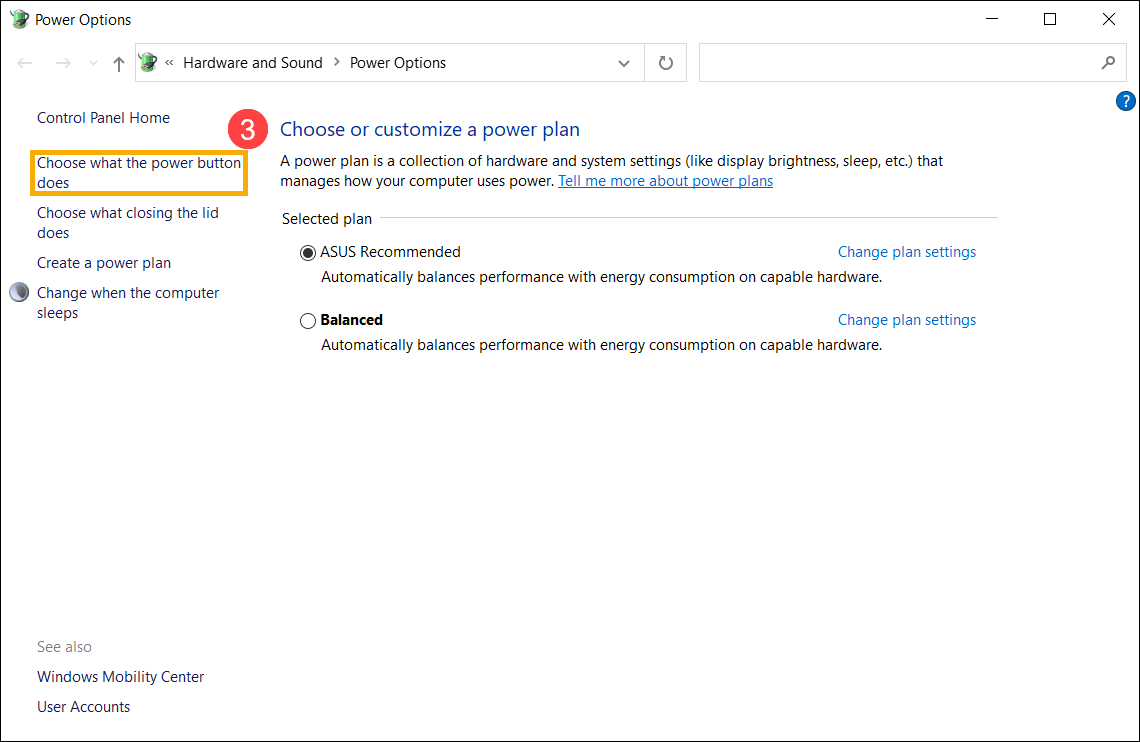
- Нажмите [Выберите действие кнопки питания] ③.
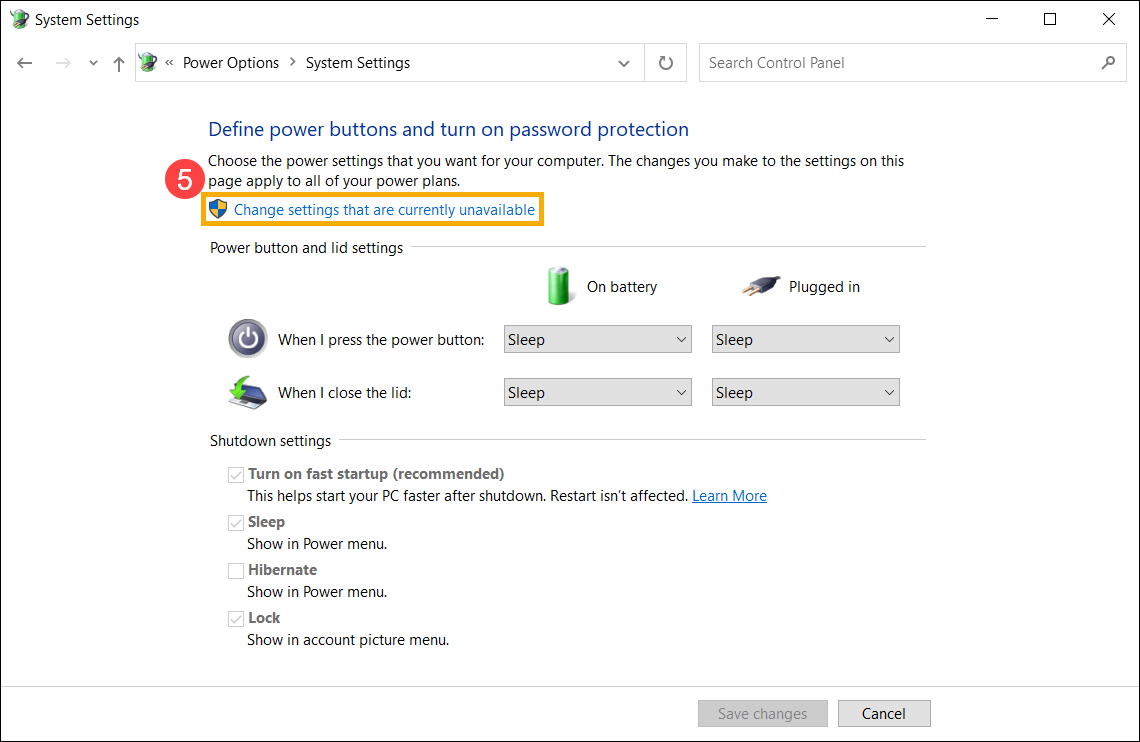
- Если опция Быстрого Запуска в настройках выключения неактивна, нажмите [Изменить настройки, которые в данный момент недоступны] ④.
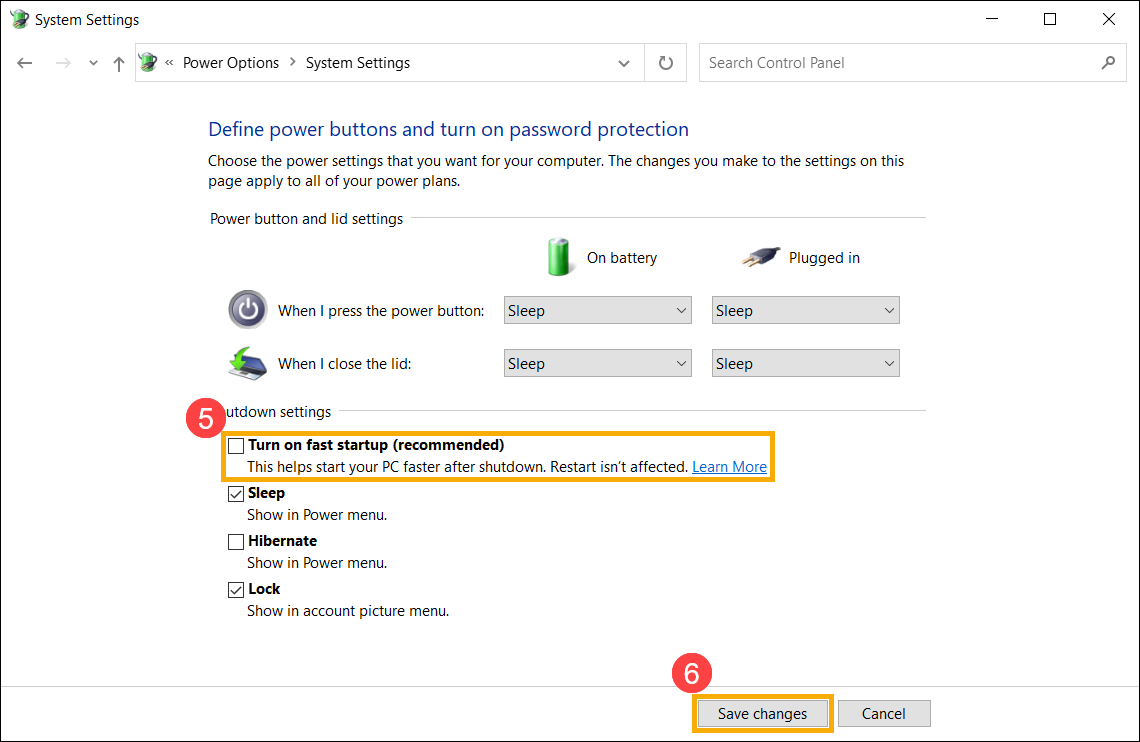
- Снимите флажок [Включить быстрый запуск] ⑤, а затем нажмите [Сохранить изменения] ⑥, Ваше устройство отключит функцию Быстрого Запуска в Windows.

Операционная система Windows 10
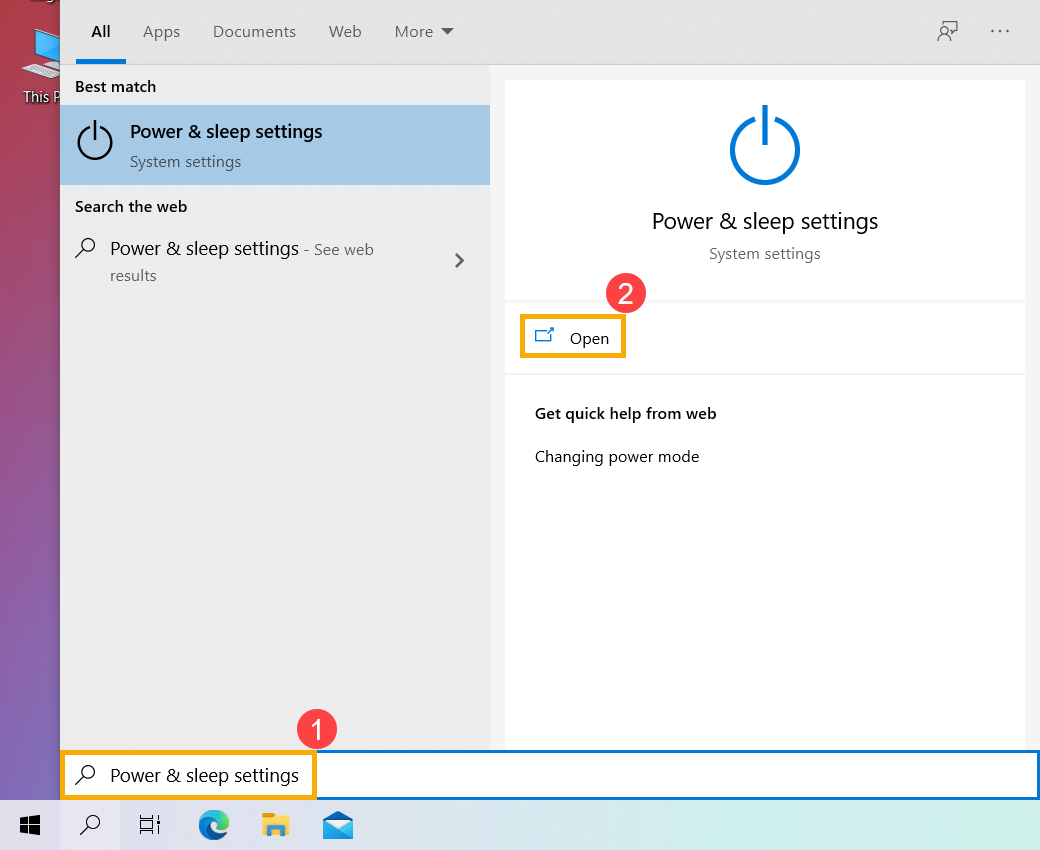
- Введите и найдите [Настройки питания и сна] в строке поиска Windows ① , а затем нажмите [Открыть] ②.
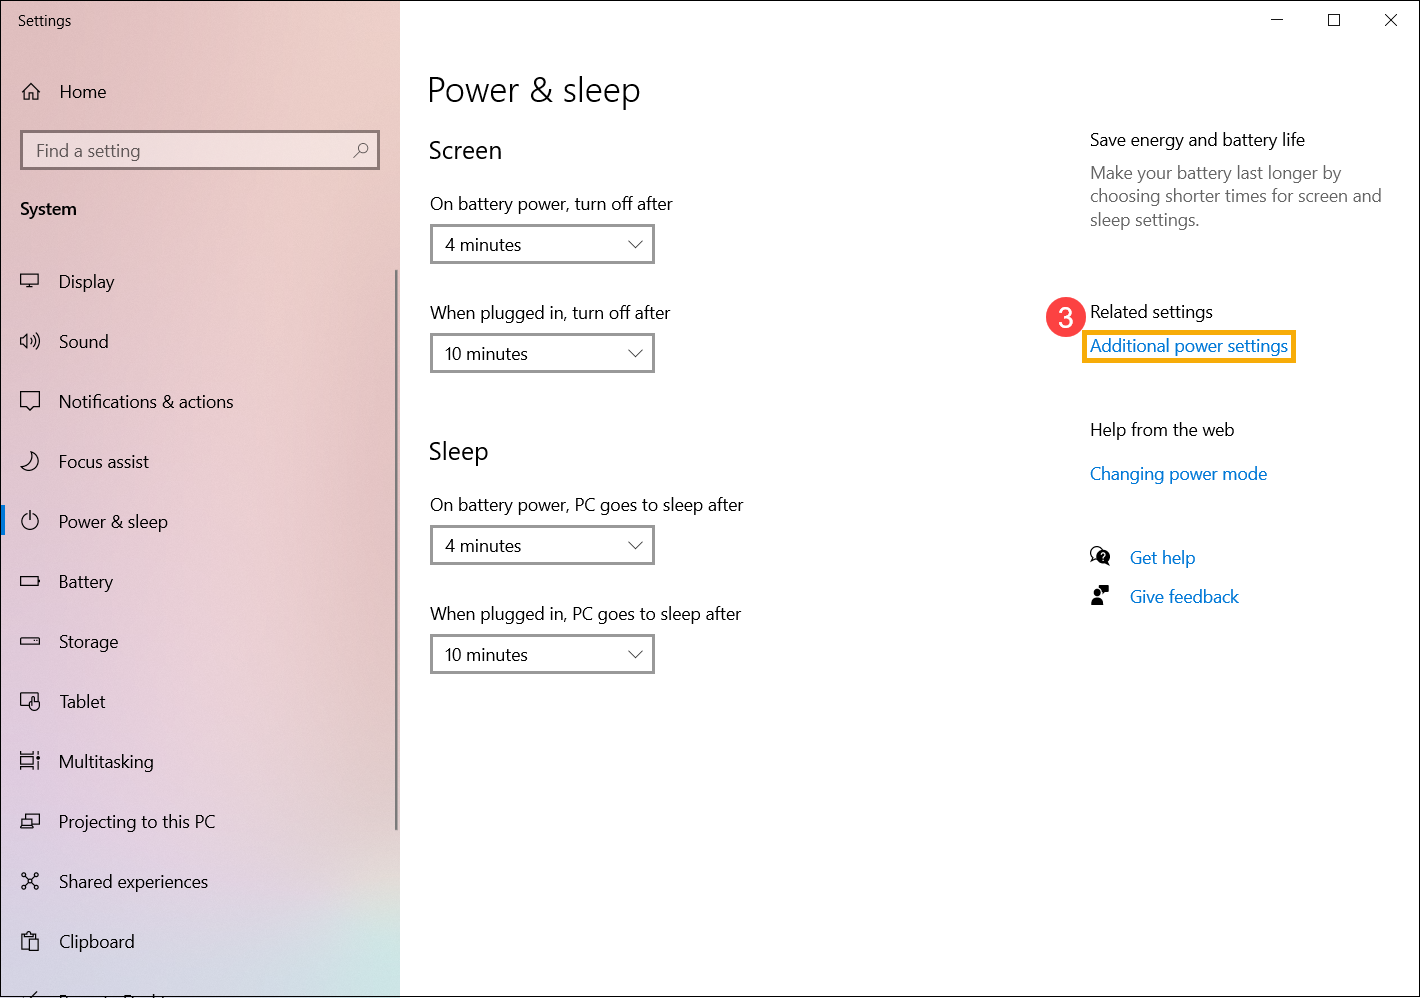
- Нажмите [Дополнительные настройки питания] ③.
- Нажмите [Выберите действие кнопки питания] ④.
- Если опция Быстрого Запуска в настройках выключения неактивна, нажмите [Изменить настройки, которые в данный момент недоступны] ⑤.
- Снимите флажок [Включить быстрый запуск] ⑥, а затем выберите [Сохранить изменения] ⑦, Ваше устройство отключит функцию Быстрого Запуска в Windows.


Эта информация была полезной?
Yes
No
- Приведенная выше информация может быть частично или полностью процитирована с внешних веб-сайтов или источников. Пожалуйста, обратитесь к информации на основе источника, который мы отметили. Пожалуйста, свяжитесь напрямую или спросите у источников, если есть какие-либо дополнительные вопросы, и обратите внимание, что ASUS не имеет отношения к данному контенту / услуге и не несет ответственности за него.
- Эта информация может не подходить для всех продуктов из той же категории / серии. Некоторые снимки экрана и операции могут отличаться от версий программного обеспечения.
- ASUS предоставляет вышеуказанную информацию только для справки. Если у вас есть какие-либо вопросы о содержании, пожалуйста, свяжитесь напрямую с поставщиком вышеуказанного продукта. Обратите внимание, что ASUS не несет ответственности за контент или услуги, предоставляемые вышеуказанным поставщиком продукта.