
Disabling DHCP in Windows 10 can be achieved by configuring your network settings to use a static IP address. This process involves a few steps which will require accessing your network adapter settings and modifying the properties. By following the detailed steps below, you will be able to disable DHCP and set up a manual IP configuration on your Windows 10 system.
In this section, we’ll go through the steps needed to disable DHCP in Windows 10 and assign a static IP address. This will ensure your computer maintains the same IP address each time it connects to the network, which can be useful for network stability and device management.
Step 1: Open Network & Internet Settings
First, right-click on the network icon in your system tray, then select «Open Network & Internet settings.»
When you right-click on the network icon, you’ll see several options, but you want to choose the one that leads you to the settings for managing your network connections. This step helps you access the necessary settings to make changes to your network configuration.
Step 2: Access Adapter Options
Next, click on «Change adapter options» to view your network connections.
This option is located under the “Status” category in the Network & Internet settings. It shows all available network connections including Wi-Fi and Ethernet, letting you pick which one to configure.
Step 3: Open Adapter Properties
Right-click on your active network connection and select «Properties.»
In the properties menu, you can manage various settings related to your network adapter. This is where you’ll make the adjustments to disable DHCP and set a static IP address.
Step 4: Access TCP/IPv4 Settings
Scroll down in the list and double-click on «Internet Protocol Version 4 (TCP/IPv4).»
This protocol is responsible for assigning IP addresses to your computer. Double-clicking on it will open a window where you can configure IP settings, like disabling DHCP.
Step 5: Set a Static IP Address
Select «Use the following IP address» and enter your desired static IP address, Subnet mask, and Default gateway. Also, fill in the «Use the following DNS server addresses» fields.
Choosing this option turns off DHCP, meaning your computer will use the static IP address you enter. Make sure the IP address is within your network’s range to avoid conflicts.
After you complete these steps, your computer will no longer obtain an IP address automatically from the DHCP server. Instead, it will use the static IP address you have entered.
Tips for Disabling DHCP in Windows 10
- Double-check your IP address settings to ensure they are correct and within your network’s range.
- Note down the original DHCP settings before making changes, in case you need to revert.
- Use a static IP that is not within the range of your DHCP server to avoid conflicts.
- Ensure you have the correct DNS server addresses; otherwise, you might experience connectivity issues.
- Restart your computer after making changes to ensure the settings take effect.
Frequently Asked Questions
What is DHCP?
DHCP (Dynamic Host Configuration Protocol) automatically assigns IP addresses to devices on a network. Disabling it means you must manually set IP addresses.
Why would I want to disable DHCP?
You might disable DHCP to ensure consistent IP addresses for devices, which is useful for specific applications like remote server access.
Will disabling DHCP affect my internet connection?
If configured correctly, it should not affect your internet connection. However, incorrect settings can cause connectivity issues.
Can I re-enable DHCP if needed?
Yes, you can re-enable DHCP by following the steps again and selecting «Obtain an IP address automatically.»
What if I enter the wrong IP settings?
Incorrect IP settings can result in loss of network connectivity. Ensure you enter accurate information or revert to automatic settings if unsure.
Summary
- Open Network & Internet Settings.
- Access Adapter Options.
- Open Adapter Properties.
- Access TCP/IPv4 Settings.
- Set a Static IP Address.
Conclusion
Disabling DHCP in Windows 10 and setting a static IP address is a straightforward process that involves a few steps of network configuration. Whether for networking stability or device management reasons, knowing how to disable DHCP can be immensely valuable.
If you’re new to these settings, it can sound a bit daunting, but simply follow each step carefully. Make sure you have your IP settings handy, and remember you can always switch back to automatic settings if something goes wrong. For those interested in diving deeper, exploring network settings and configurations can uncover how your computer communicates within your local network and the broader internet.
Disabling DHCP isn’t just a task; it’s a skill that can enhance your understanding of network management. So give it a try, and see the difference it makes in your connectivity and network organization!
Kermit Matthews is a freelance writer based in Philadelphia, Pennsylvania with more than a decade of experience writing technology guides. He has a Bachelor’s and Master’s degree in Computer Science and has spent much of his professional career in IT management.
He specializes in writing content about iPhones, Android devices, Microsoft Office, and many other popular applications and devices.
Read his full bio here.
If you are running a regular home network, devices get their IP addresses through the Dynamic Host Configuration Protocol (DHCP).
This means they are assigned an IP address the next time they connect to the network and in fact they may get a completely different address the next time they connect.
Whether or not the device uses DHCP is a per-connection setting. In other words, if you disable DHCP for your wired connection, all wireless connections will continue to use DHCP until you do so.
Disable DHCP for a connection in Windows
To disable DHCP for connection in Windows you follow the steps listed below:
Step 1. Press the Win + X keys , then select Settings.
Step 2. Click on Network & Internet item .
Step 3. Click the network connection (wired or wireless) (such as Ethernet) that you want to configure, and then click the Properties button .

Step 4. In the connection details section, you will see the IP settings section . Click the Edit button which you will find there.
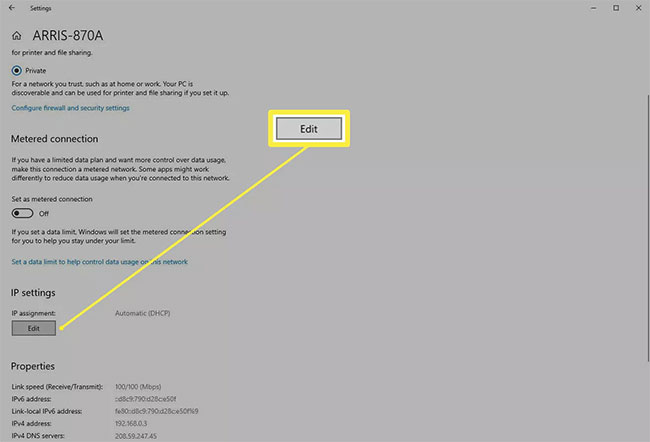
Step 5. In the Edit IP settings dialog box , the connection will most likely be configured as Automatic. Click the drop-down menu and change it to Manual.

Step 6. You should see two display toggle switches, one for IPv4 and one for IPv6. You can enable either or both, the procedure is the same for each option. For example will click the switch for IPv4.
Step 7. A series of new fields will appear. You will need to fill in these fields, including at least the IP address (which is of course the one you want the machine to have), the Subnet prefix length (this describes the class of the network, try 24 here and if that doesn’t work. dynamic, change to 16 ), Gateway (your router device address, most likely 192.168.0.1) and Preferred DNS (you can use the DNS provided by your ISP or try Google’s DNS if you don’t can be found: 8.8.8.8 ).
8. Click Save to make the changes.
Note : You can also set the same setting for the network connection from Control Panel> Networking and Sharing Center> Change adapter settings . Select the desired connection and click the Change settings of this connection button .
Then click the Internet Protocol Version 4 (TCP / IPv4) option (but don’t uncheck the checkbox) and click the Properties button . This will give you a dialog box similar to the one you saw in Settings , in the «old» Windows style. Note that you can set IPv6 in the same way.
Re-enable DHCP in Windows
While disabling DHCP can be a bit tricky, re-enabling it is much easier.
Step 1. Go back to Settings> Network & Internet , and click the Properties button for the network connection.
Step 2. Click the Edit button in the IP settings section for the connection.
Step 3. The Edit IP settings dialog box will contain your previous configurations. Click the drop-down menu at the top of the dialog box and switch it from Manual back to Automatic.
5 stars4 stars3 stars2 stars1 star3.9 ★ | 17 Vote
How To Disable DHCP Client In Windows To Avoid Network Issues?
- Step 1: Click Run, then select cmd.
- Step 2:Execute: netsh interface ipv4 show inter.
- Step 3: Execute : netsh interface ipv4 set interface 11 dadtransmits=0 store=persistent.
- Step 4: Run: services.msc.
- How do I turn off DHCP in Windows 10?
- How do I disable DHCP enabled?
- How do I disable DHCP in Windows?
- What is disable DHCP?
- Should I disable DHCP?
- What are the 4 steps of DHCP?
- How do I change my DHCP settings?
- How do I change my static IP to DHCP?
- What is DHCP in WIFI?
- Why is DHCP not enabled?
- How do I fix DHCP?
How do I turn off DHCP in Windows 10?
How to Start and Stop the DHCP Service (Command Line)
- To start the DHCP service, type the following command: # /etc/init.d/dhcp start.
- To stop the DHCP service, type the following command: # /etc/init.d/dhcp stop. The DHCP daemon stops until it is manually started again, or the system reboots.
How do I disable DHCP enabled?
Please follow these steps in order to disable the DHCP server:
- Open your web browser, type the router? s IP address and press Enter. …
- To log in enter your username and password. …
- Go to Advanced Setup > LAN IP and DHCP Setting.
- Select the Disable box next to DHCP Server.
- Click Apply to save the settings.
How do I disable DHCP in Windows?
If you want to disable DHCP and manually define your network settings instead, select the Use the following IP address option. Then, enter the appropriate values for IP address, Subnet mask, and Default Gateway. Also, select the Use the following DNS server address option and enter a value for Preferred DNS server.
What is disable DHCP?
DHCP means Dynamic Host Configuration Protocol it is a service which assigns ip addresses automatically to devices which are connected in the network and requests for an ip. So if you disable DHCP in your router your devices will not get ip addresses and they will not be able to communicate in the network.
Should I disable DHCP?
DHCP means dynamic host configuration protocol; it hands out IP addresses for devices in your network. Unless you are going to configure each device manually, or you have a second DHCP server you should leave this option on.
What are the 4 steps of DHCP?
DHCP operations fall into four phases: server discovery, IP lease offer, IP lease request, and IP lease acknowledgement. These stages are often abbreviated as DORA for discovery, offer, request, and acknowledgement. The DHCP operation begins with clients broadcasting a request.
How do I change my DHCP settings?
To enable DHCP or change other TCP/IP settings
- Select Start , then select Settings > Network & Internet .
- Do one of the following: For a Wi-Fi network, select Wi-Fi > Manage known networks. …
- Under IP assignment, select Edit.
- Under Edit IP settings, select Automatic (DHCP) or Manual. …
- When you’re done, select Save.
How do I change my static IP to DHCP?
Solution
- Go to Settings, click on Network & Internet then WiFi.
- Tap on the network you are currently connected to to open the settings menu.
- Tap on the pencil icon in the top right to access the network settings.
- Tap Advanced Options.
- Under IP Settings, change it from DHCP to Static.
What is DHCP in WIFI?
Dynamic Host Configuration Protocol (DHCP) is a network management protocol used to automate the process of configuring devices on IP networks, thus allowing them to use network services such as DNS, NTP, and any communication protocol based on UDP or TCP. … DHCP is an enhancement of an older protocol called BOOTP.
Why is DHCP not enabled?
Users experience the error message ‘DHCP is not enabled for Ethernet’ when they troubleshoot their not working internet connection through the Windows troubleshooter. … This error usually occurs when you have manually assigned your computer an IP address and subnet mask.
How do I fix DHCP?
How to Fix DHCP Errors
- Run the Windows Network Troubleshooter. The easiest way to fix internet connection issues is by letting Windows automatically fix the internet settings. …
- Check the DHCP adapter settings. …
- Check the DHCP router settings. …
- Contact IT support.
Internet Protocol (IP) networks utilize Dynamic Host Configuration Protocol or DHCP as a standardized network protocol since it is a safe and reliable configuration. It enables users to dynamically and transparently assign reusable IP addresses. If you have a DHCP server installed and configured on your network, all DHCP-enabled clients can obtain IP addresses and related framework parameters every time they start and join the network. This helps immensely in reducing the time required to configure and reconfigure computers on a network.
However, sometimes you may experience trouble connecting to the Internet. After trying all troubleshooting steps, an error message is displayed on the screen, reading ‘DHCP is not enabled’. If DHCP is not Enabled on your Windows computer, then this post will show you how to enable or disable DHCP for Ethernet, Wi-Fi or Local Area Connection in Windows 11/10/8/7.
Open ‘Control Panel’, type ‘Network and Sharing Center’ in the search box of the panel and hit Enter key.
Click ‘Change Adapter Settings’ link visible under ‘Network and Sharing Center’ screen. If you are using an Ethernet connection, right-click the option and select ‘Properties’. If you have enabled a broadband connection, choose Wi-Fi and follow the same step as mentioned above.

Next, under Ethernet/Wi-Fi Properties window, find and double-click the ‘Internet Protocol Version 4 (TCP/IPv4)’ item as shown in the screenshot below.

When done, Internet Protocol Version 4 Properties box will pop up. To turn DHCP on, simply check the radio boxes seen against-
- Obtain an IP address automatically – upper part of ‘General Screen.’
- Obtain DNS server address automatically – lower part of the ‘General Screen.’
-


Windows 11/10 will now be able to retrieve the IP address from the DHCP server. To disable the same, uncheck these options.
To confirm if DHCP is enabled or disabled, run the following command in CMD:
ipconfig /all
Here you will be able to see – DHCP Enabled … Yes/No.